preface
Hello, everyone, I've been learning to encode with Swift recently. Because many previous projects were implemented with OC, I'm still in the stage of learning about Swift. In order to improve my learning efficiency, I will set a short-term goal for myself every time. This time, in order to speed up my starting Swift, my goal is to complete a Swift version of Netease cloud music App. How do you improve your learning efficiency when you learn a new language? You might as well communicate with us in the comment area.

Investigation and analysis
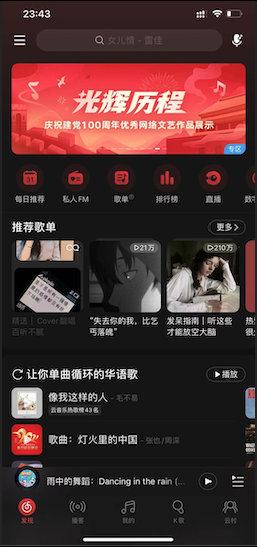
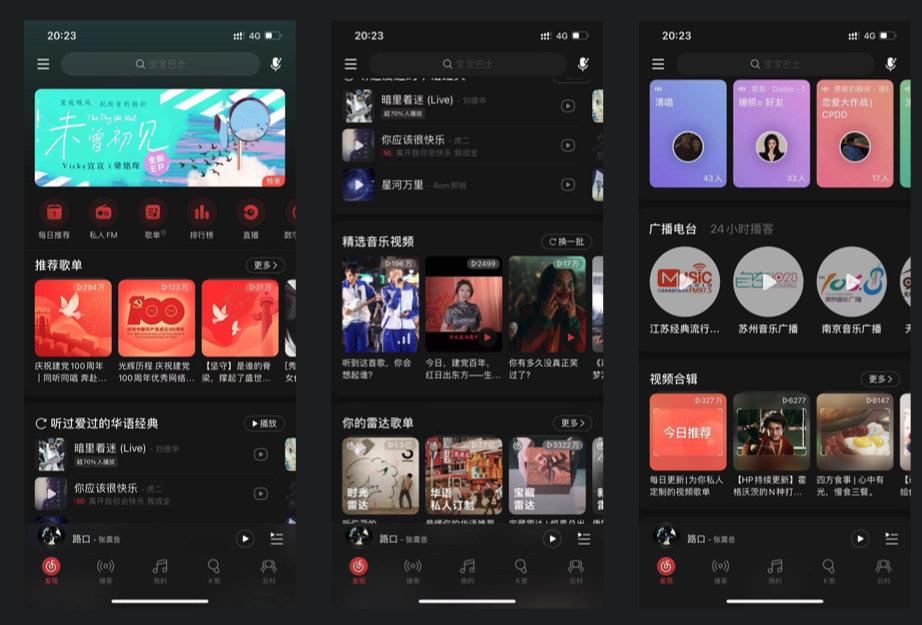
First analyze the homepage of Netease cloud music App on iOS, as shown in the figure:
After reading, the first difficulty in front of me is how to obtain these data! My first thought, of course, was to go to GitHub to find out if there was an open source API. I didn't know if I didn't find it. As soon as I found it, I was very satisfied. It turned out that a big man had already provided it Netease cloud music API:
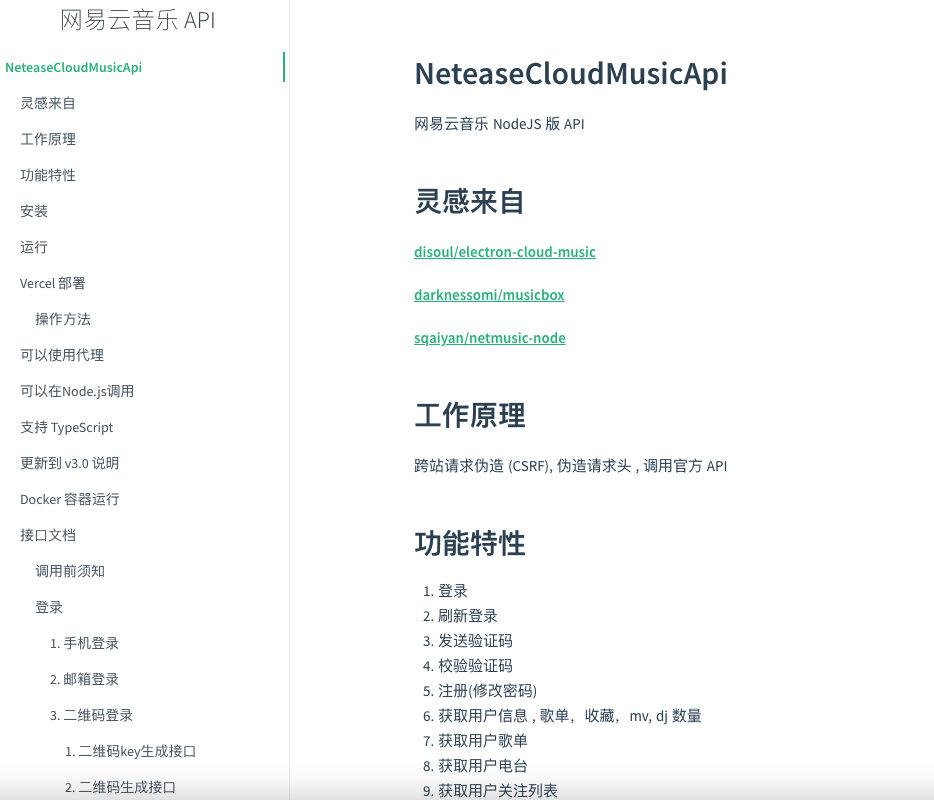
Among them, there are API s for "home page discovery" and "home page - Discovery - circular icon entry list". We can obtain all the data of the home page without calling multiple interfaces and splicing data sources! When analyzing the returned JSON data format, he gave the boss an issue. The boss replied quickly and worshipped the boss again.
{
    "code": 200,
    "data": {
        "cursor": null,
        "blocks": [
            {
                "blockCode": "HOMEPAGE_BANNER",
                "showType": "BANNER",
                "extInfo": {
                    "banners": [
                        {
                            "adLocation": null,
                            "monitorImpress": null,
                            "bannerId": "1622653251261138",
                            "extMonitor": null,
                            "pid": null,
                            "pic": "http://p1.music.126.net/gWmqDS3Os7FWFkJ3s8Wotw==/109951166052270907.jpg",
                            "program": null,
                            "video": null,
                            "adurlV2": null,
                            "adDispatchJson": null,
                            "dynamicVideoData": null,
                            "monitorType": null,
                            "adid": null,
                            "titleColor": "red",
                            "requestId": "",
                            "exclusive": false,
                            "scm": "1.music-homepage.homepage_banner_force.banner.2941964.-1777659412.null",
                            "event": null,
                            "alg": null,
                            "song": {

                ......
}
After the problem of data source is solved, the next step is to solve how to visualize the data. From the effect analysis of Netease cloud music home page display, the overall view supports up and down scrolling, and the view of a single Cell supports horizontal scrolling. Therefore, it should be more appropriate to use UITableView nested UICollectionView here.
The rest are some third-party libraries that need to be used. The third-party libraries we use here are as follows:
Functions to be implemented
As a developer, it is particularly important to have a learning atmosphere and an exchange circle. This is my iOS development exchange group: 130 595 548 , whether you are Xiaobai or Daniel, welcome to settle in. Let's make progress and develop together! (the group will provide some free learning books and materials collected by the group owners and hundreds of interview questions and answer documents for free!)
Its home page can be roughly divided into the following parts:
- Top search view
- Banner
- Round menu button
- Recommended song list
- Personalized recommendation
- Selected music videos
- Radar song list
- Popular Podcast
- Exclusive scene song list
- New song, new disc, digital album
- Music calendar
- 24-hour Podcast
- Video collection
Supports light Mode and Dark Mode themes
Here is the final effect picture:
The specific implementation details will be described in two articles. The functions will be implemented one by one according to the function sequence listed above. I won't say much nonsense. Let's continue to talk about it.
Build App framework
First, open our Xcode, create an App project based on Swift programming language, and name it.
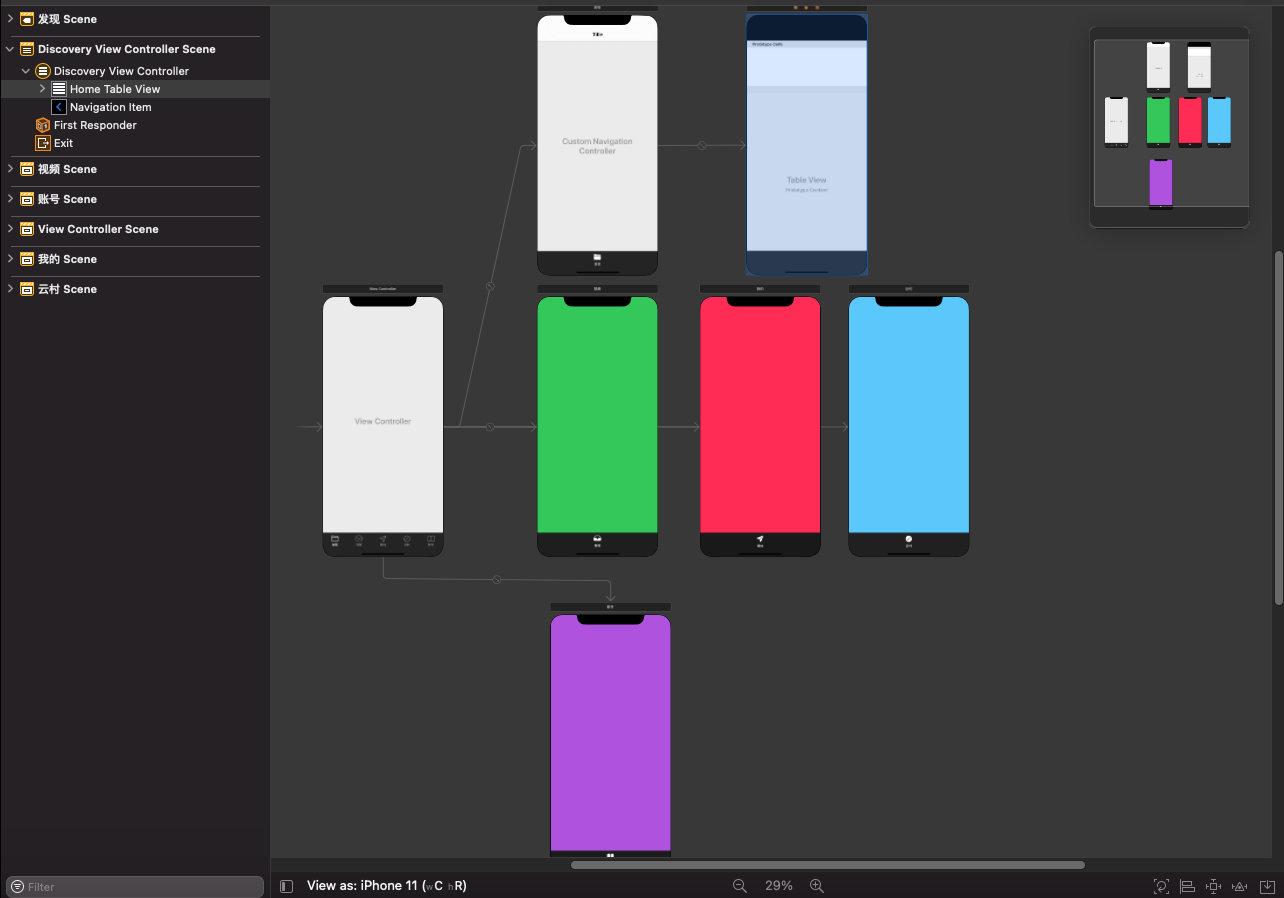
By observing the style of Netease cloud music App, we can see from the TabBar at the bottom that its overall UI framework is composed of UITabbarController and UIViewController, so we can build the overall UI architecture of our App through StoryBoard; Some people may say that I can't use StoryBoard. Can I build it in pure code? Of course, the answer is yes, because my development habit is that simple UI is dragged and dragged by StoryBoard, and complex UI is written in code. This is purely a personal habit. It's just how it suits me.
The renderings built with Storyboard are as follows:
Build home page discovery view
The page we need to build is as follows:
Through the pages shown above, we can find that the data displayed on the homepage of Netease cloud music is very rich. There are search bars, regular scrolling banners, horizontal scrolling card views, and it also supports pull-up refresh and pull-down refresh. Therefore, our homepage can use UITableView as a container, and then build corresponding sub views on the Cell, For example, Banner, UICollectionView, etc. to implement the table view of the home page.
Usually, when we load data with UITableView, the data type is single and similar, so when we build cells, we reuse the same Cell, which is similar to the mobile phone address book. However, the Netease cloud music home page is not the case. The content types presented by each Cell are different, which makes it impossible for us to present data by reusing cells. How can we build a correct view!
First, let's identify the problem.
You may often see such code in other projects. Configure UITableViewCell according to index in UITableView:
override func tableView(_ tableView: UITableView, cellForRowAt indexPath: IndexPath) -> UITableViewCell {

   if indexPath.row == 0 {
        //configure cell type 1
   } else if indexPath.row == 1 {
        //configure cell type 2
   }
   ....
}
Similarly, the same logic is used in the proxy method didSelectRowAt:
override func tableView(_ tableView: UITableView, didSelectRowAt indexPath: IndexPath) {

if indexPath.row == 0 {
        //configure action when tap cell 1
   } else if indexPath.row == 1 {
        //configure action when tap cell 1
   }
   ....
}
What's wrong with that?
If your table view is static and there is no reordering or adding or deleting cells in the table view, there is no problem at all. Until you want to perform the above operations on the table view, the structure of the table view will be destroyed by you, which requires you to manually update all index es in the cellForRowAt and didSelectRowAt methods.
Is there a better way?
In the following content, I will try my best to share with you the solutions to this problem.
MVVM
In this project, we will use MVVM mode, which represents model view ViewModel. The advantage of this mode is that it can make the view independent from the model and reduce the coupling, so as to reduce the volume of the Controller.
Model
In the last article, we have determined the interface for obtaining data sources. Next, how to request data?
The network request library I use here is a third-party open source library: Alamofire , simply encapsulate its request interface. The code is as follows:
import UIKit
import Alamofire

enum MethodType {
    case get
    case post
}

enum NetworkError: Error {
    case invalidResponse
    case nilResponse
}

class NetworkManager<T: Codable> {
    // Network request
    static func requestData(_ type: MethodType,
                           URLString: String,
                           parameters: [String : Any]?,
                           completion: @escaping (Result<T, NetworkError>) -> Void) {

        let method = type == .get ? HTTPMethod.get : HTTPMethod.post

        AF.request(URLString, method: method, parameters: parameters, encoding: URLEncoding.httpBody)
            .validate()
            .responseDecodable(of: T.self) { response in
                if let value = response.value {
                    completion(.success(value))
                    return
                }

                if let error = response.error {
                    completion(.failure(.invalidResponse))
                    return
                }

                completion(.failure(.nilResponse))
        }
    }
}
The JSON data format returned by the request is as follows:
{
    "code": 200,
    "data": {
        "cursor": null,
        "blocks": [
            {
                "blockCode": "HOMEPAGE_BANNER",
                "showType": "BANNER",
                "extInfo": {
                    "banners": [
                        {
                            "adLocation": null,
                            "monitorImpress": null,
                            "bannerId": "1622653251261138",
                            "extMonitor": null,
                            "pid": null,
                            "pic": "http://p1.music.126.net/gWmqDS3Os7FWFkJ3s8Wotw==/109951166052270907.jpg",
                            "program": null,
                            "video": null,
                            "adurlV2": null,
                            "adDispatchJson": null,
                            "dynamicVideoData": null,
                            "monitorType": null,
                            "adid": null,
                            "titleColor": "red",
                            "requestId": "",
                            "exclusive": false,
                            "scm": "1.music-homepage.homepage_banner_force.banner.2941964.-1777659412.null",
                            "event": null,
                            "alg": null,
                            "song": {

                ...... (Omitted part)
}
Now, we need to create a Model to map the JSON we requested to the Model we created. iOS native or third-party open source libraries have many ways to parse JSON in Swift. You can use the one you like, such as
SwiftyJSON, HandyJSON, etc. in this project, I insist on using the native Codable to realize the mutual conversion of JSON/Model.
When creating a Model, we can also use some external tools to quickly create a Model. For example, here is a tool I would like to recommend to you: quicktype , it can generate the corresponding Model according to the provided JSON string, which can greatly save us the time of manually coding and creating the Model.
The created Model is as follows:
// MARK: - Welcome
struct HomePage: Codable {
    let code: Int
    let data: DataClass
    let message: String
}

// MARK: - DataClass
struct DataClass: Codable {
    let cursor: JSONNull?
    let blocks: [Block]
    let hasMore: Bool
    let blockUUIDs: JSONNull?
    let pageConfig: PageConfig
    let guideToast: GuideToast
}

// MARK: - Block
struct Block: Codable {
    let blockCode, showType: String
    let extInfo: EXTInfoUnion?
    let canClose: Bool
    let action: String?
    let actionType: ActionType?
    let uiElement: BlockUIElement?
    let creatives: [Creative]?
}

enum ActionType: String, Codable {
    case clientCustomized = "client_customized"
    case orpheus = "orpheus"
}

// MARK: - Creative
struct Creative: Codable {
    let creativeType: String
    let creativeID, action: String?
    let actionType: ActionType?
    let uiElement: CreativeUIElement?
    let resources: [ResourceElement]?
    let alg: String?
    let position: Int
    let code: String?
    let logInfo: String? = ""
    let creativeEXTInfoVO: CreativeEXTInfoVO?
    let source: String?

    enum CodingKeys: String, CodingKey {
        case creativeType
        case creativeID = "creativeId"
        case action, actionType, uiElement, resources, alg, position, code
        case creativeEXTInfoVO = "creativeExtInfoVO"
        case source
    }
}

// MARK: - CreativeEXTInfoVO
struct CreativeEXTInfoVO: Codable {
    let playCount: Int
}

// MARK: - ResourceElement
struct ResourceElement: Codable {
    let uiElement: ResourceUIElement
    let resourceType: String
    let resourceID: String
    let resourceURL: String?
    let resourceEXTInfo: ResourceEXTInfo?
    let action: String
    let actionType: ActionType
    let valid: Bool
    let alg: String?
    let logInfo: String? = ""

    enum CodingKeys: String, CodingKey {
        case uiElement, resourceType
        case resourceID = "resourceId"
        case resourceURL = "resourceUrl"
        case resourceEXTInfo = "resourceExtInfo"
        case action, actionType, valid, alg
    }
}

........ ((omitted due to long code)
Copy code
Next, we start to map JSON to the Model. Since the Alamofire library already provides Codable, we only need to process its return value:
    NetworkManager<Menus>.requestData(.get, URLString: NeteaseURL.Menu.urlString, parameters: nil) { result in
        switch result {
        case .success(let response):
            let data: [Datum] = response.data
            let model: MenusModel = MenusModel(data: data)
        case .failure(let error):
           print(error.localizedDescription)
        }
    }
ViewModel
The Model is ready, so next we need to create a ViewModel, which will be responsible for providing data to our TableView table view.
We will create 12 different Sections:
- Banner
- Round button
- Recommended song list
- Personalized recommendation
- Selected music videos
- Radar song list
- Music calendar
- Exclusive scene song list
- Yunbei new song
- Podcast collection
- 24-hour Podcast
- Video collection
Because the data we get are not in the same format, we need to use different uitableviewcells for each type of data, so we need to use the correct ViewModel structure.
First, we must distinguish between data types so that we can use the correct Cell. Then how to distinguish it! if else or enum! Of course, the best way to implement multiple types and easily switch in Swift is to use enumeration, so let's start building ViewModel!
///Type
enum HomeViewModelSectionType {
    case BANNER             // Banner
    case MENUS              // Round button
    case PLAYLIST_RCMD      // Recommended song list
    case STYLE_RCMD         // Personalized recommendation
    case MUSIC_MLOG         // Selected music videos
    case MGC_PLAYLIST       // Radar song list
    case MUSIC_CALENDAR     // Music calendar
    case OFFICIAL_PLAYLIST  // Exclusive scene song list
    case ALBUM_NEW_SONG     // Yunbei new song
    case VOICELIST_RCMD     // Podcast collection
    case PODCAST24          // 24-hour Podcast
    case VIDEO_PLAYLIST     // Video collection
}
Each enum case represents different data types required by TableViewCell. However, since we want to use the same type of data in the table view, we need to abstract these cases and define a separate public class, which will determine all properties. Here, we can achieve this by using the protocol, which will provide attribute calculation for our item:
protocol HomeViewModelSection {
    ...
}
First, we need to know the type of item, so we need to create a type attribute for the protocol and specify whether the attribute is gettable or settable. In our example, the type will be HomeViewModelSection:
protocol HomeViewModelSection {
    var type: HomeViewModelSectionType { get }
}
The next attribute we need is rowCount. It will tell us how many lines there are in each section:
protocol HomeViewModelSection {
    var type: HomeViewModelSectionType { get }
    var rowCount: Int { get }
}
We also need to add two attributes to the protocol, rowHeight and frame. They define the height and size of the Section:
protocol HomeViewModelSection {
    var type: HomeViewModelSectionType { get }
    var rowCount: Int { get }
    var rowHeight: CGFloat { get }
    var frame: CGRect { get set }
}
We are now ready to create viewmodelitems for each data type. Each item needs to comply with the previously defined protocol. But before we start, let's take another step towards a concise and orderly project: providing some default values for our agreement. In swift, we can use the protocol extension to provide the default value for the protocol, so we don't have to assign a value to the rowCount of each item and save some redundant code:
extension HomeViewModelSection {
    var rowCount: Int {
        return 1
    }
}
First create a ViewModeItem for the Banner Cell:
import Foundation
import UIKit

class BannerModel: HomeViewModelSection {
    var frame: CGRect

    var type: HomeViewModelSectionType {
        return .BANNER
    }

    var rowCount: Int{
        return 1
    }

    var rowHeight:CGFloat

    var banners: [Banner]!

    init(banners: [Banner]) {
        self.banners = banners
        self.frame = BannerModel.caculateFrame()
        self.rowHeight = self.frame.size.height
    }

    ///Calculate View frame based on Model
    class func caculateFrame() -> CGRect {
        let height: CGFloat = sectionD_height * CGFloat(scaleW)
        let width: CGFloat = CGFloat(kScreenWidth)
        return CGRect(x: 0, y: 0, width: width, height: height)
    }
}
Then we can create the remaining 11 viewmodeitems:
class MenusModel: HomeViewModelSection {
    var rowHeight: CGFloat

    var frame: CGRect

    var type: HomeViewModelSectionType {
        return .MENUS
    }

    var rowCount: Int{
        return 1
    }

    var data: [Datum]!

    init(data: [Datum]) {
        self.data = data
        self.frame = MenusModel.caculateFrame()
        self.rowHeight = self.frame.size.height
    }

    ///Calculate View frame based on Model
    class func caculateFrame() -> CGRect {
        let height: CGFloat = sectionC_height * CGFloat(scaleW)
        let width: CGFloat = CGFloat(kScreenWidth)
        return CGRect(x: 0, y: 0, width: width, height: height)
    }
}

class MgcPlaylistModel: HomeViewModelSection {
    var rowHeight: CGFloat

    var frame: CGRect

    var type: HomeViewModelSectionType {
        return .MGC_PLAYLIST
    }

    var rowCount: Int{
        return 1
    }

    var creatives: [Creative]!
    var uiElement: BlockUIElement?

    init(creatives: [Creative], ui elements: BlockUIElement) {
        self.creatives = creatives
        self.uiElement = elements
        self.frame = MgcPlaylistModel.caculateFrame()
        self.rowHeight = self.frame.height
    }

    ///Calculate View frame based on Model
    class func caculateFrame() -> CGRect {
        let height: CGFloat = sectionA_height * CGFloat(scaleW)
        let width: CGFloat = CGFloat(kScreenWidth)
        return CGRect(x: 0, y: 0, width: width, height: height)
    }
}

class StyleRcmdModel: HomeViewModelSection {
    var rowHeight: CGFloat

    var frame: CGRect

    var type: HomeViewModelSectionType {
        return .STYLE_RCMD
    }

    var rowCount: Int{
        return 1
    }

    var creatives: [Creative]!
    var uiElement: BlockUIElement?

    init(creatives: [Creative], ui elements: BlockUIElement) {
        self.creatives = creatives
        self.uiElement = elements
        self.frame = StyleRcmdModel.caculateFrame()
        self.rowHeight = self.frame.height
    }

    ///Calculate View frame based on Model
    class func caculateFrame() -> CGRect {
        let height: CGFloat = sectionE_height * CGFloat(scaleW)
        let width: CGFloat = CGFloat(kScreenWidth)
        return CGRect(x: 0, y: 0, width: width, height: height)
    }
}

class PlaylistRcmdModel: HomeViewModelSection {
    var rowHeight: CGFloat

    var frame: CGRect

    var type: HomeViewModelSectionType {
        return .PLAYLIST_RCMD
    }

    var rowCount: Int{
        return 1
    }

    var creatives: [Creative]!
    var uiElement: BlockUIElement?

    init(creatives: [Creative], ui elements: BlockUIElement) {
        self.creatives = creatives
        self.uiElement = elements
        self.frame = PlaylistRcmdModel.caculateFrame()
        self.rowHeight = self.frame.height
    }

    ///Calculate View frame based on Model
    class func caculateFrame() -> CGRect {
        let height: CGFloat = sectionA_height * CGFloat(scaleW)
        let width: CGFloat = CGFloat(kScreenWidth)
        return CGRect(x: 0, y: 0, width: width, height: height)
    }
}

class MusicMLOGModel: HomeViewModelSection {
    var rowHeight: CGFloat

    var frame: CGRect

    var type: HomeViewModelSectionType {
        return .MUSIC_MLOG
    }

    var rowCount: Int{
        return 1
    }

    var uiElement: BlockUIElement?
    var mLog: [EXTInfoElement]!

    init(mLog: [EXTInfoElement], ui elements: BlockUIElement) {
        self.mLog = mLog
        self.uiElement = elements
        self.frame = MusicMLOGModel.caculateFrame()
        self.rowHeight = self.frame.size.height
    }

    ///Calculate View frame based on Model
    class func caculateFrame() -> CGRect {
        let height: CGFloat = sectionA_height * CGFloat(scaleW)
        let width: CGFloat = CGFloat(kScreenWidth)
        return CGRect(x: 0, y: 0, width: width, height: height)
    }
}

class OfficialPlaylistModel: HomeViewModelSection {
    var rowHeight: CGFloat

    var frame: CGRect

    var type: HomeViewModelSectionType {
        return .OFFICIAL_PLAYLIST
    }

    var rowCount: Int{
        return 1
    }

    var creatives: [Creative]!
    var uiElement: BlockUIElement?

    init(creatives: [Creative], ui elements: BlockUIElement) {
        self.creatives = creatives
        self.uiElement = elements
        self.frame = OfficialPlaylistModel.caculateFrame()
        self.rowHeight = self.frame.height
    }

    ///Calculate View frame based on Model
    class func caculateFrame() -> CGRect {
        let height: CGFloat = sectionA_height * CGFloat(scaleW)
        let width: CGFloat = CGFloat(kScreenWidth)
        return CGRect(x: 0, y: 0, width: width, height: height)
    }
}

class MusicCalendarModel: HomeViewModelSection {
    var rowHeight: CGFloat

    var frame: CGRect

    var type: HomeViewModelSectionType {
        return .MUSIC_CALENDAR
    }

    var rowCount: Int{
        return 1
    }

    var creatives: [Creative]!
    var uiElement: BlockUIElement?

    init(creatives: [Creative], ui elements: BlockUIElement) {
        self.creatives = creatives
        self.uiElement = elements
        self.frame = MusicCalendarModel.caculateFrame()
        self.rowHeight = self.frame.height
    }

    ///Calculate View frame based on Model
    class func caculateFrame() -> CGRect {
        let height: CGFloat = sectionB_height * CGFloat(scaleW)
        let width: CGFloat = CGFloat(kScreenWidth)
        return CGRect(x: 0, y: 0, width: width, height: height)
    }
}

class AlbumNewSongModel: HomeViewModelSection {
    var rowHeight: CGFloat

    var frame: CGRect

    var type: HomeViewModelSectionType {
        return .ALBUM_NEW_SONG
    }

    var rowCount: Int{
        return 1
    }

    var creatives: [Creative]!
    var uiElement: BlockUIElement?

    init(creatives: [Creative], ui elements: BlockUIElement) {
        self.creatives = creatives
        self.uiElement = elements
        self.frame = AlbumNewSongModel.caculateFrame()
        self.rowHeight = self.frame.height
    }

    ///Calculate View frame based on Model
    class func caculateFrame() -> CGRect {
        let height: CGFloat = sectionA_height * CGFloat(scaleW)
        let width: CGFloat = CGFloat(kScreenWidth)
        return CGRect(x: 0, y: 0, width: width, height: height)
    }
}

class Podcast24Model: HomeViewModelSection
{
    var rowHeight: CGFloat

    var frame: CGRect

    var type: HomeViewModelSectionType {
        return .PODCAST24
    }

    var rowCount: Int{
        return 1
    }

    var creatives: [Creative]!
    var uiElement: BlockUIElement?

    init(creatives: [Creative], ui elements: BlockUIElement) {
        self.creatives = creatives
        self.uiElement = elements
        self.frame = Podcast24Model.caculateFrame()
        self.rowHeight = self.frame.height
    }

    ///Calculate View frame based on Model
    class func caculateFrame() -> CGRect {
        let height: CGFloat = sectionA_height * CGFloat(scaleW)
        let width: CGFloat = CGFloat(kScreenWidth)
        return CGRect(x: 0, y: 0, width: width, height: height)
    }
}

class VoiceListRcmdModel: HomeViewModelSection {
    var rowHeight: CGFloat

    var frame: CGRect

    var type: HomeViewModelSectionType {
        return .VOICELIST_RCMD
    }

    var rowCount: Int{
        return 1
    }

    var creatives: [Creative]!
    var uiElement: BlockUIElement?

    init(creatives: [Creative], ui elements: BlockUIElement) {
        self.creatives = creatives
        self.uiElement = elements
        self.frame = VoiceListRcmdModel.caculateFrame()
        self.rowHeight = self.frame.height
    }

    ///Calculate View frame based on Model
    class func caculateFrame() -> CGRect {
        let height: CGFloat = sectionA_height * CGFloat(scaleW)
        let width: CGFloat = CGFloat(kScreenWidth)
        return CGRect(x: 0, y: 0, width: width, height: height)
    }
}

class VideoPlaylistModel: HomeViewModelSection {
    var rowHeight: CGFloat

    var frame: CGRect

    var type: HomeViewModelSectionType {
        return .VIDEO_PLAYLIST
    }

    var rowCount: Int{
        return 1
    }

    var creatives: [Creative]!
    var uiElement: BlockUIElement?

    init(creatives: [Creative], ui elements: BlockUIElement) {
        self.creatives = creatives
        self.uiElement = elements
        self.frame = VideoPlaylistModel.caculateFrame()
        self.rowHeight = self.frame.height
    }

    ///Calculate View frame based on Model
    class func caculateFrame() -> CGRect {
        let height: CGFloat = sectionA_height * CGFloat(scaleW)
        let width: CGFloat = CGFloat(kScreenWidth)
        return CGRect(x: 0, y: 0, width: width, height: height)
    }
}
This is all you need for a data item.
The final step is to create the ViewModel class. This class can be used by any ViewController, which is also one of the key ideas behind the MVVM structure: your ViewModel knows nothing about View, but it provides all the data that View may need.
The only property owned by ViewModel is the item array, which corresponds to the section array contained in UITableView:
///Homepage ViewModel
class HomeViewModel: NSObject {
    var sections = [HomeViewModelSection]()

}
First, we initialize the ViewModel and store the obtained data in the array:
///Homepage ViewModel
class HomeViewModel: NSObject {
    var sections = [HomeViewModelSection]()
    weak var delegate: HomeViewModelDelegate?

    override init() {
        super.init()
        fetchData()
    }

    // Get the home page data, asynchronously request and configure the data
    func fetchData() {
        // 1. Create task group
        let queueGroup = DispatchGroup()
        // 2. Get home page data
        queueGroup.enter()
        // Request data home page discovery + circular picture

        NetworkManager<HomePage>.requestData(.get, URLString: NeteaseURL.Home.urlString, parameters: nil) { result in
            switch result {
            case .success(let response):
                // Split the data model to each plate
                self.sections = self.splitData(data: response.data.blocks)
                queueGroup.leave()
            case .failure(let error):
                print(error.localizedDescription)
                self.delegate?.onFetchFailed(with: error.localizedDescription)
                queueGroup.leave()
            }
        }

        // 3\.  Asynchronous get home page circular button
        queueGroup.enter()
        NetworkManager<Menus>.requestData(.get, URLString: NeteaseURL.Menu.urlString, parameters: nil) { result in
            switch result {
            case .success(let response):
                // Split the data model to each plate
                let data: [Datum] = response.data
                let model: MenusModel = MenusModel(data: data)
                if self.sections.count > 0 {
                    self.sections.insert(model, at: 1)
                }
                queueGroup.leave()
            case .failure(let error):
                print(error.localizedDescription)
                self.delegate?.onFetchFailed(with: error.localizedDescription)
                queueGroup.leave()
            }
        }

        // 4\.  results of enforcement
        queueGroup.notify(qos: .default, flags: [], queue: .main) {
            // Call back the data to the view, end loading and load the data
            self.delegate?.onFetchComplete()
        }

    }
}
Then configure the ViewModel to be displayed based on the property type of ViewModelItem.
///Split the parsed data to each data model
    ///- Parameter data: home page discovery data model
    func splitData(data: [Block]) -> [HomeViewModelSection]{
        var array: [HomeViewModelSection] = [HomeViewModelSection]()

        for item in data {
            if item.blockCode == "HOMEPAGE_BANNER" || item.blockCode == "HOMEPAGE_MUSIC_MLOG"{
                switch item.extInfo {
                case .extInfoElementArray(let result):
                    // Selected music videos
                    let model: MusicMLOGModel = MusicMLOGModel(mLog: result, ui: item.uiElement!)
                    array.append(model)
                    break
                case .purpleEXTInfo(let result):
                    // BANNER
                    let banner: [Banner] = result.banners
                    let model: BannerModel = BannerModel(banners: banner)
                    array.append(model)
                    break
                case .none:
                    break
                }
            } else if item.blockCode == "HOMEPAGE_BLOCK_PLAYLIST_RCMD" {
                // Recommended song list
                let ui: BlockUIElement = item.uiElement!
                let creatives: [Creative] = item.creatives!
                let model: PlaylistRcmdModel = PlaylistRcmdModel(creatives: creatives, ui: ui)
                array.append(model)
            } else if item.blockCode == "HOMEPAGE_BLOCK_STYLE_RCMD" {
                // Personalized recommendation
                let ui: BlockUIElement = item.uiElement!
                let creatives: [Creative] = item.creatives!
                let model:StyleRcmdModel = StyleRcmdModel(creatives: creatives, ui: ui)
                array.append(model)
            }  else if item.blockCode == "HOMEPAGE_BLOCK_MGC_PLAYLIST" {
                // Radar song list of Netease cloud music
                let ui: BlockUIElement = item.uiElement!
                let creatives: [Creative] = item.creatives!
                let model:MgcPlaylistModel = MgcPlaylistModel(creatives: creatives, ui: ui)
                array.append(model)
            } else if item.blockCode == "HOMEPAGE_MUSIC_CALENDAR" {
                // Music calendar
                let ui: BlockUIElement = item.uiElement!
                let creatives: [Creative] = item.creatives!
                let model:MusicCalendarModel = MusicCalendarModel(creatives: creatives, ui: ui)
                array.append(model)
            } else if item.blockCode == "HOMEPAGE_BLOCK_OFFICIAL_PLAYLIST" {
                // Exclusive scene song list
                let ui: BlockUIElement = item.uiElement!
                let creatives: [Creative] = item.creatives!
                let model:OfficialPlaylistModel = OfficialPlaylistModel(creatives: creatives, ui: ui)
                array.append(model)
            } else if item.blockCode == "HOMEPAGE_BLOCK_NEW_ALBUM_NEW_SONG" {
                // new song
                let ui: BlockUIElement = item.uiElement!
                let creatives: [Creative] = item.creatives!
                let model: AlbumNewSongModel = AlbumNewSongModel(creatives: creatives, ui: ui)
                array.append(model)
            } else if item.blockCode == "HOMEPAGE_VOICELIST_RCMD" {
                // Podcast collection
                let ui: BlockUIElement = item.uiElement!
                let creatives: [Creative] = item.creatives!
                let model: VoiceListRcmdModel = VoiceListRcmdModel(creatives: creatives, ui: ui)
                array.append(model)
            } else if item.blockCode == "HOMEPAGE_PODCAST24" {
                // 24-hour Podcast
                let ui: BlockUIElement = item.uiElement!
                let creatives: [Creative] = item.creatives!
                let model: Podcast24Model = Podcast24Model(creatives: creatives, ui: ui)
                array.append(model)
            } else if item.blockCode == "HOMEPAGE_BLOCK_VIDEO_PLAYLIST" {
                // Video collection
                let ui: BlockUIElement = item.uiElement!
                let creatives: [Creative] = item.creatives!
                let model: VideoPlaylistModel = VideoPlaylistModel(creatives: creatives, ui: ui)
                array.append(model)
            }
        }

        return array
    }
Now, if you want to reorder, add, or delete items, you just need to modify the item array of this ViewModel. It's clear, isn't it?
Next, we add the UITableViewDataSource to the ModelView:
extension DiscoveryViewController {
    // Mark UITableViewDataSource
    override func numberOfSections(in tableView: UITableView) -> Int {
        if homeViewModel.sections.isEmpty {
            return 0
        }
        return homeViewModel.sections.count
    }

    override func tableView(_ tableView: UITableView, numberOfRowsInSection section: Int) -> Int{
        return homeViewModel.sections[section].rowCount
    }

    override func tableView(_ tableView: UITableView, cellForRowAt indexPath: IndexPath) -> UITableViewCell {
       // configure the cells here
    }
}
ending
As a developer, it is particularly important to have a learning atmosphere and an exchange circle. This is my iOS development exchange group: 130 595 548 , whether you are Xiaobai or Daniel, welcome to settle in. Let's make progress and develop together! (the group will provide some free learning books and materials collected by the group owners and hundreds of interview questions and answer documents for free!)
So far, the creation of project, App UI framework, Model and ViewModel has been basically completed. Finally, to sum up, first, when building the App UI framework, we built the UI framework by using the feature that StoryBoard can quickly build views; Then, according to the JSON returned by the interface, use the external conversion tool quicktype to quickly generate the Model and map the JSON data to the Model. We use the native Codable to realize this mapping process. Finally, create the ViewModel. Because the data displayed by each Section is different, in order to facilitate the loading of data in the table view, All the data loaded by the Section needs to be abstracted into a public class for calling, so we use the protocol here.
Well, that's the end of this article. In the next article, let's talk about how to build a View.