1, Task scheduling overview
1. Why workflow scheduling system is needed
1) A complete data analysis system is usually composed of a large number of task units:
shell script program, java program, mapreduce program, hive script, etc.
2) There are time sequence and pre and post dependence relationships among task units.
3) In order to organize such a complex execution plan well, a workflow scheduling system is needed to schedule the execution.
For example, we may have a requirement that a business system generates 20G of raw data every day, and we need to process it every day. The processing steps are as follows:
(1) Synchronize the original data to HDFS through Hadoop
(2) The original data is calculated with MapReduce calculation framework, and the generated data is stored in multiple Hive tables in the form of partition tables
(3) You need to JOIN the data of multiple tables in Hive to get a detailed data Hive large table
(4) Carry out complex statistical analysis on the detailed data to get the result report information;
(5) The result data from statistical analysis needs to be synchronized to the business system for business calls.
As shown in the figure below: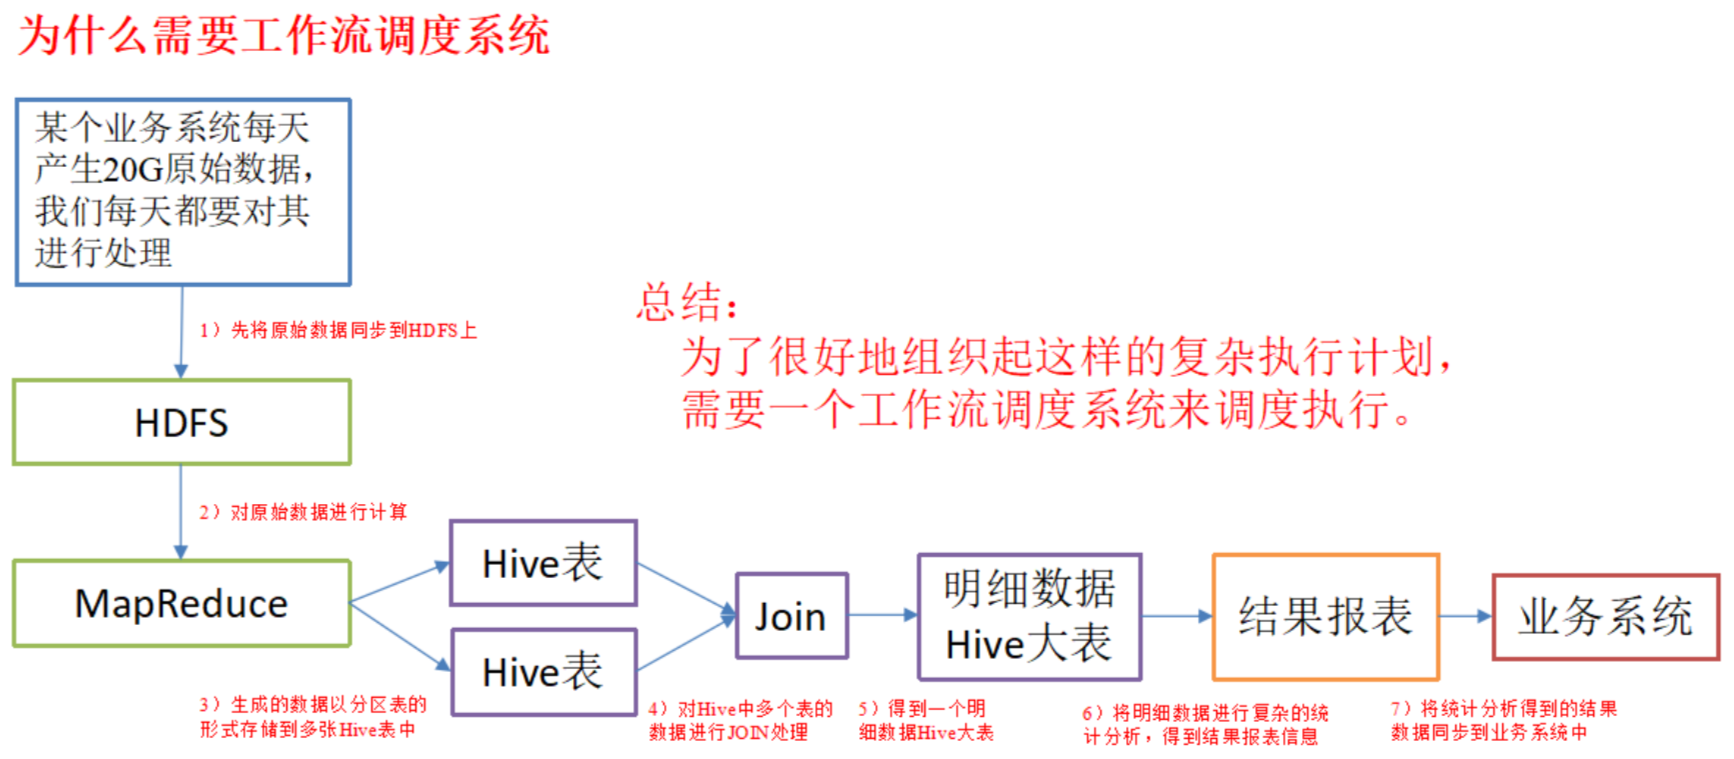
2. Common workflow scheduling tools
1) Simple task scheduling:
It is defined directly by crontab of linux.
2) Complex task scheduling:
Develop scheduling platform or use off the shelf open source scheduling system, such as Ooize, Azkaban, Cascading, Hamake, etc.
3. Comparison of various scheduling tools
The following table compares the key features of the above four kinds of hadoop workflow schedulers. Although the demand scenarios that these workflow schedulers can solve are basically the same, there are still significant differences in design concept, target users, application scenarios, etc., which can be used as a reference for technical selection.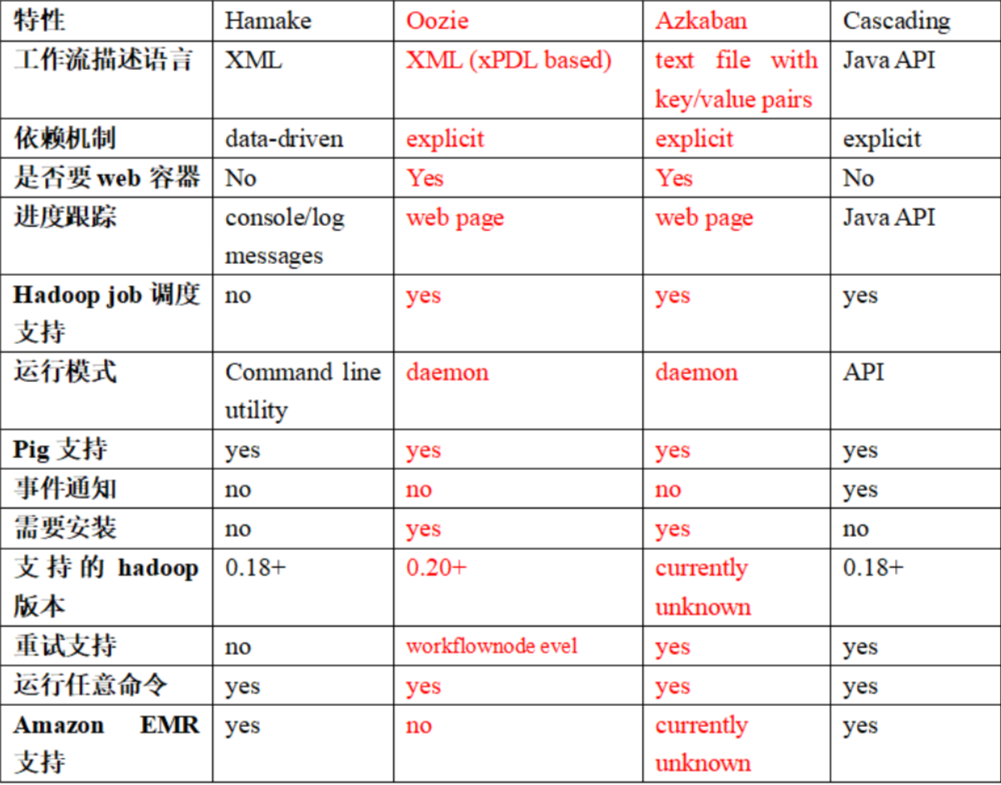
2, About Azkaban
Azkaban is a batch workflow task scheduler open-source by Linkedin. Used to run a set of work and processes in a specific sequence within a workflow. Azkaban defines a KV file format to establish dependencies between tasks, and provides an easy-to-use web user interface to maintain and track your workflow.
It has the following features:
1) Web user interface
2) Easy to upload workflow
3) Easy to set the relationship between tasks
4) Scheduling workflow
5) Authentication / authorization (work of authority)
6) Ability to kill and restart workflow
7) Modular and pluggable plug-in mechanism
8) Project work area
9) Logging and auditing of workflows and tasks
Download address: http://azkaban.github.io/downloads.html
3, Comparison between Azkaban and Oozie
For the two most popular schedulers on the market, the following detailed comparison is given for reference of technical selection. In general, ooiz is a heavy-duty task scheduling system compared with Azkaban, which has comprehensive functions, but its configuration and use are more complex. Azkaban, a lightweight scheduler, is a good candidate if you can ignore the lack of some functions.
Details are as follows:
1) function
Both can schedule mapreduce, pig, java, script workflow tasks
Both can perform workflow tasks on a regular basis
2) Workflow definition
Azkaban uses the Properties file to define the workflow
Oozie uses XML files to define workflows
3) Work spread ginseng
Azkaban supports direct parameter passing, such as input Oozie supports parameters and EL expressions, such as {input} Oozie supports parameters and EL expressions, such as input Oozie supports parameters and EL expressions, such as {fs:dirSize(myInputDir)}
4) Scheduled execution
Azkaban's scheduled tasks are time-based
Oozie's scheduled execution tasks are based on time and input data
5) Resource Management
Azkaban has strict permission control, such as user reading / writing / executing workflow
Oozie has no strict permission control
6) Workflow execution
Azkaban has two operation modes: solo server mode(executor server and web server are deployed in the same node) and multi server mode(executor server and web server can be deployed in different nodes)
Oozi e runs as a workflow server and supports multi-user and multi-workflow
7) Workflow management
Azkaban supports browser and ajax operation workflow
Oozie supports command line, HTTP REST, Java API, browser operation workflow
4, Azkaban installation and deployment
1. Preparation before installation
1) Copy Azkaban Web server, Azkaban execution server and MySQL to / opt/software directory of Hadoop 102 virtual machine
azkaban-web-server-2.5.0.tar.gz
azkaban-executor-server-2.5.0.tar.gz
azkaban-sql-script-2.5.0.tar.gz
mysql-libs.zip
2) At present, azkaban only supports mysql and needs to install mysql server. In this document, mysql server has been installed by default, and root user and password root have been established.
2. Installation of azkaban
1) Create azkaban directory under / opt/module /
[atguigu@hadoop102 module]$ mkdir azkaban
2) Unzip azkaban-web-server-2.5.0.tar.gz
azkaban-executor-server-2.5.0.tar.gz,
azkaban-sql-script-2.5.0.tar.gz to / opt/module/azkaban directory
[atguigu@hadoop102 software]$ tar -zxvf azkaban-web-server-2.5.0.tar.gz
-C /opt/module/azkaban/
[atguigu@hadoop102 software]$ tar -zxvf azkaban-executor-server-2.5.0.tar.gz
-C /opt/module/azkaban/
[atguigu@hadoop102 software]$ tar -zxvf azkaban-sql-script-2.5.0.tar.gz
-C /opt/module/azkaban/
3) Rename the extracted file
[atguigu@hadoop102 azkaban]$ mv azkaban-web-2.5.0/ server
[atguigu@hadoop102 azkaban]$ mv azkaban-executor-2.5.0/ executor
4) azkaban script import
Enter mysql, create the azkaban database, and import the extracted script into the azkaban database.
[atguigu@hadoop102 azkaban]$ mysql -uroot -p123456
mysql> create database azkaban;
mysql> use azkaban;
mysql> source /opt/module/azkaban/azkaban-2.5.0/create-all-sql-2.5.0.sql
3. Create SSL configuration
1) Generate the password and corresponding information of keystore
[atguigu@hadoop102 hadoop-2.7.2]$ keytool -keystore keystore -alias jetty -genkey -keyalg RSA

Enter the keystore password:
Enter the new password again:
What is your first and last name?
  [Unknown]:
What is the name of your organizational unit?
  [Unknown]:
What is the name of your organization?
  [Unknown]:
What is the name of your city or area?
  [Unknown]:
What is the name of your state or province?
  [Unknown]:
What is the two letter country code for the unit
  [Unknown]:   CN
 Is CN=Unknown, OU=Unknown, O=Unknown, L=Unknown, ST=Unknown, C=CN correct?
  [no]:y

Enter the master password for < jetty >
        (if the password is the same as keystore, press enter):
Enter the new password again:
2) Copy keystore to the root directory of azkaban web server
[atguigu@hadoop102 hadoop-2.7.2]$ mv keystore /opt/module/azkaban/server/
4. Time synchronization configuration
First configure the time zone on the server node
1) If the time zone configuration file Asia/Shanghai does not exist in the directory / usr/share/zoneinfo /, it needs to be generated with tzselect.
[atguigu@hadoop102 Asia]$ tzselect
Please identify a location so that time zone rules can be set correctly.
Please select a continent or ocean.
 1) Africa
 2) Americas
 3) Antarctica
 4) Arctic Ocean
 5) Asia
 6) Atlantic Ocean
 7) Australia
 8) Europe
 9) Indian Ocean
10) Pacific Ocean
11) none - I want to specify the time zone using the Posix TZ format.
#? 5
Please select a country.
 1) Afghanistan          18) Israel            35) Palestine
 2) Armenia          19) Japan         36) Philippines
 3) Azerbaijan          20) Jordan            37) Qatar
 4) Bahrain          21) Kazakhstan        38) Russia
 5) Bangladesh          22) Korea (North)     39) Saudi Arabia
 6) Bhutan          23) Korea (South)     40) Singapore
 7) Brunei          24) Kuwait            41) Sri Lanka
 8) Cambodia          25) Kyrgyzstan        42) Syria
 9) China          26) Laos          43) Taiwan
10) Cyprus          27) Lebanon           44) Tajikistan
11) East Timor          28) Macau         45) Thailand
12) Georgia          29) Malaysia          46) Turkmenistan
13) Hong Kong          30) Mongolia          47) United Arab Emirates
14) India          31) Myanmar (Burma)       48) Uzbekistan
15) Indonesia          32) Nepal         49) Vietnam
16) Iran          33) Oman          50) Yemen
17) Iraq          34) Pakistan
#? 9
Please select one of the following time zone regions.
1) Beijing Time
2) Xinjiang Time
#? 1
The following information has been given:
    China
    Beijing Time
Therefore TZ='Asia/Shanghai' will be used.
Local time is now:    Wed Jun 14 09:16:46 CST 2017.
Universal Time is now:    Wed Jun 14 01:16:46 UTC 2017.
Is the above information OK?
1) Yes
2) No
#? 1
2) Copy the time zone file and overwrite the local time zone configuration of the system
cp /usr/share/zoneinfo/Asia/Shanghai /etc/localtime
3) Cluster time synchronization
sudo date -s '2017-06-14 09:23:45'
hwclock -w
5. Configuration file
(1) Web server configuration
1) Enter the conf directory of the azkaban web server installation directory and open the azkaban.properties file
[atguigu@hadoop102 conf]$ pwd
/opt/module/azkaban/server/conf
[atguigu@hadoop102 conf]$ vim azkaban.properties
2) Modify the azkaban.properties file as follows.
#Azkaban Personalization Settings
azkaban.name=Test                           #Server UI name, used for the name displayed above the server
azkaban.label=My Local Azkaban              #describe
azkaban.color=#FF3601                       #UI color
azkaban.default.servlet.path=/index         #
web.resource.dir=web/                       #Default root web directory
default.timezone.id=Asia/Shanghai           #Default time zone, changed to Asia / Shanghai default to us

#Azkaban UserManager class
user.manager.class=azkaban.user.XmlUserManager      #User rights management default class
user.manager.xml.file=conf/azkaban-users.xml        #User configuration, see below for specific configuration

#Loader for projects
executor.global.properties=conf/global.properties   #global profile location
azkaban.project.dir=projects                        #

database.type=mysql                                 #Database type
mysql.port=3306                                     #Port number
mysql.host=hadoop102                                #Database connection IP
mysql.database=azkaban                              #Database instance name
mysql.user=root                                     #Database user name
mysql.password=123456                               #Database password
mysql.numconnections=100                            #maximum connection

# Velocity dev mode
velocity.dev.mode=false
# Jetty server properties
jetty.maxThreads=25                                 #Maximum threads
jetty.ssl.port=8443                                 #Jetty SSL port
jetty.port=8081                                     #Jetty port
jetty.keystore=keystore                             #SSL file name
jetty.password=000000                               #SSL file password
jetty.keypassword=000000                            #The Jetty master password is the same as the keystore file
jetty.truststore=keystore                           #SSL file name
jetty.trustpassword=000000                          #SSL file password

# Execute server properties
executor.port=12321                                 #Execution server port

# Mail Settings
mail.sender=xxxxxxxx@163.com                        #Send mailbox
mail.host=smtp.163.com                              #Send email to smtp address
mail.user=xxxxxxxx                                  #Name to display when sending mail
mail.password=**********                            #Mailbox password
job.failure.email=xxxxxxxx@163.com                  #Address to send mail when task fails
job.success.email=xxxxxxxx@163.com                  #Address to send mail when the task succeeds
lockdown.create.projects=false                      #
cache.directory=cache                               #Cache directory
2) web server user configuration
Install the directory conf in the azkaban web server, modify the azkaban-users.xml file according to the following configuration, and add administrator users.
    <user username="azkaban" password="azkaban" roles="admin" groups="azkaban" />
    <user username="metrics" password="metrics" roles="metrics"/>
    <user username="admin" password="admin" roles="admin,metrics" />
    <role name="admin" permissions="ADMIN" />
    <role name="metrics" permissions="METRICS"/>
</azkaban-users>
(2) Perform server configuration
1) Enter the installation directory conf of the execution server, and open azkaban.properties
[atguigu@hadoop102 conf]$ pwd
/opt/module/azkaban/executor/conf
[atguigu@hadoop102 conf]$ vim azkaban.properties
2) Modify the azkaban.properties file as follows.
#Azkaban
default.timezone.id=Asia/Shanghai                       #time zone

#Azkaban JobTypes plug in configuration
azkaban.jobtype.plugin.dir=plugins/jobtypes             #Location of the jobtype plug-in

#Loader for projects
executor.global.properties=conf/global.properties
azkaban.project.dir=projects

#Database settings
database.type=mysql                                     #Database type (currently only MySQL is supported)
mysql.port=3306                                         #Database port number
mysql.host=192.168.25.102                               #Database IP address
mysql.database=azkaban                                  #Database instance name
mysql.user=root                                         #Database user name
mysql.password=123456                                   #Database password
mysql.numconnections=100                                #maximum connection

#Perform server configuration
executor.maxThreads=50                                  #Maximum threads
executor.port=12321                                     #Port number (if modified, please be consistent with that in web Service)
executor.flow.threads=30                                #Thread count
6. Start the web server
Execute the startup command in the directory of azkaban web server
[atguigu@hadoop102 server]$ pwd
/opt/module/azkaban/server
[atguigu@hadoop102 server]$ bin/azkaban-web-start.sh
bin/azkaban-web-start.sh
7. Start the execution server
Execute the startup command in the execution server directory
[atguigu@hadoop102 executor]$ pwd
/opt/module/azkaban/executor
[atguigu@hadoop102 executor]$ bin/azkaban-executor-start.sh
After launching, enter in the browser (Google browser is recommended):
https: / / server IP address: 8443, you can access the azkaban service. Enter the new user name and password in the login and click login.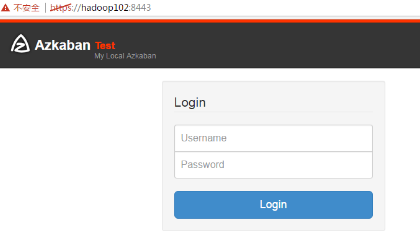
5, Case practice
Azkaba's built-in task types support command and java.
1. Single job workflow case of command type
1) Create job description file
vim command.job

#command.job
type=command
command=echo 'hello'
2) Package the job resource file into a zip file
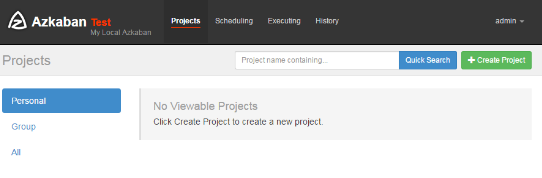
3) Create project and upload job compression package through azkaban's web Management Platform
First create the project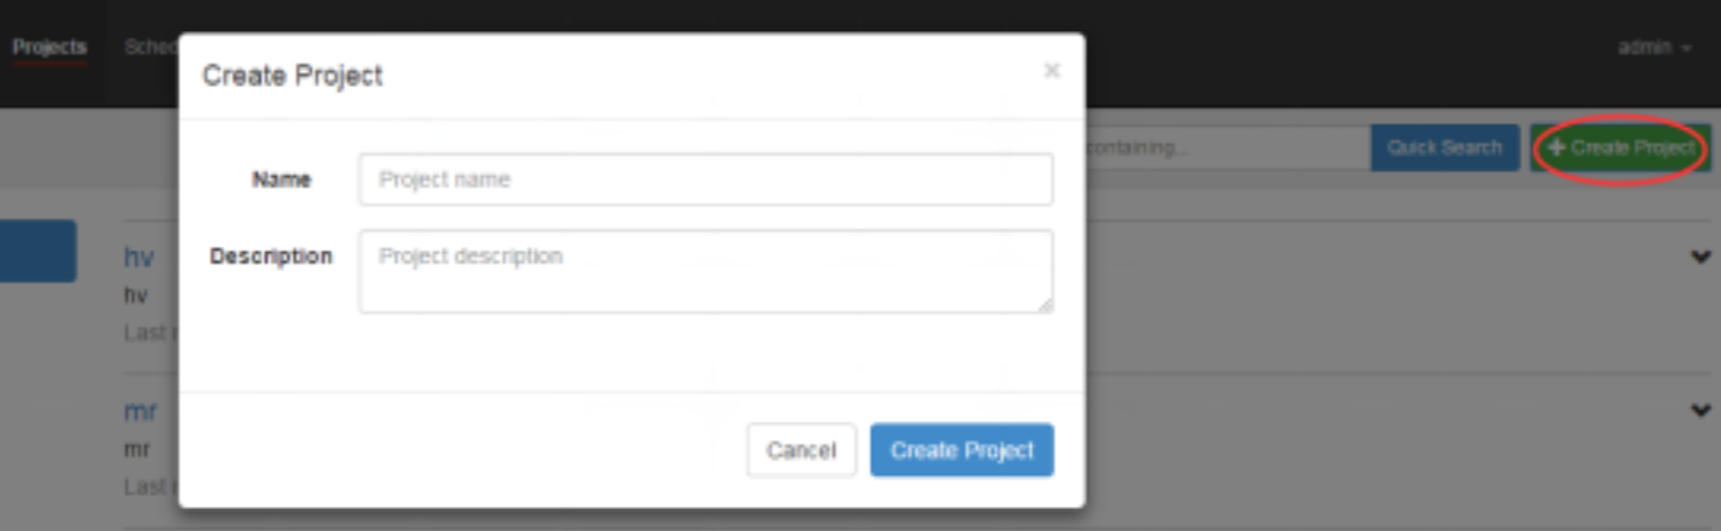
Upload zip package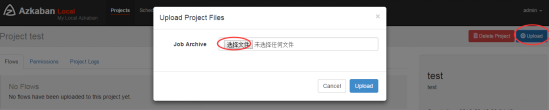
4) Start executing the job
2. Multiple job workflow cases of command type
1) Create multiple job descriptions with dependencies
The first job:foo.job
# foo.job
type=command
command=echo foo
Second job: bar.job depends on foo.job
# bar.job
type=command
dependencies=foo
command=echo bar
2) Print all job resource files into a zip package
3) Create project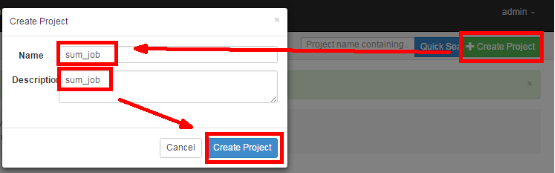
3) Create project and upload zip package in web management interface of azkaban
4) Start workflow
a. steps 1
b. step two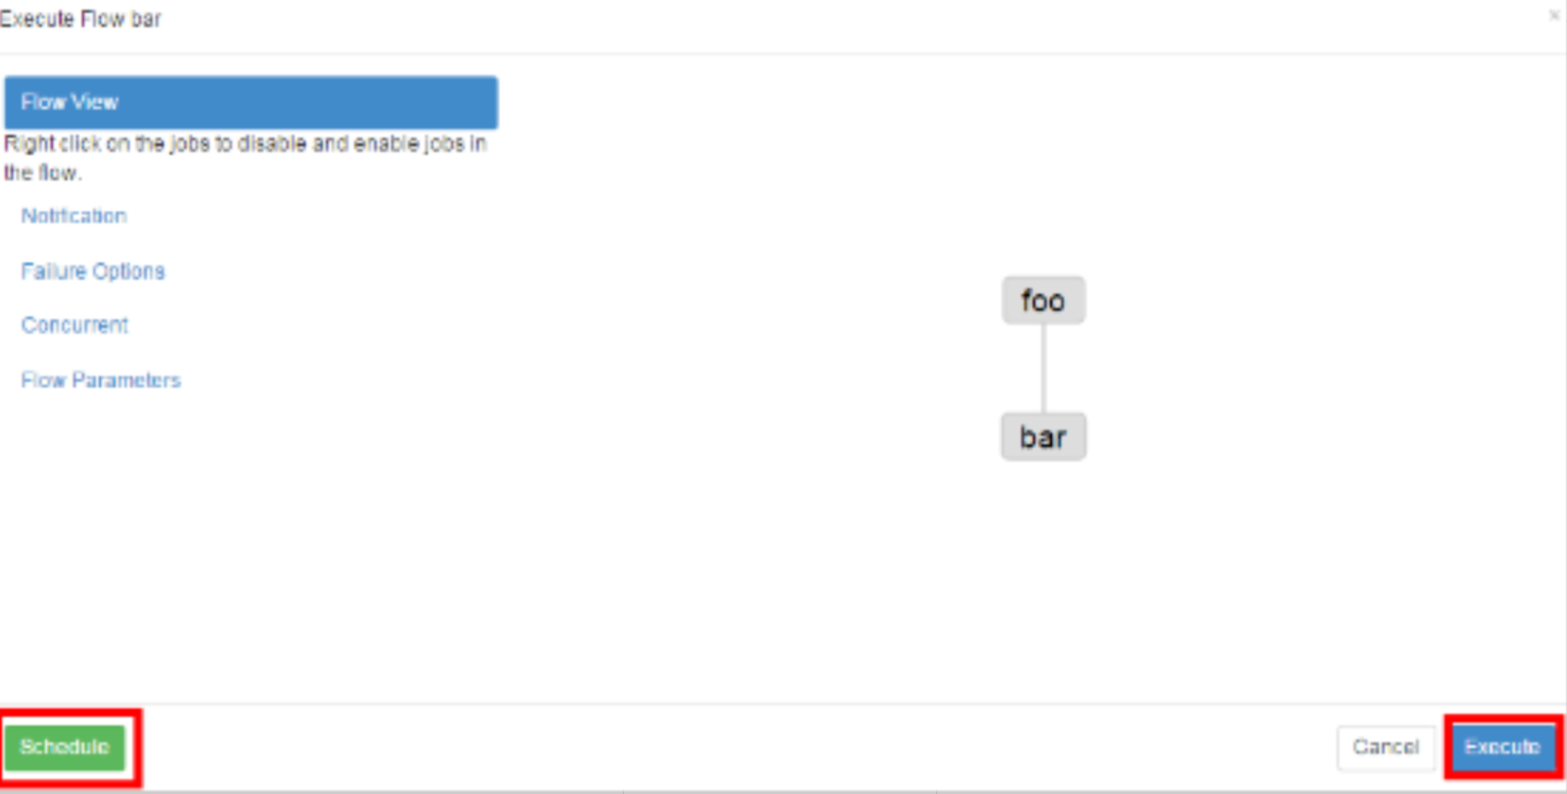
c. step three
5) View results
3.HDFS operation task
1) Create job description file
# fs.job
type=command
command=/opt/module/hadoop-2.7.2/bin/hadoop fs -mkdir /azkaban
2) Package the job resource file into a zip file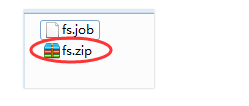
3) Create project and upload job compression package through azkaban's web Management Platform
4) Start executing the job
5) View results
4.MapReduce task
Mr tasks can still be executed using the job type of command
1) Create the job description file and mr program jar package (in the example, use the example jar provided by hadoop directly)
# mrwc.job
type=command
command=/opt/module/hadoop-2.7.2/bin/hadoop jar hadoop-mapreduce-examples-2.7.2.jar wordcount /wordcount/input /wordcount/output
2) Print all job resource files into a zip package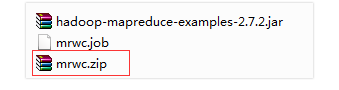
3) Create project and upload zip package in web management interface of azkaban
4) Start job
5.Hive script task
1) Create job description file and hive script
(1) Hive script: test.sql
use default;
drop table aztest;
create table aztest(id int, name string)
row format delimited fields terminated by ',';
load data inpath '/aztest/hiveinput' into table aztest;
create table azres as select * from aztest;
insert overwrite directory '/aztest/hiveoutput' select count(1) from aztest;
(2) Job description file: hivef.job
# hivef.job
type=command
command=/opt/module/hive/bin/hive -f 'test.sql'
2) Print all job resource files into a zip package
3) Create project and upload zip package in web management interface of azkaban
4) Start job

