It took bloggers many days to build DMDSC, not because of how difficult it is, but because of some details.
1. Environmental preparation
1.1 hardware facilities
The virtual machine system used by the landlord is centos7. This tutorial is applicable to most virtual machine systems. It runs 2g of memory, 20g of disk, and 20g of new shared disk. To install Damon database in linux system, please refer to the following blog:
https://blog.csdn.net/weixin_46474599/article/details/118934186
1.2 creating a shared disk
The landlord failed to build the disk for many days. The problem is to create a shared disk. When you create a shared disk, you can use the vm direct graphical tool to create it
There are two options for creating a new disk on the first node:
(1) By default, the virtual disk is split into multiple files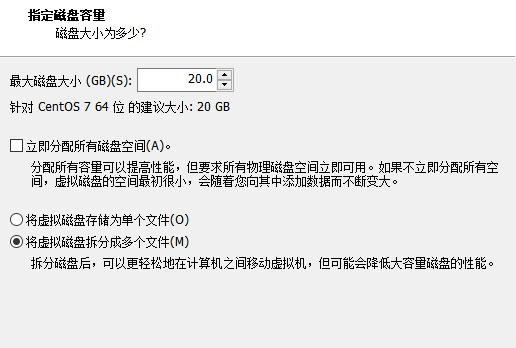
(2) Select to divide the disk into a single file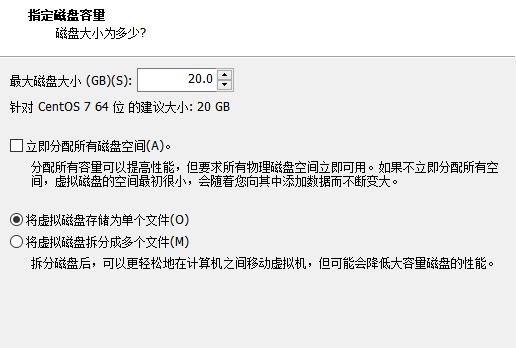
When you select to divide the file into a single file, the new hard disk 2 will be prompted for pre allocation
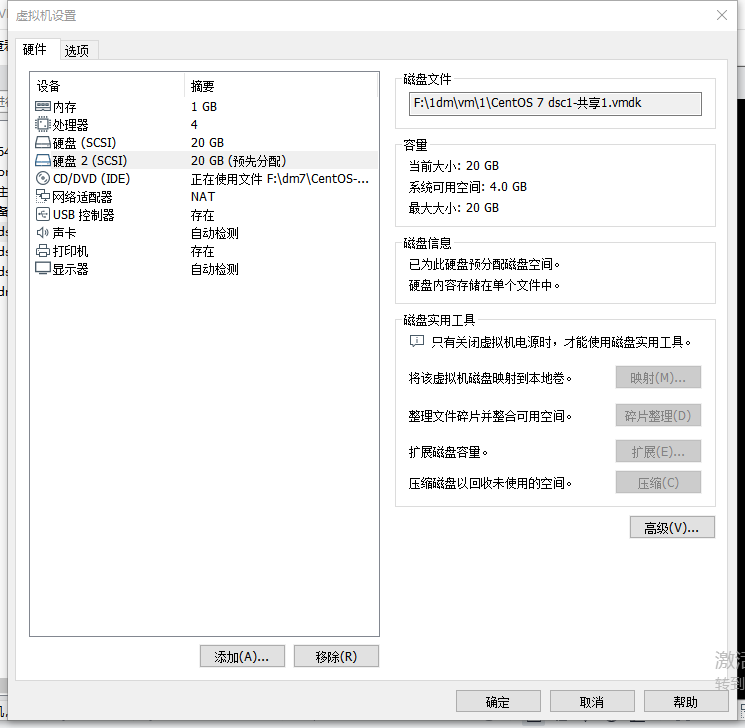
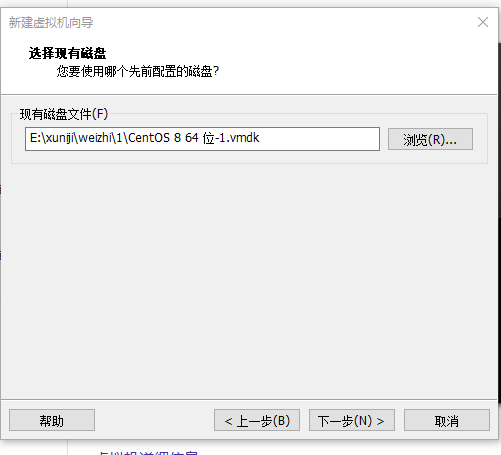
After the disk of the first node is added, the second node uses the first node to create the disk file, and selects the file with the suffix vmdk in the file
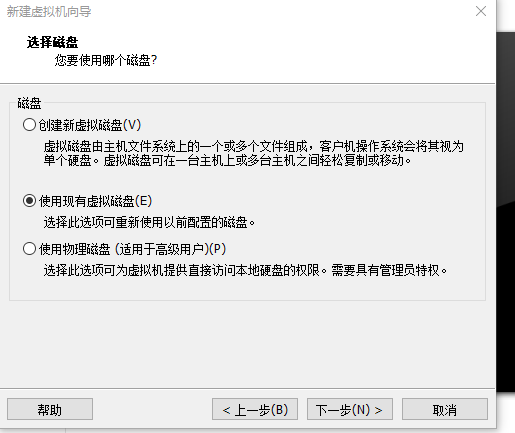
Follow the prompts step by step to successfully create
After successful creation, find XXX in the virtual machine path VMX file, add the following statement at the end. Each node needs:
disk.locking="FALSE scsi0:1.SharedBus="Virtual" scsi1:1.SharedBus="Virtual"
2. Divide shared disks and bind raw devices (only one node is required to operate)
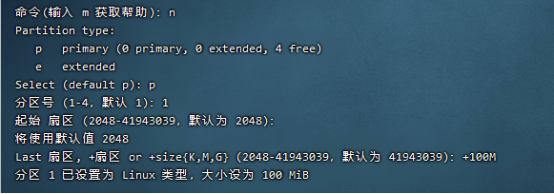
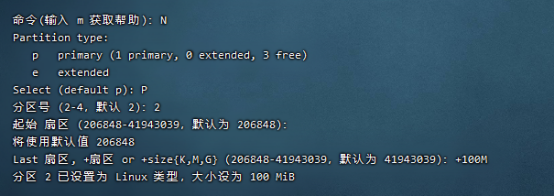
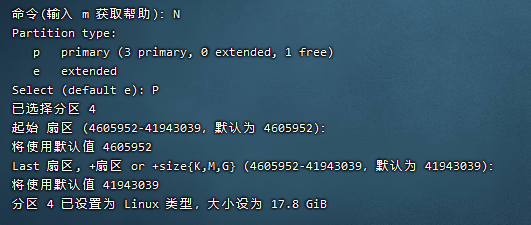
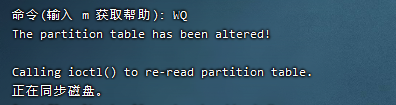
1) input fdisk /dev/sdb
2) Input in sequence n → p → 1 →enter→ +100M →Press enter to finish dividing the first disk
3) Input in sequence n → p → 2 →enter→ +100M →Press enter to complete the partition of the second disk
4) Input in sequence n → p → 3 →enter→ +2048M →Press enter to finish dividing the third disk
5) Input in sequence n → p → 4 →enter→enter→Press enter to complete the partition of the fourth disk
6)input wq preservation
The first statement is to divide the sdb disk. The memory divided by the disk should not be less than that of the above example. Otherwise, if the storage space of relevant logs is insufficient, an error will be reported.

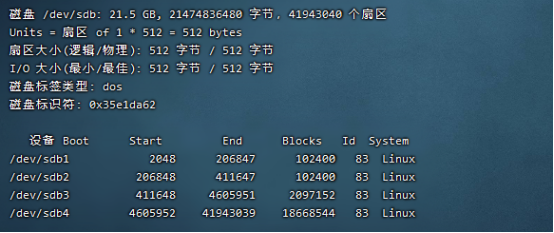
If you find the following devices in the disk view, the partition is successful. You can successfully build a dsc only if you have the same partition on each node
After partitioning the disk, edit / etc / udev / rules d/60-raw. The rules file (which should be configured for each node) is configured by root user, and the dmdba user can no longer be used
ACTION=="add", KERNEL=="sdb1", RUN+="/bin/raw /dev/raw/raw1 %N"
ACTION=="add", KERNEL=="sdb2", RUN+="/bin/raw /dev/raw/raw2 %N"
ACTION=="add", KERNEL=="sdb3", RUN+="/bin/raw /dev/raw/raw3 %N"
ACTION=="add", KERNEL=="sdb4", RUN+="/bin/raw /dev/raw/raw4 %N"
ACTION=="add", KERNEL=="raw[1-4]",OWNER="dmdba",GROUP="dinstall", MODE="660"
After saving, each node executes the following commands to mount and refresh the system partition table
udevadm trigger --type=devices --action=change
partprobe /dev/sdb
ll /dev/raw/raw*
If the following contents are found after viewing, the raw device will be bound successfully

3. Configure DMASM
3.1 relevant preparation
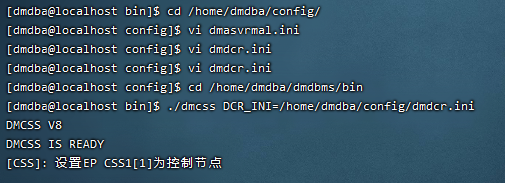
Create a folder on both nodes. All the following configuration files should be placed in the same folder
mkdir -p /home/dmdba/config
3.2 creating asm disk
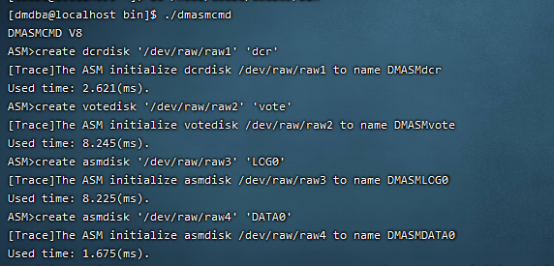
Log in to the dmdba user, go to the bin directory where Damon database is installed, and start the asmcmd tool
./dmasmcmd
ASM>create dcrdisk '/dev/raw/raw1' 'dcr'
ASM>create votedisk '/dev/raw/raw2' 'vote'
ASM>create asmdisk '/dev/raw/raw3' 'LOG0'
ASM>create asmdisk '/dev/raw/raw4' 'DATA0'
3.3 configuring dmdcr with dmdba user in node 1_ cfg. INI file, just one node configuration
DCR_N_GRP = 3
DCR_VTD_PATH = /dev/raw/raw2
DCR_OGUID = 63635
[GRP]
DCR_GRP_TYPE = CSS
DCR_GRP_NAME = GRP_CSS
DCR_GRP_N_EP = 2
DCR_GRP_DSKCHK_CNT = 60
[GRP_CSS]
DCR_EP_NAME = CSS0
DCR_EP_HOST = 192.168.202.143
DCR_EP_PORT = 9341
[GRP_CSS]
DCR_EP_NAME = CSS1
DCR_EP_HOST = 192.168.202.138
DCR_EP_PORT = 9343
[GRP]
DCR_GRP_TYPE = ASM
DCR_GRP_NAME = GRP_ASM
DCR_GRP_N_EP = 2
DCR_GRP_DSKCHK_CNT = 60
[GRP_ASM]
DCR_EP_NAME = ASM0
DCR_EP_SHM_KEY = 93360
DCR_EP_SHM_SIZE = 20
DCR_EP_HOST = 192.168.202.143
DCR_EP_PORT = 9349
DCR_EP_ASM_LOAD_PATH = /dev/raw
[GRP_ASM]
DCR_EP_NAME = ASM1
DCR_EP_SHM_KEY = 93361
DCR_EP_SHM_SIZE = 20
DCR_EP_HOST = 192.168.202.138
DCR_EP_PORT = 9351
DCR_EP_ASM_LOAD_PATH = /dev/raw
[GRP]
DCR_GRP_TYPE = DB
DCR_GRP_NAME = GRP_DSC
DCR_GRP_N_EP = 2
DCR_GRP_DSKCHK_CNT = 60
[GRP_DSC]
DCR_EP_NAME = DSC0
DCR_EP_SEQNO = 0
DCR_EP_PORT = 5236
DCR_CHECK_PORT = 9741
[GRP_DSC]
DCR_EP_NAME = DSC1
DCR_EP_SEQNO = 1
DCR_EP_PORT = 5237
DCR_CHECK_PORT = 9742
3.4 in the bin directory, use the DMASMCMD tool for initialization. This operation should be performed by each node: the relevant path, password, etc. can be modified by itself
init dcrdisk '/dev/raw/raw1' from '/home/dmdba/config/dmdcr_cfg.ini' identified by '123456'
init votedisk '/dev/raw/raw2' from '/home/dmdba/config/dmdcr_cfg.ini'

3.5 configure dmasvrmal at each node INI file with the same content. Modify the ip address by yourself:
[MAL_INST1]
MAL_INST_NAME = ASM0
MAL_HOST = 192.168.202.143
MAL_PORT = 7236
[MAL_INST2]
MAL_INST_NAME = ASM1
MAL_HOST = 192.168.202.138
MAL_PORT = 7237
You can copy files to other nodes with the following code:
scp dmasvrmal.ini 192.168.202.138:/home/dmdba/config/
3.6 configuring dmdcr INI file
Dmdcr of node 1 and node 2_ Seqo is 0 and 1 respectively, and the rest is the same
Node 1: the related paths need to be modified
DMDCR_PATH = /dev/raw/raw1
DMDCR_MAL_PATH =/home/dmdba/config/dmasvrmal.ini  #MAL profile path used by dmasmsvr
DMDCR_SEQNO = 0

#ASM restart parameter, command line startup
DMDCR_ASM_RESTART_INTERVAL = 0
DMDCR_ASM_STARTUP_CMD = /home/dmdba/dmdbms/bin/dmasmsvr  dcr_ini=/home/dmdba/config/dmdcr.ini

#DB restart parameter, command line startup
DMDCR_DB_RESTART_INTERVAL = 0
DMDCR_DB_STARTUP_CMD = /home/dmdba/dmdbms/bin/dmserver path=/home/dmdba/config/dm.ini dcr_ini=/home/dmdba/config/dmdcr.ini
Node 2:
DMDCR_PATH = /dev/raw/raw1
DMDCR_MAL_PATH =/home/dmdba/config/dmasvrmal.ini  #MAL profile path used by dmasmsvr
DMDCR_SEQNO = 1

#ASM restart parameter, command line startup
DMDCR_ASM_RESTART_INTERVAL = 0
DMDCR_ASM_STARTUP_CMD = /home/dmdba/dmdbms/bin/dmasmsvr  dcr_ini=/home/dmdba/config/dmdcr.ini

#DB restart parameter, command line startup
DMDCR_DB_RESTART_INTERVAL = 0
DMDCR_DB_STARTUP_CMD = /home/dmdba/dmdbms/bin/dmserver path=/home/dmdba/config/dm.ini dcr_ini=/home/dmdba/config/dmdcr.ini
4. Foreground start operation
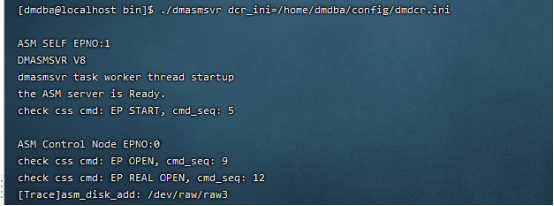
4.1 use the dmdba user to start DMCSS in the database bin. Each node needs to execute:
./dmcss DCR_INI=/home/dmdba/dmdbms/bin/dmdcr.ini

4.2 start another window, and node 1 and node 2 start dmasmsvr in turn
./dmasmsvr DCR_INI=/home/dmdba/dmdbms/config/dmdcr.ini

4.3 open another window and use DMASM tool to create DMASM disk group (node 1)
./dmasmtool DCR_INI=/home/dmdba/dmdbms/config/dmdcr.ini
#Create log disk group
create diskgroup 'DMLOG' asmdisk '/dev/raw/raw3'
#Create data disk group
create diskgroup 'DMDATA' asmdisk '/dev/raw/raw4'
4.4 configuring dminit INI file
db_name = dsc
system_path = +DMDATA/data
system = +DMDATA/data/dsc/system.dbf
system_size = 128
roll = +DMDATA/data/dsc/roll.dbf
roll_size = 128
main = +DMDATA/data/dsc/main.dbf
main_size = 128
ctl_path = +DMDATA/data/dsc/dm.ctl
roll = +DMDATA/data/dsc/roll.dbf
roll_size = 128
main = +DMDATA/data/dsc/main.dbf
main_size = 128
ctl_path = +DMDATA/data/dsc/dm.ctl
main_size = 128
ctl_path = +DMDATA/data/dsc/dm.ctl
ctl_size = 8
log_size = 256
dcr_path = /dev/raw/raw1
#dcr disk path, which currently does not support asm, can only be a raw device
dcr_seqno = 0
auto_overwrite = 1
[DSC0]
#inst_name and dmdcr_cfg.ini DB type DCR in group_ EP_ Name correspondence
config_path = /home/dmdba/data/dsc1
port_num = 5236
mal_host = 192.168.202.143
mal_port = 9340
log_path = +DMLOG/log/dsc_0log01.log
log_path = +DMLOG/log/dsc_0log02.log
[DSC1]
#inst_name and dmdcr_cfg.ini DB type DCR in group_ EP_ Name correspondence
config_path = /home/dmdba/data/dsc2
port_num = 5237
mal_host = 192.168.202.138
mal_port = 9341
log_path = +DMLOG/log/dsc_1log01.log
log_path = +DMLOG/log/dsc_1log02.log
Initialize the DB environment with dminit, which is only used on node 1:
./dminit control=/home/dmdba/config/dminit.ini
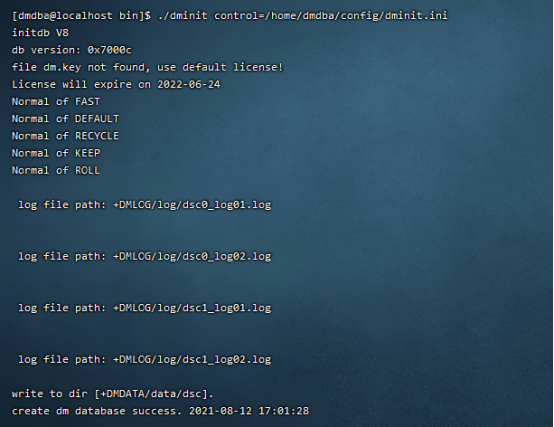
After initialization, two instance configuration folders will be generated in the configuration directory of the ini control file and copied to the second node:
scp -r /home/dmdba/dmdbms/dsc/ 192.168.30.135:/home/dmdba/dmdbms
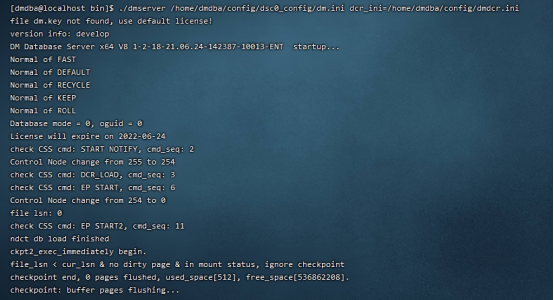
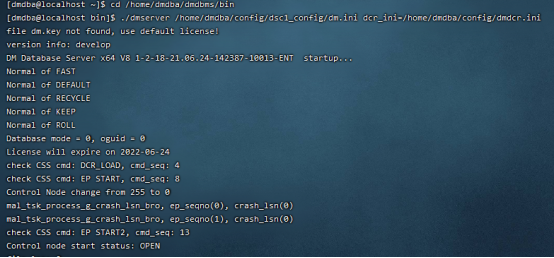
5. When the foreground starts the database service, both nodes should execute: if both css and asmsvr are started, just execute the third sentence
./dmcss DCR_INI=/home/dmdba/config/dmdcr.ini

./dmasmsvr DCR_INI=/home/dmdba/config/dmdcr.ini

./dmserver /home/dmdba/data/dsc1/dm.ini  DCR_INI=/home/dmdba/config/dmdcr.ini
Node 1:
Node 2:
6. Configure the monitor on other servers. Bloggers can configure it on node 1:
CSSM_OGUID = 63635                      #Dmdcr_ cfg. DCR in ini_ Oguid consistent
#Configure the connection information of all CSS,
#Dmdcr_ cfg. DCR of CSS configuration item in ini_ EP_ Host and DCR_EP_PORT consistent
CSSM_CSS_IP = 192.168.202.143:9341
CSSM_CSS_IP = 192.168.202.138:9343
CSSM_LOG_PATH =/home/dmdba/dmdbms/log           #Monitor log file storage path
CSSM_LOG_FILE_SIZE = 32                         #Maximum 32 MB per log file
CSSM_LOG_SPACE_LIMIT = 0  				#Unlimited total log file space
Start monitor: (under bin directory)
./dmcssm ini_path=/home/dmdba/config/dmcssm.ini
So far, the two node DMDSC has been built.