Recently, I saw the source code of several micro front-end frameworks( single-spa,qiankun,micro-app ), I feel I have gained a lot. So I plan to build a mini wheel to deepen my understanding of what I have learned.
This wheel will be divided into five versions to gradually realize a minimum available micro front-end frame:
- Support sub applications of different frameworks( v1 Branch)
- Support sub application HTML entry( v2 Branch)
- Support sandbox function, sub application window scope isolation and element isolation( v3 Branch)
- Support sub application style isolation( v4 Branch)
- Support data communication between applications( main Branch)
The code of each version is modified on the basis of the previous version, so the code of V5 version is the final code.
Github project address: https://github.com/woai3c/mini-single-spa
V1 version
V1 version intends to implement the simplest micro front-end framework, as long as it can normally load and unload sub applications. If the V1 version is subdivided, it mainly consists of the following two functions:
- Monitor page URL changes and switch sub applications
- Determine whether to load or unload the sub application according to the current URL and the trigger rules of the sub application
Monitor page URL changes and switch sub applications
The essential function of a SPA application is to monitor the change of page URL, and then render different routing components according to different routing rules. Therefore, the micro front-end framework can also switch to different sub applications according to the change of page URL:
// When location When pathname is prefixed with / vue, switch to vue sub application
https://www.example.com/vue/xxx
// When location When pathname is prefixed with / react, switch to react sub application
https://www.example.com/react/xxx
This can be done by rewriting two API s and listening to two events:
- rewrite window.history.pushState()
- rewrite window.history.replaceState()
- monitor popstate event
- monitor hashchange event
The pushState() and replaceState() methods can modify the browser's history stack, so we can rewrite these two APIs. When these two APIs are called by SPA applications, it indicates that the URL has changed. At this time, you can judge whether to load and unload sub applications according to the currently changed URL.
// After executing the following code, the URL of the browser will be from https://www.xxx.com Become https://www.xxx.com/vue
window.history.pushState(null, '', '/vue')
When the user manually clicks the forward / backward button on the browser, the pop state event will be triggered, so this event needs to be monitored. Similarly, you also need to listen to hashchange events.
The code of this logic is as follows:
import { loadApps } from '../application/apps'

const originalPushState = window.history.pushState
const originalReplaceState = window.history.replaceState

export default function overwriteEventsAndHistory() {
    window.history.pushState = function (state: any, title: string, url: string) {
        const result = originalPushState.call(this, state, title, url)
        // Load or unload app s according to the current url
        loadApps()
        return result
    }

    window.history.replaceState = function (state: any, title: string, url: string) {
        const result = originalReplaceState.call(this, state, title, url)
        loadApps()
        return result
    }

    window.addEventListener('popstate', () => {
        loadApps()
    }, true)

    window.addEventListener('hashchange', () => {
        loadApps()
    }, true)
}
It can be seen from the above code that every time the URL changes, the loadApps() method will be called. The function of this method is to switch the state of the sub application according to the current URL and the trigger rules of the sub application:
export async function loadApps() {
	// Uninstall all inactive sub applications first
    const toUnMountApp = getAppsWithStatus(AppStatus.MOUNTED)
    await Promise.all(toUnMountApp.map(unMountApp))

    // Initialize all newly registered sub applications
    const toLoadApp = getAppsWithStatus(AppStatus.BEFORE_BOOTSTRAP)
    await Promise.all(toLoadApp.map(bootstrapApp))

    const toMountApp = [
        ...getAppsWithStatus(AppStatus.BOOTSTRAPPED),
        ...getAppsWithStatus(AppStatus.UNMOUNTED),
    ]
    // Load all eligible sub apps
    await toMountApp.map(mountApp)
}
The logic of this code is also relatively simple:
- Uninstall all deactivated sub apps
- Initialize all newly registered sub applications
- Load all eligible sub apps
Determine whether to load or unload the sub application according to the current URL and the trigger rules of the sub application
In order to support sub applications of different frameworks, it is stipulated that the sub applications must expose the three methods of bootstrap() mount() unmount(). The bootstrap() method is triggered when the sub application is loaded for the first time, and will only be triggered once. The other two methods will be triggered every time the sub application is loaded or unloaded.
No matter what sub application is registered, call the mount() method of the sub application when the URL meets the loading conditions, and the sub application is responsible for whether it can render normally. When the unloading conditions are met, the unmount() method of the sub application is called.
registerApplication({
    name: 'vue',
    // Execute this method when initializing the sub application
    loadApp() {
    	return {
			mount() {
            	// Here you can mount the sub application
            	app.mount('#app')
            },
            unmount() {
                // Here you can uninstall the sub application
                app.unmount()
            },
		}
	},
	// If you pass in a string, it will be converted to a function with a parameter of location
	// activeRule: '/vue' will be converted to (location) = > location pathname === '/vue'
    activeRule: (location) => location.hash === '#/vue'
})
The above is a simple sub application registration example, in which the activeRule() method is used to judge whether the sub application is activated (returning true indicates activation). Whenever the page URL changes, the micro front-end framework will call loadApps() to determine whether each sub application is activated, and then trigger the operation of loading and unloading sub applications.
When to load and unload subapplications
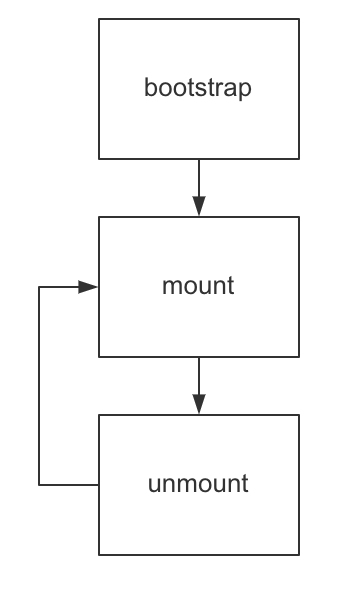
First, we divide the states of sub applications into three types:
- Bootstrap: after calling registerApplication() to register a sub application, its state is bootstrap by default and the next transition state is mount.
- mount, the state after the sub application is successfully mounted, and its next transition state is unmount.
- unmount, the state of the sub application after successful unloading. Its next transition state is mount, that is, the unloaded application can be loaded again.
Now let's see when a sub application will be loaded. When the page URL changes, if the sub application meets the following two conditions, it needs to be loaded:
- The return value of activeRule() is true. For example, when the URL changes from / to / vue, the sub application vue is activated (assuming its activation rule is / vue).
- The subapplication state must be bootstrap or unmount in order to transition to the mount state. If it is already in the mount state and the return value of activeRule() is true, no processing will be performed.
If the sub application meets the following two conditions after the URL of the page is changed, the sub application needs to be uninstalled:
- The return value of activeRule() is false. For example, when the URL changes from / vue to /, the sub application vue is inactive (assuming its activation rule is / vue).
- The subapplication state must be mount, that is, the current subapplication must be in the loading state (if it is in other states, no processing will be done). Then, the URL changes, resulting in deactivation, so you need to uninstall it, and the state changes from mount to unmount.
API introduction
The V1 version mainly exposes two API s:
- registerApplication(), register sub applications.
- start(), after calling all the sub applications, it will execute loadApps() to load the sub application inside it.
The parameters received by registerApplication(Application) are as follows:
interface Application {
    // Subapplication name
    name: string

    /**
     * Activation rules, such as incoming / vue, activate the current sub application when the path of the url changes to / vue.
     * If activeRule is a function, location will be passed in as a parameter. When activeRule(location) returns true, the current sub application will be activated.
     */
    activeRule: Function | string

    // Custom parameters passed to subapplications
    props: AnyObject

    /**
     * loadApp() A Promise must be returned, and an object is obtained after resolve():
     * {
     *   bootstrap: () => Promise<any>
     *   mount: (props: AnyObject) => Promise<any>
     *   unmount: (props: AnyObject) => Promise<any>
     * }
     */
    loadApp: () => Promise<any>
}
A complete example
Now let's look at a relatively complete example (the code is in the examples directory of the V1 branch):
let vueApp
registerApplication({
    name: 'vue',
    loadApp() {
        return Promise.resolve({
            bootstrap() {
                console.log('vue bootstrap')
            },
            mount() {
                console.log('vue mount')
                vueApp = Vue.createApp({
                    data() {
                        return {
                            text: 'Vue App'
                        }
                    },
                    render() {
                        return Vue.h(
                            'div',     // Label name
                            this.text  // Label content
                        )
                    },
                })

                vueApp.mount('#app')
            },
            unmount() {
                console.log('vue unmount')
                vueApp.unmount()
            },
        })
    },
    activeRule:(location) => location.hash === '#/vue',
})

registerApplication({
    name: 'react',
    loadApp() {
        return Promise.resolve({
            bootstrap() {
                console.log('react bootstrap')
            },
            mount() {
                console.log('react mount')
                ReactDOM.render(
                    React.createElement(LikeButton),
                    $('#app')
                );
            },
            unmount() {
                console.log('react unmount')
                ReactDOM.unmountComponentAtNode($('#app'));
            },
        })
    },
    activeRule: (location) => location.hash === '#/react'
})

start()
The demonstration effect is as follows:
Summary
The V1 version of the code is only more than 100 lines after packaging. If you just want to understand the core principle of the micro front end, just look at the V1 version of the source code.
V2 version
The implementation of V1 version is still very simple, and the applicable business scenarios are limited. As can be seen from the example of V1 version, it requires the sub application to load all resources in advance (or package the whole sub application into an NPM package and introduce it directly), so that it can render normally when executing the mount() method of the sub application.
For example, suppose we launch a vue application in the development environment. So how to introduce the resources of this vue sub application in the main application? First, exclude the form of NPM package, because it is unrealistic to package every time you modify the code. The second way is to manually introduce the resources of sub applications in the main application. For example, the entry resources of vue sub applications are:

Then we can introduce the following when registering sub applications:
registerApplication({
    name: 'vue',
    loadApp() {
        return Promise.resolve({
            bootstrap() {
            	import('http://localhost:8001/js/chunk-vendors.js')
            	import('http://localhost:8001/js/app.js')
            },
            mount() {
                // ...
            },
            unmount() {
                // ...
            },
        })
    },
    activeRule: (location) => location.hash === '#/vue'
})
This method is also unreliable. Every time the entry resource file of the sub application changes, the code of the main application has to change. Fortunately, we have a third way, that is, when registering the sub application, write the entry URL of the sub application, and the micro front end is responsible for loading the resource file.
registerApplication({
	// Sub app entry URL
    pageEntry: 'http://localhost:8081'
    // ...
})
Automatically load resource files
Now let's look at how to automatically load the entry file of the sub application (only when the sub application is loaded for the first time):
export default function parseHTMLandLoadSources(app: Application) {
    return new Promise<void>(async (resolve, reject) => {
        const pageEntry = app.pageEntry
        // load html
        const html = await loadSourceText(pageEntry)
        const domparser = new DOMParser()
        const doc = domparser.parseFromString(html, 'text/html')
        const { scripts, styles } = extractScriptsAndStyles(doc as unknown as Element, app)

        // The html content of the remaining body after extracting the script style
        app.pageBody = doc.body.innerHTML

        let isStylesDone = false, isScriptsDone = false
        // Load the contents of style script
        Promise.all(loadStyles(styles))
        .then(data => {
            isStylesDone = true
            // Add style to document Head tag
            addStyles(data as string[])
            if (isScriptsDone && isStylesDone) resolve()
        })
        .catch(err => reject(err))

        Promise.all(loadScripts(scripts))
        .then(data => {
            isScriptsDone = true
            // Execute script content
            executeScripts(data as string[])
            if (isScriptsDone && isStylesDone) resolve()
        })
        .catch(err => reject(err))
    })
}
Logic of the above code:
- Use ajax to request the content of the sub application entry URL to get the HTML of the sub application
- Extract the script style content or URL in HTML. If it is a URL, use ajax to pull the content again. Finally, get all the script style content of the entry page
- Add all style s to document Under head, the script code is executed directly
- Assign the HTML content of the remaining body part to the DOM to be mounted by the sub application.
Here is a detailed description of how these four steps are done.
1, Pull HTML content
export function loadSourceText(url: string) {
    return new Promise<string>((resolve, reject) => {
        const xhr = new XMLHttpRequest()
        xhr.onload = (res: any) => {
            resolve(res.target.response)
        }

        xhr.onerror = reject
        xhr.onabort = reject
        xhr.open('get', url)
        xhr.send()
    })
}
The code logic is very simple. Use ajax to initiate a request and get the HTML content.
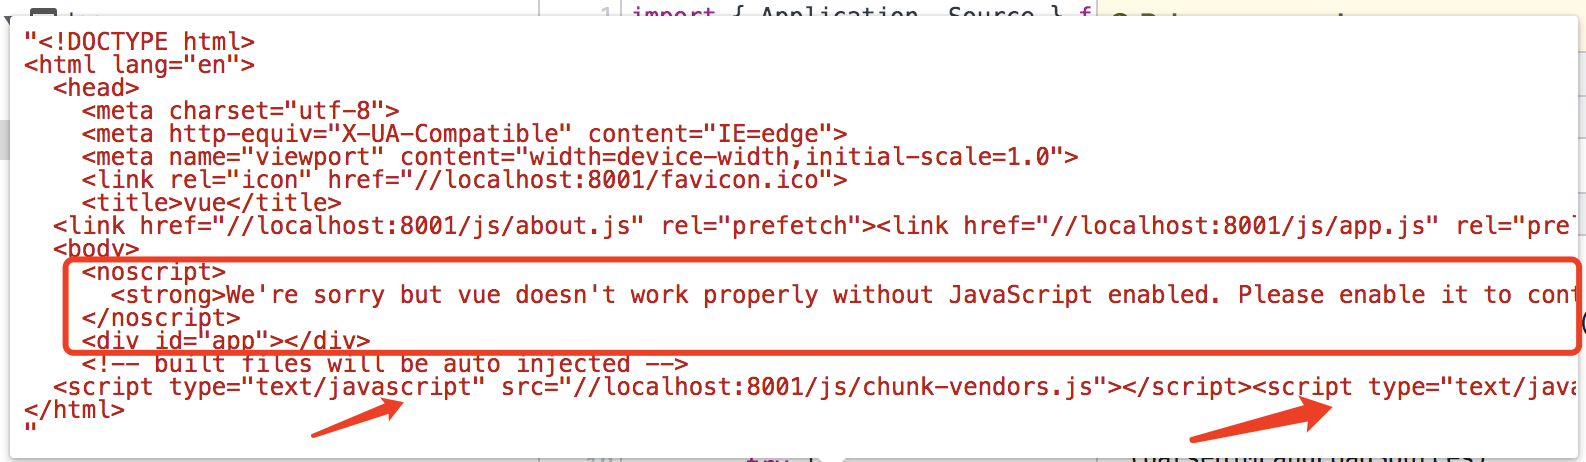
The above figure is the HTML content of a vue sub application. The arrow refers to the resource to be extracted, and the content of the box mark should be assigned to the DOM mounted by the sub application.
2, Parse HTML and extract style script tag content
This requires an API DOMParser , it can directly parse an HTML string without hanging to the document object.
const domparser = new DOMParser()
const doc = domparser.parseFromString(html, 'text/html')
There are many codes for the function extractscripts andstyles (node: element, app: application) to extract labels, so there is no code attached here. The main function of this function is to recursively traverse the DOM tree generated above and extract all the style script tags inside.
3, Add the style tag and execute the script content
This step is relatively simple, adding all extracted style tags to document Under head:
export function addStyles(styles: string[] | HTMLStyleElement[]) {
    styles.forEach(item => {
        if (typeof item === 'string') {
            const node = createElement('style', {
                type: 'text/css',
                textContent: item,
            })

            head.appendChild(node)
        } else {
            head.appendChild(item)
        }
    })
}
js script code is directly packaged and executed in an anonymous function:
export function executeScripts(scripts: string[]) {
    try {
        scripts.forEach(code => {
            new Function('window', code).call(window, window)
        })
    } catch (error) {
        throw error
    }
}
4, Assign the HTML content of the remaining body part to the DOM to be mounted by the sub application
In order to ensure the normal execution of sub applications, the contents of this part need to be saved. Then, each time before the sub application mount(), assign a value to the mounted DOM.
// Save HTML code
app.pageBody = doc.body.innerHTML

// Assign a value to the mounted DOM before loading the sub application
app.container.innerHTML = app.pageBody
app.mount()
Now we can easily load sub applications, but there are still some things that need to be modified.
What sub applications need to do
In V1 version, there is a loadApp() method when registering sub applications. The micro front-end framework will execute this method when the sub application is loaded for the first time, so as to get the three methods exposed by the sub application. Now that the pageEntry function is implemented, we don't need to write this method in the main application, because we don't need to introduce sub applications into the main application.
However, we have to let the micro front-end framework get the method to expose the sub applications, so we can expose the sub applications in another way:
// Each sub application needs to expose three API s in this way. The attribute format is ` Mini single Spa - ${appName}`
window['mini-single-spa-vue'] = {
    bootstrap,
    mount,
    unmount
}
In this way, the micro front end can also get the exposed method of each sub application, so as to realize the function of loading and unloading sub applications.
In addition, the sub application has to do two things:
- Configure cors to prevent cross domain problems (cross domain problems will occur due to the different domain names of the main application and sub application)
- Configure resource publishing path
If the sub application is developed based on webpack, it can be configured as follows:
module.exports = {
    devServer: {
        port: 8001, // Sub application access port
        headers: {
            'Access-Control-Allow-Origin': '*'
        }
    },
    publicPath: "//localhost:8001/",
}
A complete example
The sample code is in the examples directory.
registerApplication({
    name: 'vue',
    pageEntry: 'http://localhost:8001',
    activeRule: pathPrefix('/vue'),
    container: $('#subapp-viewport')
})

registerApplication({
    name: 'react',
    pageEntry: 'http://localhost:8002',
    activeRule:pathPrefix('/react'),
    container: $('#subapp-viewport')
})

start()
V3 version
V3 version mainly adds the following two functions:
- Isolate sub application window scope
- Isolate child application element scope
Isolate sub application window scope
In V2 version, the main application and all sub applications share a window object, which leads to the problem of overwriting data with each other:
// Sub application load a first
window.name = 'a'
// Post load b sub application
window.name = 'b'
// Then switch back to sub application a and read window Name gets a value of b
console.log(window.name) // b
To avoid this, we can use Proxy To proxy access to sub application window objects:
app.window = new Proxy({}, {
    get(target, key) {
        if (Reflect.has(target, key)) {
            return Reflect.get(target, key)
        }

        const result = originalWindow[key]
        // The this point of the window native method must be bound to the window to run, otherwise the error "typeerror: Legal invocation" will be reported
        // e.g: const obj = {}; obj.alert = alert;  obj.alert();
        return (isFunction(result) && needToBindOriginalWindow(result)) ? result.bind(window) : result
    },

    set: (target, key, value) => {
    	this.injectKeySet.add(key)
        return Reflect.set(target, key, value)
    }
})
As can be seen from the above code, a Proxy is used to Proxy an empty object, and then the Proxy object is used as the window object of the sub application:
- When the code in the sub application accesses the window XXX attribute will be intercepted by this proxy object. It will first check whether the proxy window object of the child application has this attribute. If it cannot be found, it will find it from the parent application, that is, in the real window object.
- When the code in the sub application modifies the window attribute, it will be directly modified on the proxy window object of the sub application.
So the question is, how can the code in the sub application access the proxy window object of the sub application when reading / modifying the window?
As described in V2 just now, the micro front-end framework will pull js resources instead of sub applications, and then execute them directly. We can use it when executing code with Statement to package the code and point the window of the sub application to the proxy object:
export function executeScripts(scripts: string[], app: Application) {
    try {
        scripts.forEach(code => {
            // ts will report an error when using with, so it needs to be wrapped like this
            // Point the js code of the sub application to the global window environment to the proxy environment proxyWindow
            const warpCode = `
                ;(function(proxyWindow){
                    with (proxyWindow) {
                        (function(window){${code}\n}).call(proxyWindow, proxyWindow)
                    }
                })(this);
            `

            new Function(warpCode).call(app.sandbox.proxyWindow)
        })
    } catch (error) {
        throw error
    }
}
Clear sub application window scope during uninstall
When the sub application is unloaded, its window Proxy object needs to be cleared. Otherwise, the next time the sub application reloads, its window Proxy object will store the last loaded data. There is a line of code this in the code that just created the Proxy injectKeySet. Add (key). This injectkeyset is a Set object that stores the new properties of each window Proxy object. Therefore, during unloading, you only need to traverse the Set and delete the corresponding key on the window Proxy object:
for (const key of injectKeySet) {
	Reflect.deleteProperty(microAppWindow, key as (string | symbol))
}
Record the bound global events and timers and clear them when unloading
Usually, a sub application will not only modify the properties on the window, but also bind some global events on the window. So we need to record these events and clear them when uninstalling the sub application. Similarly, all kinds of timers are the same. During unloading, you need to clear the unexecuted timers.
The following codes are some key codes for recording events and timers:
// Some key codes
microAppWindow.setTimeout = function setTimeout(callback: Function, timeout?: number | undefined, ...args: any[]): number {
    const timer = originalWindow.setTimeout(callback, timeout, ...args)
    timeoutSet.add(timer)
    return timer
}

microAppWindow.clearTimeout = function clearTimeout(timer?: number): void {
    if (timer === undefined) return
    originalWindow.clearTimeout(timer)
    timeoutSet.delete(timer)
}
microAppWindow.addEventListener = function addEventListener(
    type: string,
    listener: EventListenerOrEventListenerObject,
    options?: boolean | AddEventListenerOptions | undefined,
) {
    if (!windowEventMap.get(type)) {
        windowEventMap.set(type, [])
    }

    windowEventMap.get(type)?.push({ listener, options })
    return originalWindowAddEventListener.call(originalWindow, type, listener, options)
}

microAppWindow.removeEventListener = function removeEventListener(
    type: string,
    listener: EventListenerOrEventListenerObject,
    options?: boolean | AddEventListenerOptions | undefined,
) {
    const arr = windowEventMap.get(type) || []
    for (let i = 0, len = arr.length; i < len; i++) {
        if (arr[i].listener === listener) {
            arr.splice(i, 1)
            break
        }
    }

    return originalWindowRemoveEventListener.call(originalWindow, type, listener, options)
}
The following section is the key code for clearing events and timers:
for (const timer of timeoutSet) {
    originalWindow.clearTimeout(timer)
}

for (const [type, arr] of windowEventMap) {
    for (const item of arr) {
        originalWindowRemoveEventListener.call(originalWindow, type as string, item.listener, item.options)
    }
}
Cache subapplication snapshot
As mentioned earlier, the sub application will execute the mount() method every time it is loaded. Since each js file will be executed only once, the code before executing the mount() method will not be executed again in the next reload.
for instance:
window.name = 'test'

function bootstrap() { // ... }
function mount() { // ... }
function unmount() { // ... }
The above is the code of the sub application entry file. When the js code is executed for the first time, the sub application can read the window Name is the value of this attribute. However, the attribute name will be cleared when the sub application is uninstalled. Therefore, the sub application cannot read this attribute the next time it is loaded.
To solve this problem, we can cache the properties and events of the current sub application window proxy object and generate a snapshot when the sub application is initialized (after pulling all the entry js files and executing them). When the next sub application reloads, restore the snapshot back to the sub application.
Partial code for generating snapshot:
const { windowSnapshot, microAppWindow } = this
const recordAttrs = windowSnapshot.get('attrs')!
const recordWindowEvents = windowSnapshot.get('windowEvents')!

// Cache window properties
this.injectKeySet.forEach(key => {
    recordAttrs.set(key, deepCopy(microAppWindow[key]))
})

// Cache window events
this.windowEventMap.forEach((arr, type) => {
    recordWindowEvents.set(type, deepCopy(arr))
})
Some codes for restoring snapshots:
const {
    windowSnapshot,
    injectKeySet,
    microAppWindow,
    windowEventMap,
    onWindowEventMap,
} = this
const recordAttrs = windowSnapshot.get('attrs')!
const recordWindowEvents = windowSnapshot.get('windowEvents')!

recordAttrs.forEach((value, key) => {
    injectKeySet.add(key)
    microAppWindow[key] = deepCopy(value)
})

recordWindowEvents.forEach((arr, type) => {
    windowEventMap.set(type, deepCopy(arr))
    for (const item of arr) {
        originalWindowAddEventListener.call(originalWindow, type as string, item.listener, item.options)
    }
})
Isolate child application element scope
We are using document Queryselector () or other APIs for querying DOM will query on the document object of the whole page. If the sub application is queried in this way, it is likely to query DOM elements outside the scope of the sub application. To solve this problem, we need to rewrite the DOM API of the query class:
// Limit the scope of all dom queries to the dom container on which the sub application is mounted
Document.prototype.querySelector = function querySelector(this: Document, selector: string) {
    const app = getCurrentApp()
    if (!app || !selector || isUniqueElement(selector)) {
        return originalQuerySelector.call(this, selector)
    }
	// Limit the query scope to the DOM of the sub application mount container
    return app.container.querySelector(selector)
}

Document.prototype.getElementById = function getElementById(id: string) {
    // ...
}
Limit the query scope to the DOM of the sub application mount container. In addition, the rewritten API also needs to be restored when the sub application is unloaded:
Document.prototype.querySelector = originalQuerySelector
Document.prototype.querySelectorAll = originalQuerySelectorAll
// ...
In addition to querying the DOM, you should limit the scope of sub applications, and the style should also limit the scope. Suppose there is such a style in vue application:
body {
	color: red;
}
When it is loaded as a sub application, this style needs to be modified to:
/* body Is replaced by the id selector of the sub application mount DOM */
#app {
	color: red;
}
The implementation code is also relatively simple. You need to traverse each css rule, and then replace the body and html strings inside:
const re = /^(\s|,)?(body|html)\b/g
// Replace the body html tag with the id of the sub application mount container
cssText.replace(re, `#${app.container.id}`)
V4 version
V3 version implements window scope isolation and element isolation. In V4 version, we will implement sub application style isolation.
first edition
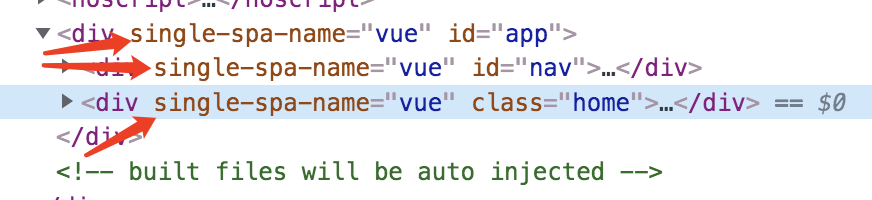
We all know that document. XML is used when creating DOM elements CreateElement () API, so we can write the name of the current sub application as an attribute on the DOM when creating a DOM element:
Document.prototype.createElement = function createElement(
    tagName: string,
    options?: ElementCreationOptions,
): HTMLElement {
    const appName = getCurrentAppName()
    const element = originalCreateElement.call(this, tagName, options)
    appName && element.setAttribute('single-spa-name', appName)
    return element
}
In this way, all style tags will have the name attribute of the current sub application when they are created. We can remove all the style tags of the current sub application when the sub application is uninstalled, and add these tags to the document again when the sub application is mounted again Head down. This enables style isolation between different sub applications.
Code to remove all style tags from subapply:
export function removeStyles(name: string) {
    const styles = document.querySelectorAll(`style[single-spa-name=${name}]`)
    styles.forEach(style => {
        removeNode(style)
    })

    return styles as unknown as HTMLStyleElement[]
}
After the first version of style scope isolation is completed, it can only be effective for scenes where only one sub application is loaded at a time. For example, a sub application is loaded first, and then b sub application is loaded after unloading. When uninstalling a sub application, its style will also be uninstalled. If multiple sub applications are loaded at the same time, the first version of style isolation will not work.
Second Edition
Because the DOM element under each sub application has a single spa name attribute with its own name as the value (if you don't know where the name comes from, please turn up the description of the first version).
Therefore, we can add the sub application name to each style of the sub application, that is, we can add such a style:
div {
	color: red;
}
Change to:
div[single-spa-name=vue] {
	color: red;
}
In this way, the scope of the style is limited to the DOM mounted by the corresponding sub application.
Add scope to style
Now let's see how to add a scope:
/**
 * Add the corresponding sub application scope to each css selector
 * 1. a {} -> a[single-spa-name=${app.name}] {}
 * 2. a b c {} -> a[single-spa-name=${app.name}] b c {}
 * 3. a, b {} -> a[single-spa-name=${app.name}], b[single-spa-name=${app.name}] {}
 * 4. body {} -> #${ID} [single spa name = ${app. Name}] {} of sub app mount container
 * 5. @media @supports For special processing, other rules are returned directly to cssText
 */
There are mainly the above five situations.
Usually, each css selector is a css rule, which can be passed through style sheet. Cssrules get:
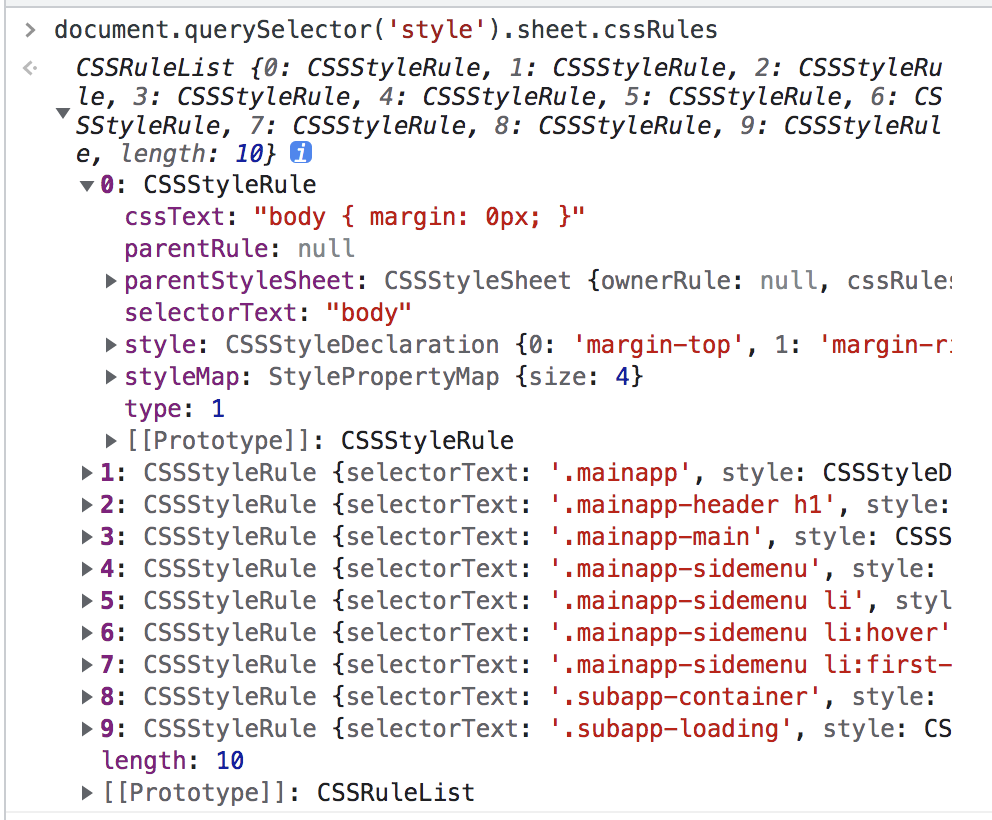
After we get each css rule, we can rewrite it and then mount it in document Under head:
function handleCSSRules(cssRules: CSSRuleList, app: Application) {
    let result = ''
    Array.from(cssRules).forEach(cssRule => {
        const cssText = cssRule.cssText
        const selectorText = (cssRule as CSSStyleRule).selectorText
        result += cssRule.cssText.replace(
            selectorText,
            getNewSelectorText(selectorText, app),
        )
    })

    return result
}

let count = 0
const re = /^(\s|,)?(body|html)\b/g
function getNewSelectorText(selectorText: string, app: Application) {
    const arr = selectorText.split(',').map(text => {
        const items = text.trim().split(' ')
        items[0] = `${items[0]}[single-spa-name=${app.name}]`
        return items.join(' ')
    })

    // If the container attached to the sub application does not have an id, an id is randomly generated
    let id = app.container.id
    if (!id) {
        id = 'single-spa-id-' + count++
        app.container.id = id
    }

    // Replace the body html tag with the id of the sub application mount container
    return arr.join(',').replace(re, `#${id}`)
}
The core code is getNewSelectorText(), which adds [single spa name = ${app. Name}] to every css rule. In this way, the style scope is limited to the corresponding sub application.
Effect demonstration
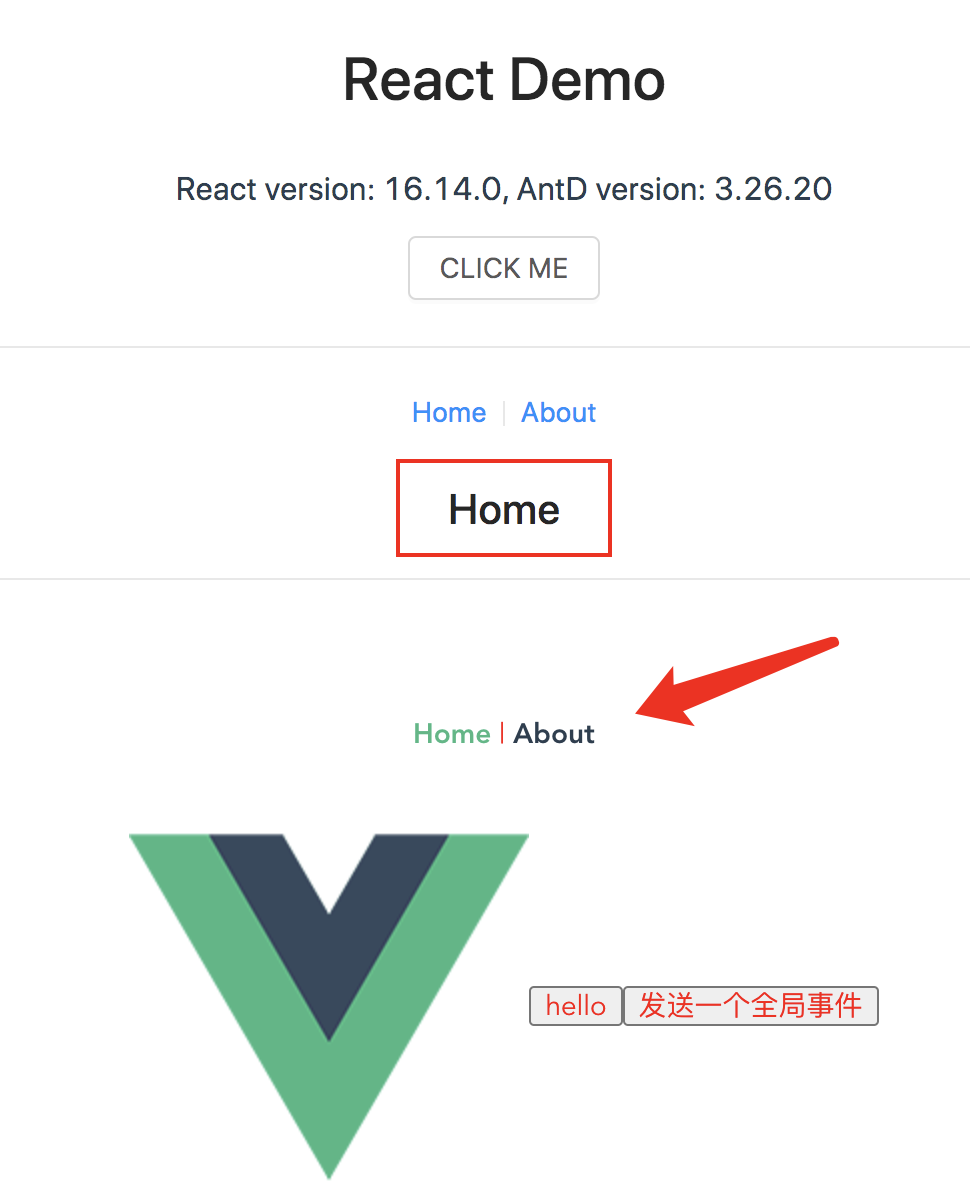
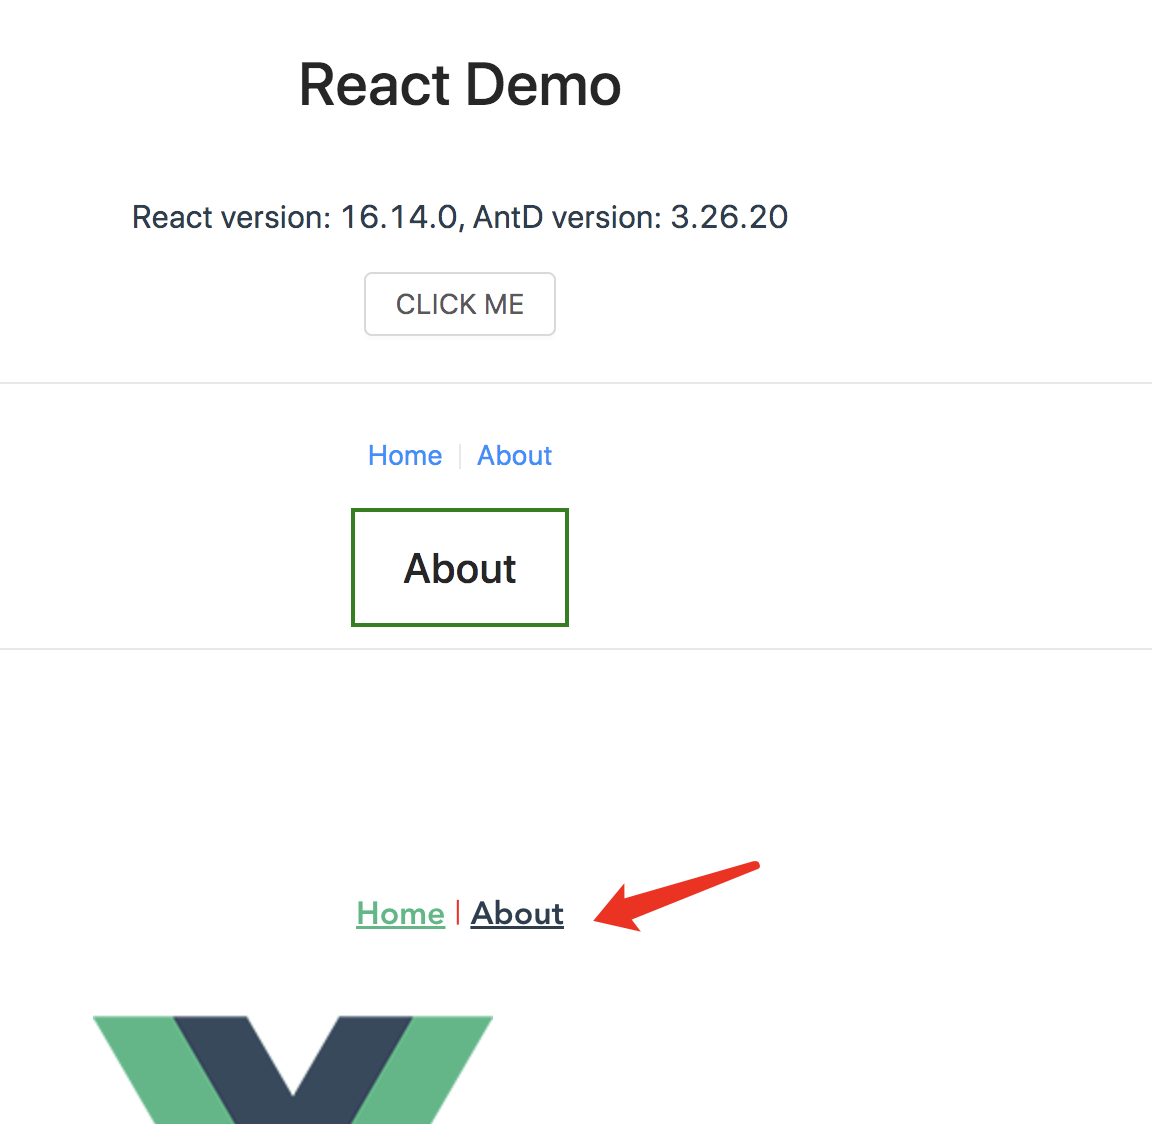
You can compare the following two figures. This example loads vue and react sub applications at the same time. Some fonts of vue sub application in the first picture are affected by the style of react sub application. The second picture is the effect picture with style scope isolation added. It can be seen that the style of vue sub application is normal and not affected.
V5 version
V5 version mainly adds a function of global data communication. The design idea is as follows:
- All applications share a global object window Spaglobalstate. All applications can listen to this global object. Whenever an application modifies it, the change event will be triggered.
- This global object can be used for event subscription / publishing, and applications can send and receive events freely.
Here are some key codes that realize the first requirement:
export default class GlobalState extends EventBus {
    private state: AnyObject = {}
    private stateChangeCallbacksMap: Map<string, Array<Callback>> = new Map()

    set(key: string, value: any) {
        this.state[key] = value
        this.emitChange('set', key)
    }

    get(key: string) {
        return this.state[key]
    }

    onChange(callback: Callback) {
        const appName = getCurrentAppName()
        if (!appName) return

        const { stateChangeCallbacksMap } = this
        if (!stateChangeCallbacksMap.get(appName)) {
            stateChangeCallbacksMap.set(appName, [])
        }

        stateChangeCallbacksMap.get(appName)?.push(callback)
    }

    emitChange(operator: string, key?: string) {
        this.stateChangeCallbacksMap.forEach((callbacks, appName) => {
            /**
             * If you click another child application or parent application to trigger global data change, the app obtained by the currently open child application is null
             * Therefore, it is necessary to use activeRule to judge whether the current sub application is running
             */
            const app = getApp(appName) as Application
            if (!(isActive(app) && app.status === AppStatus.MOUNTED)) return
            callbacks.forEach(callback => callback(this.state, operator, key))
        })
    }
}
Here are some key codes that realize the second requirement:
export default class EventBus {
    private eventsMap: Map<string, Record<string, Array<Callback>>> = new Map()

    on(event: string, callback: Callback) {
        if (!isFunction(callback)) {
            throw Error(`The second param ${typeof callback} is not a function`)
        }

        const appName = getCurrentAppName() || 'parent'

        const { eventsMap } = this
        if (!eventsMap.get(appName)) {
            eventsMap.set(appName, {})
        }

        const events = eventsMap.get(appName)!
        if (!events[event]) {
            events[event] = []
        }

        events[event].push(callback)
    }

    emit(event: string, ...args: any) {
        this.eventsMap.forEach((events, appName) => {
            /**
             * If you click another child application or parent application to trigger global data change, the app obtained by the currently open child application is null
             * Therefore, it is necessary to use activeRule to judge whether the current sub application is running
             */
            const app = getApp(appName) as Application
            if (appName === 'parent' || (isActive(app) && app.status === AppStatus.MOUNTED)) {
                if (events[event]?.length) {
                    for (const callback of events[event]) {
                        callback.call(this, ...args)
                    }
                }
            }
        })
    }
}
The above two codes have one thing in common, that is, they need to be associated with the corresponding sub application when saving the listening callback function. When a sub application is unloaded, its associated callback function needs to be cleared.
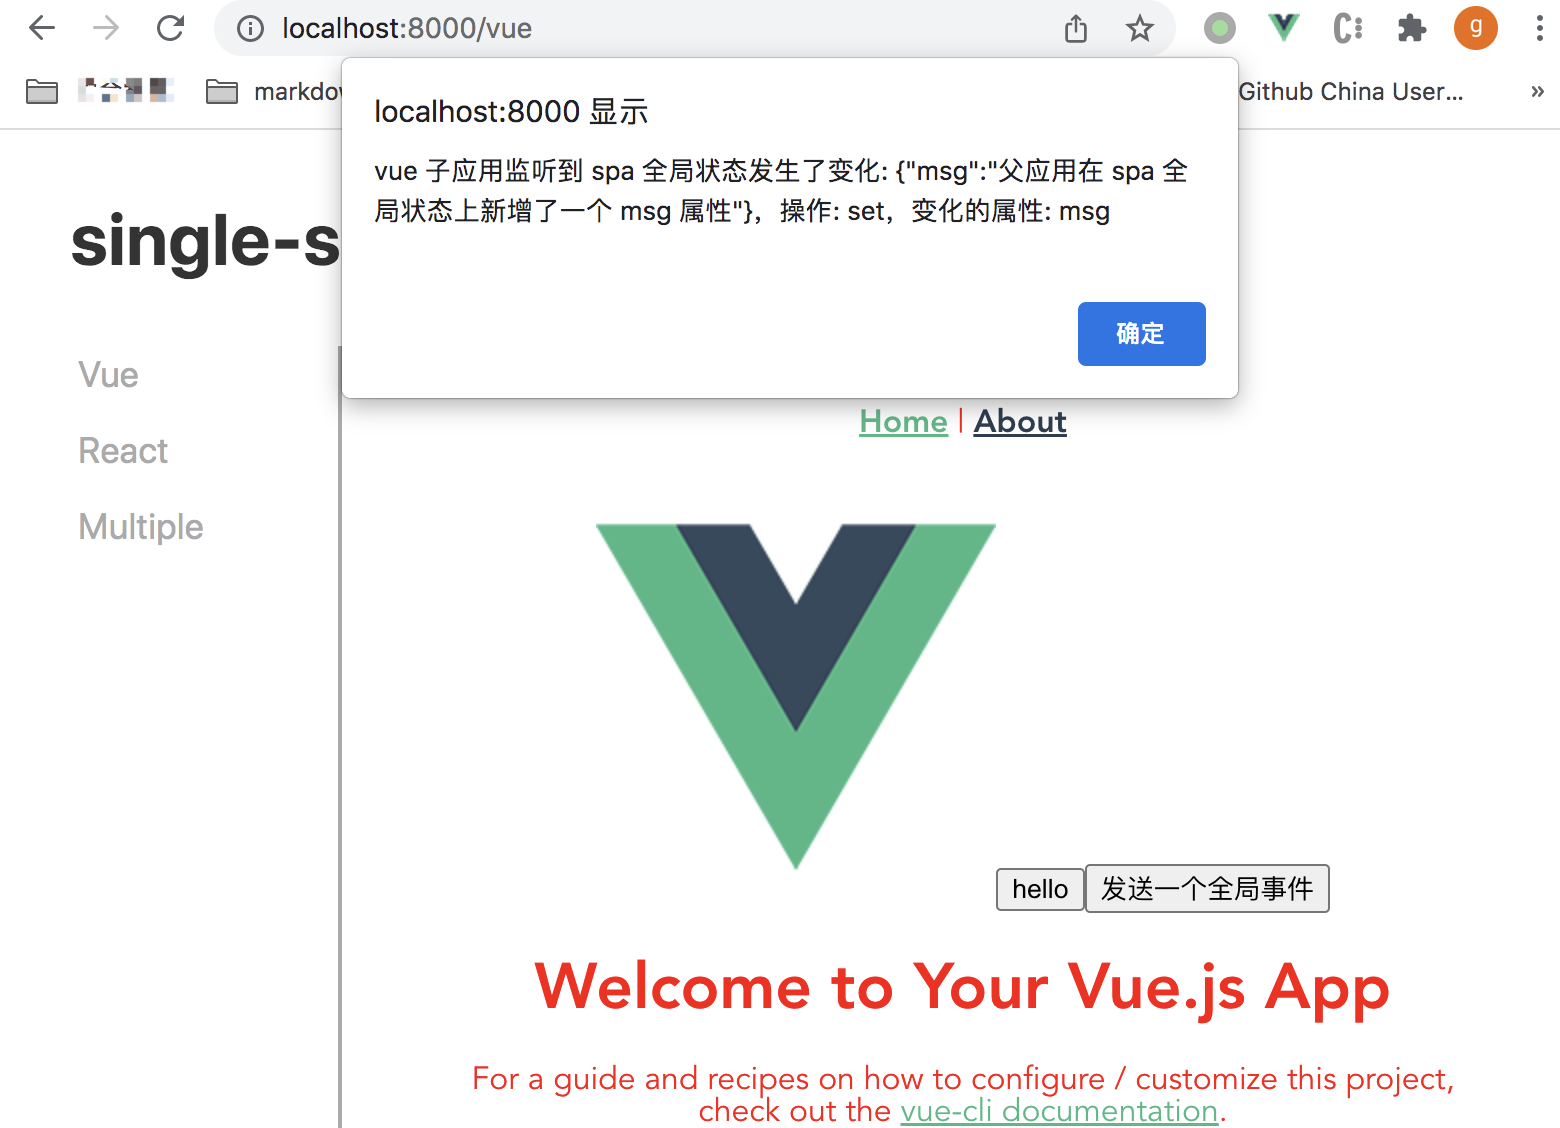
Global data modification example code:
// Parent application
window.spaGlobalState.set('msg', 'Parent application in spa A new one is added to the global status msg attribute')
// Sub application
window.spaGlobalState.onChange((state, operator, key) => {
    alert(`vue Subapplication listens to spa The global state has changed: ${JSON.stringify(state)},operation: ${operator},Changing attributes: ${key}`)
})
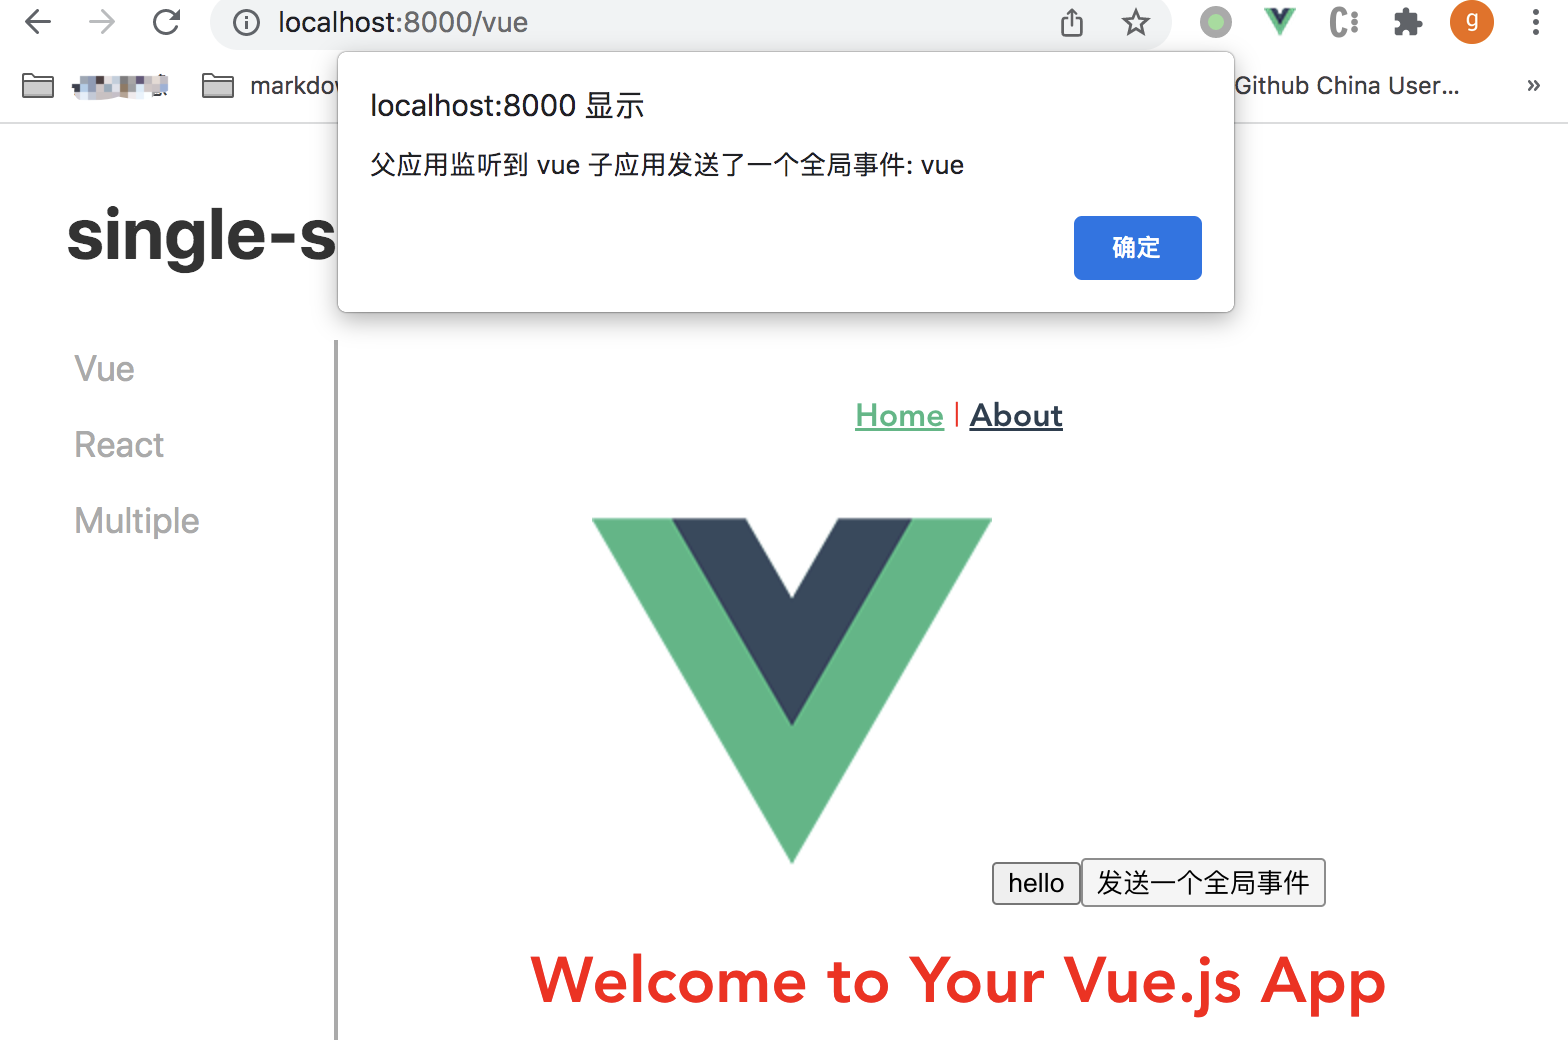
Global event example code:
// Parent application
window.spaGlobalState.emit('testEvent', 'The parent application sent a global event: testEvent')
// Sub application
window.spaGlobalState.on('testEvent', () => alert('vue The child application listens to a global event sent by the parent application: testEvent'))
summary
So far, the technical points of a simple micro front-end framework have been explained. It is strongly recommended that you run the demo while reading the document, which can help you better understand the code.
If you think my article is well written, you can also look at some other technical articles or projects:
- Take you to front end Engineering
- Some key points of visual component library analysis
- 24 suggestions for front-end performance optimization (2020)
- Some technical points and principle analysis of front-end monitoring SDK
- Teach you to write a scaffold hand in hand
- Computer system elements - building a modern computer from scratch