Tencent cloud mobile live broadcasting application practice based on uniapp + vue, realizing the following functions:
1: User login
2: Room management
3: Room chat
4: Live beauty
5: Svga gift animation
6: One on one audience
Project development environment
IDE: HbuilderX 3.0+
Development framework: uniapp + vue2 x + sass
Operating platform: Android, IOS
Environment requirements: Windows 7 +, Mac OS 10.12 6+, node 10.14. 5+
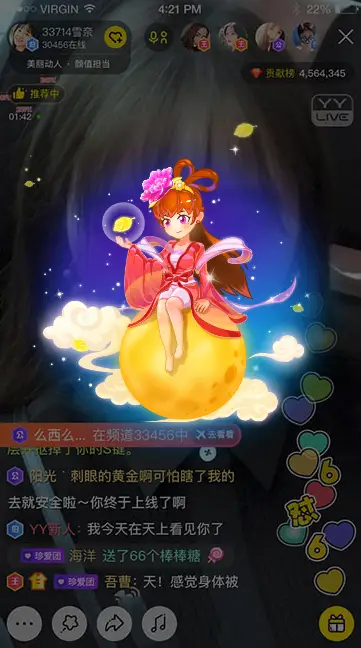
Effect demonstration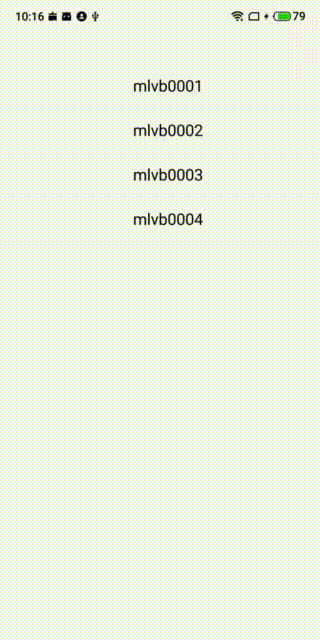
Tutorial directory
Reference document resources:
uniapp Tencent cloud MLVB native plug-in document: https://www.yuque.com/zhimike...
uniapp Svga native plug-in documentation: https://ext.dcloud.net.cn/plu...
Tencent cloud MLVB native SDK document: https://cloud.tencent.com/doc...
uniapp Tencent cloud MLVB native plug-in address: https://ext.dcloud.net.cn/plu...
uniapp Tencent cloud TXIM Smart native plug-in address: https://ext.dcloud.net.cn/plu...
uniapp Svga native plug-in address: https://ext.dcloud.net.cn/plu...
1. Configure project from 0
1.1 get the Demo project and import it into HbuilderX
The Demo project can be obtained through the plug-in page. The plug-in page address is as follows:
https://ext.dcloud.net.cn/plu...
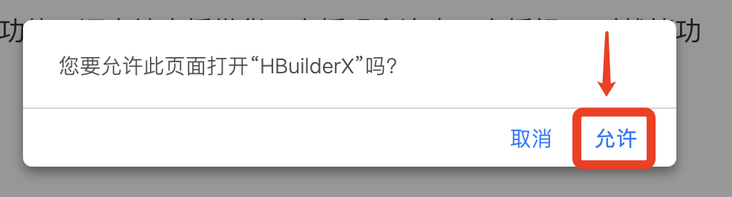
The acquisition method is very simple. You can import the project by clicking the import example project button, as follows: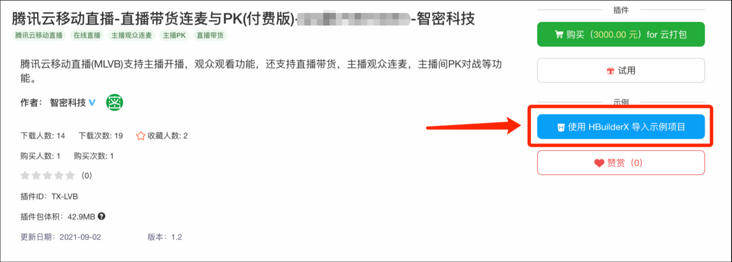
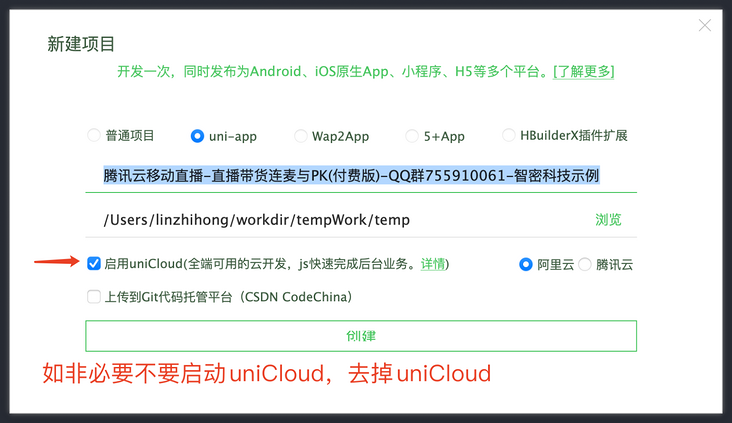
After importing the project, we need to make some adjustments to the project. Double click to open manifest JSON (under the root directory), select "basic configuration" and click to obtain AppId again. Otherwise, there may be an error in the package customization. AppId does not belong to this account.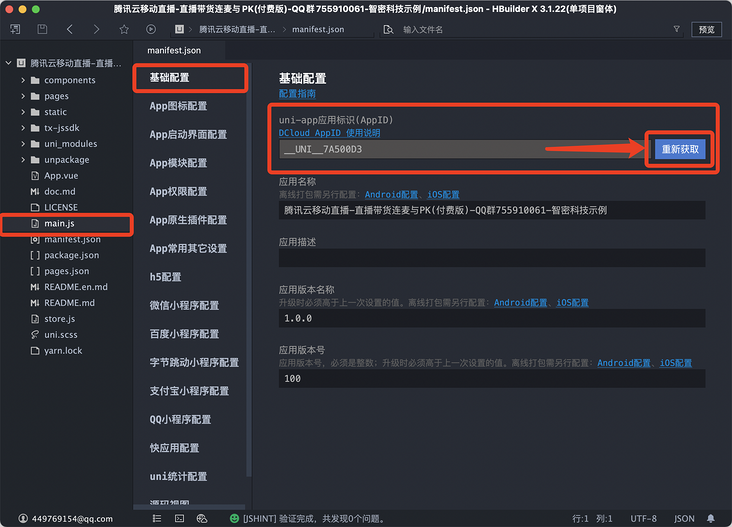
1.2 try the cloud plug-in and import it into the Demo project
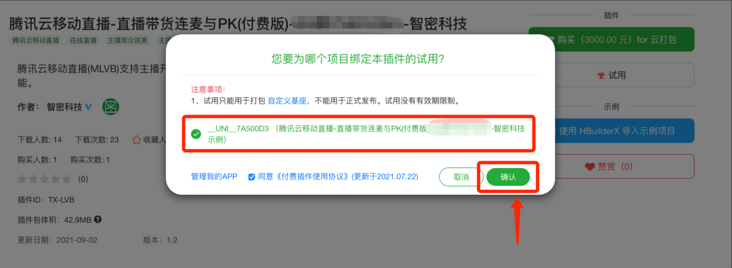
Open uniapp Tencent cloud TXIM native plug-in address: https://ext.dcloud.net.cn/plu... Click trial, select the AppId we just retrieved, and apply for a free trial plug-in for the AppId.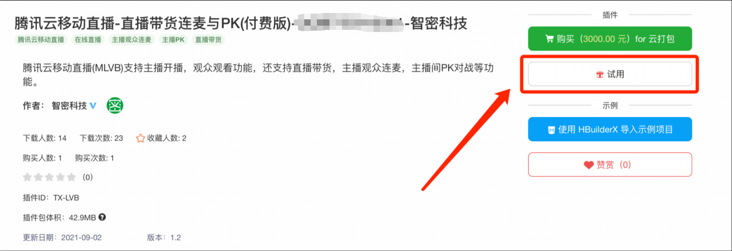
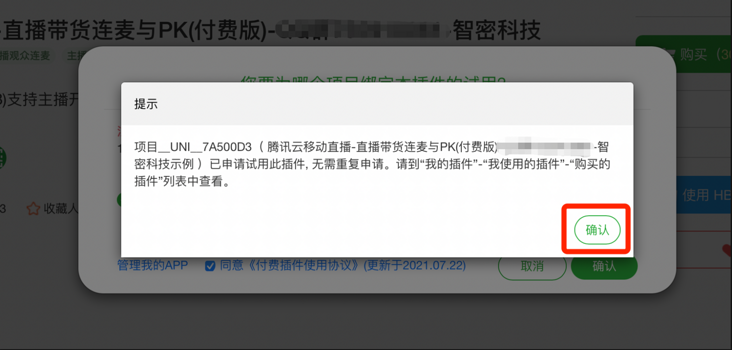
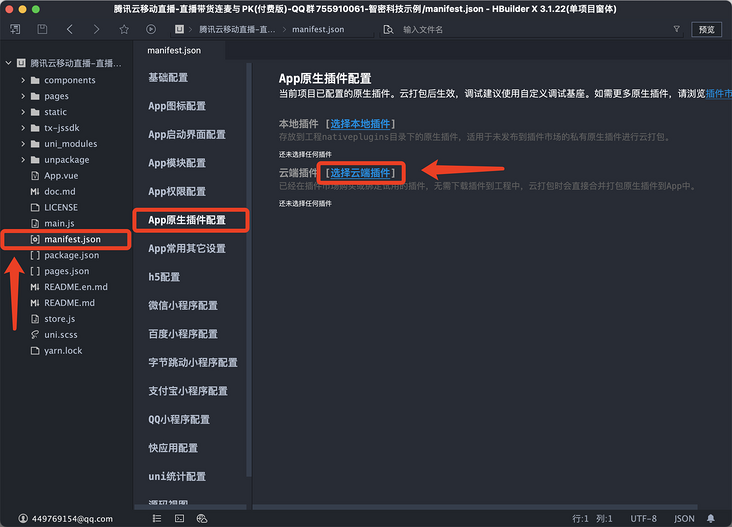
After confirming that the application is completed, we go back to HbuilderX and open manifest JSON (under the root directory), click App native plug-in configuration to import the cloud plug-in.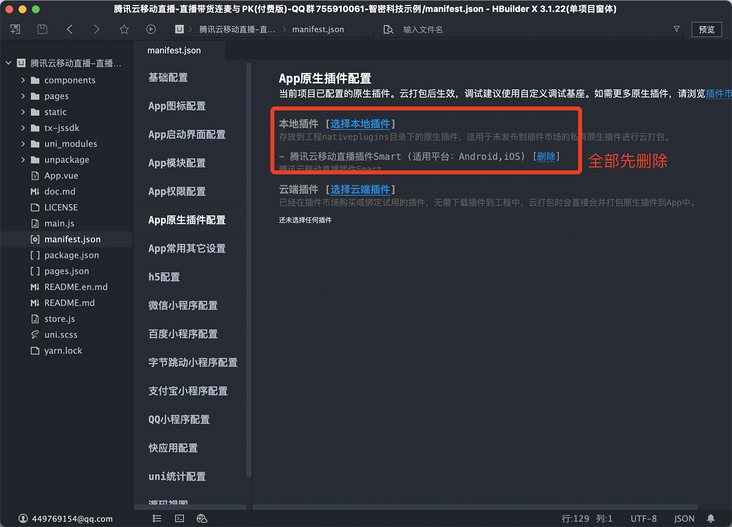

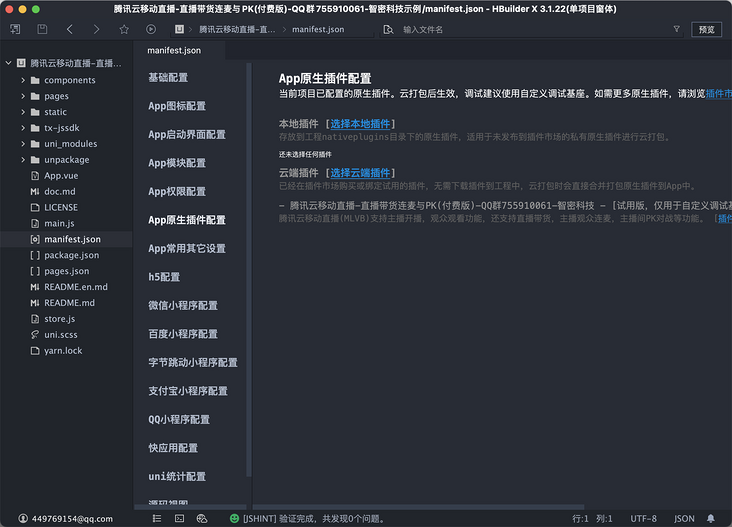
After confirming that the display is as shown in the figure (if Svga plug-in is required, one more corresponding cloud plug-in is required), start the next step
1.2. 1 import TXIM Smart that MLVB depends on
mlvb bottom layer depends on txim, so we need to introduce txim smart (the price is only 0.01 yuan). Refer to the above process for the import process
txim smart plug-in link: https://ext.dcloud.net.cn/plu...
1.3 configure Tencent cloud UserId + UserSig for test
The SDK of Tencent cloud series uses userid + usersig for user login. Generally, we get it through the back-end return, but we obviously haven't connected to the back-end. Therefore, we need to generate multiple userids + usersig for testing, generally five. After generation, we can see the effect by replacing them in the Demo.
(first ensure that you have logged in to Tencent cloud and created an application. Refer to the official document for creating an application: https://cloud.tencent.com/doc...)
Tencent cloud IM console: https://console.cloud.tencent...
After opening Tencent cloud IM console, click the corresponding application to enter management. Here, we need to record SDKAppID, as shown in the figure below. Our SDKAppID is 1400521882.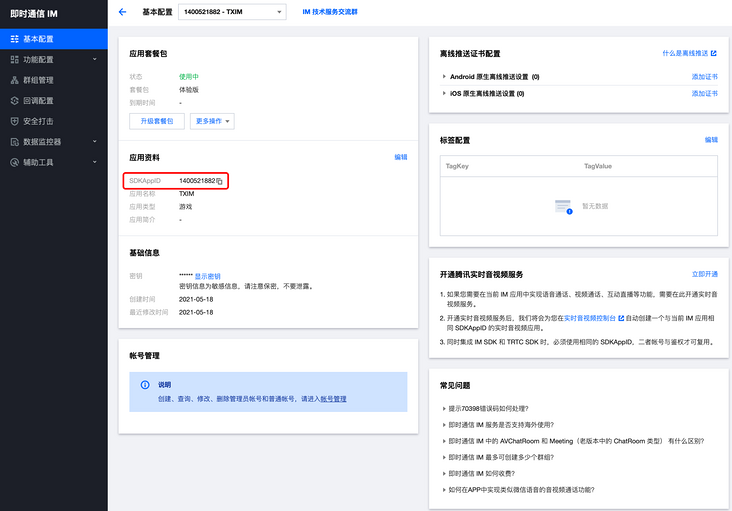
After obtaining the SDKAppID, we click [auxiliary tool] and click [UserSig generation & verification]. Here we get the required UserId + UserSIg through the auxiliary tool of Tencent cloud IM console. Note that the validity period generated here is 180 days. Please complete the test within the validity period.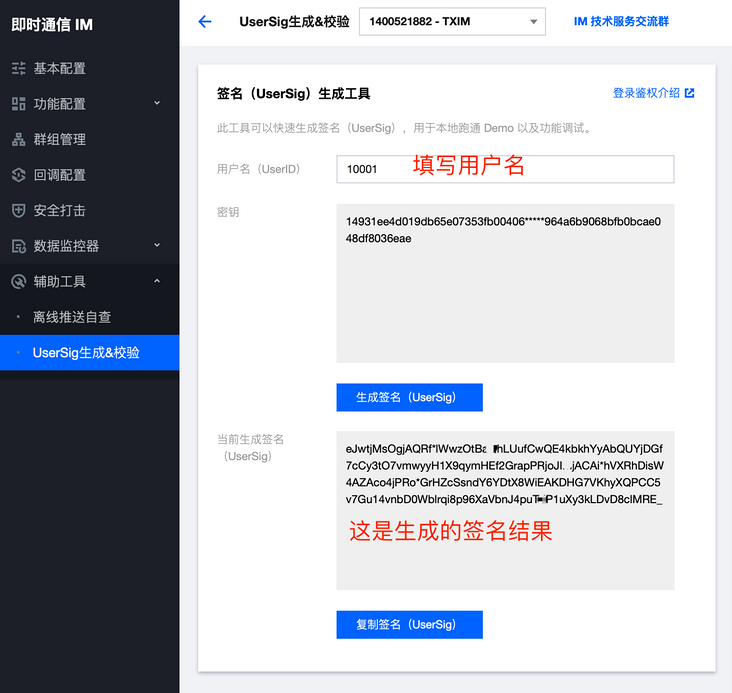
Repeat the operation so that we get 5 groups of UserID + UserSig and SDKAppID. The data are as follows:
{ id: '10001', sign: 'eJwtzF0LgjAYBeD-suuQd5tbInRjGF2kGa3upU17G8owkyL6782Py-MczvkSdTgHg*lITFgAZDVl1KbtscKJKQDQpXhqWzqHmsQ0BAgjSSnMjXk77Ix3IQTzi1l7bEaTXvlaRnx5wXr8rS6FKur0w4fH8XXS21zyJL1fG9btVCttn6Aubb6-ZdmG-P6UADBd' },
{ id: '10002', sign: 'eJyrVgrxCdYrSy1SslIy0jNQ0gHzM1NS80oy0zLBwoYGBgZGUInilOzEgoLMFCUrQxMDAxMLM0NDA4hMakVBZlEqUNzU1NQIqAMiWpKZCxIzA4oam5sbWEJNyUwHmlvh7e*X52VhWelqnpJtmh9WGZZi6OxvmBRmll0eox9u4Znk4pNvnm*WkesYaqtUCwC*HDA6' },
{ id: '10003', sign: 'eJyrVgrxCdYrSy1SslIy0jNQ0gHzM1NS80oy0zLBwoYGBgbGUInilOzEgoLMFCUrQxMDAxMLM0NDA4hMakVBZlEqUNzU1NQIqAMiWpKZCxIzA4oam5sbGUFNyUwHWZceo5-sGuzt7p-pGaNfWpUT6F0Q5OrqX2js5Z6aWRkUkuqSl1Xk6ePs6BaVbqtUCwDxBzDx' },
{ id: '10004', sign: 'eJyrVgrxCdYrSy1SslIy0jNQ0gHzM1NS80oy0zLBwoYGBgYmUInilOzEgoLMFCUrQxOgqIWZoaEBRCa1oiCzKBUobmpqagTUAREtycwFiZkBRY3NzY2NoaZkpgPNdXb1TvMMSk0xSw33ci5N83YJCnKr8vfyMshIdUqO0S-PdUvL94r0NCitski3VaoFAL*XMJM_' },
{ id: '10005', sign: 'eJyrVgrxCdYrSy1SslIy0jNQ0gHzM1NS80oy0zLBwoYGBgamUInilOzEgoLMFCUrQxOgqJGhhYURRCa1oiCzKBUobmpqagTUAREtycwFiZkZm5kaG1oaGkJNyUwHmluVm1fkUxCaWFjqllGYEqOfWxQSFlkWblmQ7JTqHpQcllZk7Jvo6ZZrFuUUaKtUCwD1lzGr' },

const SDKAppID = 1400521882
1.4 package the custom base, and use the custom base for development and debugging
Before packaging, we need to install dependencies. Here, developers need to install nodejs running environment and hbuilderx scss compilation plug-in. For developers who do not install, please install the corresponding environment according to the following link.
nodejs official website: https://nodejs.org/zh-cn/
nodejs Chinese website: http://nodejs.cn
scss/sass compilation plug-in: https://ext.dcloud.net.cn/plu...
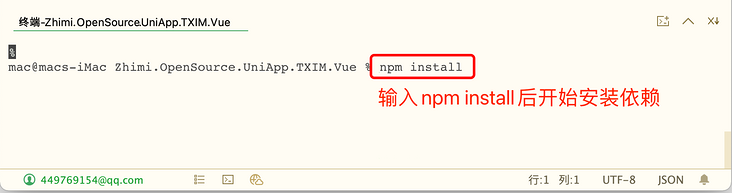
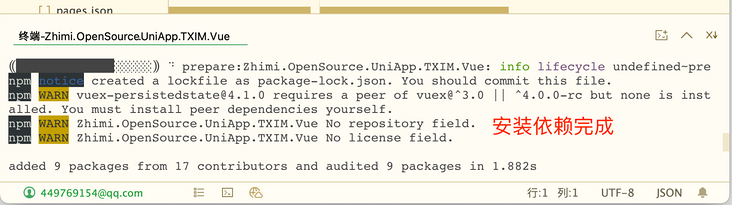
After the installation, the developer can open the terminal in hbuilderx and enter the following command to complete the dependent installation.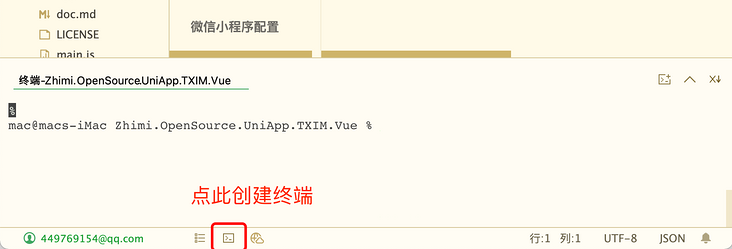
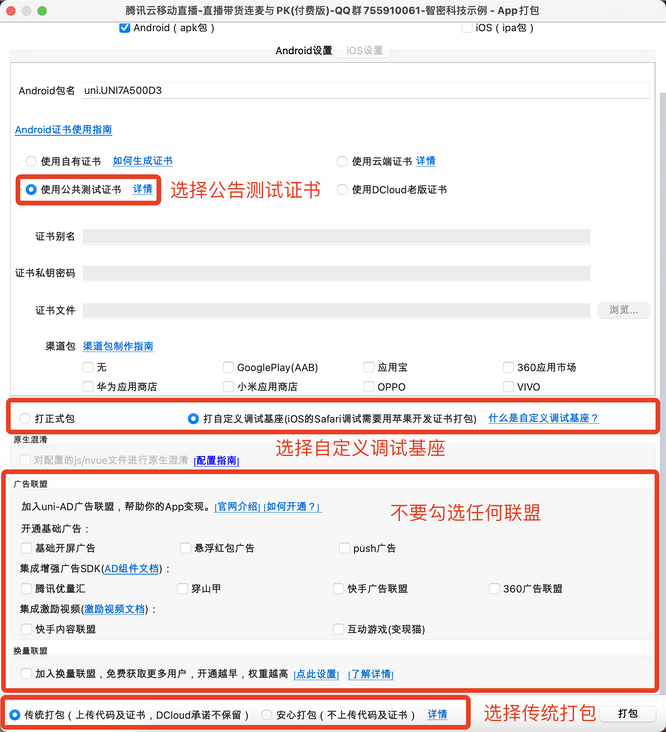
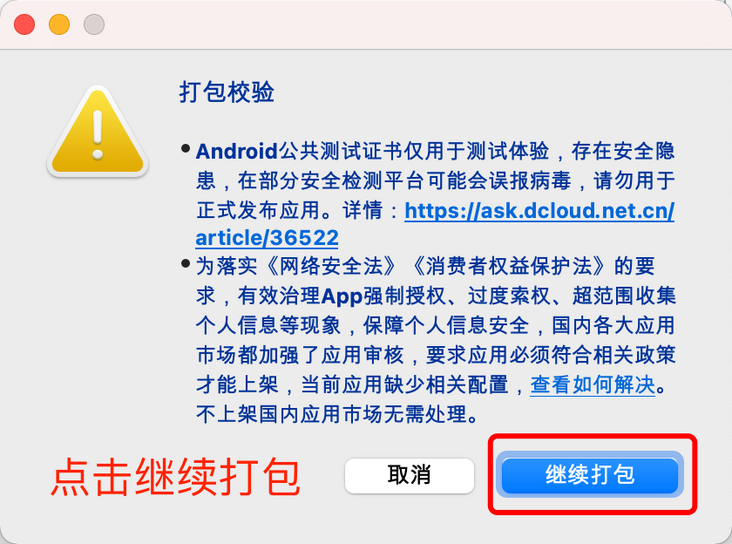
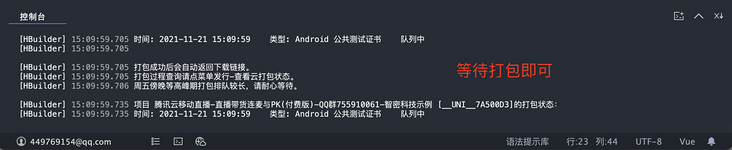
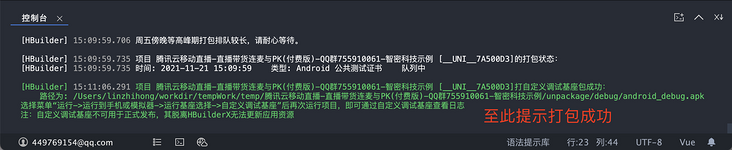
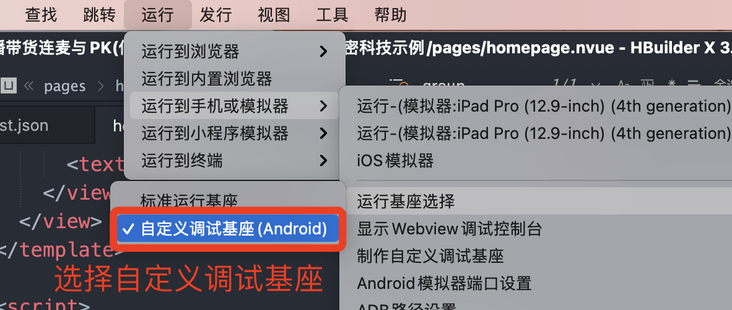
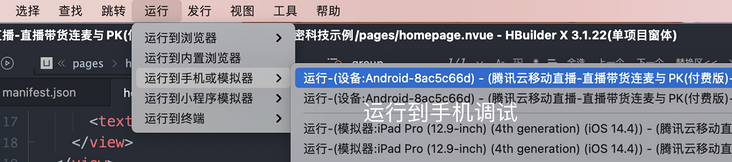
Due to the limitation of the uniapp framework, the native plug-in must first package the custom base, and then develop and debug through the custom base. Here, we first demonstrate how Android packages the custom base and uses the custom base for development (the IOS operation process is the same. The certificate needs to use the development certificate or enterprise certificate, and the release certificate cannot be used)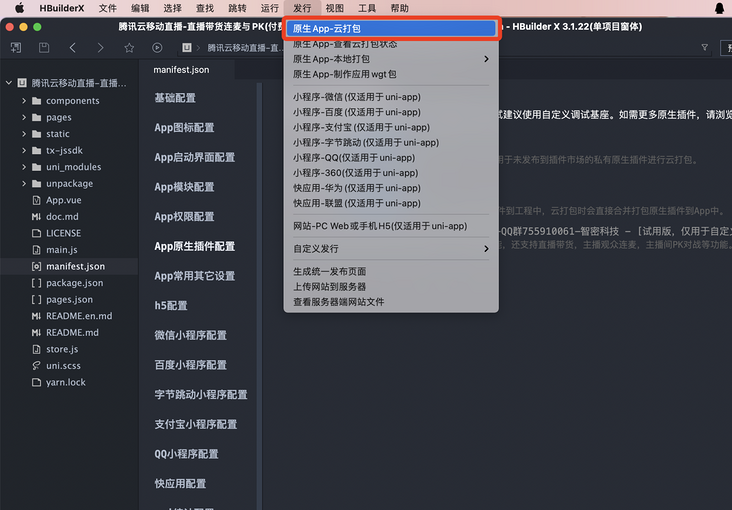

Note: the error reported here does not matter, because TXIM Smart does not have these functions, but uses the same JSSDK, which is no difference for App development.
2. Understand the design and transformation of imitation wechat App application
2.1 design and customized development of interface layout
For mobile live broadcast applications, the Demo divides the page into three large blocks and multiple components according to different UI functions, as follows: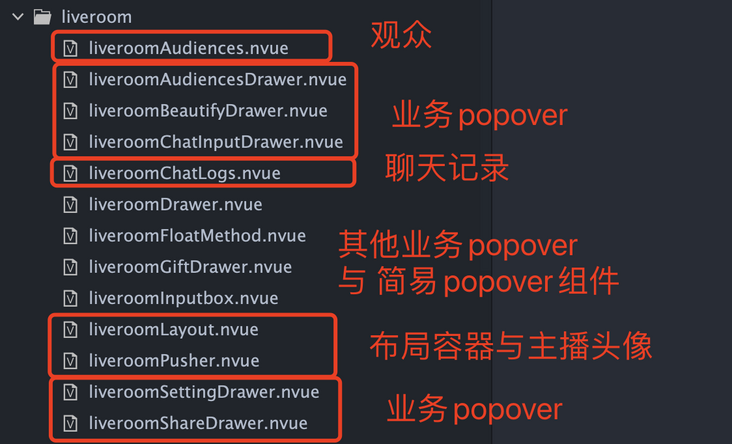
By separating UI components from business logic, the overall coupling between business and UI is reduced, so that only UI components can be modified when customized UI development is needed, so as to reduce the development cost.
The business interface is divided into three interfaces, as follows:
- login.nvue - login interface, used to login Tencent cloud account
- homepage.nvue - select the login account role
- pusher.nvue - anchor interface for room creation, chat, beauty configuration, even wheat management and other operations
- liveroom.nvue - the picture seen by the audience in the live broadcasting room
Please pay attention to the places here. Since custom controls are used here, nvue should be used in the live broadcasting room, start broadcasting and other interfaces
There are two main scenarios for developers to transform and debug:
- Change theme color and style. In this case, you can mainly modify the icon and color in the component, and modify the business interface as required.
- Change the interface layout style. In this case, you can mainly modify the icon and typesetting position in the component. For the parts with large changes, you need to adjust the liveroom layout according to the typesetting requirements (such as adding a slot, etc.).
2.2 modify test UserId + UserSig and set cdnUrl
The built-in test UserId and UserSig in the demo project are expired. In the above operation, we configured the UserId and UserSig belonging to our test. Here, we need to change them to the UserId and UserSig configured above, which can facilitate our development and debugging of the App. Of course, we also need to modify the SDKAppID, Otherwise, an error will be reported, indicating that the UserId does not match the SDKAppID.
The modification is very simple. We only need to modify 2 places, as shown in the following Icon: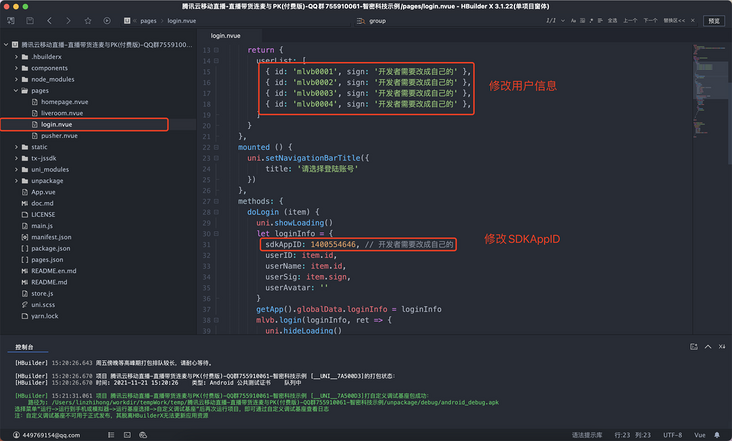
Note: after modification, we do not need to repackage the custom base, but it is best to restart debugging, because the compilation mechanism of uniapp sometimes causes some Android devices not to refresh and synchronize the additional js files, resulting in some unexpected "surprises" in debugging and development
When playing a video on the audience side, we need to configure our registered cdnUrl. For the specific process of domain name configuration, please refer to the following link:
https://cloud.tencent.com/doc...
Assuming that we have configured the custom domain name, we need to set it in main Modify sdk configuration in JS.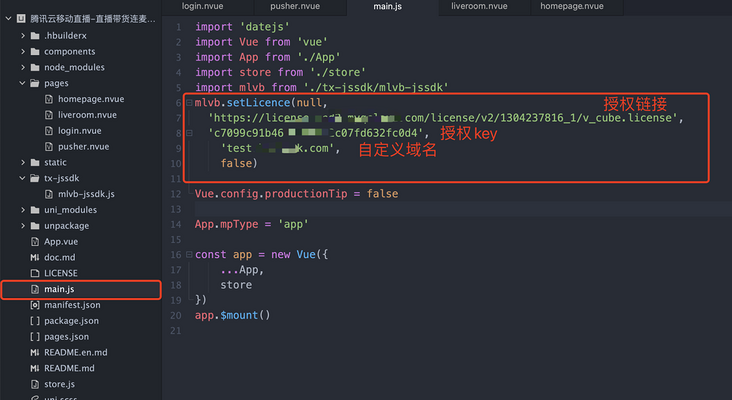
2.3 create a live studio and start camera preview streaming
First, before creating the live studio, we need to start the local preview of the camera. To start the camera preview, we need to obtain the user's camera microphone permission first. The specific acquisition methods are as follows:
import mlvb from '../tx-jssdk/mlvb-jssdk'
mlvb.checkPermissions(ret => {
  if (ret.code !== 0) {
    return
  }
  // The camera microphone permission is obtained here
})
After obtaining the camera microphone permission, we can start to open the local camera preview. The specific codes are as follows:
import mlvb from '../tx-jssdk/mlvb-jssdk'
let frontCamera = true // true = use front camera false = use rear camera
mlvb.startLocalPreview(frontCamera)
After the local camera preview is turned on, the anchor can start to create a live room after making beauty configuration and other operations. According to the official recommendation of Tencent cloud, it is best to use userid as the live room id to ensure the uniqueness of the live room id, It is also convenient for the bottom layer to manage data (the bottom layer directly determines the streaming of the streaming stream according to the userid). After the live studio is created, the bottom layer will automatically push and pull the user video stream, and the developer does not need to push and pull the stream by himself. The code is as follows:
let userId = '' // userId just pass in the userId of the currently logged in user
mlvb.createRoom(userId, {}, res => {
    // Create callback for room results
})
After the creation of the live broadcast room, the audience can join the room. Of course, the developer can also operate some configurations of the live broadcast, such as switching cameras and silencing microphones
let mute = false
mlvb.muteLocalAudio(mute)

mlvb.switchCamera()

let enable = true
mlvb.enableTorch(enable)
2.4 listening events to send and receive chat text messages
The sending and receiving of chat text messages is very simple within the framework. You only need to listen to text messages and send text messages through two APIs, as follows:
mlvb.setListener(this.mlvbroomListener)
// The following methods are written in methods
mlvbroomListener (e) {
  let { type, code, data } = e
  switch (type) {
    case 'onRecvRoomTextMsg':
      // Text message received
      this.onRecvRoomTextMsg(data)
      break
  }
}

onRecvRoomTextMsg (data) {
  this.chatLogs.push({
    nick: data.userName || data.senderID,
    message: data.message,
    payload: data
  })
}
mlvb.sendRoomTextMsg(text, res => {
if (res.code !== 0) {
console.error(res)
this.toast('fail in send')
return
}
console.log(res)
this.chatLogs.push({
nick: res.data.userName || res.data.userID,
message: res.data.message,
payload: res
})
})3. Realization of anchor beauty
3.1 get the beauty management object to initialize the beauty instance
From now on, the underlying jssdk will automatically initialize the beauty instance. We don't need to worry about it. In some cases, we can manually initialize the beauty instance through the following api
const BeautyManager = mlvb.getBeautyManager() // Automatically complete the internal acquisition and initialization operations
3.2 setting beauty parameters
For the Api of beauty part, please refer to the official documents of Tencent cloud: https://cloud.tencent.com/doc...
With beauty management, you can use the following functions:
● set "beauty style", "whitening", "ruddy", "big eyes", "thin face", "V face", "Chin", "short face", "small nose", "bright eyes", "white teeth", "removing eye bags", "removing wrinkles", "removing wrinkles" and other beauty effects.
● adjust "hairline", "eye spacing", "eye angle", "mouth shape", "nose wing", "nose position", "lip thickness" and "face shape".
● set dynamic effects such as face Pendant (material).
● add beauty.
● gesture recognition.
At present, only the following three APIs are free versions that can be called at will
const beauty = mlvb.getBeautyManager()
let beautyLevel = 9
beauty.setBeautyLevel(beautyLevel) // 0 - 9 automatic beauty
let whitenessLevel = 9
beauty.setWhitenessLevel(whitenessLevel) // 0 - 9 automatic whitening
let ruddyLevel = 9
beauty.setRuddyLevel(ruddyLevel) // 0 - 9 auto ruddy
3.3 acquisition of advanced version beauty
Tencent officially charges for the advanced version of beauty. Please refer to the following link Description: https://cloud.tencent.com/doc...
To buy the corporate beauty, please go to Tencent's official website: https://buy.cloud.tencent.com...
After purchasing the advanced version of beauty, you can support all beauty APIs, including the free version. These beauty effects call interfaces have been preset in the SDK, and developers can call them directly.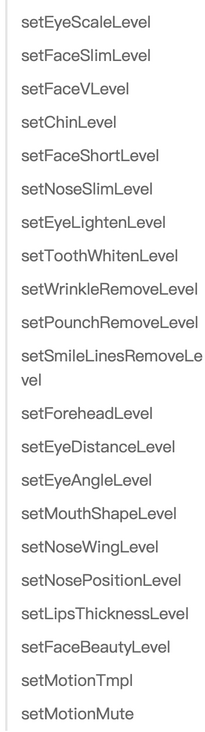
4. Realization of one-to-one anchor audience Lianmai
4.1 research and practice of continuous wheat process
The diagram of Lianmai is as follows: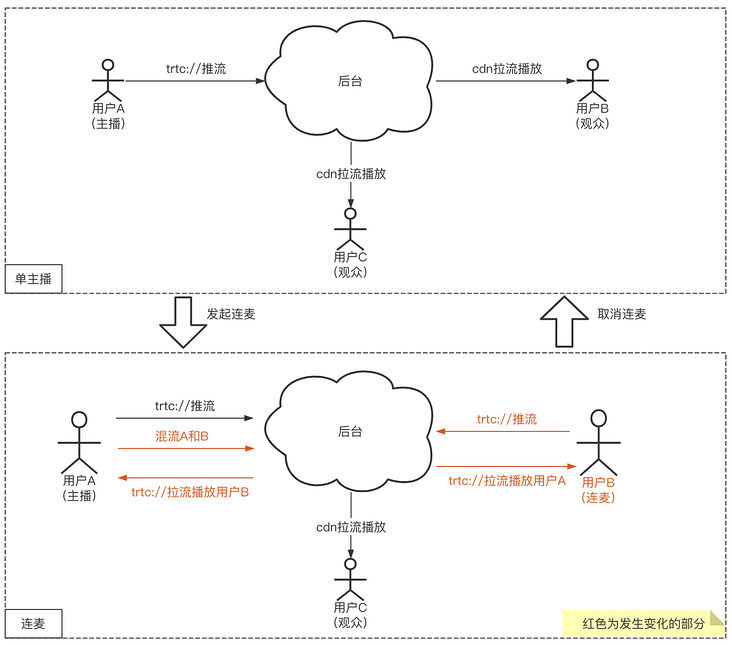
Here, the bottom layer of sdk mainly mixes the user's video stream and performs signaling operations. Here, developers generally do not need to operate special interfaces, but there are three points to pay attention to.
1: The anchor must create a userid with userid as the unique id, otherwise the mixed stream may fail
2: The audience must enter the room with the anchor userid as the unique id, otherwise the mixed flow may fail
3: The corresponding mlvb application must enable the function of cloud measurement to push. For details, please refer to https://cloud.tencent.com/doc...
4.2 actively initiate continuous wheat + continuous wheat business processing
Here, the bottom layer has been encapsulated. Here, you only need to execute an api to initiate Lianmai and wait for the feedback event. The code is as follows:
// Get camera permission first
mlvb.checkPermissions(({ code }) => {
  if (code !== 0) {
    return
  }
  uni.showLoading()
  mlvb.requestJoinAnchor('', ret => {
    uni.hideLoading()
    console.log(ret)
    let { type, code, data } = ret
    switch (type) {
      case 'onAccept':
        this.toast('The other party accepted your Lian Mai')
        this.playOpt.muted = false
        this.playOpt.frontCamera = true
        mlvb.startLocalPreview(this.playOpt.frontCamera)
        mlvb.joinAnchor(ret => {
          console.log(ret)
          if (ret.code === 0) {
            this.playOpt.inLinkMic = true
          }
        })
        break
      default:
        // Did you refuse your Lian Mai
        break
    }
  })
})
mlvb. The first method of requestjoinanchor is the reason for applying for Lianmai. If it is not necessary, it is not necessary to fill in.
4.3 actively disconnect the wheat connection + exit the wheat connection state
For the anchor, the anchor's operation is to actively disconnect the connected wheat, and the audience's operation is to exit the connected wheat. Now let's show the specific codes respectively
The anchor actively disconnects the connection
mlvb.kickoutJoinAnchor(this.currentLinkmicUserID)
this.currentLinkmicUserID = ''
After disconnecting the connection successfully, the audience will receive the onKickoutJoinAnchor event, which is the event of the anchor disconnecting the connection. The developer can handle the business logic after disconnecting the connection by himself.
Audience exits disconnected status
this.playOpt.inLinkMic = false
mlvb.quitJoinAnchor(ret => {
  console.log(ret)
})
After the audience exits the connected wheat state, the anchor will receive the onAnchorExit event. Please note that this event represents a disconnection of the streaming end. Therefore, whether the connected wheat is disconnected or the cross room PK is disconnected, this event will be received. The developer can process the logic according to the business requirements.
5. Realization of audience gift giving
5.1 try the cloud Svga plug-in and import it into the Demo project
We need to use the svga plug-in to give gifts to the audience. The plug-in link is as follows: https://ext.dcloud.net.cn/plu...
Since the operation process is consistent with the previous process of trying out mlvb, we will not repeat it. For developers, please refer to the process in 1.2 and open the plug-in link for trial and configuration.
5.2 initializing Svga and loading Svga
SVGA provides a user-defined control for playing and displaying SVGA files, so we need to insert the user-defined control of SVGA in the template.
<svga_player_view
  ref="svgaPlayerView"
  class="room-tx-view"
></svga_player_view>
For loading svga, we suggest that developers package it into the following methods and then use it. However, it should be noted that svga is best to use local path, and the network path may have the problem of loading speed.
function playSvga(url) {
    if (!url) {
    return
  }
  let svgaPlayerView = this.$refs.svgaPlayerView
  svgaPlayerView.setSVGACallback(res => {})
  svgaPlayerView.decodeFromURL(url, function(res) {
    // You must wait until onComplete to represent the completion of svga file parsing before playing
    if (res.type == "onComplete") {
      svgaPlayerView.stopAnimation()
      svgaPlayerView.setLoops(1) // Repeat play
      svgaPlayerView.startAnimation()
    }
  })
}
Here, we have built a fully functional imitation Betta tiger tooth mobile live broadcast app using the uniapp. If you are interested, you can directly search Zhimi in the uni app application market to find the same plug-in