There are few use cases for finding tf about Pruning and quantification. Just doing this work, I will move some application of official documents.
The following code mainly combines an official Mnist example and the guide document to see how to optimize pruning in tf's API.
tensorflow/model-optimization--comprehensive_guide
The general idea is: build baseline model → add pruning operation → compare model size, acc and other changes
It focuses on how to customize your pruning case and subsequent quantification
catalog
2. Import Mnist data set for simple and regular
3. Establish a Baseline model and save the weight for subsequent performance comparison
8. Save model comparison accuracy and model size
Improve the accuracy of trimming model Tips:
import tempfile
import os
import zipfile
import tensorflow as tf
import numpy as np
import tensorflow_model_optimization as tfmot
from tensorflow import keras

#%load_ext tensorboard
1. Import some dependency libraries. It seems that tensorboard is not used later. Note it out temporarily
#Load MNIST dataset
mnist = keras.datasets.mnist
(train_images, train_labels), (test_images, test_labels) = mnist.load_data()
#Adjust image pixel value to [0,1]
train_images = train_images / 255.0
test_images = test_images / 255.0
2. Import Mnist data set for simple and regular
#Model building
def setup_model():
    model = keras.Sequential([
        keras.layers.InputLayer(input_shape=(28, 28)),
        keras.layers.Reshape(target_shape=(28, 28, 1)),
        keras.layers.Conv2D(filters=12,kernel_size=(3, 3), activation='relu'),
        keras.layers.MaxPooling2D(pool_size=(2,2)),
        keras.layers.Flatten(),
        keras.layers.Dense(10)
    ])
    return model

#Training classification model parameters
def setup_pretrained_weights():
    model = setup_model()

    model.compile(optimizer = 'adam',
                  loss = tf.keras.losses.SparseCategoricalCrossentropy(from_logits = True),
                  metrics = ['accuracy']
    )

    model.fit(train_images,
              train_labels,
              epochs = 4,
              validation_split = 0.1,
    )

    _, pretrained_weights = tempfile.mkstemp('.tf')

    model.save_weights(pretrained_weights)
    return pretrained_weights
3. Establish a Baseline model and save the weight for subsequent performance comparison
setup_model()

pretrained_weights = setup_pretrained_weights()

#
Train on 54000 samples, validate on 6000 samples
Epoch 1/4
54000/54000 [==============================] - 7s 133us/sample - loss: 0.2895 - accuracy: 0.9195 - val_loss: 0.1172 - val_accuracy: 0.9685
Epoch 2/4
54000/54000 [==============================] - 5s 99us/sample - loss: 0.1119 - accuracy: 0.9678 - val_loss: 0.0866 - val_accuracy: 0.9758
Epoch 3/4
54000/54000 [==============================] - 5s 100us/sample - loss: 0.0819 - accuracy: 0.9753 - val_loss: 0.0757 - val_accuracy: 0.9787
Epoch 4/4
54000/54000 [==============================] - 6s 103us/sample - loss: 0.0678 - accuracy: 0.9797 - val_loss: 0.0714 - val_accuracy: 0.9815
4. Directly make a pruning model for the whole model, and look at the changes before and after the model
#Compare the difference between baselin and clipping model
base_model = setup_model()
base_model.summary()

base_model.load_weights(pretrained_weights)

model_for_pruning = tfmot.sparsity.keras.prune_low_magnitude(base_model)
model_for_pruning.summary()

#
Model: "sequential_4"
_________________________________________________________________
Layer (type)                 Output Shape              Param #
=================================================================
reshape_4 (Reshape)          (None, 28, 28, 1)         0
_________________________________________________________________
conv2d_4 (Conv2D)            (None, 26, 26, 12)        120
_________________________________________________________________
max_pooling2d_4 (MaxPooling2 (None, 13, 13, 12)        0
_________________________________________________________________
flatten_4 (Flatten)          (None, 2028)              0
_________________________________________________________________
dense_4 (Dense)              (None, 10)                20290
=================================================================
Total params: 20,410
Trainable params: 20,410
Non-trainable params: 0
_________________________________________________________________
Model: "sequential_4"
_________________________________________________________________
Layer (type)                 Output Shape              Param #
=================================================================
prune_low_magnitude_reshape_ (None, 28, 28, 1)         1
_________________________________________________________________
prune_low_magnitude_conv2d_4 (None, 26, 26, 12)        230
_________________________________________________________________
prune_low_magnitude_max_pool (None, 13, 13, 12)        1
_________________________________________________________________
prune_low_magnitude_flatten_ (None, 2028)              1
_________________________________________________________________
prune_low_magnitude_dense_4  (None, 10)                40572
=================================================================
Total params: 40,805
Trainable params: 20,410
Non-trainable params: 20,395
_________________________________________________________________
Analysis: it can be seen that the parameters of each layer have increased, among which the parameters added for pruning operation are non trainable parameters
5. Select a layer to make a sense (select the sense layer here), establish a pruning model, and see the model changes
In order to modularize the processing of a certain type of layer, def is a function
#Trim the model's Dense layer
def apply_pruning_to_dense(layer):
    if isinstance(layer, tf.keras.layers.Dense):
        print("Apply pruning to Dense")
        return tfmot.sparsity.keras.prune_low_magnitude(layer)
    return layer
among tf.keras.models.clone_model is to make some changes to the layer defined by keras. Let's take a look at it Official api
model_for_pruning = tf.keras.models.clone_model(
base_model, clone_function=apply_pruning_to_dense)
model_for_pruning.summary()

#
Apply pruning to Dense
Model: "sequential_4"
_________________________________________________________________
Layer (type)                 Output Shape              Param #
=================================================================
reshape_4 (Reshape)          (None, 28, 28, 1)         0
_________________________________________________________________
conv2d_4 (Conv2D)            (None, 26, 26, 12)        120
_________________________________________________________________
max_pooling2d_4 (MaxPooling2 (None, 13, 13, 12)        0
_________________________________________________________________
flatten_4 (Flatten)          (None, 2028)              0
_________________________________________________________________
prune_low_magnitude_dense_4  (None, 10)                40572
=================================================================
Total params: 40,692
Trainable params: 20,410
Non-trainable params: 20,282
_________________________________________________________________
Analysis: you can see that only the pruning operation parameters are added to the Dense layer
It may be more convenient to use the name of the layer in clone_ Select pruning instead of layer type in function
You can view the name of the layer in the following way (- - it's faster to give name directly when viewing the summary or defining the layer)
print(base_model.layers[0].name)

#reshape_4
This paper gives a warning to the way of ① Functional and ② Sequential: Although the readability is increased, the accuracy may not be as high as the above way
The reason is that it is invalid to load weights after definition (- - it should be impossible to get the weight without pruning parameters, that is, the model cannot be restored)
Functional example
# Use `prune_low_magnitude` to make the `Dense` layer train with pruning.
i = tf.keras.Input(shape=(20,))
x = tfmot.sparsity.keras.prune_low_magnitude(tf.keras.layers.Dense(10))(i)
o = tf.keras.layers.Flatten()(x)
model_for_pruning = tf.keras.Model(inputs=i, outputs=o)

model_for_pruning.summary()

Sequential example
# Use `prune_low_magnitude` to make the `Dense` layer train with pruning.
model_for_pruning = tf.keras.Sequential([
  tfmot.sparsity.keras.prune_low_magnitude(tf.keras.layers.Dense(20, input_shape=input_shape)),
  tf.keras.layers.Flatten()
])

model_for_pruning.summary()
6. Custom pruning
Through tfmot.sparsity.keras.PrunableLayer determines the parameters to be pruned
There are usually two situations: (usually, the precision of the prune in bia will be seriously reduced, and it will not be prune by default, here is just an example)
serves two use cases:
- Prune a custom Keras layer
- Modify parts of a built-in Keras layer to prune.
There are get in the API's class_ prunable_ Weights () to return the tensor that Prune needs in training Official API
class MyDenseLayer(tf.keras.layers.Dense, tfmot.sparsity.keras.PrunableLayer):

  def get_prunable_weights(self):
    # Prune bias also, though that usually harms model accuracy too much.
    return [self.kernel, self.bias]

# Use `prune_low_magnitude` to make the `MyDenseLayer` layer train with pruning.
model_for_pruning = tf.keras.Sequential([
  tfmot.sparsity.keras.prune_low_magnitude(MyDenseLayer(20, input_shape=input_shape)),
  tf.keras.layers.Flatten()
])

model_for_pruning.summary()

#
_________________________________________________________________
Model: "sequential_11"
_________________________________________________________________
Layer (type)                 Output Shape              Param #
=================================================================
prune_low_magnitude_my_dense (None, 28, 10)            583
_________________________________________________________________
flatten_13 (Flatten)         (None, 280)               0
=================================================================
Total params: 583
Trainable params: 290
Non-trainable params: 293
_________________________________________________________________


# Use `prune_low_magnitude` to make the `Dense` layer train with pruning.
i = tf.keras.Input(shape=(28,28))
x = tfmot.sparsity.keras.prune_low_magnitude(tf.keras.layers.Dense(10))(i)
o = tf.keras.layers.Flatten()(x)
model_for_pruning = tf.keras.Model(inputs=i, outputs=o)

model_for_pruning.summary()

#
Model: "model_1"
_________________________________________________________________
Layer (type)                 Output Shape              Param #
=================================================================
input_7 (InputLayer)         [(None, 28, 28)]          0
_________________________________________________________________
prune_low_magnitude_dense_9  (None, 28, 10)            572
_________________________________________________________________
flatten_12 (Flatten)         (None, 280)               0
=================================================================
Total params: 572
Trainable params: 290
Non-trainable params: 282
_________________________________________________________________
Analysis: you can see the model parameters of the two modeling methods, and the extra is the quantity of bia
7.Tensorboard visualization
Add callback parameters to training tfmot.sparsity.keras.PruningSummaries to observe variables in the process
Where callback parameters tfmot.sparsity.keras.UpdatePruningStep() is required, otherwise an error will occur Official API
base_model = setup_model()
base_model.load_weights(pretrained_weights) # optional but recommended for model accuracy
model_for_pruning = tfmot.sparsity.keras.prune_low_magnitude(base_model)

log_dir = tempfile.mkdtemp()
print(log_dir)#View save address
callbacks = [
    tfmot.sparsity.keras.UpdatePruningStep(),
    # Log sparsity and other metrics in Tensorboard.
    tfmot.sparsity.keras.PruningSummaries(log_dir=log_dir)
]

model_for_pruning.compile(
      loss = tf.keras.losses.SparseCategoricalCrossentropy(from_logits = True),
      optimizer='adam',
      metrics=['accuracy']
)

model_for_pruning.fit(
    train_images,
    train_labels,
    callbacks=callbacks,
    epochs=2,
)
Give a summary of the model to see the name and parameter structure
_________________________________________________________________
Layer (type)                 Output Shape              Param #
=================================================================
prune_low_magnitude_reshape_ (None, 28, 28, 1)         1
_________________________________________________________________
prune_low_magnitude_conv2d_2 (None, 26, 26, 12)        230
_________________________________________________________________
prune_low_magnitude_max_pool (None, 13, 13, 12)        1
_________________________________________________________________
prune_low_magnitude_flatten_ (None, 2028)              1
_________________________________________________________________
prune_low_magnitude_dense_2  (None, 10)                40572
=================================================================
Total params: 40,805
Trainable params: 20,410
Non-trainable params: 20,395
_________________________________________________________________
Finally, it's visualization!
tensorboard --logdir=log_dir
Epoch in Scalars_ accuracy,epoch_ Focus of loss: acc is higher than that before trimming (0.97 ↑ 0.98)
There are also two layers of sparsity and threshold change graphs, focusing on these two
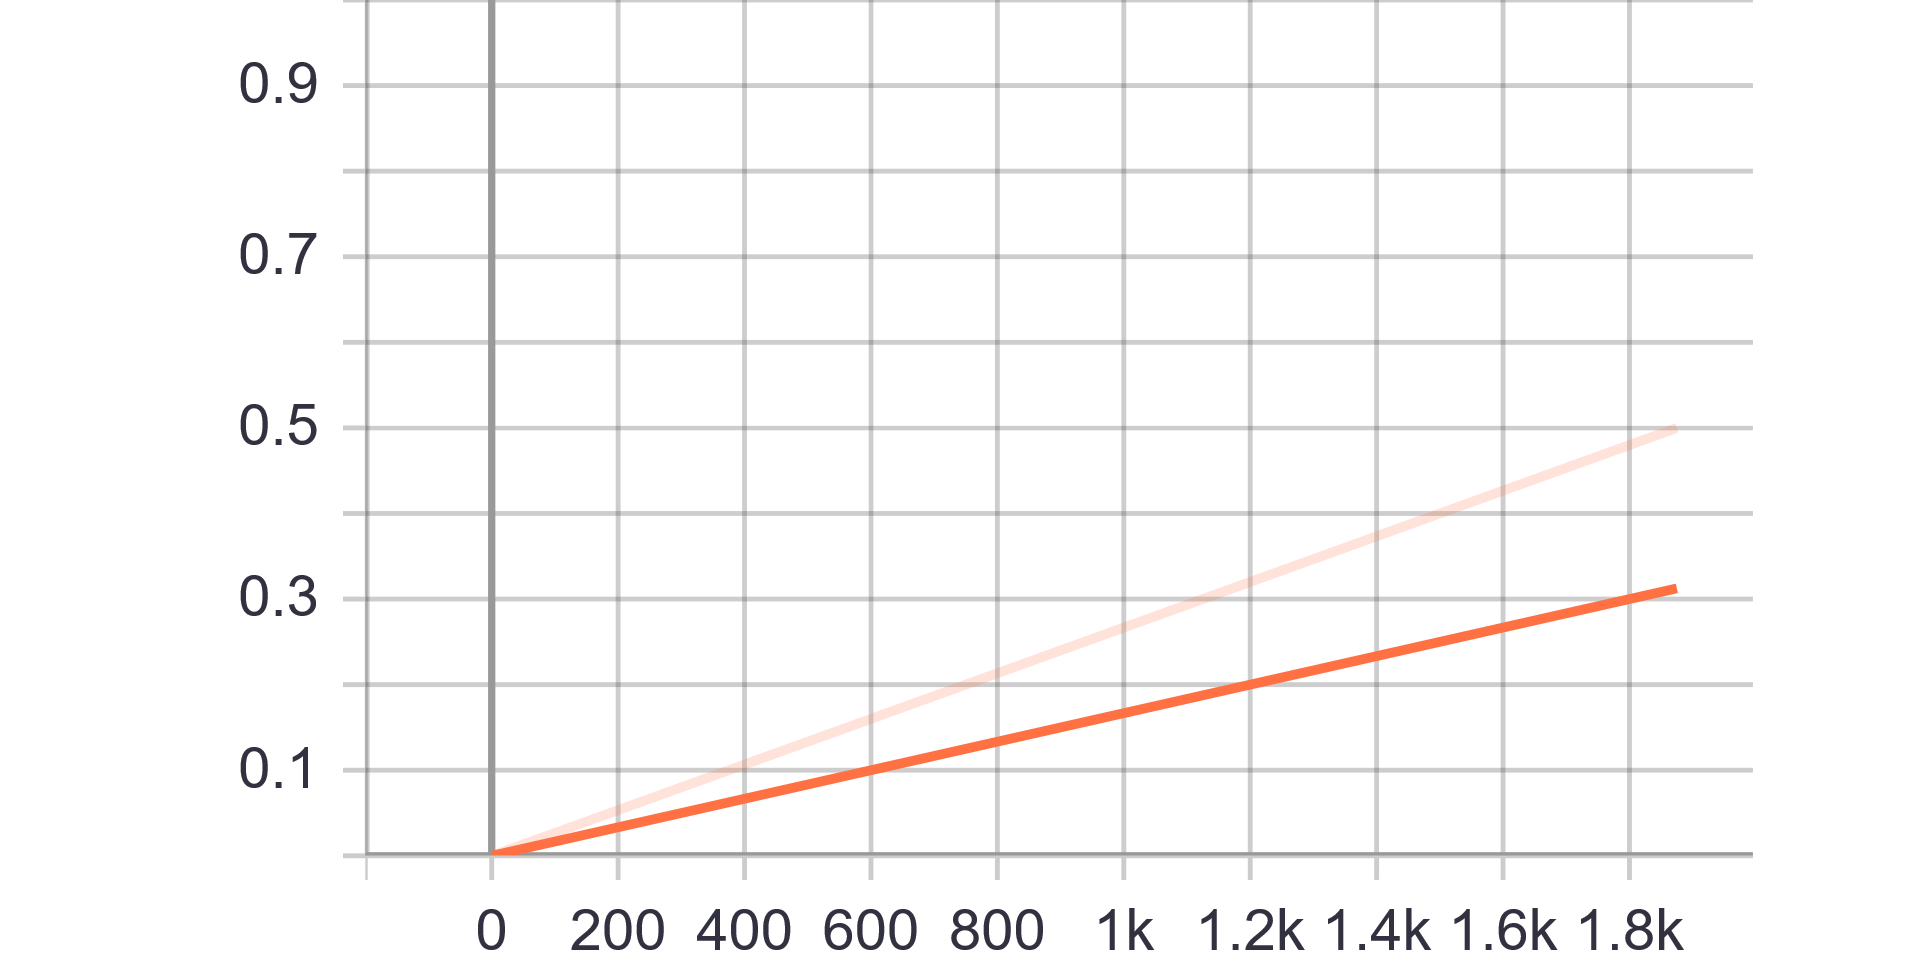 prune_low_magnitude_conv2d_2_mask_0_sparsity
Analysis: simply using the model_for_pruning = tfmot.sparsity.keras.prune_low_magnitude(base_model)
So you can see that with the training step by step, the mask with 0.5 sparse degree is finally reached (= 0)
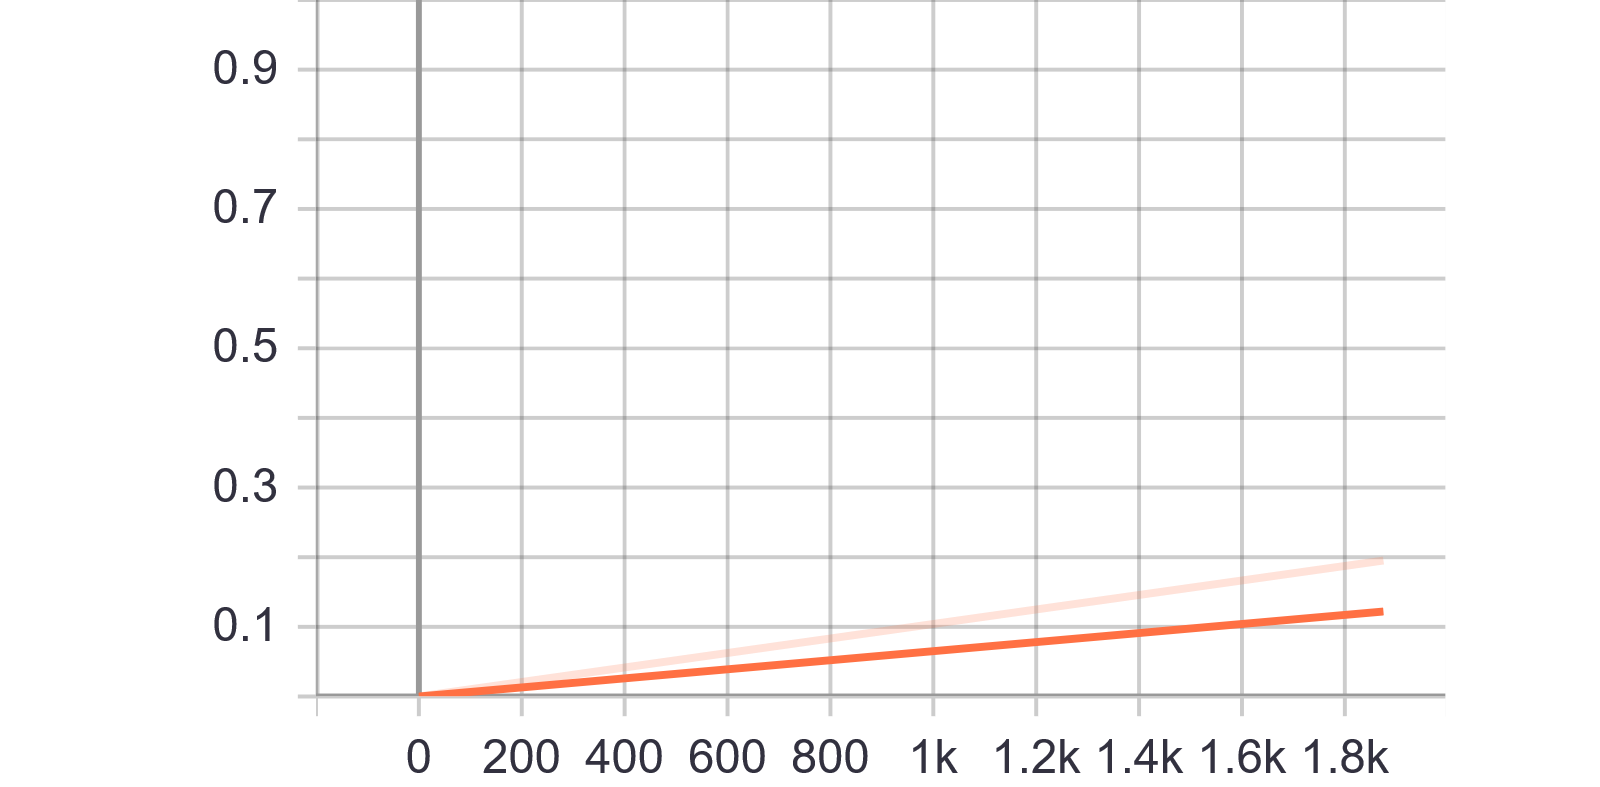 prune_low_magnitude_conv2d_2/threshold:0/threshold
Analysis: gradually increase the threshold to filter parameters with small weight, and the value of the last point is 0.1952
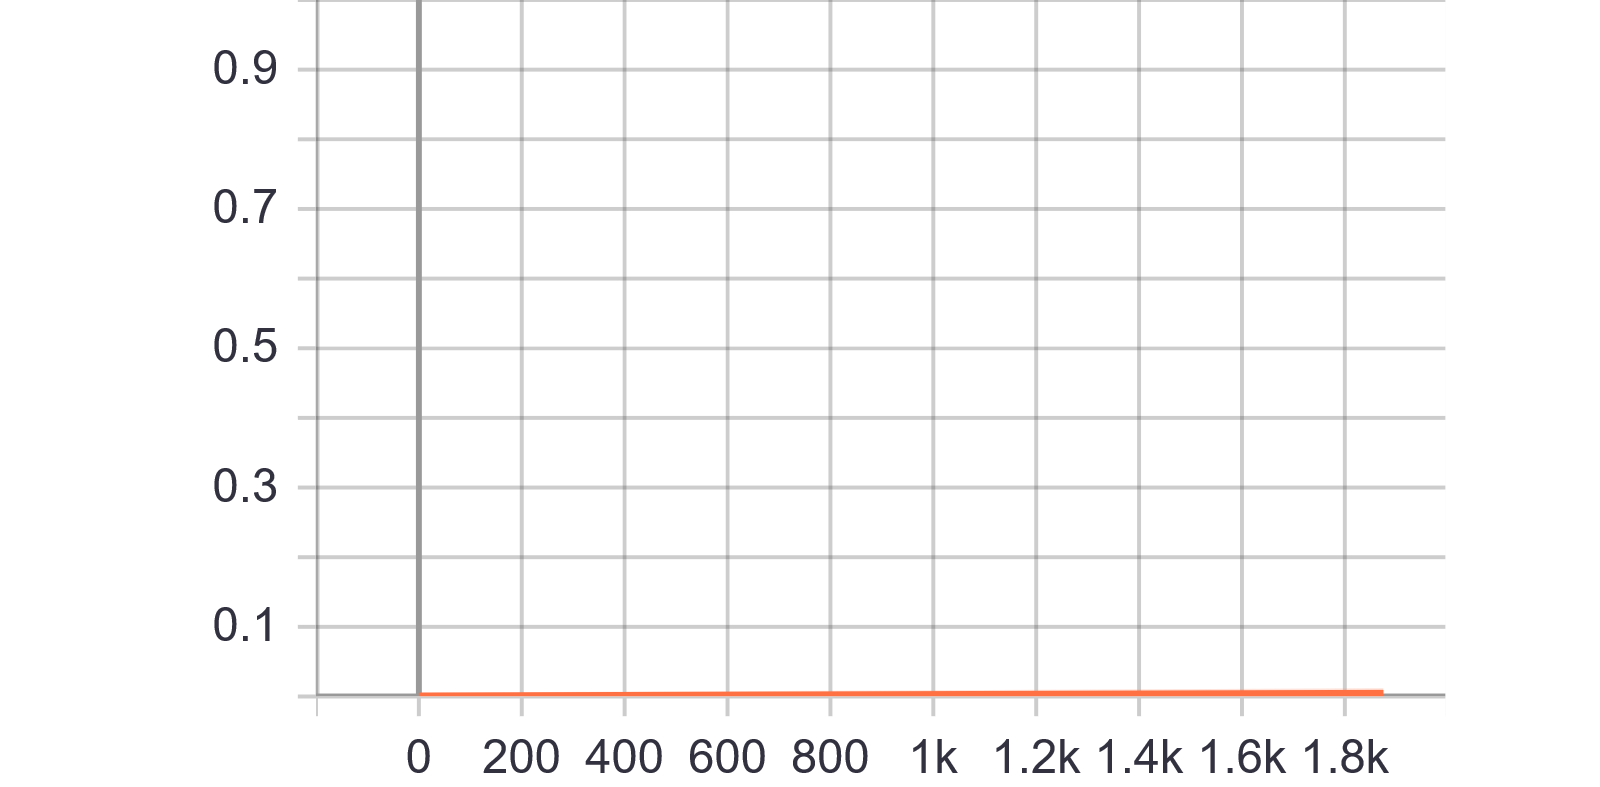
 prune_low_magnitude_dense_2/mask:0/sparsity
Analysis: consistent with conv2d
 prune_low_magnitude_dense_2/threshold:0/threshold
Analysis: when the threshold value is almost 0, the sparsity is increased to 0.5, which proves that the Dense Layer has a lot of prior knowledge of redundant information, that is, the Dense Layer can be thrown away by a large margin!
8. Save model comparison accuracy and model size
Common error: strip_pruning and applying standard compression algorithms, such as through gzip, are both necessary to see the compression benefits of pruning.
Human language: strip_pruning or using gzip to compress the model size with 0 parameter to observe the sparse effect
First, complete a calculation model size module:
#Get model weight size
def get_gzipped_model_size(model):
    _, keras_file = tempfile.mkstemp('.h5')
    model.save(keras_file, include_optimizer=False)

    _, zipped_file = tempfile.mkstemp('.zip')
    with zipfile.ZipFile(zipped_file, 'w', compression=zipfile.ZIP_DEFLATED) as f:
        f.write(keras_file)
    return os.path.getsize(zipped_file)
model_for_export = tfmot.sparsity.keras.strip_pruning(model_for_pruning)

print("final model")
model_for_export.summary()

print("\n")
print("Size of gzipped pruned model without stripping: %.2f bytes" % (get_gzipped_model_size(model_for_pruning)))
print("Size of gzipped pruned model with stripping: %.2f bytes" % (get_gzipped_model_size(model_for_export)))

#
_________________________________________________________________
Layer (type)                 Output Shape              Param #
=================================================================
reshape_3 (Reshape)          (None, 28, 28, 1)         0
_________________________________________________________________
conv2d_3 (Conv2D)            (None, 26, 26, 12)        120
_________________________________________________________________
max_pooling2d_3 (MaxPooling2 (None, 13, 13, 12)        0
_________________________________________________________________
flatten_3 (Flatten)          (None, 2028)              0
_________________________________________________________________
dense_3 (Dense)              (None, 10)                20290
=================================================================
Total params: 20,410
Trainable params: 20,410
Non-trainable params: 0
_________________________________________________________________


Size of gzipped pruned model without stripping: 55570.00 bytes
Size of gzipped pruned model with stripping: 48518.00 bytes
We can see that the parameters of sparse operation are all passed through strip_pruning is removed and restored to baseline
The model has a compression of about × 1.15, and the accuracy has been slightly improved, so we will not repeat it.
There is a callback application in the middle that has been skipped, roughly similar to the callback usage in keras, some on_epoch and on_ Functions such as train can be used as debugging pilots
Improve the accuracy of trimming model Tips:
- When pruning the model, the learning rate should not be too high or too low;
- As a quick test, try setting begin_step=0 to prune to achieve the goal of sparsity, which may lead to good results;
- Grasp the pruning frequency (parameter frequency) so that the model has time to recover;
- Make your own case in the Define model.
Common mistake:
- In order to keep pruning operation, it is necessary to use. h5 to load model instead of load weights;
- At the end of pruning, remove the pruning parameters and use strip_ One of the compression methods of pruning or gzip is good.