Prepare data
!wget --no-check-certificate \
    https://storage.googleapis.com/laurencemoroney-blog.appspot.com/horse-or-human.zip \
    -O /tmp/horse-or-human.zip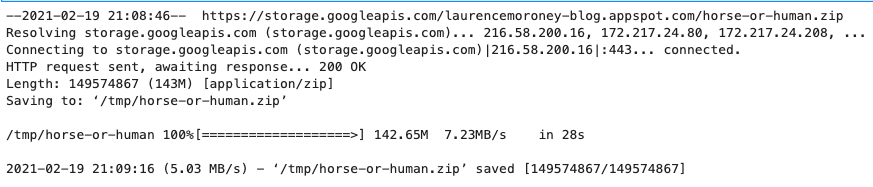
This directory contains the hosts and humans subdirectories respectively.
In short: the training set is used to tell the neural network model "this is what a horse looks like", "this is what a man looks like" and other data.
It should be noted here that we do not explicitly label the image as horse or man. If you remember the previous handwritten numeral example, its training data has been marked with "this is a 1", "this is a 7" and so on. Later, we use a class called ImageGenerator -- which reads images from subdirectories and automatically labels images according to the name of the subdirectory. Therefore, there will be a "training" directory, including a "horse" directory and a "human" directory. The ImageGenerator will label the picture appropriately for you, thus reducing one coding step. (it is not only more convenient in programming, but also can avoid the problem of insufficient memory caused by loading all training data into memory at one time.)
Let's define these directories separately.
# Directory with our training horse pictures
train_horse_dir = os.path.join('/tmp/horse-or-human/horses')

# Directory with our training human pictures
train_human_dir = os.path.join('/tmp/horse-or-human/humans')
modeling
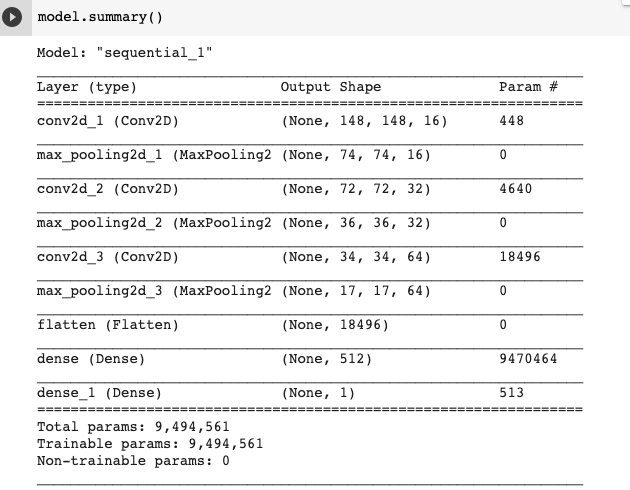
Like the previous example, add the convolution layer CNN and flatten the final result to transport it to the fully connected layer.
Finally, we add the full connection layer.
It should be noted that since we are facing a two class classification problem, that is, a two class classification problem, we will use the sigmoid activation function as the last layer of the model, so that the output of our network will be a rational number between 0 and 1, that is, the probability that the current image is class 1 (not class 0).
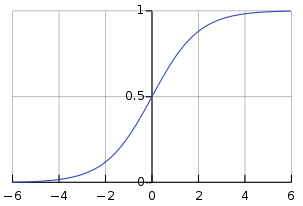
BTW, if there are multiple classifications, such as the softmax activation function for 0 ~ 9 classifications mentioned above.
import tensorflow as tf

model = tf.keras.models.Sequential([
        tf.keras.layers.Conv2D(16, (3,3), activation='relu', input_shape=(150, 150,3)),
        tf.keras.layers.MaxPooling2D(2,2),

        tf.keras.layers.Conv2D(32, (3,3), activation='relu'),
        tf.keras.layers.MaxPooling2D(2,2),
        tf.keras.layers.Conv2D(64, (3,3), activation='relu'),
        tf.keras.layers.MaxPooling2D(2,2),

        tf.keras.layers.Flatten(),
        tf.keras.layers.Dense(512, activation='relu'),
        tf.keras.layers.Dense(1, activation='sigmoid')

])
Call the model.summary() method to print the structure information of the neural network model
Next, we will configure the parameters of model training. We will use "binary_cross entropy" to measure the loss, because it is a binary classification problem, and the final activation function is a sigmoid. For a review of loss measures, see Machine learning crash course . We will use rmsprop as the optimizer with a learning rate of 0.001. During the training, we will want to monitor the classification accuracy.
NOTE. We will use the rmsprop optimizer with a learning rate of 0.001. In this case, use RMSprop optimization algorithm than Random gradient descent (SGD) is preferable because RMSprop can automatically adjust the learning rate for us. (other optimizers, such as Adam and Adagrad , it will also automatically adjust the learning rate during training, which is also effective here.)
from tensorflow.keras.optimizers import RMSprop
model.compile(loss=tf.keras.losses.BinaryCrossentropy(),
              optimizer=tf.keras.optimizers.RMSprop(lr=0.001),
              metrics=['acc'])
Data preprocessing
Let's set up the image data generator, which will read the pictures in the source folder, convert them into float32 multidimensional array, and feed back the image data (together with their labels) to the neural network. A total of two generators are required, one for generating training images and one for generating verification images. The generator will generate a batch of images with a size of 300x300 and their labels (0 or 1).
In the previous lesson, we already know how to normalize the training data. The data entering the neural network should be normalized in some way to make it easier to be processed by the network. In this example, we will preprocess the image by normalizing the pixel values to the range of [0,1] (initially all values are in the range of [0,255]).
In Keras, normalization can be achieved by using the rescale parameter through the keras.preprocessing.image.ImageDataGenerator class. Through. flow(data, labels) or. Flow of ImageDataGenerator class_ from_ Directory (directory), you can create generators. These generators can then be used as input parameters to the Keras method, such as fit_generator,evaluate_generator and predict_ Generators can accept generator instances as parameters.
from tensorflow.keras.preprocessing.image import ImageDataGenerator

train_datagen = ImageDataGenerator(rescale=1/255)
train_generator = train_datagen.flow_from_directory(
    '/tmp/horse-or-human/',
    target_size=(150, 150),
    batch_size=32,
    class_mode='binary'
)
train
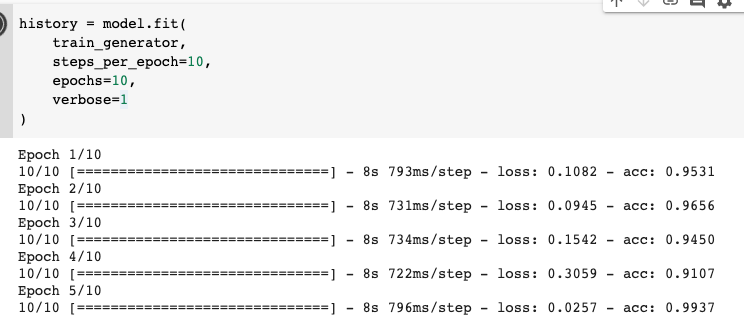
history = model.fit(
    train_generator,
    steps_per_epoch=10,
    epochs=10,
    verbose=1
)
Adjusting parameters
When constructing the neural network model,
- How many convolution layers will be considered?
- How many filters should I use?
- How many neurons are needed in the whole connection layer?
The first thought must be to manually modify those parameters, and then observe the training effect (loss and accuracy), so as to judge whether the parameter setting is reasonable. But that is very cumbersome, because there will be many parameter combinations and the training time is very long. Further, you can manually write some loops to search for appropriate parameters through traversal. However, it is better to use a special framework to search parameters, which is not easy to make mistakes, and the effect is better than the first two methods.
Kerastuner is a library that can automatically search model training parameters. Its basic idea is to insert a special object in the place where the parameters need to be adjusted (specify the parameter range), and then call the search method similar to training.
Next, first prepare the training data and the library to be loaded.
If you do not have this library, install PIP3 install - u keras tuner first, otherwise an error will be prompted. ModuleNotFoundError: No module named 'kerastuner
import os
from tensorflow.keras.preprocessing.image import ImageDataGenerator
from tensorflow.keras.optimizers import RMSprop
train_datagen = ImageDataGenerator(rescale=1/255)
validation_datagen = ImageDataGenerator(rescale=1/255)
train_generator = train_datagen.flow_from_directory('/tmp/horse-or-human/',
        target_size=(150, 150),batch_size=32,class_mode='binary')
# validation_generator = validation_datagen.flow_from_directory('/tmp/validation-horse-or-human/',
#         target_size=(150, 150), batch_size=32,class_mode='binary')
from kerastuner.tuners import Hyperband
from kerastuner.engine.hyperparameters import HyperParameters
import tensorflow as tf
Then create the HyperParameters object, and then insert the objects used for calling parameters such as Choice and Int into the model.
hp=HyperParameters()
def build_model(hp):
    model = tf.keras.models.Sequential()
    model.add(tf.keras.layers.Conv2D(hp.Choice('num_filters_top_layer',values=[16,64],default=16), (3,3),
                                     activation='relu', input_shape=(150, 150, 3)))
    model.add(tf.keras.layers.MaxPooling2D(2, 2))
    for i in range(hp.Int("num_conv_layers",1,3)):
        model.add(tf.keras.layers.Conv2D(hp.Choice(f'num_filters_layer{i}',values=[16,64],default=16), (3,3), activation='relu'))
        model.add(tf.keras.layers.MaxPooling2D(2,2))
    model.add(tf.keras.layers.Flatten())
    model.add(tf.keras.layers.Dense(hp.Int("hidden_units",128,512,step=32), activation='relu'))
    model.add(tf.keras.layers.Dense(1, activation='sigmoid'))
    model.compile(loss='binary_crossentropy',optimizer=RMSprop(lr=0.001),metrics=['acc'])
return model- The first parameter, Choice, is CNN's filter. The range is 16 ~ 64, preferably a multiple of 32. The default is 16
- The second parameter is Int, which sets 13 CNN, and the number of filters for each CNN convolutional neural network is 1664, which is 16 by default
- The third full connection requires several neurons, 128 ~ 512, with a step size of 32. Namely: 128, 128 + 32
Their first parameter is name, which can be named at will. It's best to know and express it.
Then create a Hyperband object, which is one of the four methods supported by Kerastuner. You can easily limit the search space to optimize some parameters. Specific information can be obtained from Kerastuner's website. About the other three tuners: random search, Bayesian optimization, and Sklearn
Finally, the search method is called.
tuner=Hyperband(
    build_model,
    objective='val_acc',
    max_epochs=10,
    directory='horse_human_params',
    hyperparameters=hp,
    project_name='my_horse_human_project'
)
tuner.search(train_generator,epochs=10,validation_data=validation_generator)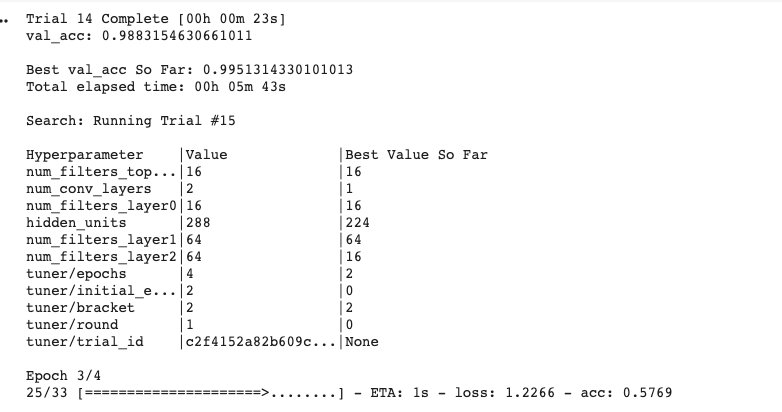
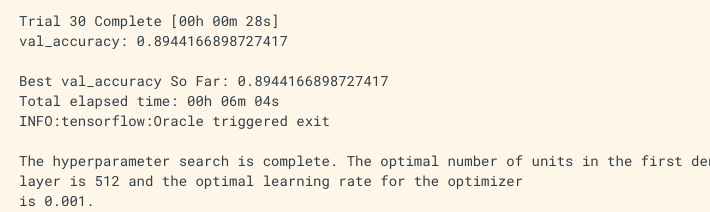
After searching the optimal parameters, you can use the following program to extract the optimal parameters with the tuner object to build the neural network model. And call the summary method to observe the optimized network structure.
best_hps=tuner.get_best_hyperparameters(1)[0]
print(best_hps.values)
model=tuner.hypermodel.build(best_hps)
model.summary()