1. Form
Using front-end js to verify the form can reduce a lot of unnecessary trouble and improve user satisfaction. Otherwise, as soon as you submit data, you will go directly to the back-end server and find that you didn't fill in the name after a series of verification, which will waste a lot of time.
1.1. Obtain form
(1)document. Form name
(2)document. Getelementbyid (form id)
(3)document.forms (form name, HTML document, all forms)
(4)document.forms [index starts from 0]
	<body>


		<form id="id1" name="myname1" action=""></form>
		<form id="id2" name="myname2" action=""></form>

	 <script type="text/javascript">
		console.log(document.getElementById("id1"))
		console.log(document.myname2)
		console.log("--------------")
		console.log(document.forms)
		console.log("-------------")
		console.log(document.forms[0])
		console.log(document.forms['myname2'])
	 </script>
	 </body>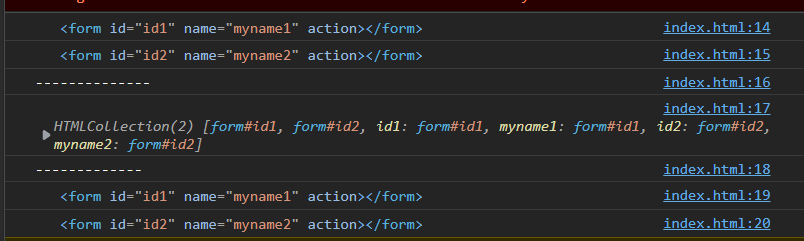
1.2. Get form elements
1.2.1. Get input element
(1) pass id: document getElementById
(2) pass the form Get name: myform Element name; Name attribute value
(3) get: document. By name Getelementbyname (name attribute value) [index]
(4) through tagName array: document Getelementbytagname ('input) [index]
	<body>
		<form action="#" id="myform" name="myform">
			<input type="hidden" id = "uno" name = "uno" value="Hidden domain"/>
			full name:<input type="text" id="name" name="username" value="Please enter your name" /><br />
			password:<input type="password" name="userpassword" value="123" maxlength="14"/><br />
			Introduction:<textarea name="remark" cols="60" rows="10"></textarea><br />
			<button type="button" onclick="getTxt()">Get element</button>
		</form>
		<script>
			function getTxt(){
				var uname  = document.getElementById("name").value
				console.log(uname)
				var pwd = document.getElementById("myform").userpassword.value
				console.log(pwd)
				var uno = document.getElementsByName("uno")[0].value
				console.log(uno)
				var intro = document.getElementsByTagName("textarea")[0].value
				console.log(intro)
			}
		</script>
	</body>
1.2.2. Obtain radio and multi-choice buttons
Through id, name, form Name, tag acquisition is the same as input
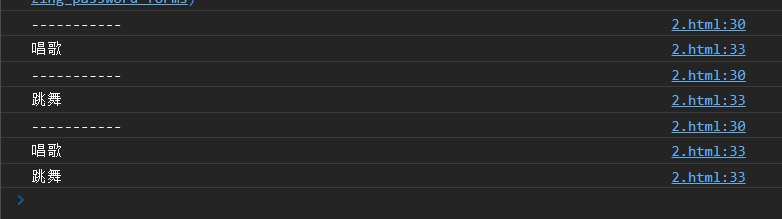
sing<input type="radio" id = "hobby1" name = "hobby" value="sing"/><br />
				dance<input type="radio" id = "hobby2" name = "hobby" /><br />
				var h1 = document.getElementsByName("hobby")
				console.log(h1[0].value)
	sing<input type="checkbox" id = "hobby1" name = "hobby" value="sing" multiple="multiple"/><br />
				dance<input type="checkbox" id = "hobby2" name = "hobby" value="dance" multiple="multiple"/><br />
1.2.3. Get drop-down options
(1) get selet object (id, name...)
(2) get the selected item index: object selectedIndex
(3) get the value attribute value of the selected options: object (. option [idx] (can not be written)) Value (value with value but without label)
(4) get the text object of the selected item options (. option [idx] (can not be written)) text
<select name="uform" id = "uform">
			<option value="city">Please select a city</option>
			<option value="beijing" selected="selected">Beijing</option>
			<option value="chengdu">Chengdu</option>
			<option>Shanghai</option>
		</select><br />
		<button type="button" onclick="getSelect();">Get options</button>
function getSelect(){
var uform = document.getElementById("uform")
console.log(uform)
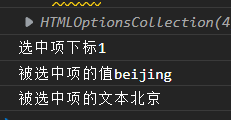
var opts = uform.options
console.log(opts)
var index = uform.selectedIndex
console.log("Selected subscript"+index)
var val = uform.value
console.log("The value of the selected item"+val)
// var val2 = uform.options[index].value
// console.log("value of selected item" + val2)
var txt = uform.options[index].text
console.log("Text of the selected item"+txt)
}
1.3 submission form
(1) Normal button: bind events and functions for buttons. Verify the data in the function and submit it manually if it passes (form object. submit())
<body>
<form id="myform" name="myform" action="#" method="get">
full name:<input name="uname" id="uname" />
<span id="msg" style="font-size: 12px;color: red;"></span><br />
<button type="button" onclick="submitForm1()">Submit Form </button>
</form>
<script>
function submitForm1(){
var uname = document.getElementById("uname").value
if(isEmpty(uname)){
document.getElementById("msg").innerHTML = "Please enter your name!"
return
}
document.getElementById("myform").submit()
}
// trim() removes spaces before and after the string
function isEmpty(str){
if(str == null||str.trim() == ""){
return true
}
return false
}
</script>
</body>If the input is blank

(2) Submit button (bind to button) (when return false, submission will be blocked. Refer to the above for judgment method)
<button type="submit" onclick=" return submitForm2()">Submit Form </button>
	function submitForm2(){
			var uname2 = document.getElementById("uname2").value
			if(isEmpty(uname2)){
				document.getElementById("msg2").innerHTML = "Please enter your name!"
				return false
			}
			return ture
		}
		// trim() removes spaces before and after the string
		function isEmpty(str){
			if(str == null||str.trim() == ""){
				return true
			}
			return false
		}
(3) Submit button (bind submit to form)
<form id="myform3" action="#" onsubmit=" return submitForm3()">
Determine whether to submit the same as the second one
2. Ajax (asynchronous no refresh)
Asynchronous: you can run the next step without waiting for the response of the previous step (running well)
2.1. Native ajax
(1) Get XMLHttprequest object
var xhr = new XMLHttprequest();
(2) Open request
xhr.open(method,uri,async)
Method: request method (get, post)
uri: request address
Async: async (true, false)
(3) Send request
xhr.send(params);
params: parameters to be passed during the request. If get, set null. If post, no parameter is null, and some parameters are parameters
(4) Receive response (asynchrony will cause problems, and the fourth step has been started when the third step requests)
xhr.status response status (200 successful, 404 resource not found, 500 server exception)
xhr.responseText get response text
Synchronization request
	<script>
			var xhr = new XMLHttpRequest()
			xhr.open("get","11.json",false)
			xhr.send(null)
			if(xhr.status == 200){
				console.log(xhr.responseText)
			}
			else{
				console.log("Status code:"+xhr.status+"as a result of:"+xhr.responseText)
			}

Due to asynchrony, you need to know that the background has processed the request before obtaining the response result. You can know the subsequent processing state by listening to the change of readyState. 4 is equal to complete processing
xhr.onreadystatechange = function(){
//Execute whenever readyState changes
}
Asynchronous request
		function t2(){
			var xhr = new XMLHttpRequest()
			xhr.open("get","11.json",true)
			xhr.send(null)
			xhr.onreadystatechange = function(){
				if(xhr.readyState == 4){
					if(xhr.status == 200){
						console.log(xhr.responseText)
					}
					else{
						console.log("Status code:"+xhr.status+"as a result of:"+xhr.responseText)
					}
				}
			}
		}
		t2()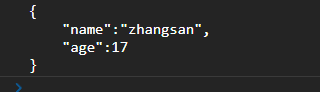
It's actually much more complicated than that