1. Environmental description
This method is used in production environments
Highly available tool: kept
Load balancing: haproxy (or nginx, lvs)
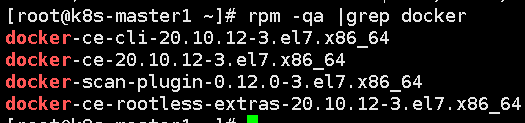
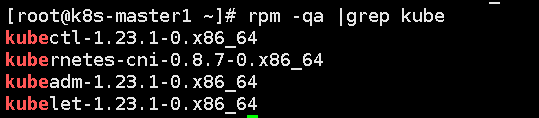
The versions of docker, kubedm and kubelet programs are shown in the figure below:
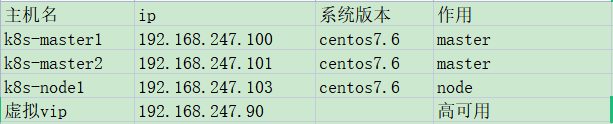
Virtual machine:
2. Main process steps
System environment configuration - kernel upgrade to above 4.19 - docker installation ----- kubedm installation ----- keepalived installation of high availability components ----- haproxy installation configuration ----- kubedm initialization ----- adding master or node nodes
3. Detailed steps
All nodes need to operate until initialization:
Step 1: change the host configuration file:
cat /etc/hosts

 127.0.0.1   localhost localhost.localdomain localhost4 localhost4.localdomain4
::1         localhost localhost.localdomain localhost6 localhost6.localdomain6
192.168.247.100 k8s-master1
192.168.247.101 k8s-master2
192.168.247.103 k8s-node1
192.168.247.90  k8s-master-vip
Step 2: close the firewall, selinux, swap, etc. on all nodes:
systemctl disable --now firewalld
systemctl disable --now NetworkManager

#selinux   /etc/sysconfig/selinux
SELINUX=disabled

swapoff -a && sysctl -w vm.swappiness=0
#/etc/fstab comment out the swap partition
Step 3: configure ntp time synchronization for all hosts:
yum install -y ntp
Configuration on server master1:
driftfile /var/lib/ntp/drift

restrict default nomodify notrap nopeer noquery  #nomodify is not allowed to modify the server time. notrap is not allowed to log in to noquery. nopeer does not provide client time query. nopeer is used to prevent the host from trying to peer with the server
#The default is to reject all clients, and control the connectable clients through restrict

restrict 127.0.0.1 #Allow any operation on this machine
restrict ::1

restrict 192.168.247.0 mask 255.255.255.0 nomodify notrap  #Change this to the network segment to which your virtual machine belongs
#Allow the host in the 192.168.247.0 network segment to operate operations other than modifying the server time and login

server 210.72.145.44 prefer  #National Time Service Center
server 0.cn.pool.ntp.org
server 1.cn.pool.ntp.org

server 127.127.1.0   #Local time

restrict 0.cn.pool.ntp.org nomodify notrap noquery
restrict 1.cn.pool.ntp.org nomodify notrap noquery
restrict 210.72.145.44 nomodify notrap noquery

fudge 127.127.1.0 stratum 10

includefile /etc/ntp/crypto/pw

keys /etc/ntp/keys

disable monitor
master2 and node1 configuration:
driftfile /var/lib/ntp/drift

restrict default nomodify notrap nopeer noquery

restrict 127.0.0.1
restrict ::1
restrict 192.168.247.100 nomodify notrap noquery

server 192.168.247.100

includefile /etc/ntp/crypto/pw

keys /etc/ntp/keys

disable monitor
Then start ntp service and set startup:
systemctl enable --now ntpd
Modify limit of all nodes:
vim /etc/security/limits.conf
# Add the following at the end
* soft nofile 655360
* hard nofile 131072
* soft nproc 655350
* hard nproc 655350
* soft memlock unlimited
* hard memlock unlimited
master1 configures ssh password free login to other nodes. Other nodes are available or not:
ssh-keygen -t rsa
for i in k8s-master1 k8s-master2 k8s-node1;do ssh-copy-id -i .ssh/id_rsa.pub $i;done
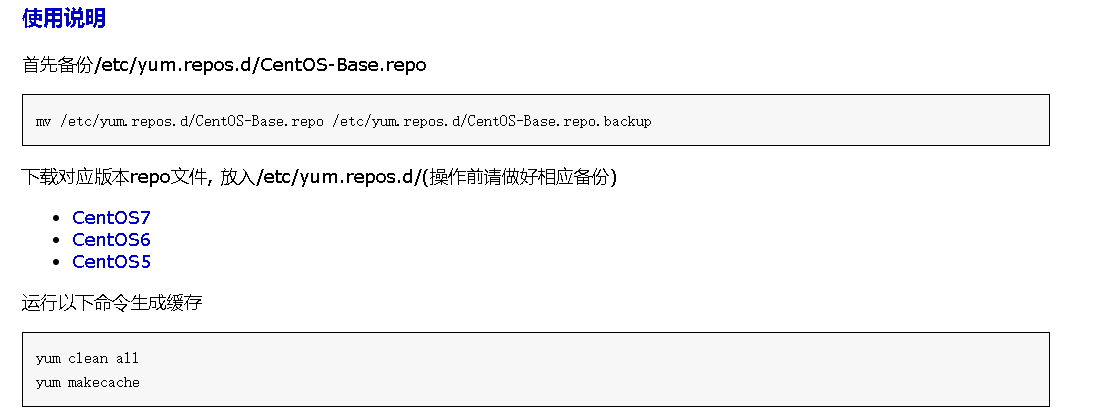
Step 4: replace the repo source. You can choose 163 mirror source,
Step 5: add kubernetes repo source and execute the following steps:
cat <<EOF > /etc/yum.repos.d/kubernetes.repo
[kubernetes]
name=Kubernetes
baseurl=https://mirrors.aliyun.com/kubernetes/yum/repos/kubernetes-el7-x86_64/
enabled=1
gpgcheck=1
repo_gpgcheck=1
gpgkey=https://mirrors.aliyun.com/kubernetes/yum/doc/yum-key.gpg https://mirrors.aliyun.com/kubernetes/yum/doc/rpm-package-key.gpg
EOF
Step 6: install the required basic software:
yum install -y yum-utils device-mapper-persistent-data lvm2
yum install wget jq psmisc vim net-tools telnet yum-utils device-mapper-persistent-data lvm2 -y
Step 6: after restarting, start upgrading the kernel, download the kernel rpm package, download the network disk: link:
https://pan.baidu.com/s/14Pg_LllldqTrLZaAlbqP3A
Extraction code: 5i2e
Upgrading the kernel is also required for all machines. Transfer these two files to all nodes.
Install kernel:
cd /root && yum localinstall -y kernel-ml*
Modify the kernel startup sequence and execute:
grub2-set-default  0 && grub2-mkconfig -o /etc/grub2.cfg

grubby --args="user_namespace.enable=1" --update-kernel="$(grubby --default-kernel)"
Restart and check the kernel version:
grubby --default-kernel
uname -r
Step 7: install ipvsadm and module
yum install ipvsadm ipset sysstat conntrack libseccomp -y
Execute separately:
modprobe -- ip_vs
modprobe -- ip_vs_rr
modprobe -- ip_vs_wrr
modprobe -- ip_vs_sh
modprobe -- nf_conntrack
Execution:
vim /etc/modules-load.d/ipvs.conf
	# Add the following
ip_vs
ip_vs_lc
ip_vs_wlc
ip_vs_rr
ip_vs_wrr
ip_vs_lblc
ip_vs_lblcr
ip_vs_dh
ip_vs_sh
ip_vs_fo
ip_vs_nq
ip_vs_sed
ip_vs_ftp
ip_vs_sh
nf_conntrack
ip_tables
ip_set
xt_set
ipt_set
ipt_rpfilter
ipt_REJECT
ipip
Restart service:
systemctl enable --now systemd-modules-load.service
Kernel parameters for opening k8s:
cat <<EOF > /etc/sysctl.d/k8s.conf
net.ipv4.ip_forward = 1
net.bridge.bridge-nf-call-iptables = 1
net.bridge.bridge-nf-call-ip6tables = 1
fs.may_detach_mounts = 1
vm.overcommit_memory=1
vm.panic_on_oom=0
fs.inotify.max_user_watches=89100
fs.file-max=52706963
fs.nr_open=52706963
net.netfilter.nf_conntrack_max=2310720

net.ipv4.tcp_keepalive_time = 600
net.ipv4.tcp_keepalive_probes = 3
net.ipv4.tcp_keepalive_intvl =15
net.ipv4.tcp_max_tw_buckets = 36000
net.ipv4.tcp_tw_reuse = 1
net.ipv4.tcp_max_orphans = 327680
net.ipv4.tcp_orphan_retries = 3
net.ipv4.tcp_syncookies = 1
net.ipv4.tcp_max_syn_backlog = 16384
net.ipv4.ip_conntrack_max = 65536
net.ipv4.tcp_max_syn_backlog = 16384
net.ipv4.tcp_timestamps = 0
net.core.somaxconn = 16384
EOF
sysctl --system
Restart again.
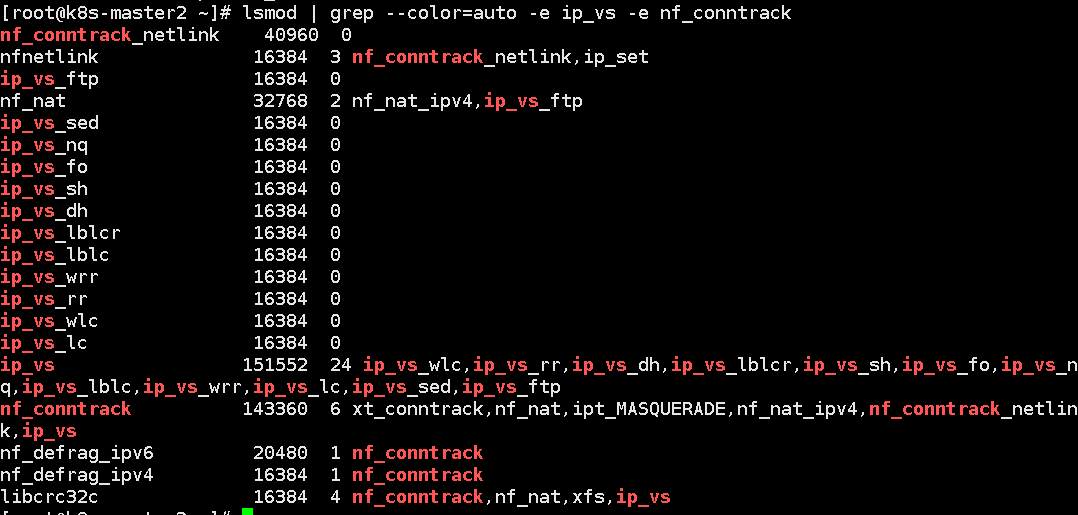
Check whether the module is loaded:
lsmod | grep --color=auto -e ip_vs -e nf_conntrack

Step 8: install docker
Add docker source repo:
yum-config-manager \
    --add-repo \
    https://download.docker.com/linux/centos/docker-ce.repo
Install directly using yum. The default version is the latest version:
yum install -y docker-ce docker-ce-cli containerd.io
There is a kernel driver problem here. kubelet now uses systemd, so we must change the docker driver to systemd.
View docker driver:
docker info |grep Cgroup
Modification:
cat > /etc/docker/daemon.json <<EOF
{
  "exec-opts": ["native.cgroupdriver=systemd"]
}
EOF
Set and start docker:
systemctl daemon-reload && systemctl enable --now docker
Step 9: install k8s
The installation is relatively simple. After configuring the kuberneter warehouse, you can use yum directly:
yum install -y kubeadm

#When installing kubedm, kubelet, kubectl and other packages will be installed automatically
Change k8s default warehouse address to domestic address:
cat >/etc/sysconfig/kubelet<<EOF
KUBELET_EXTRA_ARGS="--cgroup-driver=systemd --pod-infra-container-image=registry.cn-hangzhou.aliyuncs.com/google_containers/pause-amd64:3.2"
EOF
To set Kubelet to boot automatically:
systemctl daemon-reload
systemctl enable --now kubelet
Step 10: keepalived installation configuration
yum install -y keepalived
master1 configuration:
/etc/keepalived/keepalived.conf
! Configuration File for keepalived

global_defs {
   router_id 1  #Unique identification
}

vrrp_script chk_apiserver {
   script "/etc/keepalived/check_apiserver.sh"
   interval 5

}

vrrp_instance VI_1 {
    state MASTER  #Master node
    interface ens33  #Change this place to your de network card name
    virtual_router_id 51
    priority 100   #The higher the weight value, the better
    advert_int 1
    authentication {
        auth_type PASS
        auth_pass 1111
    }
    virtual_ipaddress {
        192.168.247.90

     }
    track_script {
        chk_apiserver

     }
}
master2:
vim /etc/keepalived/keepalived.conf
! Configuration File for keepalived

global_defs {
   router_id 1
}

vrrp_script chk_apiserver {
   script "/etc/keepalived/check_apiserver.sh"
   interval 5

}

vrrp_instance VI_1 {
    state BACKUP   #Change this to backup
    interface ens33
    virtual_router_id 51
    priority 90
    advert_int 1
    authentication {
        auth_type PASS
        auth_pass 1111
    }
    virtual_ipaddress {
        192.168.247.90

     }
    track_script {
        chk_apiserver

     }

}
Both masters 1 and 2 need to configure the monitoring script chk_apiserver:
/etc/keepalived/check_apiserver.sh
 #!/bin/bash

err=0
for k in $(seq 1 3)
do
    check_code=$(pgrep haproxy)
    if [[ $check_code == "" ]]; then
        err=$(expr $err + 1)
        sleep 1
        continue
    else
        err=0
        break
    fi
done

if [[ $err != "0" ]]; then
    echo "systemctl stop keepalived"
    /usr/bin/systemctl stop keepalived
    exit 1
else
    exit 0
fi
Grant Execution Authority:
chmod +x /etc/keepalived/check_apiserver.sh
Set startup and start the service:
systemctl enable --now keepalived
Step 11: deploy haproxy
The contents of files deployed by master1 and master2 are the same
yum install -y haproxy
Configuration file / etc / haproxy / haproxy cfg :
global
  maxconn  2000
  ulimit-n  16384
  log  127.0.0.1 local0 err
  stats timeout 30s

defaults
  log global
  mode  http
  option  httplog
  timeout connect 5000
  timeout client  50000
  timeout server  50000
  timeout http-request 15s
  timeout http-keep-alive 15s

frontend monitor-in
  bind *:33305
  mode http
  option httplog
  monitor-uri /monitor

frontend k8s-master
  bind 0.0.0.0:16443
  bind 127.0.0.1:16443
  mode tcp
  option tcplog
  tcp-request inspect-delay 5s
  default_backend k8s-master

backend k8s-master
  mode tcp
  option tcplog
  option tcp-check
  balance roundrobin
  default-server inter 10s downinter 5s rise 2 fall 2 slowstart 60s maxconn 250 maxqueue 256 weight 100
  server k8s-master1	192.168.247.100:6443  check
  server k8s-master2	192.168.247.101:6443  check
The host 16443 port is mapped to the 6443 of the backend 192.168.247.100 and 101, which is the port of the apiserver.
Step 12: cluster initialization
This is mainly to join another master and add nodes through the join after successfully initializing one master. You don't have to perform init initialization all the time. I originally thought that each master performs init initialization, and the back-end agent seems to work, but the node node also needs to be added once, which is very troublesome. k8s has a unique addition method. Join can become a master, and there is information about node nodes.
Write yaml file:
vim new.yaml
apiVersion: kubeadm.k8s.io/v1beta3
bootstrapTokens:
- groups:
- system:bootstrappers:kubeadm:default-node-token
token: 7t2weq.bjbawausm0jaxury
ttl: 24h0m0s
usages:
- signing
- authentication
kind: InitConfiguration
localAPIEndpoint:
advertiseAddress: 192.168.247.100 #This is the local ip address
bindPort: 6443 Local machine apiserver port
nodeRegistration:
criSocket: /var/run/dockershim.sock
imagePullPolicy: IfNotPresent
name: k8s-master1
taints:
- effect: NoSchedule
key: node-role.kubernetes.io/master
---
apiServer:
certSANs:
- 192.168.247.90 #Here is the vip address generated by keepalived
timeoutForControlPlane: 4m0s
apiVersion: kubeadm.k8s.io/v1beta3
certificatesDir: /etc/kubernetes/pki
clusterName: kubernetes
controlPlaneEndpoint: 192.168.247.90:16443 #Front end address used for load balancing
controllerManager: {}
dns: {}
etcd:
local:
dataDir: /var/lib/etcd
imageRepository: registry.aliyuncs.com/google_containers #Mirror warehouse address
kind: ClusterConfiguration
kubernetesVersion: v1.23.1 #kubelet version
networking:
dnsDomain: cluster.local
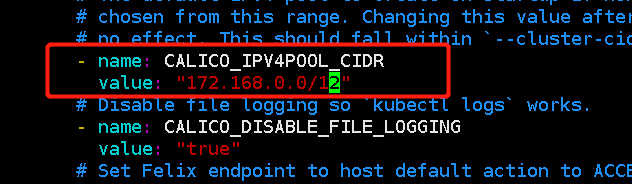
podSubnet: 172.168.0.0/12 #Define pod network segment
serviceSubnet: 10.96.0.0/12 #Define service segment
scheduler: {}
This file should be given to each server. Although it is only used for 192.168.247.100 initialization, it is necessary for each machine to pull the image. The image warehouse in this file can obtain the image.
If this configuration file is outdated, you can update it:
kubeadm config migrate --old-config new.yaml --new-config new2.yaml
Now I use new Yaml file to obtain the required images for three images. Other servers do not need to change this yaml file anywhere:
kubeadm config images pull --config /root/new.yaml
If there is an error - v5 or something, the image address cannot be accessed. You can try two more available warehouse image addresses:
daocloud.io/daocloud
registry.cn-hangzhou.aliyuncs.com/google_containers

#Directly replace registry aliyuncs. com/google_ Containers is the address
After pulling down, only master1 needs to be operated:
init initialization:
kubeadm init --config /root/new.yaml --upload-certs
If it fails, there may be two reasons: the yaml file is not configured correctly, especially the ip address. Also, docker and kubelet have different drivers.
After success, just follow the command given by it. It includes the join method of master and the add method of node. Remember to save the join command
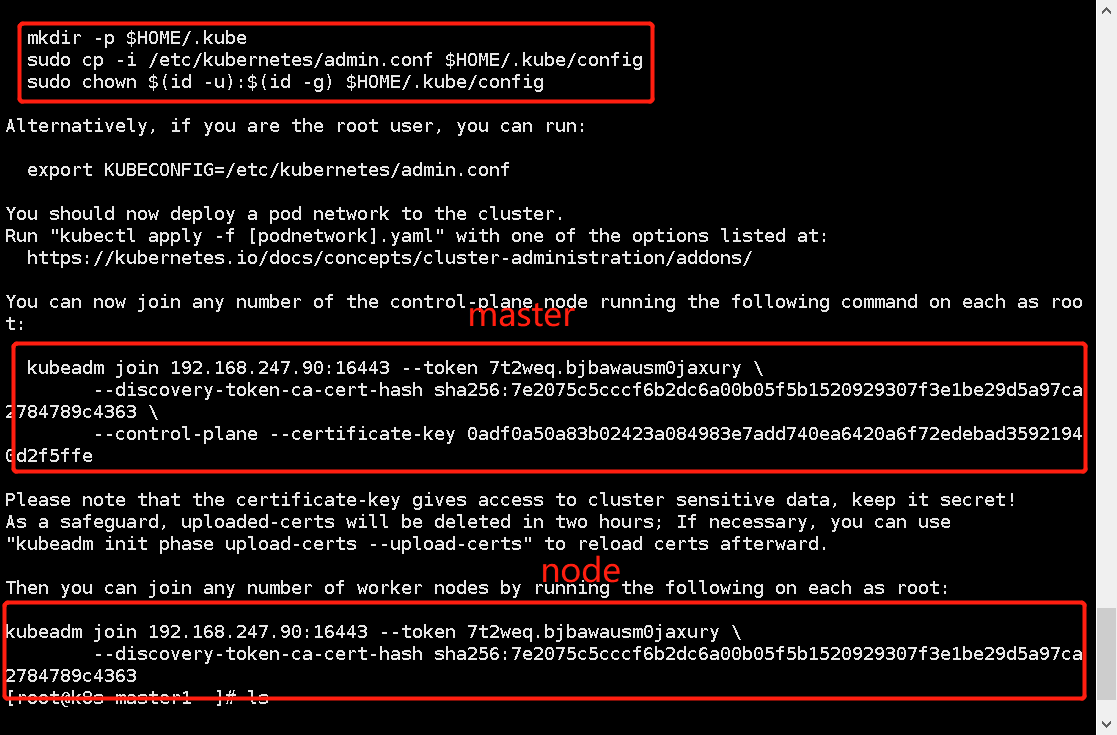
master1 execution:
mkdir -p $HOME/.kube
sudo cp -i /etc/kubernetes/admin.conf $HOME/.kube/config
sudo chown $(id -u):$(id -g) $HOME/.kube/config
The initialization of master1 has been completed. Next, start kubelet and add the following three machines:
systemctl enable --now kubelet
Step 13: add master2 and node1 to the cluster
master2: enter the command prompt after the initialization of master1
kubeadm join 192.168.247.90:16443 --token 7t2weq.bjbawausm0jaxury \
	--discovery-token-ca-cert-hash sha256:7e2075c5cccf6b2dc6a00b05f5b1520929307f3e1be29d5a97ca2784789c4363 \
	--control-plane --certificate-key 0adf0a50a83b02423a084983e7add740ea6420a6f72edebad35921940d2f5ffe
Then, as the master node, it also performs:
mkdir -p $HOME/.kube
sudo cp -i /etc/kubernetes/admin.conf $HOME/.kube/config
sudo chown $(id -u):$(id -g) $HOME/.kube/config
node1:
kubeadm join 192.168.247.90:16443 --token 7t2weq.bjbawausm0jaxury \
	--discovery-token-ca-cert-hash sha256:7e2075c5cccf6b2dc6a00b05f5b1520929307f3e1be29d5a97ca2784789c4363
View on master1:
kubectl get node

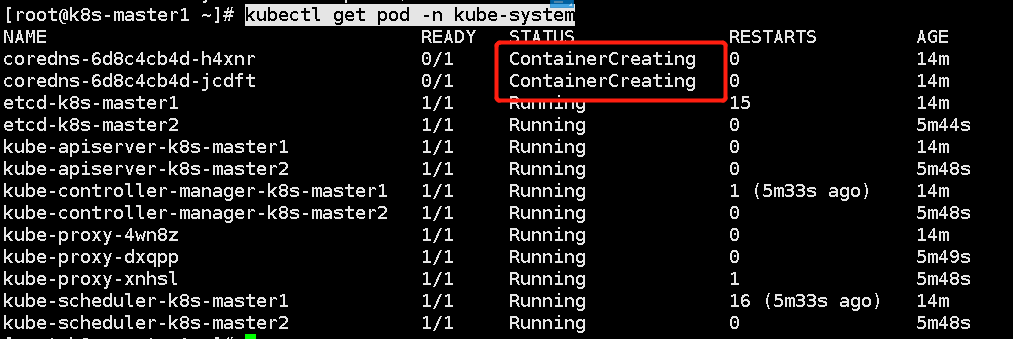
As can be seen from the above figure, the cluster dns can't work because we haven't added the calio network yet.
Step 14: add calio network
Just master1: Download yaml file:
curl https://docs.projectcalico.org/manifests/calico.yaml -O
Replace the ip address inside with the pod address of our cluster, which is new In yaml:
Uncomment and change to our cluster
Master 1 loads calio Yaml file:
kubectl apply -f calico.yaml
Let's look again:
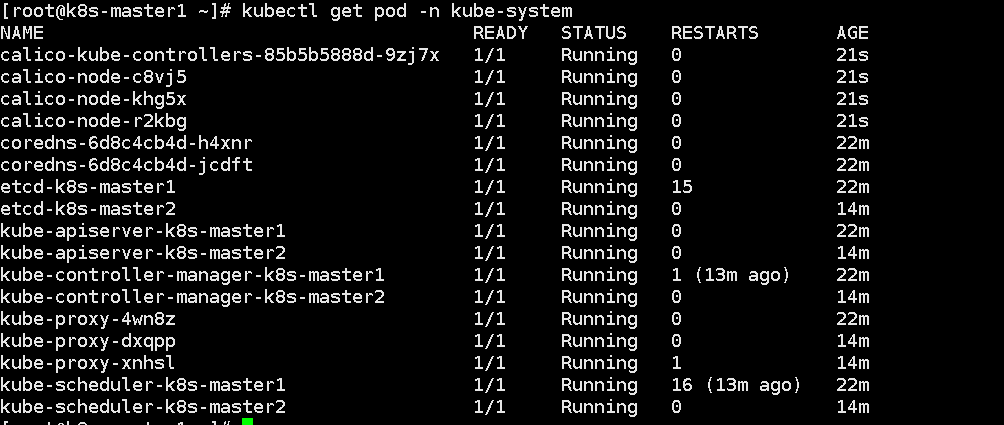
Cluster setup is now complete.