although Docker It has been very powerful, but there are still many inconveniences in practical use, such as cluster management, resource scheduling, file management and so on. In this era of containers, many solutions have emerged, such as Mesos, Swarm, Kubernetes and so on, among which Google is open source Kubernetes As a big brother.
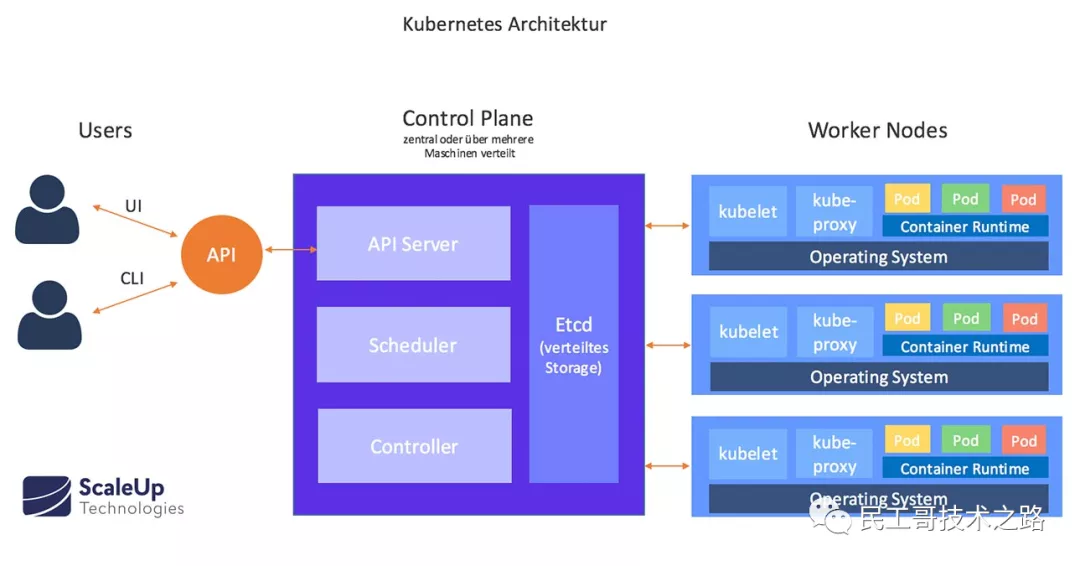
kubernetes has become the king in the field of container choreography. It is a container based cluster choreography engine. It has many characteristics and capabilities, such as cluster expansion, rolling upgrade and rollback, elastic scaling, automatic healing, service discovery and so on.
Introduction to kubernetes
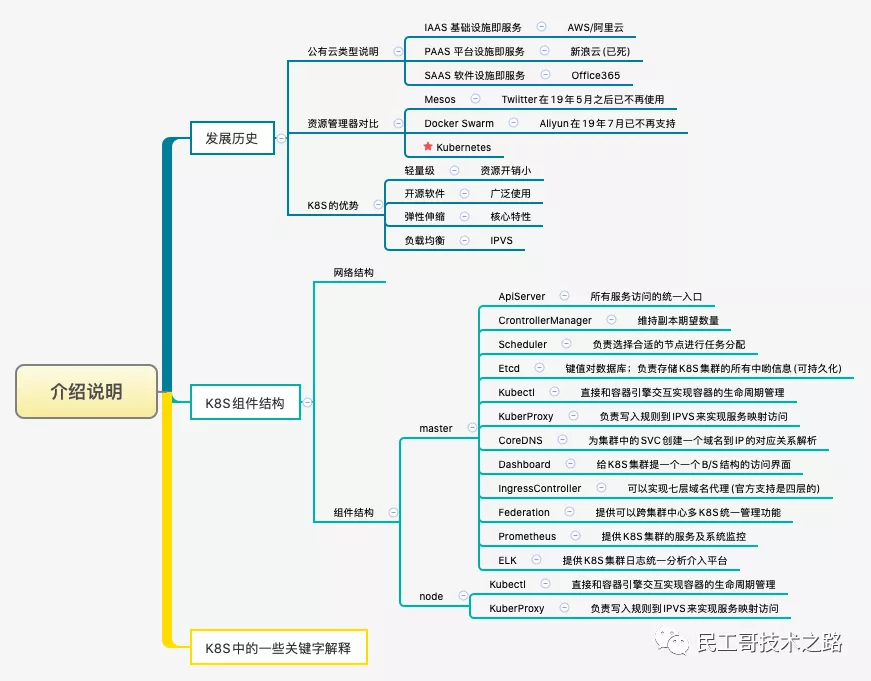
The core problem solved by Kubernetes
- Service discovery and load balancing
- Kubernetes can use DNS name or its own IP address to expose the container. If the traffic to the container is large, Kubernetes You can load balance and distribute network traffic to stabilize deployment.
- Storage orchestration
- Kubernetes allows you to automatically mount the storage system of your choice, such as local storage, public cloud providers, etc.
- Automatic deployment and rollback
- You can use Kubernetes Describes the desired state of the deployed container, which can change the actual state to the desired state at a controlled rate. For example, you can automate Kubernetes to create new containers for your deployment, delete existing containers, and use all their resources for the new container.
- Automatic binary packaging
- Kubernetes allows you to specify the CPU and memory (RAM) required for each container. When the container specifies a resource request, Kubernetes Better decisions can be made to manage the container's resources.
- Self repair
- Kubernetes restarts failed containers, replaces containers, kills containers that do not respond to user-defined health checks, and does not advertise them to clients until the service is ready.
- Key and configuration management
- Kubernetes Allows you to store and manage sensitive information, such as passwords, OAuth tokens, and ssh keys. You can deploy and update the key and application configuration without rebuilding the container image, and you do not need to expose the key in the stack configuration.
The emergence of Kubernetes not only dominates the market of container layout and changes the past operation and maintenance mode, which not only blurs the boundary between development and operation and maintenance, but also makes the role of DevOps clearer, which can be passed by every software engineer Kubernetes To define the topological relationship between services, the number of online nodes and resource usage, and can quickly realize complex operation and maintenance operations in the past, such as horizontal capacity expansion and blue-green deployment.
knowledge graph
What knowledge will you learn

Software architecture
Traditional client server architecture
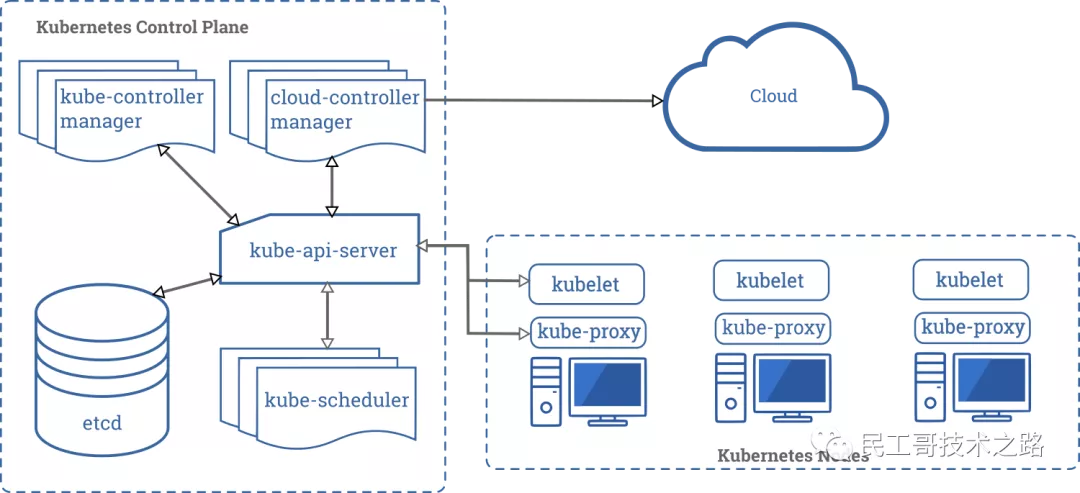
- Architecture description
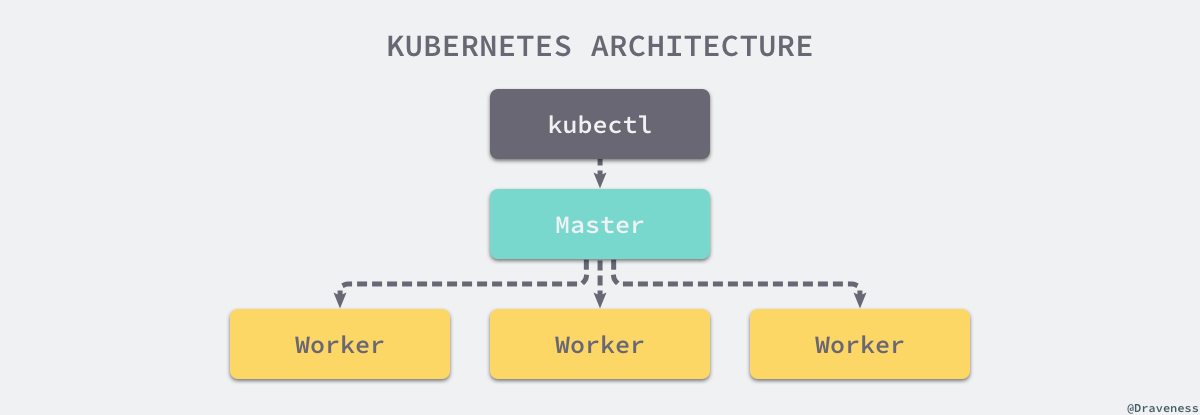
Kubernetes follows the very traditional client / server architecture mode. The client can connect with kubectl through RESTful interface or directly Kubernetes There is not much difference between the two in fact. The latter only encapsulates and provides the RESTful API provided by Kubernetes. every last Kubernetes Clusters are composed of a group of Master nodes and a series of Worker nodes. The Master node is mainly responsible for storing the state of the cluster and allocating and scheduling resources for Kubernetes objects.
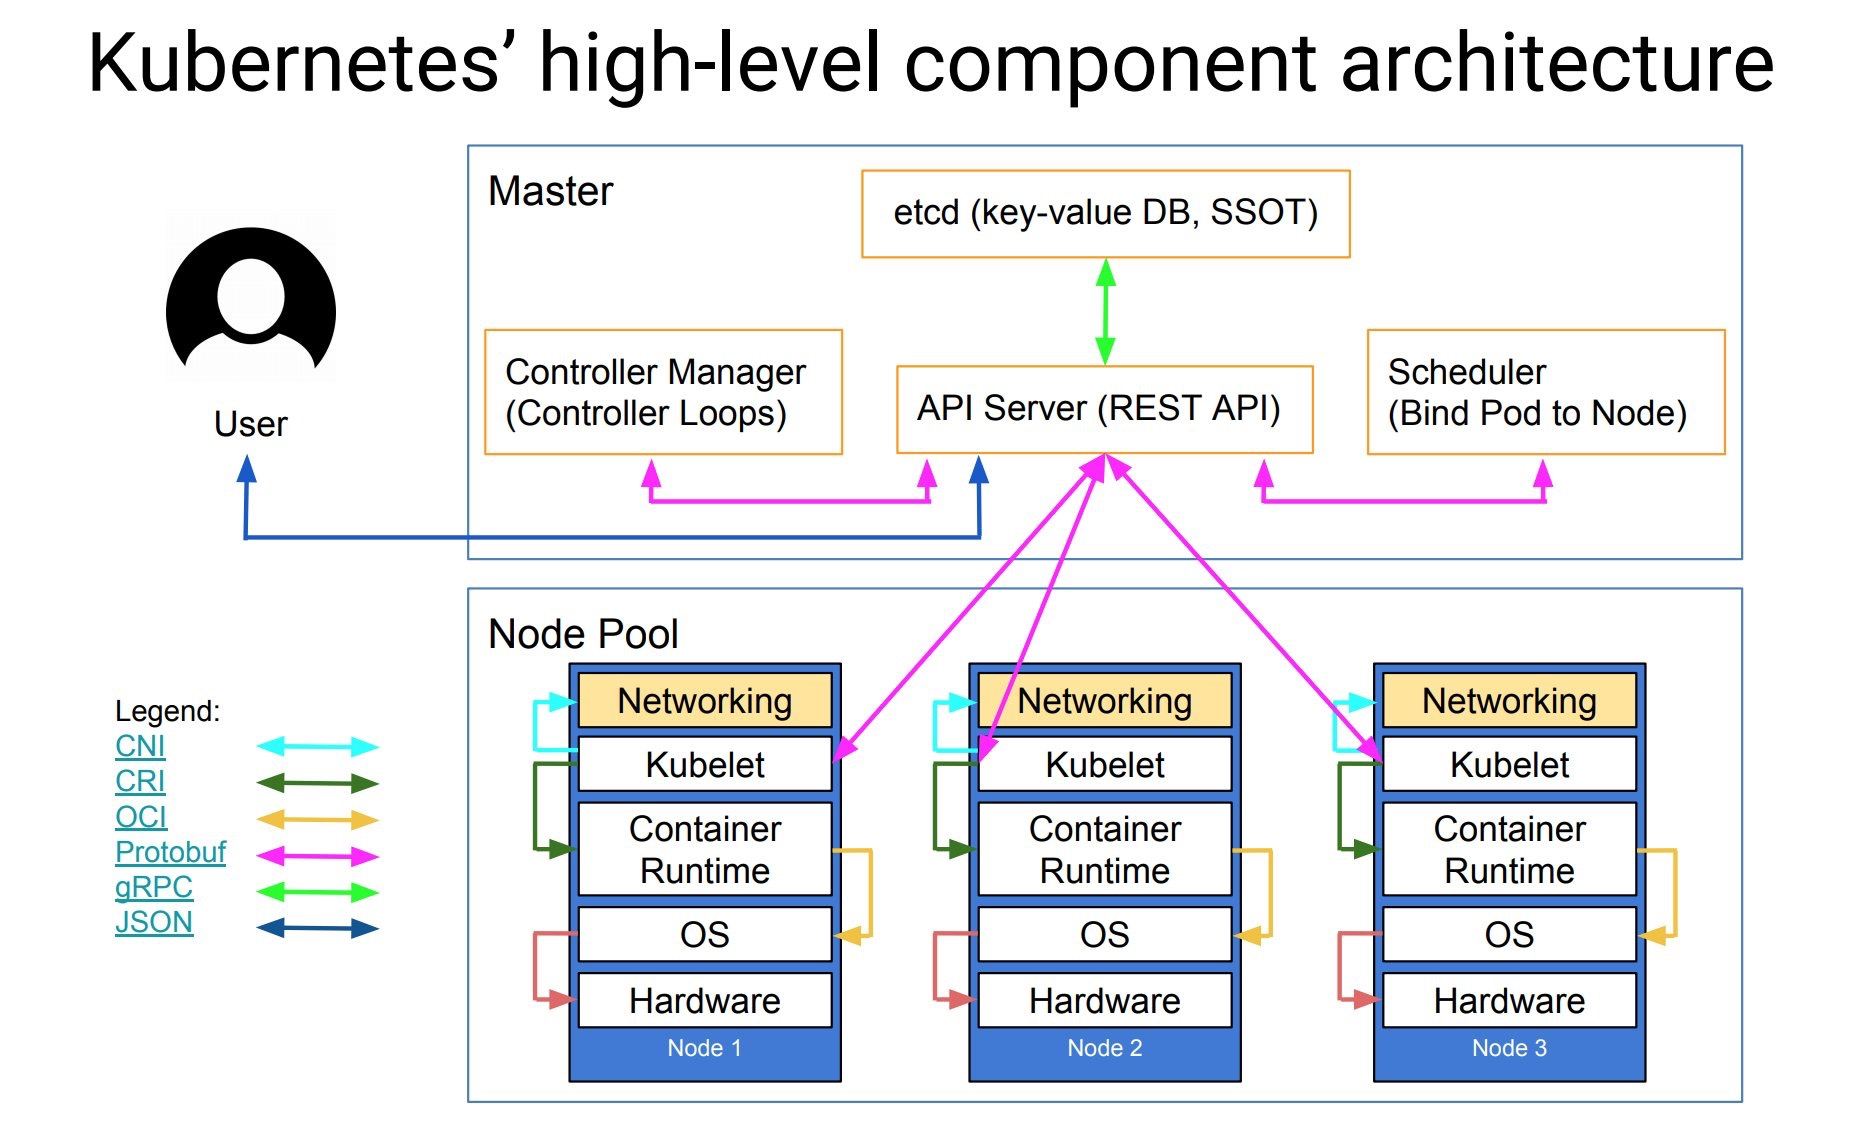
- Master node service - Master architecture
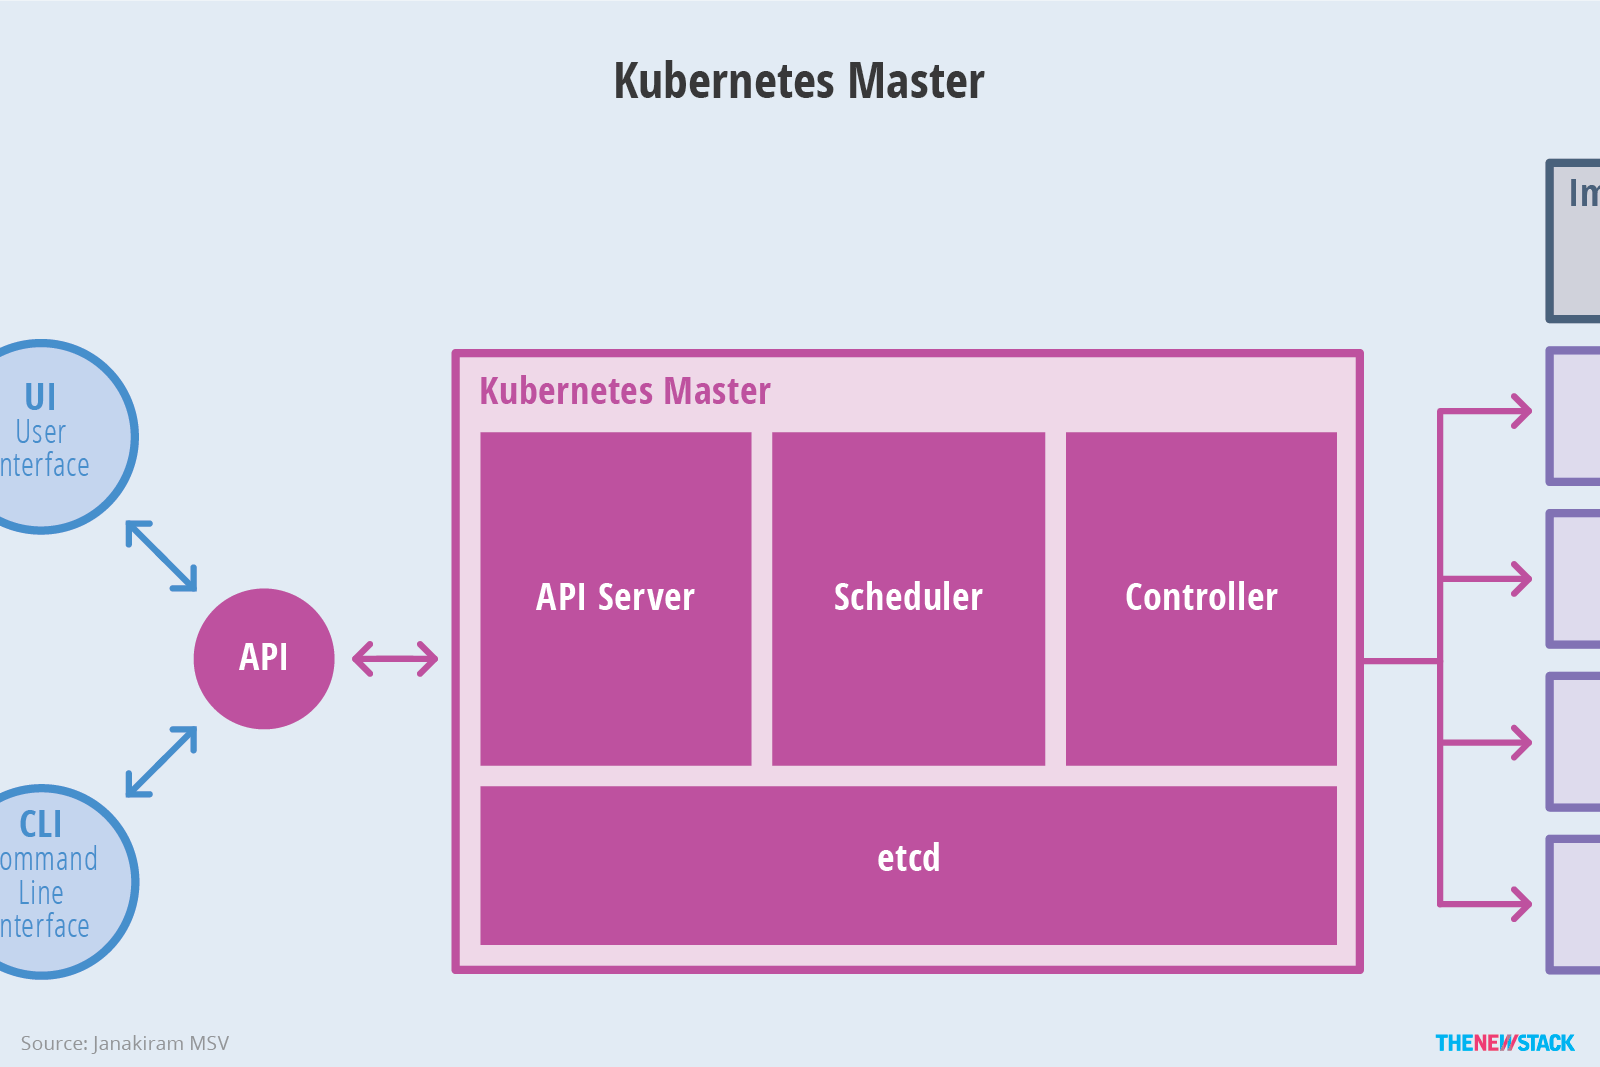
As the Master node that manages the cluster state, it is mainly responsible for receiving the request from the client, arranging the execution of the container and running the control loop to migrate the cluster state to the target state. The Master node consists of the following three components:
API Server: it is responsible for processing requests from users. Its main function is to provide external RESTful interfaces, including read requests for viewing cluster status and write requests for changing cluster status. It is also the only component to communicate with etcd cluster.
etcd: it is a key value database with consistency and high availability. It can be used as a background database to save all cluster data of Kubernetes.
Scheduler: the component on the master node, which monitors the newly created pods that do not specify the running node, and selects the node to let the Pod run on it. The factors considered in the scheduling decision include the resource requirements of a single Pod and Pod set, hardware / software / policy constraints, affinity and anti affinity specifications, data location, interference between workloads and deadline.
Controller Manager: the components that run the controller on the master node. Logically, each controller is a separate process, but in order to reduce complexity, they are compiled into the same executable file and run in the same process. These controllers include: node controller (responsible for notifying and responding in case of node failure), replica controller (responsible for maintaining the correct number of pods for each replica controller object in the system), endpoint controller (filling endpoint Endpoints object, i.e. adding service and Pod)) Service account and token controller (create default account and API access token for new namespace).
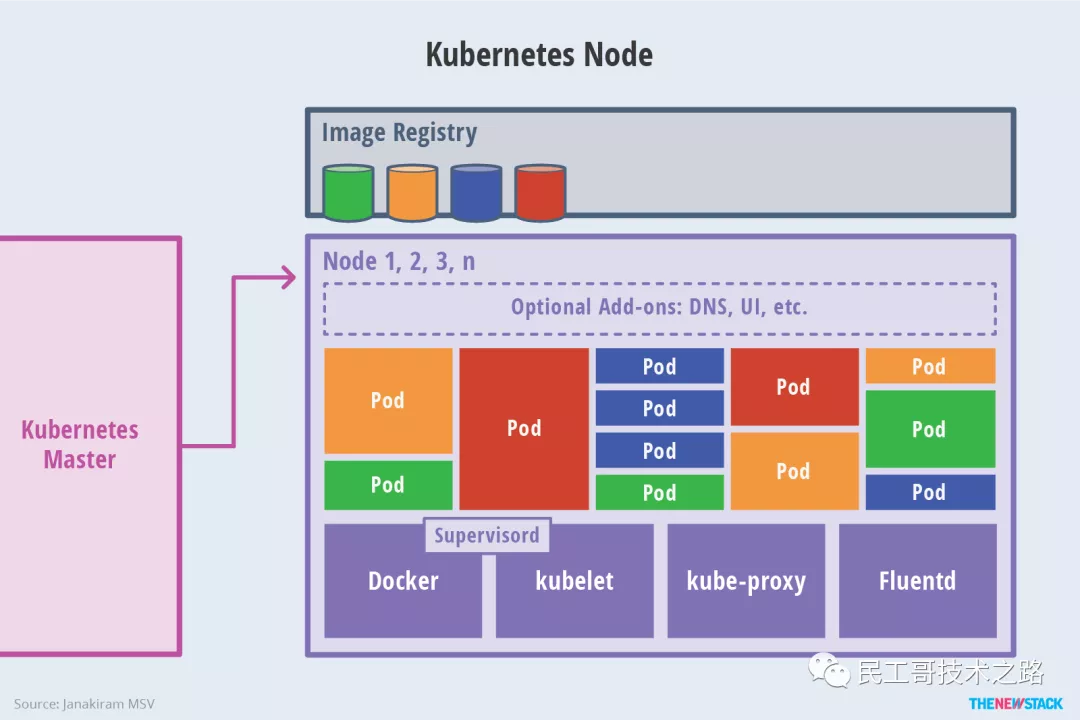
- Work Node - Node architecture
The implementation of other Worker nodes is relatively simple. It is mainly composed of kubelet and Kube proxy.
kubelet: it is the agent that the work node performs operations. It is responsible for the specific container life cycle management, manages the container according to the information obtained from the database, and reports the running status of pod.
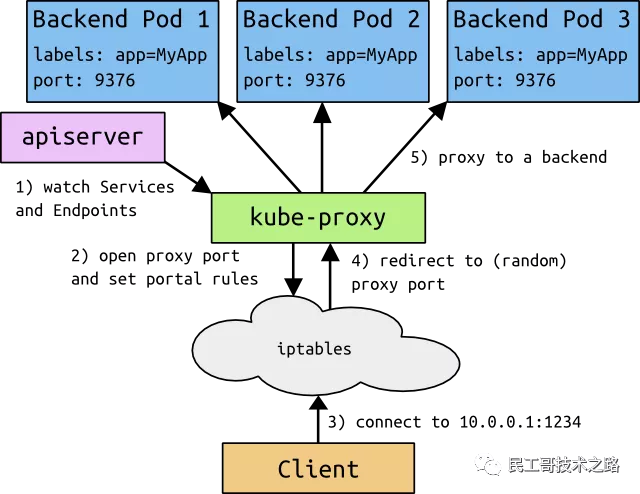
Kube proxy: it is a simple network access proxy and a Load Balancer. It is responsible for assigning the request to access a service to the Pod with the same label on the work node. The essence of Kube proxy is to realize Pod mapping by operating firewall rules (iptables or ipvs).
Container Runtime: the container runtime environment is the software responsible for running containers. Kubernetes supports multiple container runtime environments: Docker, containerd, cri-o, rktlet, and any implementation of kubernetes CRI (container runtime environment interface).
Component description
This paper mainly introduces some basic concepts of K8s
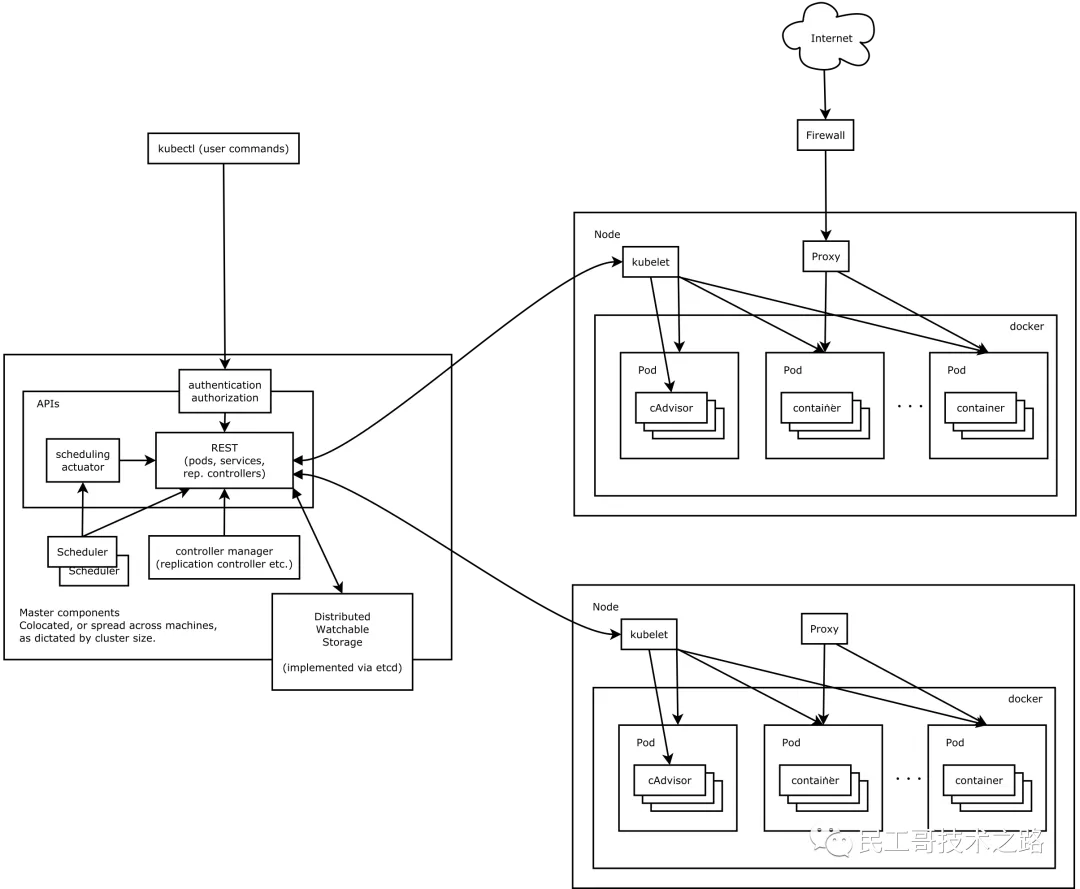
It is mainly composed of the following core components:
- apiserver
- The only access to all services, providing mechanisms such as authentication, authorization, access control, API registration and discovery
- controller manager
- Be responsible for maintaining the status of the cluster, such as expected number of copies, fault detection, automatic expansion, rolling update, etc
- scheduler
- Be responsible for resource scheduling, and schedule the Pod to the corresponding machine according to the predetermined scheduling strategy
- etcd
- The key pair of the cluster saves the state of the entire database
- kubelet
- Responsible for maintaining the life cycle of containers and managing volumes and networks
- kube-proxy
- Responsible for providing Service discovery and load balancing within the cluster for services
- Container runtime
- Responsible for image management and the real operation of Pod and container
In addition to the core components, there are some recommended plug-ins:
- CoreDNS
- You can create a DNS service to resolve the correspondence between domain names and IP for SVC S in the cluster
- Dashboard
- It provides an access portal of B/S architecture for K8s cluster
- Ingress Controller
- The official can only implement four layers of network agents, while Ingress can implement seven layers of agents
- Prometheus
- Provide K8s cluster with resource monitoring capability
- Federation
- Provide a unified management function that can span multiple K8s in the cluster center, and provide clusters across availability zones
Reference links for the above contents: https://www.escapelife.site/posts/2c4214e7.html
install
Install v1 Version 16.0 succeeded. Record here to prevent latecomers from stepping on the pit.
In this article, the installation steps are as follows:
- Install docker CE 18.09.9 (all machines)
- Set k8s environmental preconditions (all machines)
- Install k8s v1 16.0 master management node
- Install k8s v1 16.0 node work node
- Install flannel (master)
For detailed installation steps, refer to: CentOS built K8S, one-time success, collection!
For the cluster installation tutorial, please refer to: The latest and most detailed information of the whole network is based on v1 Version 20, K8S cluster tutorial for minimizing non pit deployment
Implementation principle of Pod
Pod is the smallest and simplest Kubernetes object
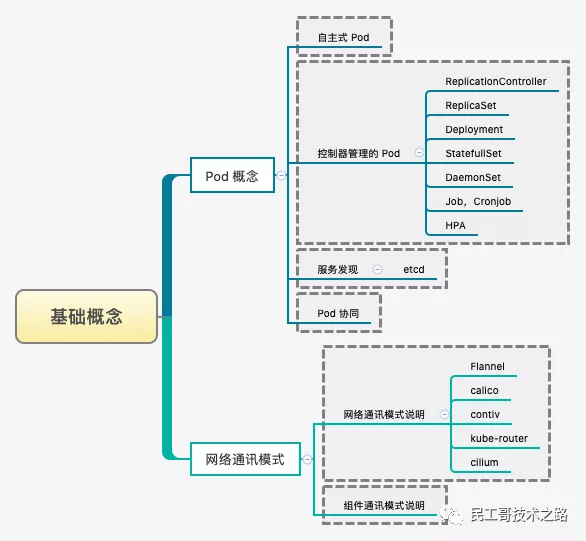
Pod, Service, Volume and Namespace are the four basic objects in Kubernetes cluster. They can represent the application, workload, network and disk resources deployed in the system and jointly define the state of the cluster. Many other resources in Kubernetes only combine these basic objects.
- Pod - > basic unit in cluster
- Service - > solve the problem of how to access the services in the Pod
- Volume - > storage volume in cluster
- Namespace - > namespace provides virtual isolation for the cluster
For details, please refer to: Implementation principle of Pod of Kubernetes
Harbor warehouse
Kuternetes enterprise Docker private warehouse Harbor tool.
Each component of Harbor is built in the form of Docker container, and Docker Compose is used to deploy it. The Docker Compose template for deploying Harbor is located at / deployer / Docker Compose In YML, it is composed of five containers, which are connected together in the form of Docker link, and the containers access each other through container names. For end users, only the service port of proxy (i.e. Nginx) needs to be exposed.
- Proxy
- Reverse proxy composed of Nginx server
- Registry
- Container instance composed of Docker's official open source Registry image
- UI
- That is, the core services Service in the architecture. The code constituting this container is the main body of the Harbor project
- MySQL
- Database container composed of official MySQL image
- Log
- The container running rsyslogd collects logs of other containers in the form of log driver
For detailed introduction and construction steps, please refer to: Building based on Harbor in enterprise environment
YAML syntax
YAML is a very concise / powerful / special language for writing configuration files!
The full name of YAML is the recursive abbreviation of "YAML Ain't a Markup Language". The design of this language refers to languages such as JSON / XML and SDL, and emphasizes data-centered, concise, easy to read and easy to write.

YAML syntax features
People who have learned programming should understand it very easily

Grammatical features
- Case sensitive
- Hierarchical relationships are represented by indentation
- Do not use tab indent, only use space bar
- The number of indented spaces is not important, as long as the same level of left alignment
- Use # to represent comments
I recommend you an article: YAML syntax of Kubernetes , this article is very detailed, with many examples.
Resource list
All contents in K8S are abstracted as resources, which are called objects after instantiation.
In the Kubernetes system, Kubernetes Objects are persistent entities, Kubernetes Use these entities to represent the state of the whole cluster. In particular, they describe the following information:
- Which containerized applications are running and on which Node
- Resources that can be used by applications
- Strategies for application runtime performance, such as restart strategy, upgrade strategy, and fault tolerance strategy
Kubernetes Objects are "targeted records" - once an object is created, Kubernetes The system will continue to work to ensure that objects exist. By creating objects, you essentially tell the Kubernetes system what the required cluster workload looks like, which is the expected state of the Kubernetes cluster.
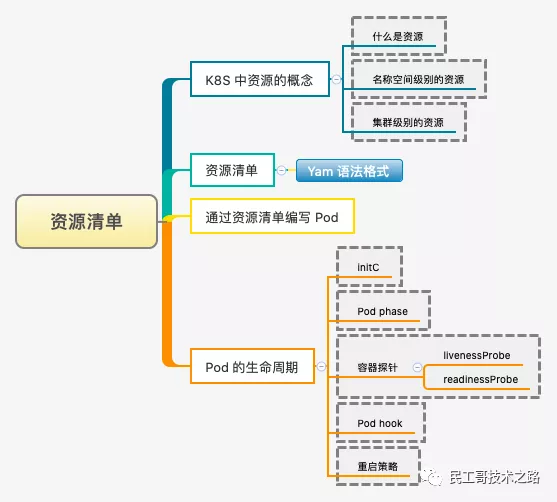
See here for a detailed introduction to the resource list of Kubernetes
Resource controller
The preparation of Kubernetes resource controller configuration file is the top priority of learning K8S!
The resource quota controller ensures that the specified resource object will never exceed the configured resources, which can effectively reduce the probability of downtime of the whole system and enhance the robustness of the system. It plays a very important role in the stability of the whole cluster.
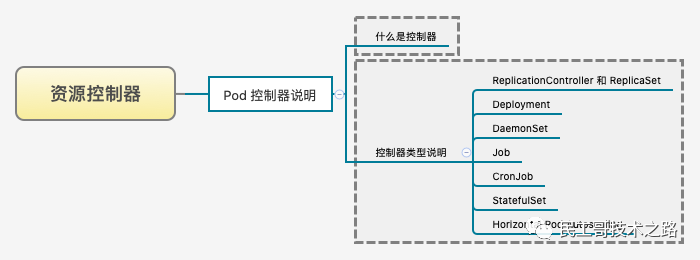
Kubernetes resource controller manual
Service discovery
In order to realize load balancing between Service instances and Service discovery between different services, Kubernetes creates Service objects, and also creates Ingress objects for accessing the cluster from outside the cluster.
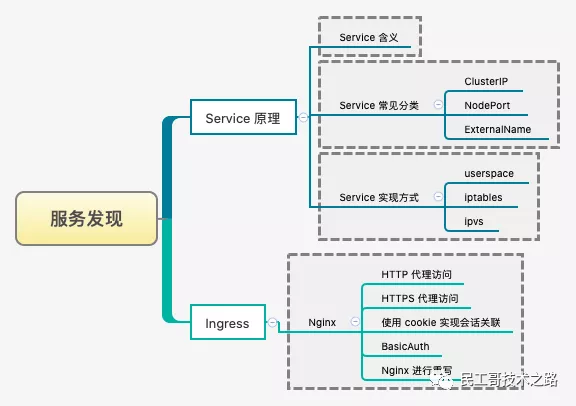
Service discovery of Kubernetes
Ingress service
We all know that the traditional SVC only supports the code on the fourth layer, but there is nothing we can do about the code on the seventh layer. For example, we use K8S cluster to provide HTTPS services externally. For convenience and convenience, we need to configure SSL encryption on the external Nginx service, but when sending the request to the back-end service, we uninstall the certificate, and then use HTTP protocol for processing. In the face of this problem, K8S uses ingress (launched in version 1.11 of K8S) to deal with it.
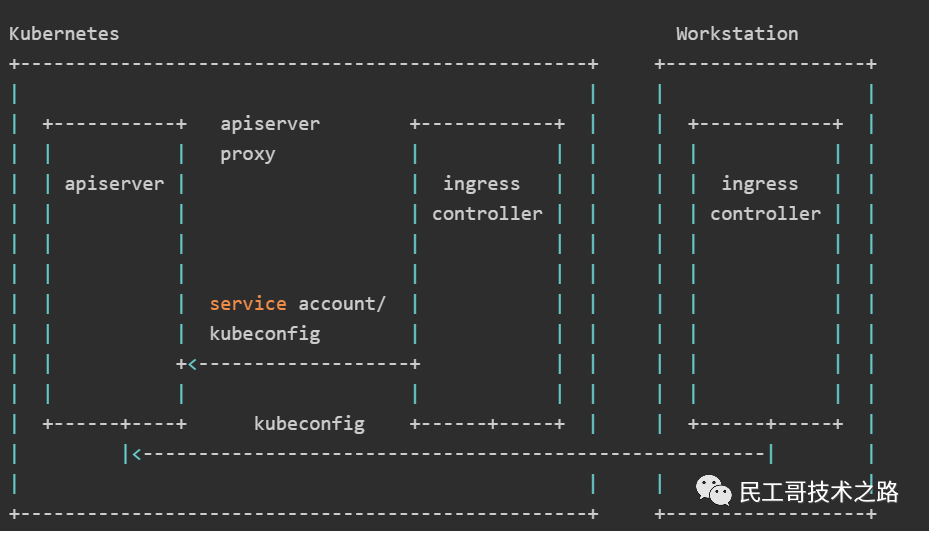
For more details, see: Kubernetes Ingress service , introduce the installation method of Ingress service, configure the HTTP proxy access of Ingress service, introduce the BasicAuth authentication method of Ingress service, and introduce the rule rewriting method of Ingress.
data storage
In previous articles, we have known many components in K8S, including resource controller and so on. In the resource controller, we talked about the controller component StatefulSet, which is specially generated for stateful services. Where should the corresponding storage be stored?
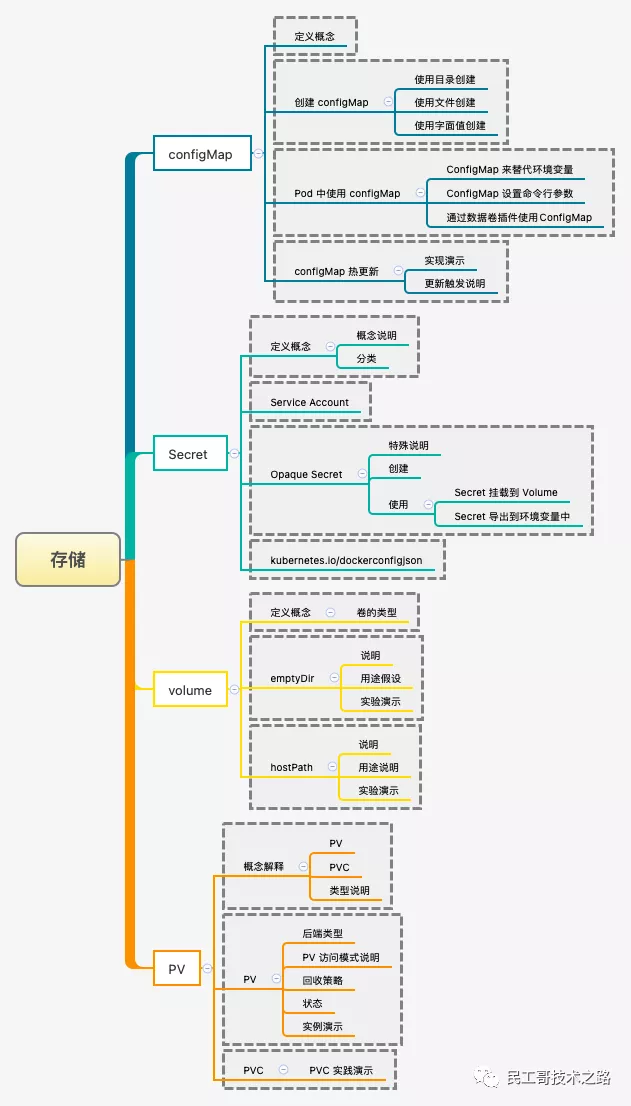
Introduce the common storage mechanisms in K8S that we can use: Data storage of Kubernetes
Cluster scheduling
There is a requirement that the configuration of multiple services in the cluster is inconsistent. This leads to uneven resource allocation. For example, we need some service nodes to run computing intensive services, and some service nodes to run services that require a lot of memory. Of course, in k8s, relevant services are also configured to deal with the above problems, that is, Scheduler.
Scheduler is the scheduler of kubernetes. Its main task is to allocate the defined Pod to the nodes of the cluster. It sounds very simple, but there are many questions to consider:
- fair
- How to ensure that each node can be allocated resources
- Efficient utilization of resources
- All resources in the cluster are maximized
- efficiency
- The scheduling performance is good and can complete the scheduling of a large number of pods as soon as possible
- flexible
- Allows users to control the logic of scheduling according to their own needs
The Scheduler runs as a separate program. After startup, it will always strengthen the API Server and obtain podspec For a Pod with an empty nodeName, a binding will be created for each Pod to indicate which node the Pod should be placed on.
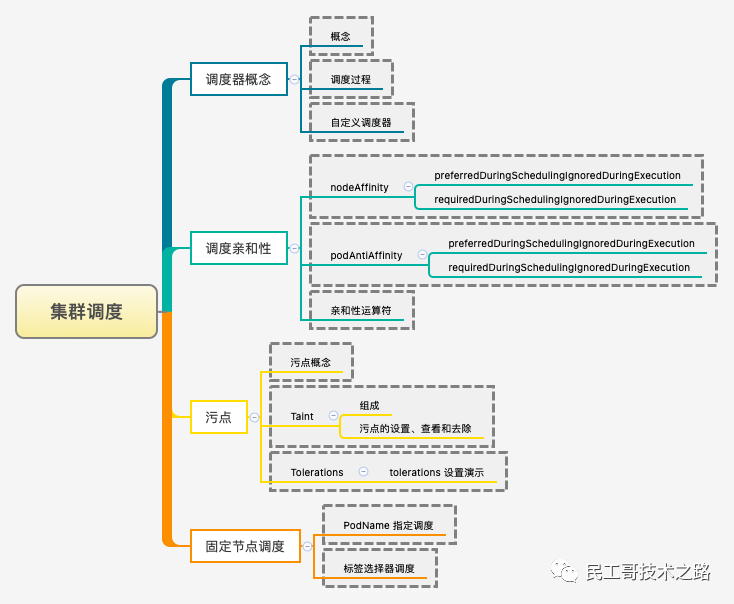
For detailed introduction, please refer to: Cluster scheduling of Kubernetes
kubectl User Guide
kubectl is the built-in client of Kubernetes, which can be used for direct operation Kubernetes Cluster.
Daily in use Kubernetes kubectl tool may be the most commonly used tool in the process of, so when we spend a lot of time studying and learning Kuernetes So it is very necessary for us to understand how to use it efficiently.
From the perspective of users, kubectl is to control the cockpit of Kubernetes, which allows you to perform all possible Kubernetes operations; From a technical point of view, kubectl is just a client of Kubernetes API.
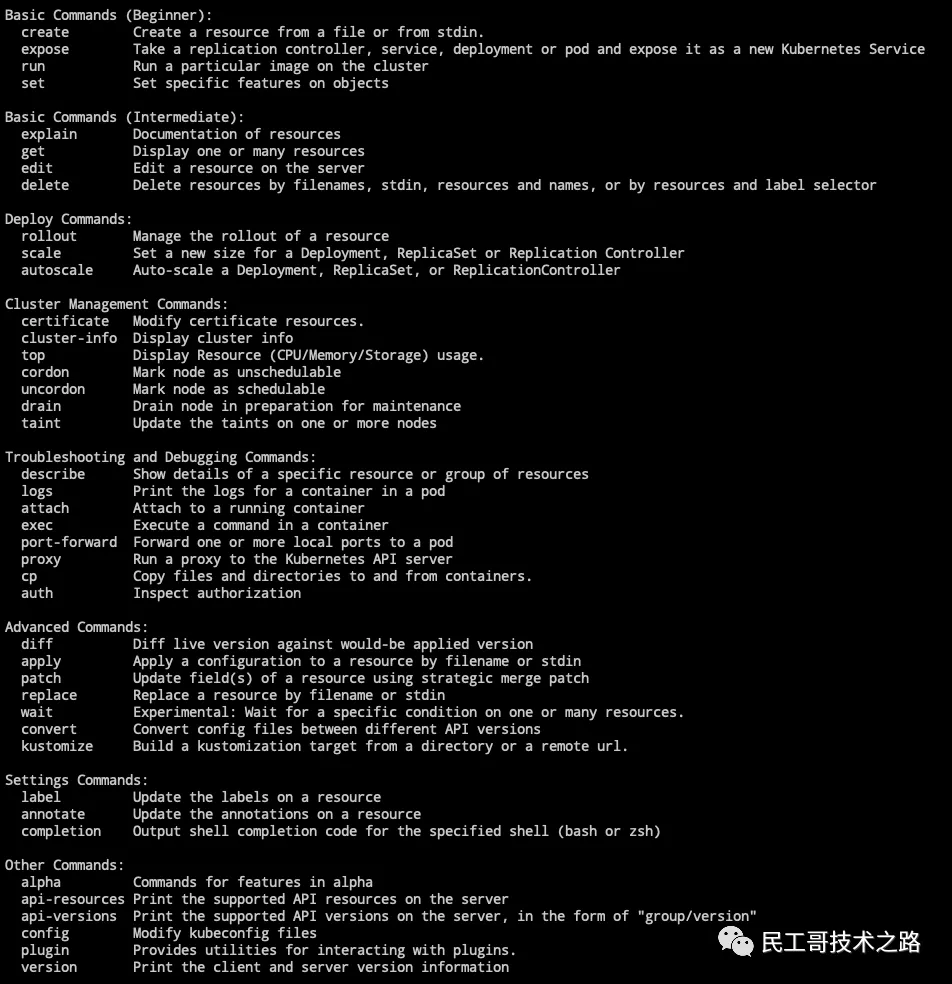
Kubernetes API is an HTTP REST API service, which is the real user interface used by kubernetes, so Kubernetes Actual control is carried out through this API. This means that everyone Kubernetes All operations will be exposed through API endpoints. Of course, corresponding operations can be performed through HTTP requests to these API ports. Therefore, the main task of kubectl is to execute Kubernetes HTTP request for API.
Tool usage parameters
get       #Displays one or more resources
describe  #Show resource details
create    #Create a resource from a file or standard input
update   #Update resources from file or standard input
delete   #Delete resources through file name, standard input, resource name or label
log       #Output the log of a container in pod
rolling-update  #Perform a rolling upgrade on the specified RC
exec  #Execute commands inside the container
port-forward #Forward local port to Pod
proxy   #Start proxy server for Kubernetes API server
run     #Start the container with the specified image in the cluster
expose   #Expose SVC or pod as a new kubernetes service
label     #Update the label of the resource
config   #Modify kubernetes configuration file
cluster-info #Display cluster information
api-versions #Output the API version supported by the server in the format of "group / version"
version       #Output the version information of the server and client
help         #Displays help information for each command
ingress-nginx  #Plug in for managing the ingress service (official installation and usage)
Use related configuration
# Kubectl automatic completion
$ source <(kubectl completion zsh)
$ source <(kubectl completion bash)

# Displays the merged kubeconfig configuration
$ kubectl config view

# Get the documents of pod and svc
$ kubectl explain pods,svc
Create resource object
Step by step creation
# yaml
kubectl create -f xxx-rc.yaml
kubectl create -f xxx-service.yaml

# json
kubectl create -f ./pod.json
cat pod.json | kubectl create -f -

# yaml2json
kubectl create -f docker-registry.yaml --edit -o json
Create once
kubectl create -f xxx-service.yaml -f xxx-rc.yaml
Create according to all yaml file definitions in the directory
kubectl create -f <catalogue>
Use the url to create the resource
kubectl create -f https://git.io/vPieo
View resource objects
View all Node or Namespace objects
kubectl get nodes
kubectl get namespace
View all Pod objects
# View subcommand help information
kubectl get --help

# Lists all pod s in the default namespace
kubectl get pods

# Lists all pod s in the specified namespace
kubectl get pods --namespace=test

# List all pod s in all namespace s
kubectl get pods --all-namespaces

# List all pod s and display details
kubectl get pods -o wide
kubectl get replicationcontroller web
kubectl get -k dir/
kubectl get -f pod.yaml -o json
kubectl get rc/web service/frontend pods/web-pod-13je7
kubectl get pods/app-prod-78998bf7c6-ttp9g --namespace=test -o wide
kubectl get -o template pod/web-pod-13je7 --template={{.status.phase}}

# List all pod s in the namespace, including uninitialized ones
kubectl get pods,rc,services --include-uninitialized
View all RC objects
kubectl get rc
Deployment view all objects
#View all deployment s
kubectl get deployment

#List the specified deployment
kubectl get deployment my-app
View all Service objects
kubectl get svc
kubectl get service
View Pod objects under different namespaces
kubectl get pods -n default
kubectl get pods --all-namespace
View resource description
Show Pod details
kubectl describe pods/nginx
kubectl describe pods my-pod
kubectl describe -f pod.json
View Node details
kubectl describe nodes c1
View Pod information associated with RC
kubectl describe pods <rc-name>
Update patch resources
Rolling update
# Rolling update pod frontend-v1
kubectl rolling-update frontend-v1 -f frontend-v2.json

# Update resource name and update image
kubectl rolling-update frontend-v1 frontend-v2 --image=image:v2

# Update the image in frontend pod
kubectl rolling-update frontend --image=image:v2

# Exit an existing rolling update in progress
kubectl rolling-update frontend-v1 frontend-v2 --rollback

# Mandatory replacement; Re create the resource after deletion; The service will be interrupted
kubectl replace --force -f ./pod.json

# Add label
kubectl label pods my-pod new-label=awesome

# adding annotations
kubectl annotate pods my-pod icon-url=http://goo.gl/XXBTWq
Repair resources
# Partial update node
kubectl patch node k8s-node-1 -p '{"spec":{"unschedulable":true}}'

# Update container image; spec.containers[*].name is required because it is a merged keyword
kubectl patch pod valid-pod -p \
    '{"spec":{"containers":[{"name":"kubernetes-serve-hostname","image":"new image"}]}}'
Scale resource
# Scale a replicaset named 'foo' to 3
kubectl scale --replicas=3 rs/foo

# Scale a resource specified in "foo.yaml" to 3
kubectl scale --replicas=3 -f foo.yaml

# If the deployment named mysql's current size is 2, scale mysql to 3
kubectl scale --current-replicas=2 --replicas=3 deployment/mysql

# Scale multiple replication controllers
kubectl scale --replicas=5 rc/foo rc/bar rc/baz
Delete resource object
Based on XXX Yaml file delete Pod object
#yaml file name is consistent with the file you created
kubectl delete -f xxx.yaml
Delete the pod object including a label
kubectl delete pods -l name=<label-name>
Delete the service object including a label
kubectl delete services -l name=<label-name>
Delete the pod and service objects including a label
kubectl delete pods,services -l name=<label-name>
Delete all pod/services objects
kubectl delete pods --all
kubectl delete service --all
kubectl delete deployment --all
Edit resource file
Edit any API resources in the editor
#Edit the service named docker registry
kubectl edit svc/docker-registry
Execute commands directly
On the host, execute the command directly without entering the container
Execute the date command of pod. The first container of pod is used by default
kubectl exec mypod -- date
kubectl exec mypod --namespace=test -- date
Specify a container in the pod to execute the date command
kubectl exec mypod -c ruby-container -- date
Enter a container
kubectl exec mypod -c ruby-container -it -- bash
View container log
View log directly
#Do not refresh kubectl logs mypod in real time
kubectl logs mypod --namespace=test
View log real-time refresh
kubectl logs -f mypod -c ruby-container
management tool
Kubernetes is accelerating its application in cloud native environment, but how to manage kubernetes clusters running anywhere in a unified and safe way is facing challenges, and effective management tools can greatly reduce the difficulty of management.
K9s
K9s is a terminal based resource dashboard. It has only one command line interface. No matter what you do on Kubernetes dashboard Web UI, you can use K9s dashboard tool to do the same operation on the terminal. K9s continues to focus on the Kubernetes cluster and provides commands to use the resources defined on the cluster.
Details: Kubernetes cluster management tool K9S
recommend: 7 tools to easily manage Kubernetes clusters
Production environment best practices
Use some of Kubernetes' strategies to apply best practices in security, monitoring, networking, governance, storage, container lifecycle management, and platform selection. Let's take a look at some of Kubernetes's production best practices. Running Kubernetes in production is not easy; There are several aspects to pay attention to.
Are survival probes and ready probes used for health checks?
Managing large-scale distributed systems can be complex, especially when there are problems, we can't be notified in time. To ensure the normal operation of the application instance, set Kubernetes Health check-up is very important.
By creating a custom run health check, you can effectively avoid the operation of zombie services in the distributed system, which can be adjusted according to the environment and needs.
The purpose of the ready probe is to Kubernetes Know if the application is ready to serve traffic. Kubernetes will always ensure that the ready probe passes and then start distributing services to send traffic to the Pod.
Liveness survival probe
How do you know if your app is alive or dead? The survival probe allows you to do this. If your app dies, Kubernetes will remove the old Pod and replace it with a new one.
Resource Management - resource management
It is a good practice to specify resource requests and restrictions for a single container. Another good practice is to divide the Kubernetes environment into separate namespaces for different teams, departments, applications, and clients.
Kubernetes resource usage
Kubernetes resource usage refers to the amount of resources used by the container / pod in production.
Therefore, it is very important to pay close attention to the resource use of pods. An obvious reason is the cost, because the higher the utilization of resources, the less the waste of resources.
Resource utilization
Ops teams usually want to optimize and maximize the percentage of resources consumed by pods. Resource usage is one of the indicators of the actual optimization degree of Kubernetes environment.
You can think of the optimized Kubernetes The average CPU and other resource utilization of containers running in the environment is the best.
Enable RBAC
RBAC stands for role-based access control. It is a method used to restrict the access and access of users and applications on the system / network.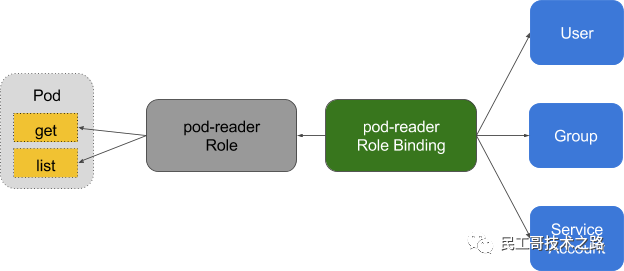 They introduced RBAC from kubernetes version 1.8. Use RBAC authorization. K8s RBAC is used to create authorization policies.
In Kubernetes, RBAC is used for authorization. With RBAC, you will be able to grant users, accounts, add / delete permissions, set rules and other permissions. Therefore, it is basically Kubernetes Additional security layers have been added to the cluster. RBAC limits who can access your production environment and cluster.
Cluster provisioning and load balancing
Production level Kubernetes infrastructure usually needs to consider some key aspects, such as high availability, multi host, multi etcd Kubernetes cluster, etc. The configuration of such clusters usually involves tools such as Terraform or Ansible.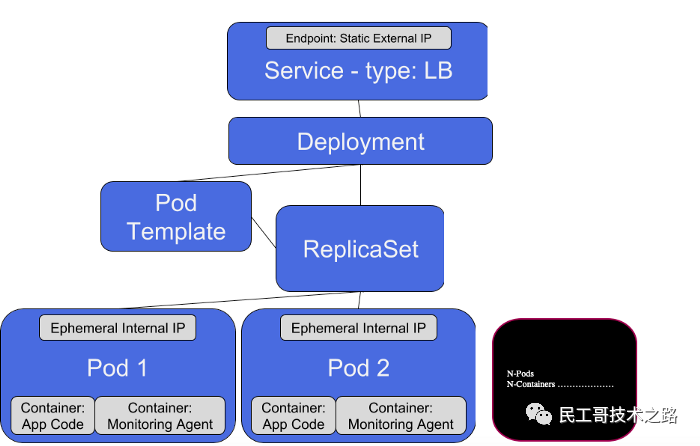 Once the clusters are set up and pods are created for running applications, these pods are equipped with load balancers; These load balancers route traffic to services. The open source Kubernetes project is not the default load balancer; Therefore, it needs to integrate with nginx progress controller and tools such as HAProxy or ELB, or any other tool to expand Kubernetes' progress plug-in to provide load balancing capability.
Label Kubernetes objects
Tags are like key / value pairs attached to objects, such as pods. Tags are used to identify the attributes of objects, which are important and meaningful to users.
The use of kunetes is an important problem in production; Tags allow batch queries and manipulation of Kubernetes objects. What's special about tags is that they can also be used to identify Kubernetes objects and organize them into groups. One of the best use cases for doing this is to group pod s according to the application they belong to. Here, the team can build and own any number of labeling conventions.
Configure network policy
When using Kubernetes, it is important to set up network policies. Network policy is just an object, which enables you to clearly declare and decide which traffic is allowed and which is not allowed. In this way, Kubernetes will be able to block all other unwanted and irregular traffic. Defining and limiting network traffic in our cluster is one of the basic and necessary security measures strongly recommended.
Each network policy in Kubernetes defines a list of authorized connections as described above. Whenever any network policy is created, all pods it references are eligible to establish or accept the listed connections. In short, a network policy is basically a white list of authorized and allowed connections - a connection, whether to or from a pod, is allowed only if at least one network policy applied to the pod allows it.
Cluster monitoring and logging
Monitoring deployment is critical when using Kubernetes. It is more important to ensure that configuration, performance and traffic remain secure. Without logging and monitoring, it is impossible to diagnose the problem. In order to ensure compliance, monitoring and logging become very important. When monitoring, it is necessary to set the logging function on each layer of the architecture. The generated logs will help us enable security tools, audit capabilities, and analyze performance.
Start with a stateless application
Running stateless applications is much simpler than running stateful applications, but this idea is changing as Kubernetes operators continue to grow. For teams new to Kubernetes, it is recommended to use stateless applications first.
It is recommended to use stateless backend, so that the development team can ensure that there are no long-running connections, which increases the difficulty of expansion. With stateless, developers can also deploy applications more efficiently and with zero downtime. It is generally believed that stateless applications can be easily migrated and expanded according to business needs.
Side start automatic expansion and contraction
Kubernetes has three auto scaling functions for deployment: horizontal pod auto scaling (HPA), vertical pod auto scaling (VPA), and cluster auto scaling.
The horizontal pod autoscaler automatically expands the number of deployment, replicationcontroller, replicaset, and statefullset based on the perceived CPU utilization.
Vertical pod autoscaling recommends appropriate values for CPU and memory requests and limits, which can be automatically updated.
Cluster Autoscaler expands and reduces the size of the work node pool. It resizes the Kubernetes cluster based on current utilization.
Control the source of image pull
Controls the mirror source of all containers running in the cluster. If you allow your Pod to pull images from public resources, you don't know what's really running in it.
If you extract them from a trusted registry, you can apply policies on the registry to extract secure and authenticated images.
Continuous learning
Continuously evaluate the status and settings of the application to learn and improve. For example, reviewing the historical memory usage of containers, we can conclude that we can allocate less memory and save costs in the long run.
Protect important services
Using pod priority, you can determine the importance of setting the operation of different services. For example, for better stability, you need to ensure that RabbitMQ pod is more important than your app pod. Or your portal controller pods is more important than data processing pods to keep the service available to users.
zero downtime
By running all services in HA, zero downtime upgrade of clusters and services is supported. This will also ensure higher availability for your customers.
Pod anti affinity is used to ensure that multiple copies of a pod are scheduled on different nodes, so as to ensure service availability through planned and unplanned cluster node downtime.
Use the pod Disruptions policy to ensure that you have the lowest number of Pod replicas at all costs!
miscarriage of one's plans
The hardware will eventually fail and the software will eventually run (Michael harton)
conclusion
As we all know, Kubernetes has actually become DevOps The standard of editing platform in the field. Kubernetes deals with the storm caused by the production environment from the perspective of availability, scalability, security, elasticity, resource management and monitoring. Since many companies use kubernetes in production, the best practices mentioned above must be followed to scale applications smoothly and reliably.
Content source: https://my.oschina.net/u/1787735/blog/4870582
Introduce five top Kubernetes log monitoring tools
For the newly installed Kubernetes, a common problem is that the Service does not work properly. If you have run Deployment and created a Service, but you don't get a response when you try to access it, you want this document( The most detailed K8s Service in the whole network cannot access the troubleshooting process )Can help you find the problem.
Kubernetes FAQ summary
How to delete rc,deployment,service in inconsistent status
In some cases, it is often found that the kubectl process is suspended, and then it is found that half of it is deleted during get, while the other cannot be deleted
[root@k8s-master ~]# kubectl get -f fluentd-elasticsearch/
NAME DESIRED CURRENT READY AGE
rc/elasticsearch-logging-v1 0 2 2 15h

NAME DESIRED CURRENT UP-TO-DATE AVAILABLE AGE
deploy/kibana-logging 0 1 1 1 15h
Error from server (NotFound): services "elasticsearch-logging" not found
Error from server (NotFound): daemonsets.extensions "fluentd-es-v1.22" not found
Error from server (NotFound): services "kibana-logging" not found
Delete these deployment,service or rc commands as follows:
kubectl delete deployment kibana-logging -n kube-system --cascade=false

kubectl delete deployment kibana-logging -n kube-system  --ignore-not-found

delete rc elasticsearch-logging-v1 -n kube-system --force now --grace-period=0
How to reset etcd after deletion
rm -rf /var/lib/etcd/*
Reboot the master node after deletion.
reset etcd The network needs to be reset after

etcdctl mk /atomic.io/network/config '{ "Network": "192.168.0.0/16" }'
Failed to start apiserver
The following problems are reported during each startup:
start request repeated too quickly for kube-apiserver.service
But in fact, it's not the startup frequency. You need to check, / var/log/messages. In my case, the startup error is caused by the ca.crt and other files not found after opening ServiceAccount.
May 21 07:56:41 k8s-master kube-apiserver: Flag --port has been deprecated, see --insecure-port instead.
May 21 07:56:41 k8s-master kube-apiserver: F0521 07:56:41.692480 4299 universal_validation.go:104] Validate server run options failed: unable to load client CA file: open /var/run/kubernetes/ca.crt: no such file or directory
May 21 07:56:41 k8s-master systemd: kube-apiserver.service: main process exited, code=exited, status=255/n/a
May 21 07:56:41 k8s-master systemd: Failed to start Kubernetes API Server.
May 21 07:56:41 k8s-master systemd: Unit kube-apiserver.service entered failed state.
May 21 07:56:41 k8s-master systemd: kube-apiserver.service failed.
May 21 07:56:41 k8s-master systemd: kube-apiserver.service holdoff time over, scheduling restart.
May 21 07:56:41 k8s-master systemd: start request repeated too quickly for kube-apiserver.service
May 21 07:56:41 k8s-master systemd: Failed to start Kubernetes API Server.
When deploying log components such as fluent D, many problems are caused by the need to enable the ServiceAccount option and configure security, so in the final analysis, you still need to configure the ServiceAccount
Permission denied occurs
Cannot create / var / log / fluent. D appears when configuring fluent D Log: permission denied error, which is caused by not turning off SElinux security.
You can set SELinux = forcing to disabled in / etc/selinux/config, and then reboot
ServiceAccount based configuration
First, generate various required keys, and k8s-master should be replaced with the host name of the master
openssl genrsa -out ca.key 2048
openssl req -x509 -new -nodes -key ca.key -subj "/CN=k8s-master" -days 10000 -out ca.crt
openssl genrsa -out server.key 2048

echo subjectAltName=IP:10.254.0.1 > extfile.cnf

#ip is determined by the following command

#kubectl get services --all-namespaces |grep 'default'|grep 'kubernetes'|grep '443'|awk '{print $3}'

openssl req -new -key server.key -subj "/CN=k8s-master" -out server.csr

openssl x509 -req -in server.csr -CA ca.crt -CAkey ca.key -CAcreateserial -extfile extfile.cnf -out server.crt -days 10000
If you modify the configuration file parameters of / etc/kubernetes/apiserver, you will fail to start Kube apiserver through systemctl start. The error message is:
Validate server run options failed: unable to load client CA file: open /root/keys/ca.crt: permission denied
However, API Server can be started from the command line
/usr/bin/kube-apiserver --logtostderr=true --v=0 --etcd-servers=http://k8s-master:2379 --address=0.0.0.0 --port=8080 --kubelet-port=10250 --allow-privileged=true --service-cluster-ip-range=10.254.0.0/16 --admission-control=ServiceAccount --insecure-bind-address=0.0.0.0 --client-ca-file=/root/keys/ca.crt --tls-cert-file=/root/keys/server.crt --tls-private-key-file=/root/keys/server.key --basic-auth-file=/root/keys/basic_auth.csv --secure-port=443 &>> /var/log/kubernetes/kube-apiserver.log &
Start controller manager from the command line
/usr/bin/kube-controller-manager --logtostderr=true --v=0 --master=http://k8s-master:8080 --root-ca-file=/root/keys/ca.crt --service-account-private-key-file=/root/keys/server.key & >>/var/log/kubernetes/kube-controller-manage.log
ETCD does not start - problem < 1 >
Etcd is the zookeeper process of kubernetes cluster. Almost all service s depend on the startup of etcd, such as flanneld,apiserver,docker... When starting etcd, the error log is as follows:
May 24 13:39:09 k8s-master systemd: Stopped Flanneld overlay address etcd agent.
May 24 13:39:28 k8s-master systemd: Starting Etcd Server...
May 24 13:39:28 k8s-master etcd: recognized and used environment variable ETCD_ADVERTISE_CLIENT_URLS=http://etcd:2379,http://etcd:4001
May 24 13:39:28 k8s-master etcd: recognized environment variable ETCD_NAME, but unused: shadowed by corresponding flag
May 24 13:39:28 k8s-master etcd: recognized environment variable ETCD_DATA_DIR, but unused: shadowed by corresponding flag
May 24 13:39:28 k8s-master etcd: recognized environment variable ETCD_LISTEN_CLIENT_URLS, but unused: shadowed by corresponding flag
May 24 13:39:28 k8s-master etcd: etcd Version: 3.1.3
May 24 13:39:28 k8s-master etcd: Git SHA: 21fdcc6
May 24 13:39:28 k8s-master etcd: Go Version: go1.7.4
May 24 13:39:28 k8s-master etcd: Go OS/Arch: linux/amd64
May 24 13:39:28 k8s-master etcd: setting maximum number of CPUs to 1, total number of available CPUs is 1
May 24 13:39:28 k8s-master etcd: the server is already initialized as member before, starting as etcd member...
May 24 13:39:28 k8s-master etcd: listening for peers on http://localhost:2380
May 24 13:39:28 k8s-master etcd: listening for client requests on 0.0.0.0:2379
May 24 13:39:28 k8s-master etcd: listening for client requests on 0.0.0.0:4001
May 24 13:39:28 k8s-master etcd: recovered store from snapshot at index 140014
May 24 13:39:28 k8s-master etcd: name = master
May 24 13:39:28 k8s-master etcd: data dir = /var/lib/etcd/default.etcd
May 24 13:39:28 k8s-master etcd: member dir = /var/lib/etcd/default.etcd/member
May 24 13:39:28 k8s-master etcd: heartbeat = 100ms
May 24 13:39:28 k8s-master etcd: election = 1000ms
May 24 13:39:28 k8s-master etcd: snapshot count = 10000
May 24 13:39:28 k8s-master etcd: advertise client URLs = http://etcd:2379,http://etcd:4001
May 24 13:39:28 k8s-master etcd: ignored file 0000000000000001-0000000000012700.wal.broken in wal
May 24 13:39:29 k8s-master etcd: restarting member 8e9e05c52164694d in cluster cdf818194e3a8c32 at commit index 148905
May 24 13:39:29 k8s-master etcd: 8e9e05c52164694d became follower at term 12
May 24 13:39:29 k8s-master etcd: newRaft 8e9e05c52164694d [peers: [8e9e05c52164694d], term: 12, commit: 148905, applied: 140014, lastindex: 148905, lastterm: 12]
May 24 13:39:29 k8s-master etcd: enabled capabilities for version 3.1
May 24 13:39:29 k8s-master etcd: added member 8e9e05c52164694d [http://localhost:2380] to cluster cdf818194e3a8c32 from store
May 24 13:39:29 k8s-master etcd: set the cluster version to 3.1 from store
May 24 13:39:29 k8s-master etcd: starting server... [version: 3.1.3, cluster version: 3.1]
May 24 13:39:29 k8s-master etcd: raft save state and entries error: open /var/lib/etcd/default.etcd/member/wal/0.tmp: is a directory
May 24 13:39:29 k8s-master systemd: etcd.service: main process exited, code=exited, status=1/FAILURE
May 24 13:39:29 k8s-master systemd: Failed to start Etcd Server.
May 24 13:39:29 k8s-master systemd: Unit etcd.service entered failed state.
May 24 13:39:29 k8s-master systemd: etcd.service failed.
May 24 13:39:29 k8s-master systemd: etcd.service holdoff time over, scheduling restart.
Core statement:
raft save state and entries error: open /var/lib/etcd/default.etcd/member/wal/0.tmp: is a directory
Enter the relevant directory and delete 0 TMP, and then you can start it!
ETCD does not start - timeout problem < 2 >
Problem background: at present, three etcd nodes are deployed. Suddenly, one day, all three clusters are powered off and down. After restarting, it is found that the K8S cluster can be used normally, but after checking the components, it is found that the etcd of one node cannot be started.
After probing again, it is found that the time is not accurate. Use the following command ntpdate NTP aliyun. Com re adjusts the time correctly, restarts etcd, and finds that it still can't get up. The error is as follows:
Mar 05 14:27:15 k8s-node2 etcd[3248]: etcd Version: 3.3.13
Mar 05 14:27:15 k8s-node2 etcd[3248]: Git SHA: 98d3084
Mar 05 14:27:15 k8s-node2 etcd[3248]: Go Version: go1.10.8
Mar 05 14:27:15 k8s-node2 etcd[3248]: Go OS/Arch: linux/amd64
Mar 05 14:27:15 k8s-node2 etcd[3248]: setting maximum number of CPUs to 4, total number of available CPUs is 4
Mar 05 14:27:15 k8s-node2 etcd[3248]: the server is already initialized as member before, starting as etcd member
...
Mar 05 14:27:15 k8s-node2 etcd[3248]: peerTLS: cert = /opt/etcd/ssl/server.pem, key = /opt/etcd/ssl/server-key.pe
m, ca = , trusted-ca = /opt/etcd/ssl/ca.pem, client-cert-auth = false, crl-file =
Mar 05 14:27:15 k8s-node2 etcd[3248]: listening for peers on https://192.168.25.226:2380
Mar 05 14:27:15 k8s-node2 etcd[3248]: The scheme of client url http://127.0.0.1:2379 is HTTP while peer key/cert
files are presented. Ignored key/cert files.
Mar 05 14:27:15 k8s-node2 etcd[3248]: listening for client requests on 127.0.0.1:2379
Mar 05 14:27:15 k8s-node2 etcd[3248]: listening for client requests on 192.168.25.226:2379
Mar 05 14:27:15 k8s-node2 etcd[3248]: member 9c166b8b7cb6ecb8 has already been bootstrapped
Mar 05 14:27:15 k8s-node2 systemd[1]: etcd.service: main process exited, code=exited, status=1/FAILURE
Mar 05 14:27:15 k8s-node2 systemd[1]: Failed to start Etcd Server.
Mar 05 14:27:15 k8s-node2 systemd[1]: Unit etcd.service entered failed state.
Mar 05 14:27:15 k8s-node2 systemd[1]: etcd.service failed.
Mar 05 14:27:15 k8s-node2 systemd[1]: etcd.service failed.
Mar 05 14:27:15 k8s-node2 systemd[1]: etcd.service holdoff time over, scheduling restart.
Mar 05 14:27:15 k8s-node2 systemd[1]: Starting Etcd Server...
Mar 05 14:27:15 k8s-node2 etcd[3258]: recognized environment variable ETCD_NAME, but unused: shadowed by correspo
nding flag
Mar 05 14:27:15 k8s-node2 etcd[3258]: recognized environment variable ETCD_DATA_DIR, but unused: shadowed by corr
esponding flag
Mar 05 14:27:15 k8s-node2 etcd[3258]: recognized environment variable ETCD_LISTEN_PEER_URLS, but unused: shadowed
 by corresponding flag
Mar 05 14:27:15 k8s-node2 etcd[3258]: recognized environment variable ETCD_LISTEN_CLIENT_URLS, but unused: shadow
ed by corresponding flag
Mar 05 14:27:15 k8s-node2 etcd[3258]: recognized environment variable ETCD_INITIAL_ADVERTISE_PEER_URLS, but unuse
d: shadowed by corresponding flag
Mar 05 14:27:15 k8s-node2 etcd[3258]: recognized environment variable ETCD_ADVERTISE_CLIENT_URLS, but unused: sha
dowed by corresponding flag
Mar 05 14:27:15 k8s-node2 etcd[3258]: recognized environment variable ETCD_INITIAL_CLUSTER, but unused: shadowed
by corresponding flag
Mar 05 14:27:15 k8s-node2 etcd[3258]: recognized environment variable ETCD_INITIAL_CLUSTER_TOKEN, but unused: sha
dowed by corresponding flag
Mar 05 14:27:15 k8s-node2 etcd[3258]: recognized environment variable ETCD_INITIAL_CLUSTER_STATE, but unused: sha
dowed by corresponding flag
resolvent:
Check the log and find that there is no obvious error. According to experience, a broken etcd node actually has no great impact on the cluster. At this time, the cluster can be used normally, but the broken etcd node has not been started. The solution is as follows:
Enter the data storage directory of etcd to back up the original data:
cd /var/lib/etcd/default.etcd/member/
cp *  /data/bak/
Delete all data files in this directory
rm -rf /var/lib/etcd/default.etcd/member/*
Stop the other two etcd nodes because all the nodes need to be started together when the etcd node is started. It can be used after it is started successfully.
#master node
systemctl stop etcd
systemctl restart etcd

#node1 node
systemctl stop etcd
systemctl restart etcd

#node2 node
systemctl stop etcd
systemctl restart etcd
Configuring host mutual trust under CentOS
In each server, you need to establish the user name of the host mutual trust. Execute the following command to generate the public key / key. Press enter by default
ssh-keygen -t rsa
You can see the file that generates a public key.
For mutual public key transmission, you need to enter the password for the first time, and then it's OK.
ssh-copy-id -i /root/.ssh/id_rsa.pub root@192.168.199.132 (-p 2222)
-p port - p is not added to the default port. If the port is changed, you have to add - p. you can see that it is in An authorized is generated under ssh /_ Keys file, which records the public keys of other servers that can log in to this server.
Test to see if you can log in:
ssh 192.168.199.132 (-p 2222)
Modification of CentOS host name
hostnamectl set-hostname k8s-master1
Virtualbox implements CentOS copy and paste functions
If you do not install or output, you can change update to install and then run.
yum install update
yum update kernel
yum update kernel-devel
yum install kernel-headers
yum install gcc
yum install gcc make
After running
sh VBoxLinuxAdditions.run
The deleted Pod is always in the Terminating state
You can force deletion through the following command
kubectl delete pod NAME --grace-period=0 --force
Deleting a namespace is always in the Terminating state
You can force deletion through the following script
[root@k8s-master1 k8s]# cat delete-ns.sh
#!/bin/bash
set -e

useage(){
    echo "useage:"
    echo " delns.sh NAMESPACE"
}

if [ $# -lt 1 ];then
    useage
    exit
fi

NAMESPACE=$1
JSONFILE=${NAMESPACE}.json
kubectl get ns "${NAMESPACE}" -o json > "${JSONFILE}"
vi "${JSONFILE}"
curl -k -H "Content-Type: application/json" -X PUT --data-binary @"${JSONFLE}" \
    http://127.0.0.1:8001/api/v1/namespaces/"${NAMESPACE}"/finalize
What can happen if the container contains valid CPU / memory requests and limits are not specified?
Let's create a corresponding container. The container has only requests but no limits,
- name: busybox-cnt02
    image: busybox
    command: ["/bin/sh"]
    args: ["-c", "while true; do echo hello from cnt02; sleep 10;done"]
    resources:
      requests:
        memory: "100Mi"
        cpu: "100m"
What's the problem with creating this container?
In fact, there is no problem for the normal environment, but for resource-based pods, if some containers do not set a limit limit, resources will be preempted by other pods, which may cause container application failure. You can use the limitrange policy to match and set the pod automatically. The premise is to configure the limitrange rules in advance.
Source: https://www.cnblogs.com/passzhang
Six tips for troubleshooting applications on Kubernetes Recommended to everyone, necessary for daily troubleshooting. Share an Alibaba cloud internal super full K8s actual combat manual , free download!
Interview questions
One goal: container Operation; Two places and three centers; Four layer service discovery; Five Pod shared resources; Six CNI common plug-ins; Seven layer load balancing; Eight isolation dimensions; Nine network model principles; Ten IP addresses; Class 100 product line; 1000 class physical machine; 10000 class container; Like no billion, k8s Hundred million: hundred million daily service person times.
One goal: container operations
Kubernetes (k8s) is an open source platform for automated container operations. These container operations include deployment, scheduling, and node cluster expansion.
Specific functions:
-
Automate container deployment and replication.
-
Real time elastic shrinkage container scale.
-
Containers are organized into groups and provide load balancing between containers.
-
Scheduling: which machine does the container run on.
form:
-
kubectl: client command line tool, which serves as the operation portal of the whole system.
-
Kube apiserver: provides an interface in the form of REST API service as the control entry of the whole system.
-
Kube Controller Manager: performs background tasks of the whole system, including node status, number of Pods, association between Pods and services, etc.
-
Kube scheduler: responsible for node resource management, receiving Pods creation tasks from Kube apiserver and assigning them to a node.
-
etcd: responsible for service discovery and configuration sharing among nodes.
-
Kube proxy: runs on each computing node and is responsible for Pod network proxy. Regularly obtain service information from etcd to make corresponding strategies.
-
kubelet: runs on each computing node, acts as an agent, receives Pods tasks assigned to the node and manages containers, periodically obtains container status and feeds back to Kube apiserver.
-
DNS: an optional DNS Service used to create DNS records for each Service object so that all pods can access the Service through DNS.
Here is k8s Architecture topology of:
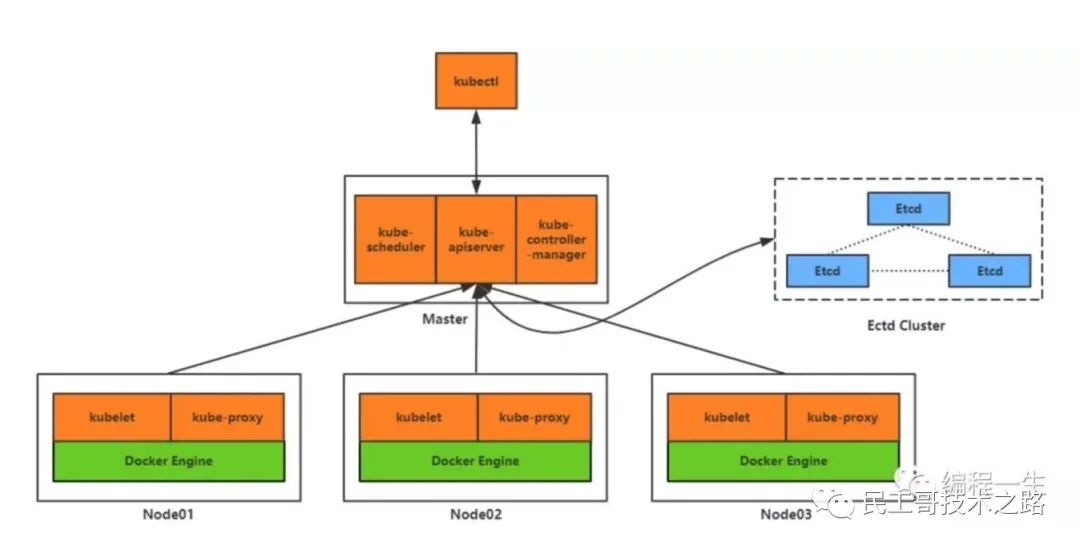
Two places and three centers
The three centers in the two places include local production center, local disaster recovery center and remote disaster recovery center.

An important problem to be solved by the three centers in the two places is the problem of data consistency.
k8s use etcd Component is a highly available and consistent service discovery repository. Used to configure sharing and service discovery.
It was received as a Zookeeper And doozer inspired projects. In addition to all their functions, they also have the following four features:
-
Simple: the API based on HTTP+JSON allows you to use curl command easily.
-
Security: optional SSL client authentication mechanism.
-
Fast: each instance supports 1000 writes per second.
-
Trusted: using Raft algorithm to fully realize distributed.
Four layer service discovery
Explain a picture first Network layer 7 agreement:
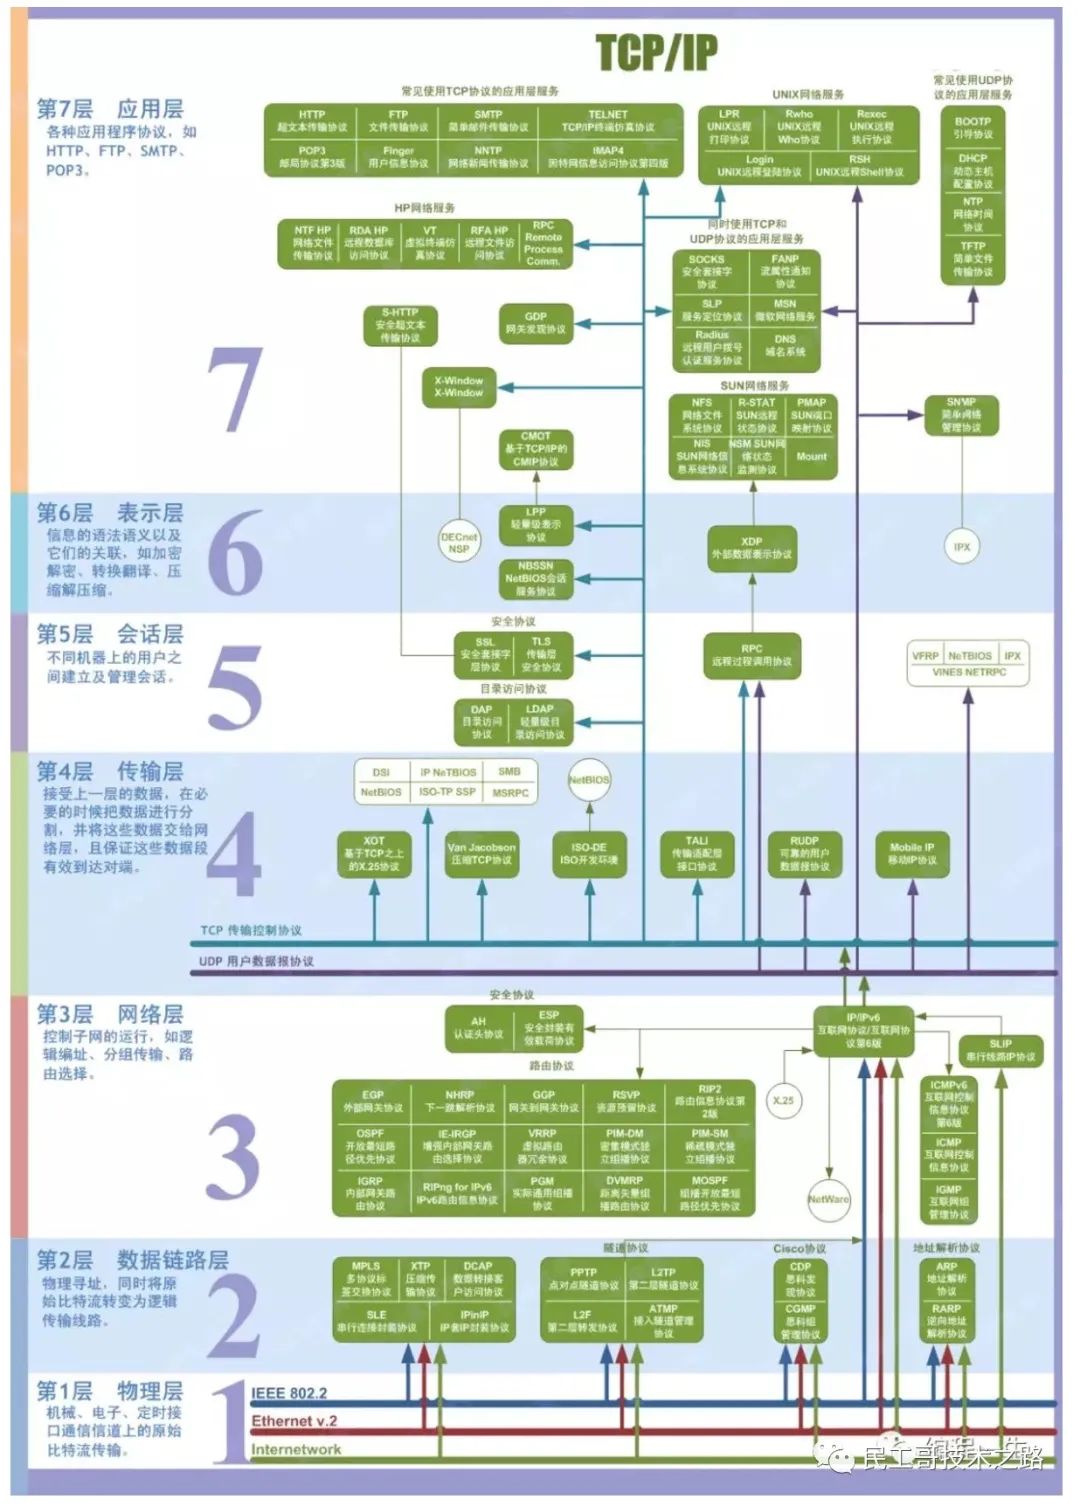
k8s provides two methods for service discovery:
- Environment variables: when creating a Pod, kubelet will inject environment variables related to all services in the cluster into the Pod. It should be noted that in order to inject the environment variable of a Service into a Pod, the Service must be created before the Pod. This almost makes Service discovery in this way unavailable. For example, if the ServiceName of a Service is redis master and the corresponding ClusterIP:Port is 10.0.0.11:6379, the corresponding environment variable is:
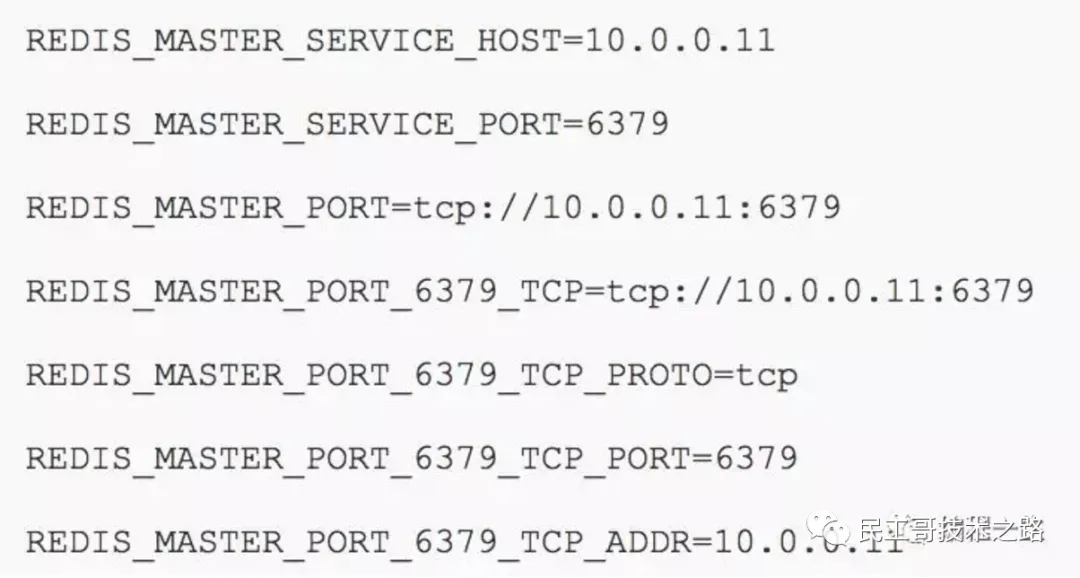
- DNS: KubeDNS can be easily created through cluster add on to discover services in the cluster.
One of the above two methods is based on TCP and DNS is based on UDP. They are both based on the four layer protocol.
Five Pod shared resources
Pod is k8s the most basic operation unit, including one or more closely related containers.
A Pod can be regarded as the "logical host" of the application layer by a container environment; Multiple container applications in a Pod are usually tightly coupled, and the Pod is created, started or destroyed on the Node; Each Pod runs a special mount Volume called Volume, so the communication and data exchange between them are more efficient. In design, we can make full use of this feature to put a group of closely related service processes into the same Pod.
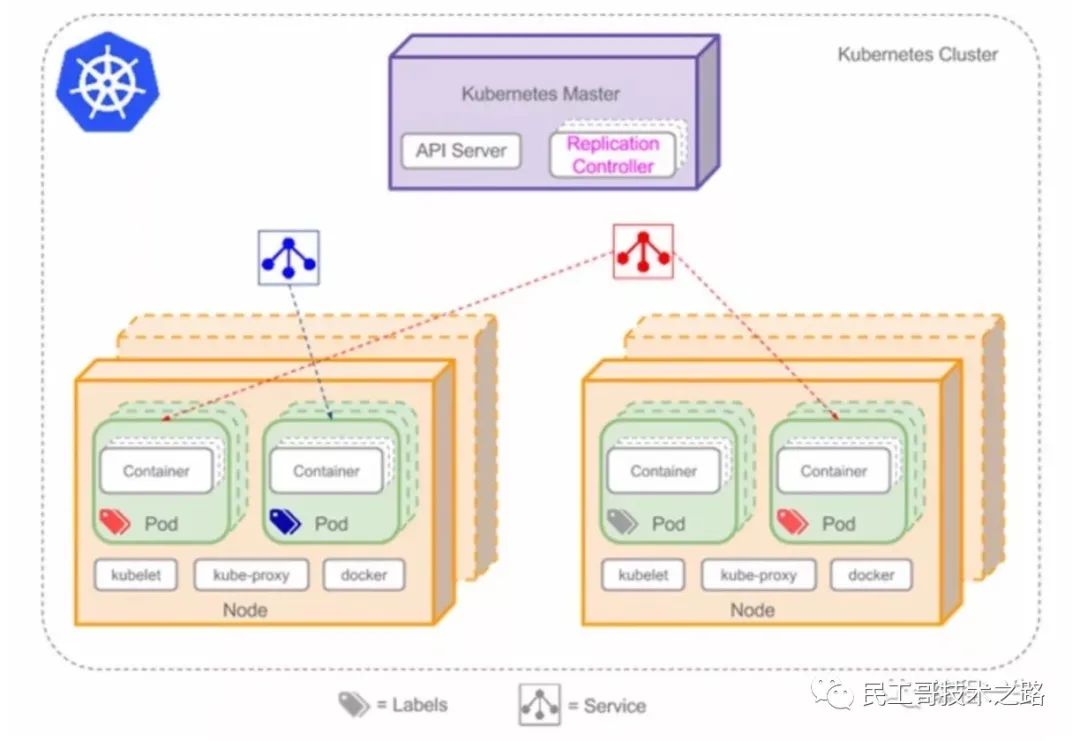
In the same Pod container They can communicate with each other only through localhost.
Application containers in a Pod share five resources:
-
PID namespace: different applications in Pod can see the process ID of other applications.
-
Network namespace: multiple containers in Pod can access the same IP and port range.
-
IPC namespace: multiple containers in Pod can communicate using SystemV IPC or POSIX message queue.
-
UTS namespace: multiple containers in Pod share a host name.
-
Volumes: individual containers in the Pod can access volumes defined at the Pod level.
The life cycle of Pod is managed by Replication Controller; It is defined through the template, and then assigned to a Node to run. After the container contained in the Pod runs, the Pod ends.
Kubernetes designed a unique network configuration for Pod, including assigning an IP address to each Pod, using the Pod name as the host name for inter container communication, etc.
Six common CNI plug-ins
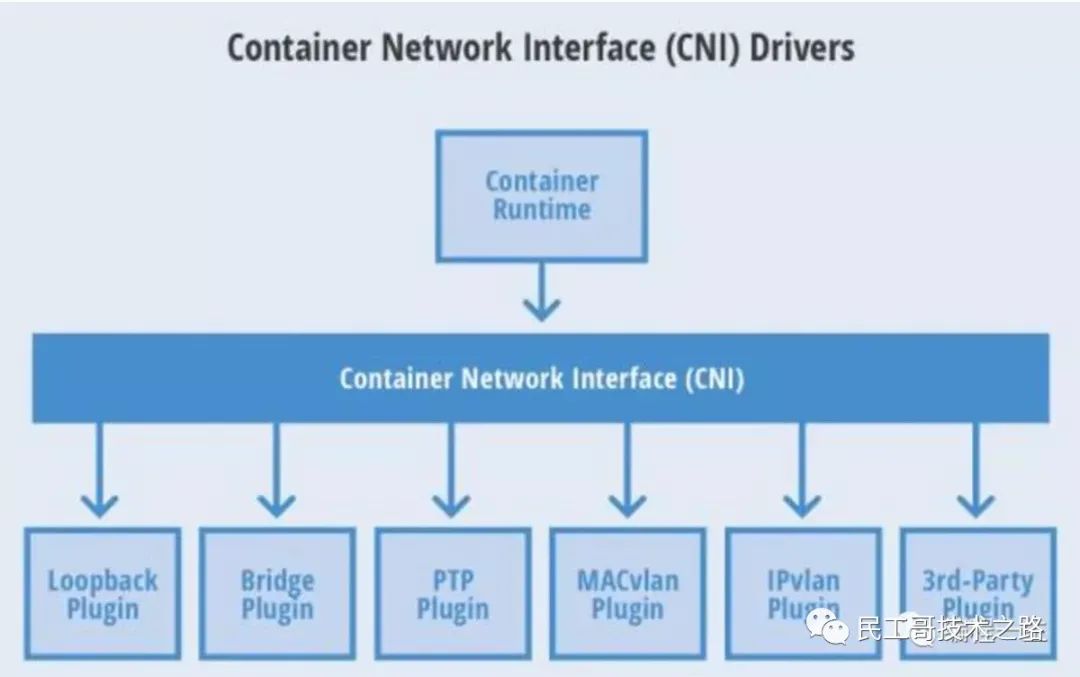
CNI (Container Network Interface) Container Network Interface is a set of standards and libraries for Linux container network configuration. Users need to develop their own container network plug-ins according to these standards and libraries. CNI only focuses on solving the resource release during container network connection and container destruction, and provides a set of framework. Therefore, CNI can support a large number of different network modes and is easy to implement.
The following figure shows six common CNI plug-ins:
Seven layer load balancing
To improve load balancing, we have to first mention the communication between servers.
IDC (Internet Data Center), also known as data center and computer room, is used to place servers. IDC Network is the bridge of communication between servers.
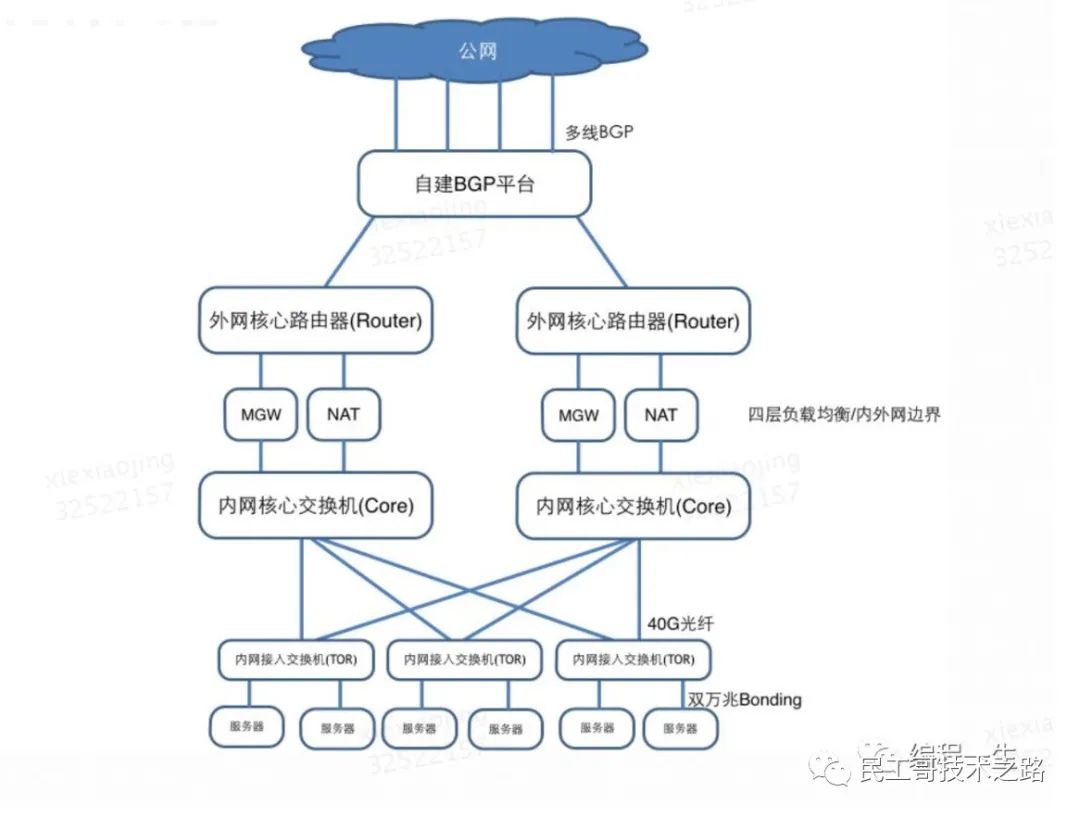
The picture above shows a lot of network devices. What are they used for?
Routers, switches and MGW/NAT are all network devices, which are divided into different roles according to performance and internal and external networks.
- Intranet access switch: also known as TOR (top of rack), it is the equipment for the server to access the network. Each intranet access switch is connected to 40-48 servers, and a network segment with mask / 24 is used as the intranet segment of the server.
- Intranet core switch: responsible for traffic forwarding of all intranet access switches in IDC and cross IDC traffic forwarding.
- MGW/NAT: MGW, or LVS, is used for load balancing, and NAT is used for address translation when intranet devices access the external network.
- External network core router: connect meituan unified external network platform through static interconnection operators or BGP.
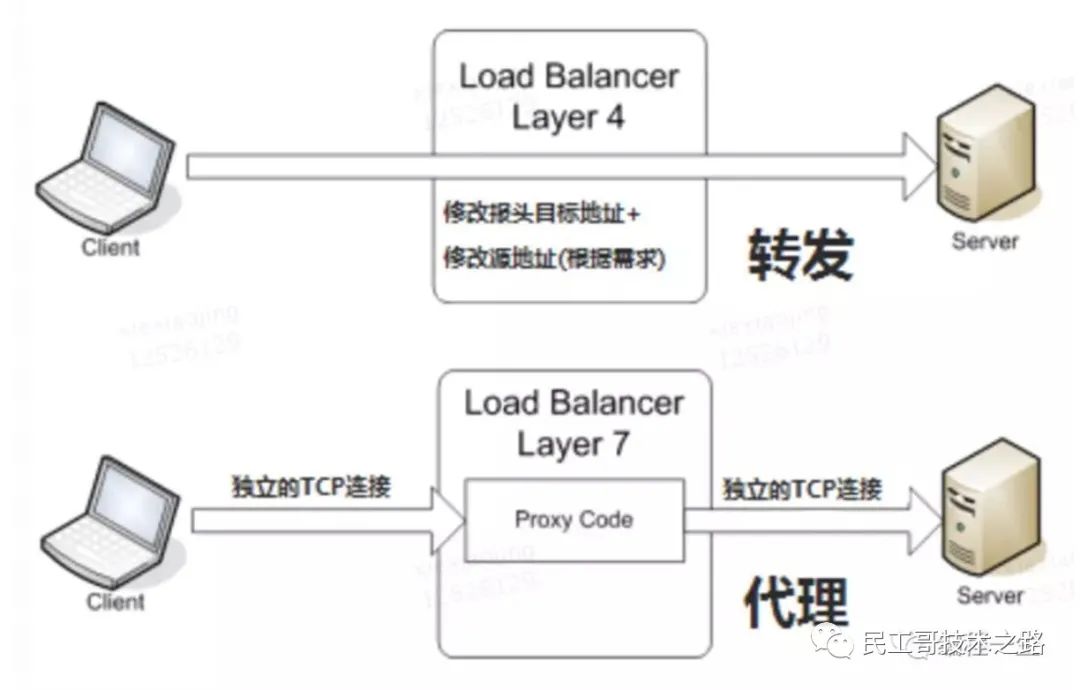
Let's talk about the load balancing of each layer first:
- Layer 2 Load Balancing: layer 2 load balancing based on MAC address.
- Three layer load balancing: load balancing based on IP address.
- Four layer load balancing: load balancing based on IP + port.
- Seven layer load balancing: load balancing based on URL and other application layer information.
Here is a diagram to illustrate the difference between the four layers and the seven layers of load balancing:
The above four layers of service discovery mainly talk about the k8s native Kube proxy method. K8s service exposure is mainly through NodePort, binding a port of minion host, and then performing Pod request forwarding and load balancing. However, this method has the following defects:
-
There may be many services. If each is bound to a Node host port, the host needs to open the peripheral port for Service calls, resulting in confusion in management.
-
Firewall rules required by many companies cannot be applied.
The ideal way is to bind a fixed port through an external load balancer, such as 80; Then forward it to the following Service IP according to the domain name or service name.
Nginx solves this requirement well, but the problem is how to modify and load new services if they are added Nginx configuration?
Kubernetes The solution given is progress. This is a scheme based on seven layers.
Eight isolation dimensions
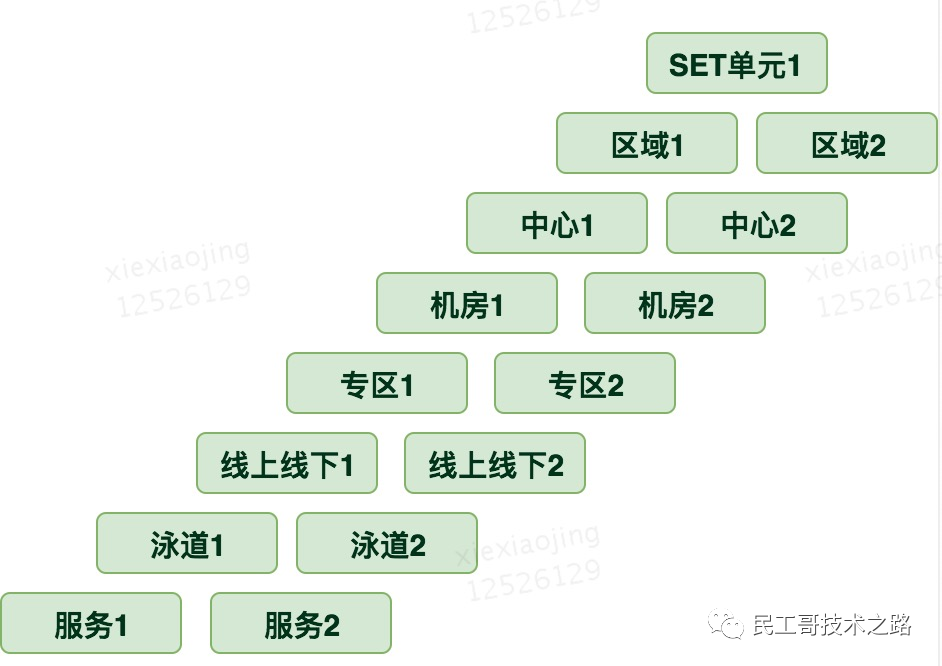
k8s cluster scheduling requires corresponding scheduling strategies for the isolation from top to bottom and from coarse-grained to fine-grained.
Nine network model principles
k8s network model should conform to four basic principles, three network requirements principles, one architecture principle and one IP principle.
Each Pod has an independent IP address, and it is assumed that all pods are in a flat network space that can be directly connected. No matter whether they are running on the same Node or not, they can be accessed through the IP of the Pod.
The IP of Pod in k8s is the minimum granularity IP. All containers in the same Pod share a network stack. This model is called IP per Pod model.
-
Pod is the IP actually assigned by docker0.
-
The IP address and port seen inside the Pod are consistent with those outside.
-
Different containers in the same Pod share the network and can access each other's ports through localhost, similar to different processes in the same virtual machine.
From the perspective of port allocation, domain name resolution, service discovery, load balancing and application configuration, the IP per Pod model can be regarded as an independent virtual machine or physical machine.
-
All containers can communicate with other containers without NAT.
-
All nodes can communicate with all containers in different NAT modes, and vice versa.
-
The address of the container is the same as that seen by others.
To comply with the following architecture:
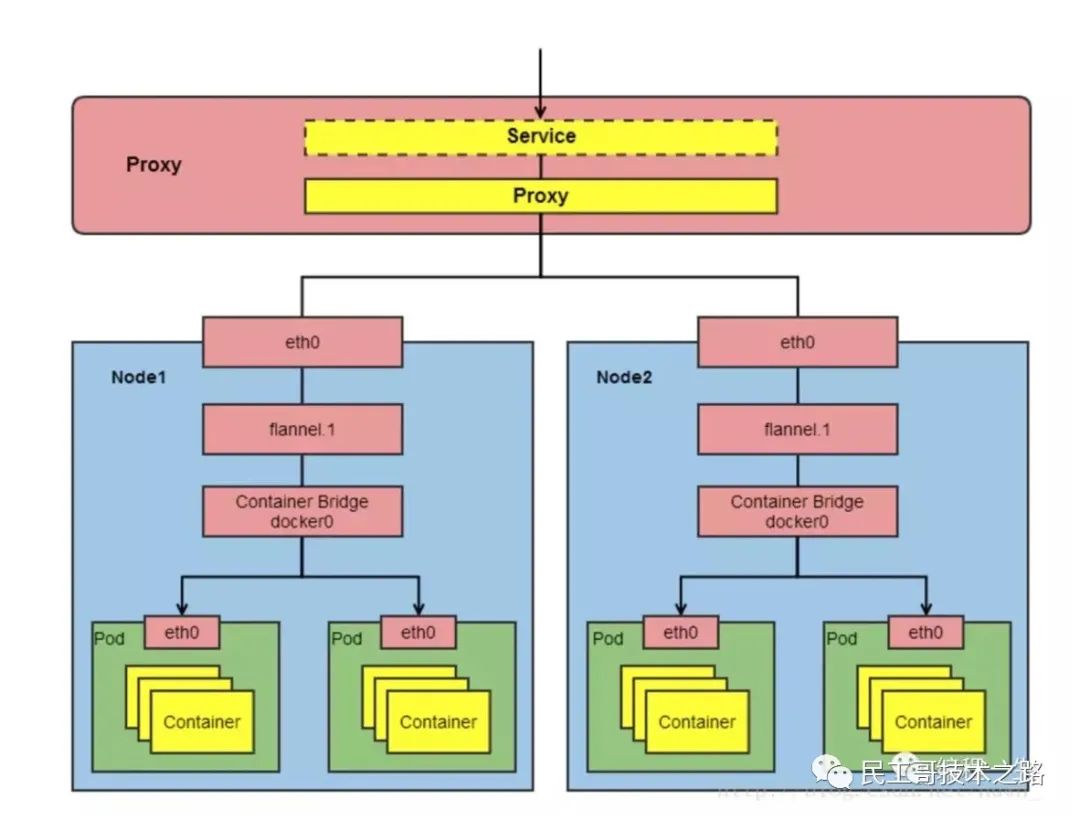
From the architecture above, the IP concept extends from the outside of the cluster to the inside of the cluster:
[the external chain picture transfer fails, and the source station may have anti-theft chain mechanism. It is recommended to save the picture and upload it directly (img-8qgzlz2q-1618716290555) (data: image / GIF; Base64, ivborw0kgoaaaaansuheugaaaaaabcaaaaaaaaffcsjaaaduleqvqimwngygbgaaabqabh6fo1aaaaaabjru5erkjggg = =)]
Ten IP addresses
As we all know, IP addresses are divided into ABCDE, and there are five types of special-purpose IP addresses.
first kind
A Class: 1.0.0.0-1226.255.255.255,default subnet mask /8,255.0.0.0.
B Class: 128.0.0.0-191.255.255.255,default subnet mask /16,255.255.0.0.
C Class: 192.0.0.0-223.255.255.255,default subnet mask /24,255.255.255.0.
D Class: 224.0.0.0-239.255.255.255,Generally used for multicast.
E Class: 240.0.0.0-255.255.255.255(Of which 255.255.255.255 It is the broadcast address of the whole network). E Class addresses are generally used for research purposes.
Class II
0.0.0.0
 Strictly speaking, 0.0.0.0 It is not a real one IP The address. It represents a collection of all unclear hosts and destination networks. Unclear here means that there is no specific entry in the local routing table to indicate how to arrive. As the default route.
127.0.0.1 Local address.
Category III
224.0.0.1 Multicast address.
If your host is turned on IRDP(internet Route discovery (using multicast function), then there should be such a route in your host routing table.
Category IV
169.254.x.x
 Used DHCP The function is automatically obtained IP Your host, DHCP If the server fails, or the response time is too long to exceed the time specified by a system, the system will assign you such a server IP,Indicates that the network is not working properly.
Category V
10.xxx,172.16.x.x~172.31.x.x,192.168.x.x Private address.
It is widely used inside the enterprise. Such an address is reserved to avoid address confusion when accessing the public network.
Link: blog csdn. net/huakai_ sun/article/details/82378856
jenkins pipeline is used to realize automatic construction and deployment to k8s
10 tips to improve the efficiency of Kubernetes container
[summary of common operation and maintenance skills of Kubernetes
](https://mp.weixin.qq.com/s?__biz=MzI0MDQ4MTM5NQ==&mid=2247491105&idx=3&sn=5d5a58420fc4cea663e6df68bdd86fe1&chksm=e91b7b3dde6cf22bb96d204e3d9fd87034b9afe937203ccf0e8ad01392d6df541e18879ffe10&scene=178&cur_album_id=1790241575034290179#rd)