Personal profile
The author is a junior from Heyuan. The following notes are some shallow experience of the author's self-study road. If there are mistakes, please correct them. In the future, we will continue to improve our notes to help more Java lovers get started.
SpringBoot+JDBC
1. Import JDBC and mysql dependencies
In POM XML import the following dependencies
        <dependency>
            <groupId>mysql</groupId>
            <artifactId>mysql-connector-java</artifactId>
            <scope>runtime</scope>
        </dependency>

        <dependency>
            <groupId>org.springframework.boot</groupId>
            <artifactId>spring-boot-starter-jdbc</artifactId>
        </dependency>
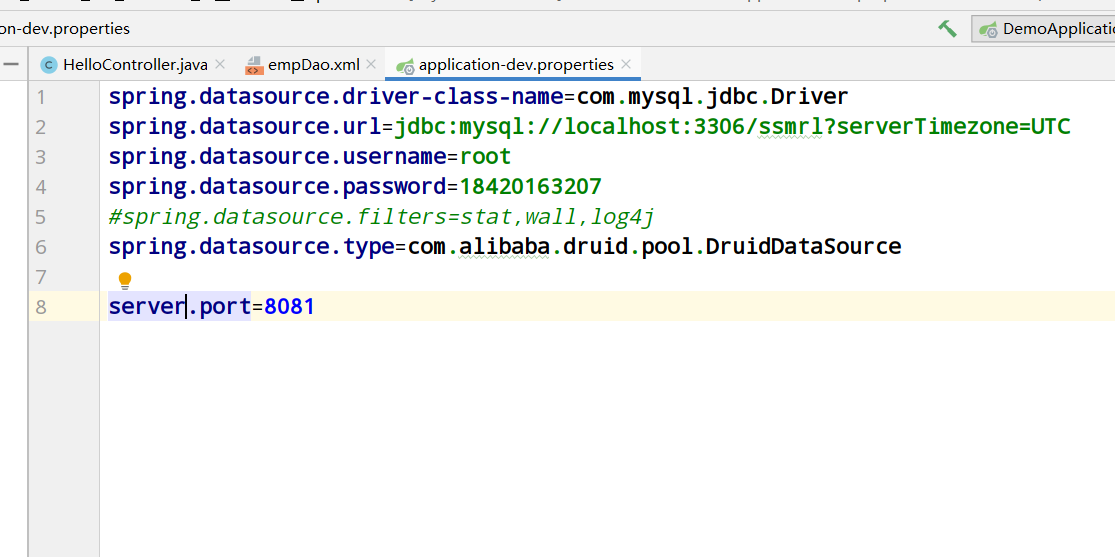
2. Configure the data source in the configuration file of application
spring.datasource.driver-class-name=com.mysql.jdbc.Driver
spring.datasource.url=jdbc:mysql://localhost:3306/ssmrl?serverTimezone=UTC
spring.datasource.username=root
spring.datasource.password=18420163207
3. Test whether the data source is effective
Unit tests are performed in SpringBoot
@SpringBootTest
class DemoApplicationTests {
    @Autowired    //Automatically inject the data source, because we have configured (application.properties), it will find the data source in the IOC container
    private  DataSource dataSource;

    @Test
    void contextLoads() {
        System.out.println(dataSource);
    }

}
The operation results are as follows:
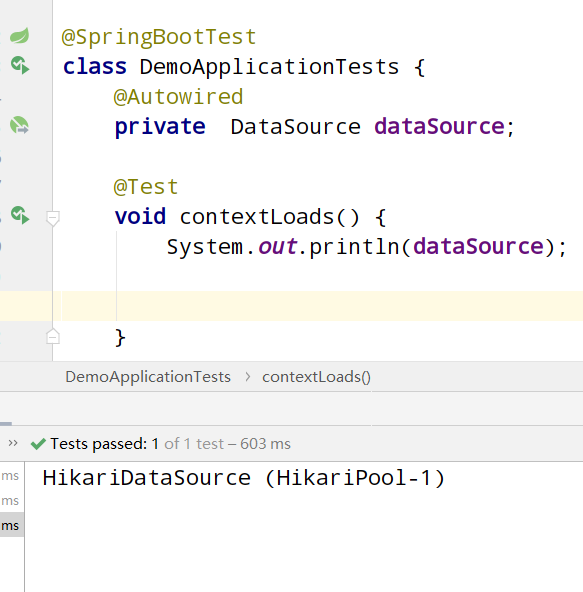
Conclusion: we can see from the output results that the default data source of SpringBoot is HikariDataSource. This data source is the fastest data source at present, faster than Alibaba's Druid, but DruidDatasource has monitoring function, which will be discussed later
SpringBoot native JDBC
1. In the SpringBoot unit test class:
@SpringBootTest
class DemoApplicationTests {
    @Autowired
    private  DataSource dataSource;

    @Test
    void contextLoads() throws SQLException {

        Connection connection = dataSource.getConnection();
        String sql="select empid,empName from emp";
        PreparedStatement preparedStatement = connection.prepareStatement(sql);
        ResultSet resultSet = preparedStatement.executeQuery();
        while (resultSet.next()){
            System.out.println(resultSet.getInt(1)+"    "+resultSet.getString(2));
        }

    }

}
The output results are as follows:

SpringBoot+JdbcTemplate
JdbcTemplate is Spring's encapsulation of JDBC to make JDBC easier to use
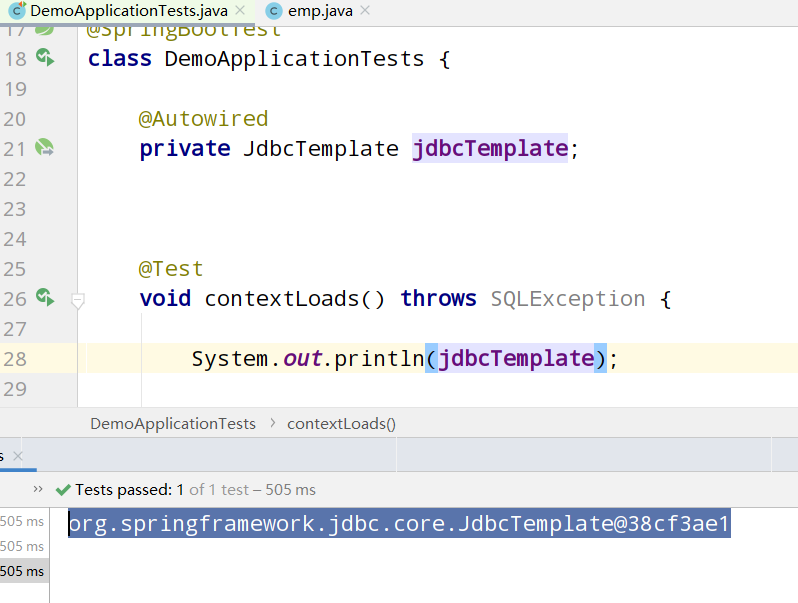
It shows that our JdbcTemplate can be used normally
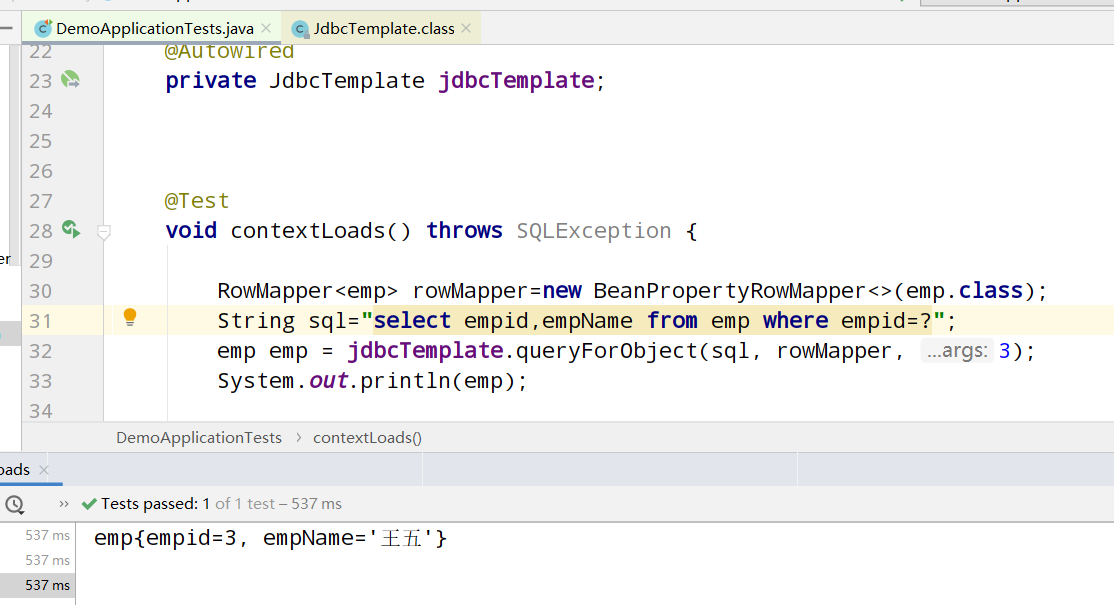
**The sql statements inside can be preprocessed, that is, use "?" Space occupying**
Query single data:
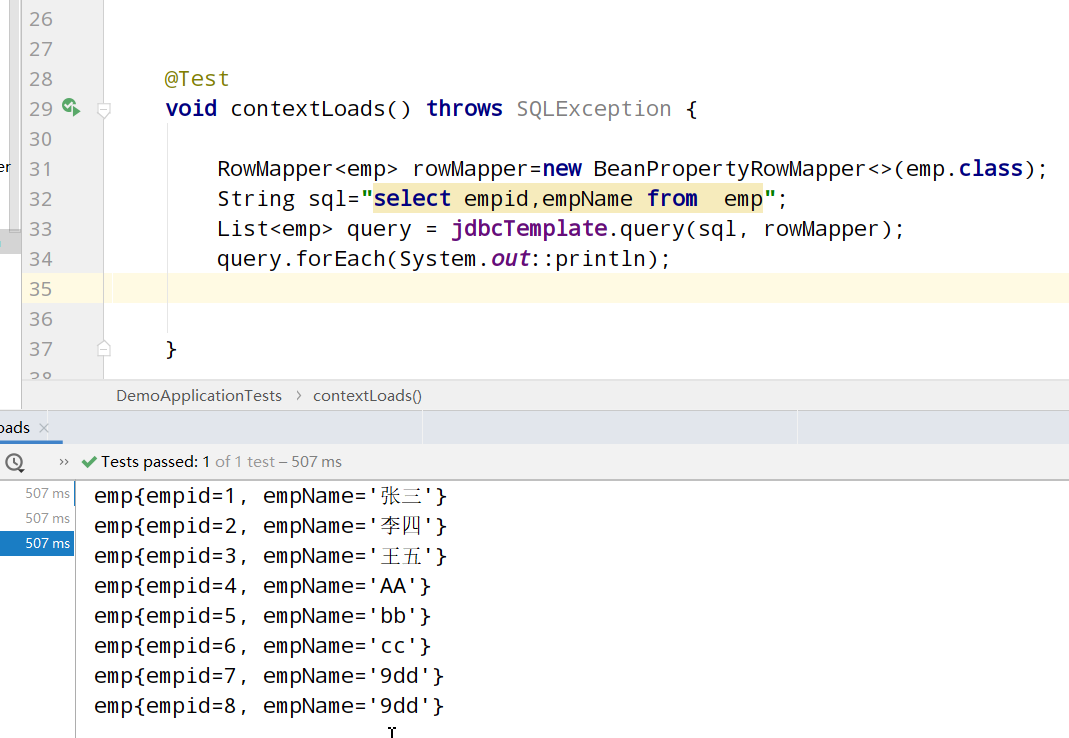
Query multiple data:
SpringBoot+Druid
Because we see the following code in the DataSourceAutoConfiguration class:
@Import({Hikari.class, Tomcat.class, Dbcp2.class, OracleUcp.class, Generic.class, DataSourceJmxConfiguration.class})
    protected static class PooledDataSourceConfiguration {
        protected PooledDataSourceConfiguration() {
        }
    }
Hikari.class imports Hikari's data source. SpringBoot comes with HikariDataSource by default. How to switch the data source?
We only need to add a code to the configuration file:
spring.datasource.type=com.alibaba.druid.pool.DruidDataSource
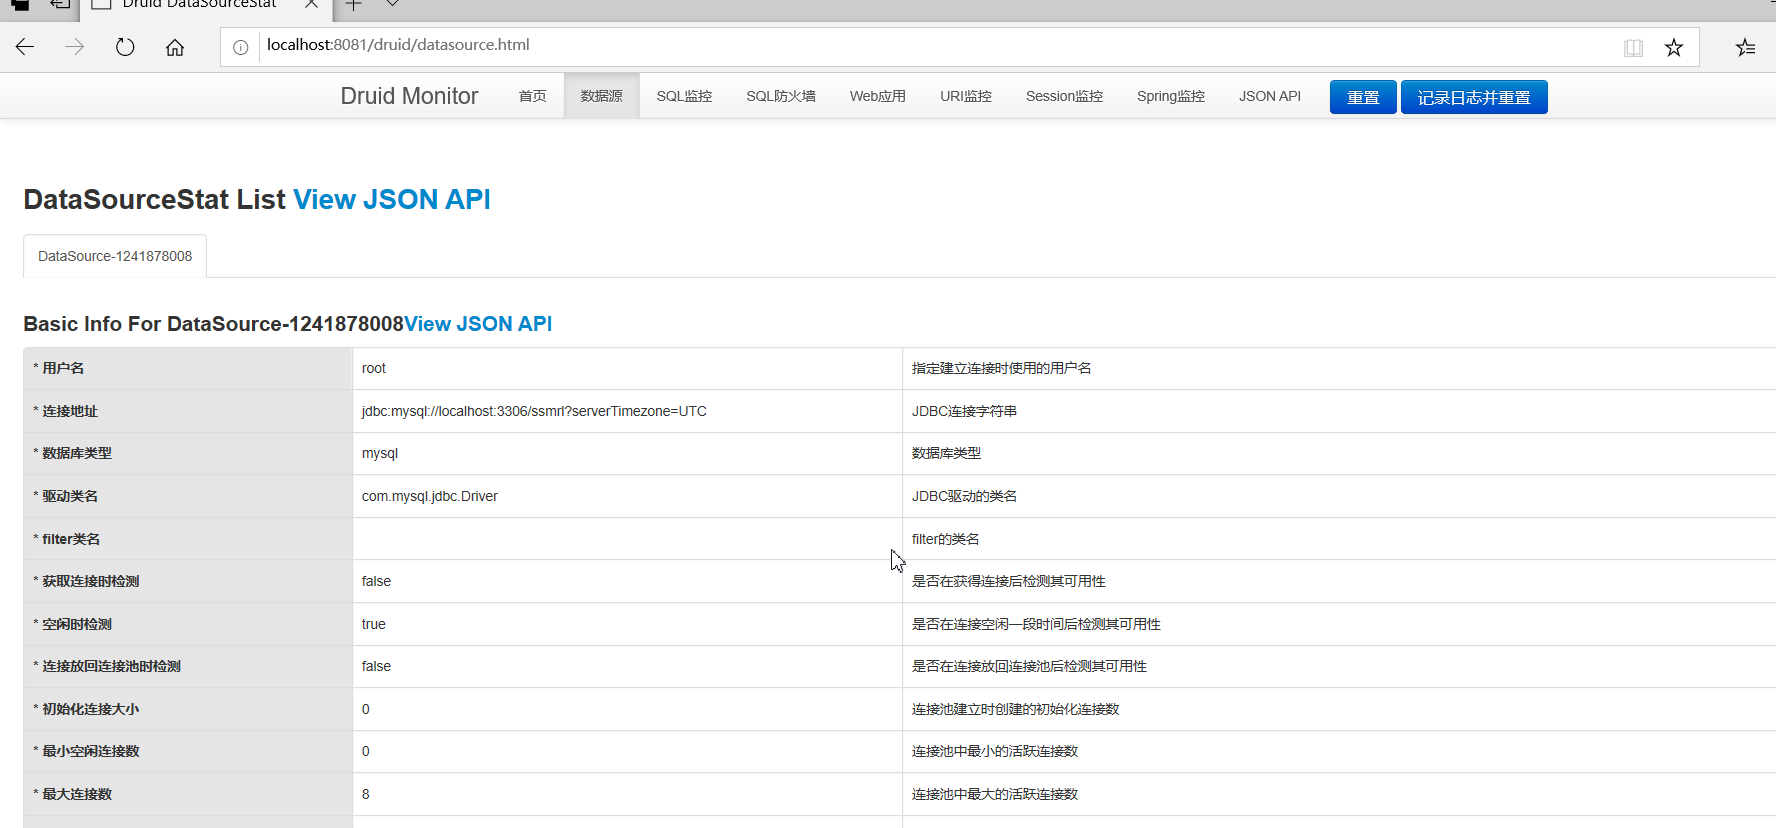
Add monitoring function of Druid data source
public abstract class ResourceServlet extends HttpServlet {
    //Druid monitored account password
    private static final Log LOG = LogFactory.getLog(ResourceServlet.class);
    public static final String SESSION_USER_KEY = "druid-user";
    public static final String PARAM_NAME_USERNAME = "loginUsername"; //Configure account
    public static final String PARAM_NAME_PASSWORD = "loginPassword"; //Configure Ciphers
Because we specified spring. Com in the configuration file datasource. type=com. alibaba. Druid. pool. Druiddatasource will automatically use the default configuration of SpringBoot. We don't want to write a Druid configuration class ourselves and attach it
@Configuration
public class myDruid {

    //The specified prefix is: spring datasource
    @ConfigurationProperties(prefix = "spring.datasource")
    @Bean  //Add to IOC container
    public DataSource druidDatasource(){
        DruidDataSource druidDataSource=new DruidDataSource();
        return druidDataSource;
    }

    //Add Druid monitoring. This ServletRegisterBean is equivalent to web XML < servlet > < / servlet >
    @Bean
    public ServletRegistrationBean servletRegistrationBean(){
        //Specifies the class of the servlet
        ServletRegistrationBean servletRegistrationBean=new ServletRegistrationBean(new StatViewServlet());
        //Configure mapping path
        servletRegistrationBean.addUrlMappings("/druid/*");
        //Configure account password
        servletRegistrationBean.addInitParameter("loginUsername","admin");
        servletRegistrationBean.addInitParameter("loginPassword","123456");
        return servletRegistrationBean;
    }
}
That's it

Enter the account password just configured to enter
SpringBoot+Mybatis
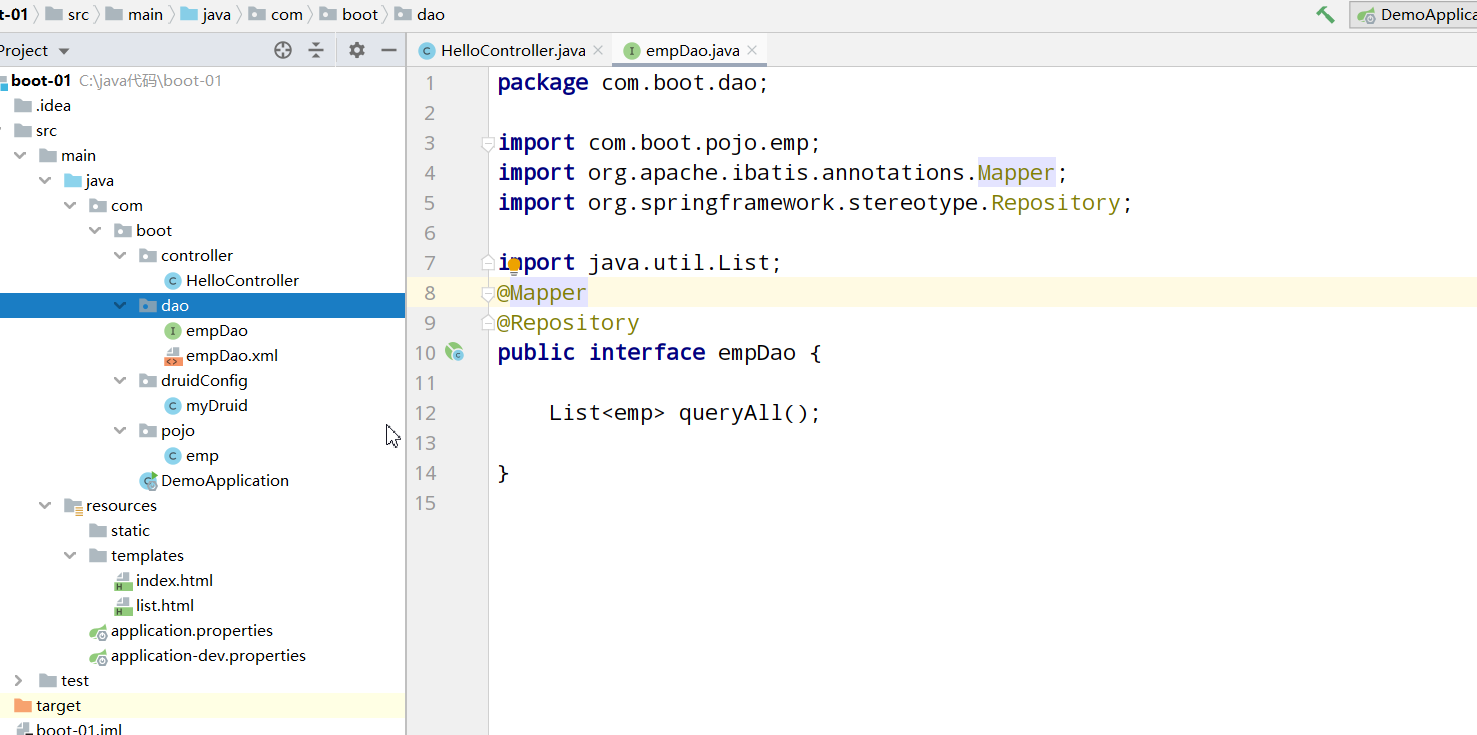
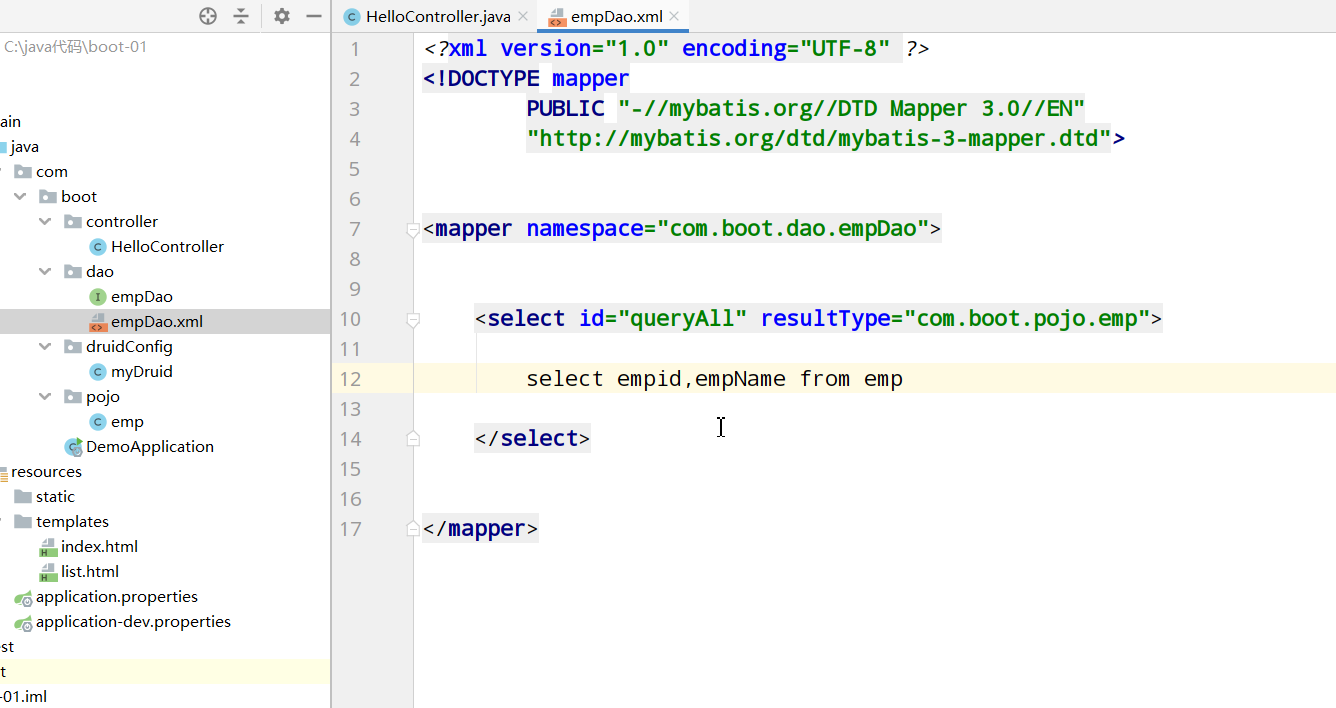

springBoot+Mybatis integration is relatively simple
@Mapper: it is used on dao interface to convert this interface into an implementation class that can be injected. (note that at this time, it is only converted into an implementation class, not in the IOC container, so we also need to add component annotations, such as @ Repository, otherwise it will not work)
You can also add @ MapperScan in the springBoot startup class: scan the Mapper interface on a package and automatically convert it into an implementation class. At this time, we are adding a component annotation and then @ AutoWired.
The specific principle of SpringBoot+Mybatis has not been mastered yet...
Spring boot + mybtis binding exception resolution
There are many kinds of binding exceptions, when we Mapper and Mapper XML is bound, but an error is reported.
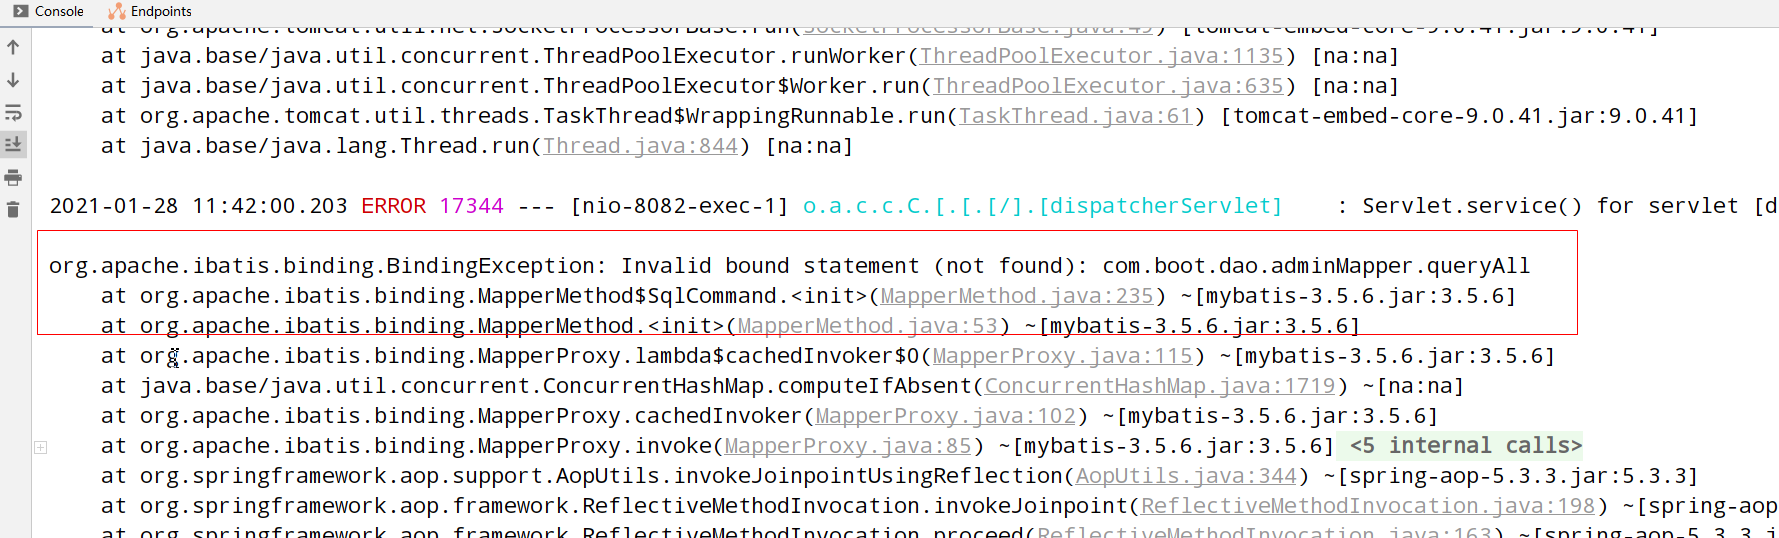
Solution: in POM XML plus Mybatis file filtering:
         <resources>
            <resource>
                <directory>src/main/java</directory>
                <includes>
                    <include>**/*.xml</include>
                </includes>
                <filtering>true</filtering>
            </resource>
        </resources>
SpringBoot asynchronous task
Usage scenario: for example, when we send a verification code, we have to wait to send a request from the front end to the back end (network communication is delayed). For example, it takes 3s for us to send a verification code successfully. If it is not asynchronous operation, We are in the "single thread" state, and we will not be able to perform any operation on the page within 3s, so the user experience will be very poor. If we are asynchronous tasks, it is equivalent to "multithreading". We will start one thread to send verification code and another thread for users to operate the page, so the user experience will be better.
@Async: mark that this class or method is asynchronous. After marking, it is equivalent to opening another thread to process this @ async method
@EnableAsync: enables the asynchronous task function. (required)
@SpringBootApplication
@EnableAsync  //Enable asynchronous task function.
public class DemoApplication {

    public static void main(String[] args) {
        SpringApplication.run(DemoApplication.class, args);
    }

}
Async methods should be placed on other classes, otherwise the asynchronous function will fail
Error demonstration:
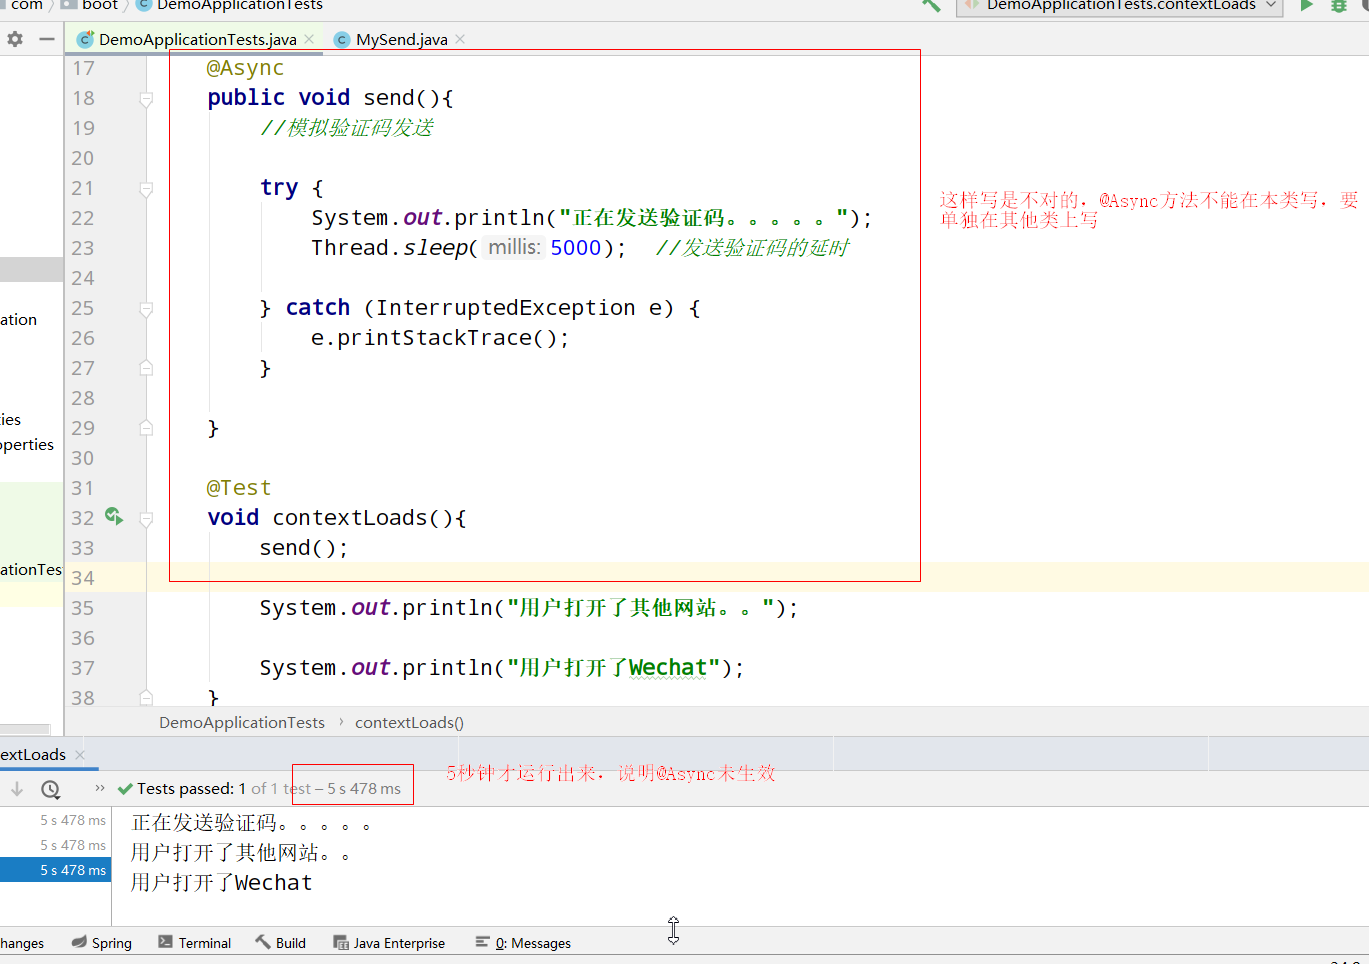
It is found that @ Async doesn't work.
Correct writing:

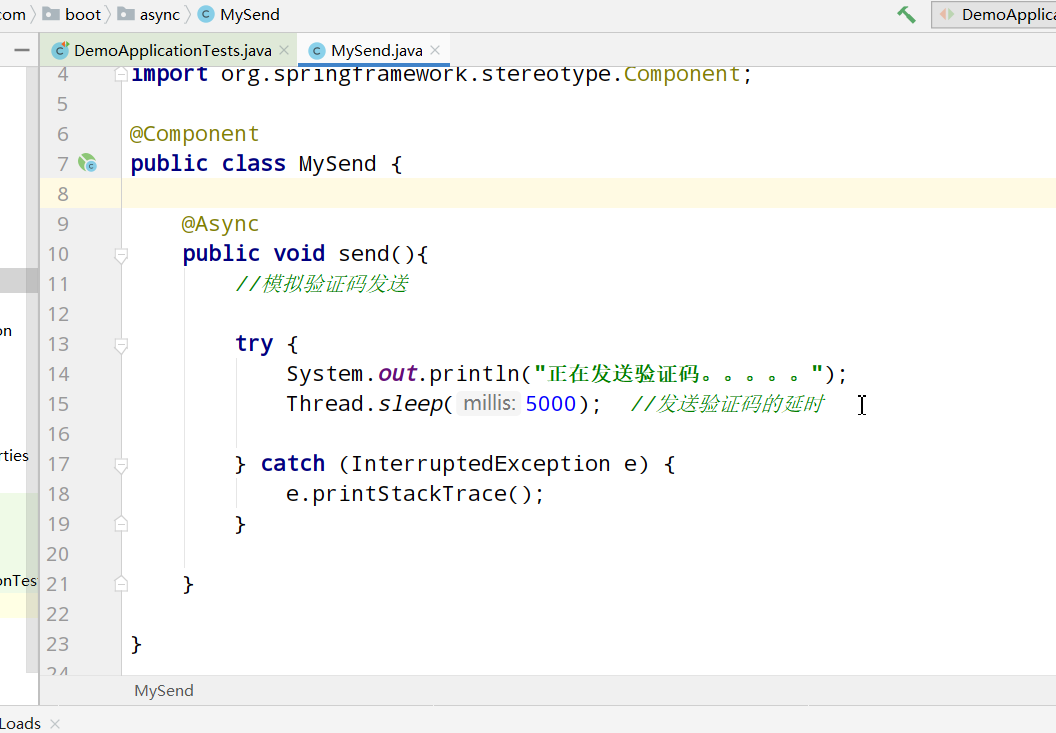
This works, so the conclusion is that @ Async asynchronous tasks need to be placed on other classes separately..... (very important)
SpringBoot scheduled task
It mainly uses cron expression for timing operation
public class MySend {
    //Every two seconds.
    @Scheduled(cron = "0/2 * * * * ? ")
    public void send(){
         System.out.println("hello");
    }

}
@SpringBootApplication
@EnableScheduling //Start the scheduled task, which is a cron expression
public class DemoApplication {

    public static void main(String[] args) {
        SpringApplication.run(DemoApplication.class, args);
    }

}
SpringBoot mail task
SpringBoot further encapsulates the mail sending code of native java, making the original cumbersome process extremely easy to use.
1. In POM XML import corresponding mail initiator
<!--        springBoot Mail initiator-->
        <dependency>
            <groupId>org.springframework.boot</groupId>
            <artifactId>spring-boot-starter-mail</artifactId>
        </dependency>
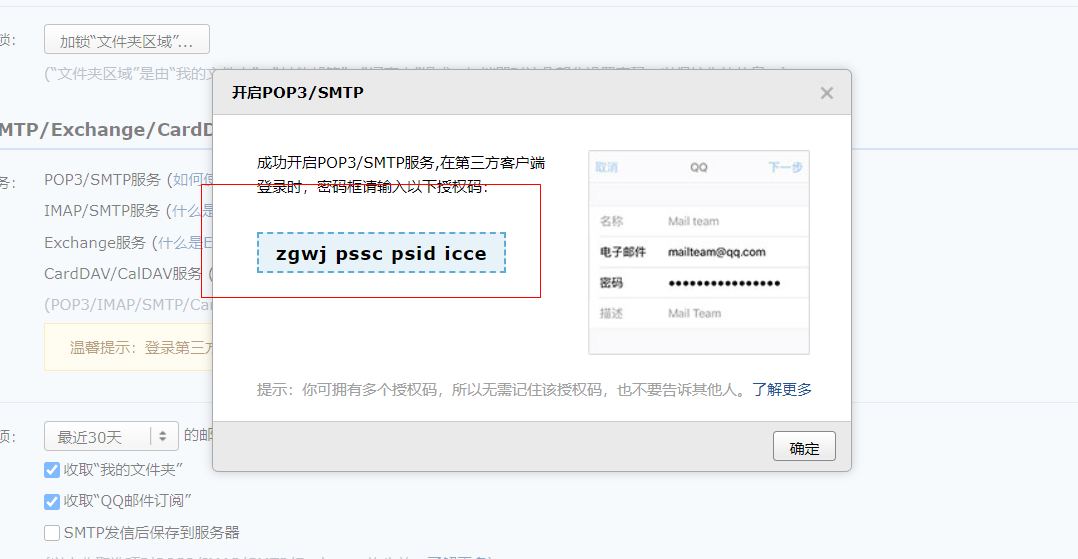
2. Open the SMTP service of qq mailbox
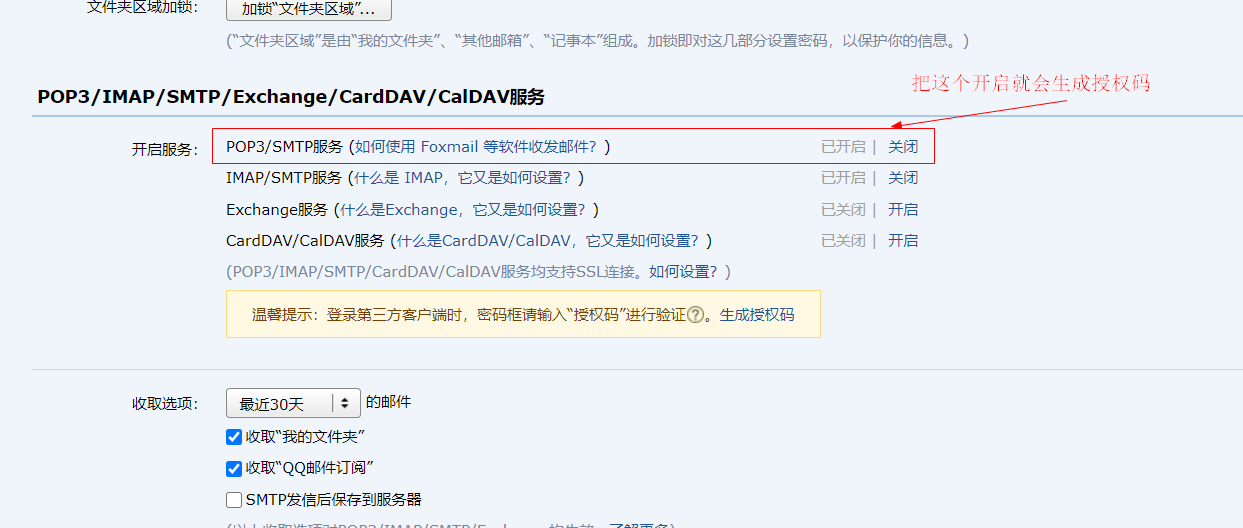
3. Obtain SMTP authorization code
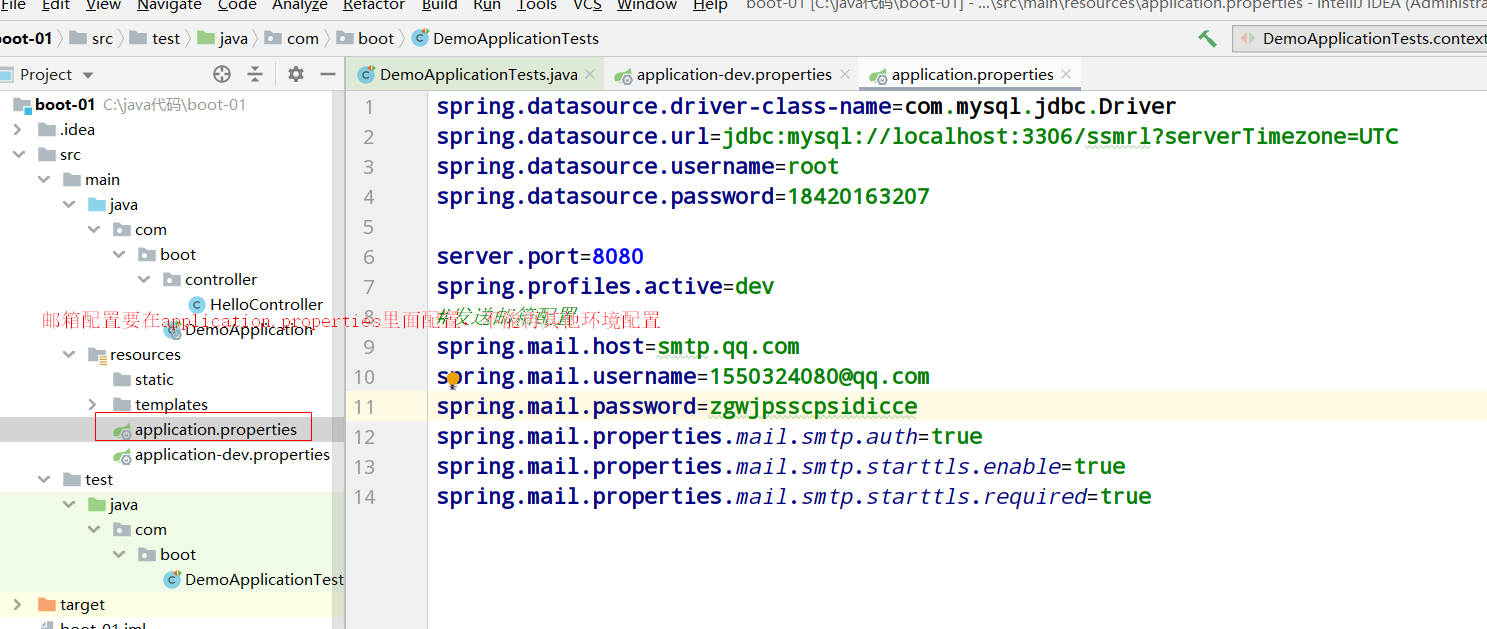
4. Configure application-dev.properties
#Send mailbox configuration
spring.mail.host=smtp.qq.com
spring.mail.username=1550324080@qq.com #Mailbox number
spring.mail.password=zgwjpsscpsidicce   #Authorization code (not password)
spring.mail.properties.mail.smtp.auth=true
spring.mail.properties.mail.smtp.starttls.enable=true
spring.mail.properties.mail.smtp.starttls.required=true
Send simple mail
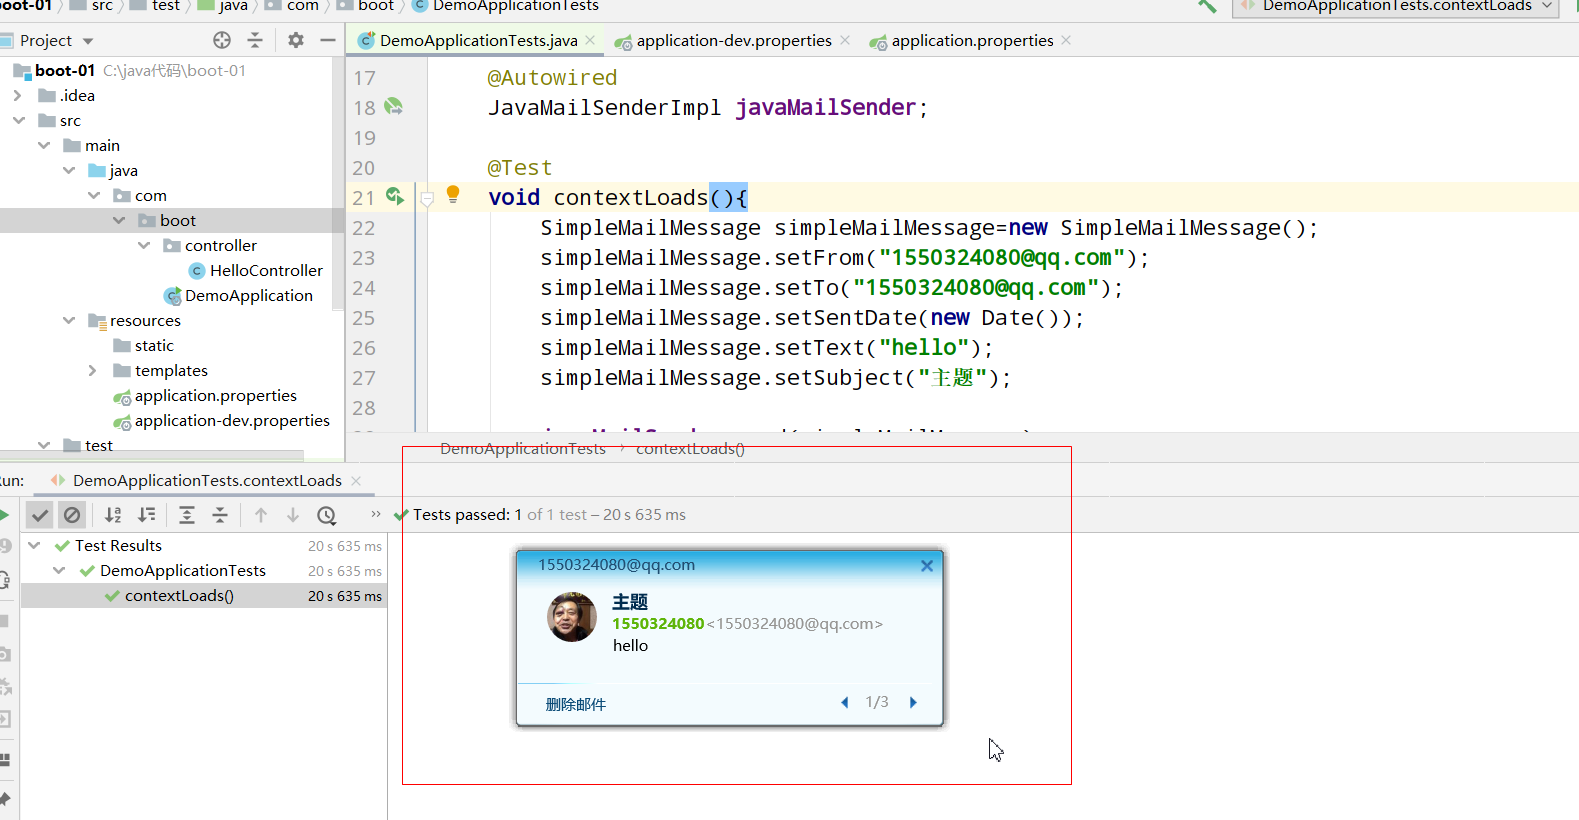
5. Test with test class
@SpringBootTest
class DemoApplicationTests {
    @Autowired
    JavaMailSenderImpl javaMailSender; //Class required for mail sending
    @Test
    void contextLoads(){
        //SimpleMailMessage class for sending simple mail
        SimpleMailMessage simpleMailMessage=new SimpleMailMessage();
        simpleMailMessage.setFrom("1550324080@qq.com"); //From which mailbox
        simpleMailMessage.setTo("1550324080@qq.com");  //To which mailbox
        simpleMailMessage.setSentDate(new Date()); //date
        simpleMailMessage.setText("hello");  //Text content
        simpleMailMessage.setSubject("theme"); //subject
        javaMailSender.send(simpleMailMessage); //Start sending mail.. It takes time to send. Here we can use asynchronous methods to improve the sense of experience
    }
}
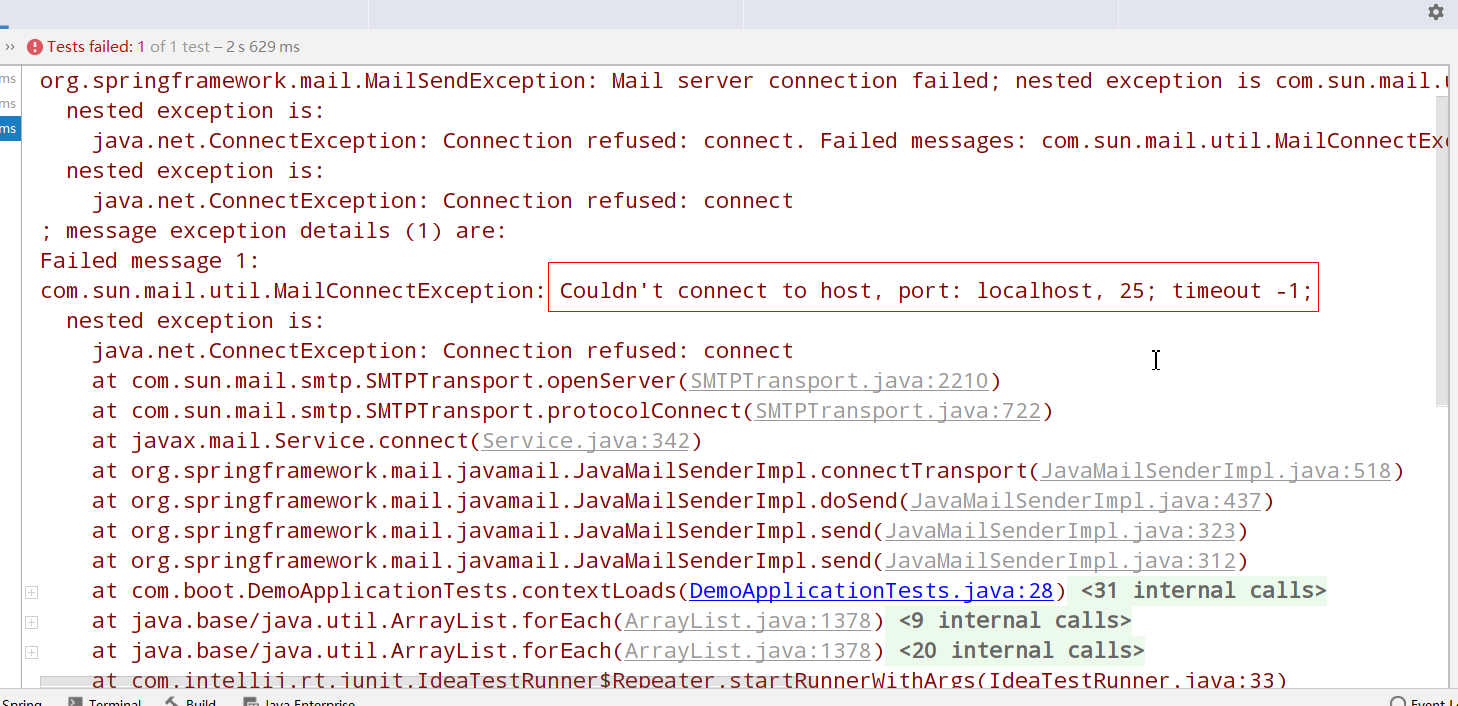
It is found that the report is wrong...
succeed!!!!
Here is a point to pay attention to, that is, why the error was reported just now.
When we automatically assemble JavaMailSenderImpl javaMailSender; It will show that the corresponding bean cannot be found... It just reported an error
Because the configuration of our mailbox must be in application Properties instead of application-dev.properties
Send complex mail
@SpringBootTest
class DemoApplicationTests {

    @Autowired
    JavaMailSenderImpl javaMailSender;

    @Test
    void contextLoads() throws MessagingException, FileNotFoundException {
        MimeMessage mimeMessage = javaMailSender.createMimeMessage(); //Create complex messages
        //*****To upload an attachment, add true to the constructor of MimeMessageHelper, otherwise an error will be reported****
        MimeMessageHelper mimeMessageHelper=new MimeMessageHelper(mimeMessage,true); //Create MimeMessageHelper to encapsulate MimeMessage
        mimeMessageHelper.setFrom("1550324080@qq.com");
        mimeMessageHelper.setTo("1550324080@qq.com");
        mimeMessageHelper.setSubject("theme");
        mimeMessageHelper.setText("<h3>h3 typeface</h3><br/><h5>h5 typeface</h5>");
//        FileSystemResource fileSystemResource = new FileSystemResource(new File("C:\\Users\\youzhengjie666\\Pictures\\1.PNG"));

       //Upload attachments
        mimeMessageHelper.addAttachment("tupian1",new File("C:\\Users\\youzhengjie666\\Pictures\\1.PNG"));

        javaMailSender.send(mimeMessage);


    }

}
SpringBoot+Shiro security framework
1. Import Shiro spring dependency first
<!--        shiro-->
        <dependency>
            <groupId>org.apache.shiro</groupId>
            <artifactId>shiro-spring</artifactId>
            <version>1.2.2</version>
        </dependency>
2. Create a class to configure shiro
package com.boot.shiro;

import com.boot.realm.myRealm;
import org.apache.shiro.authc.credential.HashedCredentialsMatcher;
import org.apache.shiro.realm.Realm;
import org.apache.shiro.spring.LifecycleBeanPostProcessor;
import org.apache.shiro.spring.web.ShiroFilterFactoryBean;
import org.apache.shiro.web.mgt.DefaultWebSecurityManager;
import org.springframework.beans.factory.annotation.Autowired;
import org.springframework.beans.factory.annotation.Qualifier;
import org.springframework.boot.web.servlet.FilterRegistrationBean;
import org.springframework.boot.web.servlet.ServletRegistrationBean;
import org.springframework.context.annotation.Bean;
import org.springframework.context.annotation.Configuration;
import org.springframework.web.filter.DelegatingFilterProxy;

import javax.servlet.Servlet;
import java.util.ArrayList;
import java.util.LinkedHashMap;

@Configuration
public class myShiro {

    //Configure encryption
    @Bean
    public HashedCredentialsMatcher hashedCredentialsMatcher(){
        HashedCredentialsMatcher hashedCredentialsMatcher = new HashedCredentialsMatcher();
        hashedCredentialsMatcher.setHashAlgorithmName("MD5");
        return hashedCredentialsMatcher;
    }


    @Bean
    public Realm realm(@Qualifier("hashedCredentialsMatcher") HashedCredentialsMatcher hashedCredentialsMatcher){
        myRealm myRealm=new myRealm();
        myRealm.setCredentialsMatcher(hashedCredentialsMatcher);
        return myRealm;
    }


    @Bean
    public DefaultWebSecurityManager defaultWebSecurityManager(@Qualifier("realm") Realm realm){
        DefaultWebSecurityManager defaultWebSecurityManager=new DefaultWebSecurityManager();
        defaultWebSecurityManager.setRealm(realm);
        return defaultWebSecurityManager;
    }


    @Bean
    public LifecycleBeanPostProcessor lifecycleBeanPostProcessor(){
        LifecycleBeanPostProcessor lifecycleBeanPostProcessor = new LifecycleBeanPostProcessor();
        return lifecycleBeanPostProcessor;
    }

    @Bean("shiroFilter")
    public ShiroFilterFactoryBean setshiroFilter(@Qualifier("defaultWebSecurityManager") DefaultWebSecurityManager defaultWebSecurityManager){
        ShiroFilterFactoryBean shiroFilterFactoryBean=new ShiroFilterFactoryBean();
        shiroFilterFactoryBean.setSecurityManager(defaultWebSecurityManager);
        shiroFilterFactoryBean.setLoginUrl("/tologin");
        shiroFilterFactoryBean.setSuccessUrl("/tolist");
        shiroFilterFactoryBean.setUnauthorizedUrl("/tounauth");

        LinkedHashMap<String, String> filters = new LinkedHashMap<>();
        filters.put("/tologin","anon");
        filters.put("/login","anon");
        filters.put("/toadmin","roles[admin]");
        filters.put("/touser","roles[user]");
        filters.put("/**","authc");


        shiroFilterFactoryBean.setFilterChainDefinitionMap(filters);

        return shiroFilterFactoryBean;
    }


//    @Bean
//    public FilterRegistrationBean shiroFilter(){
//        FilterRegistrationBean filterRegistrationBean=new FilterRegistrationBean();
//        filterRegistrationBean.setFilter(new DelegatingFilterProxy());
//        ArrayList<Object> list = new ArrayList<>();
//        list.add("/**");
//        filterRegistrationBean.setUrlPatterns(list);
//
//        return filterRegistrationBean;
//    }


}
3. Create a class and configure realm
package com.boot.realm;

import org.apache.shiro.authc.*;
import org.apache.shiro.authz.AuthorizationInfo;
import org.apache.shiro.authz.SimpleAuthorizationInfo;
import org.apache.shiro.realm.AuthorizingRealm;
import org.apache.shiro.subject.PrincipalCollection;

import java.util.HashSet;
import java.util.Set;

public class myRealm extends AuthorizingRealm {


    @Override
    protected AuthenticationInfo doGetAuthenticationInfo(AuthenticationToken authenticationToken) throws AuthenticationException {
        UsernamePasswordToken token = (UsernamePasswordToken) authenticationToken;
        //Imitate querying the database from the background
        String us="123";
        String pd="202cb962ac59075b964b07152d234b70"; //The original password is 123, which is encrypted by MD5

        SimpleAuthenticationInfo info = new SimpleAuthenticationInfo(us,pd,this.getName());

        return info;
    }

       @Override
    protected AuthorizationInfo doGetAuthorizationInfo(PrincipalCollection principalCollection) {
        //Get the principal = = >, that is, the account we passed in
        String principal = (String) principalCollection.getPrimaryPrincipal();

        Set<String> roles=new HashSet<>();
        roles.add("admin");
        SimpleAuthorizationInfo simpleAuthorizationInfo=new SimpleAuthorizationInfo(roles);

        return simpleAuthorizationInfo;
    }


}
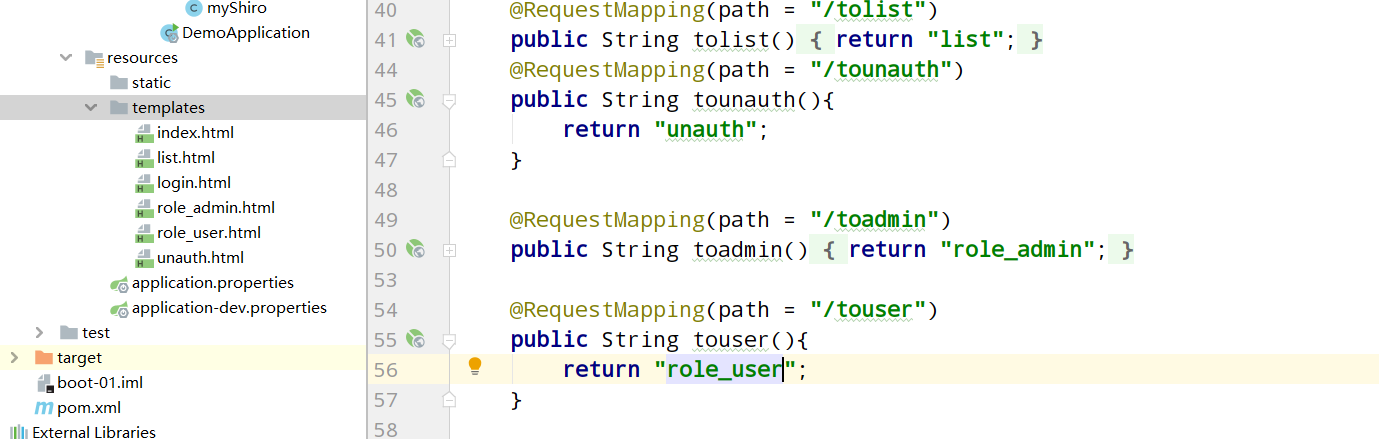
4. Configure the controller layer
@Controller
public class testController {

    @RequestMapping(path = "/tologin")
    public String tologin(){
        return "login";
    }


    @RequestMapping(path = "/login")
    public String login(String username,String password){

        Subject subject = SecurityUtils.getSubject();

        if(!subject.isAuthenticated()){
            UsernamePasswordToken usernamePasswordToken=new UsernamePasswordToken(username,password);

            try {
                subject.login(usernamePasswordToken);
            }catch (Exception e){
                return "redirect:tologin";
            }

        }

        return "forward:tolist";
    }


    @RequestMapping(path = "/tolist")
    public String tolist(){
        return "list";
    }
    @RequestMapping(path = "/tounauth")
    public String tounauth(){
        return "unauth";
    }

    @RequestMapping(path = "/toadmin")
    public String toadmin(){
        return "role_admin";
    }

    @RequestMapping(path = "/touser")
    public String touser(){
        return "role_user";
    }

}
5. Required html files
Extended MVC
To extend spring MVC, you only need to implement the WebMvcConfigurer class, which is a configuration class
If the @ EnableWebMVC annotation is added, it is equivalent to taking over spring MVC in an all-round way, that is, it will invalidate all the default configurations of spring boot
@Configuration
public class myMvcConfig implements WebMvcConfigurer {

    //Add view jump
    @Override
    public void addViewControllers(ViewControllerRegistry registry) {

        //This code is equivalent to = = >
        //@RequestMapping("/test")
        //public String xxx{
        // return "role_admin";
        //}
        registry.addViewController("/test").setViewName("role_admin");

    }


}
Page internationalization
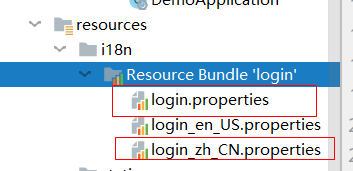
Create XXX Properties as the default internationalization configuration file, xxx_zh_CN.properties as Chinese configuration, xxx_en_US.properties is configured in English, and the Resource Bundle 'login' will be generated automatically
Enter login properties
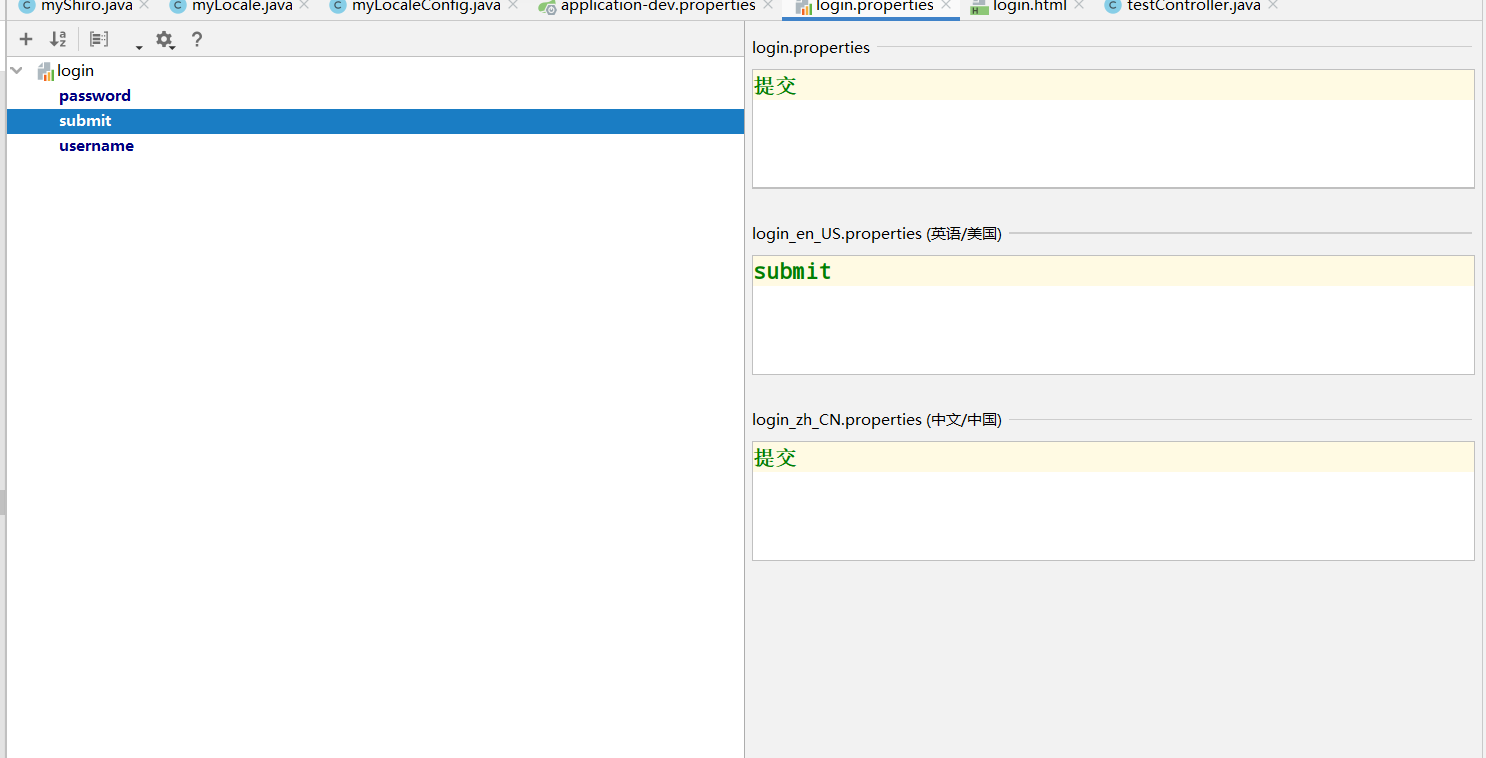
There is a "+" sign in the upper left corner, which is used to add nationalized messages
Specify the basename of the nationalized message in application-dev.properties because we have customized xxx XXX of properties is login, so login is our general nationalization configuration file. Just bind this login
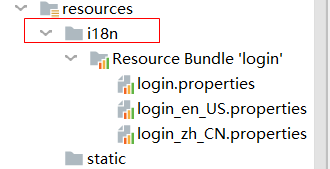
spring.messages.basename=i18n.login //i18n is the package name we use to store the nationalization configuration file
login.html
<form th:action="@{/login}" th:method="post">
<span th:text="#{username}"></span>: <input type="text" name="username">
<br/>
<span th:text="#{password}"></span>:<input type="password" name="password">
<br/>
<input type="submit" th:value="#{submit}">
</form>
<a th:href="@{/tologin(locale='zh_CN')}">chinese</a>
<a th:href="@{/tologin(locale='en_US')}">English</a>
Note: thymeleaf's #{} is used to get national news
At this point, we want to switch between Chinese and English. We need to make the following configuration:
1. In login HTML to locale
<a th:href="@{/tologin(locale='zh_CN')}">chinese</a>
<a th:href="@{/tologin(locale='en_US')}">English</a>
2. Configure custom localeResolver
public class myLocale implements LocaleResolver {
    @Override
    public Locale resolveLocale(HttpServletRequest request) {
        Locale aDefault = Locale.getDefault();//Get default Locale
        String locale = request.getParameter("locale"); //Get login HTML language
        if(!StringUtils.isEmpty(locale)){
            //zh_CN to become = = = = > locale ("zh", "CN"), only put "" Split into zh and cn
            String language=locale.charAt(0)+""+locale.charAt(1);
            String country=locale.charAt(3)+""+locale.charAt(4);
            return new Locale(language, country);
        }

        return aDefault;
    }

    @Override
    public void setLocale(HttpServletRequest httpServletRequest, HttpServletResponse httpServletResponse, Locale locale) {

    }
}
3. Leave the custom LocaleResolver to Spring for management
Note: the id of the Bean of the custom region parser must be "localeResolver", otherwise the Bean will not be found
@Configuration
public class myLocaleConfig {

    @Bean("localeResolver")
    public myLocale localeResolver(){

        return new myLocale();
    }


}
Then it's done