Web APIs
Learning objectives of this article:
Be able to say the general implementation steps of exclusive operation
You can use the dataset method in html5 to manipulate custom attributes
Be able to complete Baidu skin changing cases according to the tips
Be able to complete the selection of all cases according to the prompt
Be able to complete the tab column switching case according to the prompt
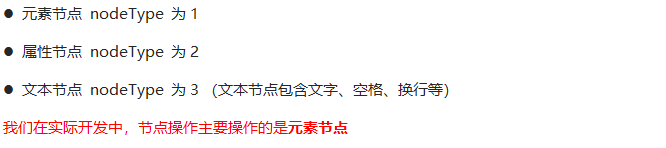
It can distinguish element nodes, text nodes and attribute nodes
Can get the parent element of the specified element
Can get all child elements of the specified element
Be able to tell the difference between childNodes and children
Ability to create page elements using createElement
1.1. Exclusive operation
1.1.1 exclusivity
If there is the same group of elements, we need to use the exclusive idea algorithm of loop if we want an element to implement a certain style:
-
Clear all elements (kill others)
-
Style the current element (leave me alone)
-
Note that the order cannot be reversed. Kill others first, and then set yourself
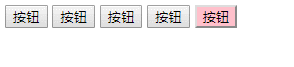
    <button>Button 1</button>
    <button>Button 2</button>
    <button>Button 3</button>
    <button>Button 4</button>
    <button>Button 5</button>
    <script>
        // 1. Get all button elements
        var btns = document.getElementsByTagName('button');
        // btns gets every element in the pseudo array btns[i]
        for (var i = 0; i < btns.length; i++) {
            btns[i].onclick = function() {
                // (1) Let's remove all the button background colors and kill everyone
                for (var i = 0; i < btns.length; i++) {
                    btns[i].style.backgroundColor = '';
                }
                // (2) Then let the current element background color be pink, leaving me
                this.style.backgroundColor = 'pink';

            }
        }
    </script>
1.2 case: Baidu skin change


<body>
    <ul class="baidu">
        <li><img src="images/1.jpg"></li>
        <li><img src="images/2.jpg"></li>
        <li><img src="images/3.jpg"></li>
        <li><img src="images/4.jpg"></li>
    </ul>
    <script>
        // 1. Get element
        var imgs = document.querySelector('.baidu').querySelectorAll('img');
        // console.log(imgs);
        // 2. Circular registration event
        for (var i = 0; i < imgs.length; i++) {
            imgs[i].onclick = function() {
                // this.src is the path where we click images/2.jpg
                // console.log(this.src);
                // Just give the path this.src to body
                document.body.style.backgroundImage = 'url(' + this.src + ')';
            }
        }
    </script>
</body>
1.3 case: table interlaced discoloration

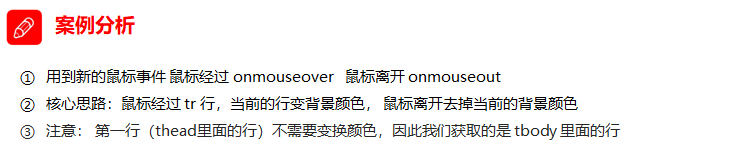
    <script>
        // 1. Get elements get all the lines in tbody
        var trs = document.querySelector('tbody').querySelectorAll('tr');
        // 2. Register events with circular binding
        for (var i = 0; i < trs.length; i++) {
            // 3. Mouse over event onmouseover
            trs[i].onmouseover = function() {
                    // console.log(11);
                    this.className = 'bg';
                }
                // 4. Mouse leaving event onmouseout
            trs[i].onmouseout = function() {
                this.className = '';
            }
        }
    </script>
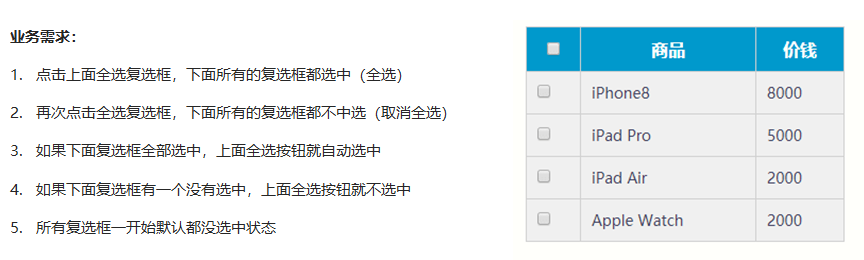
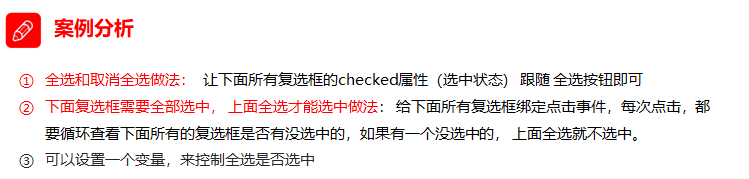
1.4 cases: select all
1.5. User defined attribute operation
1.5.1 get attribute value
<div id="demo" index="1" class="nav"></div>
<script>
var div = document.querySelector('div');
// 1. Get the attribute value of the element
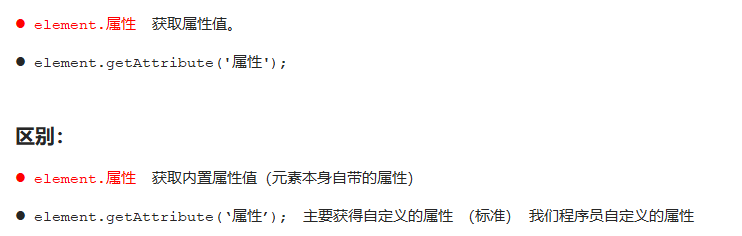
// (1) element. Attribute
console.log(div.id);
//(2) element.getAttribute('attribute ') get the meaning of getting the attribute attribute. The attribute added by our programmers is called user-defined attribute index
console.log(div.getAttribute('id'));
console.log(div.getAttribute('index'));
</script>
1.5.2. Setting attribute value
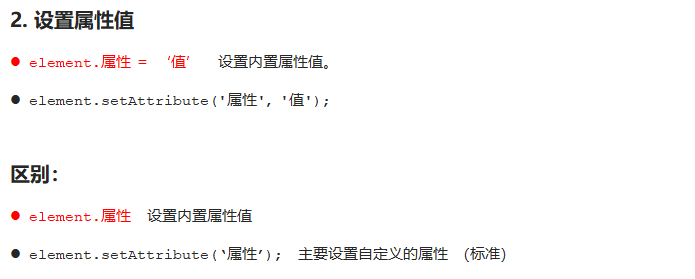
        // 2. Set element attribute value
        // (1) element. Attribute = 'value'
        div.id = 'test';
        div.className = 'navs';
        // (2) element.setAttribute('attribute ',' value '); Mainly for custom attributes
        div.setAttribute('index', 2);
        div.setAttribute('class', 'footer'); // class is special. What's written here is
1.5.3. Move out attribute

		// class is not className
        // 3 remove the attribute removeattribute (attribute)
        div.removeAttribute('index');
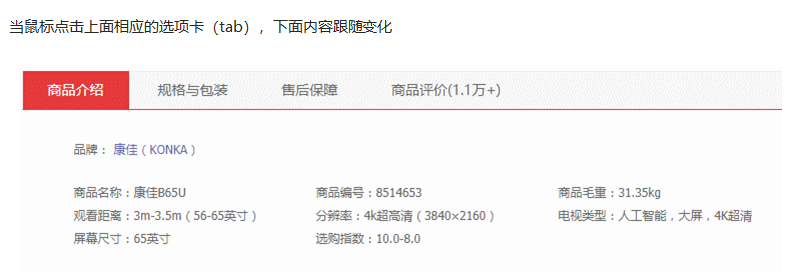
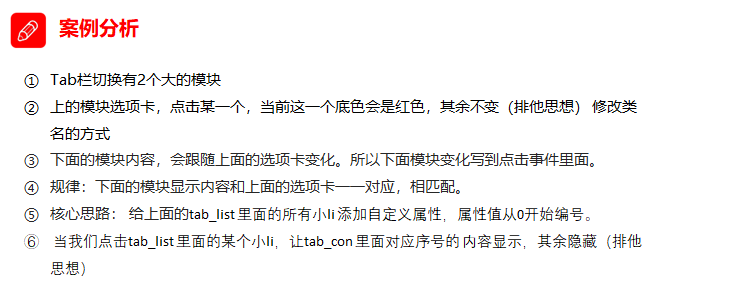
1.5.4. Case: tab column
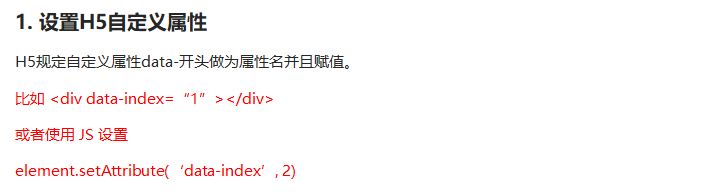
1.5.5. H5 custom attribute
Custom attribute purpose: to save and use data. Some data can be saved to the page instead of the database.
The custom attribute is obtained through getAttribute('attribute ').
However, some custom attributes are easy to cause ambiguity, and it is not easy to judge whether they are built-in attributes or custom attributes of elements.
H5 adds custom attributes to us:

    <div getTime="20" data-index="2" data-list-name="andy"></div>
    <script>
        var div = document.querySelector('div');
        // console.log(div.getTime);
        console.log(div.getAttribute('getTime'));
        div.setAttribute('data-time', 20);
        console.log(div.getAttribute('data-index'));
        console.log(div.getAttribute('data-list-name'));
        // h5 is a new method to get custom attributes. It can only get the attributes beginning with data -
        // dataset is a collection containing all custom attributes starting with data
        console.log(div.dataset);
        console.log(div.dataset.index);
        console.log(div.dataset['index']);
        // If there are multiple - linked words in the custom attribute, we use the hump naming method when obtaining them
        console.log(div.dataset.listName);
        console.log(div.dataset['listName']);
    </script>
1.6. Node operation
1.6.1. Node overview
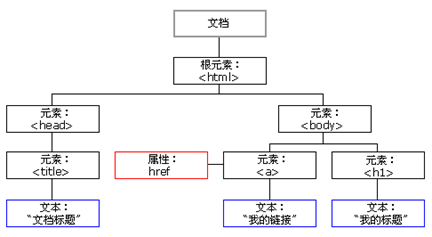
All contents in a web page are nodes (labels, attributes, text, comments, etc.), and nodes are represented by nodes in DOM.
All nodes in the HTML DOM tree can be accessed through JavaScript, and all HTML elements (nodes) can be modified, created or deleted.
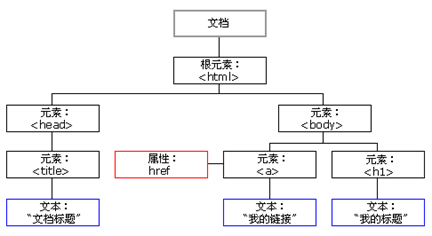
Generally, a node has at least three basic attributes: nodeType, nodeName, and nodeValue.
1.6.2. Node level
Using DOM tree, nodes can be divided into different hierarchical relationships, commonly parent-child brother hierarchical relationships.
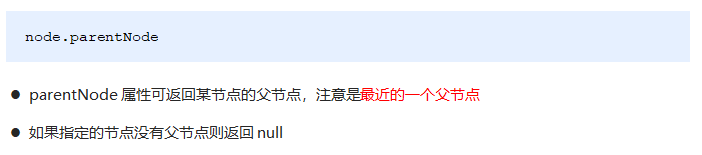
1.6.3. Parent node
    <div class="demo">
        <div class="box">
            <span class="erweima">×</span>
        </div>
    </div>
    <script>
        // 1. Parent node
        var erweima = document.querySelector('.erweima');
        // var box = document.querySelector('.box');
        // The result is the parent node closest to the element (parent). If the parent node cannot be found, it will return null
        console.log(erweima.parentNode);
    </script>
1.6.4. Child nodes
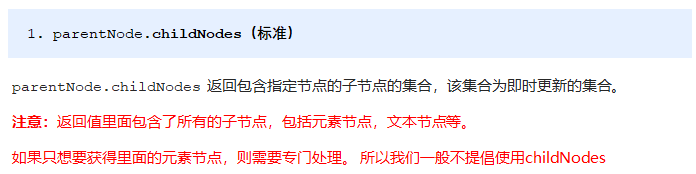
All child nodes
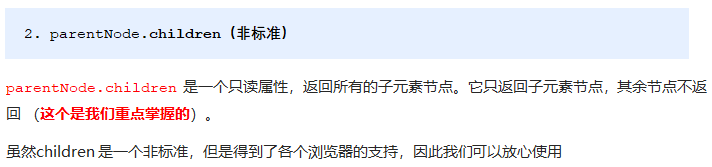
Child element node
    <ul>
        <li>I am li</li>
        <li>I am li</li>
        <li>I am li</li>
        <li>I am li</li>
    </ul>
    <script>
        // DOM provides methods (API s) to get
        var ul = document.querySelector('ul');
        var lis = ul.querySelectorAll('li');
        // 1. Child nodes all child nodes include element nodes, text nodes, etc
        console.log(ul.childNodes);
        console.log(ul.childNodes[0].nodeType);
        console.log(ul.childNodes[1].nodeType);
        // 2. It is also common for children to obtain all child element nodes in our actual development
        console.log(ul.children);
    </script>
1st child node

Last child node

1st child element node

Last child element node
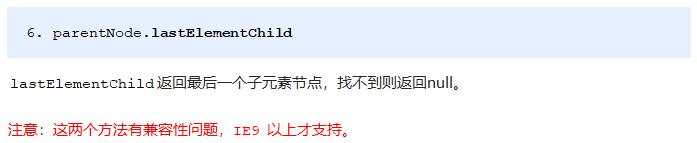
In the actual development, firstChild and lastChild contain other nodes, which is inconvenient to operate, and firstElementChild and lastElementChild have compatibility problems, so how do we get the first child element node or the last child element node?

    <ol>
        <li>I am li1</li>
        <li>I am li2</li>
        <li>I am li3</li>
        <li>I am li4</li>
        <li>I am li5</li>
    </ol>
    <script>
        var ol = document.querySelector('ol');
        // 1. The first child node of firstchild is either a text node or an element node
        console.log(ol.firstChild);
        console.log(ol.lastChild);
        // 2. firstElementChild returns the first child element node ie9 to support
        console.log(ol.firstElementChild);
        console.log(ol.lastElementChild);
        // 3. The actual development method has no compatibility problem and returns the first child element
        console.log(ol.children[0]);
        console.log(ol.children[ol.children.length - 1]);
    </script>
1.6.5. Case: Sina drop-down menu


    <script>
        // 1. Get element
        var nav = document.querySelector('.nav');
        var lis = nav.children; // Get 4 small li
        // 2. Circular registration event
        for (var i = 0; i < lis.length; i++) {
            lis[i].onmouseover = function() {
                this.children[1].style.display = 'block';
            }
            lis[i].onmouseout = function() {
                this.children[1].style.display = 'none';
            }
        }
    </script>
1.6.6. Sibling node
Next sibling node

Previous sibling node

    <div>I am div</div>
    <span>I am span</span>
    <script>
        var div = document.querySelector('div');
        // 1. The next sibling node of nextsibling includes element node or text node, etc
        console.log(div.nextSibling);
        console.log(div.previousSibling);
        // 2. Nextlementsibling gets the next sibling element node
        console.log(div.nextElementSibling);
        console.log(div.previousElementSibling);
    </script>
Next sibling element node (compatibility issue)

Previous sibling element node (compatibility issue)


   function getNextElementSibling(element) {
      var el = element;
      while (el = el.nextSibling) {
        if (el.nodeType === 1) {
            return el;
        }
      }
      return null;
    }
Summary: get the API of the node
getElementById
getElementsByTagName
getElementsByClassName
queryselector
queryselectorall
document.body
parentNode
childNodes
children
previousSibling,previousElementSliblint
nextSibling,nextElementSibling
1.6.7. Create node

1.6.8. Add node
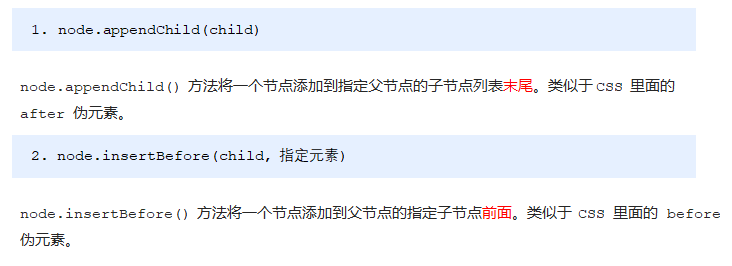
    <ul>
        <li>123</li>
    </ul>
    <script>
        // 1. Create node element node
        var li = document.createElement('li');
        // 2. Add node. AppendChild (child) node parent child is the additional element after the child
        var ul = document.querySelector('ul');
        ul.appendChild(li);
        // 3. Add node.insertBefore(child, specify element);
        var lili = document.createElement('li');
        ul.insertBefore(lili, ul.children[0]);
        // 4. We want to add a new element to the page: 1. Create element 2. Add element
    </script>
1.6.9. Case: simple version release message
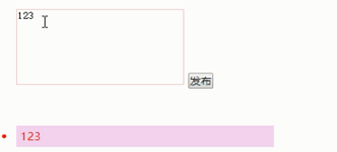
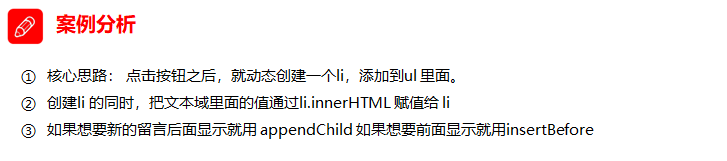
<body>
    <textarea name="" id=""></textarea>
    <button>release</button>
    <ul>

    </ul>
    <script>
        // 1. Get element
        var btn = document.querySelector('button');
        var text = document.querySelector('textarea');
        var ul = document.querySelector('ul');
        // 2. Registration event
        btn.onclick = function() {
            if (text.value == '') {
                alert('You have not entered anything');
                return false;
            } else {
                // console.log(text.value);
                // (1) Create element
                var li = document.createElement('li');
                // There must be li before assignment
                li.innerHTML = text.value;
                // (2) Add element
                // ul.appendChild(li);
                ul.insertBefore(li, ul.children[0]);
            }
        }
    </script>
</body>