Continue to adhere to the original output, click the blue word to pay attention to me

Author: Xiao Fu Ge
Blog: https://bugstack.cn
Precipitate, share and grow, so that you and others can gain something! 😜
❞catalogue
1, Foreword
2, Demand purpose
3, Case development
1. Engineering structure
2. Drag Swing panel
3. Configure the pop-up window with the right mouse button
4. Add functions to the form
5. Code generation domain services
4, Test verification
5, Summary
6, Series recommendation
1, Foreword
Can be used, can be used together!
There are several sets of one thing for promotion. If you get the result, you have to run. The brothers in the back will rebuild it!
A few years ago, this was not the case. At that time, there were still many things that could be innovated. Heroes born in troubled times could always plough in one direction and make easy-to-use product functions, framework services, technical components, etc. But then it seemed that this situation began to decrease. Instead, it was repeated, engraved and copied. A new skin, a new style and a new name were new things.
Sometimes companies or organizations are like home, but things at home are generally broken, repaired and broken. If they can't, they can change them. But no one has a toilet in the bathroom, a toilet in the kitchen, a toilet in the living room and a toilet in the bedroom, although your new toilet can spray water automatically.
Therefore, when building a good product function, you should learn as many excellent products as possible, such as IDEA, GitHub, Mysql, etc. the IDEA provides plug-in development to meet the user's extended function, rather than saying that I don't have one thing, you make it yourself. Co construction will make this thing better!
2, Demand purpose
In the previous chapter, we extended the create project wizard, added the steps we need to create DDD project scaffolding, and finally provided a DDD development framework. In this DDD project development framework, there is still a lack of the function of automatically generating corresponding PO, DAO and Mapper files based on database table information.
- In this chapter, we will expand this part in the project. The actual effect is that we can call the form for adding ORM code block by right clicking on the project, and use freemaker to automatically generate code by selecting the library table.
- In the generated code block, you need to complete the introduction of the required package. At the same time, lombok annotation will be used to replace the get and set methods in PO object to reduce the amount of code and the creation of logic.
3, Case development
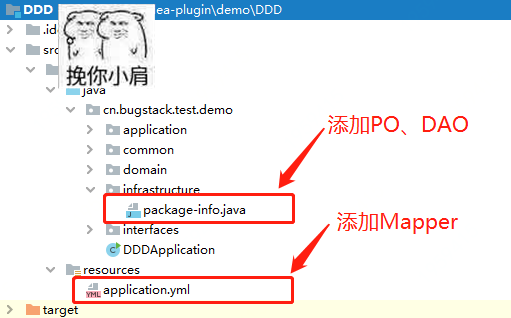
1. Engineering structure
guide-idea-plugin-orm
├── .gradle
└── src
    ├── main
    │   └── java
    │    └── cn.bugstack.guide.idea.plugin
    │        ├── action
    │        │   └── CodeGenerateAction.java
    │        ├── domain
    │        │   ├── model.vo
    │        │   │   ├── CodeGenContextVO.java
    │        │   │   └── ORMConfigVO.java
    │        │   └── service
    │        │     ├── impl
    │        │     │   └── ProjectGeneratorImpl.java
    │        │     ├── AbstractProjectGenerator.java
    │        │     ├── GeneratorConfig.java
    │        │     └── IProjectGenerator.java
    │        ├── infrastructure
    │        │   ├── data
    │        │   │   ├── DataSetting.java
    │        │   │   └── DataState.java
    │        │   ├── po
    │        │   │   ├── Base.java
    │        │   │   ├── Column.java
    │        │   │   ├── Dao.java
    │        │   │   ├── Field.java
    │        │   │   ├── Model.java
    │        │   │   └── Table.java
    │        │   └── utils
    │        │       ├── DBHelper.java
    │        │       └── JavaType.java
    │        ├── module
    │        │   └── FileChooserComponent.java
    │        └── ui
    │            ├── ORMSettingsUI.java
    │            └── ORMSettingsUI.form
    ├── resources
    │   ├── META-INF
    │   │   └── plugin.xml
    │   └── template
    │       ├── dao.ftl
    │       ├── mapper.ftl
    │       └── model.ftl
    ├── build.gradle
    └── gradle.properties
Source code: the official account: bugstack wormhole stack reply: idea can download all the IDEA plug-in development source code.
In this IDEA plug-in project, it is mainly divided into five areas:
- action: used to provide a menu bar. The location of this menu is configured in plugin.xml. We configure it to the list that appears when we right-click the project. In this way, it is more convenient for us to select the project and add the generated code fragments under the project
- Domain: domain Service layer. In fact, you can write a Service package directly, but recently, the author Xiao Fuge prefers to use the idea and structure of DDD to create code and realize functional logic.
- infrastructure: the basic layer provides the storage of data under the project. Each project has its own configuration to store default information by right clicking, so that this part can be read when it is opened next time. At the same time, this layer also provides classes for processing database operations, because we need to read the information, fields and comments of the table from the database to create PO, DAO and Mapper.
- Module: module layer, which provides a component for selecting file paths. You can right-click the project to select the corresponding location path of the code to be generated by clicking the module in the window.
- ui: provides a configuration panel, that is, the panel that pops up when we right-click on the code project. After configuration, this panel is used to generate ORM code.
2. Drag Swing panel
ORM settings UI: let's first create the panel for creating code configuration. With the screen, we can enter.
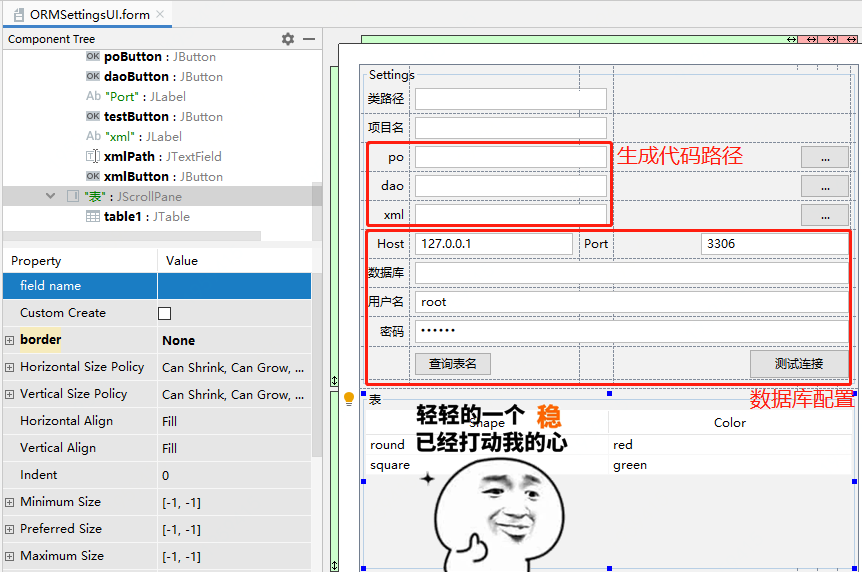
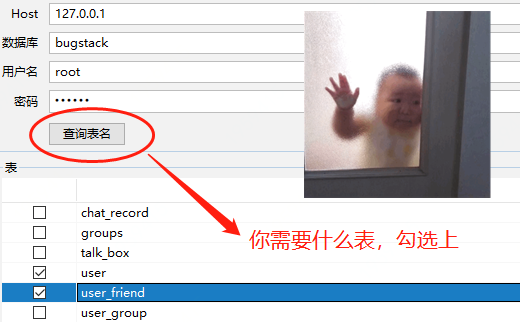
- The panel includes the code paths for generating PO, DAO and XML, as well as the contents of the configuration database and selection table.
- After you configure these basic information, you can select the query table name and select which tables you want to generate the corresponding ORM code for.
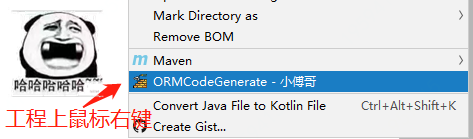
3. Configure the pop-up window with the right mouse button
First, we need to create an Action implementation class through new - > plugin devkit - > Action
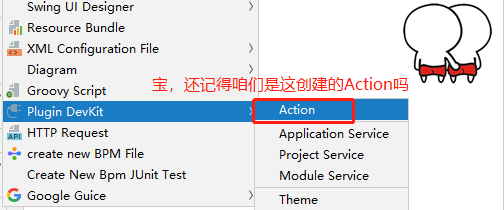
cn.bugstack.guide.idea.plugin.action.CodeGenerateAction
/**
 * @author: Little brother Fu, wechat: fustack
 * @github: https://github.com/fuzhengwei
 * @Copyright: Official account: bugstack wormhole stack  |  Blog: https://bugstack.cn  -   Precipitate, share and grow, so that you and others can gain something!
 */
public class CodeGenerateAction extends AnAction {

    private IProjectGenerator projectGenerator = new ProjectGeneratorImpl();

    @Override
    public void actionPerformed(AnActionEvent e) {
        Project project = e.getRequiredData(CommonDataKeys.PROJECT);
        ShowSettingsUtil.getInstance().editConfigurable(project, new ORMSettingsUI(project, projectGenerator));
    }

}
- This is a right-click menu entry. Only through this entry can we open our own UI form. This UI form is the configuration panel dragged from above, ORMSettingsUI
- Next, we need to configure this Action into the plugin.xml file before it can be created by the right-click menu. When developing code, it is also such a process. You always have to start from one point and grasp it with a grasp
plugin.xml configuration
<actions>
    <!-- Add your actions here -->
    <action id="CodeGenerateAction" class="cn.bugstack.guide.idea.plugin.action.CodeGenerateAction"
            text="ORMCodeGenerate - Little brother Fu" description="Code Generate ORM" icon="/icons/logo.png">
        <add-to-group group-id="ProjectViewPopupMenu" anchor="last"/>
    </action>
</actions>
ea-plugin>
- Configure our Action implementation class into xml. At the same time, you also need to configure the location where it should appear. For example, you need to add this menu to the project creation ProjectViewPopupMenu and location information anchor="last"
- In addition, in order to make the plug-in look taller, beautiful and suitable for boasting, you also need to configure an icon at this position 16 * 16 pictures can be downloaded from iconfont.
4. Add functions to the form
This step is actually to inject the soul and make the form live. Add content to the input box, add an event to the button, and add a context for generating and creating ORM code blocks on the confirmation button. The description of the article will be biased towards the explanation of the core code as much as possible. For details, please refer to the source code
Next, this part will rub repeatedly in the ORMSettingsUI class until all functions are completed.
4.1 selection box events
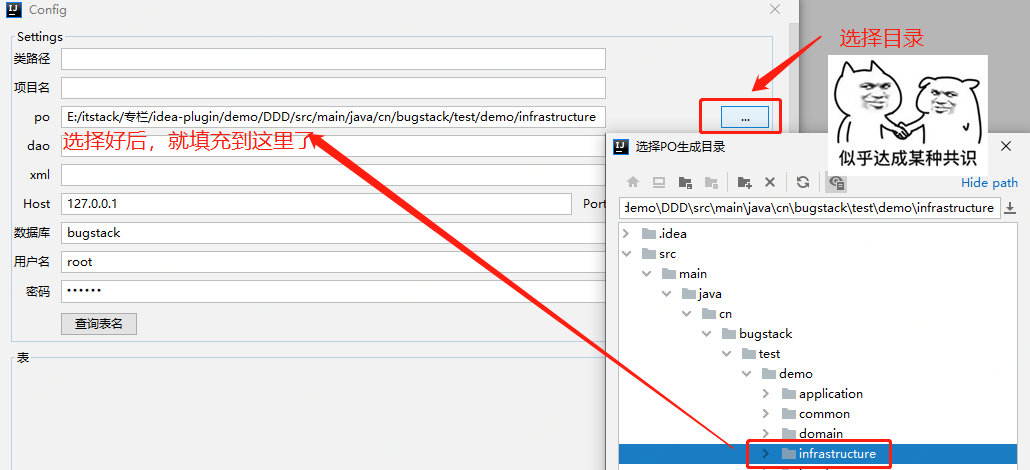
//  Select PO generation directory
this.poButton.addActionListener(e -> {
    FileChooserComponent component = FileChooserComponent.getInstance(project);
    VirtualFile baseDir = project.getBaseDir();
    VirtualFile virtualFile = component.showFolderSelectionDialog("choice PO Generate directory", baseDir, baseDir);
    if (null != virtualFile) {
        ORMSettingsUI.this.poPath.setText(virtualFile.getPath());
    }
});
- Remember what we mentioned Drag and drop the Swing panel. The step of adding an event is to add an event to your PO directory, allowing us to select the directory structure to generate the corresponding Po code.
- dao and xml are similar operations, which will not be demonstrated here.
4.2 data sheet events
this.selectButton.addActionListener(e -> {
    try {
        DBHelper dbHelper = new DBHelper(this.host.getText(), Integer.parseInt(this.port.getText()), this.user.getText(), this.password.getText(), this.database.getText());
        List<String> tableList = dbHelper.getAllTableName(this.database.getText());
        String[] title = {"", "Table name"};
        Object[][] data = new Object[tableList.size()][2];
        for (int i = 0; i < tableList.size(); i++) {
            data[i][1] = tableList.get(i);
        }
        table1.setModel(new DefaultTableModel(data, title));
        TableColumn tc = table1.getColumnModel().getColumn(0);
        tc.setCellEditor(new DefaultCellEditor(new JCheckBox()));
        tc.setCellEditor(table1.getDefaultEditor(Boolean.class));
        tc.setCellRenderer(table1.getDefaultRenderer(Boolean.class));
        tc.setMaxWidth(100);
    } catch (Exception exception) {
        Messages.showWarningDialog(project, "Database connection error,Please check the configuration.", "Warning");
    }
});
- The core process of this operation is to pull out the table where you need to generate ORM code. As long as you select the table, you can generate PO, DAO and Mapper according to the table. In fact, some other automatic code generation frameworks you use do the same.
- In addition, your table creation should be standardized, such as table comments, field comments, and field design should comply with underscores and lowercase letters, which will make it easier to create good-looking code.
4.3 assembly generated code context
What should we do when we click the OK button of the configuration form? Yes, we need to create a code fragment. At this time, we need to complete this operation in the rewritten apply.
public void apply() {
    //  Link DB
    DBHelper dbHelper = new DBHelper(config.getHost(), Integer.parseInt(config.getPort()), config.getUser(), config.getPassword(), config.getDatabase());

    //  Assembly code production context
    CodeGenContextVO codeGenContext = new CodeGenContextVO();
    codeGenContext.setModelPackage(config.getPoPath() + "/po/");
    codeGenContext.setDaoPackage(config.getDaoPath() + "/dao/");
    codeGenContext.setMapperDir(config.getXmlPath() + "/mapper/");
    List<Table> tables = new ArrayList<>();
    Set<String> tableNames = config.getTableNames();
    for (String tableName : tableNames) {
        tables.add(dbHelper.getTable(tableName));
    }
    codeGenContext.setTables(tables);

    //  Generate code
    projectGenerator.generation(project, codeGenContext);
}
- The core code in apply mainly uses the DBHelper data operation tool to obtain the link information under the corresponding library, and creates the parameters used to generate the code class from the table of the selected number, such as; Class name, field name, comment name, etc.
- Finally, call the service that generates the code, projectGenerator.generation(project, codeGenContext); This part is implemented in our domain service domain.
5. Code generation domain services
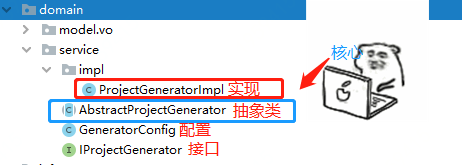
- The code used to create the code blocks of PO, DAO and Mapper is mainly implemented here. The core is to provide an abstract class and the corresponding implementation class. Because freemaker needs to be used to process code generation, it is wrapped in the abstract class, which eliminates the need to care about this part of logic in the implementation class.
ProjectGeneratorImpl generates code
@Override
protected void generateORM(Project project, CodeGenContextVO codeGenContext) {
    List<Table> tables = codeGenContext.getTables();
    for (Table table : tables) {
        List<Column> columns = table.getColumns();
        List<Field> fields = new ArrayList<>();
        for (Column column : columns) {
            Field field = new Field(column.getComment(), JavaType.convertType(column.getType()), column.getName());
            field.setId(column.isId());
            fields.add(field);
        }
        //  Generate PO
        Model model = new Model(table.getComment(), codeGenContext.getModelPackage() + CaseFormat.UPPER_UNDERSCORE.to(CaseFormat.UPPER_CAMEL, table.getName()), table.getName(), fields);
        writeFile(project, codeGenContext.getModelPackage(), model.getSimpleName() + ".java", "domain/orm/model.ftl", model);

        //  Generate DAO
        Dao dao = new Dao(table.getComment(), codeGenContext.getDaoPackage() + "I" + CaseFormat.UPPER_UNDERSCORE.to(CaseFormat.UPPER_CAMEL, table.getName()) + "Dao", model);
        writeFile(project, codeGenContext.getDaoPackage(), dao.getSimpleName() + ".java", "domain/orm/dao.ftl", dao);

        //  Generate Mapper
        writeFile(project, codeGenContext.getMapperDir(), dao.getModel().getSimpleName() + "Mapper.xml", "domain/orm/mapper.ftl", dao);
    }
}
- The process of creating code is relatively simple. Map the extracted table information into corresponding classes, attributes and comments, and then use the ftl file under resources to create corresponding classes and xml configuration files.
- If you also need to generate code fragments or create and call some common components, you can also implement them in this way.
4, Test verification
- click Plugin starts the IDEA plug-in, and then right-click the project as follows:
1. Right click and select menu
2. Configuration page, configuration information
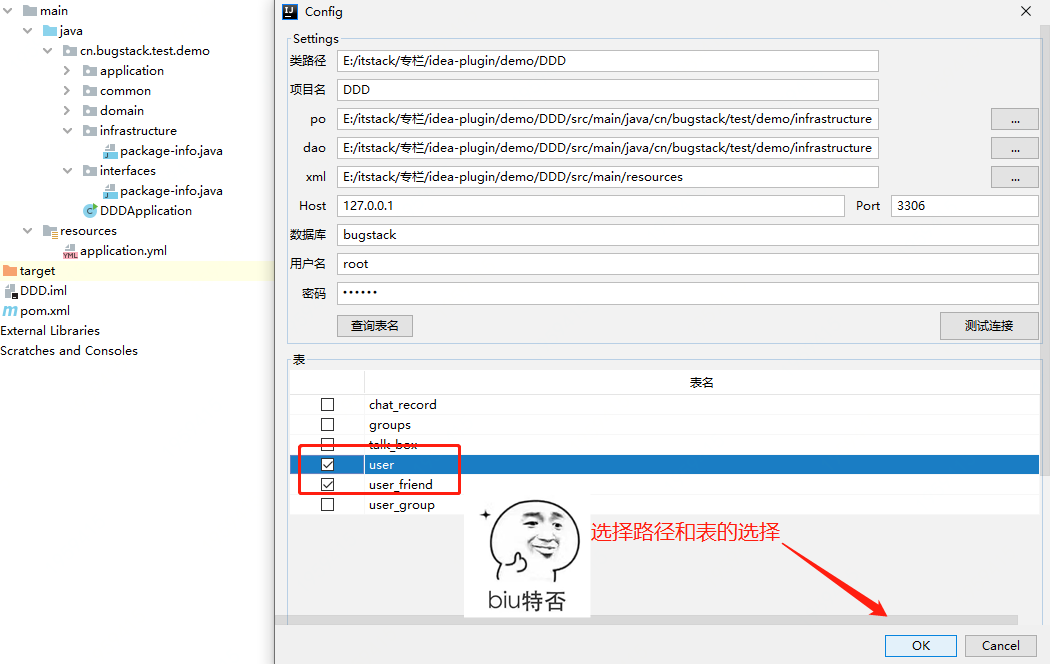
3. Automatically create and generate code
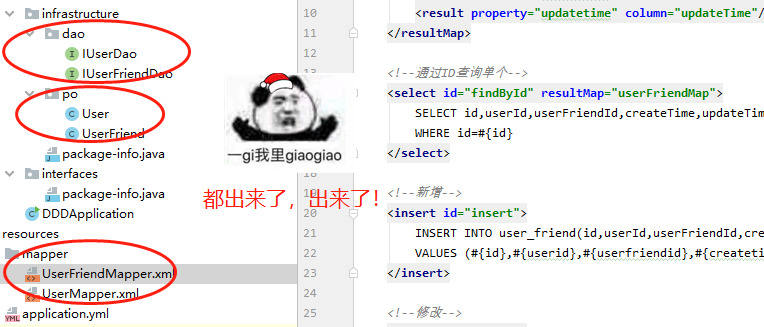
- Well, the selected code block is created in such a swish. Isn't it very convenient, and you can supplement the new library table code at any time to reduce the manual CRUD operation.
5, Summary
- In this chapter, Xiao Fu takes you through the structure of the IDEA DDD plug-in generation project to further improve the step of generating ORM code. Of course, you can also add the step of generating ORM code in the create project wizard. The method of creating ORM under engineering can be used as a supplement to scaffold engineering to meet the needs of different scenarios.
- In addition, in the series of IDEA plug-in development, we constantly try to use new ways to improve different function points. If you need to develop a complete plug-in, you can combine these functions to develop your requirements.
- There are still a lot of contents to understand and learn in plug-in development. At the same time, we should also pay attention to some code implementation details. For example, the data in this chapter is saved in what dimension, the IDEA development tool dimension, or the engineering dimension in the IDEA. These are different. For example, you do not need to save the same configuration for different projects
6, Series recommendation
- Develop a plug-in that can fish and read in the IDEA
- Scheme design: Based on IDEA plug-in development and bytecode plug-in technology, automatic analysis of R & D delivery quality is realized
- Technical literacy: sustainable delivery design and analysis for low code programming
- 💥 🎁 Lottery lottery system - Internet distributed development practice based on four-tier architecture of Domain Driven Design
- "SpringBoot middleware design and development" | yes, I'll teach you how to build rockets at the end of the year!
- END -
Scan the code below, pay attention to the bugstack wormhole stack, learn, grow and make common progress with brother Fu, and be the most expensive Coder in a code field!
- Reply to [design pattern] and obtain "re learning Java design pattern", which is a practical book of real cases of the Internet. It is extracted from the actual business to learn code design in many scenarios such as transaction, marketing, second kill, middleware and source code.
- Reply to [Spring column], Get "hand rolling Spring", which is a technical material to understand the core principles, design and implementation of Spring IOC, AOP, circular dependency and so on by taking the reader to write a simplified Spring framework.
- Reply to the [Manual of facial Sutra] to obtain the manual of facial Sutra • Take Dachang Offer ", which is a deep core content of Java. It continues to explain in depth from data structure, algorithm, concurrent programming and JVM system 8. If you understand it, you really understand it.
Wrote a PDF in 2020 Revisiting Java design patterns , the download volume of the whole network is 500000 +, which has helped many students grow up and has published books. Two projects of github in the same year, CodeGuide , itstack-demo-design , continue to dominate the list trend and become a global hot project.
A small volume will be on the shelves in 2021 SpringBoot middleware design and development , 16 Internet middleware scenarios and 30 projects are the only time in the whole network to teach you how to build wheels and write middleware, because such technology is closest to P7, architects and high salaries!
This article is shared with WeChat official account bugstack wormhole stack (bugstack).
In case of infringement, please contact support@oschina.cn Delete.
Article participation“ OSC source creation program ”, you who are reading are welcome to join us and share with us.