Django Nginx+uwsgi installation configuration
We use python manage.py runserver to run the server. This applies only in the test environment.
For officially released services, we need a stable and sustainable server, such as apache, Nginx, lighttpd, etc. This article will take Nginx as an example.
uwsgi introduction
When it comes to uwsgi, I have to mention WSGI and uwsgi.
WSGI:
The full name is web server gateway interface(web Service Gateway Interface). It is a specification that describes how the web server communicates with Applications (django, flash).
The specifications of server and application are described in pep333. To implement WSGI protocol, web server and web application must be implemented at the same time. Currently, the web frameworks running on WSGI protocol include django, flask and bottle.
uwsgi:
Like WSGI, it is a protocol for uWSGI communication, which is used to define the type of information transmitted. The first 4 bytes of each uwsgi packet is the description of the transmission information type. It is two things compared with the WSGI protocol, which is said to be 10 times faster than the fcgi protocol.
uWSGI:
Is a full-featured http server, which implements WSGI specification, uwsgi protocol, http protocol and so on. What it needs to do is to convert http protocol into language supported network protocol. For example, convert http protocol into WSGI specification so that python can be used directly.
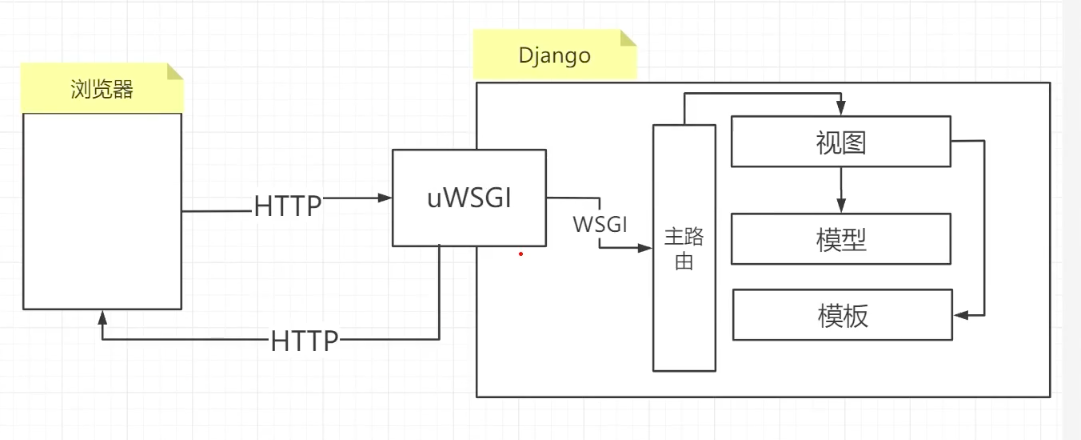
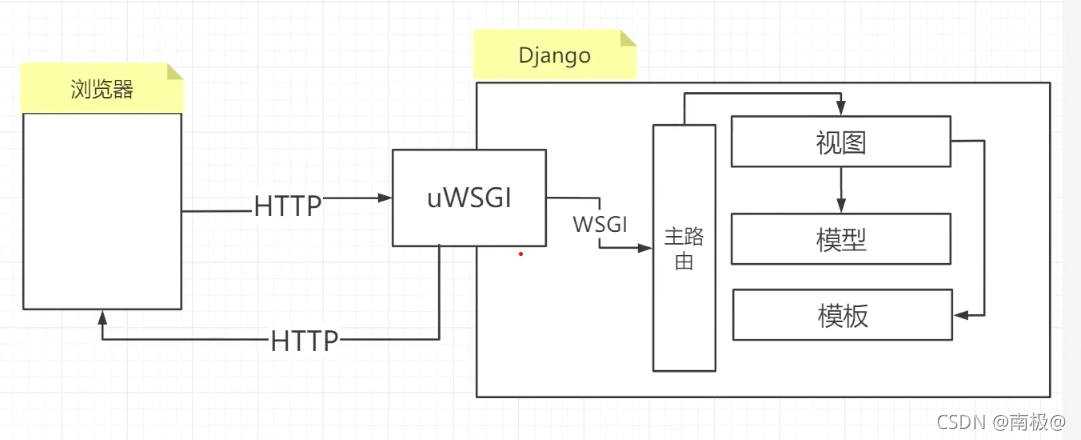
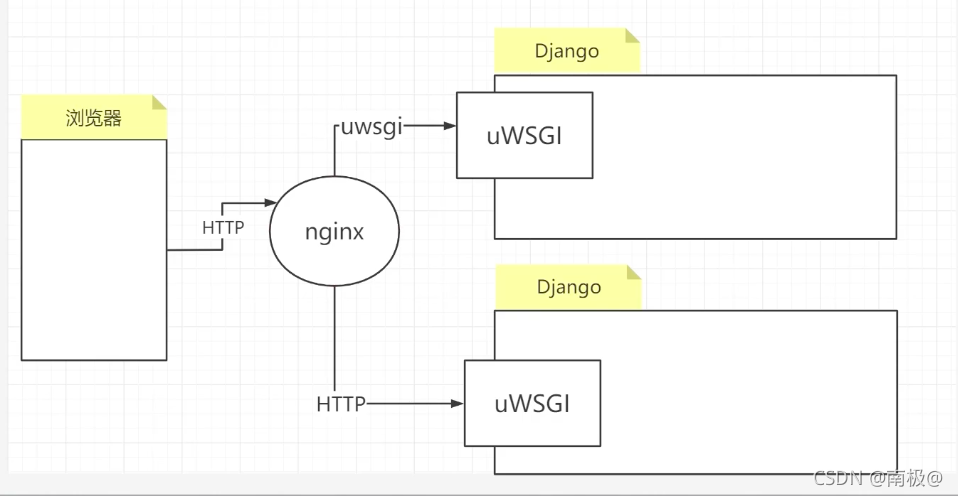
Access process
The access process of unconfigured uwsgi is shown in Figure 1

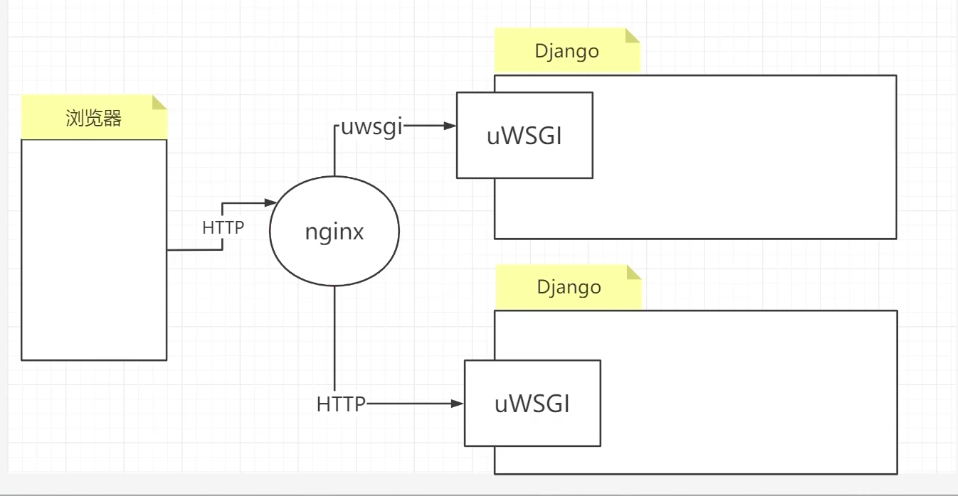
Configure uwsgi access procedures
uwsgi configuration
1: Installing uwsgi
Note: I configure uwsgi and nginx on Mac
pip3 install uwsgi
2: Configuring ini files
Create a uwsgi.ini file in the same directory of the project. The file name can be arbitrary. Generally, the project name is used. I named uwsgi for ease of differentiation
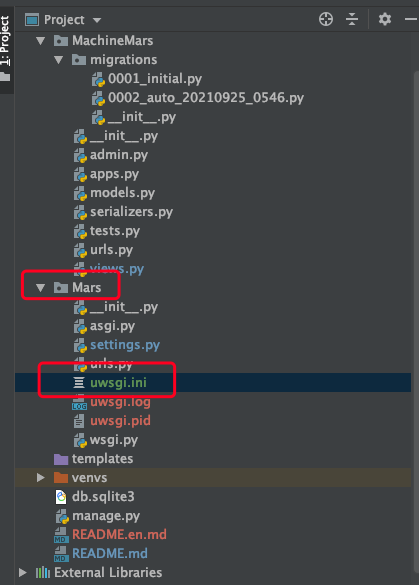
3: Edit the file and set uwsgi properties
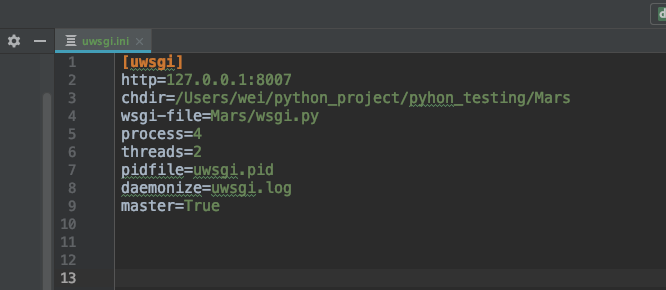
[uwsgi]
http=127.0.0.1:8007
chdir=/Users/wei/python_project/pyhon_testing/Mars
wsgi-file=Mars/wsgi.py
process=4
threads=2
pidfile=uwsgi.pid
daemonize=uwsgi.log
master=True
Configuration resolution:
Note: chdir and wsgi-file.py must not be configured with the wrong path, or errors will occur. Many people configure the wrong path because these two items cannot be found
#Must start with [uwsgi]
[uwsgi]

#nginx is not configured yet, so http is used temporarily
http=127.0.0.1:8007

#Configure the project path. The directory * * of the project must be: absolute path**
chdir=/Users/wei/python_project/pyhon_testing/Mars

#Configure wsgi interface module file path, * * relative path**
wsgi-file=Mars/wsgi.py

#Configure the number of processes started. This multi configuration is unintentional. Configure according to your own computer core
processes=4
#Configure the number of threads per process
threads=2
#Configure start management main process
master=True
#Configure the process number file to store the main process. After uwsgi is started, the * * uwsgi.pid file will be generated automatically**
pidfile=uwsgi.pid
#Configure dump logging
daemonize=uwsgi.log`
4: Start running uwsgi
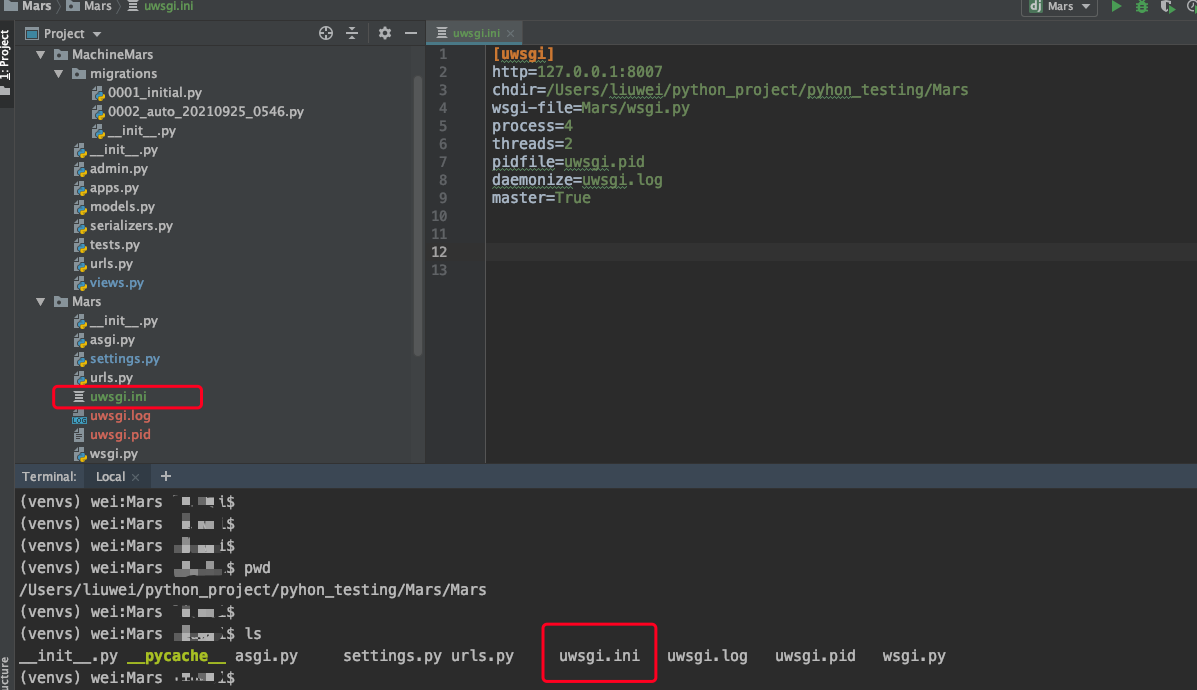
cd to the directory where the uwsgi.ini configuration file is located
Command: uwsgi --ini uwsgi.ini
Command parsing: uwsgi and – ini are key commands and cannot be wrong. uwsgi.ini is the INI configuration file name

That means it's ready to start, but we'll see if it's really successful
ps aux|grep 'uwsgi'

This indicates that the startup was successful
5: Stop uwsgi
cd to the directory where the uwsgi.pid configuration file is located
Note: uwsgi.pid is automatically generated, so according to the above configuration file path, uwsgi.pid and uwsgi.ini are in the same directory
uwsgi --stop uwsgi.pid
6: Restart
uwsgi --reload uwsgi.pid
7: Check whether the port is occupied
sudo lsof -i :8007

See, we kill the port
sudo kill -9 43057
43057 is port pid
Then visit your route and test it. If the access is successful, it means that there is no problem with the configuration
8: uwsgi operation instructions
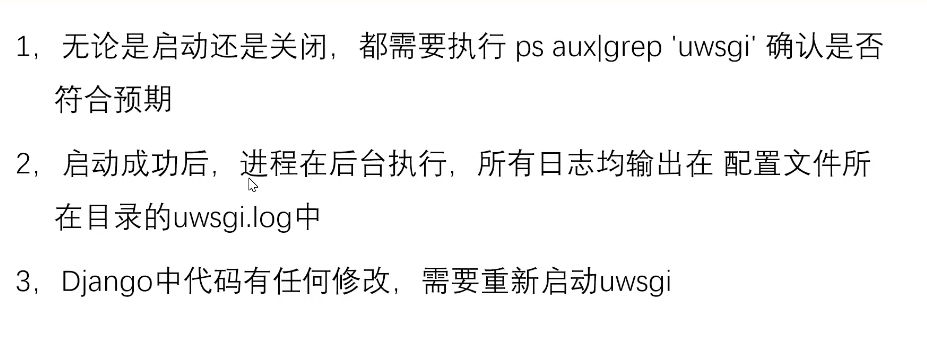
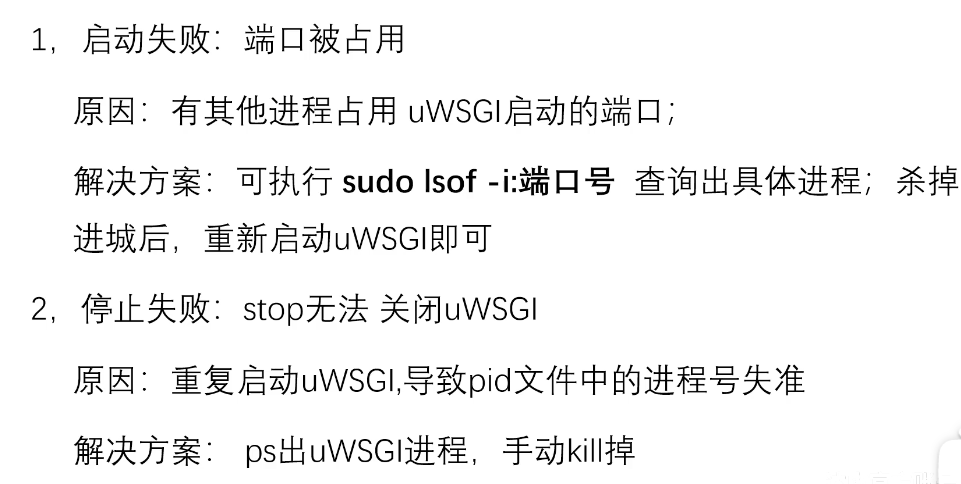
9: uwsgi frequently asked questions
Nginx
Nginx is a lightweight Web server and reverse proxy server. It is widely used in Internet projects because of its low memory consumption, fast startup, high concurrency and strong ability.

The above figure basically illustrates the current popular technical architecture, in which Nginx tastes like an entrance gateway.
1: Reverse proxy server?
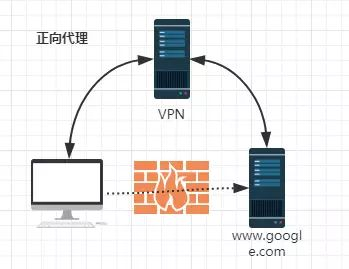
People often hear some terms, such as reverse proxy, so what is reverse proxy and what is forward proxy?
2: Forward proxy:
3: Reverse proxy:
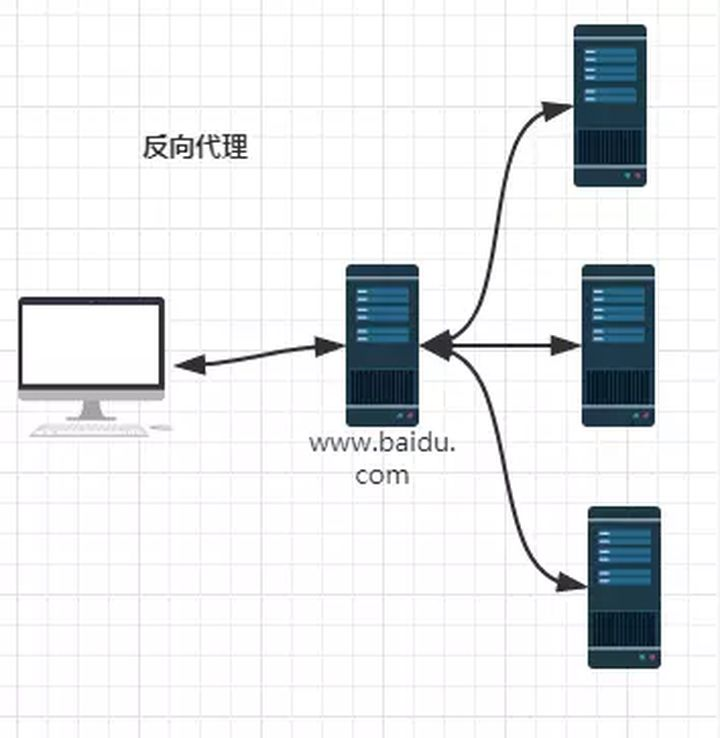
The above is a brief introduction. If you want to know more about it, you can check it Chinese official website
django and nginx processes
3: Mac OS Nginx installation
- Installation (can be installed with brew)
sudo brew install nginx
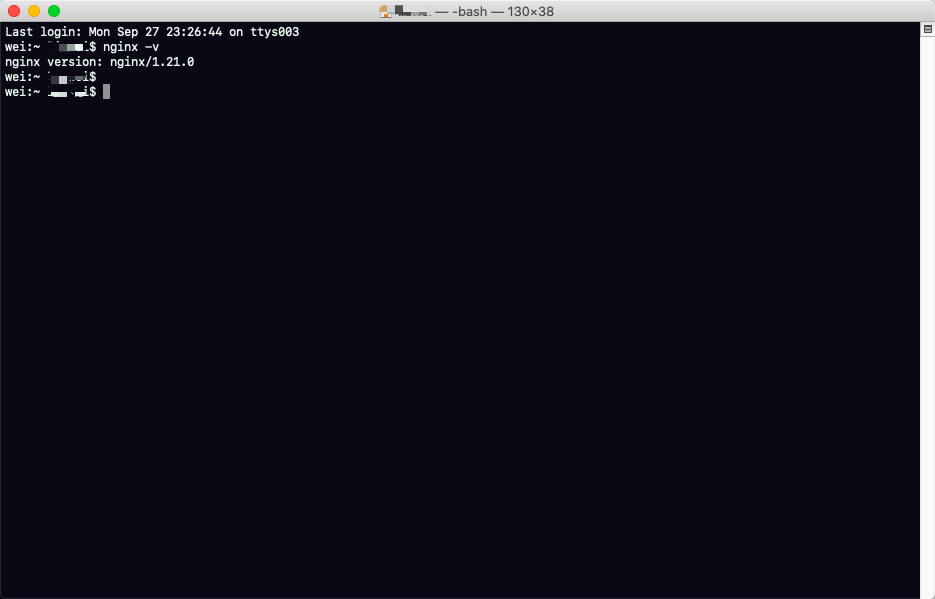
- View nginx version
nginx -v
- Configure Nginx
First, find the directory. My directory is / usr/local/etc/nginx
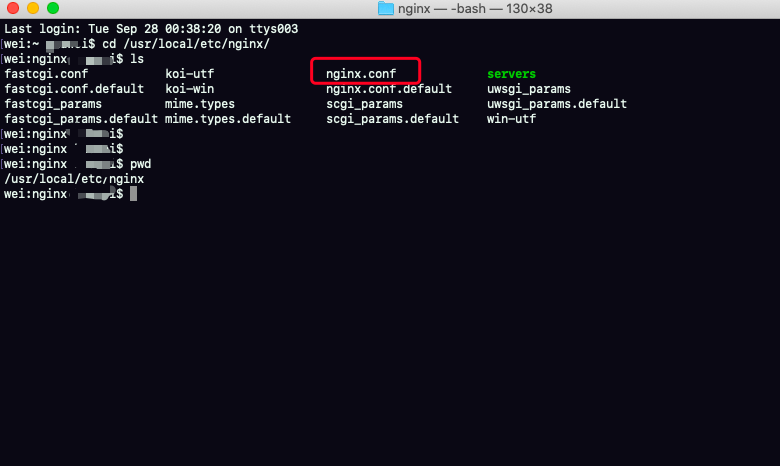
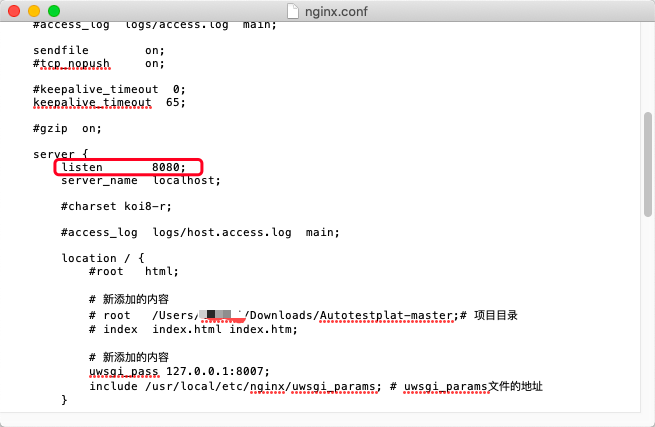
- Modify nginx.conf file
Command: vim /usr/local/etc/nginx/nginx.conf
Here are the default configuration items
#user  nobody;
worker_processes  1;

#error_log  logs/error.log;
#error_log  logs/error.log  notice;
#error_log  logs/error.log  info;

#pid        logs/nginx.pid;


events {
    worker_connections  1024;
}


http {
    include       mime.types;
    default_type  application/octet-stream;

    #log_format  main  '$remote_addr - $remote_user [$time_local] "$request" '
    #                  '$status $body_bytes_sent "$http_referer" '
    #                  '"$http_user_agent" "$http_x_forwarded_for"';

    #access_log  logs/access.log  main;

    sendfile        on;
    #tcp_nopush     on;

    #keepalive_timeout  0;
    keepalive_timeout  65;

    #gzip  on;

    server {
        listen       8080;
        server_name  localhost;

        #charset koi8-r;

        #access_log  logs/host.access.log  main;

        location / {
            #root   html;

            root   /Users/XXX/Downloads/Autotestplat-master;# Project directory
            index  index.html index.htm;

	    uwsgi_pass 0.0.0.0:8001;
            include /usr/local/etc/nginx/uwsgi_params; # uwsgi_ Address of params file
        }

        #error_page  404              /404.html;

        # redirect server error pages to the static page /50x.html
        #
        error_page   500 502 503 504  /50x.html;
        location = /50x.html {
            root   html;
        }

        # proxy the PHP scripts to Apache listening on 127.0.0.1:80
        #
        #location ~ \.php$ {
        #    proxy_pass   http://127.0.0.1;
        #}

        # pass the PHP scripts to FastCGI server listening on 127.0.0.1:9000
        #
        #location ~ \.php$ {
        #    root           html;
        #    fastcgi_pass   127.0.0.1:9000;
        #    fastcgi_index  index.php;
        #    fastcgi_param  SCRIPT_FILENAME  /scripts$fastcgi_script_name;
        #    include        fastcgi_params;
        #}

        # deny access to .htaccess files, if Apache's document root
        # concurs with nginx's one
        #
        #location ~ /\.ht {
        #    deny  all;
        #}
    }


    # another virtual host using mix of IP-, name-, and port-based configuration
    #
    #server {
    #    listen       8000;
    #    listen       somename:8080;
    #    server_name  somename  alias  another.alias;

    #    location / {
    #        root   html;
    #        index  index.html index.htm;
    #    }
    #}


    # HTTPS server
    #
    #server {
    #    listen       443 ssl;
    #    server_name  localhost;

    #    ssl_certificate      cert.pem;
    #    ssl_certificate_key  cert.key;

    #    ssl_session_cache    shared:SSL:1m;
    #    ssl_session_timeout  5m;

    #    ssl_ciphers  HIGH:!aNULL:!MD5;
    #    ssl_prefer_server_ciphers  on;

    #    location / {
    #        root   html;
    #        index  index.html index.htm;
    #    }
    #}
    include servers/*;
}
- New content
server {
        listen       8080;
        server_name  localhost;

        #charset koi8-r;

        #access_log  logs/host.access.log  main;

        location / {
            #root   html;

            # root   /Users/liuwei/Downloads/Autotestplat-master;# Project directory
            # index  index.html index.htm;

            # Newly added content
            uwsgi_pass 127.0.0.1:8007;
            include /usr/local/etc/nginx/uwsgi_params; # uwsgi_ Address of params file
        }
Only two lines are added, and the include should be changed to its own uwsgi_params file path
New content
uwsgi_pass 127.0.0.1:8007;
include /usr/local/etc/nginx/uwsgi_params;
-
Check whether there is any problem with the syntax of nginx configuration file, and the command
If there is a problem with the configuration, an error in a line will be prompted
nginx -t

Picture above: I have no problem with this
- Start nginx
Find nginx path which nginx
sudo nginx
You can also use the following command to start. However, this command does not take effect after the configuration file nginx.conf is modified. Therefore, it is not recommended to use:
sudo brew services start nginx
4: Modify uwsgi configuration
Previously, we requested access through http and forwarded it to uwsgi. Now that we have configured nginx, we need to request and forward it to uwsgi through nginx
Note: Nginx is responsible for receiving the request and forwarding the request to the following uWSGI. In this mode, uWSGI needs to be started in socket mode
[uwsgi]
# Remove
# http=127.0.0.1:8007
# Change to
socket=127.0.0.1:8007
1: The uwsgi configuration file is modified as follows:
[uwsgi]
# http=127.0.0.1:8007
socket=127.0.0.1:8007
chdir=/Users/xxx/python_project/pyhon_testing/Mars
wsgi-file=Mars/wsgi.py
process=4
threads=2
pidfile=uwsgi.pid
daemonize=uwsgi.log
master=True
2: Restart uwsgi
Execute under the file of uwsgi.ini
uwsgi --ini uwsgi.ini

Have you found that after uwsgi is configured with sockets, the number of starts is different from before, indicating that the configuration is successful. Because it starts in http mode, it will automatically start an http process for interpretation, so it has one more process than socket
3: Access project
First, let's take a look at this picture
We should first access nginx, which is 80, and then allocate nginx to uwsgi8007
Remember to visit 80 first, which is nginx. Nginx defaults to 80
4: Nginx command
# nginx stop command
nginx -s stop

# start-up
nginx

# restart
nginx -s reload
Summary:
1: The uwsgi must be restarted after modification
2: The path configuration of nginx must be correct
3: The configuration path of uwsgi must be correct
4: To start the project, I start nginx first and then uwsgi. There are no special requirements
5: If there is no problem with the configuration and startup, but it is still inaccessible, this is the reason
listen 8000; # This port is used by nginx to listen to uwsgi. The default is 80. In short, the project is through the following server_name:8080
The above is the whole process of my configuration. If it is helpful to you, please give me a praise. The content may be a little messy, but I recorded it according to my own configuration process. Thank you for your reference official
additional
pip freeze > pkg.txt
Collect Python modules in the current production environment and store them in pkg.txt file
pip install -r pkg.txt
In the deployment environment, all modules in the production environment need to be installed