By Matt Maribojoc
Translator: front end Xiaozhi
Source: medium
There are dreams and dry goods. Wechat search [Daqian world] pays attention to this bowl washing wisdom who is still washing dishes in the early morning.
This article GitHub https://github.com/qq449245884/xiaozhi It has been included. There are complete test sites, materials and my series of articles for the interview of front-line large factories.
VueUse is an open source project of Anthony Fu. It provides Vue developers with a large number of basic Composition API utility functions for Vue2 and Vue3.
It has dozens of solutions for common developer use cases, such as tracking ref changes, detecting element visibility, simplifying common Vue patterns, keyboard / mouse input, etc. This is a good way to really save development time, because we don't have to add all these standard functions ourselves. It's just right to use them (thank you again for your efforts).
I like the VueUse library because it really puts developers first in deciding which utilities to provide, and it is a well maintained library because it keeps pace with the current version of Vue.
What are the practical methods of VueUse?
If you want to see a complete list of each utility, it is recommended to take a look Official documents . But to summarize, there are nine types of functions in VueUse.
- Animation - includes easy-to-use transition, timeout, and timing features
- Browser - can be used for different screen controls, clipboard, preferences, etc
- Component - provides shorthand for different component methods
- Sensors - used to listen for different DOM events, input events, and network events
- State - manage user state (global, local storage, session storage)
- Utility -- different practical methods, such as getters, conditions, ref synchronization, etc.
- Watch -- more advanced types of observers, such as paused observers, abandoned observers, and conditional observers
- Other - different types of functions for events, WebSockets, and Web workers
Installing Vueuse into a Vue project
One of the biggest features of VueUse is that it can be compatible with Vue2 and Vue3 with only one package!
There are two options for installing VueUse: npm or CDN
npm i @vueuse/core # yarn add @vueuse/core
<script src="https://unpkg.com/@vueuse/shared"></script>
<script src="https://unpkg.com/@vueuse/core"></script>
NPM is recommended because it is easier to understand, but if we use CDN, it may be through window Vueuse to access.
Using npm, you can obtain the desired method by deconstruction:
import { useRefHistory } from '@vueuse/core'useRefHistory tracks changes in responsive data
useRefHistory tracks every change to ref and stores it in an array. In this way, we can easily provide undo and redo functions for applications.
Let's take a look at an example. In this example, we make a text area that can be undone
The first step is to create our basic components without VueUse -- using ref, textarea, and buttons for undo and redo.
<template>
  <p>
    <button> Undo </button>
    <button> Redo </button>
  </p>
  <textarea v-model="text"/>
</template>

<script setup>
import { ref } from 'vue'
const text = ref('')
</script>

<style scoped>
  button {
    border: none;
    outline: none;
    margin-right: 10px;
    background-color: #2ecc71;
    color: white;
    padding: 5px 10px;;
  }
</style>
Next, import useRefHistory, and then extract the history, undo and redo attributes from text through useRefHistory.
import { ref } from 'vue'
import { useRefHistory } from '@vueuse/core'
const text = ref('')
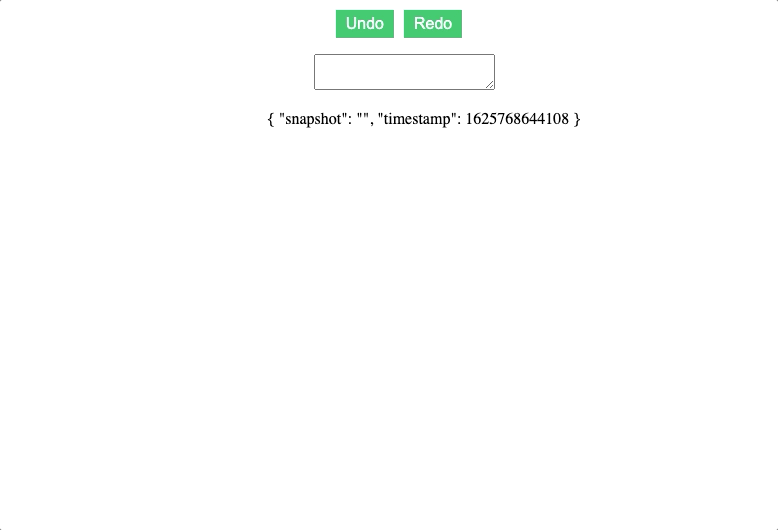
const { history, undo, redo } = useRefHistory(text)Whenever our ref changes and the history attribute is updated, a listener will be triggered.
In order to see what the bottom layer has done, we print out the history content. And call undo and redo functions when clicking the corresponding button.
<template>
  <p>
    <button @click="undo"> Undo </button>
    <button @click="redo"> Redo </button>
  </p>
  <textarea v-model="text"/>
  <ul>
    <li v-for="entry in history" :key="entry.timestamp">
      {{ entry }}
    </li>
  </ul>
</template>

<script setup>
import { ref } from 'vue'
import { useRefHistory } from '@vueuse/core'
const text = ref('')
const { history, undo, redo } = useRefHistory(text)
</script>

<style scoped>
  button {
    border: none;
    outline: none;
    margin-right: 10px;
    background-color: #2ecc71;
    color: white;
    padding: 5px 10px;;
  }
</style>
Directly, run, the effect is as follows:
There are different options to add more functions to this function. For example, we can drill down into reactive objects and limit the number of history records like this.
const { history, undo, redo } = useRefHistory(text, {
  deep: true,
  capacity: 10,
})
onClickOutside close modal
onClickOutside detects any clicks outside an element. In my experience, the most common use of this feature is to close any mode or pop-up window.
Usually, we want our modality to mask the rest of the page to attract users' attention and limit errors. However, if they do click outside the mode, we want it to close.
There are only two steps to do this.
- Create a template reference for the element to be detected
- Run onClickOutside using this template ref
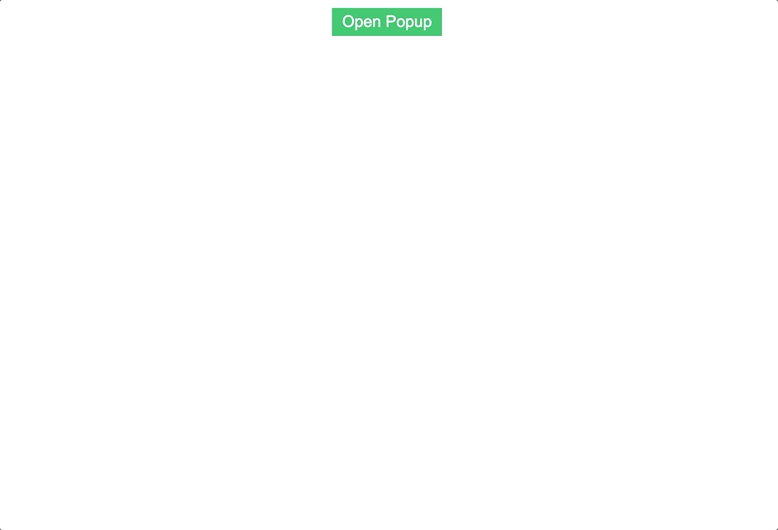
This is a simple component that uses the onClickOutside pop-up window.
<template>
  <button @click="open = true"> Open Popup </button>
  <div class="popup" v-if='open'>
    <div class="popup-content" ref="popup">
      Lorem ipsum dolor sit amet consectetur adipisicing elit. Corporis aliquid autem reiciendis eius accusamus sequi, ipsam corrupti vel laboriosam necessitatibus sit natus vero sint ullam! Omnis commodi eos accusantium illum?
    </div>
  </div>
</template>

<script setup>
import { ref } from 'vue'
import { onClickOutside } from '@vueuse/core'
const open = ref(false) // state of our popup
const popup = ref() // template ref
// whenever our popup exists, and we click anything BUT it
onClickOutside(popup, () => {
  open.value  = false
})
</script>

<style scoped>
  button {
    border: none;
    outline: none;
    margin-right: 10px;
    background-color: #2ecc71;
    color: white;
    padding: 5px 10px;;
  }
  .popup {
    position: fixed;
    top: ;
    left: ;
    width: 100vw;
    height: 100vh;
    display: flex;
    align-items: center;
    justify-content: center;
    background: rgba(, , , 0.1);
  }
  .popup-content {
    min-width: 300px;
    padding: 20px;
    width: 30%;
    background: #fff;
  }
</style
As a result, we can use our button to open the pop-up window, and then click to close it outside the pop-up content window.
useVModel simplifies the binding of v-model.
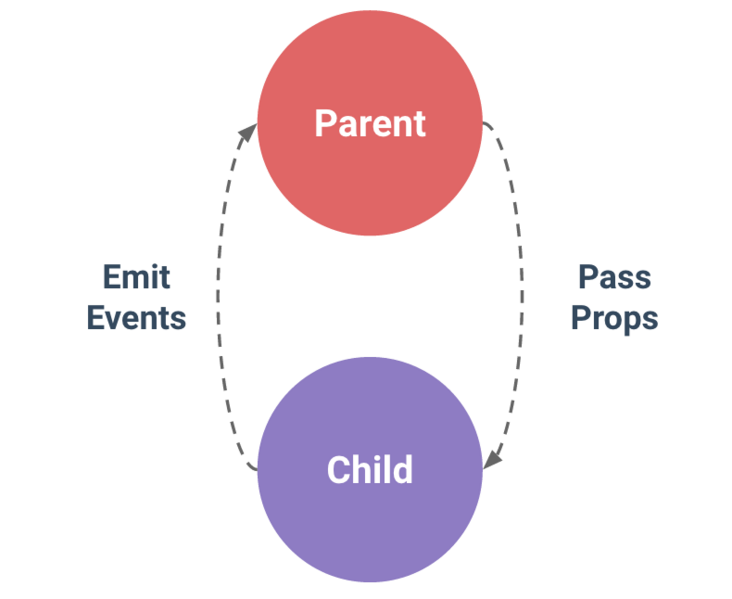
A common use case for Vue developers is to create a custom v-model binding for a component. This also requires our component to accept a value as a prop. Whenever the value is modified, our component will issue an update event to the parent class.
The useVModel function simplifies it to use only the standard ref syntax. Suppose we have a custom text input and try to create a v-model for the value of its text input. Usually, we must accept a prop of value and issue a change event to update the data value in the parent component.
We can use useVModel as a normal ref instead of using ref and calling props Value and update:value. This helps reduce the number of different grammars we need to remember!
<template>
    <div>
        <input
            type="text"
            :value="data"
            @input="update"
        />
    </div>
</template>

<script>
import { useVModel } from '@vueuse/core'
export default {
  props: ['data'],
  setup(props, { emit }) {
    const data = useVModel(props, 'data', emit)
    console.log(data.value) // equal to props.data
    data.value = 'name' // equal to emit('update:data', 'name')
    const update = (event) => {
        data.value = event.target.value
    }
    return {
        data,
        update
    }
  },
}
</script>
Whenever we need to access value, we just call Value, useVModel will provide us with the value from our component props. Whenever the value of an object is changed, useVModel sends an update event to the parent component.
The following is a simple example of a parent component
<template>
<div>
<p> {{ data }} </p>
<custom-input
:data="data"
@update:data="data = $event"
/>
</div>
</template>
<script>
import CustomInput from './components/CustomInput.vue'
import { ref } from 'vue'
export default {
components: {
CustomInput,
},
setup () {
const data = ref('hello')
return {
data
}
}
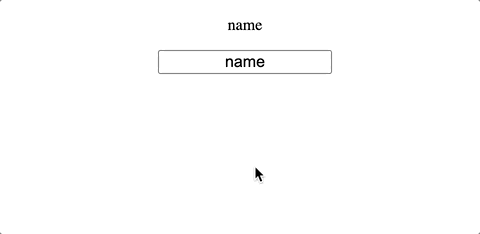
}The operation results are as follows: the value of the parent is always synchronized with the input of the child:
Use intersectionobserver to track the visibility of elements
useIntersectionObserver is very powerful when determining whether two elements overlap. A good use case for this is to check whether an element is currently visible in the viewport.
Basically, it checks the percentage of intersection between the target element and the root element / document. If this percentage exceeds a certain threshold, it calls a callback to determine whether the target element is visible.
useIntersectionObserver provides a simple syntax to use the IntersectionObserver API. All we need to do is provide a template ref for the element we want to check.
By default, the IntersectionObserver will be based on the document's viewport, with a threshold of 0.1 -- so when this threshold is outdated in any direction, our intersection observer will be triggered.
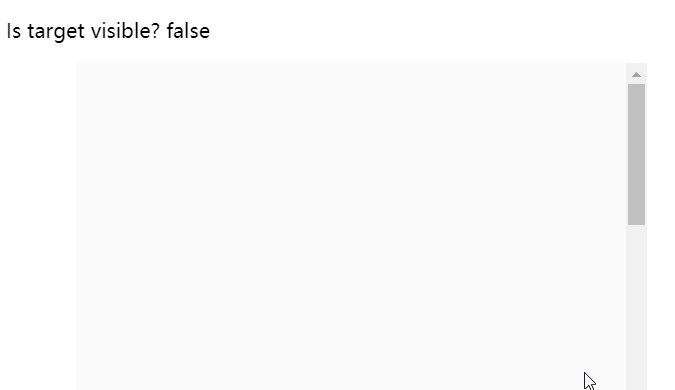
Example: we have a fake paragraph that just takes up space in our viewport, the target element, and then a print statement that prints the visibility of our element.
<template>
  <p> Is target visible? {{ targetIsVisible }} </p>
  <div class="container">
    <div class="target" ref="target">
      <h1>Hello world</h1>
    </div>
  </div>
</template>

<script>
import { ref } from 'vue'
import { useIntersectionObserver } from '@vueuse/core'
export default {
  setup() {
    const target = ref(null)
    const targetIsVisible = ref(false)
    const { stop } = useIntersectionObserver(
      target,
      ([{ isIntersecting }], observerElement) => {
        targetIsVisible.value = isIntersecting
      },
    )
    return {
      target,
      targetIsVisible,
    }
  },
}
</script>

<style scoped>
.container {
  width: 80%;
  margin:  auto;
  background-color: #fafafa;
  max-height: 300px;
  overflow: scroll;
}
.target {
  margin-top: 500px;
  background-color: #1abc9c;
  color: white;
  padding: 20px;
}
</style>
After running, the corresponding value will be updated:
We can also specify more options for our Intersection Observer, such as changing its root element, margin (offset to the root bounding box when calculating the intersection) and threshold level.
const { stop } = useIntersectionObserver(
      target,
      ([{ isIntersecting }], observerElement) => {
        targetIsVisible.value = isIntersecting
      },
      {
        // root, rootMargin, threshold, window
        // full options in the source: https://github.com/vueuse/vueuse/blob/main/packages/core/useIntersectionObserver/index.ts
        threshold: 0.5,
      }
)
Equally important, this method returns a stop function that we can call to stop observing the intersection. This is particularly useful if we only want to track when an element is first visible on the screen.
In this code, once targetIsVisible is set to true, observer will stop. Even if we scroll away from the target element, our value will remain true.
const { stop } = useIntersectionObserver(
      target,
      ([{ isIntersecting }], observerElement) => {
        targetIsVisible.value = isIntersecting
        if (isIntersecting) {
          stop()
        }
      },
    )
Use useTransition to do a number loading animation
useTransition is one of my favorite functions in the entire VueUse library. It allows us to smoothly transition between values with only one line.
If you use useTransition to do the following effect, what should you do?
We can do this in three steps.
- Initialize a ref variable count with an initial value of 0
- Use useTransition to create a variable output
- Change the value of count
import { ref } from 'vue'
import { useTransition, TransitionPresets } from '@vueuse/core'
const count = ref(0)
const output = useTransition(count , {
duration: 3000,
transition: TransitionPresets.easeOutExpo,
})
count.value = 5000
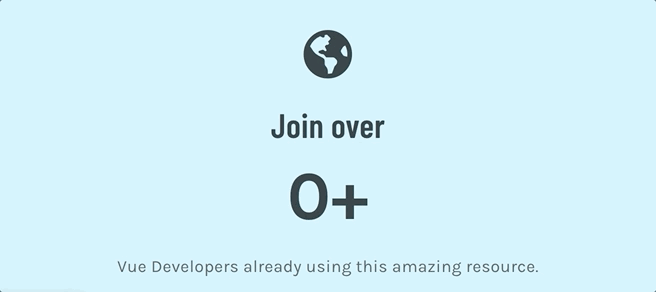
</script>Then display the value of output in the template:
<template>
  <h2>
    <p> Join over </p>
    <p> {{ Math.round(output) }}+ </p>
    <p>Developers </p>
  </h2>
</template>

<script setup>
import { ref } from 'vue'
import { useTransition, TransitionPresets } from '@vueuse/core'
const count = ref(0)
const output = useTransition(count, {
  duration: 3000,
  transition: TransitionPresets.easeOutExpo,
})
count.value = 5000
</script>
Operation results:

We can also use useTransition to convert the entire array of numbers. This is useful when using position or color. A good technique for using colors is to use calculated attributes to format RGB values into the correct color syntax.
<template>
  <h2 :style="{ color: color } "> COLOR CHANGING </h2>
</template>

<script setup>
import { ref, computed } from 'vue'
import { useTransition, TransitionPresets } from '@vueuse/core'
const source = ref([, , ])
const output = useTransition(source, {
  duration: 3000,
  transition: TransitionPresets.easeOutExpo,
})
const color = computed(() => {
  const [r, g, b] = output.value
  return `rgb(${r}, ${g}, ${b})`
})
source.value = [255, , 255]
</script>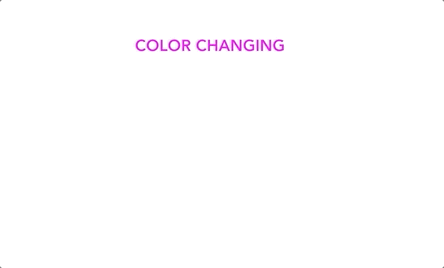
summary
This is not a complete guide to VueUse. These are just my commonly used functions, and there are many easy-to-use functions. You can learn to use them on the official website.
~After that, I went to do the dishes. I didn't do the dishes on weekends and knelt durian at night.
The bugs that may exist after code deployment cannot be known in real time. Afterwards, in order to solve these bugs, we spent a lot of time on log debugging. By the way, we recommend a useful BUG monitoring tool Fundebug.
Original text: https://learvue.co/2021/07/5-...
communication
There are dreams and dry goods. Wechat search [Daqian world] pays attention to this bowl washing wisdom who is still washing dishes in the early morning.
This article GitHub https://github.com/qq44924588... It has been included. There are complete test sites, materials and my series of articles for the interview of front-line large factories.