It is risky to brush BIOS, and the operation should be cautious. I am not responsible for any problem
BIOS brushing is risky and requires careful operation. I am not responsible for any problems
BIOS # is risky and requires careful operation. I am not responsible for any problems
preface
I'm not a professional, and I don't necessarily solve the problem. Unless you have the same obsession as me, I don't recommend brushing, because the actual performance improvement is very little. It's just to make a few fewer patches under the black apple. If you also believe that life is tossing, keep looking down.
Because of my dependence on Apple's family bucket, since the glorious retirement of the last 14 macbook pro (the hot hold can't live), I blacked my other MacBook Pro. However, there are many small problems in the process of using it. In addition, I have a little mental cleanliness. I still resent the cfg lock. I searched a lot of ThinkPad and BIOS modification tutorials on the Internet, Special thanks here I know an article written by a big man , let me understand the process of brushing BIOS from zero to one.
This process looks long, but the actual process is not complicated: insert programmer - > connect BIOS chip - > read, backup - > patch - > brush back
tool
- Another computer besides ThinkPad (nonsense is true)
- CH341A + SOIC8 test clip (a lot of treasure)+ drive
Software
- UEFI tools (especially UEFI Patch) In particular, it is emphasized that there is no patch in the Axx version, and the required version number is numeric
- AsProgrammer perhaps One master of station B Homemade software looks much more refreshing
Learn more about your computer
- BIOS Version (on the first page of BIOS Setup)
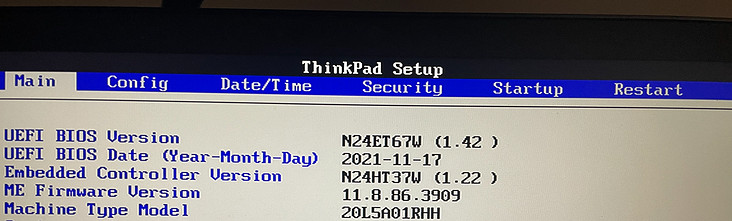
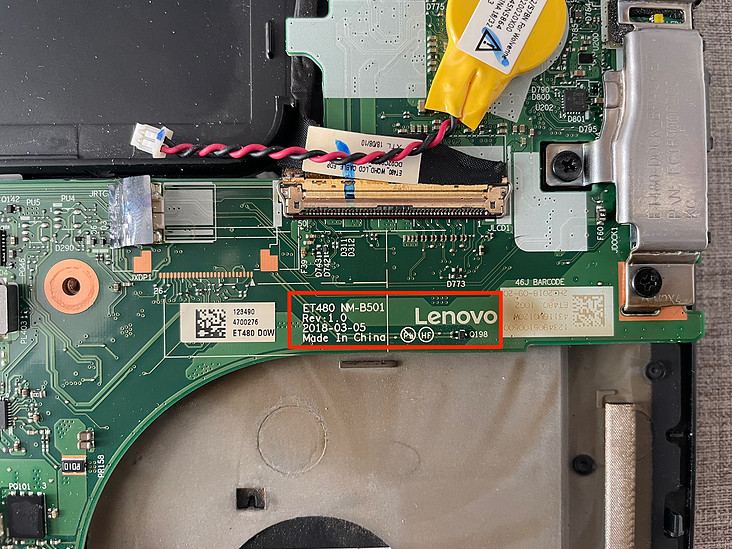
- Motherboard model, motherboard Version (near the CPU, it may be covered by tape) (remember to unplug the battery), for example: my BIOS version 1.42, motherboard model NM-B501, Rev1 0
Download patch patch
You can also copy the code below to save
# Patch string format
# FileGuid SectionType PatchType:FindPatternOrOffset:ReplacePattern
# Please ensure that the latest symbol in patch string is space

# Possible section types:
#  PE32 image                    10
#  Position-independent code     11
#  TE Image                      12
#  DXE Dependency                13
#  Version information           14
#  User interface string         15
#  16-bit code                   16
#  Guided freeform               18
#  Raw data                      19
#  PEI Dependency                1B
#  SMM Dependency                1C
# Please do not try another section types, it can make the resulting image broken

# Possible patch types:
#  P - pattern-based, first parameter is a pattern to find, second - a pattern to replace
#  O - offset-based, first parameter is hexadecimal offset, second - a pattern to replace
# Patterns can have . as "any possible value" symbol

# works with paranoidbashthot's bypass method, 's/\x4C\x4E\x56\x42\x42\x53\x45\x43\xFB\xFF/\x4C\x4E\x56\x42\x42\x53\x45\x43\xFF\xFF/g'
# all patches by \x unless stated, no warranties.
#-------------------------------------------------------------------------------
#-------------------------------------------------------------------------------
# SystemFormBrowserCoreDxe | enable advance menu Lenovo xx70/xx80
#-------------------------------------------------------------------------------
721C8B66-426C-4E86-8E99-3457C46AB0B9 10 P:04320b483cc2e14abb16a73fadda475f:778b1d826d24964e8e103467d56ab1ba
32442D09-1D11-4E27-8AAB-90FE6ACB0489 10 P:04320b483cc2e14abb16a73fadda475f:778b1d826d24964e8e103467d56ab1ba

#-------------------------------------------------------------------------------
# Setup | Lenovo Thinkpad xx70/xx80 | igpu add oc options. 1250, 1300, 1350, 1400. removes 100, 150, 200, 250
#-------------------------------------------------------------------------------
E6A7A1CE-5881-4B49-80BE-69C91811685C 10 P:09072C1300000209072D1300000309072E1300000409072F13000005:09072C1300001909072D1300001A09072E1300001B09072F1300001C
E6A7A1CE-5881-4B49-80BE-69C91811685C 10 P:00143100300030004D0068007A000000143100350030004D0068007A000000143200300030004D0068007A000000143200350030004D0068007A:00143100320035003000200020000000143100330030003000200020000000143100330035003000200020000000143100340030003000200020

#-------------------------------------------------------------------------------
# Setup | Lenovo Thinkpad xx70/xx80 | enable LCDControl
#-------------------------------------------------------------------------------
E6A7A1CE-5881-4B49-80BE-69C91811685C 10 P:0A821286A10B04001206A60B010016021206A60B020016022902:0A821286A10B04001206A60B000016021206A60B000016022902

#-------------------------------------------------------------------------------
# LenovoWmaPolicyDxe | Lenovo Thinkpad xx70/xx80 | remove wwan whitelist
#-------------------------------------------------------------------------------
79E0EDD7-9D1D-4F41-AE1A-F896169E5216 10 P:0BC8394B040F8437020000:0BC8394B04E93802000000
79E0EDD7-9D1D-4F41-AE1A-F896169E5216 10 P:C8390B7516:C8390B7500
79E0EDD7-9D1D-4F41-AE1A-F896169E5216 10 P:ECA8047404:ECA804EB04
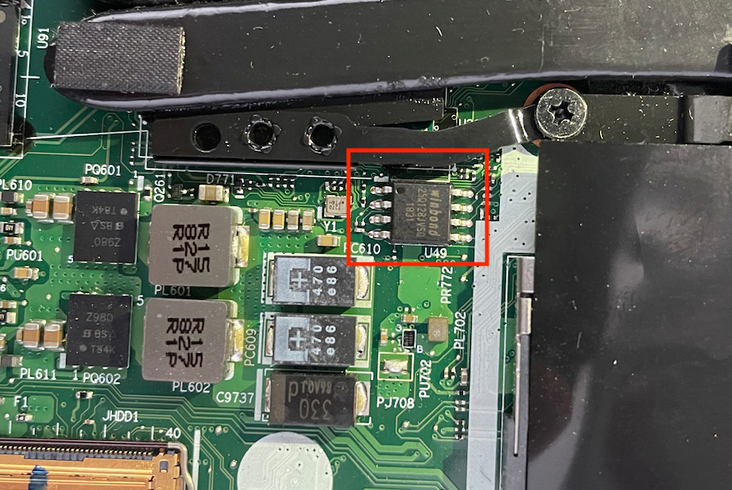
Find BIOS chip location
- The motherboard is labeled U49. A chip with a particularly small angle between the memory module and the fan may have the logo of winbond or that of other manufacturers, and write down the chip model
Open brush
- Here I suggest Another master Video, nanny teaching, I did it from zero to one with him.
Save and back up the read BIOS data in a safe place (key!)
- Save the data to the folder of UEFI Patch software. It is recommended to rename the read data to 1 Bin, and then put the previously downloaded xx70_xx80_patches_v6.txt is also put here, because the following steps need to use this file name, or you can make your own file name, but the following should also be modified accordingly
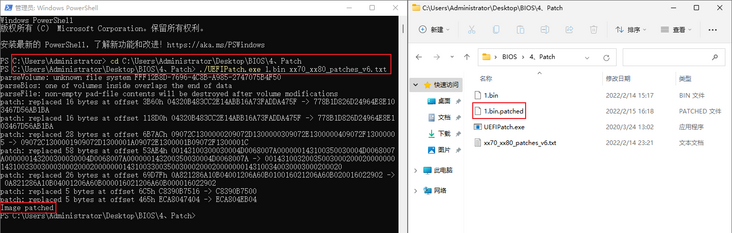
Open Powershell and cd to uefipatch Exe file folder, enter the following command
./UEFIPatch.exe 1.bin xx70_xx80_patches_v6.txt
- After completion, a 1 bin. Patched file
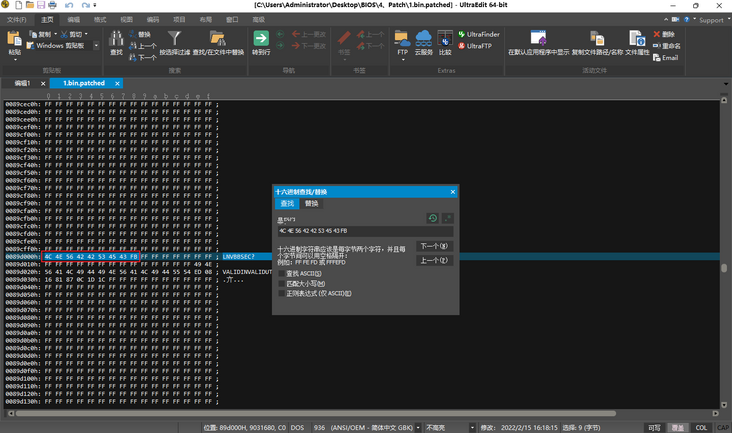
- Open with binary editor {1 bin. Find 4ce 42, replace 4ce 42 with 4ce 53, then 4ce 42 with 4ce 53, then 4ce 53, and then 4CD 53
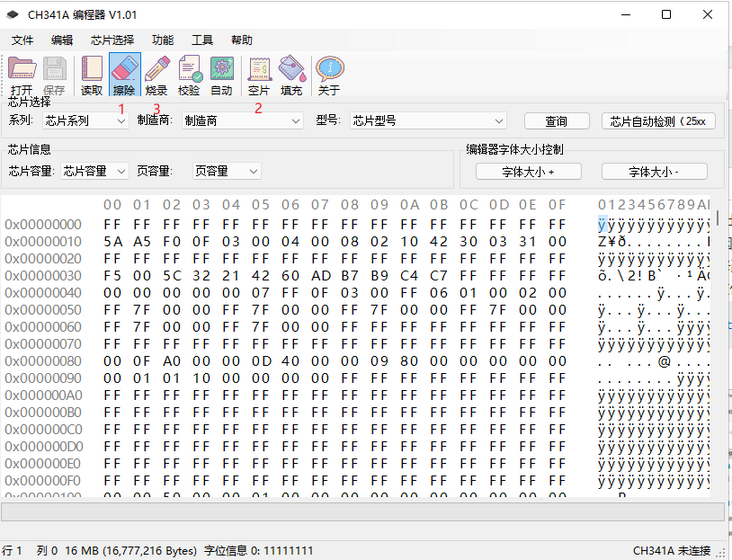
- Use the programmer software to open this 1 bin. Type out a set of operations of erasing, blank film and burning, and click these three buttons in sequence
Sprinkle flowers at the end
- After brushing, turn on the computer to see the BIOS (it may restart automatically several times, and it will sound "5 + 5" for the first time. In short, there may be strange problems. Just wait a moment or turn it on several times). There should be an Advanced menu with the option to unlock CFG, Have Fun!
- Be careful when pulling out the clip. Don't Yeet down all at once, otherwise you may not be able to clamp it next time
PS
- Recovery method: if you can't start or have other problems, you can use the programmer software to open the BIOS file backed up before and brush it back
- If not, you can use the factory BIOS Patch to brush it again