
Preface
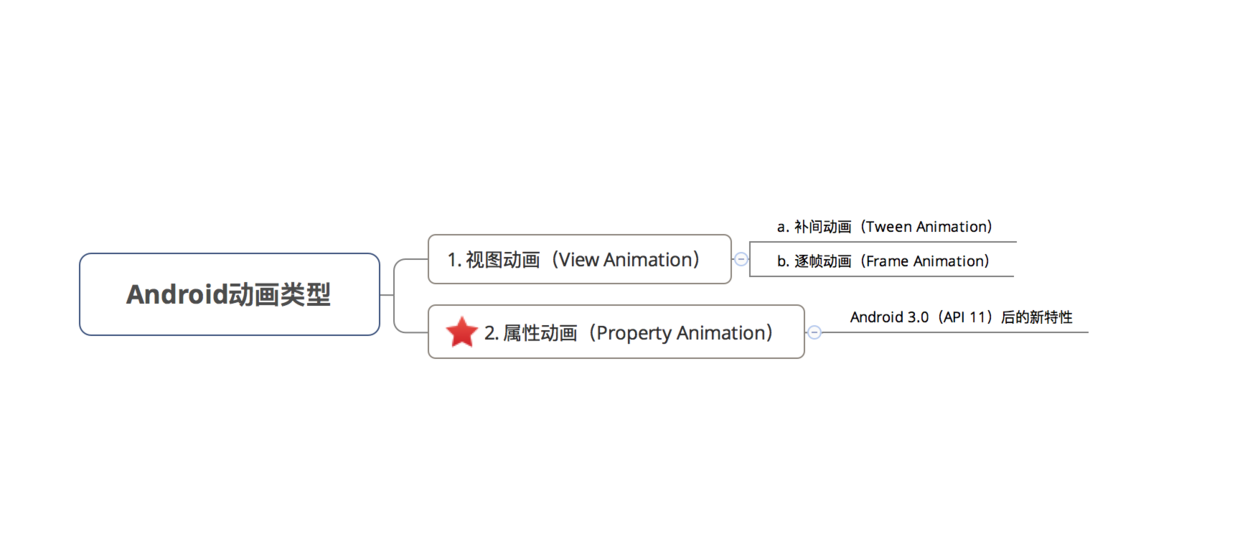
- The use of animation is a common knowledge in Android development
- This article will introduce in detail the principle of attribute animation in Android animation
- A series of articles on Android animation
- For the use of animation, please refer to the article:
Android Attribute Animation: This is a very detailed summary of Attribute Animation & Introduction
Android Animation: Hand-in-hand teaches you how to use makeup animation
Android frame-by-frame animation: The use of frame-by-frame animation is here!
Android Animation: Do you really use interpolators and estimators? (with detailed examples) - For the principles of customizing View, please refer to the article:
(1) Custom View Foundation - The easiest to understand series of Custom View Principles
(2) Custom View Measure Process - The easiest to understand series of Custom View Principles
(3) Custom View Layout Process - The easiest to understand series of Custom View Principles
(4) Custom View Draw Process - The easiest to understand series of Custom View Principles - For the application of custom View, please refer to the article:
Hand in hand teaches you to write a complete custom View
The most comprehensive and detailed description of the Path class - Custom View application series
The most comprehensive and detailed description of the Canvas class - Custom View Application Series
Why does your custom View wrap_content not work?
- For the use of animation, please refer to the article:
Catalog
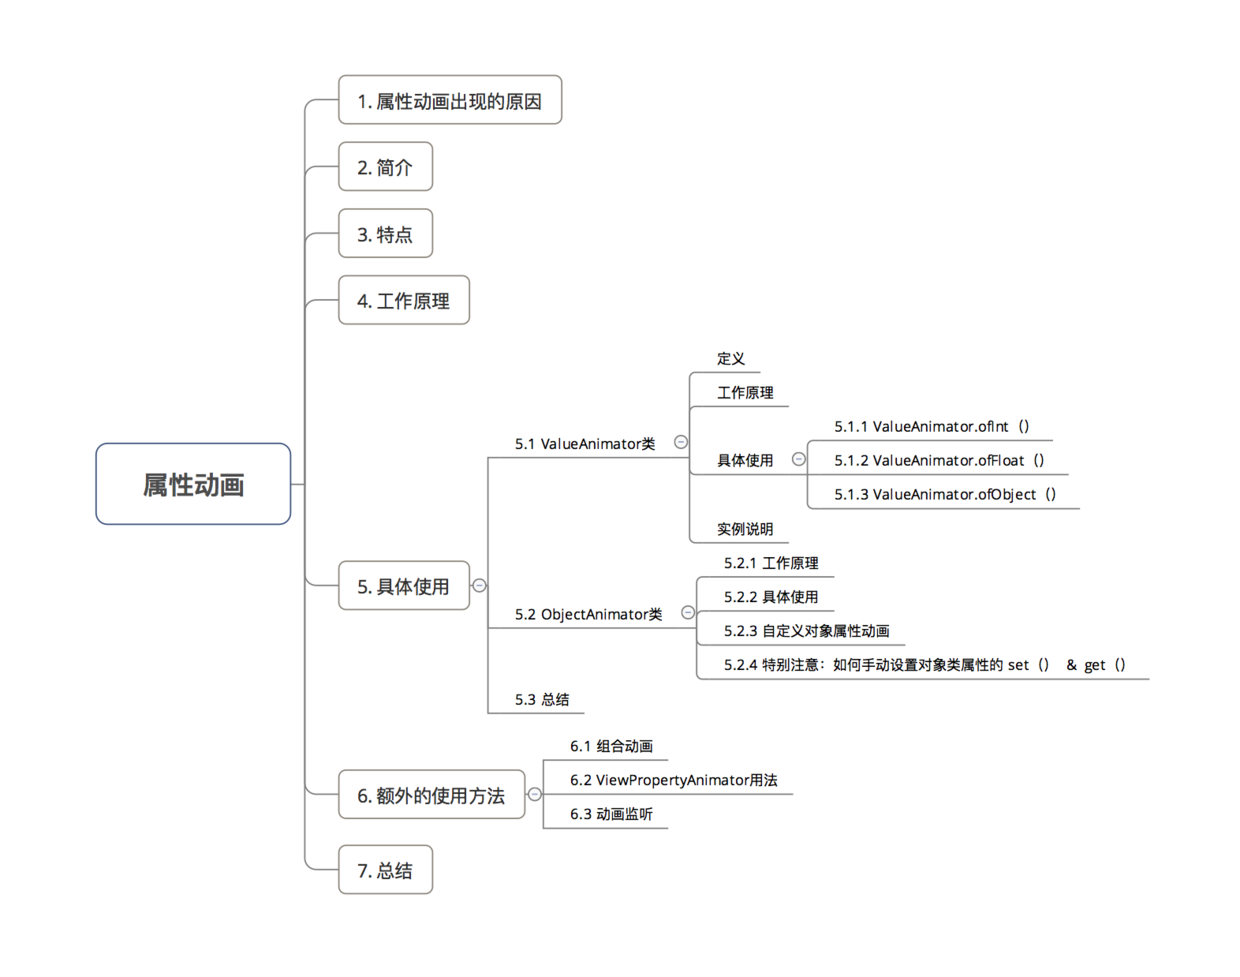
1. Reasons for Attribute Animation
- Property Animation is a completely new animation mode provided after Android 3.0 (API 11).
- So why provide Property Animation?
1.1 Background
Implementing animation effects is very common in Android development, so the Android system provides two ways to implement animation from the beginning:
- Frame Animation
- Tweened animation
1.2 Question
Frame-by-frame animation-interpolation animation has some shortcomings:
a. Object limitations: View
That is, interpolation animation can only be used on View view, that is, only one Button, TextView, or even Linear Layout, or other components inherited from View can be animated, but can not animate non-View objects.
- In some cases, the animation effect is only an attribute of the view - object rather than the whole view.
- For example, if we need to realize the dynamic change of the color of the view, we need to manipulate the color attributes of the view to achieve the animation effect instead of animation operation for the whole view.
b. No change in View attributes, just visual effects
- Intermediate animation only changes the visual effect of View, but does not really change the attributes of View.
- For example, the button in the upper left corner of the screen is moved to the lower right corner of the screen through the interpolation animation.
- Clicking on the current button position (lower right corner of the screen) is ineffective, because the button actually stays in the upper left corner of the screen. The filler animation only draws the button to the lower right corner of the screen, which changes the visual effect.
c. Single animation effect
- Inter-patch animation can only achieve simple animation requirements such as translation, rotation, zooming and transparency.
- Once encountering relatively complex animation effects, that is, beyond the above four animation effects, then the interpolation animation can not be achieved.
That is to say, there are great limitations in function-scalability.
1.3 Question
- In order to solve the shortcomings of space animation, starting with Android 3.0 (API 11), the system provides a new animation mode: Property Animation.
- Next, I'll give you a comprehensive introduction to Property Animation.
2. Introduction
- Acting object: Any Java object
No longer limited to View view objects
- Realized animation effect: can customize various animation effects
No longer limited to four basic transformations: translation, rotation, scaling & Transparency
3. Characteristics
- Acting objects are extended: not just View objects, but even no objects
- Animation effects: not only four basic transformations, but also other animation effects
- Domain of action: Introduced after API 11
4. Working Principle
-
In a certain time interval, the animation effect of the object on the attribute is realized by constantly changing the value and assigning the value to the attribute of the object.
Any property that can be any object
-
The concrete working principle logic is as follows:
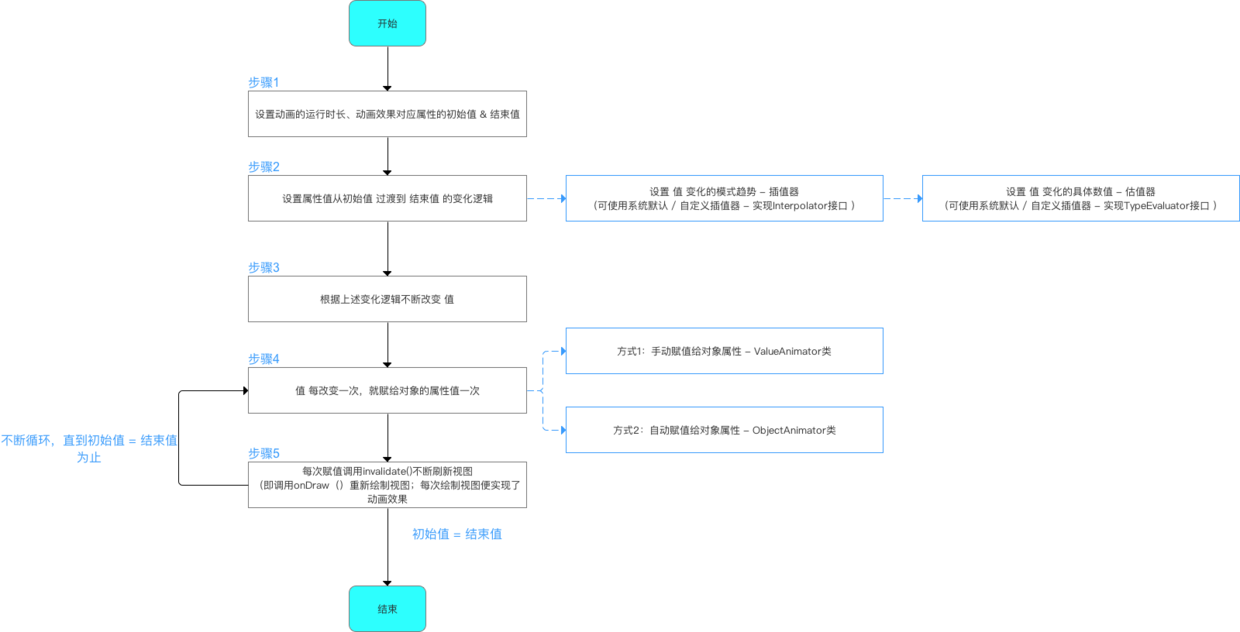
- From the above work principle, we can see that attribute animation has two very important classes: ValueAnimator class & ObjectAnimator class
- In fact, the use of attribute animation basically depends on these two classes.
- So, in the following section, I will focus on these two classes in the specific use of attribute animation.
5. Specific use
5.1 ValueAnimator class
- Definition: A Core Class in Attribute Animation Mechanism
- The principle of animation is to control the change of values and assign the attributes of objects manually, so as to achieve the animation effect. As shown below:
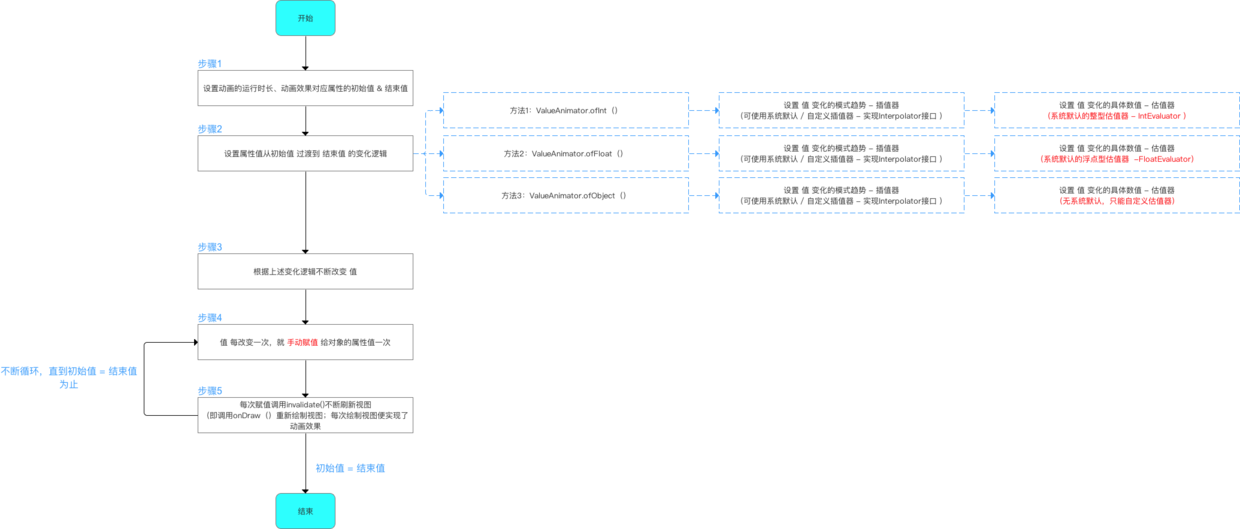
From the above principles, we can see that there are three important methods in the ValueAnimator class:
- ValueAnimator.ofInt(int values)
- ValueAnimator.ofFloat(float values)
- ValueAnimator.ofObject(int values)
I will introduce them one by one.
5.1.1 ValueAnimator.ofInt(int values)
- Role: Transition of initial values to end values in the form of integer values
That is, the estimator is an integer Estimator - IntEvaluator
- Working principle:
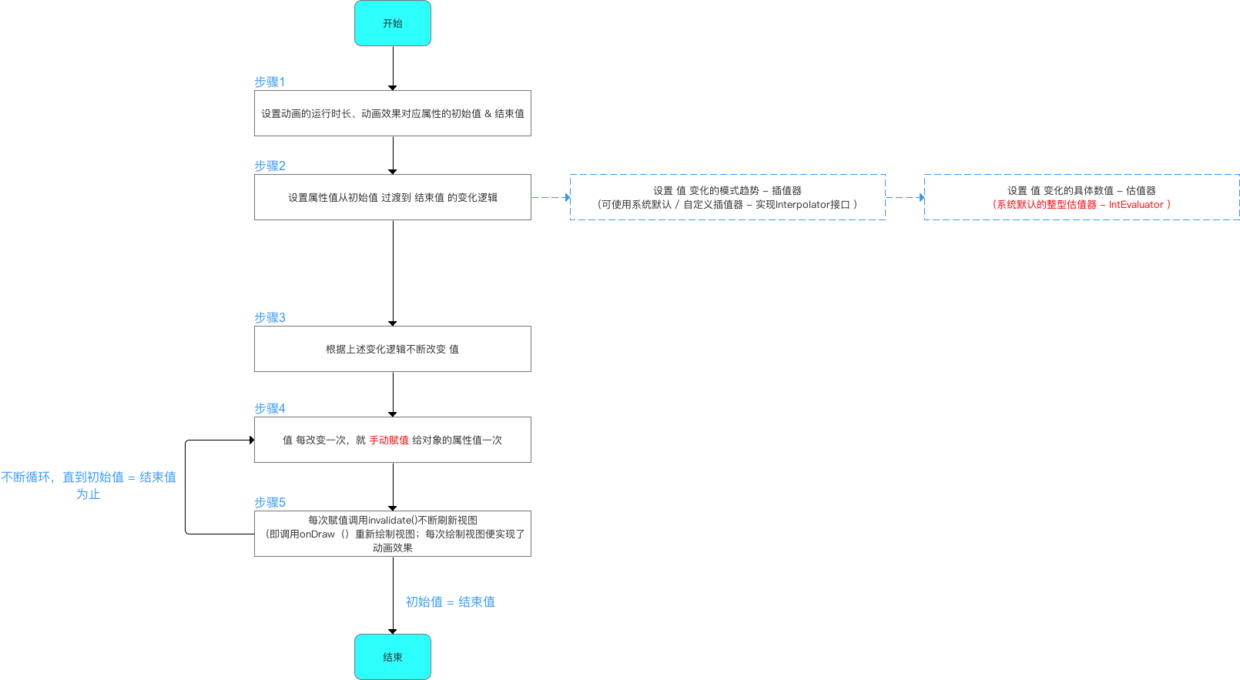
- Specific use:
In particular:
- Because Value Animator is essentially just a value manipulation mechanism, the following introduction first shows how to change a value (the following example mainly explains how to smoothly transition a value from 0 to 3)
- As for how to implement animation, developers need to assign these values to the attribute values of the object manually. This section will be explained in the next section.
The way to manipulate values is divided into XML settings / Java code settings
Settings 1: Java Code Settings
In actual development, it is recommended to use Java code to implement attribute animation: because many times the starting value of the attribute can not be determined in advance (can not be set using XML), which requires dynamic acquisition in Java code.
// Step 1: Set the initial and end values of the animation properties
ValueAnimator anim = ValueAnimator.ofInt(0, 3);
        // ofInt () has two functions
        // 1. Create animation instances
        // 2. Smoothing the incoming multiple Int parameters: Here 0 and 1 are passed in, indicating a smooth transition from 0 to 1
        // If three Int parameters a,b,c are introduced, the transition from a to B is smooth, then from B to C is smooth, and so on.
        // ValueAnimator.ofInt() has an integer estimator built in and uses the default directly. No settings are required, that is, how to transition from the initial value to the end value is set by default.
        // I'll talk about custom interpolators in the next section
        // Let's look at the source code analysis of ofInt() - > Concern 1

// Step 2: Set various properties for animation playing
        anim.setDuration(500);
        // Set the duration of the animation run

        anim.setStartDelay(500);
        // Setting the Delay Play Time of Animation

        anim.setRepeatCount(0);
        // Set the number of animation replays = the number of replays + 1
        // When the number of animations played = infinite, the animation repeats indefinitely

        anim.setRepeatMode(ValueAnimator.RESTART);
        // Setting Repeated Play Animation Mode
        // ValueAnimator. RESTART (default): Positive playback
        // Value Animator. REVERSE: Reverse playback

// Step 3: Manually assign the changed value to the object's attribute value: Update listener through animation
        // Update listener for setting values
        // That is, the method will be called once every time the value changes or changes.
        anim.addUpdateListener(new ValueAnimator.AnimatorUpdateListener() {
            @Override
            public void onAnimationUpdate(ValueAnimator animation) {

                int currentValue = (Integer) animation.getAnimatedValue();
                // Get the changed value

                System.out.println(currentValue);
                // Output changed value

        // Step 4: Assign the changed value to the attribute value of the object, which will be explained in detail below.
                View.setproperty(currentValue);

       // Step 5: Refresh the view, i. e. redraw, to achieve animation effects
                View.requestLayout();


            }
        });

        anim.start();
        // Start animation
    }

// Focus on 1:ofInt() Source Code Analysis
    public static ValueAnimator ofInt(int... values) {
        // Allow one or more Int parameters to be passed in
        // 1. Enter a case (e.g. a): transition from 0 to a;
        // 2. Input multiple cases (e.g. a, b, c): first smooth transition from a to b, then smooth transition from B to C

        ValueAnimator anim = new ValueAnimator();
        // Creating Animation Objects
        anim.setIntValues(values);
        // Assign the incoming value to the animated object
        return anim;
    }
Design sketch
The transition from the initial value to the end value is as follows:

Setting method 2: Setting in XML code
Reusability, that is, to write generic animations into XML, which can be reused in various interfaces
- Step 1: Create the corresponding animation. xml file in the path res/animator folder
Set this to res/animator/set_animation.xml
- Step 2: Set animation parameters
set_animation.xml
// Value Animator uses <animator> Tags
<animator xmlns:android="http://schemas.android.com/apk/res/android"
    android:valueFrom="0"   // initial value
    android:valueTo="100"  // End value
    android:valueType="intType" // Variation type: floatType & intType

    android:duration="3000" // Animation duration (ms) must be set before animation can be effective
    android:startOffset ="1000" // Delayed Start Time for Animation (ms)
    android:fillBefore = "true" // After the animation is played, will the view stay at the beginning of the animation, default to true
    android:fillAfter = "false" // After the animation is played, will the view stay at the end of the animation, prior to the fillBefore value, default to false
    android:fillEnabled= "true" // Whether or not the fillBefore value is applied has no effect on the fillAfter value. The default is true.
    android:repeatMode= "restart" // Choose Repeat Play Animation mode, restart stands for positive playback, reverse stands for reverse playback, default is restart.|
    android:repeatCount = "0" // The number of replays (so the number of animations played = the number of replays + 1), unlimited repetition for infinite
    android:interpolator = @[package:]anim/interpolator_resource // Interpolators, which affect the playback speed of animation, are described in detail below.

/>
- Step 3: Start animation in Java code
Animator animator = AnimatorInflater.loadAnimator(context, R.animator.set_animation);
// Load XML Animation

animator.setTarget(view);
// Setting Animation Objects

animator.start();
// Start animation
Design sketch
The effect is the same as the first way.
Examples
- Next, I will combine the manual assignment of object attributes to achieve a complete animation effect.
- Realized animation effect: the width of the button is enlarged from 150 PX to 500 PX
Button mButton = (Button) findViewById(R.id.Button);
        // Create animation action objects: Take Button as an example

// Step 1: Set the initial and end values of the attribute values
        ValueAnimator valueAnimator = ValueAnimator.ofInt(mButton.getLayoutParams().width, 500);
        // Initial value = the width of the current button, set to 150 in the xml file
        // End value = 500
        // ValueAnimator.ofInt() has an integer estimator built into it, using the default directly. No settings are required.
        // That is, the default setting is how to transition from initial value 150 to end value 500.

// Step 2: Set various properties for animation playing
        valueAnimator.setDuration(2000);
        // Set animation run time: 1s

// Step 3: Manually assign the attribute value to the attribute of the object: Here assign the value to the width of the button
        // Setting Update Listener: This method is called every time the value changes and updates
        valueAnimator.addUpdateListener(new AnimatorUpdateListener() {
            @Override
            public void onAnimationUpdate(ValueAnimator animator) {

                int currentValue = (Integer) animator.getAnimatedValue();
                // Get the attribute values after each change
                System.out.println(currentValue);
                // Output the attribute values after each change for viewing

                mButton.getLayoutParams().width = currentValue;
                // Manual assignment of values to object attributes each time a value changes
                // It assigns the value after each change to the width of the button, thus realizing the dynamic change of the button width attribute.

// Step 4: Refresh the view, that is, redraw, to achieve the animation effect
                mButton.requestLayout();

            }
        });

        valueAnimator.start();
        // Start animation

    }
Design sketch

5.1.2 ValueAnimator.oFloat(float values)
-
Role: Transition of initial values to end values in the form of floating-point values
-
Working principle:
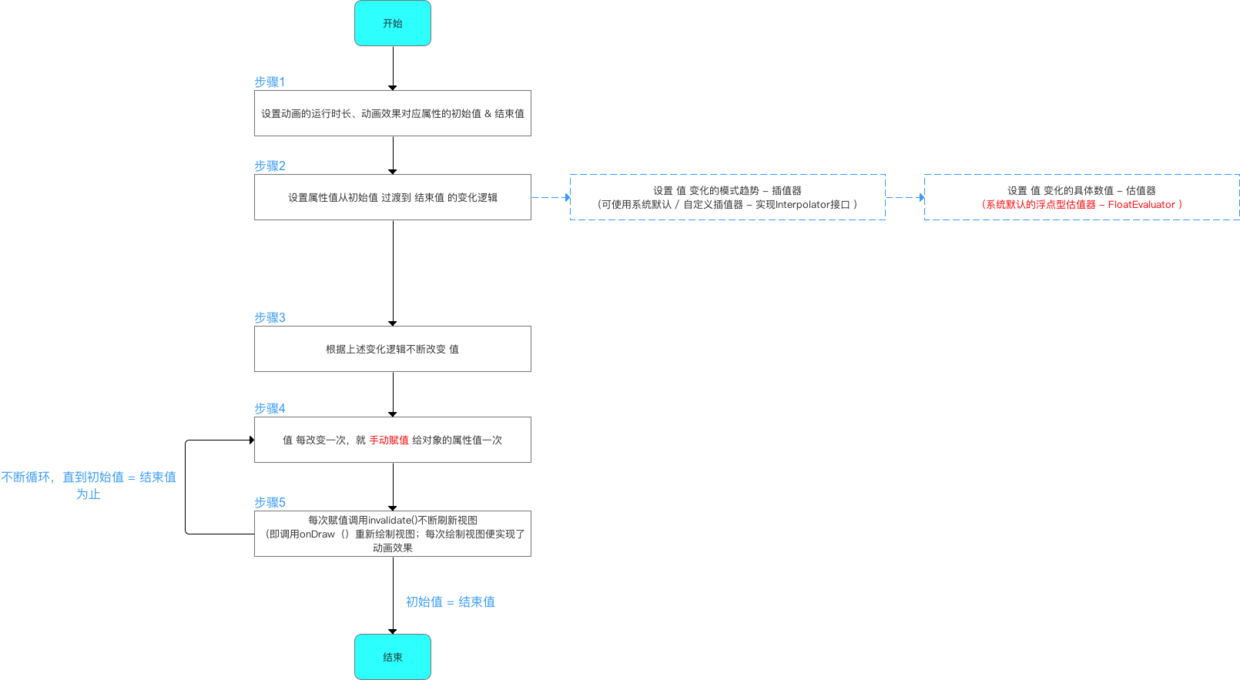
- Specific use: divided into XML settings / Java code settings
Setting method 1: Setting in Java code
ValueAnimator anim = ValueAnimator.ofFloat(0, 3);
// Other uses are similar to ValueAnimator.ofInt (int values), which are not described too much here.
Setting method 2: Setting in XML code
- Step 1: Create the corresponding animation. xml file in the path res/animator folder
Set this to res/animator/set_animation.xml
- Step 2: Set animation parameters
set_animation.xml
// Value Animator uses <animator> Tags
<animator xmlns:android="http://schemas.android.com/apk/res/android"
    // Setting properties as above
    android:valueFrom="0"
    android:valueTo="100"
    android:valueType="intType"/>
- Step 3: Start animation in Java code
Animator animator = AnimatorInflater.loadAnimator(context, R.animator.set_animation);
// Load XML Animation

animator.setTarget(view);
// Setting Animation Objects

animator.start();
// Start animation
Design sketch
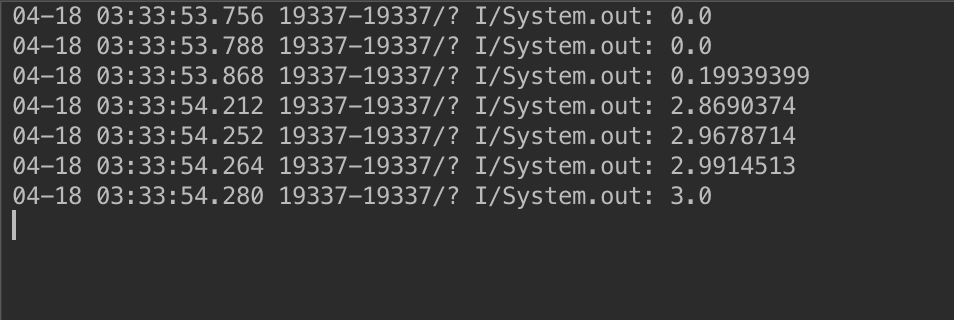
As you can see from the above, ValueAnimator.ofInt () and ValueAnimator.oFloat () are just different from the estimator: (i.e., how to transition from the initial value to the end value)
- ValueAnimator.oFloat () uses the default Float Evaluator
- ValueAnimator.ofInt () uses the default integer estimator (IntEvaluator)
There is absolutely no difference in use, and the use of ValueAnimator.oFloat () is not described too much here.
5.1.3 ValueAnimator.ofObject()
-
Role: Transition from initial value to end value as an object
That is to say, animation effect can be achieved by manipulating objects.
-
Working principle:
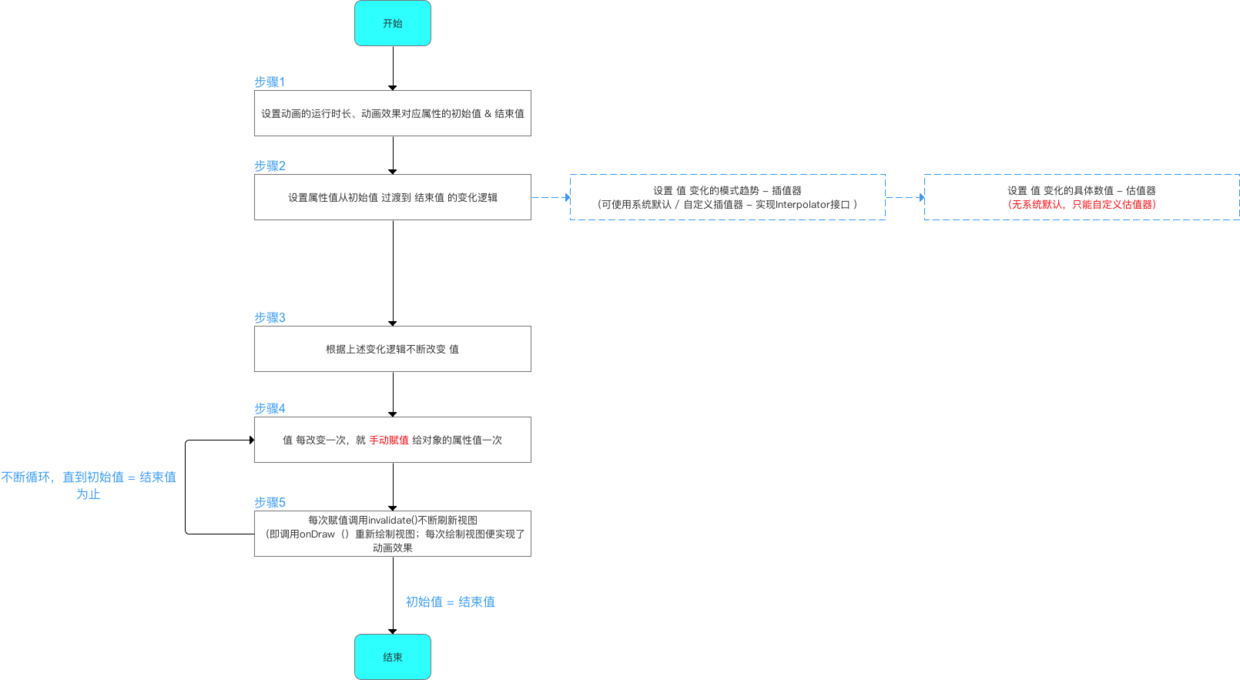
- Specific use:
// Object when creating initial Animation & object when ending animation
myObject object1 = new myObject();
myObject object2 = new myObject();

ValueAnimator anim = ValueAnimator.ofObject(new myObjectEvaluator(), object1, object2);
// Creating Animation Objects & Setting Parameters
// Description of parameters
// Parametric 1: Custom Type Evaluator Type Parameters - Detailed below
// Parametric 2: Objects for initial animation
// Parametric 3: Object that ends the animation
anim.setDuration(5000);
anim.start();
Before continuing with the use of ValueAnimator.ofObject (), let me talk about the Type Evaluator.
Introduction to Type Evaluator
- Role: Set the logic of how animation transits from initial to end values
- The Change Mode of Interpolator Decision Value (Uniform and Accelerated Bla blabla)
- Specific changes in the value determined by the Type Evaluator
As can be seen from Section 5.1.2:
- ValueAnimator.ofFloat () implements the logic of transitioning the initial value to the end value in the form of a floating point, so what is the transitional logic?
- In fact, a Float Evaluator estimator is built into the system, which implements a floating-point transition logic between initial and end values.
- Let's look at the code implementation of Float Evaluator:
public class FloatEvaluator implements TypeEvaluator {
// FloatEvaluator implements the TypeEvaluator interface

// Rewrite evaluate()
    public Object evaluate(float fraction, Object startValue, Object endValue) {
// Description of parameters
// fraction: Represents the animation completion (from which the current animation value is calculated)
// startValue, endValue: Initial and end values of animation
        float startFloat = ((Number) startValue).floatValue();

        return startFloat + fraction * (((Number) endValue).floatValue() - startFloat);
        // The algorithm of transition from initial value to end value is:
        // 1. subtract the initial value from the end value and calculate the difference between them.
        // 2. Multiply the difference by fraction coefficient
        // 3. Adding the initial value, we get the current animation value.
    }
}
-
ValueAnimator.ofInt () & ValueAnimator. ofFloat () all have built-in system estimators, namely Float Evaluator & IntEvaluator.
That is, the system has implemented the logic of how to transition from initial value to end value by default.
- But for ValueAnimator.ofObject (), we can see from the above working principle that there is no default implementation of the system, because the animation operation of the object is complex and diverse, and the system can not know how to transit from the initial object to the end object.
- Therefore, for ValueAnimator.ofObject (), we need to customize the Type Evaluator to tell the system how to transit from the initial object to the end object.
- The logic of the custom implementation is as follows
// Implementing the TypeEvaluator interface
public class ObjectEvaluator implements TypeEvaluator{

// Rewrite evaluate ()
// Write the logic of object animation transition in evaluation ()
    @Override
    public Object evaluate(float fraction, Object startValue, Object endValue) {
        // Description of parameters
        // fraction: Represents the animation completion (from which the current animation value is calculated)
        // startValue, endValue: Initial and end values of animation

        ... // Logic of Writing Object Animation Transition

        return value;
        // Returns the logically computed value of object animation transition
    }
Examples
- Next, I'll show you how to customize the TypeEvaluator interface and animate through ValueAnimator.ofObject ().
-
Realized animation effect: a circle moves from one point to another
 Design sketch
 -
The project catalogue documents are as follows:
 Engineering catalogue
Step 1: Define object classes
- Because ValueAnimator.ofObject () is an object-oriented operation, you need to customize the object class.
-
The object to be manipulated in this example is the point coordinates of the circle.
Point.javapublic class Point { // Set two variables to record coordinate positions private float x; private float y; // Constructing method for setting coordinates public Point(float x, float y) { this.x = x; this.y = y; } // get method for obtaining coordinates public float getX() { return x; } public float getY() { return y; } }
Step 2: Implement the TypeEvaluator interface according to requirements
- The purpose of implementing the TypeEvaluator interface is to customize how to transit from the initial point coordinate to the end point coordinate.
- This example implements a coordinate transition logic from the upper left corner to the lower right corner.
 Design sketch
PointEvaluator.java
// Implementing the TypeEvaluator interface
public class PointEvaluator implements TypeEvaluator {

    // Rewrite evaluate ()
    // Write the logic of object animation transition in evaluation ()
    @Override
    public Object evaluate(float fraction, Object startValue, Object endValue) {

        // Converting the mandatory type of animation initial value startValue and animation end value endValue to a Point object
        Point startPoint = (Point) startValue;
        Point endPoint = (Point) endValue;

        // Calculate the x and y values of the current animation based on fraction
        float x = startPoint.getX() + fraction * (endPoint.getX() - startPoint.getX());
        float y = startPoint.getY() + fraction * (endPoint.getY() - startPoint.getY());

        // Encapsulate the calculated coordinates into a new Point object and return
        Point point = new Point(x, y);
        return point;
    }

}
- The above step is to customize the implementation of TypeEvaluator according to requirements
- Next, we will explain how to animate Point objects to achieve the animation effect of the entire custom View.
Step 3: Animate attributes into a custom View
MyView.java
/**
 * Created by Carson_Ho on 17/4/18.
 */
public class MyView extends View {
    // Setting the variables to be used
    public static final float RADIUS = 70f;// The radius of a circle = 70
    private Point currentPoint;// Current Point Coordinates
    private Paint mPaint;// Drawing brush


    // Constructing Method (Initial Brush)
    public MyView(Context context, AttributeSet attrs) {
        super(context, attrs);
        // Initialization Brush
        mPaint = new Paint(Paint.ANTI_ALIAS_FLAG);
        mPaint.setColor(Color.BLUE);
    }

    // Replicate onDraw() to implement rendering logic
    // Drawing logic: Draw a circle at the initial point, and call onDraw() to redraw the circle every time by monitoring the change of current Point, so as to achieve the effect of the circle moving smoothly.
    @Override
    protected void onDraw(Canvas canvas) {
        // If the current point coordinates are empty (that is, the first time)
        if (currentPoint == null) {
            currentPoint = new Point(RADIUS, RADIUS);
            // Create a point object (coordinates are (70, 70))

            // Draw a circle at this point: center = 70,70, radius = 70
            float x = currentPoint.getX();
            float y = currentPoint.getY();
            canvas.drawCircle(x, y, RADIUS, mPaint);


 // (Focus on) Applying Attribute Animation to View
            // Step 1: Object Points at the Initial Animation Creation & Object Points at the End of Animation
            Point startPoint = new Point(RADIUS, RADIUS);// The initial point is the center of the circle (70,70)
            Point endPoint = new Point(700, 1000);// The end point is (700,1000)

            // Step 2: Create Animation Objects & Set Initial and End Values
            ValueAnimator anim = ValueAnimator.ofObject(new PointEvaluator(), startPoint, endPoint);
            // Description of parameters
            // Parametric 1: TypeEvaluator type parameter - Using a custom Point Evaluator (implementing the TypeEvaluator interface)
            // Parametric 2: Object Points for Initial Animation
            // Parametric 3: Object point to end animation

            // Step 3: Set animation parameters
            anim.setDuration(5000);
            // Setting the animation duration

// Step 3: Manually assign the changed object to the current object through the value update listener
// Here, the changed coordinate value object is assigned to the current coordinate value object.
            // Update listener for setting values
            // That is, every time the coordinate value (Point object) is updated, the method is called once.
            anim.addUpdateListener(new ValueAnimator.AnimatorUpdateListener() {
                @Override
                public void onAnimationUpdate(ValueAnimator animation) {
                    currentPoint = (Point) animation.getAnimatedValue();
                    // The Piont object value returned by evaluation () in Point Evaluator after each change is transferred to the current Point object.
                    // To update the current Point

// Step 4: Rendering after each assignment to achieve animation effect
                    invalidate();
                    // When invalidate() is called, the View is refreshed to see the redrawn interface, that is, onDraw() is called again.
                    // So every time the coordinate value is changed, onDraw() is called once.
                }
            });

            anim.start();
            // Start animation


        } else {
            // If the coordinate value is not zero, draw a circle
            // So every time the coordinate value changes, onDraw() will be called once, and a circle will be drawn to achieve the animation effect.

            // Draw a circle at this point: center = 30,30, radius = 30
            float x = currentPoint.getX();
            float y = currentPoint.getY();
            canvas.drawCircle(x, y, RADIUS, mPaint);
        }
    }


}
Step 4: Add a custom View space to the layout file
activity_main.xml
<?xml version="1.0" encoding="utf-8"?>
<RelativeLayout xmlns:android="http://schemas.android.com/apk/res/android"
    xmlns:tools="http://schemas.android.com/tools"
    android:layout_width="match_parent"
    android:layout_height="match_parent"
    android:paddingBottom="@dimen/activity_vertical_margin"
    android:paddingLeft="@dimen/activity_horizontal_margin"
    android:paddingRight="@dimen/activity_horizontal_margin"
    android:paddingTop="@dimen/activity_vertical_margin"
    tools:context="scut.carson_ho.valueanimator_ofobject.MainActivity">

    <scut.carson_ho.valueanimator_ofobject.MyView
        android:layout_width="match_parent"
        android:layout_height="match_parent"
         />
</RelativeLayout>
Step 5: Set the display view in the main code file
MainActivity.java
public class MainActivity extends AppCompatActivity {

    @Override
    protected void onCreate(Bundle savedInstanceState) {
        super.onCreate(savedInstanceState);
        setContentView(R.layout.activity_main);
    }
}
Design sketch

Source address
Github address of Carson_Ho: https://github.com/Carson-Ho/PropertyAnimator_ofObject
Particular attention
As can be seen from the above, the essence of ValueAnimator.ofObject () is still the operation value. It is just to encapsulate multiple values into an object and operate on multiple values at the same time.
As in the example above, the essence is to encapsulate the two values of x and Y in the operation coordinates into the Point object to facilitate the simultaneous operation of the two values of x and y.
- So far, the core ValueAnimator class in attribute animation has been explained.
- I'll continue with another important class: the ObjectAnimator class.
5.2 ObjectAnimator class
5.2.1 Principle of Realizing Animation
Change the attribute value of the object directly to achieve the animation effect.
- For example, the animation effect of transparency can be achieved by directly changing the alpha attribute of View.
- Inherited from the ValueAnimator class, that is, the underlying animation implementation mechanism is based on the ValueAnimator class
- Essential Principle: The animation effect can be achieved by continuously controlling the change of the value and automatically assigning the attributes of the object. As follows:
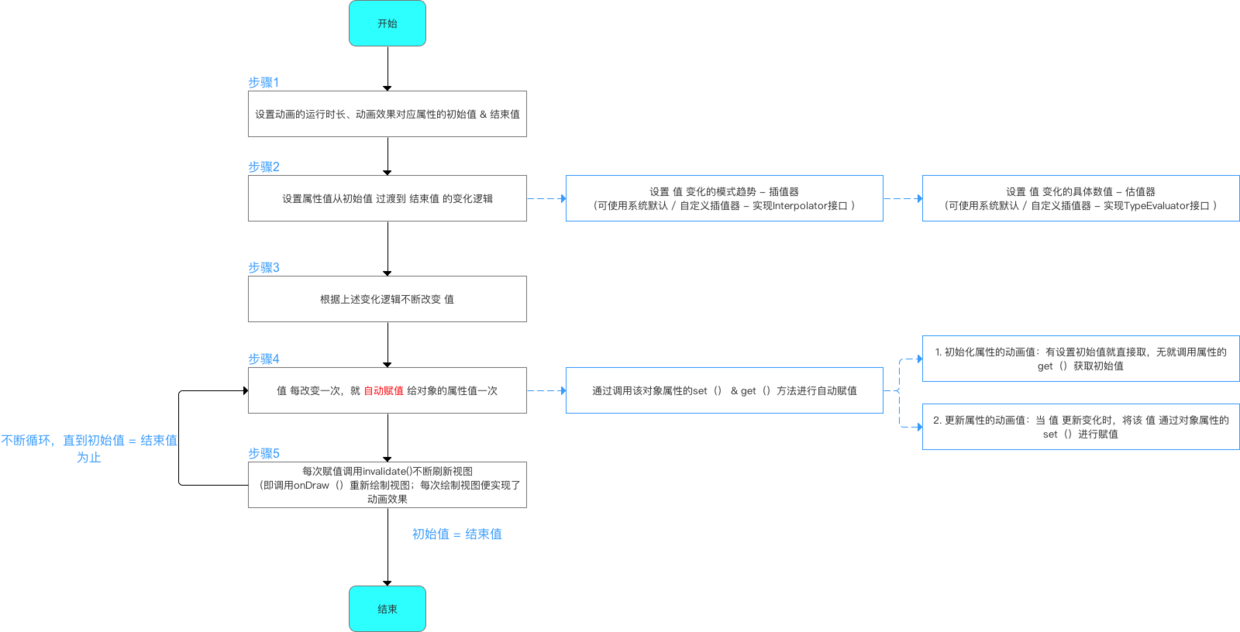
From the above work principle, we can see the difference between ObjectAnimator and ValueAnimator classes:
- The ValueAnimator class first changes the value, then assigns the attribute to the object manually to realize animation, and indirectly operates on the attribute of the object.
-
Object Animator class first changes the value, then automatically assigns the attribute to the object to achieve animation; it directly operates on the attribute of the object;
How to assign attributes to objects automatically is explained in detail below.
5.2.2 Specific use
Since the ValueAnimator class is inherited, the method used is very similar: XML settings / Java settings
Settings 1: Java Settings
ObjectAnimator animator = ObjectAnimator.ofFloat(Object object, String property, float ....values);

// ofFloat() has two functions
// 1. Create animation instances
// 2. Parameter settings: The parameters are as follows
// Object object: Object that needs to be manipulated
// String property: Properties of objects that need to be manipulated
// Float.... Values: animation initial value & end value (not fixed length)
// If there are two parameters a and b, then the animation effect is from a value of the attribute to B value.
// If there are three parameters a,b,c, then the animation effect is from a value of the attribute to b value and then to C value.
// And so on
// How to transition from initial value to end value is also determined by the estimator, where ObjectAnimator.ofFloat () is a system-built floating-point estimator Float Evaluator, explained with Value Animator.

anim.setDuration(500);
        // Set the duration of the animation run

        anim.setStartDelay(500);
        // Setting the Delay Play Time of Animation

        anim.setRepeatCount(0);
        // Set the number of animation replays = the number of replays + 1
        // When the number of animations played = infinite, the animation repeats indefinitely

        anim.setRepeatMode(ValueAnimator.RESTART);
        // Setting Repeated Play Animation Mode
        // ValueAnimator. RESTART (default): Positive playback
        // Value Animator. REVERSE: Reverse playback

animator.start();
// Start animation
Setting method 2: Setting in XML code
- Step 1: Create the animation effect. xml file in the path res/animator folder
Set this to res/animator/set_animation.xml
- Step 2: Set animation parameters
set_animation.xml
// Object Animator uses <animator> Tags
<objectAnimator xmlns:android="http://schemas.android.com/apk/res/android"
    android:valueFrom="1"   // initial value
    android:valueTo="0"  // End value
    android:valueType="floatType"  // Variation type: floatType & intType
    android:propertyName="alpha" // Property names for object changes

/>
Start animation in Java code
Animator animator = AnimatorInflater.loadAnimator(context, R.animator.view_animation);
// Load XML Animation

animator.setTarget(view);
// Setting Animation Objects

animator.start();
// Start animation
- Use examples
Here we first show four basic transformations: translation, rotation, scaling and transparency.
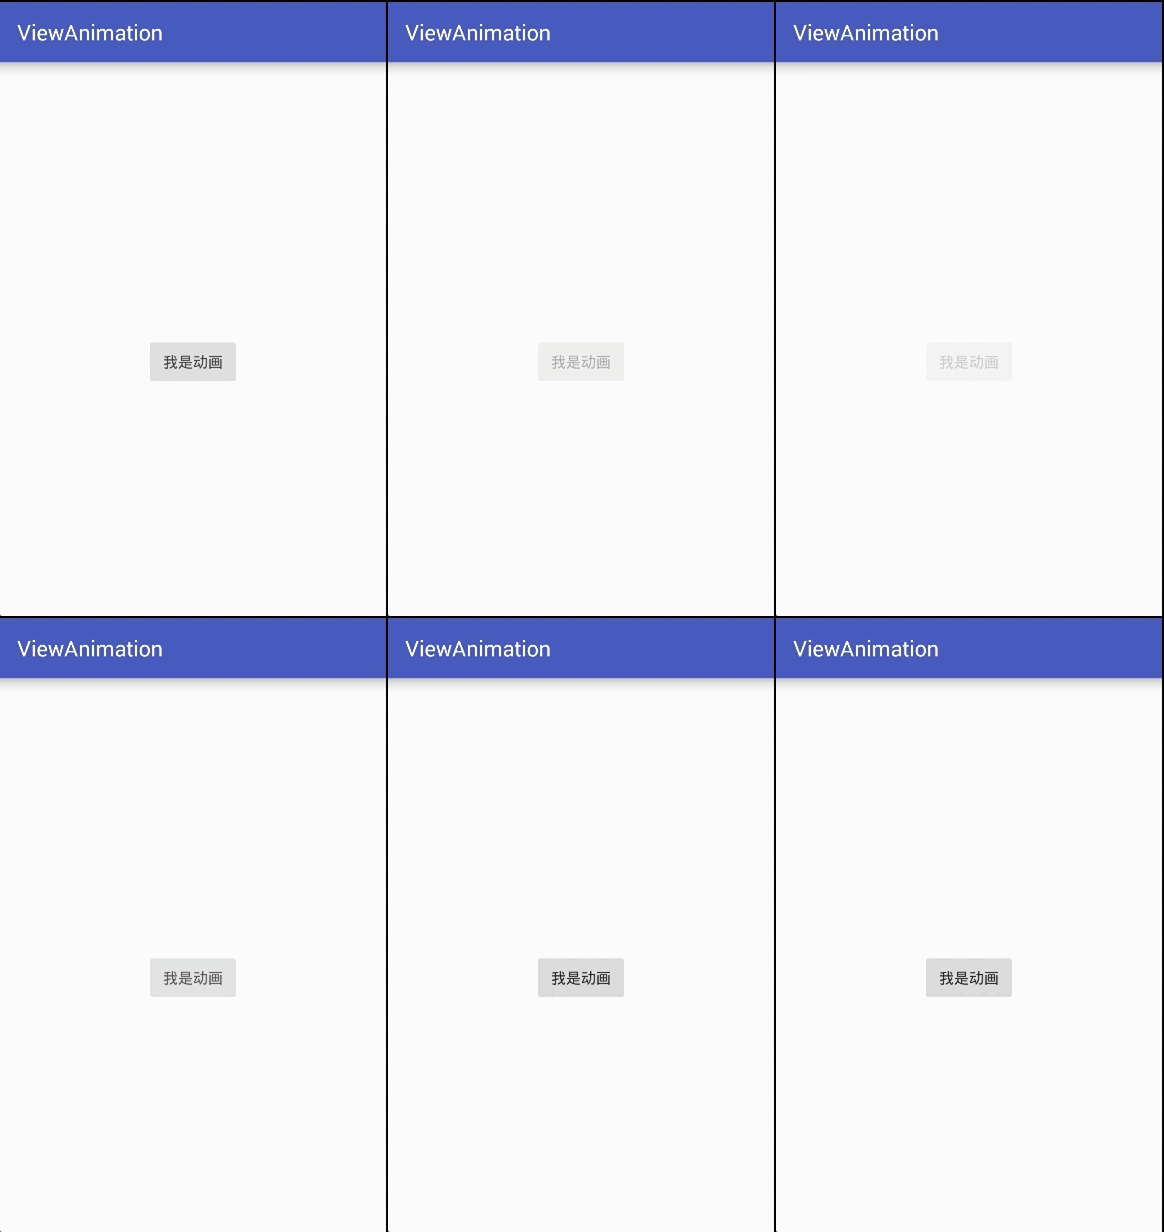
a. Transparency
mButton = (Button) findViewById(R.id.Button);
        // Create animation action objects: Take Button as an example

        ObjectAnimator animator = ObjectAnimator.ofFloat(mButton, "alpha", 1f, 0f, 1f);
        // The expression is:
        // The animation object is mButton
        // The property of the animated object is transparency alpha
        // The animation effect is: conventional - transparent - conventional
        animator.setDuration(5000);
        animator.start();
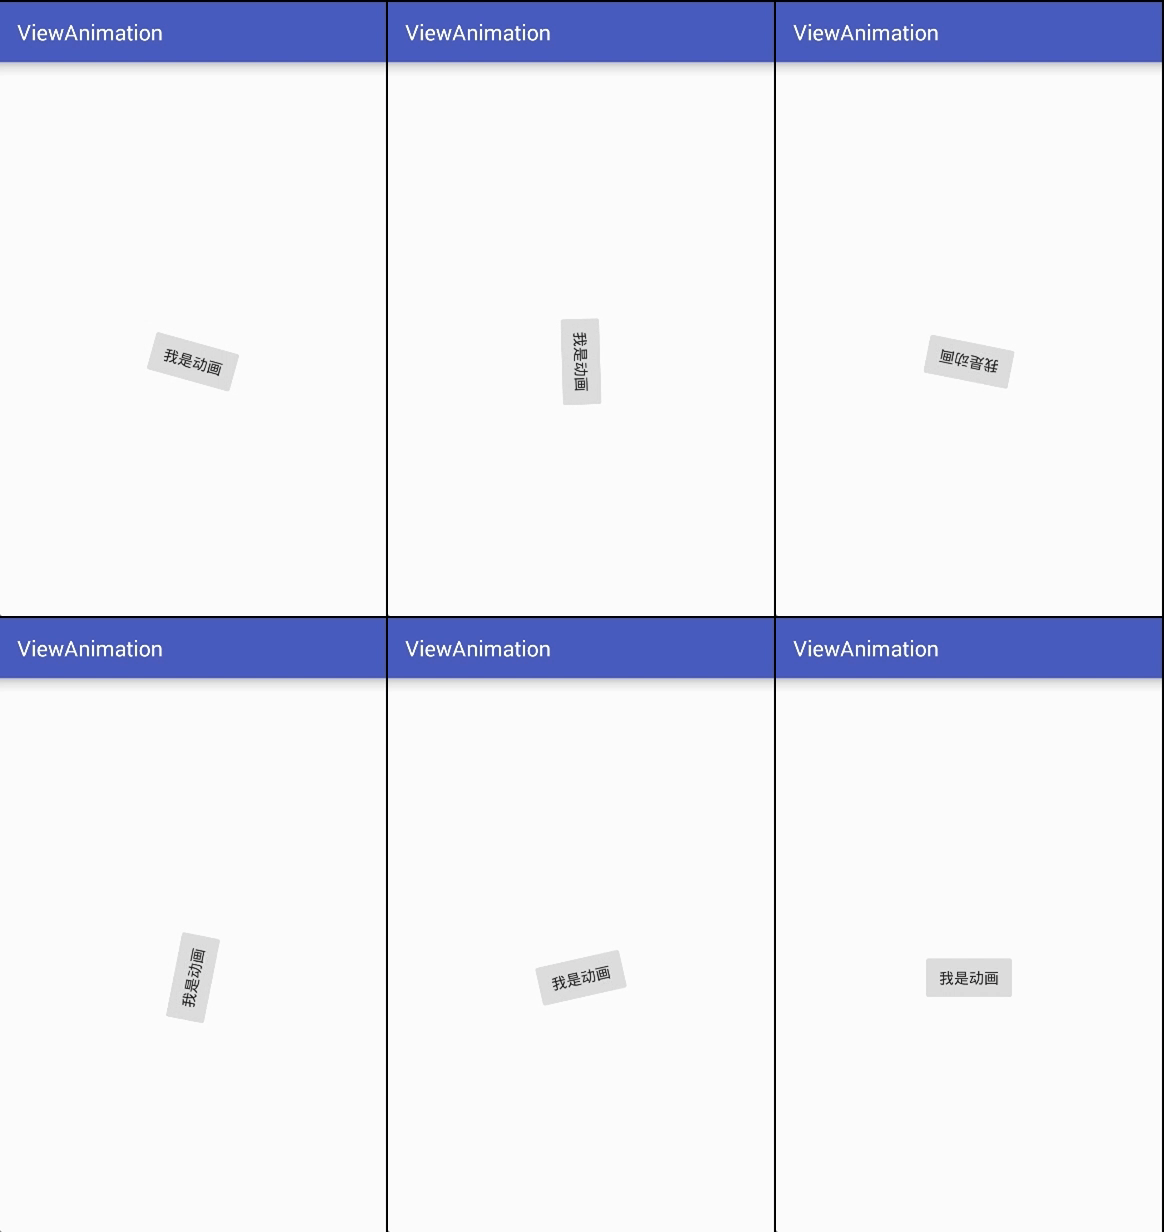
b. Rotation
mButton = (Button) findViewById(R.id.Button);
        // Create animation action objects: Take Button as an example

  ObjectAnimator animator = ObjectAnimator.ofFloat(mButton, "rotation", 0f, 360f);

        // The expression is:
        // The animation object is mButton
        // The property of the animated object is to rotate alpha
        // The animation effect is: 0 - 360
        animator.setDuration(5000);
        animator.start();
c. translation
mButton = (Button) findViewById(R.id.Button);
        // Create animation action objects: Take Button as an example

  float curTranslationX = mButton.getTranslationX();
        // Get the position of the current button
        ObjectAnimator animator = ObjectAnimator.ofFloat(mButton, "translationX", curTranslationX, 300,curTranslationX);


        // The expression is:
        // The animation object is mButton
        // The attribute of the animation object is X-axis translation (translation on Y-axis is the same, using attribute "translation Y"
        // The animation effect is to move from the current position to x=1500 and then to the initial position.
        animator.setDuration(5000);
        animator.start();

d. Scaling
mButton = (Button) findViewById(R.id.Button);
        // Create animation action objects: Take Button as an example

  ObjectAnimator animator = ObjectAnimator.ofFloat(mButton, "scaleX", 1f, 3f, 1f);
        // The expression is:
        // The animation object is mButton
        // The property of the animated object is the X-axis zoom.
        // The animation effect is: zoom in three times and then shrink to the initial size.
        animator.setDuration(5000);
        animator.start();

- In the above explanation, we use four basic animation effects of attribute animation: transparency, translation, rotation and zooming.
That is, the second parameter String property of ObjectAnimator.ofFloat () passes in blabla bla such as alpha, rotation, translationX, scaleY, etc.
| attribute | Effect | value type |
|---|---|---|
| Alpha | Controlling View Transparency | float |
| TranslationX | Controlling displacement in X direction | float |
| TranslationY | Controlling displacement in Y direction | float |
| ScaleX | Controlling the zoom factor in the X direction | float |
| ScaleY | Controlling the Scaling Multiplier in the Y Direction | float |
| Rotation | Controlling the rotation of the screen axis | float |
| RotationX | Controlling the rotation of X-axis | float |
| RotationY | Controlling the Rotation Degree on the Y-axis | float |
Question: What attribute values can the second parameter of ofFloat() pass in?
Answer: Any attribute value. Because:
- Object Animator class changes the object attribute value to achieve the essence of animation effect: by constantly controlling the change of the value, and then automatically assigning the object attribute, so as to achieve animation effect.
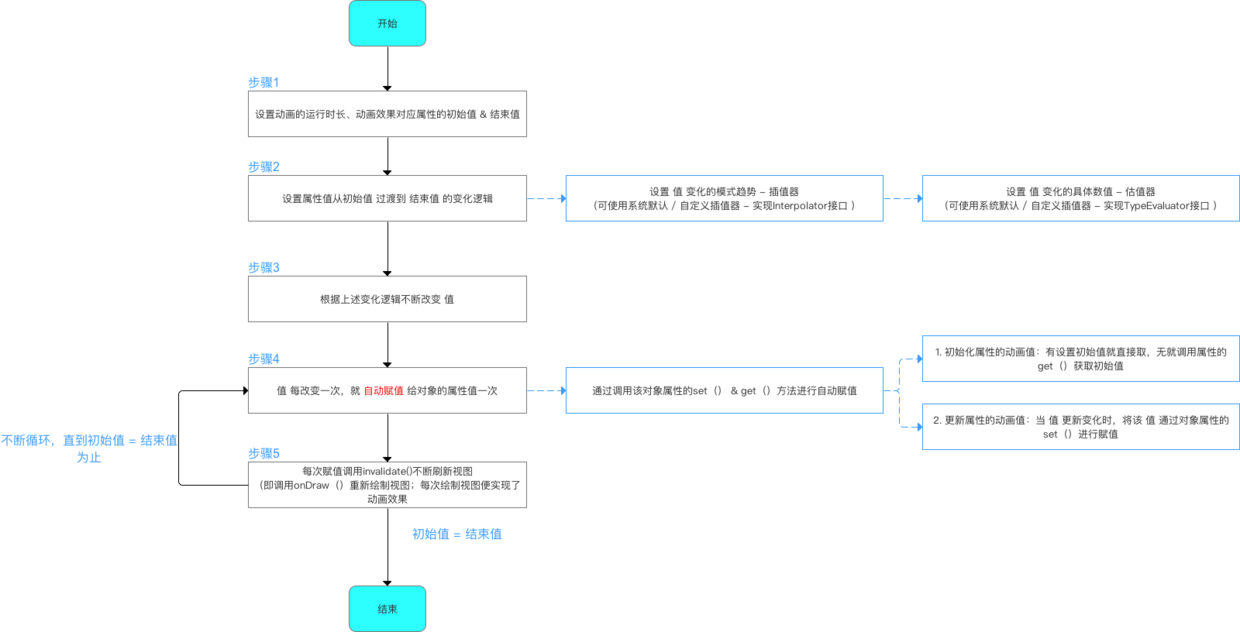
- The essence of automatically assigning attributes to an object is to call the set () & get () method of the object's attributes for assignment.
- Therefore, the second parameter of ObjectAnimator. ofFloat (Object object, String property, float.... Values) passes in the value of the object property by letting the ObjectAnimator class find the set () & get () method of the corresponding attribute name of the object according to the attribute name passed in, thus assigning the value of the object property, as in the example above:
ObjectAnimator animator = ObjectAnimator.ofFloat(mButton, "rotation", 0f, 360f);
// In fact, there is no rotation attribute value in the Button object.
// ObjectAnimator does not operate directly on our incoming attribute names
// Instead, it searches for the get and set methods corresponding to the object's corresponding attribute name according to the incoming attribute value "rotation", and assigns the attribute through set () & get ().

// Because the Button object has the get & set method corresponding to the rotation attribute
// So the incoming rotation attribute is valid
// So we can assign the rotation attribute to the operation.
public void setRotation(float value);
public float getRotation();

// In fact, these two methods are provided by View objects, so any object inherited from View has this property.
As for how to automatically assign values, let's look directly at source code analysis:
// Usage method
ObjectAnimator animator = ObjectAnimator.ofFloat(Object object, String property, float ....values);
anim.setDuration(500);
animator.start();
// Start the animation, and source code analysis begins directly with start().

<--  start()  -->
@Override
public void start() {
    AnimationHandler handler = sAnimationHandler.get();

    if (handler != null) {
        // Determine whether there is the same animation in the Pending animation as the current animation, and if so, cancel the same animation.
        numAnims = handler.mPendingAnimations.size();
        for (int i = numAnims - 1; i >= 0; i--) {
            if (handler.mPendingAnimations.get(i) instanceof ObjectAnimator) {
                ObjectAnimator anim = (ObjectAnimator) handler.mPendingAnimations.get(i);
                if (anim.mAutoCancel && hasSameTargetAndProperties(anim)) {
                    anim.cancel();
                }
            }
        }
      // Determine if there is the same animation in Delay as the current animation, and if there is, cancel the same animation.
        numAnims = handler.mDelayedAnims.size();
        for (int i = numAnims - 1; i >= 0; i--) {
            if (handler.mDelayedAnims.get(i) instanceof ObjectAnimator) {
                ObjectAnimator anim = (ObjectAnimator) handler.mDelayedAnims.get(i);
                if (anim.mAutoCancel && hasSameTargetAndProperties(anim)) {
                    anim.cancel();
                }
            }
        }
    }

    super.start();
   // Call the start() of the parent class
   // Because the ObjectAnimator class inherits the ValueAnimator class, it calls star () of ValueAnimator.
   // After layer-by-layer invocation, eventually the method that automatically assigns the object's attribute values is invoked.
   // Here's how to look directly at this section
}


<-- Logical Method of Automatically Assigning Object Attribute Values ->>

// Step 1: Initialize the animation value
private void setupValue(Object target, Keyframe kf) {
    if (mProperty != null) {
        kf.setValue(mProperty.get(target));
        // When initializing, if the initial value of the property is not provided, the get () of the property is called to get the value.
    }
        kf.setValue(mGetter.invoke(target));
    }
}

// Step 2: Update the animation value
// When the next frame of the animation comes (that is, when the animation is updated), setAnimatedValue () is called.
void setAnimatedValue(Object target) {
    if (mProperty != null) {
        mProperty.set(target, getAnimatedValue());
        // Internally invokes the set () method of the object's property, thereby setting the new property value to the object's property
    }

}
Logic of automatic assignment:
- When initializing, if the initial value of the attribute is not provided, the get () of the attribute is called to get the value.
- When the value changes, the set () method of the property of the object is used to set the new property value to the object property.
So:
- ObjectAnimator classes are for arbitrary objects - arbitrary attribute values, not just for View objects
- If you need to use ObjectAnimator class to achieve animation effect, then the object you need to manipulate must have set () & get () of that property.
- Similarly, for the other three basic animation effects mentioned above, View also has setRotation(), getRotation(), setTranslationX(), getTranslationX(), setScaleY(), getScaleY(), and so on set () & get ().
5.2.3 Implementing Animation Effect by Customizing Object Attributes
For attribute animation, its extensibility lies in that it is not limited to system-defined animation, but can customize the animation, that is, to customize the attributes of the object, and to achieve animation by manipulating the customized attributes.
So how do you customize attributes? Essentially, it is:
- Setting the set () & get () method for an object that requires an operation property
- Define the logic of attribute changes by implementing the TypeEvaluator class
A process similar to Value Animator
Next, I will use an example to illustrate how to achieve animation effects through custom attributes.
-
Realized animation effect: a circular color gradient
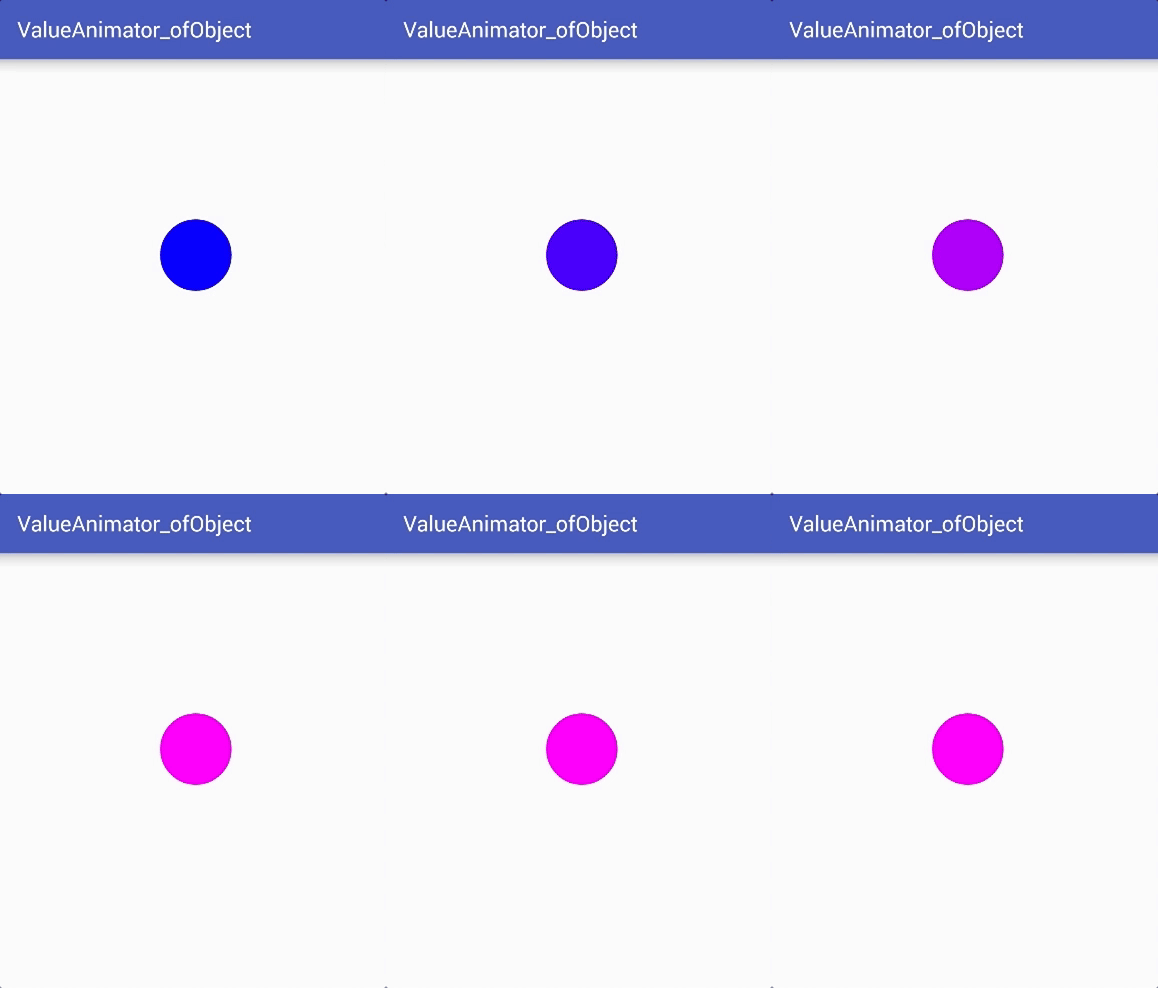 Attribute animation - color change
 -
The logic of custom attributes is as follows: (you need to customize the background color of the attribute as a circle)
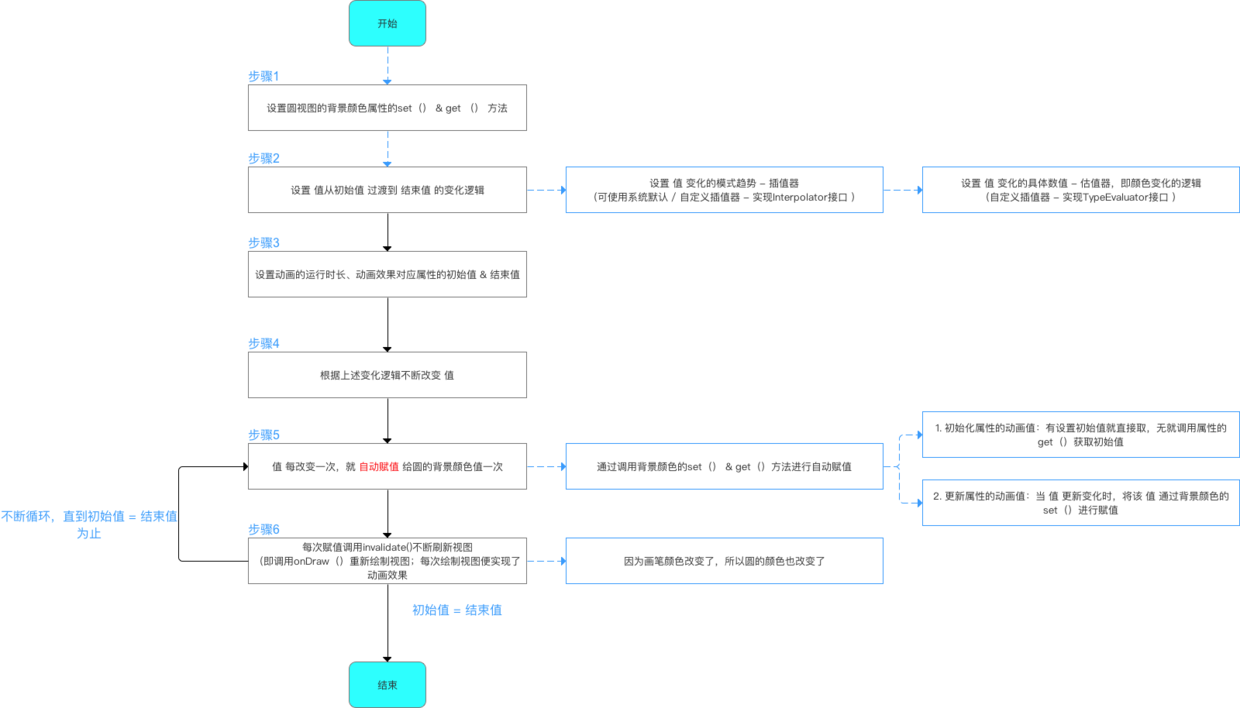
Step 1: set () & get () method for setting object class attributes
There are two ways to set () & get () an object class property:
-
By inheriting the original class and adding the get () & set () of the attribute directly to the class, the get () & set () of the attribute is added to the object.
-
Indirectly add get () of this property to the object by wrapping the original animated object&
set (). That is, to wrap the original object with a class
The first method is mainly used here.
The use of the second method will be described in detail in the next section.
MyView2.java
public class MyView2 extends View {
    // Setting the variables to be used
    public static final float RADIUS = 100f;// The radius of a circle = 100
    private Paint mPaint;// Drawing brush

    private String color;
    // Setting Background Color Properties

    // Get () & set () method for setting background color
    public String getColor() {
        return color;
    }

    public void setColor(String color) {
        this.color = color;
        mPaint.setColor(Color.parseColor(color));
        // Set the color of the brush to the color passed in by the method parameter
        invalidate();
        // invalidate() method is called, which refreshes the view every time the brush color changes, and then onDraw() method is called to redraw the circle.
        // Because the color of the brush changes every time the onDraw() method is called, the color of the circle also changes.
    }


    // Constructing Method (Initial Brush)
    public MyView2(Context context, AttributeSet attrs) {
        super(context, attrs);
        // Initialization Brush
        mPaint = new Paint(Paint.ANTI_ALIAS_FLAG);
        mPaint.setColor(Color.BLUE);
    }

    // Replicate onDraw() to implement rendering logic
    // Drawing logic: Draw a circle at the initial point, and call onDraw() to redraw the circle every time by monitoring the change of current Point, so as to achieve the effect of the circle moving smoothly.
    @Override
    protected void onDraw(Canvas canvas) {
        canvas.drawCircle(500, 500, RADIUS, mPaint);
    }
}
Step 2: Add a custom View control to the layout file
activity_main.xml
<?xml version="1.0" encoding="utf-8"?>
<RelativeLayout xmlns:android="http://schemas.android.com/apk/res/android"
    xmlns:tools="http://schemas.android.com/tools"
    android:layout_width="match_parent"
    android:layout_height="match_parent"
    android:paddingBottom="@dimen/activity_vertical_margin"
    android:paddingLeft="@dimen/activity_horizontal_margin"
    android:paddingRight="@dimen/activity_horizontal_margin"
    android:paddingTop="@dimen/activity_vertical_margin"
    tools:context="scut.carson_ho.valueanimator_ofobject.MainActivity">

    <scut.carson_ho.valueanimator_ofobject.MyView2
        android:id="@+id/MyView2"
        android:layout_width="wrap_content"
        android:layout_height="wrap_content"
         />
</RelativeLayout>
Step 3: Implement the TypeEvaluator interface according to requirements
The essence of realizing the estimator here is to realize the logic of color transition.
ColorEvaluator.java
public class ColorEvaluator implements TypeEvaluator {
    // Implementing the TypeEvaluator interface

    private int mCurrentRed;

    private int mCurrentGreen ;

    private int mCurrentBlue ;

    // Rewrite evaluate ()
    // Write the logic of object animation transition in evaluate (): here is the logic of color transition
    @Override
    public Object evaluate(float fraction, Object startValue, Object endValue) {

        // Gets the initial and end values of the color
        String startColor = (String) startValue;
        String endColor = (String) endValue;

        // Initialization color is divided into RGB three parts by string interception, and RGB value is converted into decimal number.
        // So the range of values for each color is 0-255.
        int startRed = Integer.parseInt(startColor.substring(1, 3), 16);
        int startGreen = Integer.parseInt(startColor.substring(3, 5), 16);
        int startBlue = Integer.parseInt(startColor.substring(5, 7), 16);

        int endRed = Integer.parseInt(endColor.substring(1, 3), 16);
        int endGreen = Integer.parseInt(endColor.substring(3, 5), 16);
        int endBlue = Integer.parseInt(endColor.substring(5, 7), 16);

        // Define the value of the initialized color as the current color value that needs to be operated on
            mCurrentRed = startRed;
            mCurrentGreen = startGreen;
            mCurrentBlue = startBlue;


        // Calculate the difference between the initial color and the end color
        // The difference determines the speed of color change: if the initial color value is close to the end color value, the color change will be slow; otherwise, the change will be fast.
        // The logic of how to determine the speed of color change according to the difference is written in getCurrentColor().
        int redDiff = Math.abs(startRed - endRed);
        int greenDiff = Math.abs(startGreen - endGreen);
        int blueDiff = Math.abs(startBlue - endBlue);
        int colorDiff = redDiff + greenDiff + blueDiff;
        if (mCurrentRed != endRed) {
            mCurrentRed = getCurrentColor(startRed, endRed, colorDiff, 0,
                    fraction);
                    // getCurrentColor() decides how to determine the speed of color change based on the difference - > Focus on 1
        } else if (mCurrentGreen != endGreen) {
            mCurrentGreen = getCurrentColor(startGreen, endGreen, colorDiff,
                    redDiff, fraction);
        } else if (mCurrentBlue != endBlue) {
            mCurrentBlue = getCurrentColor(startBlue, endBlue, colorDiff,
                    redDiff + greenDiff, fraction);
        }
        // Assemble and return the calculated value of the current color
        String currentColor = "#" + getHexString(mCurrentRed)
                + getHexString(mCurrentGreen) + getHexString(mCurrentBlue);

        // Since the color we calculated is a decimal number, we need to convert it to a hexadecimal string: call getHexString ()- > Concern 2
        // Finally, the RGB color is assembled and returned as the final result.
        return currentColor;
    }


    // Concern 1:getCurrentColor()
    // Specifically, the current color is calculated based on fraction values.

    private int getCurrentColor(int startColor, int endColor, int colorDiff,
                                int offset, float fraction) {
        int currentColor;
        if (startColor > endColor) {
            currentColor = (int) (startColor - (fraction * colorDiff - offset));
            if (currentColor < endColor) {
                currentColor = endColor;
            }
        } else {
            currentColor = (int) (startColor + (fraction * colorDiff - offset));
            if (currentColor > endColor) {
                currentColor = endColor;
            }
        }
        return currentColor;
    }

    // Concern 2: Convert 10-ary color values to 16-ary.
    private String getHexString(int value) {
        String hexString = Integer.toHexString(value);
        if (hexString.length() == 1) {
            hexString = "0" + hexString;
        }
        return hexString;
    }

}
Step 4: Call the ObjectAnimator.ofObject () method
MainActivity.java
public class MainActivity extends AppCompatActivity {

    MyView2 myView2;
    @Override
    protected void onCreate(Bundle savedInstanceState) {
        super.onCreate(savedInstanceState);
        setContentView(R.layout.activity_main);

        myView2 = (MyView2) findViewById(R.id.MyView2);
        ObjectAnimator anim = ObjectAnimator.ofObject(myView2, "color", new ColorEvaluator(),
                "#0000FF", "#FF0000");
        // Setting Custom View Object, Background Color Attribute Value & Color Estimator
        // Essential logic:
        // Step 1: Changing values according to the color estimator
        // Step 2: Call set () to set the property value of the background color (in fact, the color setting is done with a brush)
        // Step 3: Call invalidate() to refresh the view, that is, call onDraw () to redraw, so as to achieve the animation effect.

        anim.setDuration(8000);
        anim.start();
    }
}
Design sketch

Source address
5.2.4 Pay special attention to how to set () & get () of object class attributes manually
a. Background
- The essence of the ObjectAnimator class automatically assigning attributes to an object is to call the set () & get () method of the object's attributes for assignment.
- Therefore, the second parameter of ObjectAnimator. ofFloat (Object object, String property, float.... Values) passes in the value of the object property by letting the ObjectAnimator class find the set () & get () method of the corresponding property name of the object according to the property name passed in, so as to assign the value of the object property.
From the above principle, if you want the animation of attribute a of an object to take effect, attribute a needs to satisfy the following two conditions at the same time:
-
Object must provide the set () method of attribute a
A. If the initial value is not passed, the get () method needs to be provided, because the system is going to fetch the initial value of attribute a.
b. If this condition is not satisfied, the procedure is directly Crash -
The set () method of attribute a provided by an object must reflect the change of attribute a in some way.
a. bring about changes in ui
b. If this is not satisfied, the animation will not work, but it will not Crash.
Generally, Article 2 will satisfy the above conditions, mainly in Article 1.
- For example, since the setWidth () of View does not set the width of View, but sets the maximum width and minimum width of View, it is impossible to change the width of control by setWidth (), so animating the width of View has no effect.
- See the Button button example below.
       Button  mButton = (Button) findViewById(R.id.Button);
        // Create animation action objects: Take Button as an example
        // The Button's width is set to 200 px.

               ObjectAnimator.ofInt(mButton, "width", 500).setDuration(5000).start();
                 // Setting Animated Objects
Design sketch
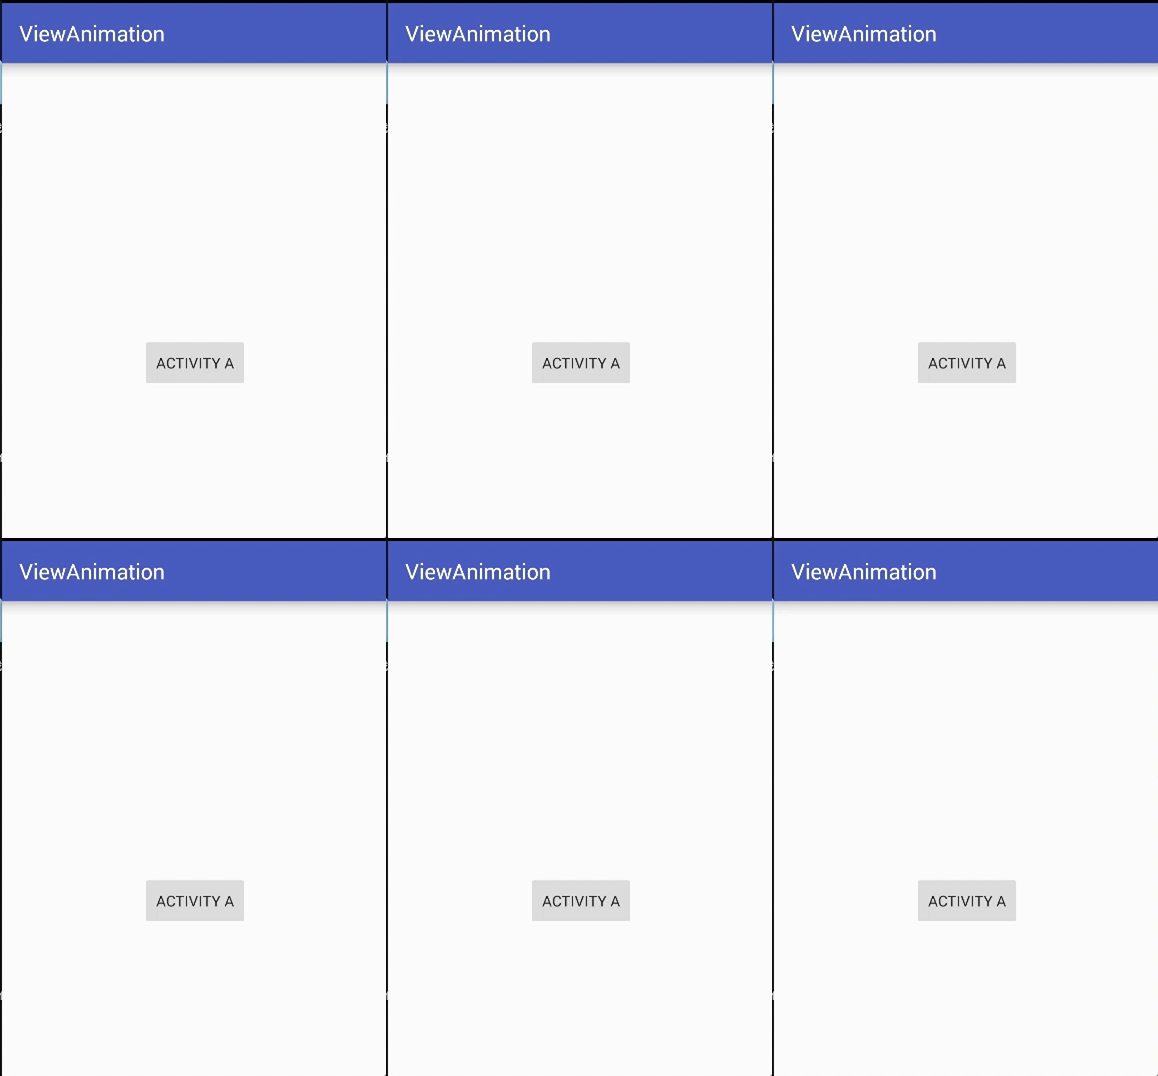
Why is there no animation effect? Let's look at the setWidth method of View
public void setWidth(int pixels) {
    mMaxWidth = mMinWidth = pixels;
    mMaxWidthMode = mMinWidthMode = PIXELS;
    // Because setWidth () does not set the width of the View, it sets the maximum width and minimum width of the Button.
    // So the width of the control cannot be changed by setWidth ().
   // So animating width attributes is ineffective

    requestLayout();
    invalidate();
}


@ViewDebug.ExportedProperty(category = "layout")
public final int getWidth() {
    return mRight - mLeft;
    // getWidth is really getting the width of the View
}
b. Questions
So how to deal with the case that set () for the above object property is not set ()/ get () or there is no set ()/ get () at all?
c. Solutions
Manually set () & get () of object class properties. There are two ways:
-
By inheriting the original class and adding the get () & set () of the attribute directly to the class, the get () & set () of the attribute is added to the object.
-
Indirectly add get () of this property to the object by wrapping the original animated object&
set (). That is, to wrap the original object with a class
For the first method, the above example has been illustrated; the second method is mainly explained below: by wrapping the original animation object, indirectly add the get ()& set () of the attribute to the object.
Essentially, adopt the decorative pattern in the design pattern, that is, expand the function of the object by packaging classes.
Or an example of using the Button button mentioned above
public class MainActivity extends AppCompatActivity {
    Button mButton;
    ViewWrapper wrapper;

    @Override
    protected void onCreate(Bundle savedInstanceState) {
        super.onCreate(savedInstanceState);
        setContentView(R.layout.activity_main);

        mButton = (Button) findViewById(R.id.Button);
        // Create animation action objects: Take Button as an example

        wrapper = new ViewWrapper(mButton);
        // Create wrapper classes and pass in animated objects

        mButton.setOnClickListener(new View.OnClickListener() {
            @Override
            public void onClick(View v) {

                ObjectAnimator.ofInt(wrapper, "width", 500).setDuration(3000).start();
                // The object to set the animation is the object of the wrapper class
            }
        });

    }
    // Provides the ViewWrapper class for wrapping View objects
    // This example: wrapping Button objects
    private static class ViewWrapper {
        private View mTarget;

        // Constructor: Pass in the object that needs to be wrapped
        public ViewWrapper(View target) {
            mTarget = target;
        }

        // Set get () & set () for width
        public int getWidth() {
            return mTarget.getLayoutParams().width;
        }

        public void setWidth(int width) {
            mTarget.getLayoutParams().width = width;
            mTarget.requestLayout();
        }

    }

}
Design sketch

5.4 Summary
- Compared with ValueAnimator class, ObjectAnimator class, in fact, both belong to attribute animation, which is essentially the same: first change the value, then assign the attribute to the object to achieve the animation effect.
-
But the difference between them lies in:
The ValueAnimator class first changes the value, then assigns the attribute to the object manually to realize animation, and indirectly operates on the attribute of the object.The ValueAnimator class is essentially an operational mechanism for changing values.
Object Animator class first changes the value, then automatically assigns the attribute to the object to achieve animation; it directly operates on the attribute of the object;
Object Animator is more intelligent and automated.
6. Additional usage
6.1 Combination Animation (AnimatorSet Class)
- The effect of single animation is quite limited. More scenes are used simultaneously with multiple animation effects, that is, combination animation.
- Implementing Composite Animation: AnimatorSet Class
- Specific use:
AnimatorSet.play(Animator anim): Play the current animation
 AnimatorSet.after(long delay): Delays existing animations by x milliseconds before execution
 AnimatorSet.with(Animator anim): Executing both existing and incoming animations
 AnimatorSet.after(Animator anim): Execute after inserting an existing animation into the incoming animation
 AnimatorSet.before(Animator anim): Execute an existing animation before inserting it into the incoming animation
- Example
The main animation is translation, which is accompanied by rotation animation, and transparency changes after translation.There are XML settings / Java code settings for implementation
Settings 1: Java Code Settings
// Step 1: Set the animation effects that need to be combined
ObjectAnimator translation = ObjectAnimator.ofFloat(mButton, "translationX", curTranslationX, 300,curTranslationX);
// translating animation
ObjectAnimator rotate = ObjectAnimator.ofFloat(mButton, "rotation", 0f, 360f);
// Rotary animation
ObjectAnimator alpha = ObjectAnimator.ofFloat(mButton, "alpha", 1f, 0f, 1f);
// Transparency animation

// Step 2: Create composite animation objects
AnimatorSet animSet = new AnimatorSet();

// Step 3: Combine animations according to requirements
animSet.play(translation).with(rotate).before(alpha);
animSet.setDuration(5000);

// Step 4: Start the animation
animSet.start();
Design sketch

Settings 2: XML settings
- Step 1: Create the animation. xml file in the res/animator folder
Here is res/animator/set_animation.xml
- Step 2: Set up the animation effect
set_animation.xml
<?xml version="1.0" encoding="utf-8"?>
<set xmlns:android="http://schemas.android.com/apk/res/android"
    android:ordering="sequentially" >
    // Represents that the animation in the Set collection proceeds in sequence
    // The attribute value of ordering: sequentially & together
    // Sequenctially: Represents the animation in the set and proceeds step by step in sequence (b after a is completed)
    // together: Represents the animation in the set, which is performed simultaneously at the same time, as the default value

    <set android:ordering="together" >
        // The following animation takes place simultaneously
        <objectAnimator
            android:duration="2000"
            android:propertyName="translationX"
            android:valueFrom="0"
            android:valueTo="300"
            android:valueType="floatType" >
        </objectAnimator>

        <objectAnimator
            android:duration="3000"
            android:propertyName="rotation"
            android:valueFrom="0"
            android:valueTo="360"
            android:valueType="floatType" >
        </objectAnimator>
    </set>

        <set android:ordering="sequentially" >
            // The following animation proceeds in sequence
            <objectAnimator
                android:duration="1500"
                android:propertyName="alpha"
                android:valueFrom="1"
                android:valueTo="0"
                android:valueType="floatType" >
            </objectAnimator>
            <objectAnimator
                android:duration="1500"
                android:propertyName="alpha"
                android:valueFrom="0"
                android:valueTo="1"
                android:valueType="floatType" >
            </objectAnimator>
        </set>

</set>
Start animation in Java code
mButton = (Button) findViewById(R.id.Button);
        // Create animation action objects: Take Button as an example

        AnimatorSet animator = (AnimatorSet) AnimatorInflater.loadAnimator(this, R.animator.set_animation);
// Creating Composite Animation Objects-Loading XML Animation
        animator.setTarget(mButton);
        // Setting Animation Objects
        animator.start();
        // Start animation
Design sketch
Same as the first way.
6.2 ViewProperty Animator usage
- As can be seen from the above, the essence of attribute animation is value manipulation.
- But Java is object-oriented, so the Google team adds attribute animation for object-oriented operations using the - ViewProperty Animator class
Can be considered as a shorthand way of attribute animation
- Specific use
// Using parsing
        View.animate().xxx().xxx();
        // ViewProperty Animator's functionality is built on animate()
        // The return value of calling animate() method is a ViewPropertyAnimator object, and all subsequent methods are invoked through this instance.
        // Calling various methods of this instance to achieve animation effect
        // All interface methods of ViewProperty Animator are designed using the conjunction grammar, and the return value of each method is its own instance.
        // So after calling one method, you can call another method directly, and you can complete all the animation effects through one line of code.

// Here are some examples
        mButton = (Button) findViewById(R.id.Button);
        // Create animation action objects: Take Button as an example

        mButton.animate().alpha(0f);
        // Single animation settings: Turn buttons into transparent state
        mButton.animate().alpha(0f).setDuration(5000).setInterpolator(new BounceInterpolator());
        // Single animation effect settings & parameter settings
        mButton.animate().alpha(0f).x(500).y(500);
        // Combination animation: Turn the button transparent and move to (500,500)

        // Special attention should be paid to:
        // The animation starts automatically without calling the start() method. Because the new interface uses the function of implicitly starting the animation, as long as we have finished defining the animation, the animation will start automatically.
        // This mechanism is also effective for combination animation. As long as new methods are continually linked, the animation will not be executed immediately. When all the methods set on ViewProperty Animator are executed, the animation will start automatically.
        // If you don't want to use this default mechanism, you can also explicitly call the start() method to start the animation.
6.3 Monitoring Animation
- Animation classes perform a series of operations, such as jumping pages, by listening for animation start/end/repeat/cancel moments.
- Setup by addListener () in Java code
      Animation.addListener(new AnimatorListener() {
          @Override
          public void onAnimationStart(Animation animation) {
              //Execution at the beginning of animation
          }

           @Override
          public void onAnimationRepeat(Animation animation) {
              //Execution of animation duplication
          }

         @Override
          public void onAnimationCancel()(Animation animation) {
              //Execute when animation cancels
          }

          @Override
          public void onAnimationEnd(Animation animation) {
              //Execution at the end of animation
          }
      });

// Special note: Each listening must be rewritten in four ways.
- The following inheritance relationships exist for Animator class, AnimatorSet class, ValueAnimator, ObjectAnimator class
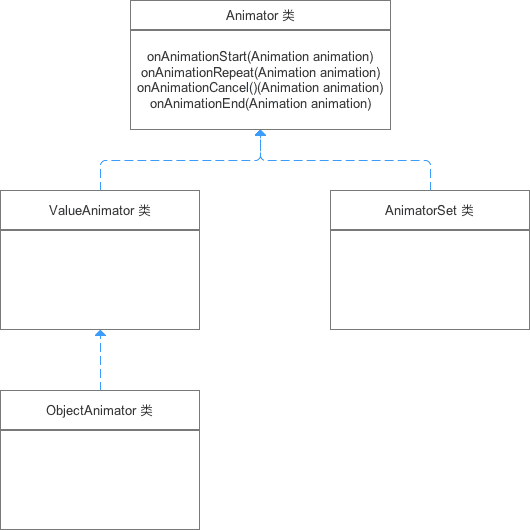
- So the AnimatorSet class, ValueAnimator, ObjectAnimator can use the addListener() listener for animation monitoring.
Animator Listener Adapter
- Background: Sometimes we don't need to monitor all the moments of animation.
- Problem: But addListener(new AnimatorListener()) listener is required to rewrite four-time methods, which makes rewriting interface methods too cumbersome.
- Solution: Using Animator Listener Adapter to solve the problem
The tedious problem of realizing interface
anim.addListener(new AnimatorListenerAdapter() {
// Pass in the adapter object AnimatorListenerAdapter() to the addListener() method
// Because each interface has been implemented in AnimatorListener Adapter
// So if we don't implement all the methods here, we won't report any errors.
    @Override
    public void onAnimationStart(Animator animation) {
    // If you want to listen only to the beginning of the animation, you just need to rewrite the method separately.
    }
});
So far, all the knowledge points of attribute animation in Android animation have been explained.
7. Summary
- The essential principle of attribute animation: by constantly changing the value and assigning the value to the attribute of the object, the animation effect of the object on the attribute can be achieved. The concrete working principle logic is as follows:
 Working principle
 - Attribute animation is mainly used in the following categories, as follows:
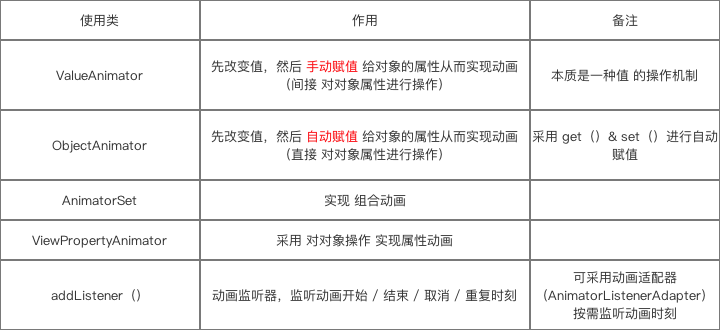
-
Next, I will continue my analysis of Android animation, and those who are interested can continue to pay attention to it. Carson_Ho's Notes on Android Development
Praise me, please! Because your approval / encouragement is my greatest motivation to write!
-
A series of articles on Android animation
- For the use of animation, please refer to the article:
Android Attribute Animation: This is a very detailed summary of Attribute Animation & Introduction
Android Animation: Hand-in-hand teaches you how to use makeup animation
Android frame-by-frame animation: The use of frame-by-frame animation is here!
Android Animation: Do you really use interpolators and estimators? (with detailed examples) - For the principles of customizing View, please refer to the article:
(1) Custom View Foundation - The easiest to understand series of Custom View Principles
(2) Custom View Measure Process - The easiest to understand series of Custom View Principles
(3) Custom View Layout Process - The easiest to understand series of Custom View Principles
(4) Custom View Draw Process - The easiest to understand series of Custom View Principles - For the application of custom View, please refer to the article:
Hand in hand teaches you to write a complete custom View
The most comprehensive and detailed description of the Path class - Custom View application series
The most comprehensive and detailed description of the Canvas class - Custom View Application Series
Why does your custom View wrap_content not work?
- For the use of animation, please refer to the article:
Welcome your attention Carson_Ho A short book!
Share dried products about Android development from time to time, in the pursuit of short, flat and fast, but without lack of depth.
