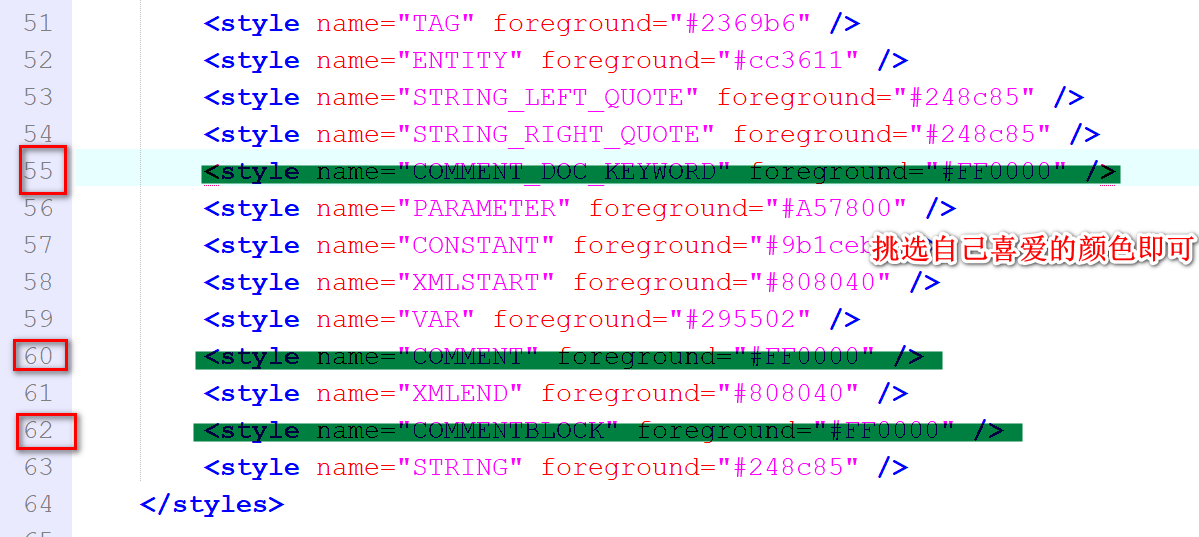
0 HBuilderX modify comments
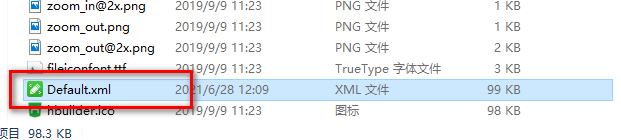
Path: root directory \ plugins \ theme default \ themes \ default
File name: default XML file
Modify color:
1. Getting started with Vue
1.1 what is Vue
Vue (pronunciation / vju) ː/, Similar to view) is a progressive framework for building user interfaces. Unlike other large frameworks, Vue is designed to be applied layer by layer from bottom to top. Vue's core library only focuses on view layers, which is not only easy to start, but also easy to integrate with third-party libraries or existing projects. On the other hand, when combined with modern tool chains and various supporting class libraries, Vue can also provide drivers for complex single page applications.
Progressive: build projects can be simple to complex
1.2 Vue benefits
1). The volume is small, and the compressed file is only 33k
2). Higher efficiency, using virtual machine DOM, which can calculate data through javaScript in advance The technology of calculating and optimizing the final DOM operation Because this DOM operation is a preprocessing operation, there is no real DOM operation, so it is called virtual dom
3). Two way data binding allows developers to stop operating DOM and put more experience into business
4). Rich ecology, there are a large number of open source projects in the market based on vue, mature and stable
1.3 Vue case
1.3.1 introduction cases
<!DOCTYPE html>
<html>
	<head>
		<meta charset="utf-8">
		<title>hello Introductory case</title>
	</head>
	<body>
		<div id="app">
			<h1>Bidirectional data binding test</h1>
			<h3>{{ hello }}</h3>
		</div>
		<!-- introduce js -->
		<script src="../js/vue.js"></script>
		<script type="text/javascript">
			const app = new Vue({
				//Element element
				el: "#app",
				data: {
					hello: "helloVue"
				}
			})
		</script>
	</body>
</html>
1.3.2 v-cloak attribute
Introduction:
This instruction remains on the element until the associated instance finishes compiling. When used with CSS rules such as [v-cloak] {display: none}, this instruction can hide the uncompiled Mustache tag until the instance is ready.
<!DOCTYPE html>
<html>
	<head>
		<meta charset="utf-8">
		<title>v-clock attribute</title>
		<style>
			/* Define attribute styles */
			[v-cloak]{
				/*Hide elements  */
				display: none;
			}
		</style>
	</head>
	<body>
		This instruction remains on the element until the associated instance finishes compiling. The property disappears after the compilation is successful
		<div id="app" v-cloak>
			<h1>v-clock attribute</h1>
			<h3>{{ hello }}</h3>
		</div>
		<!-- introduce js -->
		<script src="../js/vue.js"></script>
		<script type="text/javascript">
			const app = new Vue({
				//Element element
				el: "#app",
				data: {
					hello: "helloVue"
				}
			})
		</script>
	</body>
</html>
1.3.3 data binding instruction
1.3.3.1 v-text command
Function: directly display and analyze data
	<!-- v-text The command has no flashing effect -->
	<h3 v-text="text"></h3>
	<!-- introduce js -->
		<script src="../js/vue.js"></script>
		<script type="text/javascript">
			const app = new Vue({
				//Element element
				el: "#app",
				data: {
					hello: "helloVue",
					text: "Data binding text"
				}
			})
		</script>
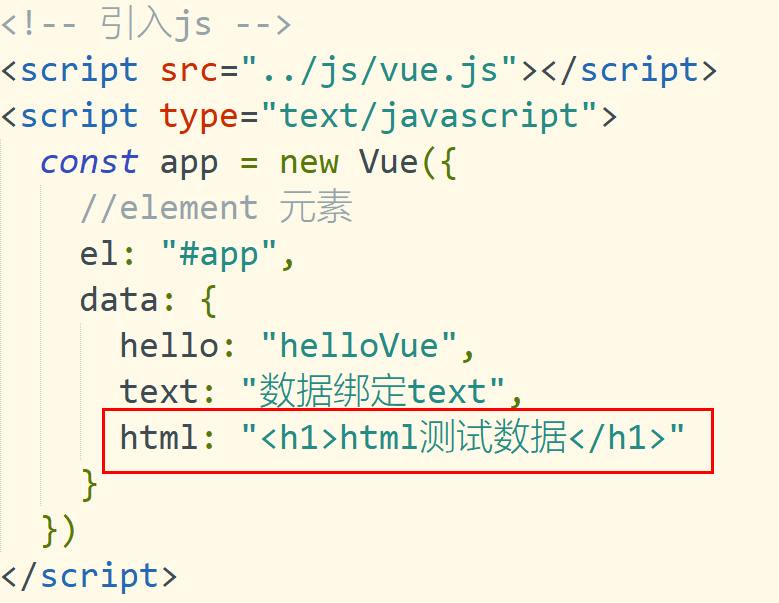
1.3.3.2 v-html instruction
Description: parse html data

1.3.3.3 v-pre instruction
Usage:
Skip the compilation of this element and its child elements. Can be used to display the original Mustache tag. Skipping a large number of nodes without instructions speeds up compilation.
Edit html:

1.3.3.4 v-once instruction
Usage:
Render elements and components only once. For subsequent re rendering, the element / component and all its child nodes are treated as static content and skipped. This can be used to optimize update performance.
html usage:

Console test
app.once, the page rendering content remains unchanged
1.3.3.5 v-model instruction
Usage: create a two-way binding on a form control or component. When js data is modified, the page content changes. When the page content is modified, the data changes

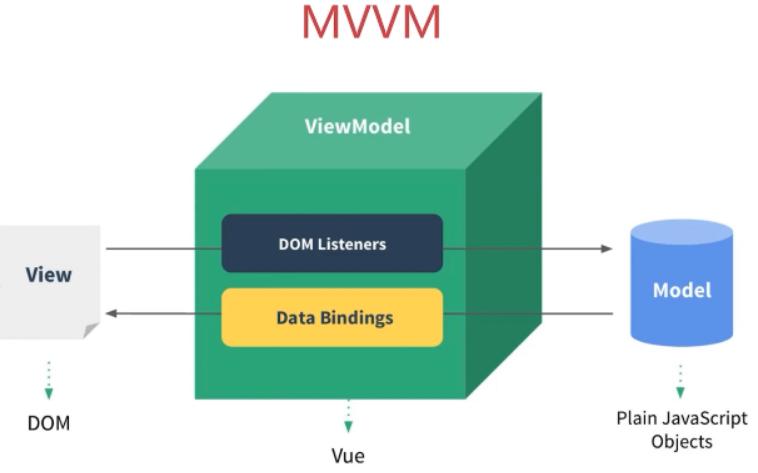
1.3.4 MVVM idea
1). Letter interpretation
1.M model data
2.V view
3. VM (view model) data and view control
2). When the page data changes, the data is transmitted to the model through dom listening
When the data of the model changes, it is bound to the page through data binding
1.4 event binding
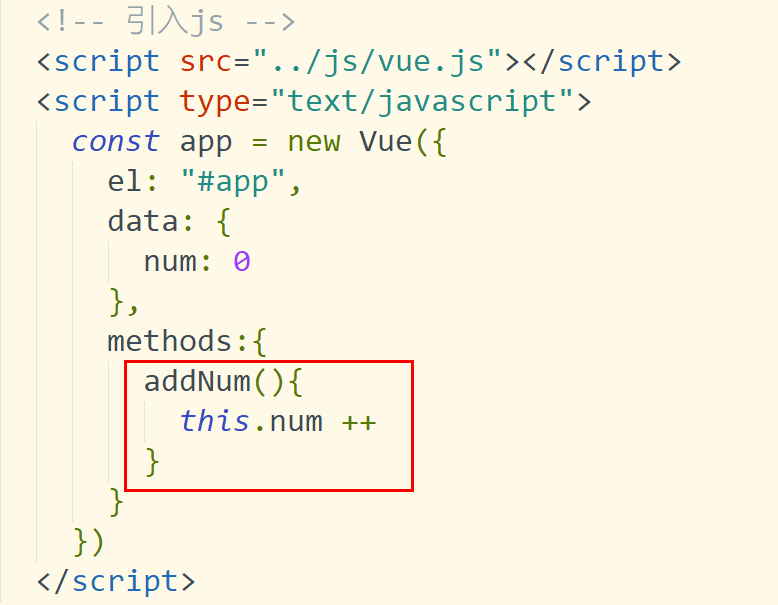
1.4.1 v-on instruction
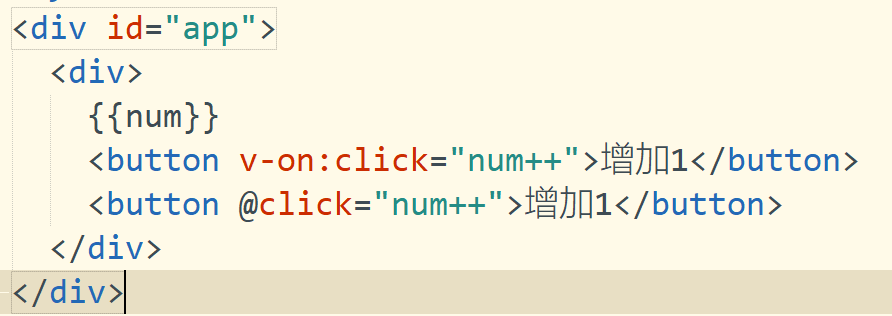
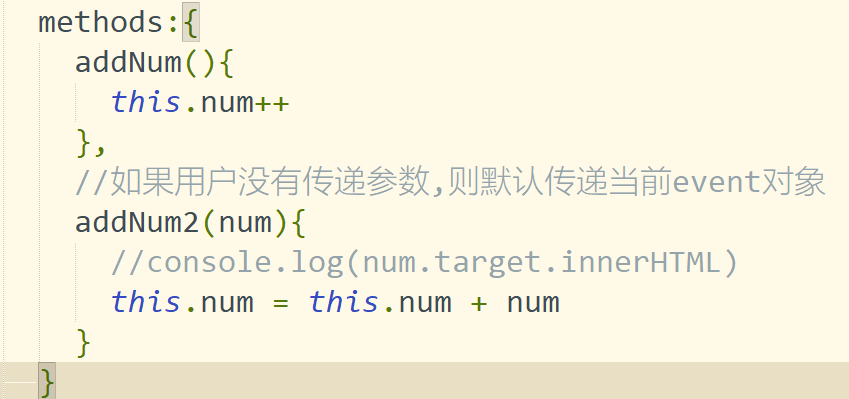
1). <button v-on:click="num++">Add 1</button>   Bind click event
2).<button @click="num++">Add 1</button>		   Simplified writing
3).<button @click="addNum">Add 1</button>
4).
< button @ Click = "addNum2($event)" > pass event object
1.4.2 event modifiers
1). Stop bubbling stop
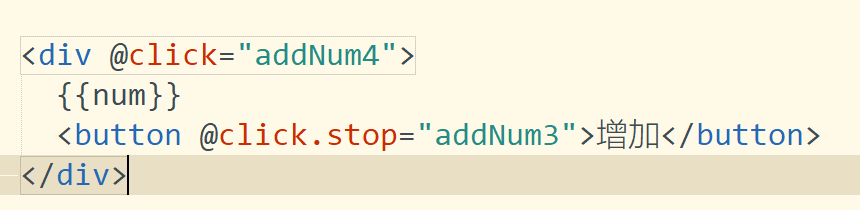
2). Block default behavior @ click prevent

1.4.3 key modifier
<div>
	<input name="username" type="text" @keyup.enter="handler" value="Carriage return trigger"/>
	<input name="username" type="text" @keyup.space="handler" value="Space trigger"/>
	<input name="username" type="text" @keyup.delete="handler" value="Delete key trigger"/>
	<input name="username" type="text" @keyup.left="handler" value="<-trigger"/>
	<input name="username" type="text" @keyup.right="handler" value="->Key trigger"/>
</div>
1.4.4 comprehensive case exercises
<!DOCTYPE html>
<html>
	<head>
		<meta charset="utf-8">
		<title>Calculator case</title>
	</head>
	<body>
		<div id="app">
			<h1>Implement calculator function</h1>
			<div>
				<div>data A:<input type="text" name="num1" v-model="num1"/></div>
				<div>data B:<input type="text" name="num2" v-model="num2"/></div>
				<button type="button" @click="count">calculation</button>
				<div>result:<span v-text="result"></span></div>
			</div>
		</div>
		<script type="text/javascript" src="../../js/vue.js"></script>
		<script type="text/javascript">
				const app = new Vue({
					el : "#app",
					data : {
						num1 : '',
						num2 : '',
						result : ''
					},
					methods:{
						count(){
							this.result = parseInt(this.num1) + parseInt(this.num2);
							//this.result = eval(this.num1) + eval(this.num2)
						}
					}
				})
		</script>
	</body>
</html>
1.5 attribute binding
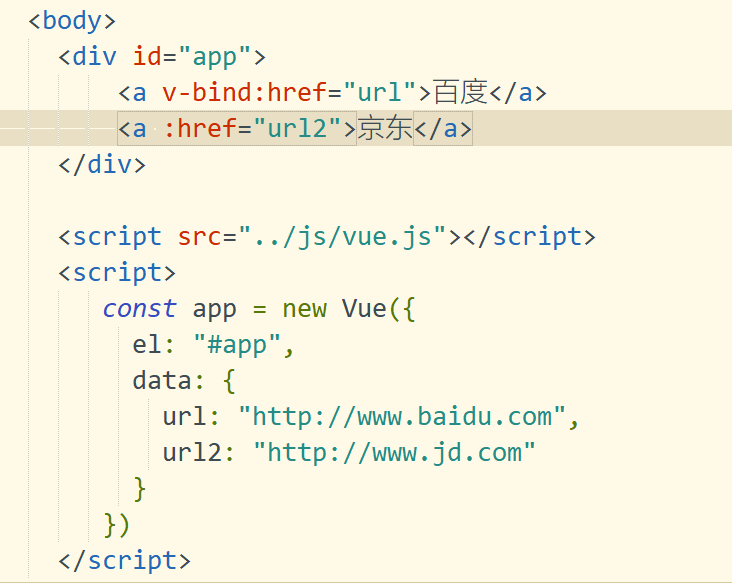
1.5.1 v-bind attribute binding
1.5.2 v-bind Class style binding
	<div>
		Style binding
		<div v-bind:class="{red: isActive}">Style test</div>
		<button @click="isActive = !isActive">switch</button>
	</div>
	<div>
		Style array writing
		<div v-bind:class="[redClass,fontSize]">Attribute style test</div>
		<button @click="changeCss">switch</button>
	</div>
	<script>
			 const app = new Vue({
				 el: "#app",
				 data: {
					 url: "http://www.baidu.com",
					 url2: "http://www.jd.com",
					 isActive: true,
					 redClass: "red",
					 fontSize:	"fontSize"
				 },
				 methods: {
					 changeCss(){
						 this.redClass = ''
						 this.fontSize = ''
					 }
				 }
			 })
	</script>
1.5.3 v-bind Style binding
1). Style binding
	style Style binding
		<div v-bind:style="{border: borderStyle,width: widthStyle,height: heightStyle}">123</div>
		 data: {
					 url: "http://www.baidu.com",
					 url2: "http://www.jd.com",
					 isActive: true,
					 redClass: "red",
					 fontSize:	"fontSize",
					 borderStyle: "1px solid blue",
					 widthStyle: "100px",
					 heightStyle: "100px"
				 },
2). Object encapsulation
	<div v-bind:style="myStyle">456</div>
	data: {
		 myStyle : {
			 border: '2px solid green',
			 width: "20px",
			 height: "20px"
		 }
	 },
1.6 branch structure syntax
1.6.1 branch structure description
1).v-if
2).v-else
3).v-else-if
4).v-show
1.6.2 branch structure usage
<!DOCTYPE html>
<html>
	<head>
		<meta charset="utf-8">
		<title>Branch structure grammar</title>
	</head>
	<body>
		<div id="app" align="center">
			<h1>Rating by score</h1>
			<!-- v-if When the judgment condition is true div Presentation control dom The increase of element cost is large -->
			<div v-if="score>=90">excellent</div>
			<div v-else-if="score>=80">good</div>
			<div v-else-if="score>=70">secondary</div>
			<div v-else>fail,</div>
			<!-- Render directly to the page using display: none;Hide attributes if frequently exposed elements are used v-show -->
			<div v-show="flag">test show data</div>
			<button @click="flag= !flag">to show</button>
		</div>
		<script src="../js/vue.js"></script>
		<script>
			const app = new Vue({
				el: "#app",
				data: {
					//Define score
					score: 100,
					flag: false
				}
			})
		</script>
	</body>
</html>
1.7 circulation structure
1.7.1 v-for cycle
		<div id="app">
			<!-- If the interpolation expression is not fully rendered, it will appear{{}} -->
			<span v-for="item in hobby">{{item}}</span>
			<!-- use v-text Optimization properties -->
			<span v-for="item in hobby" v-text="item"></span>
			<!-- Display array subscript -->
			<span v-for="(item,index) in hobby" v-text="index"></span>
			<!-- Loop through array objects :key Node information used to distinguish traversal -->
			<div v-for="item in users" :key="item.id">
					<span v-text="item.id"></span>
					<span v-text="item.name"></span>
			</div>
			<!-- Traversing the object to get the of the object key-value-index Indexes -->
			<div v-for="(value,key,index) in user">
				<span v-text="key"></span>
				<span v-text="value"></span>
				<span v-text="index"></span>
			</div>
		</div>
		<script src="../js/vue.js"></script>
		<script>
			const app = new Vue({
				el : "#app",
				data : {
					hobby: ['eat','drink','play','happy'],
					users: [{
						id: 100,
						name: 'Wang Zhaojun'
					},{
						id: 101,
						name: 'Angela'
					}],
					user: {
						id: 1,
						name: 'Zhang San',
						age: 18
					}
				}
			})
		</script>
1.8 Vue common features
1.8.1 form operation
1.8.1.1 common form attributes
- Input text input box
- textarea multiline text
- select drop-down multiple selection box
- Radio radio box
- Checkbox multi check box
1.8.1.2 writing method of data binding between form data and vue
<!DOCTYPE html>
<html>
	<head>
		<meta charset="utf-8">
		<title>Common form properties</title>
	</head>
	<body>
		<h1>This case exercises how data is related to when a form submits data vue Data binding</h1>
		<div id="app">
			<form id="userForm"action="http://www.baidu.com">
				<div>
					<span>
						full name:
					</span>
					<span>
						<input type="text" name="name" v-model="name"/>
					</span>
				</div>
				<div>
					<span>Gender:</span>
					<span>
						<input type="radio" name="gender" value="male" id="man" v-model="gender"/>
						<label for="man">male</label>
						<input type="radio" name="gender" value="female" id="women" v-model="gender"/>
						<label for="women">female</label>
					</span>
				</div>
				<div>
					<span>hobby:</span>
					<input type="checkbox" name="hobbies" value="eat" v-model="hobbies"/>eat
					<input type="checkbox" name="hobbies" value="drink" v-model="hobbies"/>drink
					<input type="checkbox" name="hobbies" value="play" v-model="hobbies"/>play
				</div>
				<div>
					<span>occupation</span>
					<!-- If it needs to be set to multiple selection, add the attribute -->
					<select name="occupation" v-model="occupation" multiple="true">
						<option value="worker">worker</option>
						<option value="teacher">teacher</option>
						<option value="engineer">engineer</option>
					</select>
				</div>
				<div>
					<span>Personal profile</span>
					<textarea name="userInfo" style="width: 200px;height: 50px;" v-model="userInfo"></textarea>
				</div>
				<div>
					<!-- Block default commit events -->
					<input type="submit"  value="Submit" v-on:click.prevent="submitForm"/>
				</div>
			</form>
		</div>
		<!-- introduce JS file -->
		<script src="../js/vue.js"></script>
		<script>
			const app = new Vue({
				el:	"#app",
				data: {
					name: '',
					gender: 'male',
					//An array should be used when defining multiple data
					hobbies:	['eat','drink'],
					occupation: ['worker'],
					userInfo: ''
				},
				methods: {
					submitForm(){
						//Data submission
						console.log("full name:"+this.name)
						console.log("Gender:"+this.gender)
						console.log('hobby:'+this.hobbies)
						console.log('occupation:'+this.occupation)
						console.log('User details:'+this.userInfo)
						console.log('After encapsulating the data,have access to ajax Data submission by')
					}
				}
			})
		</script>
	</body>
</html>
1.8.2 form field modifiers
1.8.2.1 common attributes
1).number: convert data to a number
2).trim: remove the spaces at the beginning and end
3).lazy: switch input event to change event
1.8.2.2 number attribute

1.8.2.2 trim attribute
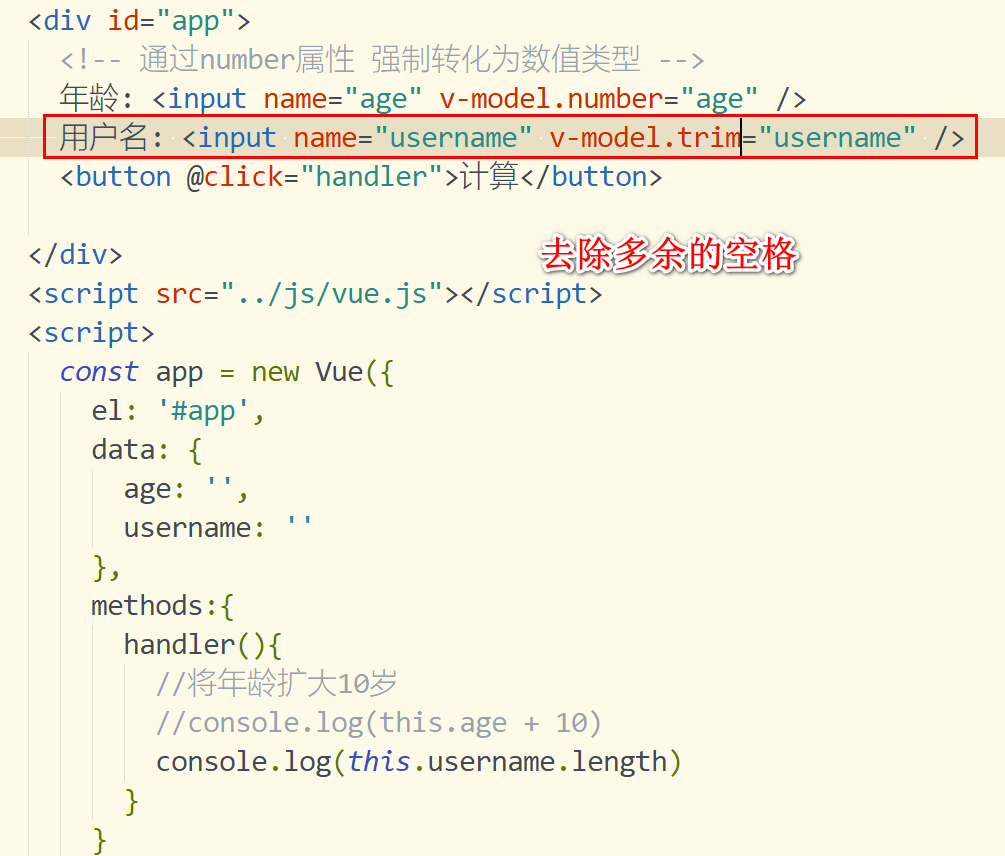
1.8.2.3 lazy attribute

1.8.3 calculation attributes
1.8.3.1 why should attributes be calculated
Due to business needs, the business logic of the expression may be complex and not concise enough to read. The code structure can be optimized by calculating attributes
1.8.3.2 calculate attribute cases
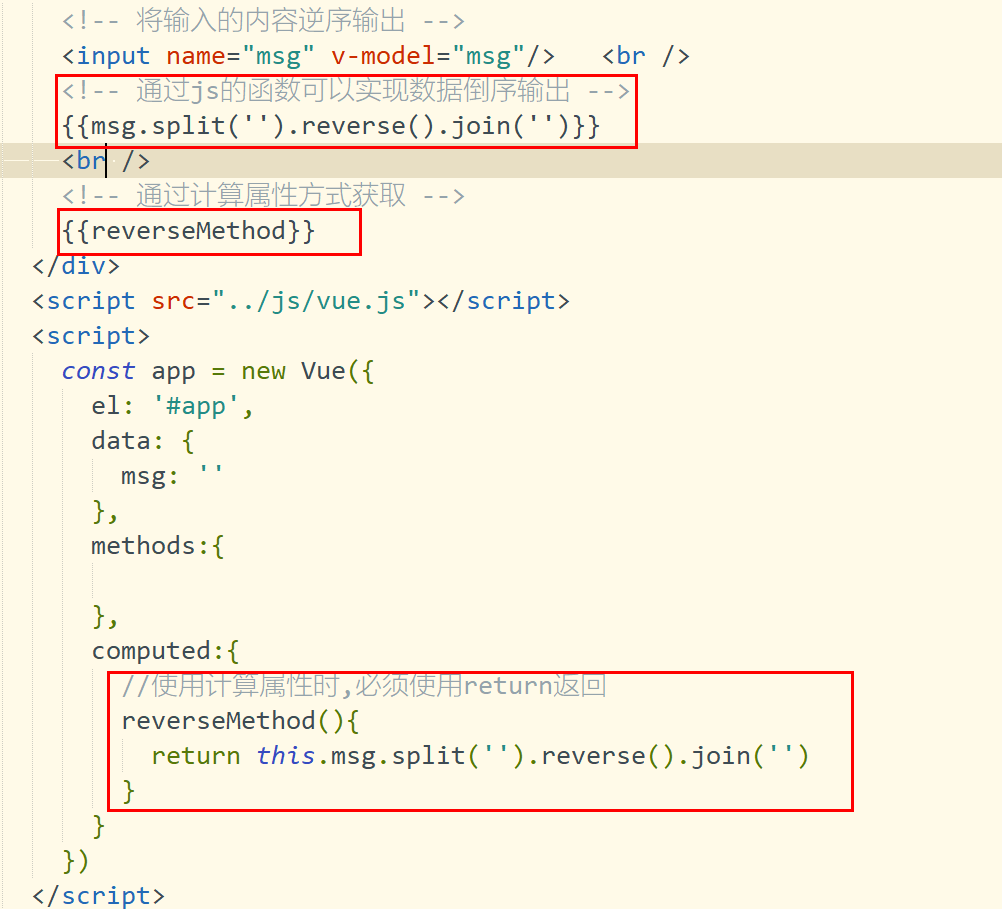
1.8.4 differences between calculation attributes and methods
1). Calculation property has cache method but not cache method
1.8.5 listener
1.8.5.1 function of listener
When the attribute data changes, the method bound to notify the listener is generally used to perform asynchronous operations
1.8.5.2 configuring listeners
1.8.5.3 listener case implementation
1.8.6 filter
1.8.6.1 function of filter
Formatting data, such as formatting dates, is used for special data formats
1.8.6.2 filter usage
1.9 VUE life cycle
1.9.1 main stages
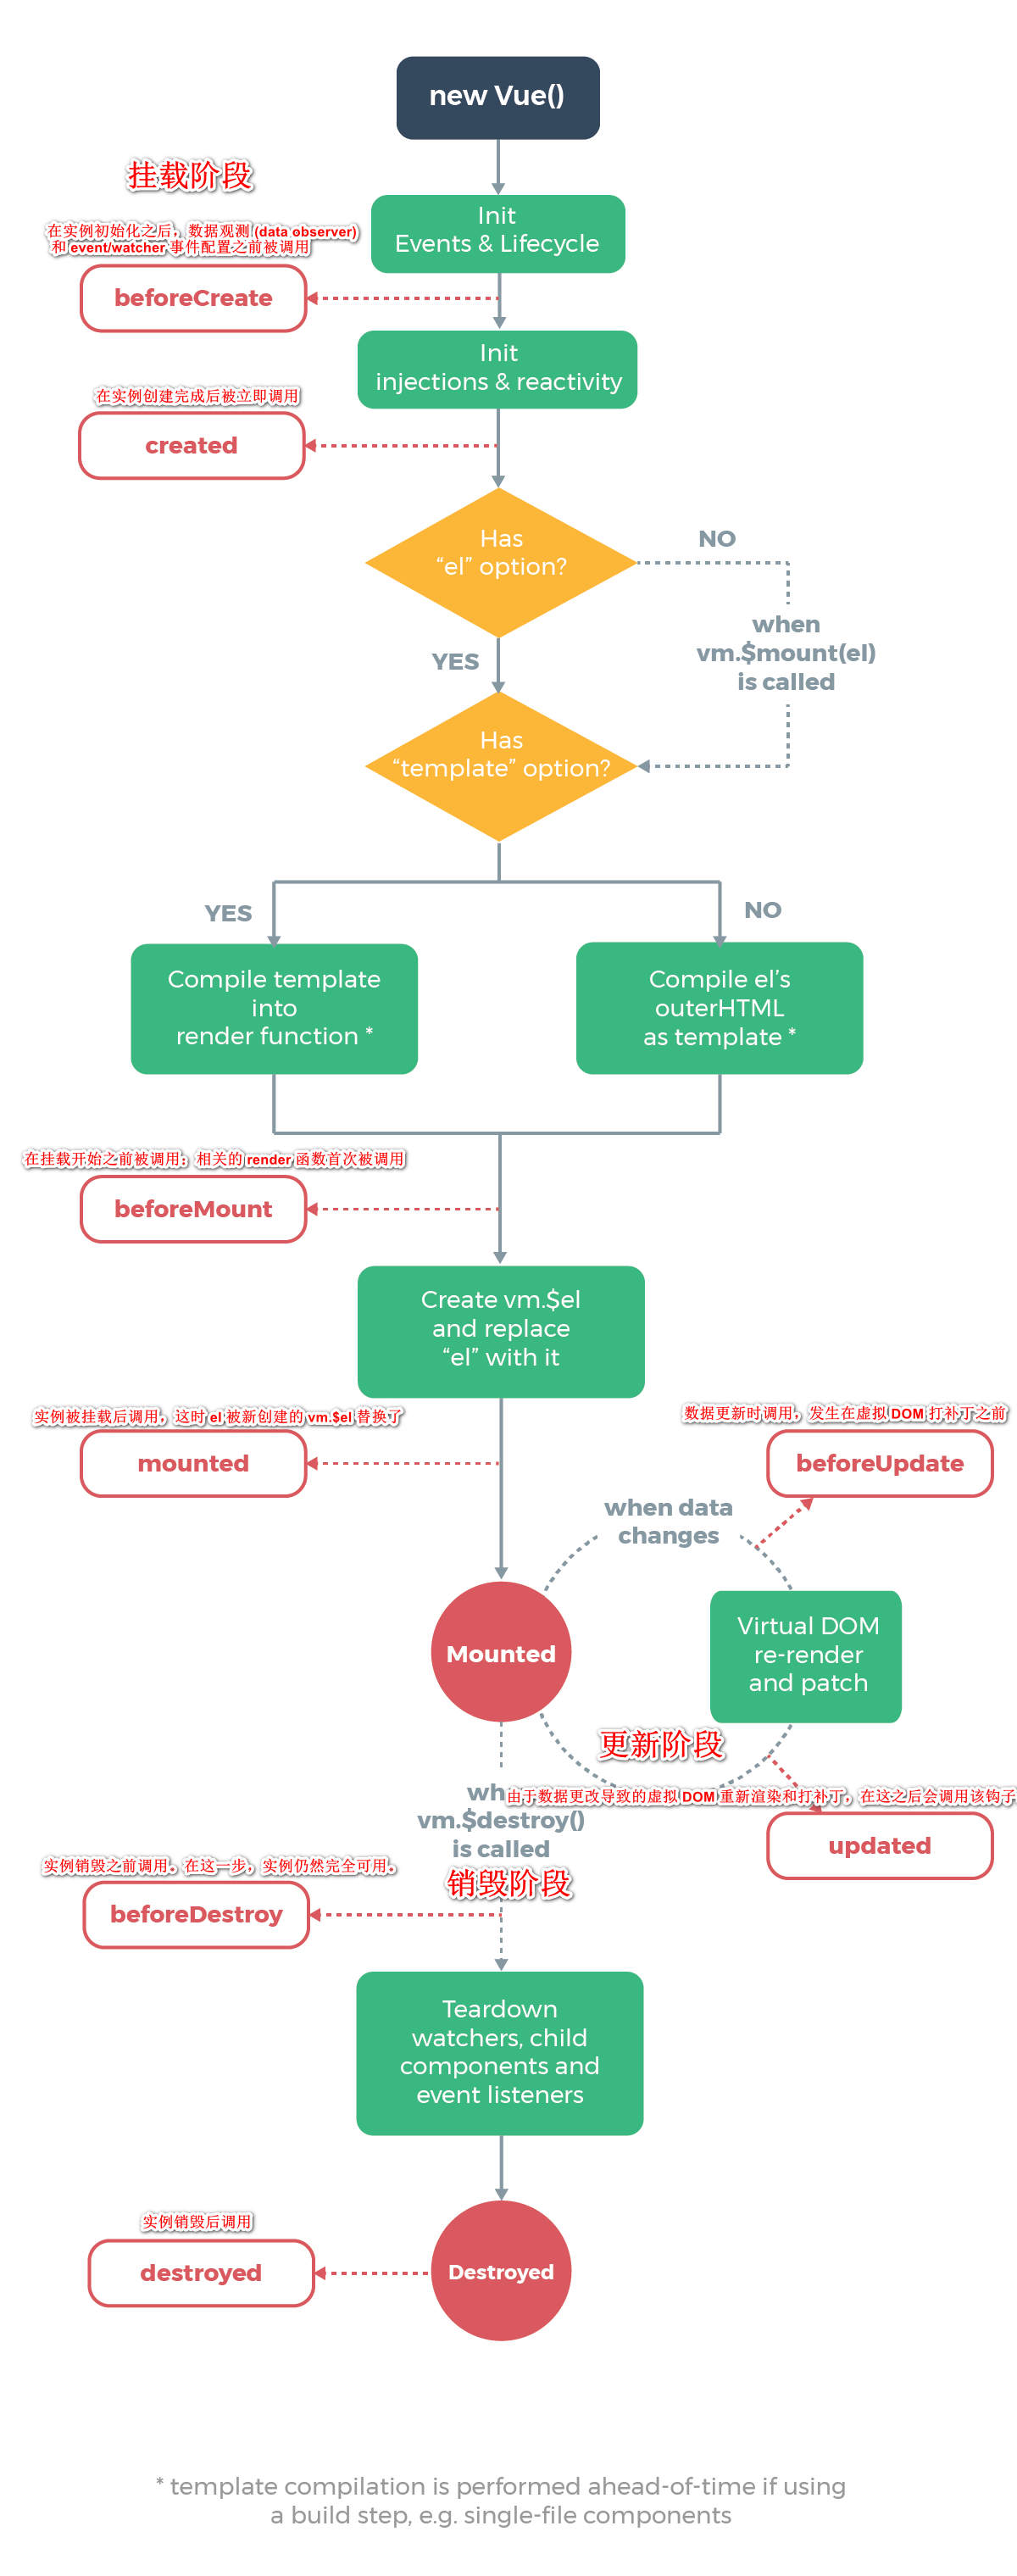
1.9.2 page structure call
Just master mounted
<!DOCTYPE html>
<html>
	<head>
		<meta charset="utf-8">
		<title>test vue Life cycle function</title>
	</head>
	<body>
		<div id="app">
			<h3 v-text="msg"></h3>
			<button @click="destroy">Destroy</button>
		</div>
		<!--introduce js Function class library  -->
		<script src="../js/vue.js"></script>
		<script>
			const app = new Vue({
				el : "#app",
				data : {
					msg: "vue life cycle"
				},
				//After instance initialization, data observer and event/watcher events are called before configuration.
				beforeCreate(){
					console.log("beforeCreate")
				},
				//Called immediately after the instance is created
				created(){
					console.log("created")
				},
				//Called before the mount starts: the related render function is called for the first time.
				beforeMount(){
					console.log("beforeMount")
				},
				//The instance is called after being mounted, when el is newly created vm.$. El replaced.
				mounted(){
					console.log("mounted")
				},
				//Called during data update, which occurs before the virtual DOM is patched
				beforeUpdate(){
					console.log("beforeUpdate")
				},
				//The hook is invoked after the virtual DOM is re rendered and patched due to data changes.
				updated(){
					console.log("updated")
				},
				//Before the instance is destroyed, it is called. At this step, the instance is still fully available
				beforeDestroy(){
					console.log("beforeDestroy")
				},
				//After the instance is destroyed, it is called.
				destroyed(){
					console.log("destroyed")
				},
				methods:{
					destroy(){
						this.$destroy()
					}
				}
			})
		</script>
	</body>
</html>
1.10 VUE array operation
1.10.1 document location
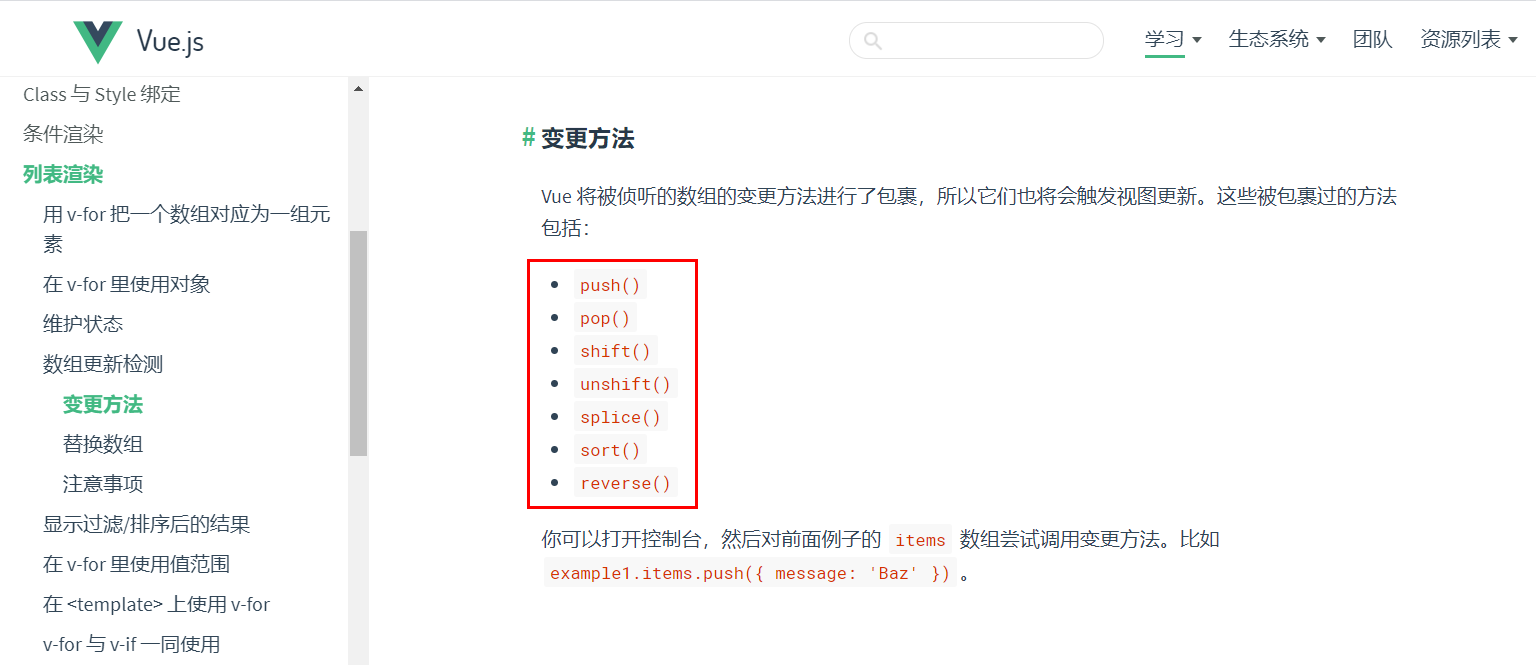
1.10.2 introduction to array usage
1.push() append at the last
2.pop() deletes the last
3.shift() deletes the first element
4.unshift() appends an element at the beginning
5.splice() replaces the element at the specified position
6.sort() array sorting defaults to sorting by character encoding
7.reverse() array inversion
1.10.3 array use cases
<!DOCTYPE html>
<html>
	<head>
		<meta charset="utf-8">
		<title>Array usage</title>
	</head>
	<body>
		<div id="app">
			<span v-for="num in array"> {{num}}</span>
			<hr />
			<input type="text" name="num" v-model="num"/>
			<button @click="add">add to</button>
			<button @click="del">delete</button>
			<button @click="shift">Delete first</button>
			<button @click="upshift">Add from first element</button>
			<button @click="splice">Replace data</button>
			<button @click="sort">sort</button>
			<button @click="reverse">reversal</button>
		</div>
		<!--introduce js Function class library  -->
		<script src="../js/vue.js"></script>
		<script>
			const app = new Vue({
				el : "#app",
				data : {
					array: [4,2,3,1,5],
					num: ''
				},
				methods:{
					add(){
						this.array.push(this.num)
					},
					del(){
						this.array.pop()
					},
					shift(){
						this.array.shift()
					},
					upshift(){
						this.array.unshift(this.num)
					},
					splice(){
						//Parameter Description: 1 Operation data start position 2 Operation quantity 3 Replace the value of the element (if not written, it means deletion)
						//Replace the second digit
						//this.array.splice(1,1,this.num)
						//Delete second data
						this.array.splice(1,1)
					},
					sort(){
						//Array from small to large
						this.array.sort()
					},
					//Array inversion
					reverse(){
						this.array.reverse()
					}
				}
			})
		</script>
	</body>
</html>
2.VUE componentization
2.1 component introduction
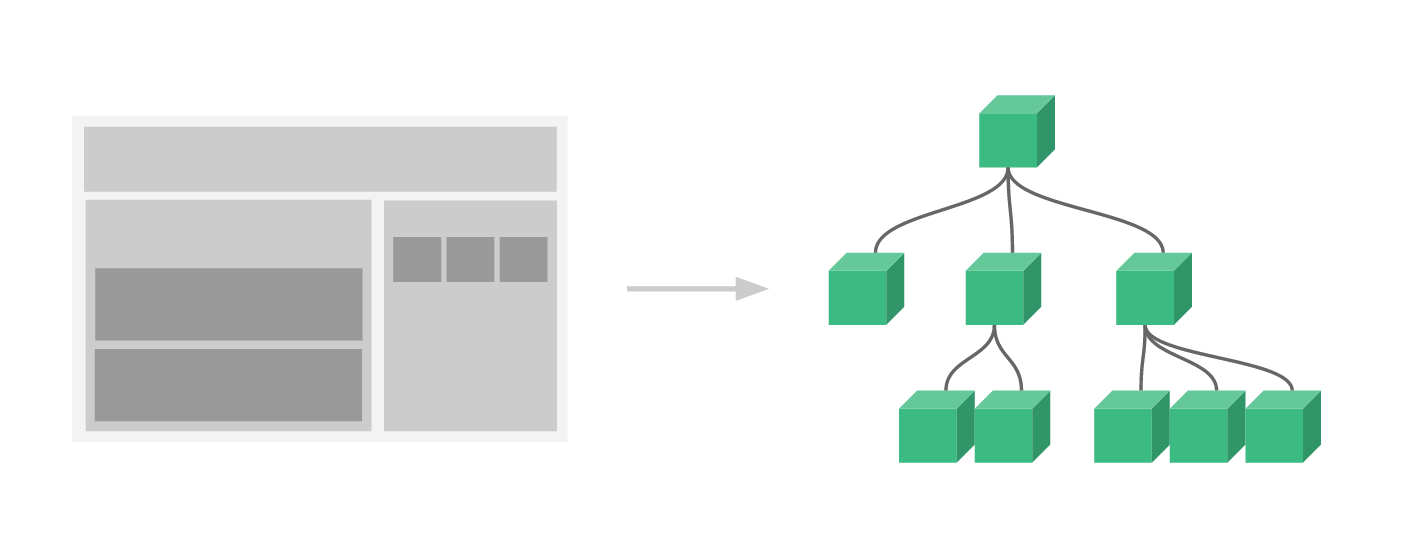
Component system is another important concept of Vue because it is an abstraction that allows us to build large applications using small, independent and usually reusable components. Think about it, almost any type of application interface can be abstracted as a component tree
Using components, you can encapsulate some duplicate content Each component is maintained separately It embodies the idea of divide and conquer (distributed idea)
Supplementary knowledge: in order to ensure that componentization does not interfere with each other, html/js/css should be defined separately within the component
2.2 component registration
2.2.1 basic grammar
matters needing attention:
1. Data in the component is a function data(){return {}}
2. The content of the component template must be a root element
3. If components are named by hump rule, use - line for association
2.2.2 case use
<!DOCTYPE html>
<html>
<head>
<meta charset="utf-8">
<title>Component registration</title>
</head>
<body>
<div id="app">
<!-- Use of hump rules-Line separation -->
<add-num-component></add-num-component>
<!-- Components can be reused -->
<add-num-component></add-num-component>
<add-num-component></add-num-component>
</div>
<!-- The template label must be defined with the label, otherwise the compilation is invalid -->
<template id="addNumTem">
<div>
numerical value: {{num}}
<button @click="addNum">add to</button>
</div>
</template>
<!--introduce js Function class library -->
<script src="../js/vue.js"></script>
<script>
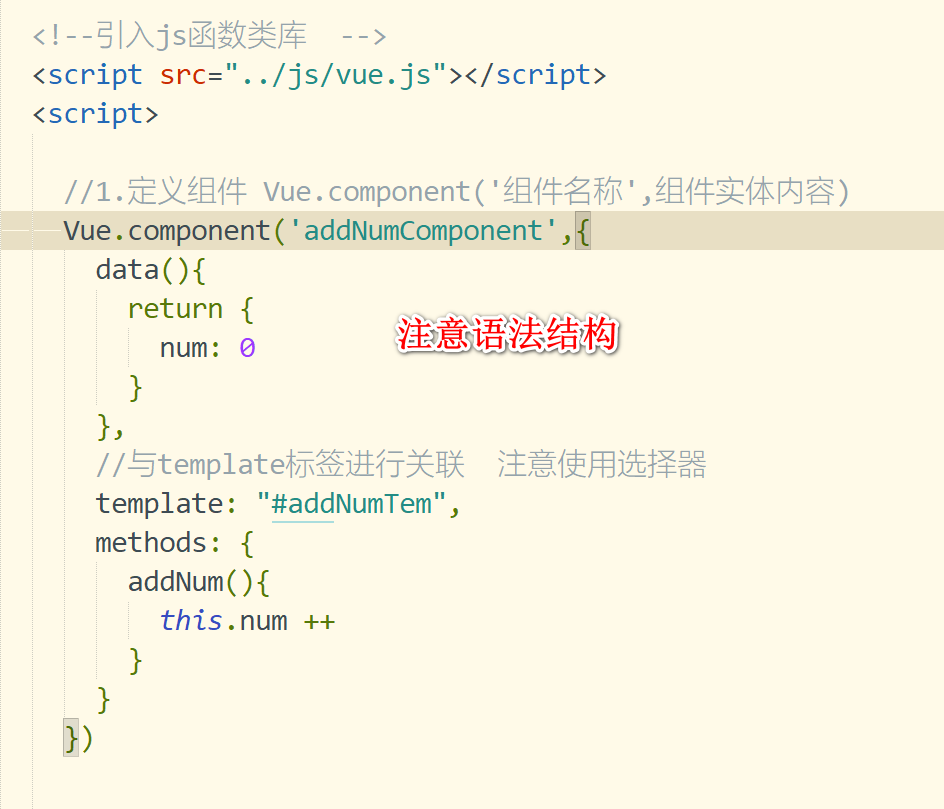
//1. Define component Vue Component ('component name ', component entity content)
Vue.component('addNumComponent',{
data(){
return {
num: 0
}
},
//Associated with the template tag, note the use of selectors
template: "#addNumTem",
methods: {
addNum(){
this.num ++
}
}
})
const app = new Vue({
el : "#app",
data : {
}
})
</script>
</body>
</html>
2.3 local component registration
2.3.1 define local components through components
2.3.2 edit component demo
<!DOCTYPE html>
<html>
<head>
<meta charset="utf-8">
<title>Component registration</title>
</head>
<body>
<div id="app">
<hello1></hello1>
<hello2></hello2>
<hello3></hello3>
</div>
<!-- Define template code 1 -->
<template id="hello1">
<div>
{{msg}}
</div>
</template>
<template id="hello2">
<div>
{{msg}}
</div>
</template>
<template id="hello3">
<div>
{{name}}
<!-- Referencing local components in global components does not take effect -->
<!-- <hello1></hello1> -->
</div>
</template>
<!--introduce js Function class library -->
<script src="../js/vue.js"></script>
<script>
//Define global components
Vue.component('hello3',{
data(){
return {
name: 'Define global components'
}
},
template: "#hello3"
})
/* Define local components */
let hello1 = {
data(){
return {
msg: 'Hello Hello1'
}
},
template: "#hello1"
}
let hello2 = {
data(){
return {
msg: 'Hello Hello2'
}
},
template: "#hello2"
}
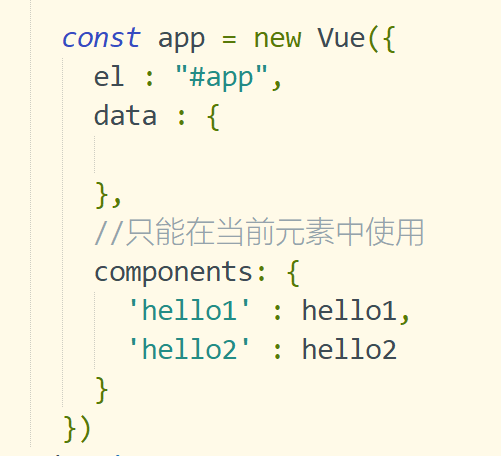
const app = new Vue({
el : "#app",
data : {
},
//Can only be used in the current element
components: {
'hello1' : hello1,
'hello2' : hello2
}
})
</script>
</body>
</html>
3.Vue front end interaction
3.1 Promise overview
Promise is a solution for asynchronous programming Syntactically promise is an object From it, you can get the information of asynchronous call
effect:
1. Effectively avoid callback hell problem, typical Ajax nesting problem (closure method)
2.Promise object provides a concise API with simple usage
3.2 Promise basic usage
3.3 Promise API introduction
1. Return when the then asynchronous call is correct
2.catch to get exception information
3.finally, the operation will be executed whether it is successful or not
<!DOCTYPE html>
<html>
<head>
<meta charset="utf-8">
<title>promise call API</title>
</head>
<body>
<div id="app">
</div>
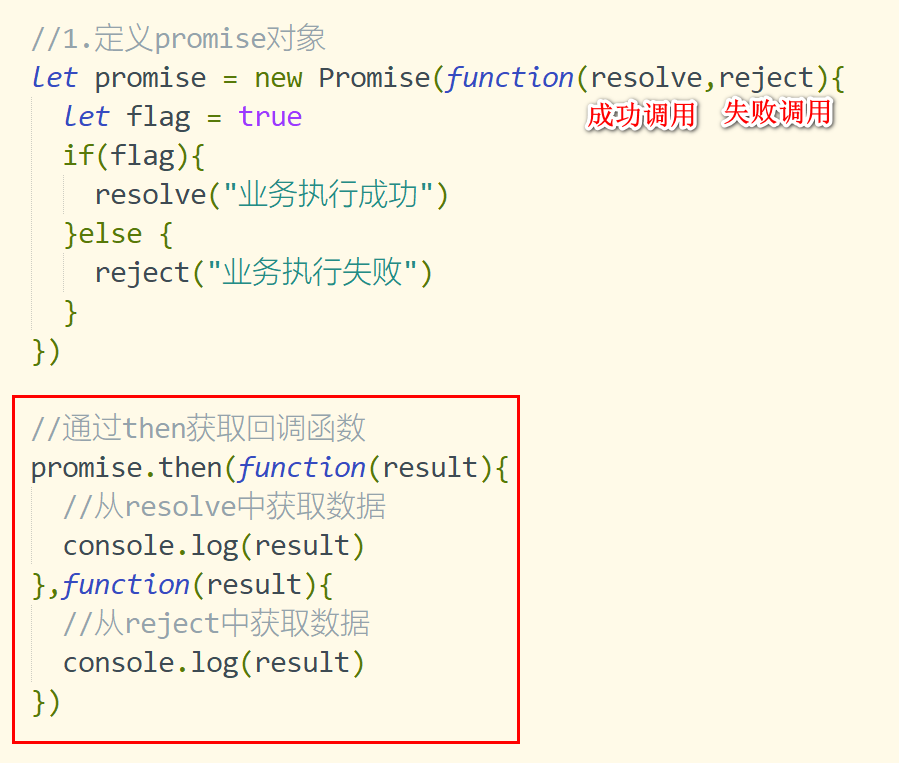
<script>
let promise = new Promise(function(resolve,reject){
let flag = true
if(flag){
resolve("Successful business execution")
}else {
reject("Business execution failed")
}
})
//Get callback function through then
promise.then(function(result){
//Get data from resolve
console.log(result)
})
.catch(function(data){
console.log(data)
})
.finally(function(){
console.log("Will eventually be implemented")
})
</script>
</body>
</html>
3.4 Axios mode
3.4.1 Axios introduction
Axios is a promise based HTTP library that can be used in browsers and node JS.
characteristic:
1. Create XMLHttpRequests from the browser
2. From node JS create http request
3. Support Promise API
4. Intercept requests and responses
5. Convert request data and response data
6. Cancellation request
7. Automatically convert JSON data
8. The client supports XSRF defense
3.4.2 introduction to Axios
Description of result:

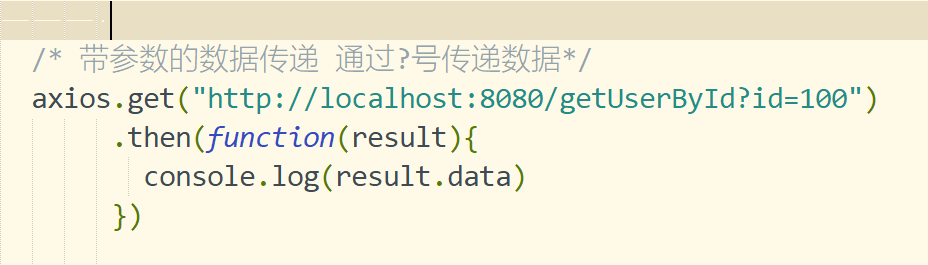
3.4.3 Axios GET/DELETE call
1).get mode
2). Mode with parameters
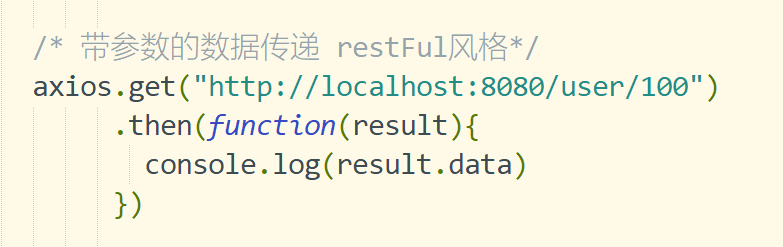
3.restFul style
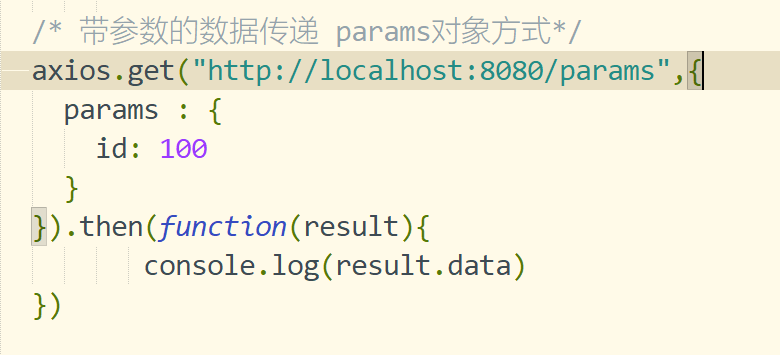
4.params parameter mode
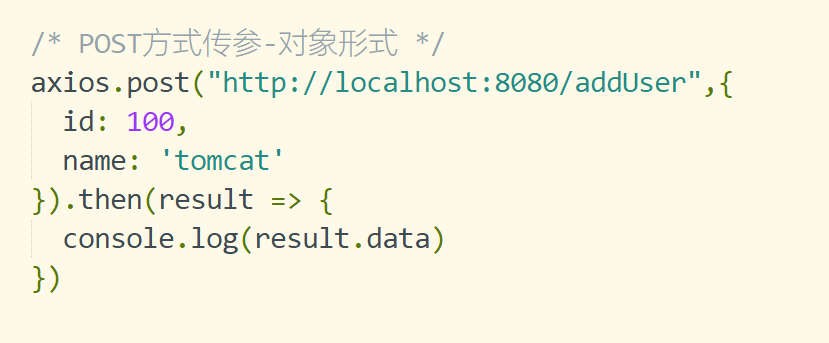
3.4.4 Axios post/put call
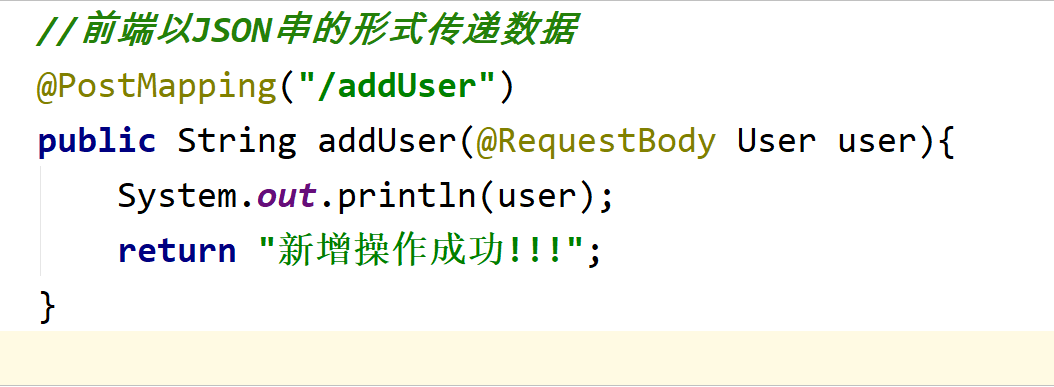
3.4.4.1 submitting data by object method
1). Edit page JS
2). Edit background Controller
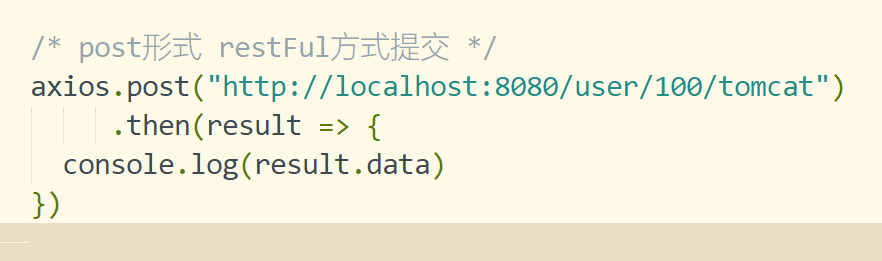
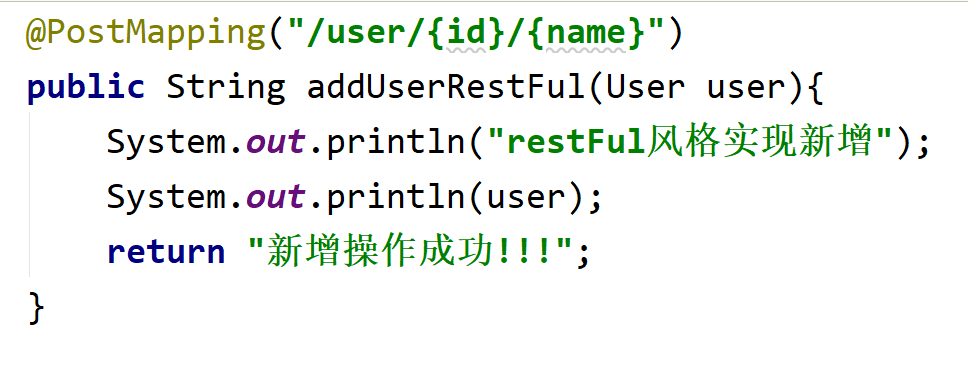
3.4.4.2 data submission in restful mode
1). Edit page JS
2). Edit background Controller
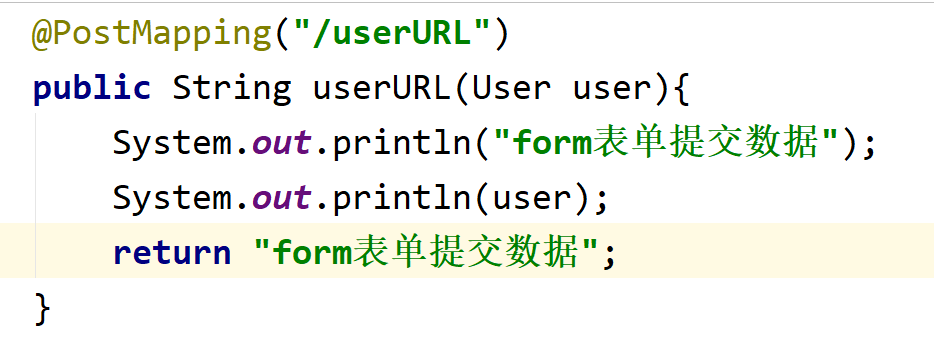
3.4.4.3 form data
1). Edit page JS
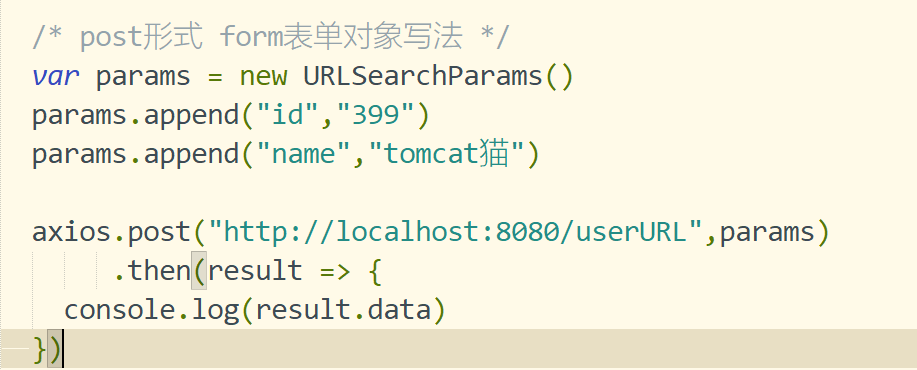
2). Page submission parameter structure
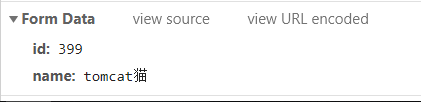
3. Edit Controller
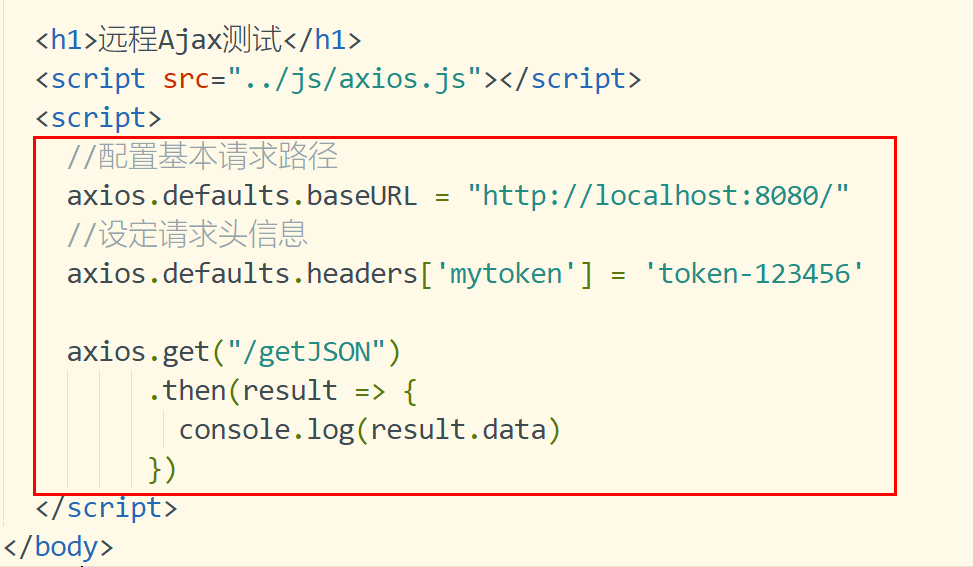
3.4.5 Axios configuration information
	//Configure basic request path
	axios.defaults.baseURL = "http://localhost:8080/"
	//Set request header information
	axios.defaults.headers['mytoken'] = 'token-123456'
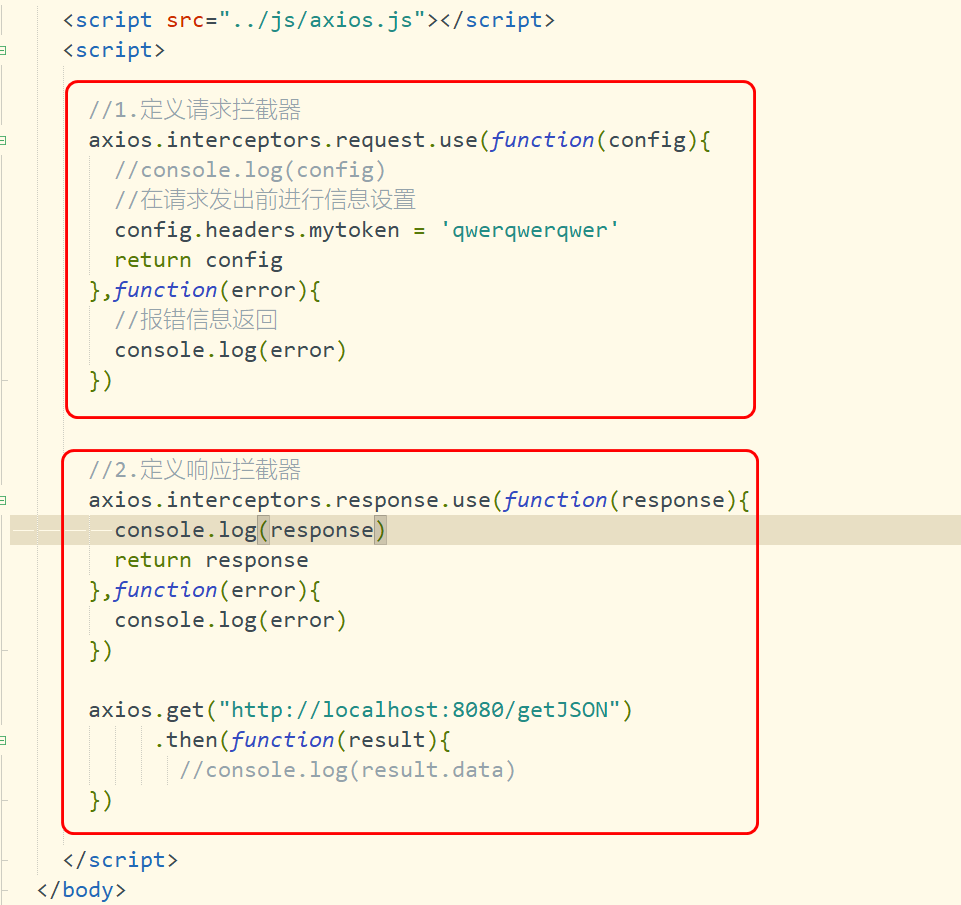
3.4.6 Axios interceptor mechanism
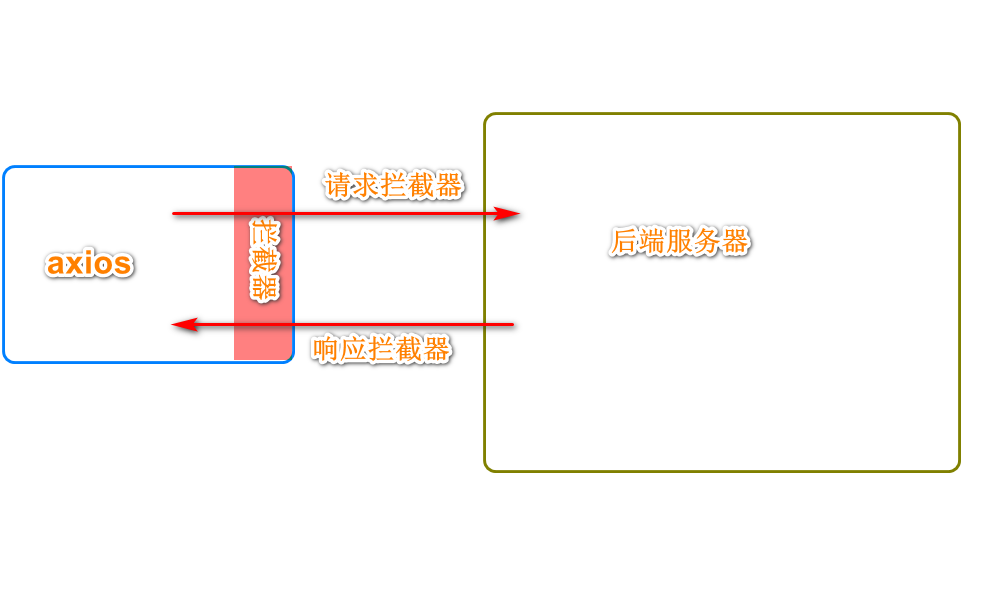
3.4.6.1 request interceptor
	//1. Define request interceptor
	axios.interceptors.request.use(function(config){
		//console.log(config)
		//Set the information before the request is sent
		config.headers.mytoken = 'qwerqwerqwer'
		return config
	},function(error){
		//Error message return
		console.log(error)
	})
3.4.6.2 response interceptor
//2. Define response interceptors
axios.interceptors.response.use(function(response){
console.log(response)
return response
},function(error){
console.log(error)
})
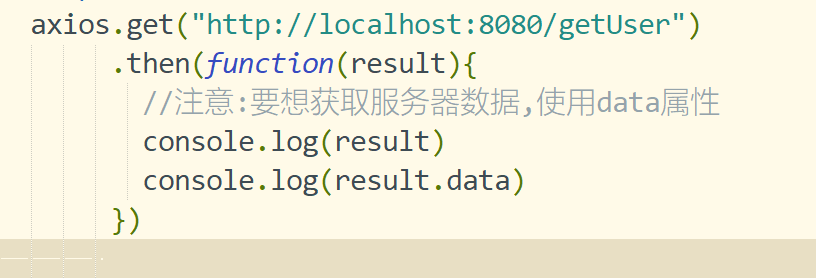
axios.get("http://localhost:8080/getJSON")
.then(function(result){
//console.log(result.data)
})
3.4.7 async await usage
3.4.7.1 introduction
1.async/await is a new syntax introduced by ES7, which can facilitate asynchronous operation
2.async keyword is used on functions The return value is a promise object
3.await keyword is used in async function
3.4.7.2 introduction case usage
<!DOCTYPE html>
<html>
<head>
<meta charset="utf-8">
<title>Axios to configure</title>
</head>
<body>
<h1>long-range Ajax test</h1>
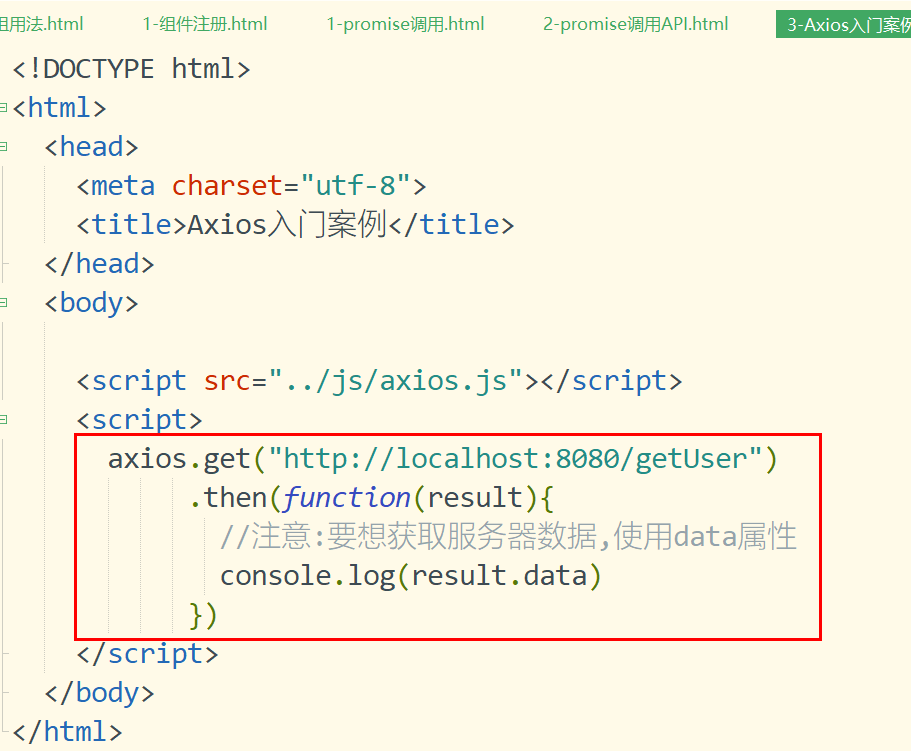
<script src="../js/axios.js"></script>
<script>
async function getJSON(){
//Returns a promise object
const result = await axios.get('http://localhost:8080/getJSON')
//Get data through data
return result.data
}
//Call function
getJSON().then(function(result){
console.log(result)
})
</script>
</body>
</html>
3.4.8 ajax teaching cases
3.4.8.1 edit page html
<!DOCTYPE html>
<html>
	<head>
		<meta charset="utf-8">
		<title>User list presentation case</title>
	</head>
	<body>
		<div id="app">
			<h1 align="center">User list presentation case</h1>
			<table align="center" border="1px" width="800px">
				<tr align="center">
					<td>ID number</td>
					<td>full name</td>
					<td>Age</td>
					<td>Gender</td>
					<td>operation</td>
				</tr>
				<tr align="center" v-for="user in userList" :key="user.id">
					<td>{{user.id}}</td>
					<td>{{user.name}}</td>
					<td>{{user.age}}</td>
					<td>{{user.sex}}</td>
					<td>
						<button @click="updateUser(user)">modify</button>
						<button @click="deleteUser(user)">delete</button>
					</td>
				</tr>
			</table>
			<hr />
			<div>
				<h3 align="center">User modification</h3><br>
				<p>
						user ID number: <input type="text" name="id" v-model="user.id" disabled/>
						User name: <input type="text" name="name" v-model="user.name"/>
				</p>
				<p>
					User age: <input type="text" name="age" v-model="user.age"/>
					User gender: <input type="text" name="sex" v-model="user.sex"/>
				</p>
				<p>
					<button @click="updateUserBtn">modify</button>
				</p>
			</div>
		</div>
		<script src="../js/axios.js"></script>
		<script src="../js/vue.js"></script>
		<script>
			//1. Define the default axios request path
			axios.defaults.baseURL = "http://localhost:8090/"
			const app = new Vue({
				el: "#app",
				data: {
					//Prepare user data
					userList: [],
					user: {
						id: '',
						name: '',
						age: '',
						sex: ''
					}
				},
				methods: {
					//1. Initiate get request
					async getUserList(){
						const {data: result} = await axios.get('/getUserList')
						this.userList = result
					},
					updateUser(user){
						//1. Get the data of page modification
						this.user = user
					},
					async updateUserBtn(){
						await axios.put('updateUser',this.user)
						//Reload page data
						this.getUserList()
					},
					async deleteUser(user){
						let id = user.id
						await axios.delete('user/'+id)
						//After deletion, reload the data
						this.getUserList()
					}
				},
				mounted(){
					this.getUserList()
				}
			})
		</script>
	</body>
</html>
3.4.8.2 edit page
package com.jt.controller;
import com.jt.pojo.User;
import com.jt.service.UserService;
import org.springframework.beans.factory.annotation.Autowired;
import org.springframework.web.bind.annotation.*;
import java.util.List;
/**
 * @author Liu Yujiang
 * Time: May 9, 2021
 */
@RestController
@CrossOrigin
public class UserController {
    @Autowired
    private UserService userService;
    @GetMapping("/getUserList")
    public List<User> findAll(){
        return userService.findAll();
    }
    @PutMapping("/updateUser")
    public void updateUser(@RequestBody User user){
        userService.updateUser(user);
    }
    @DeleteMapping("/user/{id}")
    public void deleteUser(@PathVariable Integer id){
        userService.deleteUser(id);
    }
}
4 VUE routing
4.1 introduction to Vue router
Vue Router is Vue JS official routing manager. It and Vue JS core deep integration makes it easy to build single page applications. The functions include:
Nested routing / view tables
Modular, component-based routing configuration
Routing parameters, queries, wildcards
Based on Vue View transition effect of JS transition system
Fine grained navigation control
Links with automatically activated CSS class es
HTML5 history mode or hash mode, automatically degraded in IE9
Custom scroll bar behavior
4.2 introduction to router routing
4.2.1 steps for using router
- Import related library files
- Add routing link
- Add route padding bit
- Define routing components
- Configure routing rules and create routing instances
- Mount the route to the Vue root instance
4.2.2 introduction to router
<!DOCTYPE html>
<html>
<head>
<meta charset="utf-8">
<title>Routing instance</title>
</head>
<body>
<div id="app">
<!-- 2.Add routing connection
Vue Add routing rule by default
1.router-link Renders to by default a label
2.to Property is rendered by default href label
-->
<router-link to="/user">user</router-link>
<router-link to="/dog">dog</router-link>
<!-- 3.Define route padding bits
Components to be matched by routing in the future,It will be displayed through the route filling bit
-->
<router-view></router-view>
</div>
<!--introduce js Function class library -->
<script src="../js/vue.js"></script>
<!-- Introducing routing rules -->
<script src="../js/vue-router.js"></script>
<script>
//4. Define user component
const user = {
template: '<h1>I am User assembly</h1>'
}
//Define dog components
const dog = {
template: `<h1>I am Dog assembly</h1>`
}
//5. Create routing rules
//The attribute routes [] defines routing rules
//Path: defines the path
//Component: define component name
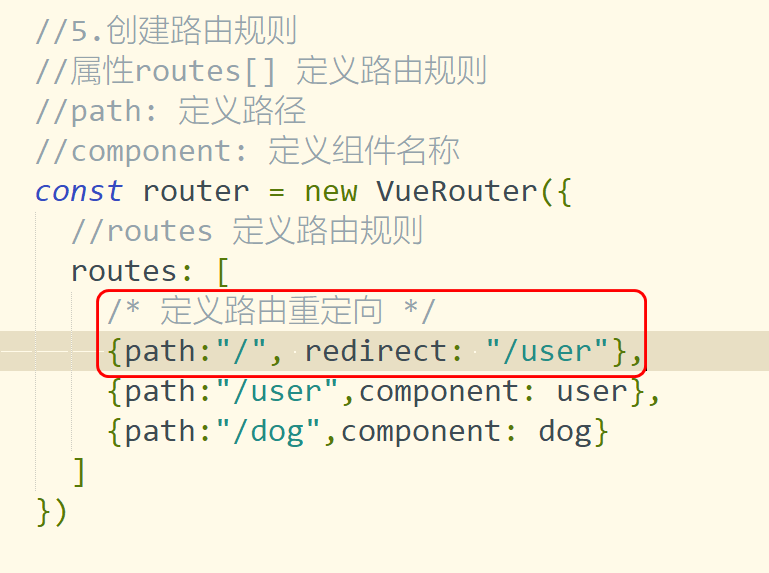
const router = new VueRouter({
//routes define routing rules
routes: [
{path:"/user",component: user},
{path:"/dog",component: dog}
]
})
//6. Mount the route to the Vue instance
const app = new Vue({
el: "#app",
//Attaching routing instance objects can be simplified if their names are consistent
//router: router
router
})
</script>
</body>
</html>
4.3 Router redirection
Note: when A user accesses address A, forced jump to access address B requires the use of route redirection technology
Key sub: redirect
The usage is as follows:
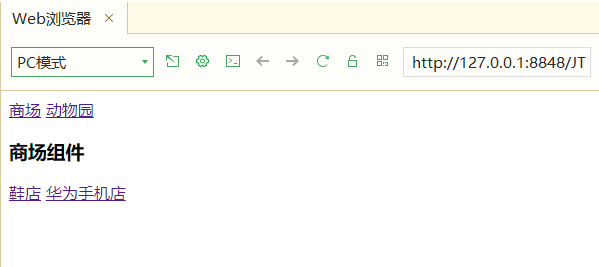
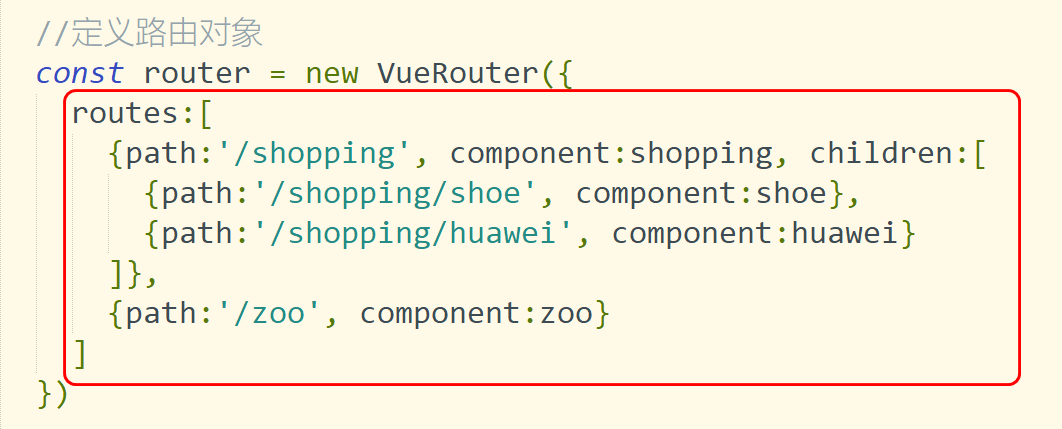
4.3 Router nesting
Core code:
<!DOCTYPE html>
<html>
	<head>
		<meta charset="utf-8">
		<title>Routing instance</title>
	</head>
	<body>
		<div id="app">
			<router-link to="/shopping">market</router-link>
			<router-link to="/zoo">zoo</router-link>
			<router-view></router-view>
		</div>
		<template id="shopping">
			<div>
				<h3>Mall components</h3>
				<!-- Define sub routes -->
				<router-link to="/shopping/shoe">Shoe shop</router-link>
				<router-link to="/shopping/huawei">Huawei mobile phone store</router-link>
				<router-view></router-view>
			</div>
		</template>
		<template id="zoo">
			<div>
				<h3>Zoo components</h3>
			</div>
		</template>
		<template id="shoe">
			<div>
				<h3>Components of shoes</h3>
			</div>
		</template>
		<template id="huawei">
			<div>
				<h3>Welcome to Huawei mobile phone store</h3>
			</div>
		</template>
		<!--introduce js Function class library  -->
		<script src="../js/vue.js"></script>
		<!-- Introducing routing rules -->
		<script src="../js/vue-router.js"></script>
		<script>
			//1. Define mall components
			const shopping = {
				template: "#shopping"
			}
			const zoo = {
				template: "#zoo"
			}
			const shoe = {
				template: "#shoe"
			}
			const huawei = {
				template: "#huawei"
			}
						//Define routing objects
			const router = new VueRouter({
				routes:[
					{path:'/shopping', component:shopping, children:[
						{path:'/shopping/shoe', component:shoe},
						{path:'/shopping/huawei', component:huawei}
					]},
					{path:'/zoo', component:zoo}
				]
			})
			const app = new Vue({
				el: '#app',
				router
			})
		</script>
	</body>
</html>