1: Built in master-slave mode under Windows
1: Basic introduction
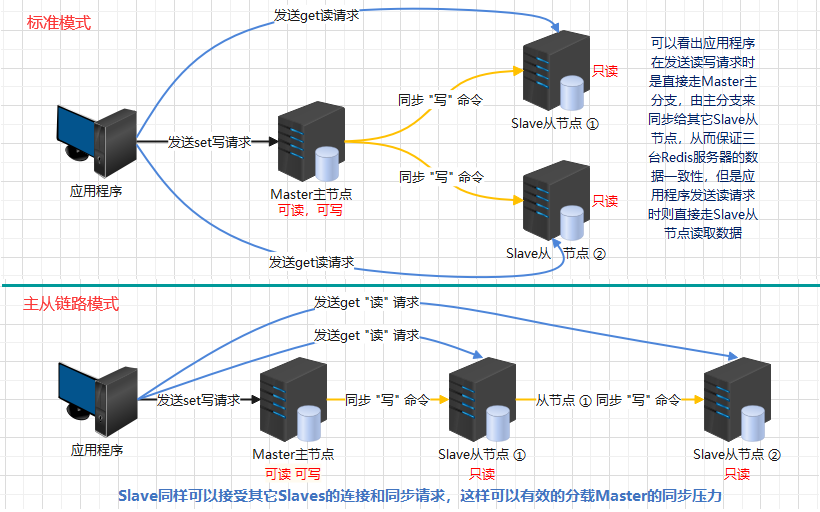
In master-slave replication, a} master node can have multiple slave nodes, but a slave can only correspond to one master. In this way, when a slave goes down, it will not affect the reading of other slave and the reading and writing of the master; However, after the service of the slave that was previously down is restarted, the data will be synchronized from the automatic master (provided that the master-slave replication configured on the configuration file. If the master-slave replication is set by command, no matter which one is down and restarted, it will become an ordinary stand-alone redis, which is the master by default). In the master-slave mode, only one master node can write and read, while the slave node can only read, so usually the master node is responsible for writing and the slave node is responsible for reading (because the reading operation is the most frequent). However, when the only master hangs up, the read operation of the slave will not be affected, but the write operation of the current master-slave replication redis service will be affected. Redis will not provide the write service again until the master is restarted (provided that the master-slave replication configured in the configuration file)
2: Advantages and disadvantages of master-slave replication
advantage:
    ①: Support master-slave replication, host(Master)The data will be automatically synchronized to the slave(Slave),Read write separation is possible
    ②: For load sharing Master Read operating pressure, Slave The server can provide a read-only operation service for the client, and the write service must still be provided by the server Master To complete
    ③: Slave Others are also acceptable Slaves Connection and synchronization requests, which can effectively split the load Master Synchronous pressure.
    ④: Master Server Is in a non blocking manner Slaves Provide services. So in Master-Slave During synchronization, clients can still submit queries or modify requests.
    ⑤: Slave Server It also completes data synchronization in a non blocking way. During synchronization, if a client submits a query request, Redis The data before synchronization is returned
Disadvantages:
    ①: Redis Without automatic fault tolerance and recovery function, the downtime of the host and slave will lead to the failure of some read and write requests in the front end. You need to wait for the machine to restart or manually switch the front end IP To recover.
    ②: When the host goes down, some data cannot be synchronized to the slave in time before the shutdown, and the switch is over IP Later, the problem of inconsistent data will be introduced, which reduces the availability of the system.
    ③: Redis It is difficult to support online capacity expansion. When the cluster capacity reaches the upper limit, online capacity expansion will become very complex.
3: Configure master-slave mode
For convenience windows Master slave copy under operation( Linux And here Windows After the operations are basically the same, they are all decompressed and copied out)
Note: if not Redis How to create a document under Redis Please refer to Redis basic operation
Environmental Science:
    Redis: Unzip three copies Redis Application (here I take 6.2.5 (for example)
Unzipped folder:
    redis6379   Used to configure the host Master
    redis6380   Used to configure slave Slave①
    redis6381   Used to configure slave Slave②

modify redis6379,redis6380,redis6381 Lower Redis to configure
Note: Redis Configuration file in Windows The following is generally "redis.windows.conf"
Note: Redis Configuration file in Windows The following is generally "redis.conf"
① : redis6379 Master profile modification
Redis If you don't understand various configurations in, please refer to "“
get into redis6379 Master node Master Modify basic configuration under folder
①: appoint Redis Primary node port (ports cannot conflict)
    port:6379
②: Specify a new PID File path( windows (not under)
    pidfile /var/run/redis_6379.pid
③: Log file location, when specified as "Empty string" Is standard output. as redis Run as a daemon and the log will be output to "/dev/null"
    logfile "redisLog_6379.log"
④: RDB The file name of the persistent snapshot
    dbfilename dump6379.rdb
⑤: set up redis Connection password
    requirepass 1234
⑥: Protected mode, enabled by default, external access is denied, and it is recommended to close it -- Set to: no
    protected-mode yes
② : redis6380 modify from the node (Slave ①) configuration file
get into redis6380 Slave node Slave①Modify basic configuration under folder
①: appoint Redis Primary node port (ports cannot conflict)
    port:6380
②: Specify a new PID File path( windows (not under)
    pidfile /var/run/redis_6380.pid
③: Log file location, when specified as "Empty string" Is standard output. as redis Run as a daemon and the log will be output to "/dev/null"
    logfile "redisLog_6380.log"
④: RDB The file name of the persistent snapshot
    dbfilename dump6380.rdb
⑤: set up redis Connection password
    requirepass 1234
⑥: Protected mode, enabled by default, external access is denied, and it is recommended to close it -- Set to: no
    protected-mode yes

Configure master Master address
①: Master slave replication, using replicaof To indicate Master Master node address, off by default
    replicaof 127.0.0.1 6379
②: If Master If password authentication is required, it is set here. It is not set by default
    masterauth 1234
③ : redis6381 Slave node (Slave ②) profile modification
get into redis6381 Slave node Slave②Modify basic configuration under folder
①: appoint Redis Primary node port (ports cannot conflict)
    port:6381
②: Specify a new PID File path( windows (not under)
    pidfile /var/run/redis_6381.pid
③: Log file location, when specified as "Empty string" Is standard output. as redis Run as a daemon and the log will be output to "/dev/null"
    logfile "redisLog_6381.log"
④: RDB The file name of the persistent snapshot
    dbfilename dump6381.rdb
⑤: set up redis Connection password
    requirepass 1234
⑥: Protected mode, enabled by default, external access is denied, and it is recommended to close it -- Set to: no
    protected-mode yes

Configure master Master address
①: Master slave replication, using replicaof To indicate Master Master node address, off by default
    replicaof 127.0.0.1 6379
②: If Master If password authentication is required, it is set here. It is not set by default
    masterauth 1234
4: Start master-slave mode
Start three Redis Server
Note: the configuration files and services are placed in one directory

establish bat Script file:redis Service startup.bat
    @echo off
    rem Set us redis Directory location open Redis Server
    set redis_home=C:\Users\xiaof\Desktop\redis
    start cmd /k "cd /d  %redis_home%\redis6379 && redis-server.exe redis.windows.conf"
    start cmd /k "cd /d  %redis_home%\redis6380 && redis-server.exe redis.windows.conf"
    start cmd /k "cd /d  %redis_home%\redis6381 && redis-server.exe redis.windows.conf"
    exit

establish bat Script file:redis Client startup.bat
    @echo off
    rem Set us redis Directory location open Redis client
    set redis_home=C:\Users\xiaof\Desktop\redis
    start cmd /k "cd /d  %redis_home%\redis6379 && redis-cli.exe -h 127.0.0.1 -p 6379 -a 1234"
    start cmd /k "cd /d  %redis_home%\redis6380 && redis-cli.exe -h 127.0.0.1 -p 6380 -a 1234"
    start cmd /k "cd /d  %redis_home%\redis6381 && redis-cli.exe -h 127.0.0.1 -p 6381 -a 1234"
    exit
establish bat Script file:redis Server client shutdown.bat
@echo off
start cmd /k "taskkill /f /t /im redis-server.exe && taskkill /f /t /im cmd.exe"
exit
5: Test master-slave replication
At this point, even if we successfully set up the master-slave replication, using the set command on the host will synchronize to other slaves, but there will be no write command on the slave
info replication Attribute description:
    role
        current Redis Server role (there will be Master and slave)
    connected_slaves
        current Redis Number of slaves connected under the server
    slave(N)
        Connection status information of slave state=online Representative status online
    master_failover_state
        The failover status of the primary node. The optional values are as follows:
            no-failover: There are currently no failover being coordinated.
            waiting-for-sync: The master node is waiting for the replica to get its replica data offset value.
            failover-in-progress: The master node has been demoted and attempts to transfer ownership to the target replica.
    master_replid
        Every restart redis Generate a 40 bit ID,For master-slave replication.An identifier that identifies the increment
    master_host,master_port
        Connected to the master node IP+Port number
    master_link_status
        Status of the connected master node up Representative connection down Represents not connected
Master Host configuration view:
    127.0.0.1:6379> info replication
    # Replication
    role:master
    connected_slaves:2
    slave0:ip=127.0.0.1,port=6381,state=online,offset=438,lag=0
    slave1:ip=127.0.0.1,port=6380,state=online,offset=438,lag=0
    master_failover_state:no-failover
    master_replid:e96c06dc1ffde9d13cb7791bdfba36dd26b89794
    master_replid2:0000000000000000000000000000000000000000
    master_repl_offset:438
    second_repl_offset:-1
    repl_backlog_active:1
    repl_backlog_size:1048576
    repl_backlog_first_byte_offset:1
    repl_backlog_histlen:438

Slave View slave configuration:
    127.0.0.1:6380> info replication
    # Replication
    role:slave
    master_host:127.0.0.1
    master_port:6379
    master_link_status:up
    master_last_io_seconds_ago:11
    master_sync_in_progress:0
    slave_repl_offset:410
    slave_priority:100
    slave_read_only:1
    replica_announced:1
    connected_slaves:0
    master_failover_state:no-failover
    master_replid:e96c06dc1ffde9d13cb7791bdfba36dd26b89794
    master_replid2:0000000000000000000000000000000000000000
    master_repl_offset:410
    second_repl_offset:-1
    repl_backlog_active:1
    repl_backlog_size:1048576
    repl_backlog_first_byte_offset:1
    repl_backlog_histlen:410
6: Configure master-slave replication using command mode
It is not recommended to configure the master-slave in this way, which can only be used for testing, because the configuration of the master-slave in this way will not be persistent, and it will become a single machine every time it is shut down and restarted
Take the above configuration file building case as an example. After the Redis service is closed, note the # replicaof, masterauth and requirepass configured in the configuration files of the host and slave
At this time, the Redis services started by script are all single Master hosts
At this time, we can see Master There are no slaves in the original master node. Next, I set 6380 and 6381 as slaves
127.0.0.1:6379> info replication
# Replication
role:master
connected_slaves:0
master_failover_state:no-failover
master_replid:a0b02f9a1a0e6a2b24c90a19a7d9c2e5e1f2c96c
master_replid2:0000000000000000000000000000000000000000
master_repl_offset:0
second_repl_offset:-1
repl_backlog_active:0
repl_backlog_size:1048576
repl_backlog_first_byte_offset:0
repl_backlog_histlen:0
hold Redis6380 Set as slave node Slave①:
    127.0.0.1:6380> slaveof 127.0.0.1 6379
hold Redis6381 Set as slave node Slave②:
    127.0.0.1:6381> slaveof 127.0.0.1 6379

At this time, the master-slave 6379 is set as Master Master node;6380,6381 by Slave Slave node
 If one of the slaves wants to disconnect from the host, execute the following steps: slaveof no one
 If the master node goes down, it will not affect the reading of the slave, but the lack of the master node means that there is no write function
 If the slave is restarted after downtime, the configuration previously configured as a slave is initialized and defaults to a single host after startup
7: Briefly introduce the principle of master-slave replication
Full synchronization:Usually occurs in Slave During the initialization phase after connecting to the host, at this time Slave Need to Master Copy all the data on the
    ①: To connect from the server to the master server, send a message first SYNC Command;
    ②: Master server received SYNC After naming, the master server starts execution bgsave Command generation RDB File and use the buffer to record all write commands executed thereafter;
    ③: master server bgsave After the command is executed, send the snapshot file to all slave servers, and continue to record the write commands executed by the master server during the sending;
    ④: After receiving the snapshot file from the server, discard all old data and load the received snapshot;
    ⑤: After sending the snapshot from the master server, start sending the write command in the buffer to the slave server;
    ⑥: Finish loading the snapshot from the server, start receiving the command request, and execute the write command from the main server buffer;
    After completing the above steps, all the operations of data initialization from the server are completed. At this time, the server can receive the read request from the user.

Incremental synchronization:Redis Incremental replication refers to Slave The process of synchronizing the write operation of the master server to the slave server when it starts working normally after initialization.
    The main process of incremental replication is that every time the master server executes a write command, it will send the same write command to the slave server, and the slave server will receive and execute the received write command.
2: Master slave replication under Linux
Through the above construction operation under Windows, I won't be wordy here. I can directly start the construction
If you are not familiar with how to build a stand-alone Redis on Linux, please refer to: Redis introduction and environment construction
After the master-slave replication is completed, it looks like this:
If you want to quickly build master-slave replication according to my directory, you can directly copy the following code:
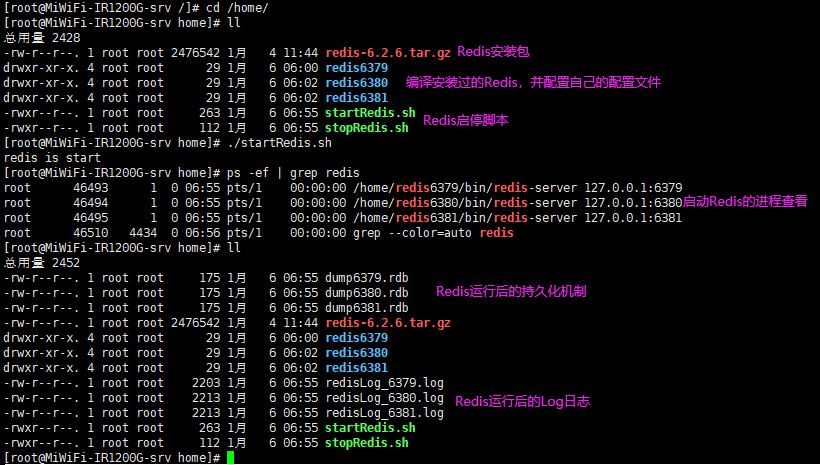
Specific steps:
①: hold redis-6.2.6.tar.gz Put the compressed package into home Unzip under directory
    rz -y
    tar -zxvf redis-6.2.6.tar.gz
②: Enter after decompression redis Compile and install in the directory,
    cd redis-6.2.6/
    make && make PREFIX=/home/redis6379 install
③: Copy into three copies (master-slave copy 6379 master, 6380, 6381 slave)
    cp -r redis6379 redis6380
    cp -r redis6379 redis6381
④: For each redis Create profile directories and copies redis configuration file
    mkdir /home/redis6379/conf
    mkdir /home/redis6380/conf
    mkdir /home/redis6381/conf
    cp /home/redis-6.2.6/redis.conf /home/redis6379/conf/redis6379.conf
    cp /home/redis-6.2.6/redis.conf /home/redis6380/conf/redis6380.conf
    cp /home/redis-6.2.6/redis.conf /home/redis6381/conf/redis6381.conf
⑤: To edit each Redis Directory redis63*.conf configuration file
    Refer to the above for details Windows Next, set up the file configuration in Section 3 of master-slave replication

⑥: Write startup script: startRedis.sh and stopRedis.sh
cd /home/
cat > startRedis.sh <<EOF
#!/bin/sh
/home/redis6379/bin/redis-server /home/redis6379/conf/redis6379.conf  2>&1 &
/home/redis6380/bin/redis-server /home/redis6380/conf/redis6380.conf  2>&1 &
/home/redis6381/bin/redis-server /home/redis6381/conf/redis6381.conf  2>&1 &
echo "redis is start"
EOF
cat > stopRedis.sh <<EOF
#!/bin/sh
#stop redis
ps -ef|grep redis |grep -v grep|awk '{print }'|xargs kill
echo "redis is stop"
EOF
chmod 744 startRedis.sh stopRedis.sh
The next step is to start the test. The test can be carried out according to the above test. When starting, start the command!
Redis Client startup:
    /home/redis6379/bin/redis-cli -h 127.0.0.1 -p 6379 -a 1234
    /home/redis6380/bin/redis-cli -h 127.0.0.1 -p 6380 -a 1234
    /home/redis6381/bin/redis-cli -h 127.0.0.1 -p 6381 -a 1234
Then by: info replication Command to view specific master-slave services
Via tail - f XXX Conf to refresh the log view in real time
3: Sentinel mode built under Linux
1: Basic introduction
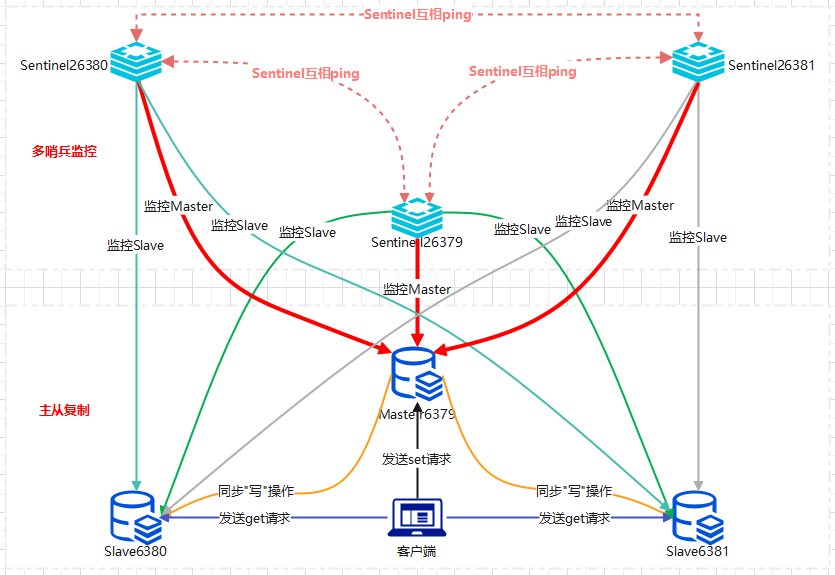
After introducing the master-slave replication, we know that after the slave becomes the slave node of the master, once the master master node goes down, we can select a normal slave to become the new master node, and then connect the other slave nodes to the new master node to realize manual fault recovery. However, manual intervention is inefficient, error prone, and fault perception lags behind, so it does not have production practicability. A reliable component that can automatically sense system failure and automatically failover must be the most needed in the production environment. To this end, Redis officially provides a highly available solution - Sentinel, which can be used to build a highly available Redis distributed system that can resist some types of failures even without intervention.
Sentry is an operation mode of Redis. It focuses on monitoring the operation status of Redis instances (master node and slave node), and can realize master selection and master-slave switching through a series of mechanisms in case of master node failure, so as to realize failover and ensure the availability of the whole Redis system.
Redis Sentinel Official documents
Redis The official said Redis Sentinels have the following functions:
    Monitor( Monitoring):
        Continuous monitoring Redis Whether the master node and slave node are in the expected working state.
    Notice( Notification):
        The Sentry can Redis Running fault information of the instance API Notify the monitoring system or other applications.
    Automatic fault recovery( Automatic failover):
        When the master node fails, the Sentry will start the automatic fault recovery process: a slave node will be upgraded to the master node, and other slave nodes will use the new master node for master-slave replication,
        Notify the client to use the new master node.
    Configuration center( Configuration provider):
        The sentinel can be used as the authorization source for client service discovery. The client connects to the sentinel to request the authorization of a given service Redis Master node address. If a failover occurs, the sentinel will notify the new address.
        Note here: Sentinels are not Redis Proxy, which only provides for the client Redis Address information of master and slave nodes.
Sentinel Distributed features of:
    Redis Sentinel Is a distributed system, which is designed based on a set of configurations and works with the cooperation of multiple sentinel instances. Multi instance collaboration has the following advantages:
        ①: The system failure of the master node is completed when multiple instances are jointly recognized, which greatly reduces the probability of false alarm.
        ②: Even if not all sentinel instances are running normally, the sentinel cluster can work normally (unless all sentinel instances are down), which greatly increases the stability and robustness of the system.
2: Role of sentinel mode
Sentinel sends commands to return the Redis server (Master server and Slave server) to the current running state; When the sentinel detects that the Master is down, the sentinel service will automatically switch the Slave to the Master, and then notify other Slave servers through publish and subscribe mode to modify the configuration file and let them switch the host; However, if a sentinel process service monitors the Redis server, there may also be downtime. Therefore, we can use multiple sentinels for monitoring. Each sentinel will also be monitored, which forms a multi sentinel mode. Even if one sentinel process goes down, the subsequent sentinels can continue to work
advantage:
    Sentinel mode is based on master-slave mode. Sentinel mode has all the advantages of master-slave mode
    The master and slave can switch automatically, making the system more robust and more available
 Disadvantages:
    Redis It is difficult to support online capacity expansion. When the cluster capacity reaches the upper limit, online capacity expansion will become very complex
3: Failover process
Assuming that the Master server is down, sentry A detects this result first and will not immediately carry out the failover process. Only sentry A subjectively thinks that the Master server is unavailable, which becomes A subjective offline phenomenon (it is not certain that the Master is down). When sentinel B, sentinel C, sentinel D in the back It is also detected that the Master server is not available, and when multiple sentinel services subjectively think that the Master is down and the number subjectively thinks that it reaches A certain value, A vote will be held between sentinels, and the voting result will be initiated by one sentinel for failover. After the switch is successful, each sentinel will switch the host from the server through the publish subscribe mode. This process is called objective offline (the Master is indeed down). In this way, everything is transparent to the client.
4: How sentinel mode works
①: eachSentinel(The sentinel process sends information to the primary server in the entire cluster at a frequency of once per second( Master),Slave server( Slave),Sentry( Sentinel)process
  Send a PING Command.
②: If an instance( instance)Last valid reply PING Command time exceeded down-after-milliseconds The value specified by the option (30 seconds by default),
  This instance will be Sentinel Process marked as offline( SDOWN)
③: If one Master Marked as subjective offline( SDOWN),Is monitoring this Master All Sentinel The process should be confirmed once per second Master
  Did you enter the subjective offline state
④: When there are enough Sentinel The process (greater than or equal to the value specified in the configuration file) confirms within the specified time range Master Entered the subjective offline state( SDOWN),
  Then the Lord Master Will be marked as offline( ODOWN)
⑤: In general, each Sentinel The process sends messages to all in the cluster every 10 seconds Master Master server Slave Send from server INFO Orders,
  The purpose is to find slave Node to determine the master-slave relationship.
⑥: When Master cover Sentinel Process marked as offline( ODOWN)When, Sentinel Process going offline Master All of Slave send out INFO The frequency of the command will change from
  10 Change from once per second to once per second.
⑦: If there is not enough Sentinel Process agreement Master Offline, Master The objective offline status of will be removed. If previously marked Master Go back to Sentinel process
  send out PING The command returns a valid reply, Master The subjective offline status of the master server will be removed.
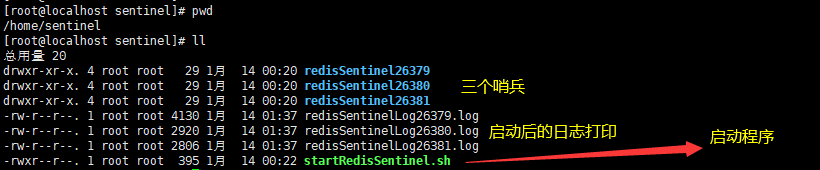
5: Build sentinel mode
Sentinel mode is based on master-slave replication mode, so you have to prepare a basic master-slave mode environment of one master and two slaves
Note: the master-slave construction here completely uses the master-slave copy in Section 2 Linux Directory configuration in the next build
Here I use multi sentry mode (both in 127).0.0.1 (inside the machine):
    ./redisSentinel26379      The sentry is stored in this folder A port:26379
    ./redisSentinel26380      The sentry is stored in this folder B port:26380
    ./redisSentinel26381      The sentry is stored in this folder C port:26381

①: Create a folder for sentinel mode
    mkdir /home/sentinel
②: 3 copies Redis The program acts as a sentinel program and copies the sentinel configuration file (here I copy 6379 directly from the original master to the copy host)
    cp -r /home/redis6379 /home/sentinel/redisSentinel26379
    cp -r /home/redis6379 /home/sentinel/redisSentinel26380
    cp -r /home/redis6379 /home/sentinel/redisSentinel26381
    rm -rf /home/sentinel/redisSentinel26379/conf/*
    rm -rf /home/sentinel/redisSentinel26380/conf/*
    rm -rf /home/sentinel/redisSentinel26381/conf/*
    cp /home/redis-6.2.6/sentinel.conf /home/sentinel/redisSentinel26379/conf/sentinel26379.conf
    cp /home/redis-6.2.6/sentinel.conf /home/sentinel/redisSentinel26380/conf/sentinel26380.conf
    cp /home/redis-6.2.6/sentinel.conf /home/sentinel/redisSentinel26381/conf/sentinel26381.conf
③: Write sentinel startup script
cd /home/sentinel
cat > startRedisSentinel.sh << EOF
#!/bin/sh
/home/sentinel/redisSentinel26379/bin/redis-sentinel /home/sentinel/redisSentinel26379/conf/sentinel26379.conf 2>&1 &
/home/sentinel/redisSentinel26380/bin/redis-sentinel /home/sentinel/redisSentinel26380/conf/sentinel26380.conf 2>&1 &
/home/sentinel/redisSentinel26381/bin/redis-sentinel /home/sentinel/redisSentinel26381/conf/sentinel26381.conf 2>&1 &
echo "redis sentinel is start"
EOF
chmod 744 startRedisSentinel.sh
6: Change profile
Note: the configuration files of each sentry must be consistent. There are differences between the processing port and the log file. Others monitor a host
①: Protected mode, enabled by default, external access is denied, and it is recommended to close it -- Set to: no
    protected-mode no
②: Specify a new PID File path( windows (not under)
    pidfile /var/run/redis-sentinel26379.pid
③: Log file location
    logfile "./redisSentinelLog26379.log"
④: Working directory (store runtime files)
    dir /home/sentinel
⑤: Configure the primary server for listening. Here sentinel monitor Representative monitoring
    -- mymaster Represents the server name, which can be customized
    -- 127.0.0.1 6379 Represents the primary server being monitored IP And port
    -- 2 It means that only when two or more sentinels think the primary server is unavailable, they will fail over
    sentinel monitor mymaster 127.0.0.1 6379 2
⑥: Define connection Master Service password (the built master-slave service password must be consistent, otherwise there will be a problem)
    -- mymaster The service name (corresponding to the above) 1234 is the password
    sentinel auth-pass mymaster 1234
7: Start sentinel test
Note: the master-slave replication machine must be started first. After confirming that there is no problem, start the multi sentry machine again
Script start before execution:/ startRedisSentinel.sh
Start sentinel log printing:
Start the sentinel services of 26379, 26380 and 26381 (for 26379 logs, the three logs are the same)
~# oO0OoO0OoO0Oo Redis is starting oO0OoO0OoO0Oo
~# Redis version=6.2.6, bits=64, commit=00000000, modified=0, pid=9099, just started
~# Configuration loaded
~* Increased maximum number of open files to 10032 (it was originally set to 1024).
~* monotonic clock: POSIX clock_gettime
~* Running mode=sentinel, port=26379.
~# WARNING: The TCP backlog setting of 511 cannot be enforced because /proc/sys/net/core/somaxconn is set to the lower value of 128.
~# Sentinel ID is ae12e9902494e32aa77172ad7900dafb83b29ea4
~# +monitor master mymaster 127.0.0.1 6379 quorum 2
~* +slave slave 127.0.0.1:6380 127.0.0.1 6380 @ mymaster 127.0.0.1 6379
~* +slave slave 127.0.0.1:6381 127.0.0.1 6381 @ mymaster 127.0.0.1 6379
~* +sentinel sentinel dbeba218078a3400c04c0fb2247861be0167e2b8 127.0.0.1 26381 @ mymaster 127.0.0.1 6379
~* +sentinel sentinel 335d08176477f79734a60420f0b1890303c9aec1 127.0.0.1 26380 @ mymaster 127.0.0.1 6379
Use the client to connect to the sentinel service:
/home/sentinel/redisSentinel26379/bin/redis-cli -h 127.0.0.1 -p 26379
Basic command of sentry:
    ping
        reply PONG.
    sentinel masters
        Display all monitored master And their status
    sentinel master <master name>
        Displays the specified monitored master Information and status of; If we set the name as mymaster
    sentinel slaves <master name>
        Display assignment master All slave And their status
    sentinel get-master-addr-by-name <master name>
        Return specified master of ip And ports, if in progress failover perhaps failover Already completed,
        Will show promoted to master of slave of ip And ports.
    sentinel reset <pattern>
        Resets all names that match the regular expression master The status information of, and know the previous status information, and slaves information
    sentinel failover <master name>
        force sentinel implement failover,And you don't need to get anything else sentinel Your consent.
        however failover The latest configuration will be sent to other users sentinel.
Host downtime simulation:
30 seconds after forcibly killing the master node 6379 server, the Sentry will conduct the master node election
Sentinel 26379 log printing:
~# +sdown master mymaster 127.0.0.1 6379
~# +odown master mymaster 127.0.0.1 6379 #quorum 2/2
~# +new-epoch 1
~# +try-failover master mymaster 127.0.0.1 6379
~# +vote-for-leader ae12e9902494e32aa77172ad7900dafb83b29ea4 1
~# dbeba218078a3400c04c0fb2247861be0167e2b8 voted for ae12e9902494e32aa77172ad7900dafb83b29ea4 1
~# 335d08176477f79734a60420f0b1890303c9aec1 voted for ae12e9902494e32aa77172ad7900dafb83b29ea4 1
~# +elected-leader master mymaster 127.0.0.1 6379
~# +failover-state-select-slave master mymaster 127.0.0.1 6379
~# +selected-slave slave 127.0.0.1:6380 127.0.0.1 6380 @ mymaster 127.0.0.1 6379
~* +failover-state-send-slaveof-noone slave 127.0.0.1:6380 127.0.0.1 6380 @ mymaster 127.0.0.1 6379
~* +failover-state-wait-promotion slave 127.0.0.1:6380 127.0.0.1 6380 @ mymaster 127.0.0.1 6379
~# +promoted-slave slave 127.0.0.1:6380 127.0.0.1 6380 @ mymaster 127.0.0.1 6379
~# +failover-state-reconf-slaves master mymaster 127.0.0.1 6379
~* +slave-reconf-sent slave 127.0.0.1:6381 127.0.0.1 6381 @ mymaster 127.0.0.1 6379
~* +slave-reconf-inprog slave 127.0.0.1:6381 127.0.0.1 6381 @ mymaster 127.0.0.1 6379
~* +slave-reconf-done slave 127.0.0.1:6381 127.0.0.1 6381 @ mymaster 127.0.0.1 6379
~# -odown master mymaster 127.0.0.1 6379
~# +failover-end master mymaster 127.0.0.1 6379
~# +switch-master mymaster 127.0.0.1 6379 127.0.0.1 6380
~* +slave slave 127.0.0.1:6381 127.0.0.1 6381 @ mymaster 127.0.0.1 6380
~* +slave slave 127.0.0.1:6379 127.0.0.1 6379 @ mymaster 127.0.0.1 6380
~# +sdown slave 127.0.0.1:6379 127.0.0.1 6379 @ mymaster 127.0.0.1 6380
Sentinel 26380 and 26381 log printing (the two are the same)
~# +sdown master mymaster 127.0.0.1 6379
~# +new-epoch 1
~# +vote-for-leader ae12e9902494e32aa77172ad7900dafb83b29ea4 1
~# +odown master mymaster 127.0.0.1 6379 #quorum 3/2
~# Next failover delay: I will not start a failover before Fri Jan 14 01:16:10 2022
~# +config-update-from sentinel ae12e9902494e32aa77172ad7900dafb83b29ea4 127.0.0.1 26379 @ mymaster 127.0.0.1 6379
~# +switch-master mymaster 127.0.0.1 6379 127.0.0.1 6380
~* +slave slave 127.0.0.1:6381 127.0.0.1 6381 @ mymaster 127.0.0.1 6380
~* +slave slave 127.0.0.1:6379 127.0.0.1 6379 @ mymaster 127.0.0.1 6380
~# +sdown slave 127.0.0.1:6379 127.0.0.1 6379 @ mymaster 127.0.0.1 6380
It can be seen from the above log that 6379 is down, but the sentry selects 6380 as the host and connects it from the host to 6380 as the host
Online simulation after the original host goes down:
The command switches to the home directory: / home / redis6379 / bin / redis server / home / redis6379 / conf / redis6379 conf 2>&1 &
However, after starting 6379, the log desperately printed the following log and found that it could not be connected to the host of sentry election (at Redis (if the server has a password)
~* Retrying with SYNC...
~# MASTER aborted replication with an error: NOAUTH Authentication required.
~* Reconnecting to MASTER 127.0.0.1:6381 after failure
~* MASTER <-> REPLICA sync started
~* Non blocking connect for SYNC fired the event.
~* Master replied to PING, replication can continue...
~* (Non critical) Master does not understand REPLCONF listening-port: -NOAUTH Authentication required.
~* (Non critical) Master does not understand REPLCONF capa: -NOAUTH Authentication required.
~* Partial resynchronization not possible (no cached master)
~# Unexpected reply to PSYNC from master: -NOAUTH Authentication required.
You have to kill 6379 at this time Redis Simple configuration after service redis6379.conf Found inside masterauth Configure host password
    masterauth 1234
    This configuration can configure the password when copying from master to slave
Sentinel 26380 log printing:
~# -sdown slave 127.0.0.1:6379 127.0.0.1 6379 @ mymaster 127.0.0.1 6380
~* +convert-to-slave slave 127.0.0.1:6379 127.0.0.1 6379 @ mymaster 127.0.0.1 6380
~# +sdown slave 127.0.0.1:6379 127.0.0.1 6379 @ mymaster 127.0.0.1 6380
~* +reboot slave 127.0.0.1:6379 127.0.0.1 6379 @ mymaster 127.0.0.1 6380
~# -sdown slave 127.0.0.1:6379 127.0.0.1 6379 @ mymaster 127.0.0.1 6380
Sentinel 26379 and 26381 log printing (the two are the same)
~# -sdown slave 127.0.0.1:6379 127.0.0.1 6379 @ mymaster 127.0.0.1 6380
~# +sdown slave 127.0.0.1:6379 127.0.0.1 6379 @ mymaster 127.0.0.1 6380
~* +reboot slave 127.0.0.1:6379 127.0.0.1 6379 @ mymaster 127.0.0.1 6380
~# -sdown slave 127.0.0.1:6379 127.0.0.1 6379 @ mymaster 127.0.0.1 6380
At this time, the Redis service of 6379 will be used as a slave to point to the Redis host of 6380 sentinel election
8: Sentinel log output status description
@
    The contents after the character are used to specify the primary server. These contents are optional and they are only available in@Specified before character
    Used when the instance is not the primary server
+slave
    A new slave server has been Sentinel Identify and correlate.
+sdown
    The given instance is now in a subjective offline state.
-sdown
    The given instance is no longer in the subjective offline state.
+odown
    The given instance is now offline.
-odown
    The given instance is no longer in the objective offline state.
+new-epoch
    The current era( epoch)Has been updated.
+try-failover
    A new failover operation is in progress and is waiting to be replaced by the majority Sentinel Select( waiting to be
     elected by the majority)
+reset-master
    The master server has been reset
+monitor
    The master node has been monitored by the monitor
+failover-state-reconf-slaves
    Failover state switched to reconf-slaves Status.
+failover-detected
    the other one Sentinel A failover operation is started, or a server is converted from the server to the master server.
+slave-reconf-sent
    Lead( leader)of Sentinel Sent to instance [SLAVEOF](/commands/slaveof.html) Orders,
    Set up a new master server for the instance.
+slave-reconf-inprog
    The instance is setting itself as the slave server of the specified master server, but the corresponding synchronization process has not been completed.
+slave-reconf-done
    The slave server has successfully completed the synchronization of the new master server.
-dup-sentinel
    One or more that monitor a given primary server Sentinel Has been removed for repetition - when Sentinel real
    This happens when the instance is restarted.
+sentinel
    A new server that monitors a given primary server Sentinel Has been identified and added.
+elected-leader
    After winning the election of the specified era, you can perform the failover operation.
+failover-state-select-slave
    The failover operation is now in select-slave Status—— Sentinel Looking for a slave server that can be upgraded to the master server.
no-good-slave
    Sentinel The operation failed to find a suitable slave server for upgrade. Sentinel Will try again to find the right one after a period of time
    Upgrade from the server, or give up the failover operation directly.
selected-slave
    Sentinel Successfully find the slave server suitable for upgrading.
failover-state-send-slaveof-noone
    Sentinel Upgrading the specified slave server to master server, waiting for the upgrade function to complete.
failover-end-for-timeout
    Failover was aborted because of a timeout, but eventually all slave servers will start replicating the new master server
    (slaves will eventually be configured to replicate with the new master anyway)
failover-end
    The failover operation completed successfully. All slave servers have started to copy the new master server.
+switch-master
    Configuration change, master server IP And address have changed. This is the information that most external users are concerned about.
+tilt
    get into tilt pattern.
-tilt
    sign out tilt pattern.
4: Build under cluster mode Linux (key)
Redis is a caching middleware that we are currently using on a large scale. It has been widely used because of its powerful, efficient and convenient functions. Single node redis has achieved high performance. In order to improve availability, we use master-slave replication to sentinel and then to a more powerful redis cluster.
Redis Cluster is a distributed storage system introduced by Redis 3.0; Redis Cluster is a facility that can share data among multiple redis nodes. However, Redis Cluster does not support redis commands that need to process multiple keys at the same time (such as mset, hmset...), Because these commands need to move data between multiple redis nodes, and under high load, these commands will reduce the performance of Redis Cluster and lead to unpredictable errors.
Next, I will introduce the Redis cluster in detail. The construction of master-slave and sentry is just for understanding the evolution of the cluster. This section applies to Redis versions 3.0 ~ 6.0
1: Introduction to Redis cluster
Redis Cluster through partition( partition)To provide a degree of availability( availability);
Even if some nodes in the cluster fail or cannot communicate, the cluster can continue to process command requests.
Redis Clustering provides the following two benefits:
    Automatic data segmentation( split)The ability to connect to multiple nodes, which is the data fragmentation mentioned below.
    When some nodes in the cluster fail or cannot communicate, they can still continue to process command requests.
2: Data slicing
Redis cluster does not use consistency hashing, but introduces the concept of hash slot, which is used to realize data sharding; A redis cluster contains 16384 hash slots. After calculation, each key in the database will be in one of the 16384 hash slots; For slot location calculation in the cluster, the formula CRC16(key)% 16384 is used to calculate which slot the key belongs to. The CRC16(key) statement is used to calculate the CRC16 checksum of the key.
Each node in the cluster is responsible for processing a portion of the hash slot. For example, if there are three Master master nodes in a cluster, it can have at most three hash slots, including:
Node A is responsible for processing hash slots 0 to 5460. [5461 slot points]
Node B is responsible for processing hash slots 5461 to 10922. [5462 slot points]
Node C is responsible for processing hash slots 10923 to 16383. [5461 slot points]
This method of distributing Hashi slots to different nodes makes it easy for users to add or delete nodes to the cluster.
Because to add a cluster Master node, I only need to bring out the slot points in the slots on the first three Master nodes and distribute them to the slots on the newly added Master node; Deletion is almost the same. You only need to extract all the slot points on the Master node to be deleted in advance, distribute them to the slots on other Master nodes, and then delete the Master node
At this time, I want to add a key key, for example: set a key called MyName = = > set MyName antLaddie
According to the hash slot algorithm of Redis Cluster, CRC16('MyName') = 45121; 45121% 16384 = 12353, then this key is assigned to node C; Similarly, when I connect to any node (A,B,C) and want to obtain the key MyName, I will go to node C; If the user adds A new node d to the cluster, the cluster only needs to move some slots in nodes A, B and C to node D. The results of adding A D node may be as follows (divide ABC slot points into parts to d):
Node A covers 1365-5460
Node B covers 6827-10922
Node C covers 12288-16383
Node D covers 0-13645461-682610923-1228
Similarly, if the user wants to remove node A from the cluster, the cluster only needs to move all hash slots in node A to node B and node C, and then remove the blank (excluding any hash slots) node A, because moving A hash slot from one node to another will not cause node blocking, Therefore, no matter adding new nodes, removing existing nodes, or changing the number of hash slots contained in A node, the cluster will not be offline.
3: Cluster master-slave replication model
In order to ensure that the cluster can still operate normally when some nodes are offline or cannot communicate with most nodes of the cluster, Redis cluster uses the master-slave replication function for nodes; Each node in the cluster has one to n replicas, one of which is the master and the other N-1 replicas are slave. In the examples of nodes A, B and C listed earlier, if node B goes offline (without slave node), the cluster will not operate normally because the cluster cannot find A node to process the hash slots from 5461 to 10922. On the other hand, if we add slave node B1 to master node B when creating the cluster (or at least before node B goes offline), then when master node B goes offline, the cluster will set B1 as the new master node and let it replace the offline master node B to continue to process the hash slots from 5461 to 10922, In this way, the cluster will not be unable to operate normally due to the offline of primary node B. However, if both nodes B and B1 go offline, the Redis cluster will still stop working.
Generally speaking, when a Master node in charge of the specified slot goes offline and no slave can be found to replace the Master node within the Master-slave model in charge of the slot, the whole cluster will be set to unavailable state; However, this restriction can be turned off through cluster require full coverage no, which means that except for the offline slots, other slots can be written and read normally
4: Redis consistency assurance
Redis It does not guarantee the strong consistency of data. This means that in practice, the cluster may lose write operations under certain conditions
The first reason is that the cluster uses asynchronous replication. Write operation process:
  ①: Client to master B Write a command.
  ②: Master node B Reply command status to client (success or failure).
  ③: The master node copies the write operation to the slave node under the current master-slave copy B1,B2,B3...
The master node copies commands after returning the command status reply, because if the master node needs to wait for the copy operation to complete every time it processes command requests, the speed at which the master node processes command requests
Will greatly reduce; We have to make a trade-off between performance and consistency.be careful: Redis The cluster may provide synchronous write methods in the future.
The second reason is Redis The case where the cluster may lose commands is that the cluster has a network partition and a client is isolated from a few instances including at least one master node:
  Suppose the cluster contains A,B,C,A1,B1,C1 Six nodes, of which A,B,C Master node, A1,B1,C1 by A,B,C There is a slave node and a client Z1 hypothesis
If a network partition occurs in a cluster, the cluster may be divided into two parties, most of which contain nodes A,C,A1,B1,C1 ,A small part of the party contains nodes B And client Z1.
Z1 Still be able to connect to the master node B Write in, If the network partition occurs for a short time,Then the cluster will continue to operate normally,If the partition time is enough, most of the party will B1 Elected as new
master,that Z1 write in B The data in the is lost.
Note that during network fragmentation, the client Z1 You can apply to the master node B The maximum time to send a write command is limited,
This time limit is called the node timeout( node timeout),yes Redis An important configuration option for clusters
5: Redis cluster setup preparation
To build a Redis cluster, at least three Master nodes and three Slave nodes need to be prepared. A total of six nodes can build a Redis cluster. Because the cost of six machines is too high, it is replaced by a pseudo cluster and deployed on one machine; Here I will introduce Redis3 0 ~ 6.0 two ways to build clusters
Note: if you don't need to use version 5.0 + directly, you can directly use the official redis cli - C to operate the cluster. You don't need to download Ruby scripts
①: Node description
    127.0.0.1:8001[Master Master node]              127.0.0.1:8004 [Slave Slave node]
    127.0.0.1:8002[Master Master node]              127.0.0.1:8005 [Slave Slave node]
    127.0.0.1:8003[Master Master node]              127.0.0.1:8006 [Slave Slave node]
    127.0.0.1:8007 [Later, it is used to test capacity expansion]
    127.0.0.1:8008 [Later, it is used to test capacity expansion]
    127.0.0.1:8009 [Later, it is used to test capacity expansion]
    127.0.0.1:8010 [Later, it is used to test capacity expansion]
②: Build basic environment and BaseRedis(It's a stand-alone version Redis)
    cd /home
    yum -y install cpp binutils glibc glibc-kernheaders glibc-common glibc-devel gcc make gcc-c++ libstdc++-devel tcl
    # adopt rz -y upload Redis Compressed package redis-3.2.9.tar.gz or redis-6.2.6.tar.gz
    tar -zxvf redis-3.2.9.tar.gz
    cd redis-3.2.9/
    mkdir -p /usr/local/redisCluster/redisBase/bin
    make && make PREFIX=/usr/local/redisCluster/redisBase install
    # Here we have a basic Redis Program, you can use this redisBase Use the commands in to start the cluster in batches with different configuration files
    # Batch cluster node folder creation
    mkdir -p /usr/local/redisCluster/redis8001  /usr/local/redisCluster/redis8001/etc
    mkdir -p /usr/local/redisCluster/redis8002  /usr/local/redisCluster/redis8002/etc
    mkdir -p /usr/local/redisCluster/redis8003  /usr/local/redisCluster/redis8003/etc
    mkdir -p /usr/local/redisCluster/redis8004  /usr/local/redisCluster/redis8004/etc
    mkdir -p /usr/local/redisCluster/redis8005  /usr/local/redisCluster/redis8005/etc
    mkdir -p /usr/local/redisCluster/redis8006  /usr/local/redisCluster/redis8006/etc
    mkdir -p /usr/local/redisCluster/redis8007  /usr/local/redisCluster/redis8007/etc
    mkdir -p /usr/local/redisCluster/redis8008  /usr/local/redisCluster/redis8008/etc
    mkdir -p /usr/local/redisCluster/redis8009  /usr/local/redisCluster/redis8009/etc
    mkdir -p /usr/local/redisCluster/redis8010  /usr/local/redisCluster/redis8010/etc
    # Put one in each node folder Redis configuration file
    cp /home/redis-3.2.9/redis.conf /usr/local/redisCluster/redis8001/etc/redisNodes_8001.conf
    cp /home/redis-3.2.9/redis.conf /usr/local/redisCluster/redis8002/etc/redisNodes_8002.conf
    cp /home/redis-3.2.9/redis.conf /usr/local/redisCluster/redis8003/etc/redisNodes_8003.conf
    cp /home/redis-3.2.9/redis.conf /usr/local/redisCluster/redis8004/etc/redisNodes_8004.conf
    cp /home/redis-3.2.9/redis.conf /usr/local/redisCluster/redis8005/etc/redisNodes_8005.conf
    cp /home/redis-3.2.9/redis.conf /usr/local/redisCluster/redis8006/etc/redisNodes_8006.conf
    cp /home/redis-3.2.9/redis.conf /usr/local/redisCluster/redis8007/etc/redisNodes_8007.conf
    cp /home/redis-3.2.9/redis.conf /usr/local/redisCluster/redis8008/etc/redisNodes_8008.conf
    cp /home/redis-3.2.9/redis.conf /usr/local/redisCluster/redis8009/etc/redisNodes_8009.conf
    cp /home/redis-3.2.9/redis.conf /usr/local/redisCluster/redis8010/etc/redisNodes_8010.conf
After the basic file is created, we need to modify the configuration file of each node, and then start the script with one click
①: Modify the configuration file under each node, as shown in the following example. Other files only need to apply this configuration to replace 8001 in batch*
    Specific replacement vim command :%s/Source string/Target string/g
# Port number
    port 8001
# Set that any external IP can be connected, or set the specified IP connection to be separated by "-"
  bind 0.0.0.0 or *   New version settings: bind * -::*
# Background start
    daemonize yes
# Specify the storage and distribution location of data files. You must specify different directory locations, otherwise you will lose some running data, such as logs, persistent files, etc
    dir /usr/local/redisCluster/redis8001
# Specify a new PID Process file path( windows (no) when daemonize yes Must be set when it is a daemon
    pidfile /var/run/redisNodes_8001.pid
# Log file name
    logfile "/usr/local/redisCluster/redis8001/redisNodes_8001.log"
# RDB The file name of the persistent snapshot
    dbfilename dumpNodes_8001.rdb
# open aof Note: simultaneous opening AOF and RDB When Redis When restarting, it will be used preferentially AOF File to restore the dataset. If performance is considered, it can be closed aof
    appendonly yes
# aof File path
    appendfilename "appendonly_8001.aof"
# Start cluster(Must be on)
    cluster-enabled yes
#Cluster node profile
    cluster-config-file nodes-8001.conf
# Cluster connection timeout
    cluster-node-timeout 5000
②: establish Redis Cluster startup script RedisClusterStart.sh  Although the 8007 8008 8009 8010 here is started, it is not used. It will be used later for capacity expansion
cat > RedisClusterStart.sh << EOF
#!/bin/sh
/usr/local/redisCluster/redisBase/bin/redis-server /usr/local/redisCluster/redis8001/etc/redisNodes_8001.conf
/usr/local/redisCluster/redisBase/bin/redis-server /usr/local/redisCluster/redis8002/etc/redisNodes_8002.conf
/usr/local/redisCluster/redisBase/bin/redis-server /usr/local/redisCluster/redis8003/etc/redisNodes_8003.conf
/usr/local/redisCluster/redisBase/bin/redis-server /usr/local/redisCluster/redis8004/etc/redisNodes_8004.conf
/usr/local/redisCluster/redisBase/bin/redis-server /usr/local/redisCluster/redis8005/etc/redisNodes_8005.conf
/usr/local/redisCluster/redisBase/bin/redis-server /usr/local/redisCluster/redis8006/etc/redisNodes_8006.conf
/usr/local/redisCluster/redisBase/bin/redis-server /usr/local/redisCluster/redis8007/etc/redisNodes_8007.conf
/usr/local/redisCluster/redisBase/bin/redis-server /usr/local/redisCluster/redis8008/etc/redisNodes_8008.conf
/usr/local/redisCluster/redisBase/bin/redis-server /usr/local/redisCluster/redis8009/etc/redisNodes_8009.conf
/usr/local/redisCluster/redisBase/bin/redis-server /usr/local/redisCluster/redis8010/etc/redisNodes_8010.conf
echo "redis is start"
EOF
chmod 744 RedisClusterStart.sh
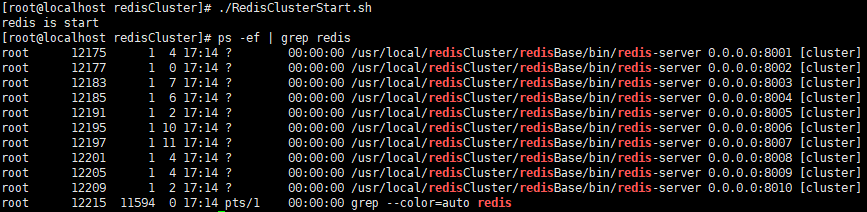
At this time, we start Redis of 10 nodes. At this time, Redis is started in cluster mode, but there is no cluster association between them
6: Redis cluster Association (native)
The establishment of clusters can be divided into four steps:
    ①: Start node: start the node in cluster mode. At this time, the node is independent and has no connection;[Previous section started]
    ②: Node Handshake: connect independent nodes into a network;
    ③: Allocate slots: allocate 16384 slots to the master node;
    ④: Specify master-slave relationship: specify the master node for the slave node.
Note: I only use 8001 here ~ 8006 Including 8001 ~ 8003 by Master Master node, to allocate slots, 8004 ~ 8006 by Slave Slave node
1: Node handshake
After the above 10 nodes are started, they are independent of each other and do not know the existence of other nodes; Node handshake is needed to form a network of independent nodes. The node handshake is implemented with the command "cluster meet {ip} {port}". For example, execute cluster meet 10.200.157.126 8002 in 8001 node to complete the handshake between 8001 node and 8002 node; Note that ip uses LAN ip instead of localhost or 127.0.0.1, so that nodes or clients on other machines can also access it. It can be viewed using cluster nodes
Connect 8001 nodes in cluster mode: (it must be added here) -c (start in cluster mode)
    /usr/local/redisCluster/redisBase/bin/redis-cli -c -h 10.200.157.126 -p 8001
View the current node: (at this time, 8001 is a single node cluster)
  10.200.157.126:8001> cluster nodes
  3a00331cad40d52e5755c22699668574e090fa7e :8001 myself,master - 0 0 0 connected

Used under 8001 node Cluster meet The command adds all nodes to the cluster and completes the node Handshake:
    cluster meet 10.200.157.126 8002
    cluster meet 10.200.157.126 8003
    cluster meet 10.200.157.126 8004
    cluster meet 10.200.157.126 8005
    cluster meet 10.200.157.126 8006

2: Distribution slot
In Redis cluster, data partition is realized with the help of slots. The cluster has 16384 slots, which are the basic units of data management and migration. When 16384 slots in the database are allocated nodes, the cluster is in the online state (ok); If there is no node assigned to any slot, the cluster will fail. The cluster info command can view the cluster status. The status before slot allocation is fail;
Unassigned (or unassigned) slot points:
    10.200.157.126:8001> cluster info
    cluster_state:fail          [Cluster status fail fail ok [success]
    cluster_slots_assigned:0    [Currently, the number of slots allocated to the whole cluster cannot be started until it reaches 16384]
adopt redis_cli The client command is 8001 ~ 8003 Allocate slots [randomly allocate points to the slots in each section, and I will allocate them equally here]
/usr/local/redisCluster/redisBase/bin/redis-cli -p 8001 cluster addslots {0..5460}
/usr/local/redisCluster/redisBase/bin/redis-cli -p 8002 cluster addslots {5461..10922}
/usr/local/redisCluster/redisBase/bin/redis-cli -p 8003 cluster addslots {10923..16383}
The slot point after allocation is displayed normally:
    10.200.157.126:8001> cluster info
    cluster_state:ok
    cluster_slots_assigned:16384
3: Specify master-slave relationship
When the master-slave relationship is specified in the cluster, the slaveof command is no longer used, but the cluster replicate command is used; Parameter uses node ID
The master node has been determined from the time of slot allocation Master Because only the master node can allocate slots, I will connect the slave to the host
    Master 8001  --> Slave 8004
    Master 8002  --> Slave 8005
    Master 8003  --> Slave 8006
Enter any cluster node to query all the current clusters ID,It is used to allocate master-slave relationship. Here I go to node 8001 to view it
Start assigning master-slave: cd /usr/local/redisCluster/redisBase/bin/ ./redis-cli -p 8004 cluster replicate 3a00331cad40d52e5755c22699668574e090fa7e ./redis-cli -p 8005 cluster replicate 72cfe73954d8dc94f3ba0a3910885fccf1a26aba ./redis-cli -p 8006 cluster replicate 372db80734eaf94f4edeab82ab3b8e5ba4bc40d6


Test:
10.200.157.126:8001> set name zhangsan
-> Redirected to slot [5798] located at 10.200.157.126:8002
OK
[↑↑ At this time, it is calculated name It belongs to 5798 slot point, so in 8002, it is automatically switched to 8002 node to save]
10.200.157.126:8002> set age 22
-> Redirected to slot [741] located at 10.200.157.126:8001
OK
[↑↑ At this time, it is calculated age It belongs to 741 slot point, so in 8001, it is automatically switched to 8001 node to save]
7: Redis cluster Association (redis trib built by Ruby script)
Detailed explanation of redis trib command (quoting other people's articles)
In addition to using the native method, we can also use Ruby scripts to build clusters, but we need to download and rely on Ruby and rubygems before building; After downloading, we can use redis trib RB's Ruby script file realizes automatic cluster construction
①: Download dependency ruby and rubygems: yum -y install ruby rubygems
②: install redis and ruby Interface:gem install redis
Redis5.0.0 This method is not recommended in the above versions because there is a better method redis-cli mode
When you have this situation, you need to solve it according to the following steps:
>>[root@MiWiFi-IR1200G-srv redisCluster]# gem install redis
>>Fetching: redis-4.5.1.gem (100%)
>>ERROR:  Error installing redis:
>>    redis requires Ruby version >= 2.4.0.  [What I'm talking about is the need for 2.4 And 2.4 Above Ruby [version]

Solution:
①: install curl
    yum install curl
②: install rvm
    curl -L get.rvm.io | bash -s stable
    Problems may arise at this time:
        curl: (7) Failed connect to raw.githubusercontent.com:443; connection denied
    We need to modify it hosts File: sudo vim /etc/hosts
    Then put 199.232.28.133 raw.githubusercontent.com Copy add hosts Last line of file
    Then execute curl -L get.rvm.io | bash -s stable
③: Refresh rvm file
    source /usr/local/rvm/scripts/rvm
⑤: see rvm Known in the library ruby edition
    rvm list known
⑥: Install one ruby edition
    rvm install 2.6.3
⑦: Use one ruby Version and set as the default version
    rvm use 2.6.3
    ruby --version
⑧: Uninstall a known version
    rvm remove 2.0.0
⑨: Install the command that initially went wrong
    [root@MiWiFi-IR1200G-srv redisCluster]# gem install redis
    Fetching redis-4.5.1.gem
    Successfully installed redis-4.5.1
    Parsing documentation for redis-4.5.1
    Installing ri documentation for redis-4.5.1
    Done installing documentation for redis after 0 seconds
    1 gem installed
We can use it now redis-trib.rb To build a cluster
Decompress and compile the redis Inside redis-trib.rb Copy files to our redisBase In the basic command folder
cp /home/redis-3.2.9/src/redis-trib.rb /usr/local/redisCluster/redisBase/bin/
## Note: no spaces are allowed
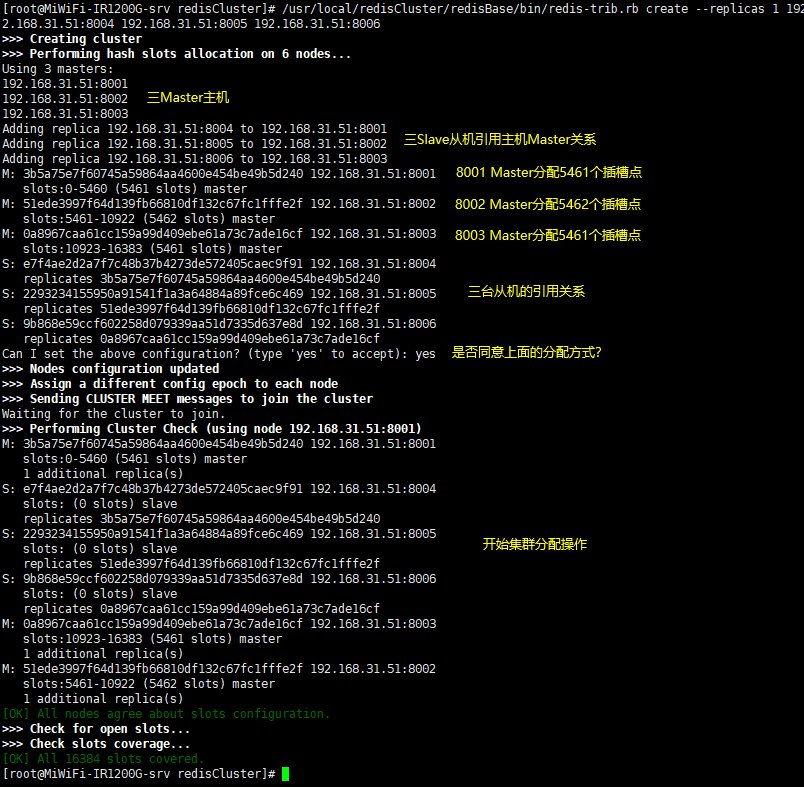
/usr/local/redisCluster/redisBase/bin/redis-trib.rb create --replicas 1 10.200.157.126:8001 10.200.157.126:8002 10.200.157.126:8003 10.200.157.126:8004 10.200.157.126:8005 10.200.157.126:8006
explain:
create: This indicates that we want to create a new cluster
--replicas 1: Represents the proportion, that is, the number of main nodes/Proportion of slave nodes
1: Representative 1/1=1 Note 1 Master 1Slave Assume 20 Redis The node represents that there are 10 master-slave nodes in the cluster Master There is one below Slave
0.5: Representative 1/2 Note 1 Master 2Slave Assume 15 Redis The node represents that there are five master-slave nodes in the cluster, each of which is Master There are 2 below Slave
Clusters are created in order. For example, 1, the above example is the first 3 Master,The last three are Slave,Correspond to the previous one-to-one
Build successfully, remember to test!
8: Redis cluster Association (built by the official redis cli tool)
If Redis is above version 5.0, it will be much easier to build a Redis cluster. We can use Redis cli directly to quickly build a cluster;
Note: redis5 0 use the above method redis trib rb
[root@MiWiFi-IR1200G-srv redisCluster]# cd /usr/local/redisCluster/redisBase/bin/
[root@MiWiFi-IR1200G-srv bin]# ./redis-cli --cluster create --cluster-replicas 1 192.168.31.51:8001 192.168.31.51:8002 192.168.31.51:8003 192.168.31.51:8004 192.168.31.51:8005 192.168.31.51:8006
Introduction to basic parameters:
    --cluster
        Specifies the environment used to create the cluster
    --cluster-replicas
        Used to specify the number of slave nodes on the master node. 1 represents 1 master and 1 slave, and 2 represents 1 master and 2 slave;
        Note: the number of hosts must be greater than or equal to three. Setting 2 slaves means preparing at least 9 nodes, three 1 masters and 2 slaves
    -a
        If there is a password, use this setting (the premise is the same)
    {IP}:{port}...
        Which clusters are represented to form a cluster
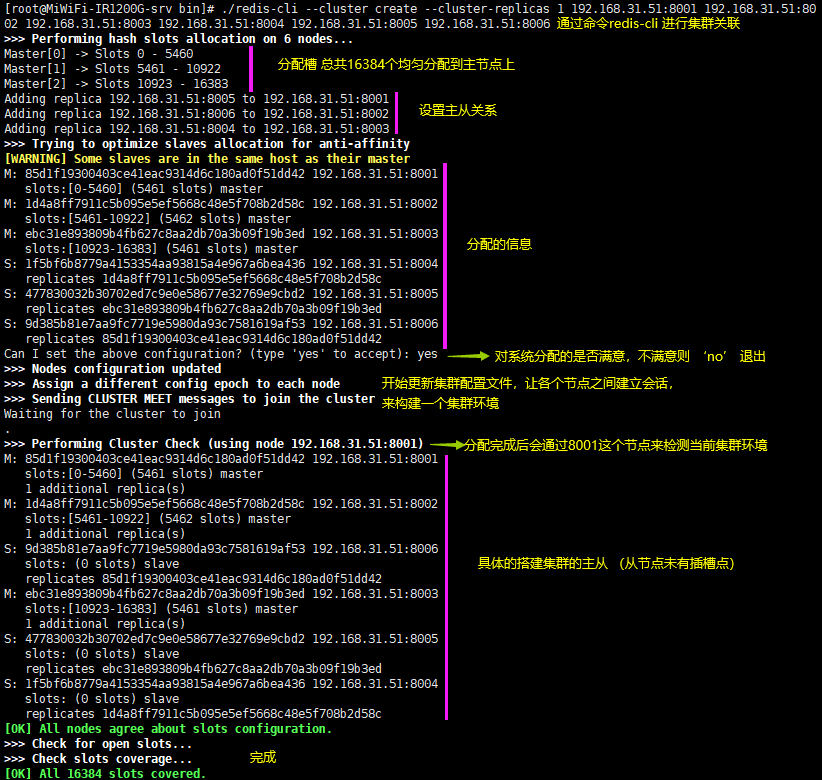
We can also use:/ Redis cli -- cluster check 127.0.0.1:8001 view cluster status
9: Basic connection and node offline of Redis cluster
Here, we use the official redis cli to connect to the cluster, but note that the - c parameter must be added to represent that we are connected in a cluster. Here, I will test it with 8001
# Connect the 8001 master node port (the Slave node Slave cannot write, so the test is not connected)
[root@MiWiFi-IR1200G-srv bin]# ./redis-cli -c -h 127.0.0.1 -p 8001
127.0.0.1:8001> set name zhangsan
-> Redirected to slot [5798] located at 192.168.31.51:8002
OK
[↑↑ At this time, it is calculated name It belongs to 5798 slot point, so in 8002, it is automatically switched to 8002 node to save]
192.168.31.51:8002> set age 22
-> Redirected to slot [741] located at 192.168.31.51:8001
OK
[↑↑ At this time, it is calculated age It belongs to 741 slot point, so in 8001, it is automatically switched to 8001 node to save]
192.168.31.51:8001> keys *
1) "age"
[↑↑ At this time, it is in slot 8001, so you can only query all the data under slot 8001]
192.168.31.51:8001> set height 180
-> Redirected to slot [8223] located at 192.168.31.51:8002
OK
[↑↑ At this time, it is calculated height It belongs to 8223 slot point, so in 8002, it is automatically switched to 8002 node to save]
192.168.31.51:8002> keys *
1) "height"
2) "name"
[↑↑ At this time, it is in slot 8001, so you can only query all the data under slot 8001]
192.168.31.51:8002> get age
-> Redirected to slot [741] located at 192.168.31.51:8001
"22"
[↑↑ calculation age The key is under 8001, so jump to the past value]
192.168.31.51:8001> get name
-> Redirected to slot [5798] located at 192.168.31.51:8002
"zhangsan"
[↑↑ calculation age The key is under 8002, so jump to the past value]
192.168.31.51:8002>
[↑↑ [under 8002 node]
The Master node of test 8001 is down
In this case, our cluster consists of three master nodes [8001 ~ 8003] and three slave nodes [8004 ~ 8006]; At this time, I shut down 8001, so 8004 is the host from the top of the opportunity
①: use kill Forcibly kill an 8001 node RedisCluster
②: use redis-trib.rb To check the status of the current cluster (Note: an online master or slave node must be connected)
[root@MiWiFi-IR1200G-srv bin]# /usr/local/redisCluster/redisBase/bin/redis-trib.rb check 127.0.0.1:8006
>>> Performing Cluster Check (using node 127.0.0.1:8006)
S: 9b868e59ccf602258d079339aa51d7335d637e8d 127.0.0.1:8006
   slots: (0 slots) slave
   replicates 0a8967caa61cc159a99d409ebe61a73c7ade16cf
S: 2293234155950a91541f1a3a64884a89fce6c469 192.168.31.51:8005
   slots: (0 slots) slave
   replicates 51ede3997f64d139fb66810df132c67fc1fffe2f
M: 51ede3997f64d139fb66810df132c67fc1fffe2f 192.168.31.51:8002
   slots:5461-10922 (5462 slots) master
   1 additional replica(s)
M: 0a8967caa61cc159a99d409ebe61a73c7ade16cf 192.168.31.51:8003
   slots:10923-16383 (5461 slots) master
   1 additional replica(s)
M: e7f4ae2d2a7f7c48b37b4273de572405caec9f91 192.168.31.51:8004
   slots:0-5460 (5461 slots) master
   0 additional replica(s)
[OK] All nodes agree about slots configuration.
>>> Check for open slots...
>>> Check slots coverage...
[OK] All 16384 slots covered.
initial  S representative Slave M representative Master   8001 After going offline, it was found that 8004 took the initiative to shoulder the responsibility of the master node
Note: if not redis-trib.rb Can be used redis-cli Program to connect and view the status
/usr/local/redisCluster/redisBase/bin/redis-cli -c -h 127.0.0.1 -p 8006
127.0.0.1:8006>cluster nodes
Test that the master node of 8001 is online
①: Use the 8001 configuration file to start the 8001 node
[root@MiWiFi-IR1200G-srv bin]# cd /usr/local/redisCluster/redisBase/bin/
[root@MiWiFi-IR1200G-srv bin]# ./redis-server /usr/local/redisCluster/redis8001/etc/redisNodes_8001.conf
②: Check cluster status
[root@MiWiFi-IR1200G-srv bin]# /usr/local/redisCluster/redisBase/bin/redis-trib.rb check 127.0.0.1:8006
>>> Performing Cluster Check (using node 127.0.0.1:8006)
S: 9b868e59ccf602258d079339aa51d7335d637e8d 127.0.0.1:8006
   slots: (0 slots) slave
   replicates 0a8967caa61cc159a99d409ebe61a73c7ade16cf
S: 2293234155950a91541f1a3a64884a89fce6c469 192.168.31.51:8005
   slots: (0 slots) slave
   replicates 51ede3997f64d139fb66810df132c67fc1fffe2f
M: 51ede3997f64d139fb66810df132c67fc1fffe2f 192.168.31.51:8002
   slots:5461-10922 (5462 slots) master
   1 additional replica(s)
M: 0a8967caa61cc159a99d409ebe61a73c7ade16cf 192.168.31.51:8003
   slots:10923-16383 (5461 slots) master
   1 additional replica(s)
S: 3b5a75e7f60745a59864aa4600e454be49b5d240 192.168.31.51:8001
   slots: (0 slots) slave
   replicates e7f4ae2d2a7f7c48b37b4273de572405caec9f91
M: e7f4ae2d2a7f7c48b37b4273de572405caec9f91 192.168.31.51:8004
   slots:0-5460 (5461 slots) master
   1 additional replica(s)
[OK] All nodes agree about slots configuration.
>>> Check for open slots...
>>> Check slots coverage...
[OK] All 16384 slots covered.
At this time, node 8001 can only be a slave when it goes online, because node 8004 sought power and usurped the throne before, and 8001 will become the master node only after 8004 goes offline
Test that the 8004 master node and 8001 slave node are all down
Check the process through ps -ef | grep redis and use kill to shut down 8001 and 8004 nodes. At this time, according to the default configuration, the cluster cannot be used normally. At this time, only people can participate and start the down machine; Or transfer the slot of downtime to other good primary nodes, so that there will be two primary nodes in the cluster;
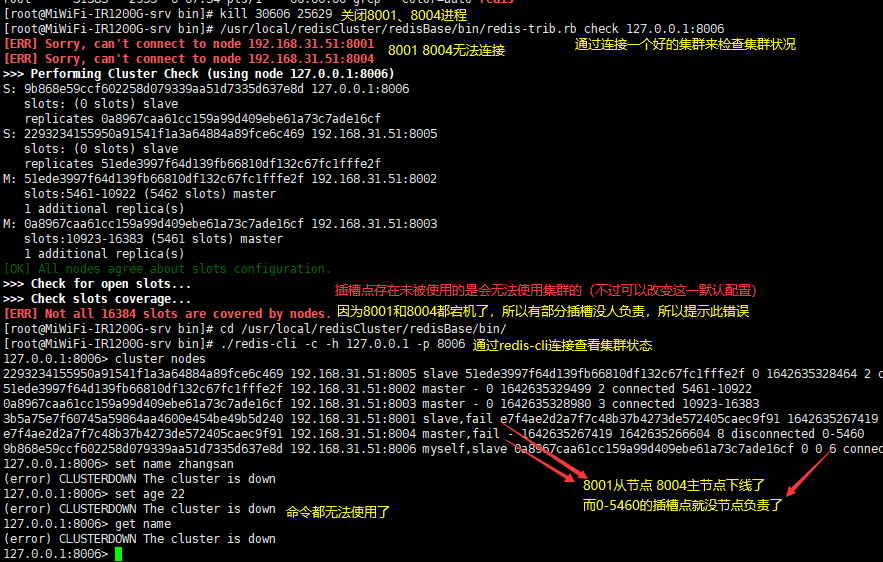
This is why we need to restart 8001 and 8004. For convenience, I directly kill all Redis processes and re execute the script
# Kill all Redis processes
kill -9 `ps -ef | grep redis | grep -v grep | awk '{print $2}'`
# Start script to start all Redis (including)
/usr/local/redisCluster/RedisClusterStart.sh
Starting from the following, I will introduce two ways to operate clusters: redis trib (3.0 > = redis < 5.0) and redis cli (redis > = 5.0); Redis cli is recommended
The old version uses redis trib, and the new version uses redis cli (recommended)
10: Adding primary nodes to the cluster (redis trib mode)
We can see that I have been starting the four machines 8007 ~ 8010 before to prepare for the subsequent expansion. At this time, I add 8007 to the cluster and set the Master node; We can add nodes through the add node instruction of redis trib
# Use redis trib add of RB-node instructions
# redis-trib.rb add-node {To be added to the cluster IP:port} {Any node in the cluster already exists IP:port}
[root@localhost redisCluster]# cd /usr/local/redisCluster/redisBase/bin/
[root@localhost bin]# ./redis-trib.rb add-node 10.200.157.141:8007 10.200.157.141:8001
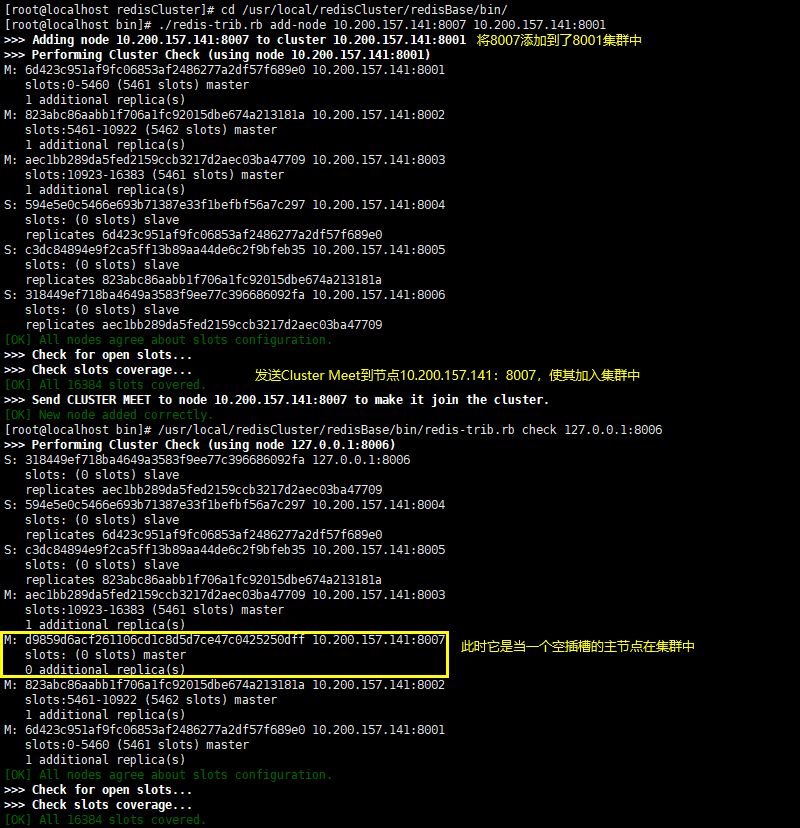
At this moment, we have added the master node to the cluster, 8007 Master It's a( slots: (0 slots) master);So if you want to use it, you must allocate slots first,
From 8001~8003 Give 8007 any part of it; Allocation use redis-trib.rb of reshard Command re fragmentation;
Note: this IP You can connect to any port, as long as you can enter the cluster
[root@localhost bin]# ./redis-trib.rb reshard 10.200.157.141:8005
    How many slots do you want to move (from 1 to 16384)? 4096 [[Enter]
(Prompt us how many slots to move (from 1 to 16384); We can distribute 16384 evenly/4=4096 So we'll fill in 4096. If there are decimals even down, we'll take a whole number)
(It is suggested that the distribution should be as uniform as possible. If the difference is too large, there may be problems (it's ok if the difference is dozens). This is my little suggestion. If there is a problem, it's always in trouble)
    What is the receiving node ID? d9859d6acf261106cd1c8d5d7ce47c0425250dff [[Enter]
(Prompt us to assign these 4096 slot points to that one MasterID )
    Please enter all the source node IDs.
      Type 'all' to use all the nodes as source nodes for the hash slots.
      Type 'done' once you entered all the source nodes IDs.
    Source node #1: all [Enter]
(Remind us redis-trib.rb You will be asked about the source node of the re shard( source node), In other words, 4096 hash slots should be taken from which node and moved
 To node 8007. If we do not intend to take out the specified number of hash slots from a specific node, we can redis-trib input all,In this case, all primary nodes in the cluster
 Will become the source node, redis-trib.rb Take out a part of hash slots from each source node, add up to 4096, and then move to 7006 node)
    Do you want to proceed with the proposed reshard plan (yes/no)? yes [[Enter]
    (Do you want to continue the proposed re fragmentation plan

11: Adding primary nodes to the cluster (redis cli mode)
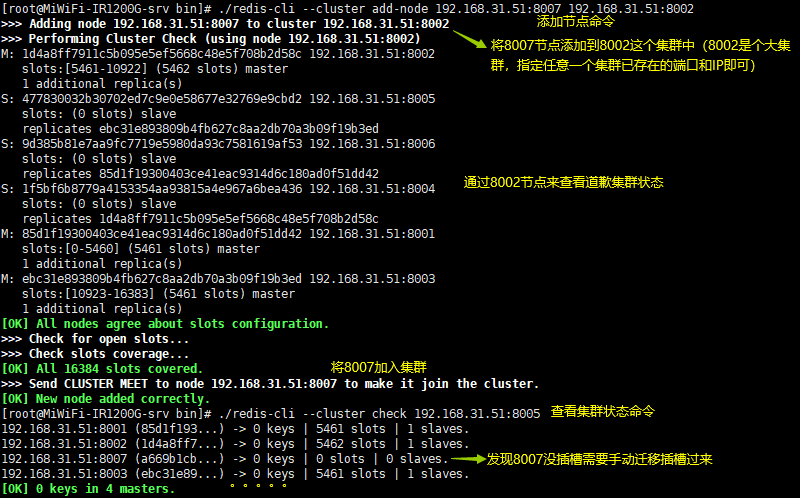
Here I need to add one8007Node. It is added as the master node by default Master
[root@MiWiFi-IR1200G-srv bin]# ./redis-cli --cluster add-node 192.168.31.51:8007 192.168.31.51:8002
    add-node {To be added IP}:{Port to be added} {Already exists IP}:{Port already exists}
Allocate slots to 8007 [average allocation]
[root@MiWiFi-IR1200G-srv bin]# ./redis-cli --cluster rebalance --cluster-threshold 1 --cluster-use-empty-masters 192.168.31.51:8007Allocation [manual allocation]
./redis-cli --cluster reshard --cluster-from all --cluster-to {Need to assign slot points ID} --cluster-slots {Assigned slot point} --cluster-yes 127.0.0.1:8001
12: Add slave nodes to the cluster (redis trib mode)
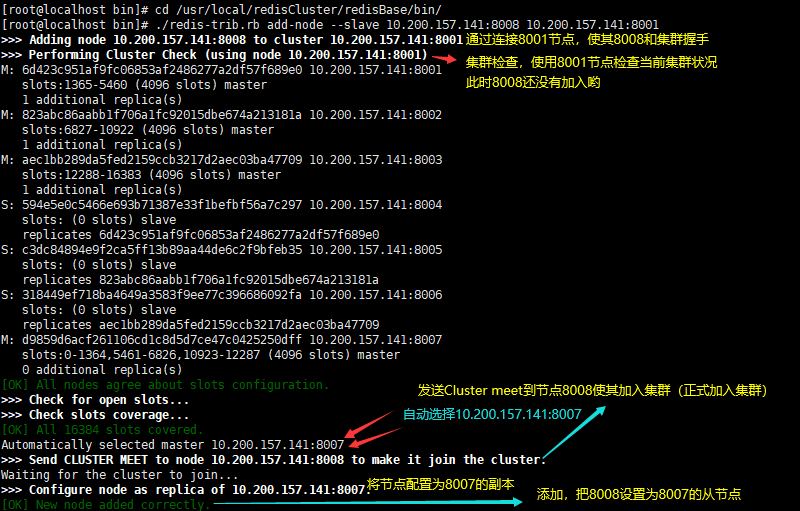
An 8008 node is added as the slave of the 8007 master node
It's the same as adding a master node, but with --slave It means that the slave node is added;
Note: however, it is not specified under which primary node to add, only 10 nodes are configured.200.157.141:8001 Join it to a cluster
 At this time redis-trib.rb The 8008 slave node will be added to the master node with fewer slave nodes Master On (obviously added to 8007 here) Master (top)
[root@localhost bin]# cd /usr/local/redisCluster/redisBase/bin/
[root@localhost bin]# ./redis-trib.rb add-node --slave 10.200.157.141:8008 10.200.157.141:8001
But then again, I don't want redis-trib To assign a slave node to any master node, I need to manually assign it to the master node Master Next, Here, I am going to assign 8009 nodes not assigned to the cluster to 8003 master nodes there --master-id Represents the specified master node node id [root@localhost bin]# cd /usr/local/redisCluster/redisBase/bin/ [root@localhost bin]# ./redis-trib.rb add-node --slave --master-id aec1bb289da5fed2159ccb3217d2aec03ba47709 10.200.157.141:8009 10.200.157.141:8002
13: Add slave nodes to the cluster (redis cli mode)
Here, I will add 8008 to node 8007 (8007 is the primary node we just added)
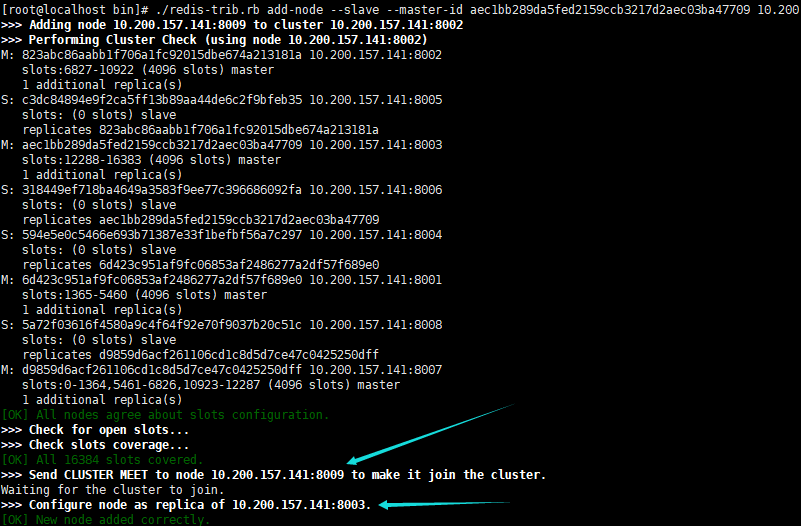
[root@MiWiFi-IR1200G-srv bin]# ./redis-cli --cluster add-node --cluster-slave --cluster-master-id a669b1cb86c103eb08e527fc6ff6a489f7fb2904 192.168.31.51:8009 192.168.31.51:8003
--cluster-slave: Join the slave node
--cluster-master-id: Set who will be connected as the master node later; Set here ID
14: Remove a primary node from the cluster (redis trib mode)
My current demand is to remove the 8007 master node, but before removing the master node, we must first remove all the slots in the 8007 master node to be removed, that is, to re partition
Here, I will move all the slots in 8007 to the 8003 master node
there del-node The instruction represents the removal of the node; d9859d6acf261106cd1c8d5d7ce47c0425250dff Represents the removed 8007 node ID
[root@localhost bin]# cd /usr/local/redisCluster/redisBase/bin/
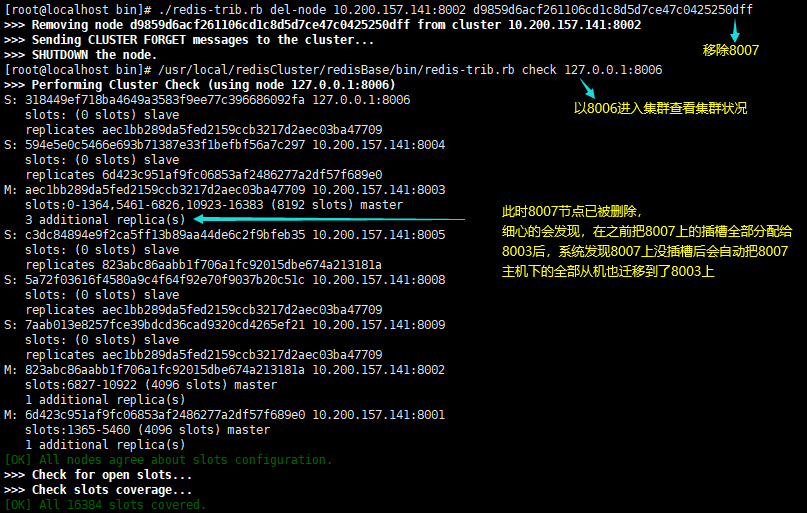
[root@localhost bin]# ./redis-trib.rb del-node 10.200.157.141:8002 d9859d6acf261106cd1c8d5d7ce47c0425250dff
>>> Removing node d9859d6acf261106cd1c8d5d7ce47c0425250dff from cluster 10.200.157.141:8002
[ERR] Node 10.200.157.141:8007 is not empty! Reshard data away and try again.
[report errors >>> From cluster 10.200.157.141:8002 Delete node from d9859d6acf261106cd1c8d5d7ce47c0425250dff]
[report errors[ERR] Node 10.200.157.141:8007 Not empty (that is, there are slots in node 8007)! Re slice the data and try again.]
# Re partition note: any IP and port can be connected, as long as it can enter the cluster
[root@localhost bin]# ./redis-trib.rb reshard 10.200.157.141:8002
How many slots do you want to move (from 1 to 16384)? 4096
(I'll move 4096 slots here)
What is the receiving node ID? aec1bb289da5fed2159ccb3217d2aec03ba47709
(Move the 4096 slot points to whose master node, here I move to 8003 master node)
Please enter all the source node IDs.
Type 'all' to use all the nodes as source nodes for the hash slots.
Type 'done' once you entered all the source nodes IDs.
Source node #1:d9859d6acf261106cd1c8d5d7ce47c0425250dff
Source node #2:done
(It's about which master node i want to go from ID Allocate these 4096 slot points in the, if set all If so, it will draw out a little slot on average)
(But I clearly point out that we should move the slot from 8007 node to 8003 node;; done (end setting)
Do you want to proceed with the proposed reshard plan (yes/no)? yes [[Enter]
15: Remove a master / slave node from the cluster (redis cli mode)
The logic of deleting nodes is the same as that in the previous section
①: Re partition the current cluster and move all the slots on the host to be deleted to other primary nodes
    ./redis-cli --cluster reshard {Any in the cluster IP}:{Any port in the cluster}
    ==>Refer to the above and for details ./redis-trib.rb reshard 10.200.157.141:8002 equally
②: Delete node (the command to delete the master node here is the same as that of the slave node)
    ./redis-cli --cluster del-node {Any in the cluster IP}:{Any port in the cluster} {To be deleted ID}
16: Remove a slave node from the cluster (redis trib mode)
Now I want to remove the 8009 slave node, because it is a slave node and has no slot, so I can remove it directly
[root@localhost bin]# ./redis-trib.rb del-node 10.200.157.141:8002 7aab013e8257fce39bdcd36cad9320cd4265ef21
>>> Removing node 7aab013e8257fce39bdcd36cad9320cd4265ef21 from cluster 10.200.157.141:8002
>>> Sending CLUSTER FORGET messages to the cluster...
>>> SHUTDOWN the node.
.