background
Welcome the Winter Olympics and look forward to the future together! 2022 Winter Olympics will begin soon. This paper uses three JS + react technology stack realizes winter and Olympic elements, and makes a 3D page full of interesting and commemorative Winter Olympic theme. The knowledge Points involved in this paper mainly include TorusGeometry torus, MeshLambertMaterial matte surface material, MeshDepthMaterial depth mesh material, custromMaterial custom material, Points particles, PointsMaterial point material, etc.
effect
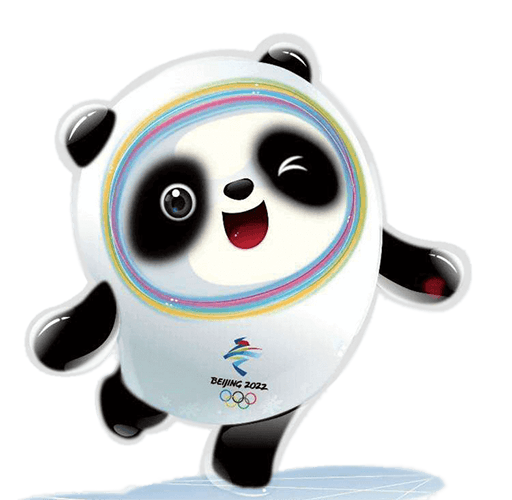
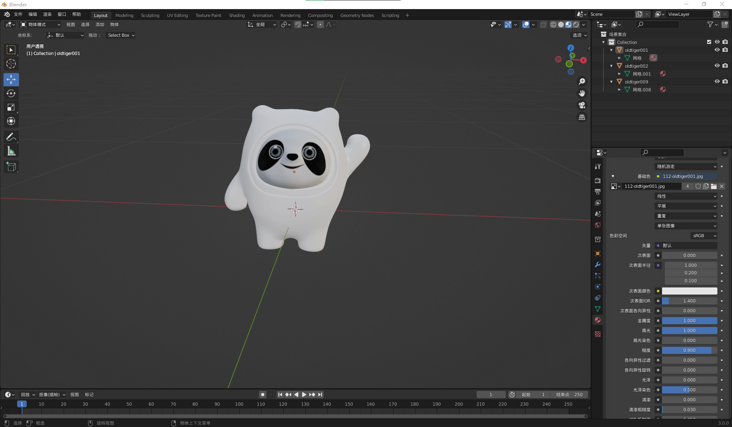
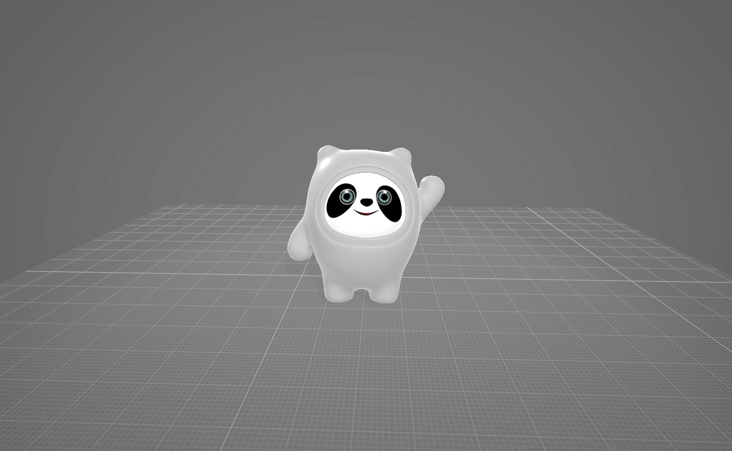
The effect is as follows: 👇 Bing dwen dwen shows that the page is mainly composed of 2022 Winter Olympic mascots, ice pier, Olympic rings and dancing flags. 🚩, Trees 🌲 And snow effect ❄️ Etc. Hold down the left mouse button and move to change the camera position to obtain different views.

👀 Online preview: https://dragonir.github.io/3d... (deployed in GitHub, the loading speed may be a little slow 😓)
realization
Introduce resources
Firstly, the library and external resources required for developing pages are introduced. OrbitControls is used for lens track control, TWEEN is used for gap animation implementation, GLTFLoader is used to load 3D models in glb or gltf format, as well as some other models, maps and other resources.
import React from 'react';
import { OrbitControls } from "three/examples/jsm/controls/OrbitControls";
import { TWEEN } from "three/examples/jsm/libs/tween.module.min.js";
import { GLTFLoader } from "three/examples/jsm/loaders/GLTFLoader";
import bingdundunModel from './models/bingdundun.glb';
// ...
Page DOM structure
The DOM structure of the page is very simple, with only the #container for rendering 3D elements and the container for displaying the loading progress olympic_loading element.
<div>
  <div id="container"></div>
  {this.state.loadingProcess === 100 ? '' : (
    <div className="olympic_loading">
      <div className="box">{this.state.loadingProcess} %</div>
    </div>
  )}
</div>
Scene initialization
Initialize render container, scene, camera. For the detailed knowledge of this part, you can refer to my previous articles, which will not be repeated in this article.
container = document.getElementById('container');
renderer = new THREE.WebGLRenderer({ antialias: true });
renderer.setPixelRatio(window.devicePixelRatio);
renderer.setSize(window.innerWidth, window.innerHeight);
renderer.shadowMap.enabled = true;
container.appendChild(renderer.domElement);
scene = new THREE.Scene();
scene.background = new THREE.TextureLoader().load(skyTexture);
camera = new THREE.PerspectiveCamera(60, window.innerWidth / window.innerHeight, 0.1, 1000);
camera.position.set(0, 30, 100);
camera.lookAt(new THREE.Vector3(0, 0, 0));
Add light
In this example, two kinds of light sources are mainly added: DirectionalLight is used to generate shadows, adjust the brightness of the page, and AmbientLight is used to render the environment atmosphere.
// Direct light
const light = new THREE.DirectionalLight(0xffffff, 1);
light.intensity = 1;
light.position.set(16, 16, 8);
light.castShadow = true;
light.shadow.mapSize.width = 512 * 12;
light.shadow.mapSize.height = 512 * 12;
light.shadow.camera.top = 40;
light.shadow.camera.bottom = -40;
light.shadow.camera.left = -40;
light.shadow.camera.right = 40;
scene.add(light);
// Ambient light
const ambientLight = new THREE.AmbientLight(0xcfffff);
ambientLight.intensity = 1;
scene.add(ambientLight);
Loading schedule management
Use three The loading manager manages the loading progress of the page model and executes some methods related to the loading progress in its callback function. The page loading progress in this example is completed in onProgress. When the page loading progress is 100%, the TWEEN shot gap animation is executed.
const manager = new THREE.LoadingManager();
manager.onStart = (url, loaded, total) => {};
manager.onLoad = () => { console.log('Loading complete!')};
manager.onProgress = (url, loaded, total) => {
  if (Math.floor(loaded / total * 100) === 100) {
    this.setState({ loadingProcess: Math.floor(loaded / total * 100) });
    // Shot gap animation
    Animations.animateCamera(camera, controls, { x: 0, y: -1, z: 20 }, { x: 0, y: 0, z: 0 }, 3600, () => {});
  } else {
    this.setState({ loadingProcess: Math.floor(loaded / total * 100) });
  }
};
Create ground
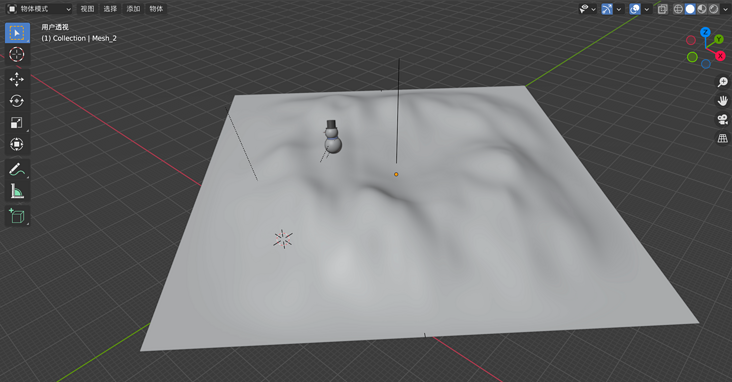
The bumpy ground in this example is created by using Blender to build the model, and then exporting glb format loading. Of course, you can only use three JS with its own plane mesh and bump map can also achieve a similar effect. The advantage of using Blender self built model is that it can freely and visually adjust the fluctuation effect of the ground.
var loader = new THREE.GLTFLoader(manager);
loader.load(landModel, function (mesh) {
  mesh.scene.traverse(function (child) {
    if (child.isMesh) {
      child.material.metalness = .1;
      child.material.roughness = .8;
      // ground
      if (child.name === 'Mesh_2') {
        child.material.metalness = .5;
        child.receiveShadow = true;
      }
  });
  mesh.scene.rotation.y = Math.PI / 4;
  mesh.scene.position.set(15, -20, 0);
  mesh.scene.scale.set(.9, .9, .9);
  land = mesh.scene;
  scene.add(land);
});
Bing dwen dwen Winter Olympic mascot
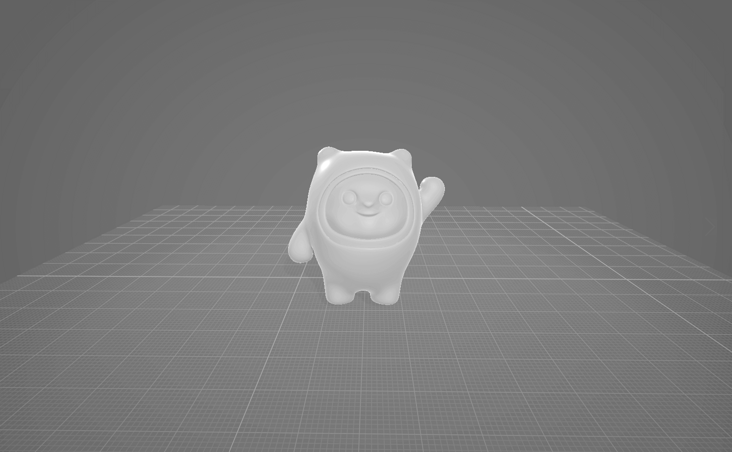
Now add the Bing dwen dwen Winter Olympic mascot. 🐼, Bing dwen dwen is also loaded by glb format. Its original model comes from here , after the current model is free from this website, the original model is built using 3D max. I found that it can not be directly used in the web page. I need to convert the model format in Blender and adjust the map normal of the model to restore the rendering effect.
Original model:
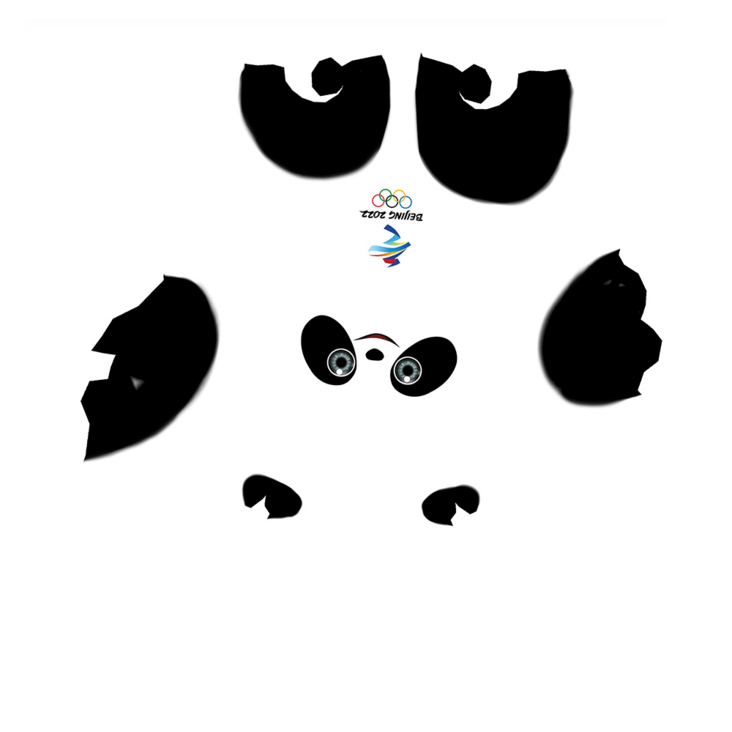
Map of Bing dwen dwen:
Convert to the model supported by Blender, adjust the model map normals in Blender, and add the map:
Export glb format:
📖 To add a mapping tutorial portal to a model in Blender: How to map the model in Blender
Bing dwen dwen 🐼 It can be found that there is a layer of transparent plastic or glass shell outside it. This effect can be achieved by modifying the transparency, metallicity, roughness and other material parameters of the model. Finally, it can be rendered as 👆 The effect shown in the banner diagram is shown in the following code.
loader.load(bingdundunModel, mesh => {
  mesh.scene.traverse(child => {
    if (child.isMesh) {
      // inside
      if (child.name === 'oldtiger001') {
        child.material.metalness = .5
        child.material.roughness = .8
      }
      // Translucent shell
      if (child.name === 'oldtiger002') {
        child.material.transparent = true;
        child.material.opacity = .5
        child.material.metalness = .2
        child.material.roughness = 0
        child.material.refractionRatio = 1
        child.castShadow = true;
      }
    }
  });
  mesh.scene.rotation.y = Math.PI / 24;
  mesh.scene.position.set(-8, -12, 0);
  mesh.scene.scale.set(24, 24, 24);
  scene.add(mesh.scene);
});
Create the Olympic rings
The five Olympic rings are realized by TorusGeometry, a basic geometric model. Five circular rings are created, and their material, color and position are adjusted to form a five ring structure in the order of blue, black, red, yellow and green. The five rings material uses MeshLambertMaterial.
const fiveCycles = [
  { key: 'cycle_0', color: 0x0885c2, position: { x: -250, y: 0, z: 0 }},
  { key: 'cycle_1', color: 0x000000, position: { x: -10, y: 0, z: 5 }},
  { key: 'cycle_2', color: 0xed334e, position: { x: 230, y: 0, z: 0 }},
  { key: 'cycle_3', color: 0xfbb132, position: { x: -125, y: -100, z: -5 }},
  { key: 'cycle_4', color: 0x1c8b3c, position: { x: 115, y: -100, z: 10 }}
];
fiveCycles.map(item => {
  let cycleMesh = new THREE.Mesh(new THREE.TorusGeometry(100, 10, 10, 50), new THREE.MeshLambertMaterial({
    color: new THREE.Color(item.color),
    side: THREE.DoubleSide
  }));
  cycleMesh.castShadow = true;
  cycleMesh.position.set(item.position.x, item.position.y, item.position.z);
  meshes.push(cycleMesh);
  fiveCyclesGroup.add(cycleMesh);
});
fiveCyclesGroup.scale.set(.036, .036, .036);
fiveCyclesGroup.position.set(0, 10, -8);
scene.add(fiveCyclesGroup);
💡 TorusGeometry torus
TorusGeometry is a class used to generate torus geometry.
Constructor:
TorusGeometry(radius: Float, tube: Float, radialSegments: Integer, tubularSegments: Integer, arc: Float)
- Radius: radius of the ring, from the center of the ring to the center of the pipe (cross section). The default value is 1.
- tube: the radius of the pipe. The default value is 0.4.
- radialSegments: the number of segments of the torus. The default value is 8.
- tubularSegments: the number of pipe segments. The default value is 6.
- arc: the center angle of the ring (in radians). The default value is math PI * 2.
💡 MeshLambertMaterial matte surface material
A non glossy surface material without specular highlights. The material uses a non physical based Lambertian model to calculate reflectivity. This can well simulate some surfaces (such as untreated wood or stone), but it cannot simulate shiny surfaces with specular highlights (such as painted wood).
Constructor:
MeshLambertMaterial(parameters : Object)
- parameters: (optional) an object that defines the appearance of a material, with one or more attributes. Any property of the material can be passed in from here.
Create flag
The flag model is from sketchfab Download, also need a flagpole, you can add a cylindrical cube in Blender, and adjust the appropriate length, width and height to combine with the flag surface. Originally, I wanted to add the flag map to the flag model, but in order to avoid using it incorrectly and causing sensitive problems, I used the flag map of Beijing 2022 Winter Olympic Games 😂.
Flag map:

Animation has been added to the flag surface, and the animation frame playback needs to be performed in the code.
loader.load(flagModel, mesh => {
  mesh.scene.traverse(child => {
    if (child.isMesh) {
      child.castShadow = true;
      // flag
      if (child.name === 'mesh_0001') {
        child.material.metalness = .1;
        child.material.roughness = .1;
        child.material.map = new THREE.TextureLoader().load(flagTexture);
      }
      // flagpole
      if (child.name === 'Cylinder') {
        child.material.metalness = .6;
        child.material.roughness = 0;
        child.material.refractionRatio = 1;
        child.material.color = new THREE.Color(0xeeeeee);
      }
    }
  });
  mesh.scene.rotation.y = Math.PI / 24;
  mesh.scene.position.set(2, -7, -1);
  mesh.scene.scale.set(4, 4, 4);
  // animation
  let meshAnimation = mesh.animations[0];
  mixer = new THREE.AnimationMixer(mesh.scene);
  let animationClip = meshAnimation;
  let clipAction = mixer.clipAction(animationClip).play();
  animationClip = clipAction.getClip();
  scene.add(mesh.scene);
});
Create trees
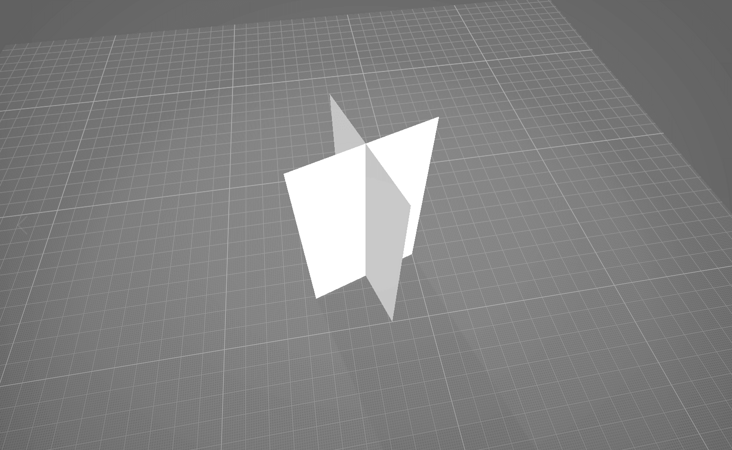
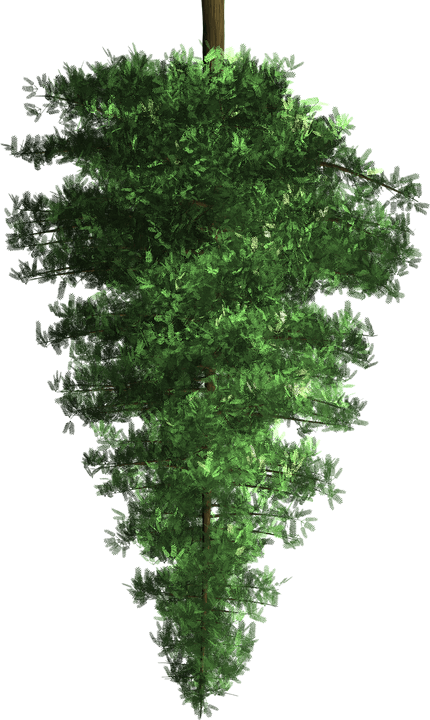
In order to enrich the picture and create a winter atmosphere, several pine trees were added 🌲 As a decoration. A skill is very important when adding pine trees: we know that because the tree model is very complex and has a lot of faces, too many faces will reduce the page performance and cause jamming. Two are used in this article, as shown in the figure below 👇 The two intersecting faces shown are used as the base of the tree. In this way, the tree has only two faces. Using this technique can greatly optimize the page performance, and the tree 🌲 It also looks 3D.
Texture mapping:
In order to make the tree transparent only in the transparent part of the map and opaque in other places, and can produce tree shadow instead of box shadow, you need to add the following two materials to the tree model: MeshPhysicalMaterial and MeshDepthMaterial. The two materials use the same texture map, in which MeshDepthMaterial is added to the custromMaterial attribute of the model.
 let treeMaterial = new THREE.MeshPhysicalMaterial({
  map: new THREE.TextureLoader().load(treeTexture),
  transparent: true,
  side: THREE.DoubleSide,
  metalness: .2,
  roughness: .8,
  depthTest: true,
  depthWrite: false,
  skinning: false,
  fog: false,
  reflectivity: 0.1,
  refractionRatio: 0,
});
let treeCustomDepthMaterial = new THREE.MeshDepthMaterial({
  depthPacking: THREE.RGBADepthPacking,
  map: new THREE.TextureLoader().load(treeTexture),
  alphaTest: 0.5
});
loader.load(treeModel, mesh => {
  mesh.scene.traverse(child =>{
    if (child.isMesh) {
      child.material = treeMaterial;
      child.custromMaterial = treeCustomDepthMaterial;
    }
  });
  mesh.scene.position.set(14, -9, 0);
  mesh.scene.scale.set(16, 16, 16);
  scene.add(mesh.scene);
  // Clone the other two trees
  let tree2 = mesh.scene.clone();
  tree2.position.set(10, -8, -15);
  tree2.scale.set(18, 18, 18);
  scene.add(tree2)
  // ...
});
The effect can also be achieved from 👆 As can be seen from the Banner picture above, I canceled the shadow display of the tree in order to make the picture better.
📌 In 3D function development, some unimportant decoration models can adopt this strategy to optimize.
💡 MeshDepthMaterial depth mesh material
A material that draws geometry by depth. The depth is based on the near and far plane of the camera. White is the closest and black is the farthest.
Constructor:
MeshDepthMaterial(parameters: Object)
- parameters: (optional) an object that defines the appearance of a material, with one or more attributes. Any property of the material can be passed in from here.
Special properties:
- . depthPacking[Constant]: the code of depth packing. The default is BasicDepthPacking.
- . displacementMap[Texture]: displacement maps affect the position of mesh vertices. Unlike other maps that only affect the lighting and shadows of materials, displaced vertices can cast shadows, block other objects, and act as real geometry.
- . displacementScale[Float]: the degree of influence of the displacement map on the mesh (black is no displacement, white is the maximum displacement). If no displacement map is set, this value is not applied. The default value is 1.
- . displacementBias[Float]: the offset of the displacement map on the mesh vertices. If no displacement map is set, this value is not applied. The default value is 0.
💡 custromMaterial custom material
Adding custromMaterial custom material attribute to the mesh can realize the shadow of the content area of the transparent peripheral png picture map.
Create snowflakes
Create snowflakes ❄️, You need particle knowledge. THREE.Points is a class used to create points. It is also used to manage particles in batch. In this example, 1500 snowflake particles are created, and they are set with random coordinates defining three-dimensional space and random moving speeds in horizontal and vertical directions.
// Snowflake map
let texture = new THREE.TextureLoader().load(snowTexture);
let geometry = new THREE.Geometry();
let range = 100;
let pointsMaterial = new THREE.PointsMaterial({
  size: 1,
  transparent: true,
  opacity: 0.8,
  map: texture,
  // Background fusion
  blending: THREE.AdditiveBlending,
  // Depth of field attenuation
  sizeAttenuation: true,
  depthTest: false
});
for (let i = 0; i < 1500; i++) {
  let vertice = new THREE.Vector3(Math.random() * range - range / 2, Math.random() * range * 1.5, Math.random() * range - range / 2);
  // Longitudinal velocity
  vertice.velocityY = 0.1 + Math.random() / 3;
  // Lateral velocity
  vertice.velocityX = (Math.random() - 0.5) / 3;
  // Add to geometry
  geometry.vertices.push(vertice);
}
geometry.center();
points = new THREE.Points(geometry, pointsMaterial);
points.position.y = -30;
scene.add(points);
💡 Points particles
Three.js, rain 🌧️, snow ❄️, Cloud ☁️, stars ✨ And other common particles in life can be simulated using Points.
Constructor:
new THREE.Points(geometry, material);
- The constructor can accept two parameters, a geometry and a material. The geometry parameter is used to determine the position coordinates of particles, and the material parameter is used to format particles;
- Simple geometry objects such as BoxGeometry and sphereometry can be used as parameters of particle system;
- Generally speaking, you need to assign vertices to determine the position of particles.
💡 PointsMaterial point material
Through three Pointsmaterial can set the attribute parameters of particles. It is the default material used by Points.
Constructor:
PointsMaterial(parameters : Object)
- parameters: (optional) an object that defines the appearance of a material, with one or more attributes. Any property of the material can be passed in from here.
💡 Material properties blending
Material Blending attribute mainly controls the superposition mode of texture fusion The values of the blending property include:
- THREE.NormalBlending: default
- THREE. Additive blending: additive blending mode
- THREE.SubtractiveBlending: subtractive blending mode
- THREE. Multiplicyblending: multiplicative fusion mode
- THREE.CustomBlending: custom blending mode, and blendSrc, .blendDst or The blendEquation attribute is used in combination
💡 Material properties sizeAttenuation
Whether the size of particles will be attenuated by the camera depth. The default is true (perspective cameras only).
💡 Three.js vector
Vector x and vector z have three-dimensional components, and vector x and vector z have four-dimensional components.
Related API:
- Vector2: 2D vector
- Vector3: 3D vector
- Vector4: four dimensional vector
Lens control, zoom adaptation, animation
controls = new OrbitControls(camera, renderer.domElement);
controls.target.set(0, 0, 0);
controls.enableDamping = true;
// Disable translation
controls.enablePan = false;
// Disable scaling
controls.enableZoom = false;
// Vertical rotation angle limit
controls.minPolarAngle = 1.4;
controls.maxPolarAngle = 1.8;
// Horizontal rotation angle limit
controls.minAzimuthAngle = -.6;
controls.maxAzimuthAngle = .6;
window.addEventListener('resize', () => {
  camera.aspect = window.innerWidth / window.innerHeight;
  camera.updateProjectionMatrix();
  renderer.setSize(window.innerWidth, window.innerHeight);
}, false);
function animate() {
requestAnimationFrame(animate);
renderer.render(scene, camera);
controls && controls.update();
// Flag animation update
mixer && mixer.update(new THREE.Clock().getDelta());
// Lens animation
TWEEN && TWEEN.update();
// Five ring rotation
fiveCyclesGroup && (fiveCyclesGroup.rotation.y += .01);
// After the vertex changes, it needs to be updated, otherwise the raindrop effect cannot be realized
points.geometry.verticesNeedUpdate = true;
// Snowflake animation update
let vertices = points.geometry.vertices;
vertices.forEach(function (v) {
v.y = v.y - (v.velocityY);
v.x = v.x - (v.velocityX);
if (v.y <= 0) v.y = 60;
if (v.x <= -20 || v.x >= 20) v.velocityX = v.velocityX * -1;
});
}🔗 Full code: https://github.com/dragonir/3...
summary
💡 The new knowledge points mainly included in this paper include:
- TorusGeometry torus
- MeshLambertMaterial matte surface material
- MeshDepthMaterial depth mesh material
- custromMaterial custom material
- Points particles
- PointsMaterial point material
- Material properties blending,. sizeAttenuation
- Three.js vector
Space for further optimization:
- Add more interactive functions and interface styles to further optimize;
- Mascot Bing dwen dwen adds skeletal animation, and controls the movement and interaction through the mouse and keyboard.
Forecast for next period:
- Metahuman! Three.js portrait optimization
Want to know about scene initialization, lighting, shadows, base geometry, meshes, materials and other three JS related knowledge, you can read my previous articles. If you think the article is helpful to you, don't forget to click three times 👍.
appendix
- [1]. 1000 powder! Use three JS make an exclusive 3D Medal 🥇
- [2]. Three.js to realize the 3D creative page of the Spring Festival in the year of the tiger
- [3]. Three.js to realize the 3D dynamic Logo of Facebook metauniverse
- [4]. Three.js to achieve 3D panoramic detective games
- [5]. Three.js to achieve cool acid style 3D pages
- [6]. Conversion of 3dx model to blender supported format