Tomcat multi instance
Install the jdk
jdk must be installed before deploying tomcat, because jdk is the necessary environment for Tomcat to run.
1. # turn off the firewall
systemctl stop firewalld
systemctl disable firewalld
setenforce 0
2. # transfer the software package required to install Tomcat to the / opt directory
apache-tomcat-9.0.16.tar.gz
jdk-8u201-linux-x64.rpm
3. # switch to / opt and install JDK
cd /opt
rpm -ivh jdk-8u201-linux-x64.rpm
4. # view the java version
java -version
Install tomcat
1. # switch to / opt and unzip the tomcat package
cd /opt
tar -zxf apache-tomcat-9.0.16.tar.gz
2. # create a new folder / usr/local/tomcat
mkdir /usr/local/tomcat
3. # copy the unzipped package to / usr/local / and rename it
cp -a apache-tomcat-9.0.16 /usr/local/tomcat/tomcat1
cp -a apache-tomcat-9.0.16 /usr/local/tomcat/tomcat2
Configure tomcat environment variables
vim /etc profile
export JAVA_HOME=/usr/java/jdk1.8.0_201-amd64
export CLASSPATH=$JAVA_HOME/lib/tools.jar:$JAVA_HOME/lib/dt.jar
export PATH=$JAVA_HOME/bin:$PATH
Modify the main configuration file in tomcat2
vim /usr/local/tomcat/tomcat2/conf/server.xml
22 <Server port="8006" shutdown="SHUTDOWN">
69 <Connector port="8081" protocol="HTTP/1.1"
116 <Connector port="8010" protocol="AJP/1.3" redirectPort="8443" />
Modify startup and shutdown scripts
1. # modify / usr / local / Tomcat / tomcat1 / bin / startup sh
vim /usr/local/tomcat/tomcat1/bin/startup.sh
export CATALINA_HOME1=/usr/local/tomcat/tomcat1
export CATALINA_BASE1=/usr/local/tomcat/tomcat1
export TOMCAT_HOME1=/usr/local/tomcat/tomcat1
2. # modify / usr / local / Tomcat / tomcat1 / bin / shutdown of tomcat1 sh
vim /usr/local/tomcat/tomcat1/bin/shutdown.sh
export CATALINA_HOME1=/usr/local/tomcat/tomcat1
export CATALINA_BASE1=/usr/local/tomcat/tomcat1
export TOMCAT_HOME1=/usr/local/tomcat/tomcat1
3. # modify / usr / local / Tomcat / tomcat2 bin / startup sh
vim /usr/local/tomcat/tomcat2/bin/startup.sh
export CATALINA_HOME1=/usr/local/tomcat/tomcat2
export CATALINA_BASE1=/usr/local/tomcat/tomcat2
export TOMCAT_HOME1=/usr/local/tomcat/tomcat2
4. # modify / usr / local / Tomcat / tomcat2 / bin / shutdown sh
vim /usr/local/tomcat/tomcat2/bin/shutdown.sh
export CATALINA_HOME1=/usr/local/tomcat/tomcat2
export CATALINA_BASE1=/usr/local/tomcat/tomcat2
export TOMCAT_HOME1=/usr/local/tomcat/tomcat2
Start tomcat and view
1. # start tomcat1
cd /usr/local/tomcat/
./tomcat1/bin/startup.sh
2. # start tomcat2
./tomcat2/bin/startup.sh
3. # check whether the startup is successful
ss -ntap|grep java
http://192.168.80.130:8080/
Nginx+Tomcat load balancing, dynamic and static separation
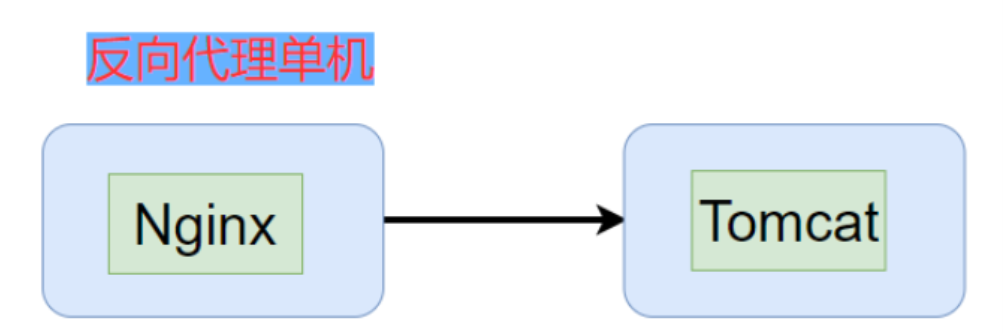
- In the standalone mode, Tomcat runs alone and directly accepts user requests. It is not recommended. The reverse agent, running on a single machine, provides an nginx as the reverse agent, which can provide static response from nginx and dynamic jsp proxy to Tomcat
- LNMT: Linux + Nginx + MySQL + Tomcat
- LAMT: Linux + Apache(Httpd)+ MySQL + Tomcat
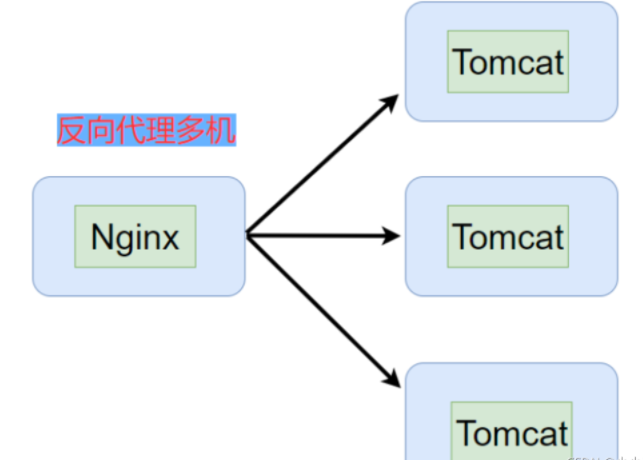
- In front of one Nginx, reverse proxy and load balancing scheduling are performed for multiple Tomcat instances. The pure dynamic pages deployed on Tomcat are more suitable
- LNMT: Linux + Nginx + MySQL + Tomcat
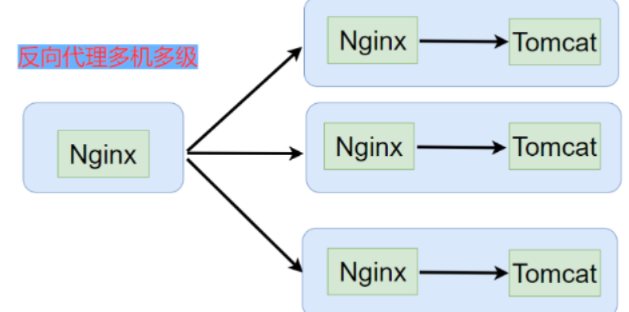
- Multilevel agent
- LNNMT: Linux + Nginx + Nginx + MySQL + Tomcat
The problem with dynamic servers is that the concurrency capability is too weak, and multiple dynamic servers are often required to provide services together. How to allocate concurrent pressure requires scheduling. A certain scheduling strategy is adopted to distribute requests to different servers, which is Load Balance.
When single machine Tomcat evolves multi machine and multi-level deployment, a problem is highlighted, which is Session. The origin of this problem is that the HTTP protocol did not think of the future development at the beginning of its design.
Deploy Nginx load balancer
Environmental profile:
ngnix: 192.168.80.130
tomcat1: 192.168.80.133
tomcat2: 192.168.80.129
1. #Turn off firewall systemctl stop firewalld setenforce 0 2. #Install dependency package yum -y install pcre-devel zlib-devel gcc gcc-c++ make 3. #Create new users and groups for easy management useradd -M -s /sbin/nologin nginx 4. #Switch to the opt directory and transfer the downloaded compressed package to extract it cd /opt tar -zxf nginx-1.12.0.tar.gz 4. #Switch to the decompressed directory and compile cd nginx-1.12.0 ./configure \ --prefix=/usr/local/nginx \ --user=nginx \ --group=nginx \ --with-http_stub_status_module 5. #install make && make install -j4 6. #Make a soft connection and let the system recognize the operation commands of nginx ln -s /usr/local/nginx/sbin/nginx /usr/local/sbin/ 7. #Add nginx command to service cd /lib/systemd/system vim nginx.service #!/bin.bash [Unit] Description=nginx After=network.target [Service] Type=forking PIDFile=/usr/local/nginx/logs/nginx.pid ExecStart=/usr/local/nginx/sbin/nginx ExecReload=/usr/bin/kill -s HUP $MAINPID ExecStop=/usr/bin/kill -s QUIT $MAINPID PrivateTmp=true [Install] WantedBy=multi-user.target 8. #Reload the unit Start service systemctl daemon-reload systemctl start nginx 9. #See if it started successfully ss -ntap|grep nginx http://192.168.80.130/
Deploy the first Tomcat
192.168.80.129
1. #Turn off firewall
systemctl stop firewalld
setenforce 0
2. #Switch to / opt and transfer the software packages required to install Tomcat to the / opt directory
apache-tomcat-9.0.16.tar.gz
jdk-8u201-linux-x64.rpm
3. #Install JDK
rpm -ivh jdk-8u201-linux-x64.rpm
4. #Modify the variable configuration file
vim /etc/profile
export JAVA_HOME=/usr/java/jdk1.8.0_201-amd64
export CLASSPATH=$JAVA_HOME/lib/tools.jar:$JAVA_HOME/lib/dt.jar
export PATH=$JAVA_HOME/bin:$PATH
5. #Refresh profile
source /etc/profile
6. #Switch to / opt and unzip the tomcat package
cd /opt
tar -zxf apache-tomcat-9.0.16.tar.gz
7. #Copy the extracted package to / usr/local / and rename it
cp -r apache-tomcat-9.0.16 /usr/local/tomcat
8. #Add user set primary group
useradd -s /sbin/nologin tomcat
chown tomcat:tomcat /usr/local/tomcat -R
9. #New service file
vim /etc/systemd/system/tomcat.service
[Unit]
Description=Tomcat
#After=syslog.target network.target remote-fs.target nss-lookup.target
After=syslog.target network.target
[Service]
Type=forking
ExecStart=/usr/local/tomcat/bin/startup.sh
ExecStop=/usr/local/tomcat/bin/shutdown.sh
RestartSec=3
PrivateTmp=true
User=tomcat
Group=tomcat
[Install]
WantedBy=multi-user.target
10. #Reload the service and start it to see if it starts successfully
systemctl daemon-reload
systemctl start tomcat
ss -ntap |grep 8080
#############New dynamic page site###########3
11. #Switch to webapp and create a new test directory
cd /usr/local/tomcat/webapps/
mkdir test
12. #Create dynamic page file
vim test/index.jsp
<%@ page language="java" import="java.util.*" pageEncoding="UTF-8"%>
<html>
<head>
<title>JSP test1 page </title>
</head>
<body>
<% out.println("Dynamic page 1,http://www.test1.com");%>
</body>
</html>
13. #Modify master profile
vim /usr/local/tomcat/conf/server.xml
Delete the original site module
add to
<Host name="localhost" appBase="webapps"
unpackWARs="true" autoDeploy="true" xmlValidation="false"
xmlNamespaceAware="false">
<Context docBase="/usr/local/tomcat/webapps/test"
path="" reloadable="true" />
</Host>
14. #Restart the service and test it on the web page
systemctl restart tomcat.service
http://192.168.80.129:8080/Deploy the second Tomcat
1. #Turn off firewall
systemctl stop firewalld
setenforce 0
2. #Switch to / opt and transfer the software packages required to install Tomcat to the / opt directory
apache-tomcat-9.0.16.tar.gz
jdk-8u201-linux-x64.rpm
3. #Install JDK
rpm -ivh jdk-8u201-linux-x64.rpm
4. #Modify environment variable configuration file
vim /etc/profile
export JAVA_HOME=/usr/java/jdk1.8.0_201-amd64
export CLASSPATH=$JAVA_HOME/lib/tools.jar:$JAVA_HOME/lib/dt.jar
export PATH=$JAVA_HOME/bin:$PATH
5. #Refresh profile
source /etc/profile
6. #Switch to / opt and unzip the tomcat package
cd /opt
tar -zxf apache-tomcat-9.0.16.tar.gz
7. #Copy the extracted package to / usr/local / and rename it
cp -r apache-tomcat-9.0.16 /usr/local/tomcat
8. #Add user set primary group
useradd -s /sbin/nologin tomcat
chown tomcat:tomcat /usr/local/tomcat -R
9. #New service file
vim /etc/systemd/system/tomcat.service
[Unit]
Description=Tomcat
#After=syslog.target network.target remote-fs.target nss-lookup.target
After=syslog.target network.target
[Service]
Type=forking
ExecStart=/usr/local/tomcat/bin/startup.sh
ExecStop=/usr/local/tomcat/bin/shutdown.sh
RestartSec=3
PrivateTmp=true
User=tomcat
Group=tomcat
[Install]
WantedBy=multi-user.target
10. #Reload the service and start it to see if it starts successfully
systemctl daemon-reload
systemctl start tomcat
ss -ntap |grep 8080
#############New dynamic page site###########3
11. #Switch to webapp and create a new test directory
cd /usr/local/tomcat/webapps/
mkdir test
12. #Create dynamic page file
vim test/index.jsp
<%@ page language="java" import="java.util.*" pageEncoding="UTF-8"%>
<html>
<head>
<title>JSP test2 page </title>
</head>
<body>
<% out.println("Dynamic page 2,http://www.test2.com");%>
</body>
</html>
13. #Modify master profile
vim /usr/local/tomcat/conf/server.xml
Delete the original site module
add to
<Host name="localhost" appBase="webapps"
unpackWARs="true" autoDeploy="true" xmlValidation="false"
xmlNamespaceAware="false">
<Context docBase="/usr/local/tomcat/webapps/test"
path="" reloadable="true" />
</Host>
14. #Restart the service and test it on the web page
systemctl restart tomcat.service
http://192.168.80.133:8080/nginx configuration
Prepare static pages and pictures
1. #Switch to / usr/local/nginx/html /
cd /usr/local/nginx/html/
2. #Create a test folder and create a static web page in it
mkdir test
cd test
vim test.html
this is static test web !!
3. #Drag a picture to test and rename it 1 jpg
mv 1.jfif 1.jpg
4. #Configure master profile
vim /usr/local/nginx/conf/nginx.conf
#Configure the load balancing server list. The weight parameter indicates the weight. The higher the weight, the greater the probability of being assigned
#gzip on;
upstream tomcat_server {
server 192.168.59.105:8080 weight=1;
server 192.168.59.118:8080 weight=1;
}
#Dynamic and static separation
location ~ .*\.jsp$ {
proxy_pass http://tomcat_server;
proxy_set_header HOST $host;
proxy_set_header X-Real-IP $remote_addr;
proxy_set_header X-Forwarded-For $proxy_add_x_forwarded_for;
}
#Static picture regularization
location ~* .*\.(jpg|html|png|gif)$ {
root /usr/local/nginx/html/test;
}
location / {
root html;
index index.html index.htm;
}
5. #Restart nginx and test
http://192.168.80.130/1.jpg
http://192.168.80.130/test.html