Hey, hey, ha ha, I haven't sat down for a long time and made up some notes. Usually, ECS is used to it. docker is installed with one command, but the untimely new computer room is not so lucky. How untimely is it? Not only does the server have no external network, but also there is no mobile network around a kilometer, To check a data, you can only walk kilometers away to search the network.
Don't fight unprepared War: I'm a rookie. Wouldn't it be even worse if such an environment was added? In order to successfully complete the deployment, I also fought hard. Ha ha, ha ha, I found a lot of installation materials about offline docker on the Internet. All kinds of fancy play methods are really contested by hundreds of schools. I searched and collected 1 mole of materials and went to the site with anxiety.
At the first sight of the server configuration, wow, this configuration is really luxurious. You are right, proper local tyrant. This is just the tip of the iceberg. Just ask you a question, extravagance or not.

Fledgling and in a hurry: I started the first offline installation of docker with an uneasy heart. The first installation was steadily declared to have failed. According to the error, I rushed to find aunt Du kilometers away. After finding aunt Du, I repaired the old problems and new problems with full expectation. In this way, Docker still stubbornly couldn't get up after N rounds. It's time to get off work and fight again tomorrow.
Regroup and fight again in the future: install a centos8 virtual machine environment on your computer, continue to search and try many times. The test is successful. Organize your ideas, have a good sleep and fight again in the future.
According to the gourd painting ladle, World War I was successful: I returned to the computer room the next day and found a new server. According to the successful experience last night, World War I was successful. The same method continues to build the server that failed yesterday, but it still fails, and the success can't go back. Fortunately, I have a habit. According to the new environment, I like to operate step by step, record step by step, find yesterday's installation notes, operate step by step, and finally successfully recycle.
Hahaha, after talking for a long time, haw has not entered today's theme. Hahaha, are you worried about me? Uh huh, OK, let me sort out and send out the notes of successful installation for your reference.
1. Download docker offline installation package
The download of Docker offline installation package is very simple. You can directly select your own appropriate version according to the following address:
https://download.docker.com/linux/static/stable/x86_64/
But when choosing a specific version, give some suggestions: don't choose a version that is too low. The performance and other aspects of the low version are better than ideal. The version is too new and I don't know whether there is a problem with stability. Hahaha, do you think I'm too conservative? Uh huh, my starting point is that stability is the first point. I suggest choosing a version above 19, The above are purely personal narrow views. Please forgive me if you offend me.
I'm used to using docker-19.03.6 Tgz, choose it this time.
2. Install docker
2.1 installation package upload
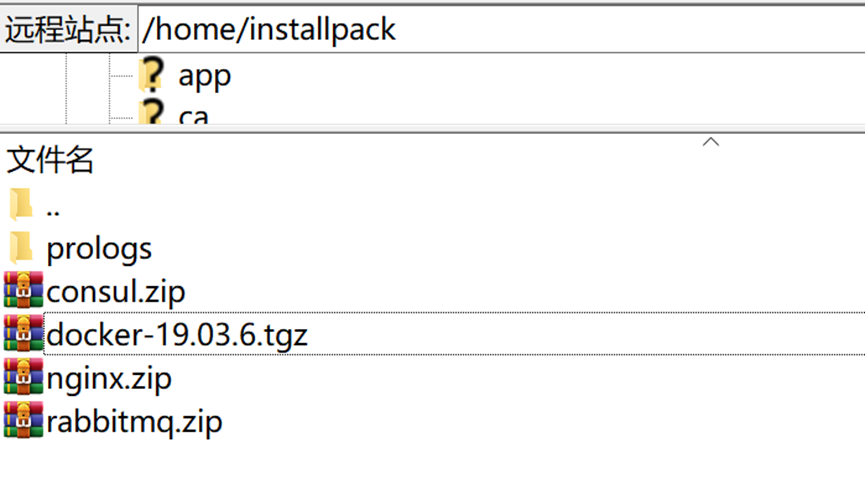
Upload the docker installation package prepared in the previous step to the offline server. I am used to uploading it to the directory: / home/installpack. If there are any requirements in the specific directory, operate according to my hobbies.
2.2 unpacking the installation package
First, you need to enter the installation package and perform decompression. Of course, it's unnecessary to enter the installation package by determining the path. Ha, I don't mind the trouble. I'll do it step by step. Execute the following commands respectively
cd /home/installpack
tar xzvf docker-19.03.6.tgz
After the implementation, you will see a docker folder, and you will be successful. In this step, I believe it is difficult for everyone to think wrong. You won't be given a chance to be wrong.

2.3 installation
The installation is also very simple. You only need to execute the following two commands:
cp docker/* /usr/bin/
dockerd &
You may not be so lucky at this step. If it is the first installation, I think you will continue to be smooth as before. As long as you don't report an error, you will succeed.
2.4 testing
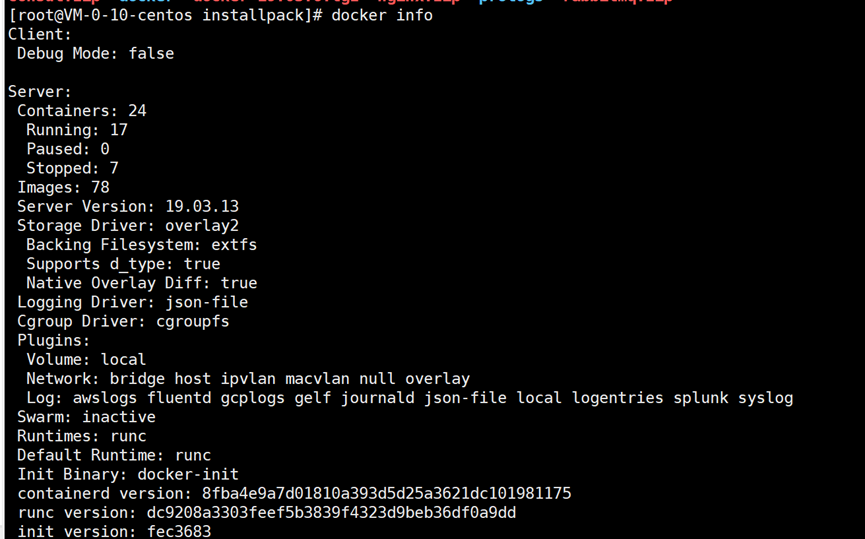
To test whether the installation is successful, just execute the following command:
docker info
The following interface is displayed. Congratulations. The first step of installation is successful, and the dawn is at hand.
Of course, you don't need to care too much about the meaning of these contents, or simply see whether the installation is successful. As long as there is no red word, everything is fine.
If you're wrong, don't panic. There's more below
2.5 error reporting and fallback
Whether an error is reported during installation or in the test results, it is an error. If it is wrong, please complete the rollback according to the following steps.
First of all, think about whether you have found the tutorial operations of other masters on the Internet. If so, you should first think about what operations you have done and restore them all. In particular, if you have modified some configuration files, does it make sense to think that a good memory is better than a bad pen.
Next, delete the installation file and execute the following commands:
rm -rf /var/run/docker
rm -rf /var/lib/docker
rm -rf /var/run/docker.pid
rm -rf /var/run/docker.sock

stop it docker Related processes
ps -aux | grep docker
kill Drop all the processes found

relieve docker Port occupied by related processes
netstat -nplt | grep docker
After completing the above operations, you can execute the command of installation + test again. If repeated execution is unpleasant for many times, I suggest you can take out the problem repair killer: restart the server
3. Set docker to serve the system
3.1 create and configure containerd service
Create the containerd folder in the etc directory, and create containerd Service file. The relevant commands are as follows:
	mkdir /etc/containerd
	touch /usr/lib/systemd/system/containerd.service
	vi /usr/lib/systemd/system/containerd.service
Where containerd The contents of the service file are filled in as follows (don't care what is configured in it, run first is the king, and have time to study slowly later):
[Unit]
Description=containerd container runtime
Documentation=https://containerd.io
After=network.target
[Service]
ExecStartPre=/sbin/modprobe overlay
ExecStart=/usr/bin/containerd
Delegate=yes
KillMode=process
LimitNOFILE=1048576
# Having non-zero Limit*s causes performance problems due to accounting overhead
# in the kernel. We recommend using cgroups to do container-local accounting.
LimitNPROC=infinity
LimitCORE=infinity
[Install]
WantedBy=multi-user.target
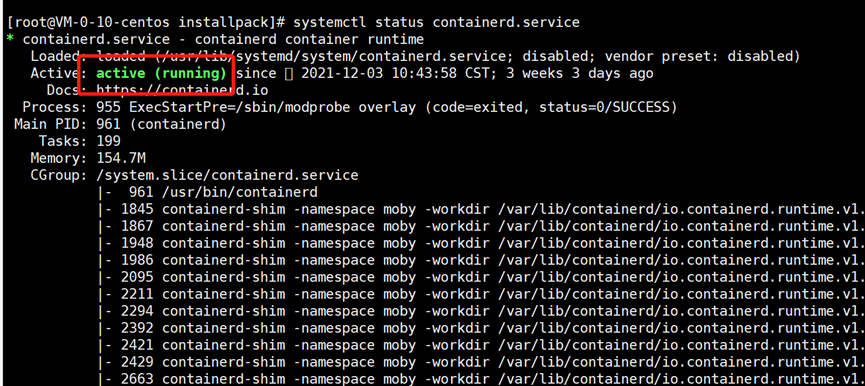
Start the containerd service. The command is as follows:
# Reload configuration information
systemctl daemon-reload

#Set containerd Service is started for startup
systemctl enable containerd.service

#Start containerd service
systemctl start containerd.service

#View the startup status of containerd service
systemctl status containerd.service
Execute the above commands in sequence, and finally see the green [active (running)]. Congratulations on the successful startup of the containerd service configuration. If the service fails to start, it is the ultimate killer: try to restart docker first. If not, try to restart the server. Anyway, I didn't restart
3.2 create and configure docker Socket service
stay/usr/lib/systemd/system folders creating docker.socket File, the command is as follows:
groupadd docker
touch /usr/lib/systemd/system/docker.socket
vi /usr/lib/systemd/system/docker. socket
Including docker The contents of the socket file shall be filled in as follows (I don't care what is configured in it, running first is the king, and I have time to study slowly later):
[Unit]
Description=Docker Socket for the API
PartOf=docker.service
[Socket]
ListenStream=/var/run/docker.sock
SocketMode=0660
SocketUser=root
# If an error occurs: chown socket at step GROUP: No such process, you can modify the following SocketGroup=root or create a docker user group (command groupadd docker)
SocketGroup=docker
[Install]
WantedBy=sockets.target
Start the containerd service and check whether it is normal. The command is as follows:
# Reload configuration information
systemctl daemon-reload

#Set containerd Service is started for startup
systemctl enable containerd.service

#Start containerd service
systemctl start containerd.service

#View the startup status of containerd service
systemctl status containerd.service
Execute the above commands in sequence, and finally see the green [active (running)]. Congratulations on the successful startup of the containerd service configuration. If the service fails to start, it is the ultimate killer: try to restart docker first. If not, try to restart the server. Anyway, I didn't restart
3.3 create and configure docker Service
stay/usr/lib/systemd/system folders creating docker.service File, the command is as follows:
touch /usr/lib/systemd/system/docker.service
vi /usr/lib/systemd/system/docker.service
Including docker Fill in the following contents in the service file (don't care what is configured in it first, it's the king to run first, and then have time to study slowly):
[Unit]
Description=Docker Application Container Engine
Documentation=https://docs.docker.com
BindsTo=containerd.service
After=network-online.target firewalld.service containerd.service
Wants=network-online.target
Requires=docker.socket
[Service]
Type=notify
# the default is not to use systemd for cgroups because the delegate issues still
# exists and systemd currently does not support the cgroup feature set required
# for containers run by docker
ExecStart=/usr/bin/dockerd -H fd:// --containerd=/run/containerd/containerd.sock
ExecReload=/bin/kill -s HUP $MAINPID
TimeoutSec=0
RestartSec=2
Restart=always
# Note that StartLimit* options were moved from "Service" to "Unit" in systemd 229.
# Both the old, and new location are accepted by systemd 229 and up, so using the old location
# to make them work for either version of systemd.
StartLimitBurst=3
# Note that StartLimitInterval was renamed to StartLimitIntervalSec in systemd 230.
# Both the old, and new name are accepted by systemd 230 and up, so using the old name to make
# this option work for either version of systemd.
StartLimitInterval=60s
# Having non-zero Limit*s causes performance problems due to accounting overhead
# in the kernel. We recommend using cgroups to do container-local accounting.
LimitNOFILE=infinity
LimitNPROC=infinity
LimitCORE=infinity
# Comment TasksMax if your systemd version does not support it.
# Only systemd 226 and above support this option.
TasksMax=infinity
# set delegate yes so that systemd does not reset the cgroups of docker containers
Delegate=yes
# kill only the docker process, not all processes in the cgroup
KillMode=process
[Install]
WantedBy=multi-user.target
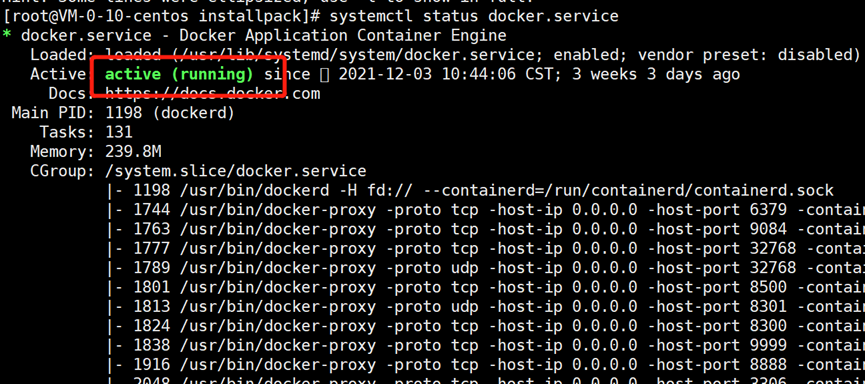
Start docker Service, the command is as follows:
#relieve
systemctl unmask docker.service
systemctl unmask docker.socket

# Reload configuration information
systemctl daemon-reload

#Set docker to boot
systemctl enable docker

#Start docker service
systemctl start docker

#View the start status of docker service
systemctl status docker
Execute the above commands in turn, and finally see the green [active (running)]. Congratulations, docekr Service configuration started successfully. If the service fails to start, the ultimate killer is to try to restart docker first. If not, try to restart the server. Anyway, I succeed only by restarting the server.
When I saw that docker was started normally, I felt uneasy about the environmental construction trip. The truth is.
4. Installation summary
At this step, congratulations on the completion of the offline docker. Let's briefly review the experience of this installation:
Don't be impatient: don't be eager for success. Follow the documents one by one
Good at taking notes: a good memory is not as good as a bad pen. Record your every step of operation, so as to facilitate subsequent withdrawal and summary
This sorting has no other purpose, but is a summary of environment deployment notes. If you are looking for it, it may help you a little. Isn't it a pleasure.
Well, this record is here see good by. There will be time to sort out and share the migration of relevant images in docker later.