The words written in the front
This year's video game is finally over. Many friends around have chosen the topic of drug delivery car. At the beginning, they may think it's simple. Tracking car + digital recognition can be done. At the beginning, many friends considered using OpenMv as a digital recognition platform. In addition to the OpenMv we talked about, I also had a domestic K210. To be honest, personally, I prefer to use K210. Firstly, as an open source project, OpenMv has been well supported by K210, which means that most of the operations that can be done with Xingtong OpenMv can be completed by K210, or even better. Secondly, star pupil OpenMv is mainly based on STM32 series processors of ST company. At present, the best one should use H7 series. Although it can also run the neural network, its performance is very limited. Once the neural network is run, the frame rate drops seriously. The frame rate of a group of small partners is 3 ~ 4 frames. The domestic chip K210 is not only cheaper, but also its computing power is up to 1TOPS. At the same time, the hardware KPU supports the common layer of neural network and has strong performance! Interestingly, this year, many small partners intend to use OpenMv as a digital recognition scheme, and as a result, they overturned one after another. It's not that OpenMv can't do it. It's estimated that we are not very familiar with it and don't react. Although the online training platform of Xingtong OpenMv neural network is free, there are still restrictions on the training time. Manually modifying the network layers deeper will lead to the timeout and termination of the training thread, which is not as real as the local TensorFlow training. In the final analysis, the neural networks running on OpenMv are basically tflite models. After TensorFlow is locally trained, it is no problem to convert the models to run on OpenMv. Due to my personal preference for K210, my OpenMv was basically put aside to eat ash during the video game. I have also seen several groups use K210 as a digital recognition scheme like me, but we use more training tools or models provided by a third party, and the final effect after training is mostly unsatisfactory. There are many reasons that affect the results of convolutional neural network. The structure of the model, the selection of optimizer function, the quantity and quality of data sets will affect the effect of the final model.
This article only introduces how to use your own data set to train your own model on TensorFlow. The construction, tuning and conversion of CNN model to kmodel format supported by K210 are beyond the scope of this article. Interested partners can consult relevant documents by themselves~~
1, Customize the directory structure of the dataset (take this year's video game number recognition as an example)
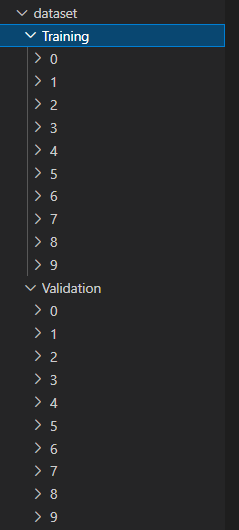
Where Training is the Training set and Validation is the test set
Some samples in various types:

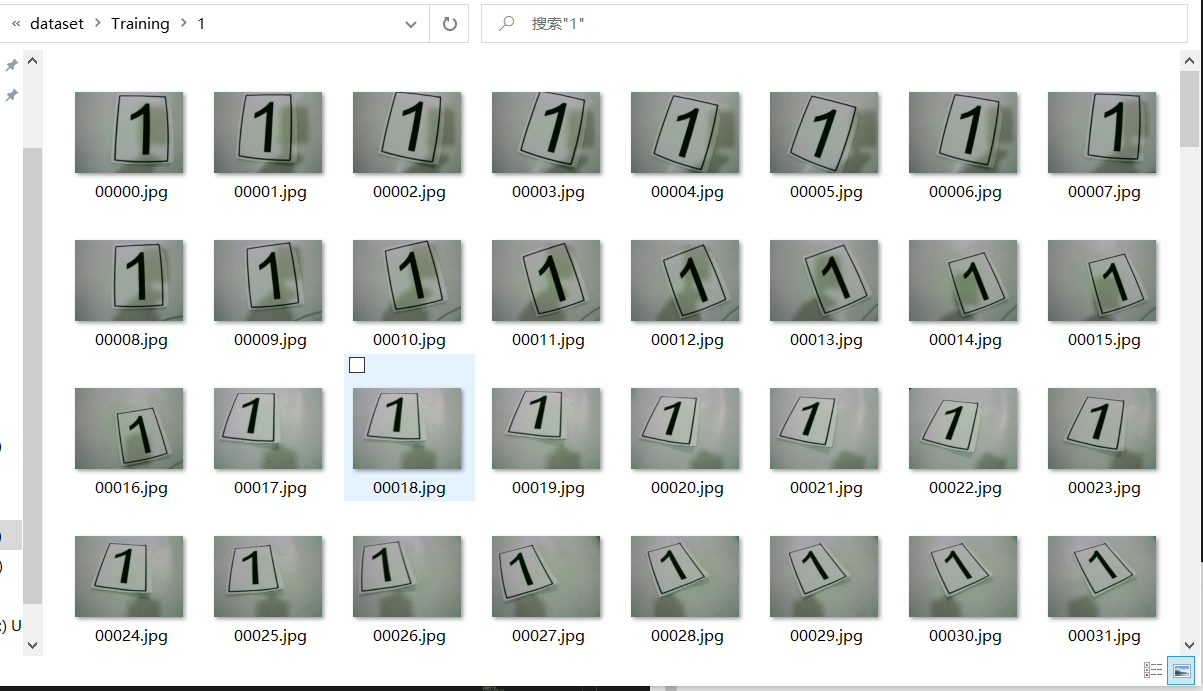
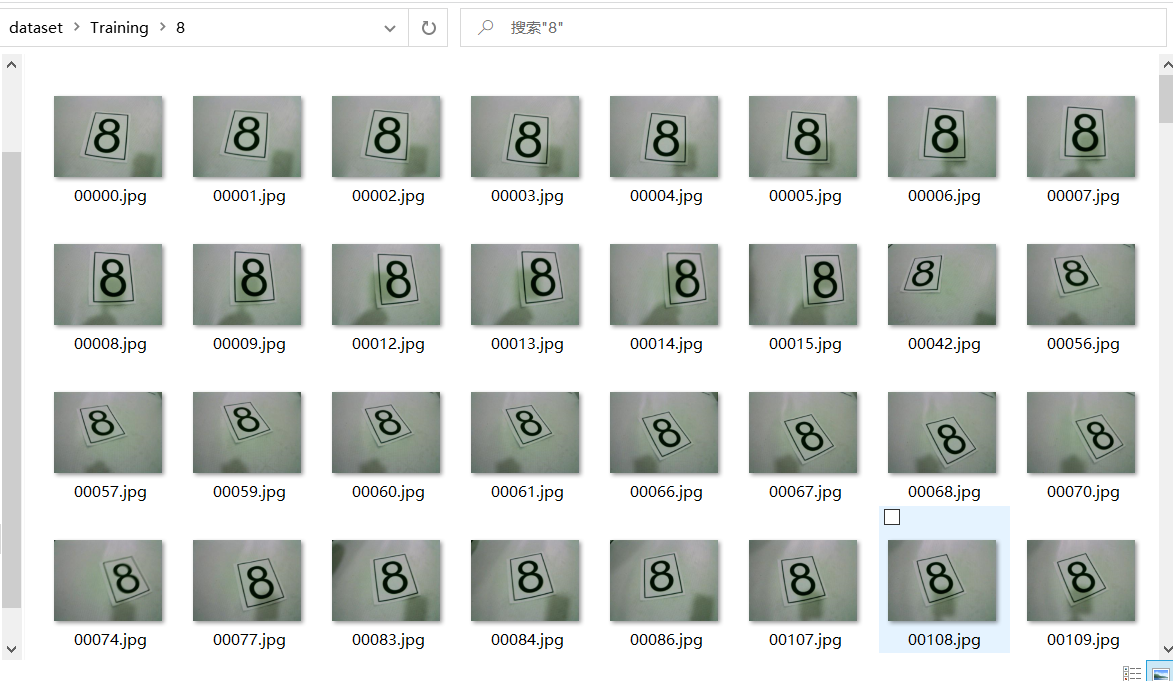
The data set above is confusing because I intend to use mnist data set for training directly at the beginning, but the recognition effect is not very good. When remaking the data set for training, the model trained earlier is directly used. Although the number required to be recognized by the title is only 1 ~ 8, 0 and 9 are still retained.
Specific steps:
1. Create a new directory dataset for storing datasets
2. Create the Training directory in the dataset directory to store the Training set pictures, and the Validation directory to store the test set pictures (if the test set is needed)
3. The name of each folder in the Training directory and the Validation directory is a label (the number and name of folders in the Training directory and the Validation directory should be consistent). As shown in the figure above, folders 0 ~ 9 under the Training directory correspond to labels 0 ~ 9 in mnist dataset respectively
4. The image data corresponding to the label in the training set is stored in the dataset / training / * directory (as shown in some samples in the above figure)
At this point, the directory of the dataset has been built. Next, you need to read the directory structure of the dataset in TensorFlow, parse and convert it to the data type of tensor to meet the requirements of automatic reasoning later in TensorFlow
2, Read dataset in TensorFlow
Generally, if TensorFlow's own dataset is used, it can be loaded in the following ways:
import tensorflow as tf

(train_data,train_label),(test_data,test_label) = tf.keras.datasets.mnist.load_data()
For custom datasets, we need to manually implement the intermediate process. First, import the relevant packages:
import tensorflow as tf
import pathlib
The directory structure of the dataset can be made by referring to the above. The loading process of custom dataset can be divided into the following steps:
1. Get the path of all pictures
2. Get labels and convert them to numbers
3. Read the picture and perform corresponding preprocessing
4. Packing pictures and labels
The following will take importing training set (dataset/Training) in TensorFlow as an example. The import methods of Validation set and test set are the same, and will not be described below.
2.1 path to get all pictures
# Specifies the path to the training set data
my_dataset_path = 'dataset/Training'
# Specify the size of the image to be adjusted. The image size should be consistent with the model input layer
my_image_size = (32,32)
# Specify image dimension 1, single channel (such as grayscale image); 3. Three channels (color picture)
my_input_shape = my_image_size + (3,)
# Specify batch
my_batch = 32
# shuffle buffer size
my_shuffle_buffer_size = 1000

AUTOTUNE = tf.data.experimental.AUTOTUNE

# Gets the path of all image files
dataset_path = pathlib.Path(my_dataset_path)
all_images_paths = [str(path) for path in list(dataset_path.glob('*/*'))]
print('Path to all files:', all_images_paths)
print('Total number of documents:', len(all_images_paths))
The output results are as follows:
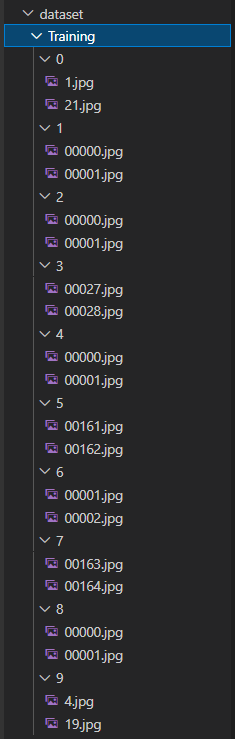
Path to all files: ['dataset\\Training\\0\\1.jpg', 'dataset\\Training\\0\\21.jpg', 'dataset\\Training\\1\\00000.jpg', 'dataset\\Training\\1\\00001.jpg', 'dataset\\Training\\2\\00000.jpg', 'dataset\\Training\\2\\00001.jpg', 'dataset\\Training\\3\\00027.jpg', 'dataset\\Training\\3\\00028.jpg', 'dataset\\Training\\4\\00000.jpg', 'dataset\\Training\\4\\00001.jpg', 'dataset\\Training\\5\\00161.jpg', 'dataset\\Training\\5\\00162.jpg', 'dataset\\Training\\6\\00001.jpg', 'dataset\\Training\\6\\00002.jpg', 'dataset\\Training\\7\\00163.jpg', 'dataset\\Training\\7\\00164.jpg', 'dataset\\Training\\8\\00000.jpg', 'dataset\\Training\\8\\00001.jpg', 'dataset\\Training\\9\\19.jpg', 'dataset\\Training\\9\\4.jpg']
At this point, all_ images_ The paths list stores the paths of all pictures in the training data set. Later, we need to read the pictures into memory through these paths
2.2 get labels and convert them to numbers
In the task of target detection, there are usually multiple labels. In order to facilitate people to distinguish, these labels are usually described by strings. However, text labels cannot be used in TensorFlow reasoning. We need to convert them into numbers.
First, we need to obtain the label by parsing the upper directory of all_images_paths:
# Get tag name
label_name = [i.name for i in dataset_path.iterdir() if i.is_dir()]
print('Label name:', label_name)
The output results are as follows:
Label name: ['0', '1', '2', '3', '4', '5', '6', '7', '8', '9']
You can see that these tags are exactly the name of our directory, which proves that the parsing of our program is correct. Next, we need to assign a unique number to these tags and use this number instead of the tag name:
# Because the parameters must be numeric during training, a numeric index is assigned to the label
label_index = dict((name,index)for index,name in enumerate(label_name))
print('Assign a numeric index to the label:', label_index)
The output results are as follows:
Assign a numeric index to the label: {'9': 9, '1': 1, '6': 6, '5': 5, '2': 2, '0': 0, '3': 3, '4': 4, '7': 7, '8': 8}
Then we pair the picture with the digital index of the label. Be sure to ensure all_ images_ The label of the image data in the paths list must be consistent with the digital index:
# Pair the picture with the number index of the label (number encoding)
number_encodeing = [label_index[i.split('\\')[2]]for i in all_images_paths]
print('number_encodeing:', number_encodeing, type(number_encodeing))
The output results are as follows:
number_encodeing: [0, 0, 1, 1, 2, 2, 3, 3, 4, 4, 5, 5, 6, 6, 7, 7, 8, 8, 9, 9] <class 'list'>
In order to facilitate the screenshot, I deleted a large number of samples. Here, there are two picture samples for each category in our dataset dataset/Training, so the results after reading are consistent with the above output results
In order to facilitate training, you also need to make One Hot transformation to the label in most cases:
label_one_hot = tf.keras.utils.to_categorical(number_encodeing)
print(label_one_hot)
The output results are as follows:
[[1. 0. 0. 0. 0. 0. 0. 0. 0. 0.]
 [1. 0. 0. 0. 0. 0. 0. 0. 0. 0.]
 [0. 1. 0. 0. 0. 0. 0. 0. 0. 0.]
 [0. 1. 0. 0. 0. 0. 0. 0. 0. 0.]
 [0. 0. 1. 0. 0. 0. 0. 0. 0. 0.]
 [0. 0. 1. 0. 0. 0. 0. 0. 0. 0.]
 [0. 0. 0. 1. 0. 0. 0. 0. 0. 0.]
 [0. 0. 0. 1. 0. 0. 0. 0. 0. 0.]
 [0. 0. 0. 0. 1. 0. 0. 0. 0. 0.]
 [0. 0. 0. 0. 1. 0. 0. 0. 0. 0.]
 [0. 0. 0. 0. 0. 1. 0. 0. 0. 0.]
 [0. 0. 0. 0. 0. 1. 0. 0. 0. 0.]
 [0. 0. 0. 0. 0. 0. 1. 0. 0. 0.]
 [0. 0. 0. 0. 0. 0. 1. 0. 0. 0.]
 [0. 0. 0. 0. 0. 0. 0. 1. 0. 0.]
 [0. 0. 0. 0. 0. 0. 0. 1. 0. 0.]
 [0. 0. 0. 0. 0. 0. 0. 0. 1. 0.]
 [0. 0. 0. 0. 0. 0. 0. 0. 1. 0.]
 [0. 0. 0. 0. 0. 0. 0. 0. 0. 1.]
 [0. 0. 0. 0. 0. 0. 0. 0. 0. 1.]]
2.3 read the picture and carry out corresponding preprocessing
In the above steps, we have completed the processing of the dataset label. Now we need to load the image from the disk and preprocess the image before officially starting the training:
def process(path, label):
    # Read in picture file
    image = tf.io.read_file(path)
    # Decode the input picture into gray or rgb
    image = tf.image.decode_jpeg(image, channels=my_input_shape[2])
    # Adjust the picture size to meet the requirements of network input layer
    image = tf.image.resize(image, my_image_size)
    # normalization
    image /= 255.
    return image,label
The process method receives a path (and a label for later packaging). In this method, some methods of TensorFlow are used to read the image, and the size and dimension of the image are adjusted to meet the needs of the model. Finally, normalize the adjusted image data. Generally, we map the range to the interval of 0 ~ 1. Of course, you can also map to the interval of - 0.5 ~ 0.5, which can be designed according to your own needs. A good interval can make the model converge better and improve the accuracy.
Use matplotlib.pyplot to view the image:
import matplotlib.pyplot as plt

img = process('dataset\\Training\\1\\00001.jpg', 1)
# or
img = process(all_images_paths[2], 1)

print(img[0].shape)
plt.imshow(img[0])
plt.show()
Output results:
(32, 32, 3)
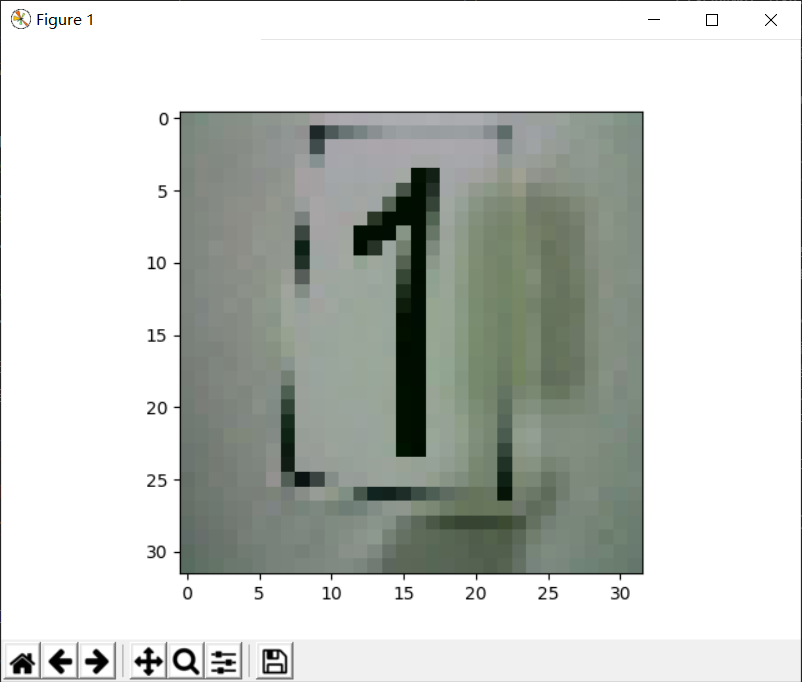
From the output results, we can see that the size of the image has been adjusted to the size we set_ imput_ Shape = (32,32,3) consistent
2.4 packaging pictures and labels
# Splice data and labels together
label_one_hot = tf.cast(label_one_hot, tf.int32)
path_ds = tf.data.Dataset.from_tensor_slices((all_images_paths, label_one_hot))
image_label_ds = path_ds.map(process, num_parallel_calls=AUTOTUNE)
print('image_label_ds:', image_label_ds)
Output results:
image_label_ds: <ZipDataset shapes: ((32, 32, 3), (10,)), types: (tf.float32, tf.int32)>
tf.data.Dataset.from_tensor_slices is used to slice data sets. In the above, we will all the paths of all the pictures_ images_ Paths and label_one_hot is passed in and a binary is obtained after map(), where index 0 stores image data and index 1 stores One Hot code corresponding to its label:
# Take the third data as an example and output the result
res = [i for i in image_label_ds.take(3)][-1]
print(res[0])
print(res[1])

# display picture
plt.imshow(res[0])
plt.show()
Output results:
tf.Tensor(
[[[0.48088235 0.54362744 0.49803922]
  [0.5034314  0.5495098  0.5122549 ]
  [0.5264706  0.56960785 0.5382353 ]
  ...
  [0.54068625 0.60343134 0.5602941 ]
  [0.5112745  0.59656864 0.5254902 ]
  [0.4970588  0.58137256 0.53137255]]

 [[0.46813726 0.53088236 0.49019608]
  [0.50980395 0.5529412  0.52156866]
  [0.5137255  0.5568628  0.5254902 ]
  ...
  [0.5352941  0.5980392  0.55490196]
  [0.5132353  0.57598037 0.5328431 ]
  [0.5156863  0.5745098  0.5470588 ]]

 [[0.49509802 0.5421569  0.5029412 ]
  [0.5107843  0.55784315 0.51862746]
  [0.5323529  0.5715686  0.54019606]
  ...
  [0.5387255  0.5857843  0.54656863]
  [0.50980395 0.5715686  0.5205882 ]
  [0.50735295 0.57009804 0.53088236]]

 ...

 [[0.38333333 0.44607842 0.40686274]
  [0.42009804 0.4632353  0.43186274]
  [0.43333334 0.4764706  0.46078432]
  ...
  [0.422549   0.50490195 0.44607842]
  [0.4240196  0.5181373  0.44558823]
  [0.41813725 0.5122549  0.45735294]]

 [[0.3882353  0.4392157  0.4       ]
  [0.40882352 0.4598039  0.42058823]
  [0.42941177 0.48039216 0.44509804]
  ...
  [0.44166666 0.5122549  0.45735294]
  [0.42647058 0.5088235  0.44215685]
  [0.39950982 0.4779412  0.43088236]]

 [[0.36862746 0.44509804 0.39803922]
  [0.3882353  0.46470588 0.41764706]
  [0.40441176 0.47990197 0.4377451 ]
  ...
  [0.43186274 0.502451   0.44754902]
  [0.41127452 0.49362746 0.4269608 ]
  [0.40686274 0.4852941  0.43823528]]], shape=(32, 32, 3), dtype=float32)
tf.Tensor([0 1 0 0 0 0 0 0 0 0], shape=(10,), dtype=int32)
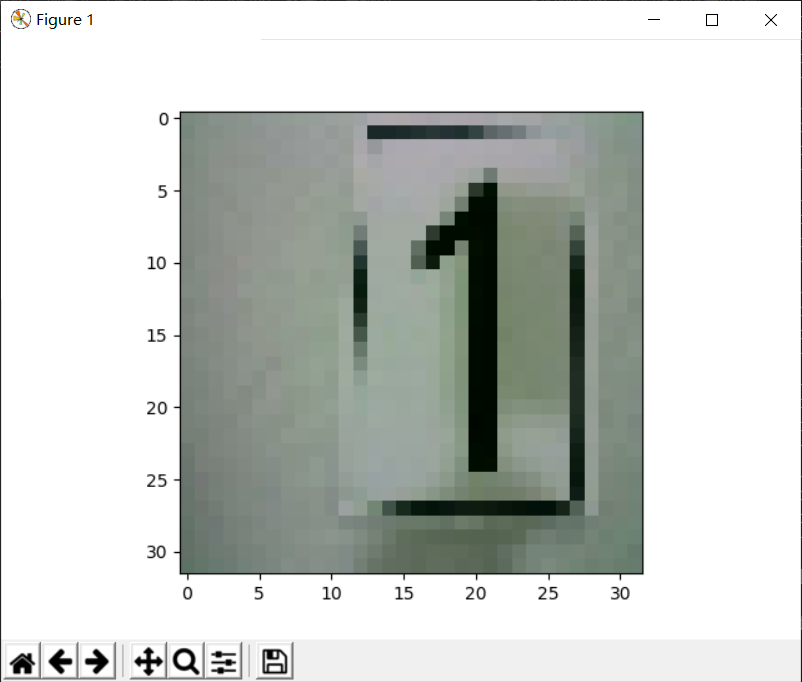
In order to prevent over fitting and enhance the generalization ability of the model, we also need to disrupt the order of the data set. Let's take a look at the order of the pictures before the disruption:
def display_more_image(image_label_ds, s_pos, e_pos, max_r, max_c):
    if e_pos >= s_pos:
        index = 1
        plt.figure()
        for n,image in enumerate(image_label_ds.take(e_pos)):
            if n >= s_pos-1:
                img = image[0]
                label = image[1]
                plt.subplot(max_r, max_c, index)
                index += 1
                plt.imshow(img)
                plt.xlabel(str(list(label.numpy()).index(max(label.numpy()))))
        plt.show()

display_more_image(image_label_ds, 1, 6, 2, 3)
Output results:

Now break the order
# Disrupt the elements in the dataset and set batch
image_label_ds = image_label_ds.shuffle(my_shuffle_buffer_size).batch(my_batch)
Show pictures out of order:
# Displays the first six pictures of the first bath
index = 1
plt.figure()
for i in image_label_ds.take(1):
    for j in range(6):
        plt.subplot(2, 3, index)
        index += 1
        # print(i[1][j])
        plt.imshow(i[0][j])
        plt.xlabel(str(list(i[1][j].numpy()).index(max(i[1][j].numpy()))))

# Be sure to call the display after the above for execution is completed
plt.show()
Execution results:
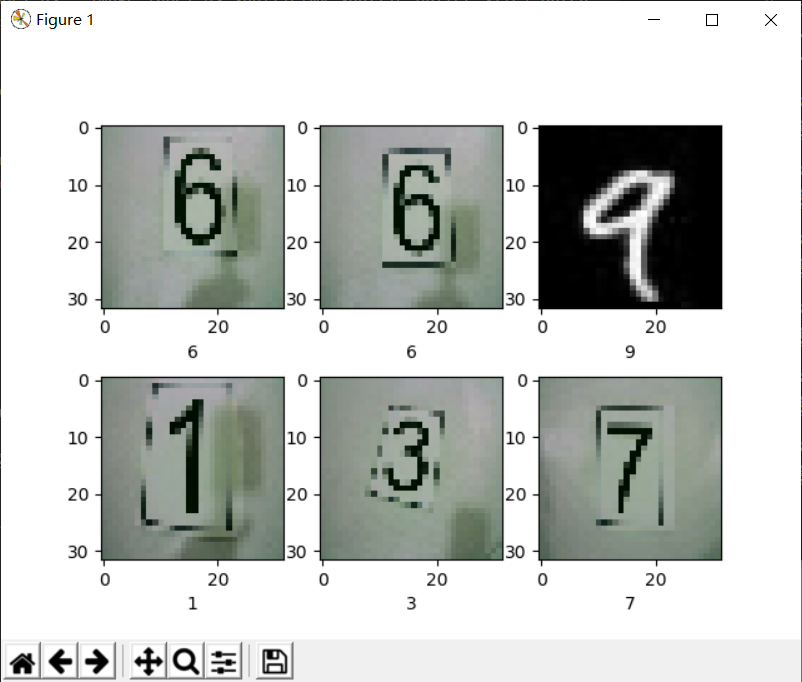
It can be seen that the output after shuffle is inconsistent with the picture order before shuffle!
So far, TensorFlow has completed the operation of loading custom data sets, followed by the construction of network model and training.
3, Verify that the custom dataset is available
The following takes the network model of digital recognition in this year's video game as an example to test whether the customized data set above is available. The construction of the model is not the focus of this paper. Interested partners can consult relevant materials by themselves. The following directly gives a complete test case:
#!/usr/bin/env python
# -*- encoding: utf-8 -*-
# Python version: 3.5.4
'''
@File    :   tf_data_generator.py
@Time    :   2021/11/04 16:11:19
@Author  :   Wu Xueru
@Version :   1.0
@Contact :   t01051@163.com
@License :
@Desc    :
'''

# here put the import lib
import tensorflow as tf
import pathlib
import matplotlib.pyplot as plt
from time import strftime


my_dataset_path = 'dataset/Training'
my_image_size = (32,32)
my_input_shape = my_image_size + (3,)
# Specify the number of workouts
my_train_epochs = 2
# Specify batch
my_batch = 32
# shuffle buffer size
my_shuffle_buffer_size = 1000

AUTOTUNE = tf.data.experimental.AUTOTUNE

# Get all file paths
dataset_path = pathlib.Path(my_dataset_path)
all_images_paths = [str(path) for path in list(dataset_path.glob('*/*'))]
print('Path to all files:', all_images_paths)
print('Total number of documents:', len(all_images_paths))

# Get tag name
label_name = [i.name for i in dataset_path.iterdir() if i.is_dir()]
print('Label name:', label_name)
# Because the parameters must be numeric during training, a numeric index is assigned to the label
label_index = dict((name,index)for index,name in enumerate(label_name))
print('Assign a numeric index to the label:', label_index)

# Pair the picture with the number index of the label (number encoding)
number_encodeing = [label_index[i.split('\\')[2]]for i in all_images_paths]
print('number_encodeing:', number_encodeing, type(number_encodeing))
label_one_hot = tf.keras.utils.to_categorical(number_encodeing, num_classes=10)
print('label_one_hot:', label_one_hot)


def process(path,label):
    # Read in picture file
    image = tf.io.read_file(path)
    # Decode the input picture into gray or rgb
    image = tf.image.decode_jpeg(image, channels=my_input_shape[2])
    # Adjust the picture size to meet the requirements of network input layer
    image = tf.image.resize(image, my_image_size)
    # normalization
    image /= 255.
    return image,label

# Splice data and labels together
path_ds = tf.data.Dataset.from_tensor_slices((all_images_paths, tf.cast(label_one_hot, tf.int32)))
image_label_ds = path_ds.map(process, num_parallel_calls=AUTOTUNE)
print('image_label_ds:', image_label_ds)
steps_per_epoch=tf.math.ceil(len(all_images_paths)/my_batch).numpy()
print('steps_per_epoch', steps_per_epoch)

# Disrupt the elements in the dataset and set batch
image_label_ds = image_label_ds.shuffle(my_shuffle_buffer_size).batch(my_batch)


if __name__ == '__main__':
    # Define model
    # Input layer
    input_data = tf.keras.layers.Input(shape=my_input_shape)
    # first floor
    middle = tf.keras.layers.Conv2D(128, kernel_size=[3,3], strides=(1,1), padding='same', activation=tf.nn.relu)(input_data)
    middle = tf.keras.layers.Conv2D(128, kernel_size=[3,3], strides=(1,1), padding='same', activation=tf.nn.relu)(middle)
    middle = tf.keras.layers.Conv2D(128, kernel_size=[3,3], strides=(1,1), padding='same', activation=tf.nn.relu)(middle)
    middle = tf.keras.layers.MaxPool2D(pool_size=[2,2], strides=2, padding='same')(middle)
    # The second floor
    middle = tf.keras.layers.Conv2D(128, kernel_size=[3,3], strides=(1,1), padding='same', activation=tf.nn.relu)(middle)
    middle = tf.keras.layers.Conv2D(128, kernel_size=[3,3], strides=(1,1), padding='same', activation=tf.nn.relu)(middle)
    middle = tf.keras.layers.Conv2D(128, kernel_size=[3,3], strides=(1,1), padding='same', activation=tf.nn.relu)(middle)
    middle = tf.keras.layers.MaxPool2D(pool_size=[2,2], strides=2, padding='same')(middle)
    # Third floor
    middle = tf.keras.layers.Conv2D(128, kernel_size=[3,3], strides=(1,1), padding='same', activation=tf.nn.relu)(middle)
    middle = tf.keras.layers.Conv2D(128, kernel_size=[3,3], strides=(1,1), padding='same', activation=tf.nn.relu)(middle)
    middle = tf.keras.layers.MaxPool2D(pool_size=[2,2], strides=2, padding='same')(middle)

    # to pave nicely
    dense = tf.keras.layers.Flatten()(middle)
    dense = tf.keras.layers.Dropout(0.1)(dense)
    dense = tf.keras.layers.Dense(60, activation='relu')(dense)
    # output
    # Output layer
    output_data = tf.keras.layers.Dense(len(label_name), activation='softmax')(dense)
    # Confirm the input position and output position
    model = tf.keras.Model(inputs=input_data, outputs=output_data)

    # Define the gradient descent and loss function of the model
    model.compile(optimizer=tf.optimizers.Adam(1e-4),
                loss=tf.losses.categorical_crossentropy,
                metrics=['accuracy'])

    # Print model structure
    model.summary()

    # Start training
    start_time = strftime("%Y-%m-%d %H:%M:%S")
    history = model.fit(
        image_label_ds,
        epochs=my_train_epochs,
        verbose=1,
        steps_per_epoch=int(steps_per_epoch))

    end_time = strftime("%Y-%m-%d %H:%M:%S")
    print('Time to start training:', start_time)
    print('Time to end training:', end_time)
Output results:
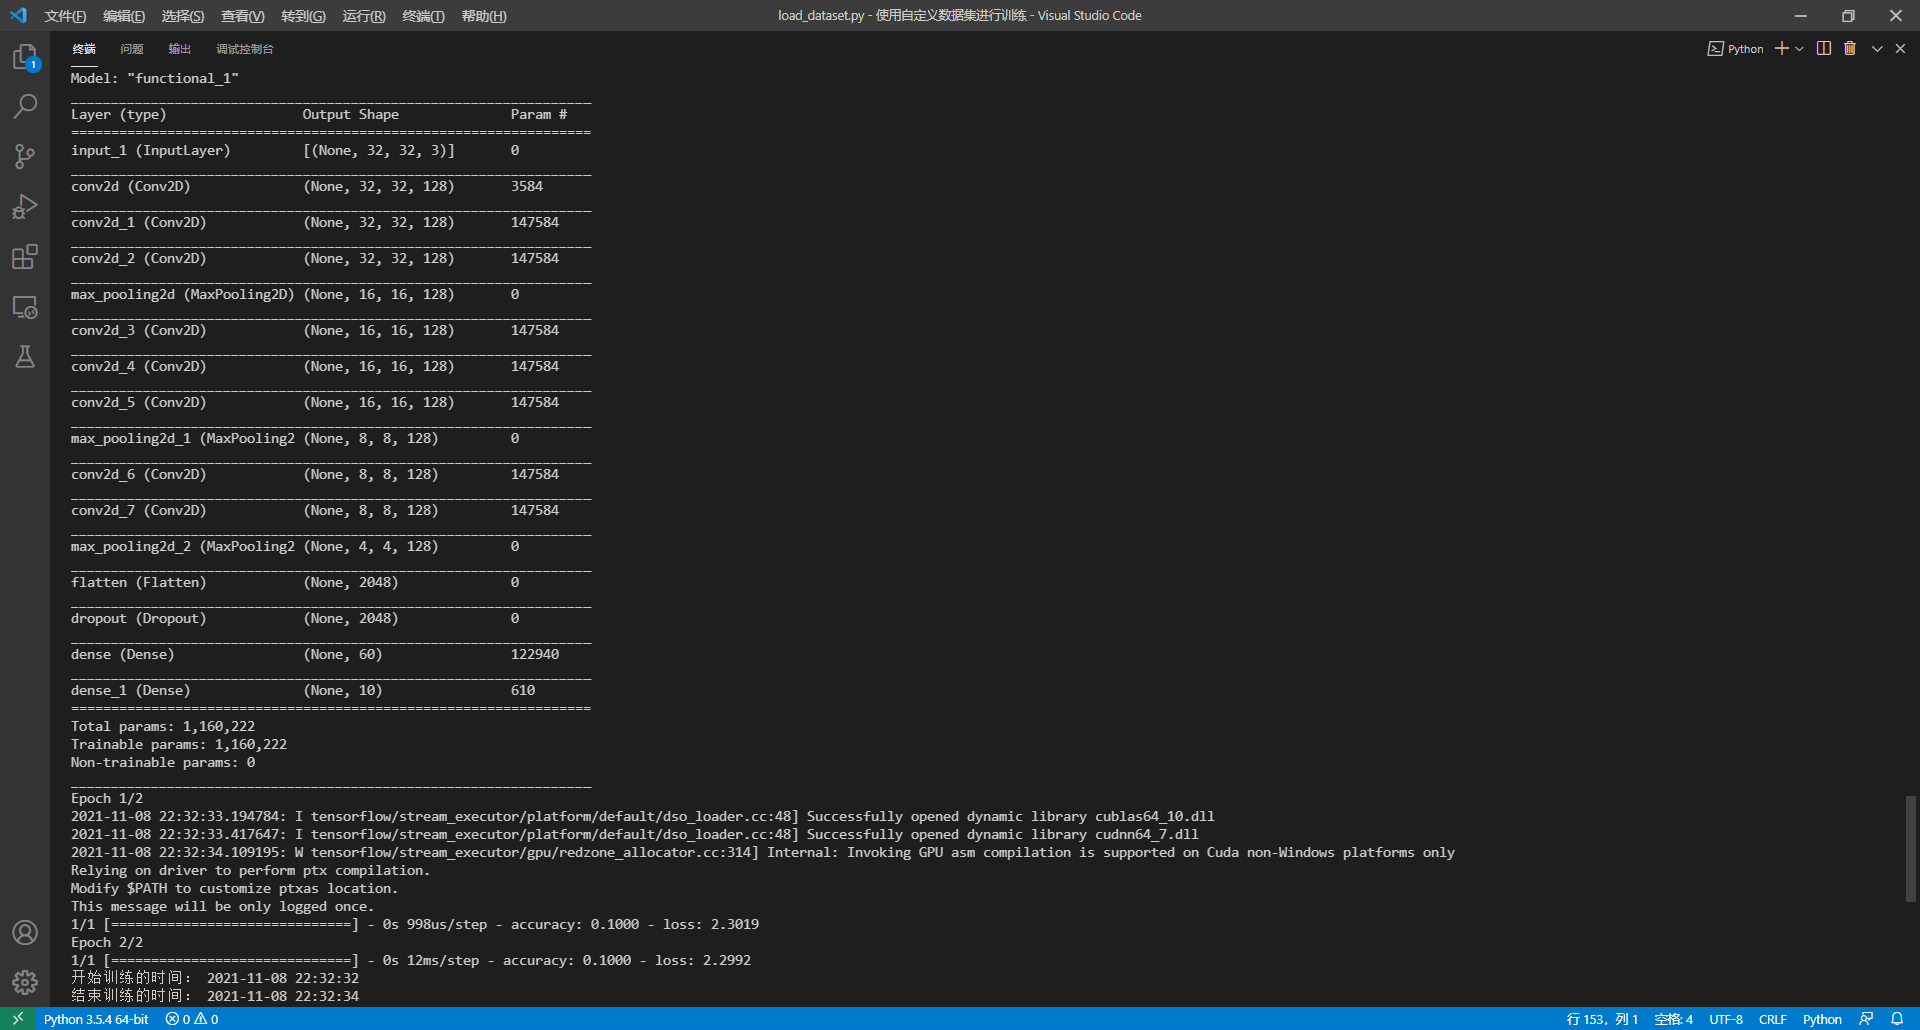
From the output, you can see that the customized data set has been read correctly, and TensorFlow can reason normally.