Author: HelloGitHub- Xiaoxia (first official account of HelloGitHub)
As a developer who relies on code as a "livelihood", whether the bug is written well or not, the editor is really important! Then the name Visual Studio Code will be familiar to you. As an old and powerful editor, its excellence is as follows:
-
First of all, its designer is a famous engineer: Eric Gamma. 20 years ago, he was one of the authors of design patterns: the basis of reusable object-oriented software. The position of this book in the development community was regarded as a guiding light for object-oriented software development.

-
Secondly, for those who write JavaScript, although there are many different editors in the market, such as sublime, atom, webstorm and so on, the difference between VS Code and them is that it is open-source, faster than atom and lighter than webstorm.
1, Introduction
The full name of VS Code Visual Studio Code is an open source editor of Microsoft, with GitHub superscript 115k (110000). It is written based on TypeScript, with a total number of code of more than 300000. It is a large well-known open source project.
>Project address: https://github.com/microsoft/vscode
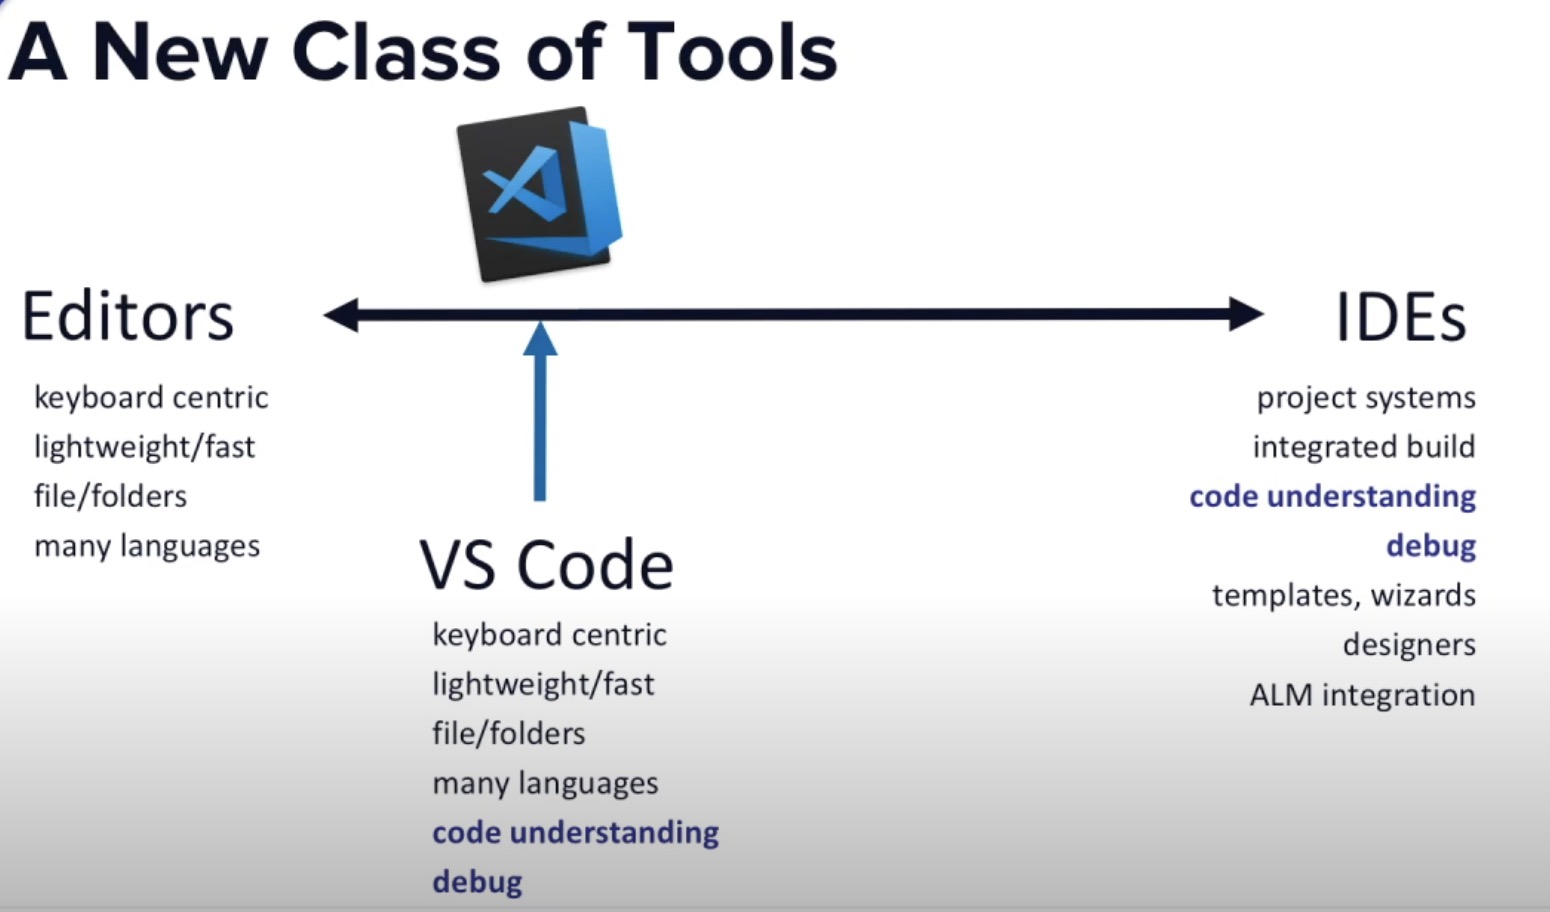
Let's take a brief look at its product positioning first. It can be seen that the positioning of the project author belongs to a lightweight editor, so it is required to be lightweight, fast response, suitable for multiple languages and so on. The editing ability of VS Code comes from a software called monaco At the same time, in order to meet the needs of cross platform, Electron is introduced: a desktop application that uses JavaScript, HTML and CSS to build cross platform applications.
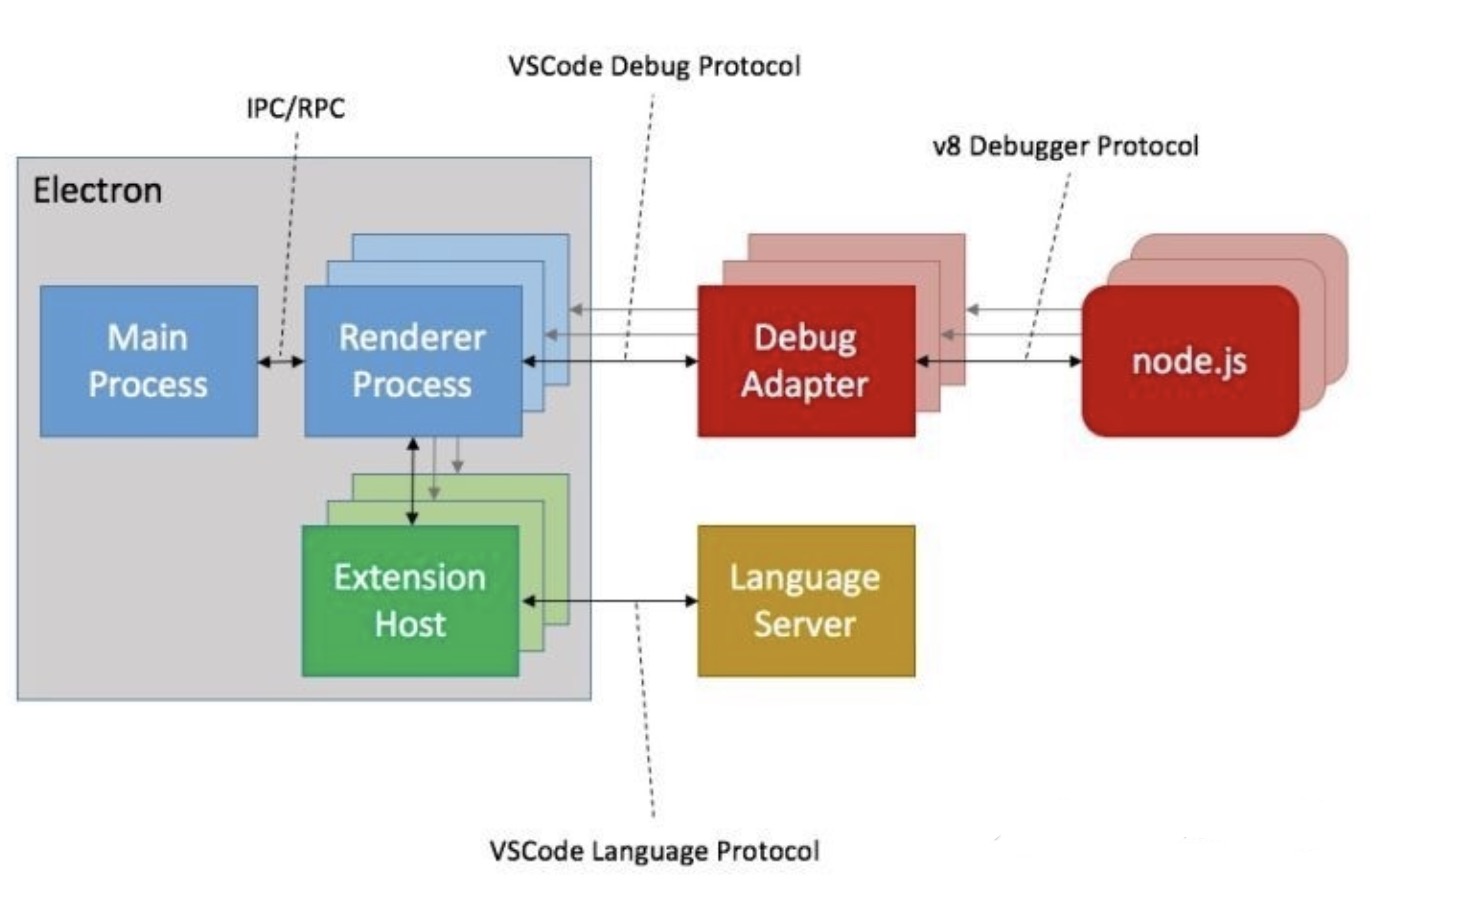
It is precisely because of the clear positioning and direction that there will be a clearer boundary. You may wonder how he supports multiple languages and is lightweight? Then we have to take a look at its multi process architecture.
- VS Code has a main process entry, which is responsible for some global tasks such as window management, inter process communication and automatic update;
- Rendering process, as the name suggests, is responsible for the rendering of a Web page;
- Plug in host process: the code of each plug-in runs in the host process of an independent and isolated Node environment, and the plug-in cannot access the UI;
- Debug process, used for debugging;
- Language service is an important special expansion, which can provide editing experience for many programming languages. It can also realize the automatic supplement of VS Code support, error checking (diagnosis), jump to definition and many other language functions.
The core part is its plug-in system, which brings more personalized open source customization to the expansion of the editor. As long as you can find powerful VS Code plug-ins to combine together, your editor must be an advanced and efficient helper.
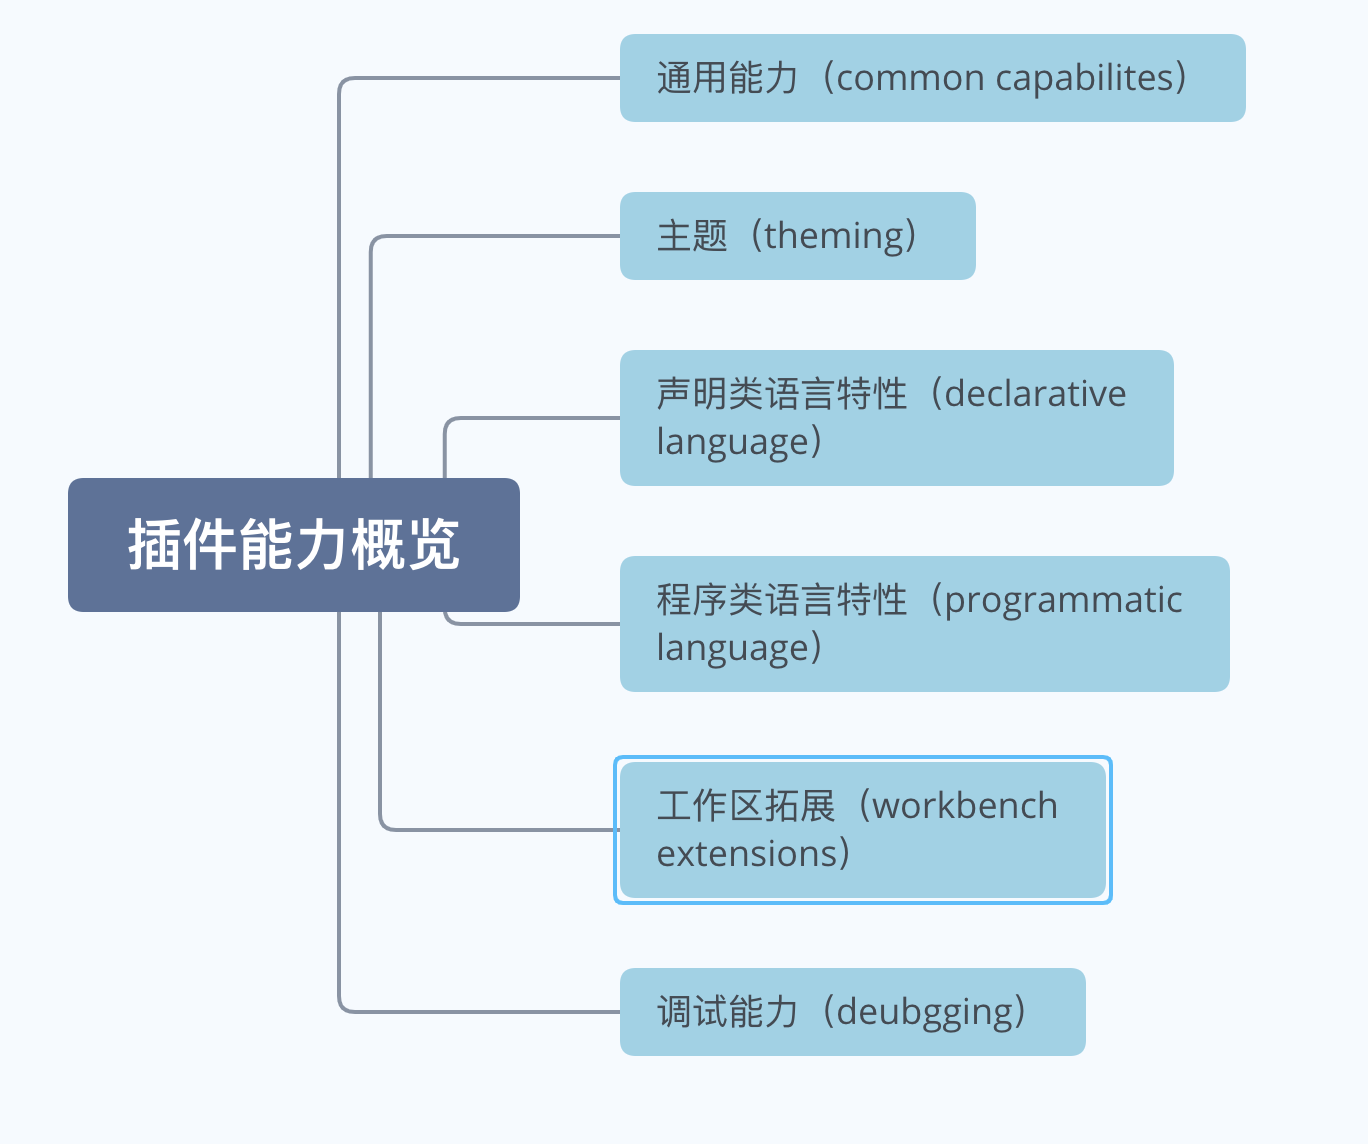
Let's take a look at the capabilities of VS Code that we can expand.
Are you itching to build a VS Code plug-in yourself? Let's take you to make an entry-level VS Code plug-in.
2, Environmental preparation
First, you make a Node.js and Git.
Secondly, "global (- g)" installs Yeoman (Modern Web application scaffolding tool) and VS Code Extension Generator, two officially designated scaffolding tools (tools for generating VS Code plug-in projects).
npm install -g yo generator-code
When you see the following information, the installation is successful:

3, Initialize project structure
After the dependent environment is well done, Yeoman will be used to help us quickly create the project structure! Many people may not be familiar with this scaffold. In short, Yeoman is a general scaffold system that allows the creation of any type of application. You can use it to quickly start a new project. So not only JavaScript, but also Java, Python and C can use it to generate projects, as long as there is a corresponding generator. Let's go to the next step and enter yo code on the command line.
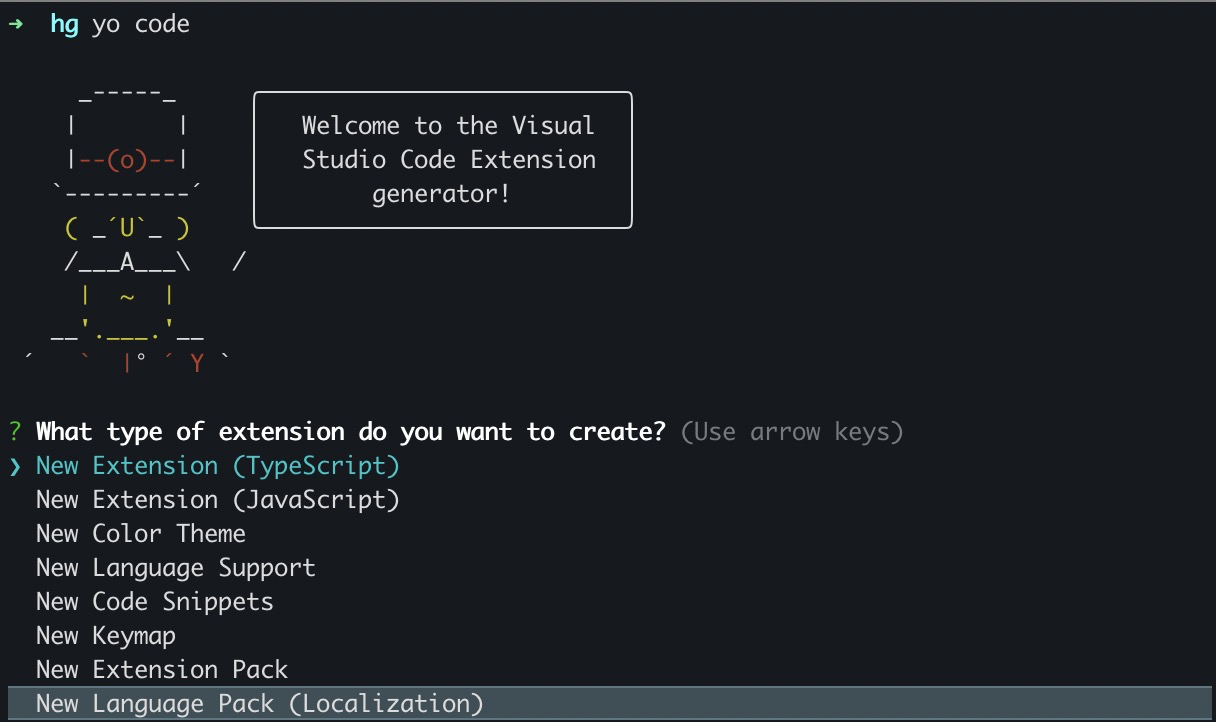
Let's analyze the meaning of these options, which is the same as the literal meaning, from top to bottom:
- New plug-in (Typescript)
- New plug-in (JavaScript)
- New theme color
- New language support
- New code snippet
- New key value binding
- New plug-in package
- New language pack (localization)
You can start with the first one that supports multiple types of plug-ins, so you can choose the first one that supports TypeScript and the second one that we recommend; If you don't want to write all kinds of troublesome type definitions and type verification, choose the second JavaScript. This time, we choose JavaScript for a simple introduction. Then you will need to fill in a series of initialization information as follows:
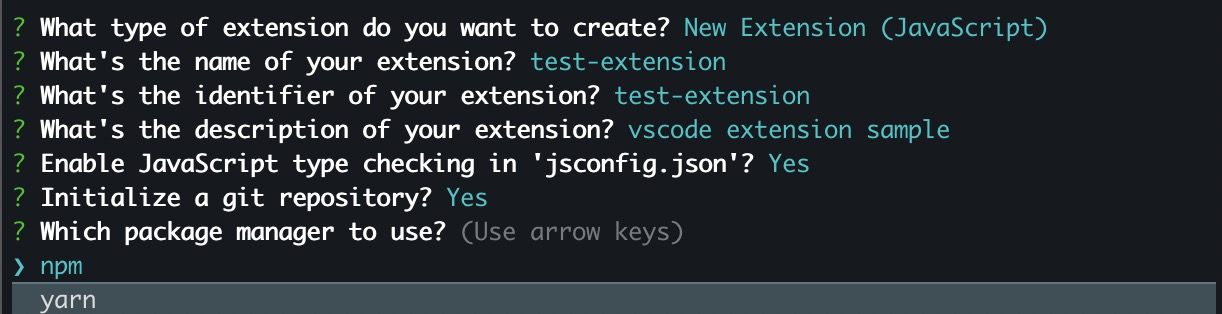
The notes are as follows:
- What type of extension do you want to create? (what type of extension do you want to create?)
- What's the name of your extension? (the extended name? Should be all lowercase letters without spaces)
- What's the identifier of your extension? (extended marking?)
- What's the description of your extension? (what is the extended description?)
- Initialize a git repository? (initialize git warehouse?)
- Which package manager to use? (because we install npm, we can choose npm. If you have yarn, you can also choose yarn)
- What kind of package manager do you use (to download various npm packages)
4, Build a simple VS Code plug-in
The preparations in front are almost ready! Then we'll start driving the green train.
Enter the newly created file directory CD test extension, file directory:

Maybe you can see the file directory at a glance. It's just a few configuration information or item descriptions, but the configuration information in it is "very important" x3, so important that you may have one less configuration or the configuration is wrong, and the function will not come out. So let's spend a little time talking about the information here.
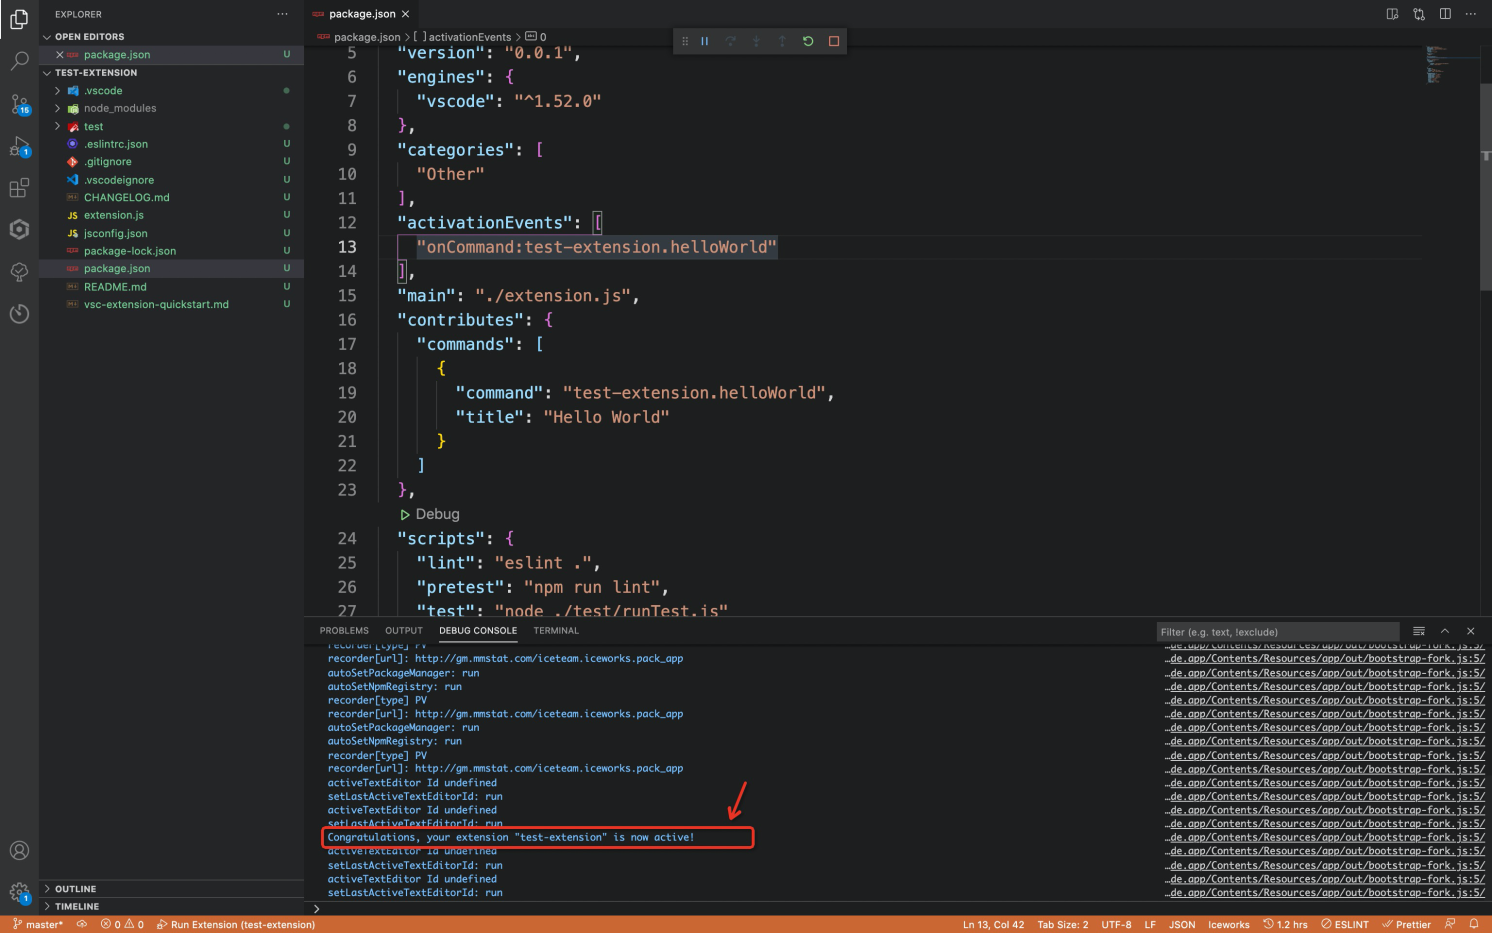
First, you can go to package In the JSON file, you can see the values you set in the previous step. The main meanings of each value in the configuration are as follows. Here is a small point. Note that if your VS Code is old and can not be updated, you can set the version of the following engines to a lower level, For example, I changed it to ^ 1.52.0 to ensure that it is compatible with the current VS Code Editor:
{
  "name": "test-extension", // Name of the plug-in
  "displayName": "test-extension", // Name displayed in the plug-in Market
  "description": "vscode extension sample", // Plug in description
  "version": "0.0.1", // Plug in version
  "engines": { // Minimum supported version of vscode
    "vscode": "^1.52.0"
  },
  "categories": [ // Category of plug-ins, which is used to distinguish the plug-in market
    "Other"
  ],
  "activationEvents": [ // The list of events activated by the plug-in can have multiple trigger mechanisms, so it is in the form of array
    "onCommand:test-extension.helloWorld"
  ],
  "main": "./extension.js", // Plug in main entrance
  "contributes": { // Contribution points, configuration items used to expand plug-in functions, which will not be discussed in detail here. First, use command as an example
    "commands": [
      {
        "command": "test-extension.helloWorld",
        "title": "Hello World"
      }
    ]
  },
  "scripts": {
    "lint": "eslint .",
    "pretest": "npm run lint",
    "test": "node ./test/runTest.js"
  },
  "devDependencies": {
    "@types/vscode": "^1.55.0",
    "@types/glob": "^7.1.3",
    "@types/mocha": "^8.0.4",
    "@types/node": "^12.11.7",
    "eslint": "^7.19.0",
    "glob": "^7.1.6",
    "mocha": "^8.2.1",
    "typescript": "^4.1.3",
    "vscode-test": "^1.5.0"
  }
}
After getting familiar with the configuration, let's take a look at the plug-in's entry file extsnsion JS, which mainly has two main functions. One is activate, which indicates the processing when activating the plug-in. Generally, it is some initialization operations such as registration commands; The other is deactivate, which indicates the processing done when the plug-in is inactivated. In fact, you should have a sense of body when listening to the name. These are the two hook functions in the life cycle of the plug-in.
// The vscode module is introduced, so you can use many functions in it
const vscode = require('vscode');

/**
 * @param {vscode.ExtensionContext} context
 */
function activate(context) {

  console.log('Congratulations, your extension "test-extension" is now active!');

  let disposable = vscode.commands.registerCommand('test-extension.helloWorld', function () {
    vscode.window.showInformationMessage('Hello World from test-extension!');
  });

  context.subscriptions.push(disposable);
}

function deactivate() {}

module.exports = {
  activate,
  deactivate
}
Let's analyze the above code. You can see that there is a command in registerComman. Does it feel like deja vu? Yes, it's up in package The command mentioned in JSON. Let's take it out and have a look:
...,
 // package.json
 "contributes": { // Contribution points, configuration items used to expand plug-in functions, which will not be discussed in detail here. First, use command as an example
    "commands": [
      {
        "command": "test-extension.helloWorld",
        "title": "Hello World"
      }
    ]
  },
...
...
// extension.js
function activate(context) {
  console.log('Congratulations, your extension "test-extension" is now active!');

  let disposable = vscode.commands.registerCommand('test-extension.helloWorld', function () {
    vscode.window.showInformationMessage('Hello World from test-extension!');
  });

  context.subscriptions.push(disposable);
}
...
Does this look intuitive? In package The value of command set in JSON is extension The value of registerCommand in JS. What do these commands mean? Let's run it together:
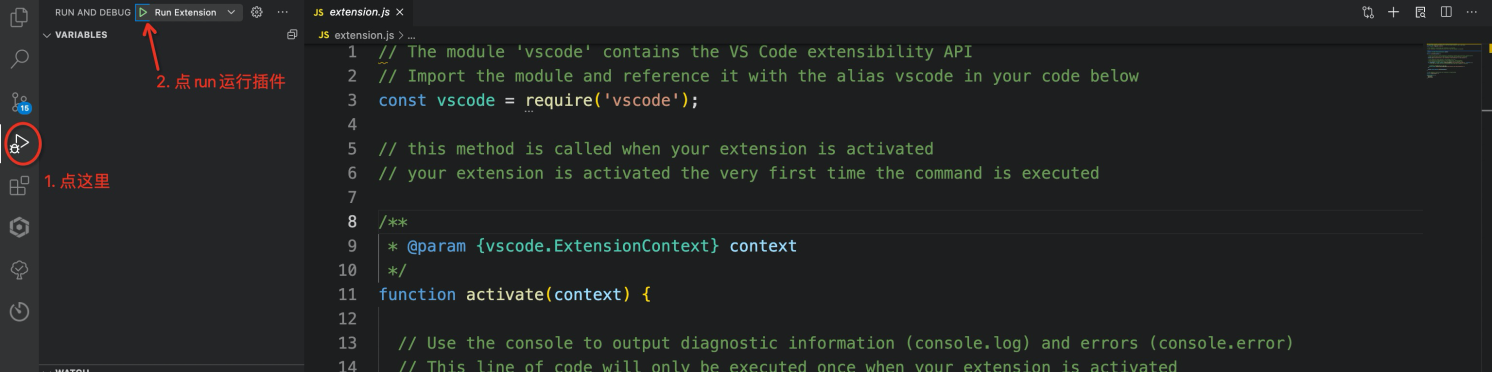
He will help you open a new VS Code editor, and the plug-in will only be loaded into this editor. Now we use the call shortcut (MacOS) command+p and enter & gt; Hello World (case insensitive):

Press enter and you will find that a prompt is output in an insignificant corner in the lower right corner:
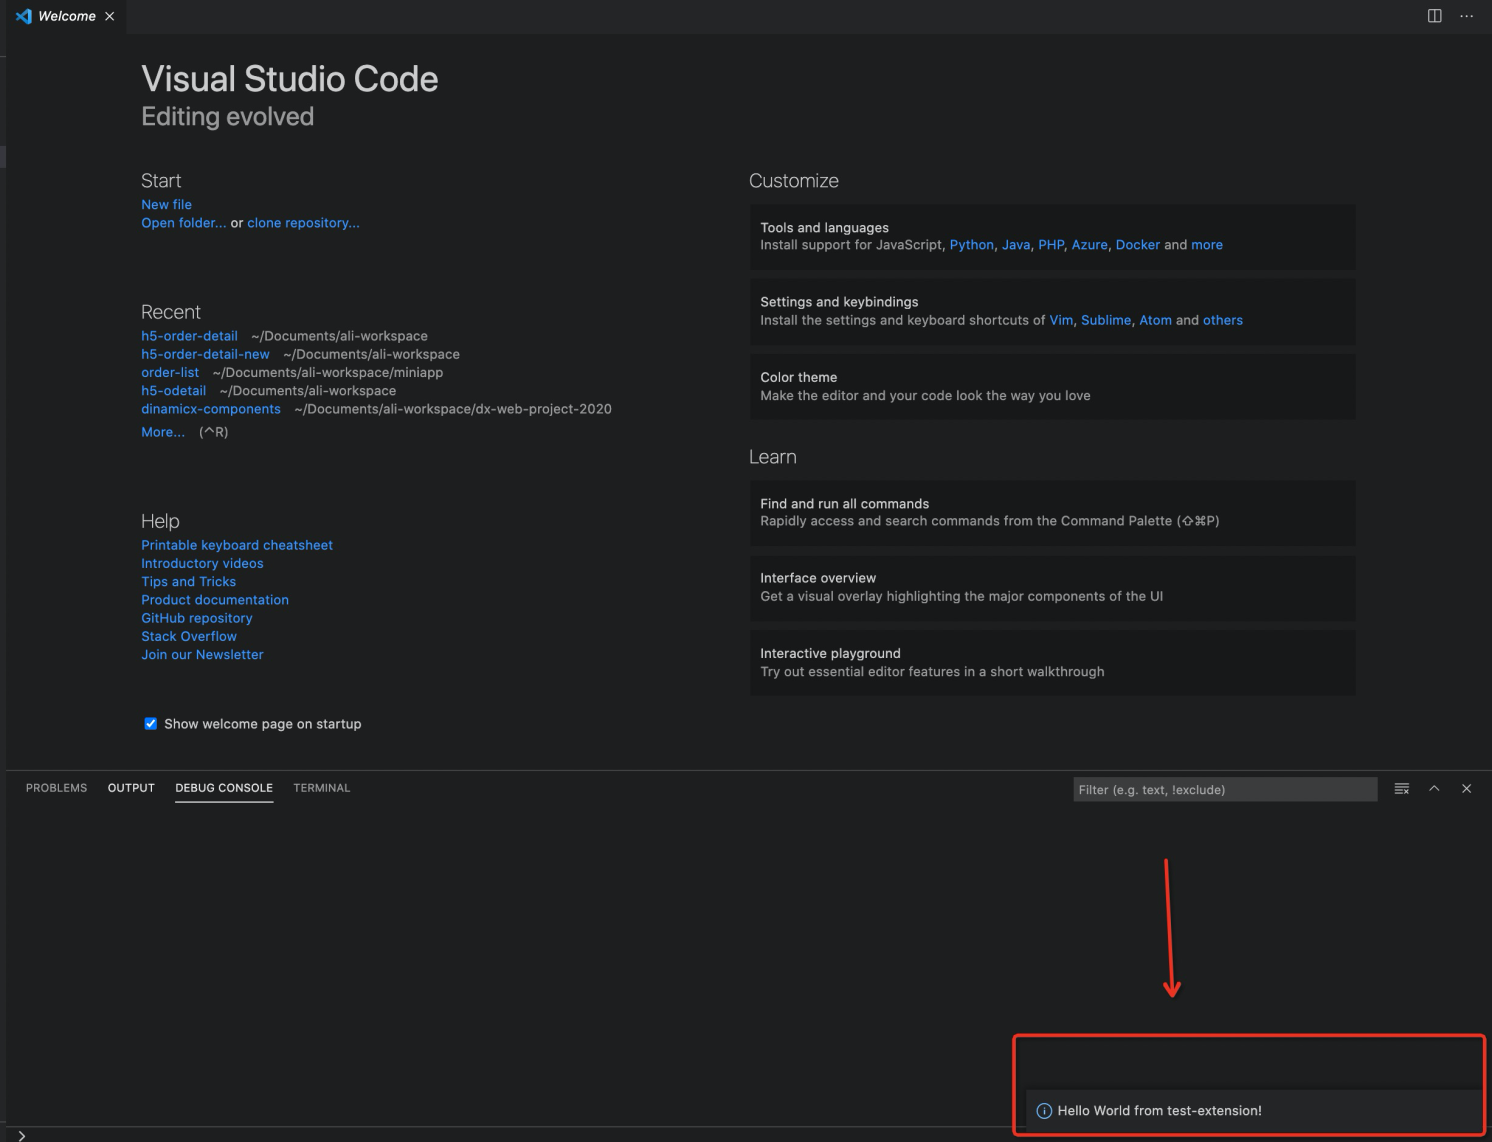
I believe that the smart code you combine must have realized it, right! I wonder if you have this question, the console above Where are you going? Don't worry. Let's go back to the editor of the plug-in code and take a closer look at the following. It will appear after we enter the above command, because it is in package In JSON, the activation time of the plug-in is oncommand: Test extension helloWorld :
Now let's change the above code with the idea of "deliberate learning", such as changing test extension to test:
...,
// package.json
"activationEvents": [
    "onCommand:test.helloWorld"
],
...,
"contributes": {
  "commands": [
    {
      "command": "test.helloWorld",
      "title": "Hello World"
    }
  ]
},
...
// extension.js
...
function activate(context) {

  console.log('I am here!!');

  let disposable = vscode.commands.registerCommand('test.helloWorld', function () {
    vscode.window.showInformationMessage('I changed command Name of!');
  });

  context.subscriptions.push(disposable);
}
...
Follow the above trigger method again and find that it is still possible! So the name here is just a namespace. You can change it to any name you want to apply to the more complex plug-in system. Since it's a namespace, it's OK not to use this prefix.
5, Implement a plug-in of your own
After so much introduction, have you found that this system is not difficult. There are big guys paving the way in front. In fact, we just need to "fill in the blank" according to the rules. Now let's realize a small function - add a button and his click event.
Modify our package JSON is as follows. At present, I want the plug-in to subscribe to the button click event when it is loaded, so here we can change activationEvents to *, so that our plug-in can activate and register events at the beginning:
...,
"activationEvents": [
        "*",
],
"contributes": {
  "commands": [
    {
      "command": "test.helloWorld",
      "title": "Hello World"
    },
    // Register the event clicked by the button, and then configure a small icon
    {
      "command": "test.button",
      "title": "Button",
      "icon": {
        "light": "./media/light/preview.svg",
        "dark": "./media/dark/preview.svg"
      }
    }
  ],
  // Add the following configuration here
  "menus": {
    "editor/title": [
      {
        "command": "test.button",
        "group": "navigation"
      }
    ]
  }
},
...
Then go back to our extension JS adds a simple message reminder:
function activate(context) {
  console.log('I am here!!');
  let disposable = vscode.commands.registerCommand('test.helloWorld', function () {
    vscode.window.showInformationMessage('I changed command Name of!');
  });
  // Add the click command operation content of a button
  let button = vscode.commands.registerCommand('test.button', function () {
    vscode.window.showInformationMessage('Button click');
  });
  // Remember to put this new command in and subscribe
  context.subscriptions.push(disposable, button);
}
Take a look at the effect:
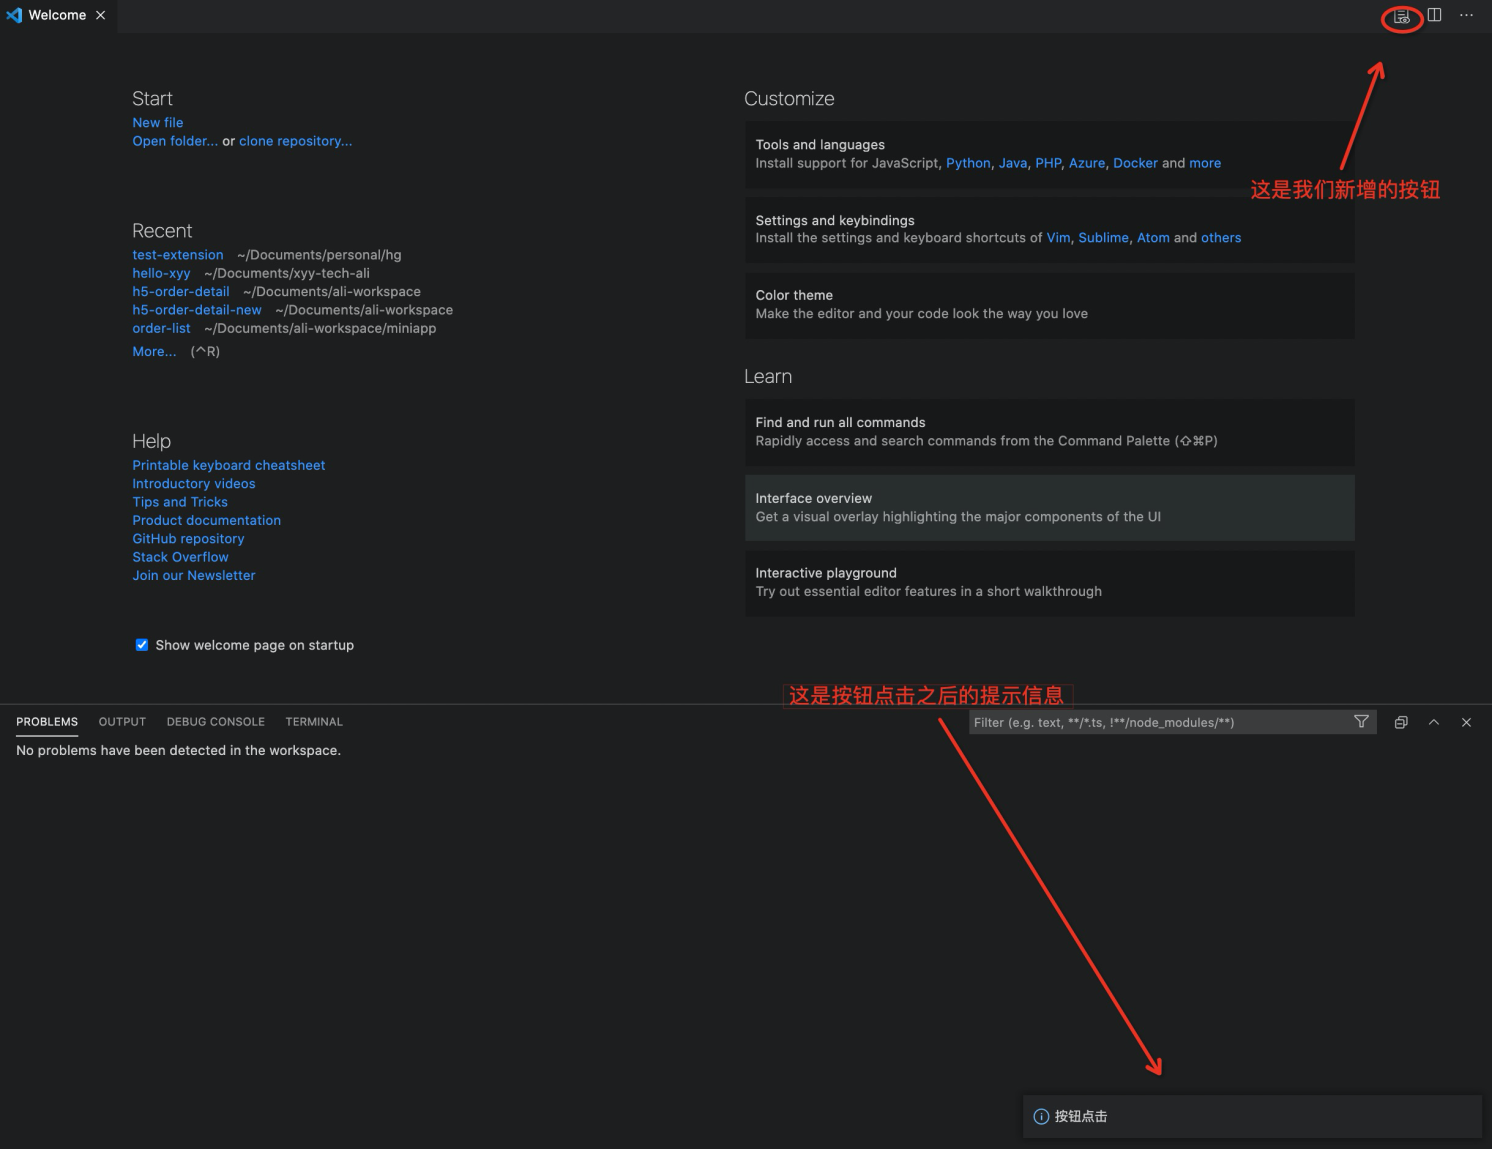
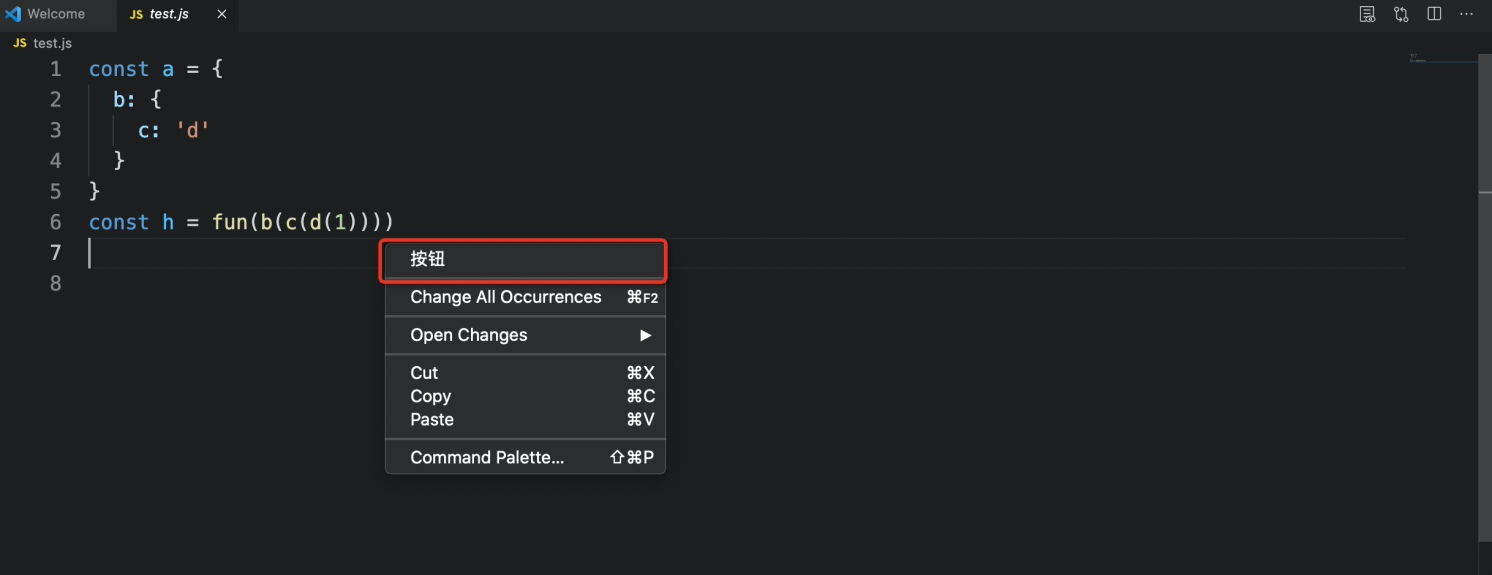
Is it easy to customize the style of VS Code? Now let's analyze what we do above. First, we modified the package The configuration in JSON adds a menu. What is this menu? The answer is the menu. The menu item definition includes the command that should be called when selecting and the condition (when) that the item should be displayed, so you can also add a display logic to the menu item display. For example, we specify that the button should be displayed only when the javascript file is opened:
{
  "contributes": {
    "menus": {
      "editor/title": [
        {
          "when": "resourceLangId == javascript",
          "command": "test.button",
          "group": "navigation"
        }
      ]
    }
  }
}


The meaning of group is used to define the sorting and grouping of menu items. A diagram from the official website shows the order relationship between different groups. Of course, this menu is not the one we wrote above, but editor/context. Therefore, there are slight differences between groups in different menus, but they are almost the same, and the display priority of navigation is the highest:

We can also add this one to see:
"menus": {
  "editor/title": [
    {
      "command": "test.button",
      "group": "navigation",
      "when": "resourceLangId == javascript"
    }
  ],
    "editor/context": [
      {
        "command": "test.button",
        "group": "navigation",
        "when": "resourceLangId == javascript"
      }
    ]
}
The effect is the same:
If you're curious about the other menus, I've simply "translated" the contents of the official website (only the common menus are not all):
| Name of the configuration menu item | Menu location |
|---|---|
| commandPalette | Global command panel |
| explorer/context | Explorer context menu |
| editor/context | Editor context menu |
| editor/title | Editor title bar, display text without configuring pictures |
| editor/title/context | Editor title right click context menu |
| debug/callstack/context | Context menu for debug stack view |
| debug/toolbar | Debug Toolbar |
| scm/title | SCM title menu |
| view/title | Look at the title menu |
| touchBar | macOS touch bar |
| timeline/title | Timeline view title menu bar |
| extension/context | Extender view context menu |
6, Make a summary
As can be seen from the above simple example, VS Code can not only support us to customize the desired commands, but also allow us to personalize the editor within the "limited scope". Why limit the scope? According to the official website, the current plug-in system has the following limitations:
The plug-in does not have the ability to access the DOM of VS Code UI. Therefore, you cannot apply custom CSS to VS Code or add HTML elements to the extension of VS Code UI. Such limitations are:
- Ensure that the user's operation is within the controllable range and ensure the consistency of operation
- Prevent the change of underlying Web technology from affecting some existing plug-ins
- Ensure that developers can continue to iterate on the basis of the original plug-in as usual without breaking the original rules and relearning
In fact, the learning area is still a small part of our learning system! Next time, let's go to the "declarative language feature" and wonder how the automatic prompt and completion in the editor are done?
HelloGitHub official account is updated.
There are more open source projects and treasure projects waiting for you to explore.