preparation
Summarize the whole process for self use
1. Download arm none EABI GCC
Download address

After decompression, open the terminal under the bin file of GCC arm none EABI and add the current PATH to the PATH variable:
echo export PATH=$PATH:$(pwd)
You can also manually add a path in the ~ directory.
arm-none-eabi-gcc --version
Check the version. The version information indicates success.
arm-none-eabi-gcc (GNU Arm Embedded Toolchain 10-2020-q4-major) 10.2.1 20201103 (release)
Copyright (C) 2020 Free Software Foundation, Inc.
This is free software; see the source for copying conditions.  There is NO
warranty; not even for MERCHANTABILITY or FITNESS FOR A PARTICULAR PURPOSE.
2.JLink drive
Download address

Select version 6.5 (the latest version I downloaded at the beginning is not connected to my pirated jlink), and the deb version is convenient.
cd /opt/SEGGER/
These two folders contain executable files.
3.STM32 library file
F103 board is used. Download the standard library and unzip it.
Download address
Makefile management stm32 project
1.stm32 library file analysis
Cortex-M3 chip support file:
core_cm3.c
core_cm3.h
Register definition interrupt vector definition:
stm32f10x.h
Clock configuration:
system_stm32f10x.c
system_stm32f10x.h
Startup file:
startup_stm32f10x_hd.s
ld: small memory
md: medium memory
hd: large memory
Libraries contains various peripheral files.
2.Makefile project
Folder composition
Select the corresponding file from the standard library function just downloaded and add it to stm32_temp_proj
- stm32_temp_proj
- cmsis
- core_cm3.c
- core_cm3.h
- stm32f10x.h
- system_stm32f10x.c
- system_stm32f10x.h
- doc
- lib
- inc
- src
- output
- startup
- startup_stm32f10x_hd.s
- user
- stm32f10x_it.c
- stm32f10x_it.h
- stm32f10x_conf.h
- main.c
- Makefile
- stm32_flash.ld
- cmsis
core_ cm3. There are some places in the GCC file that need to be changed, otherwise the compilation cannot pass, because the tolerance of source code errors is reduced after GCC update.
//Change r to & R
__ASM volatile ("strexh %0, %2, [%1]" : "=&r" (result) : "r" (addr), "r"(value) );
See reference 1 for details Project management of STM32 development on Ubuntu / Hexo
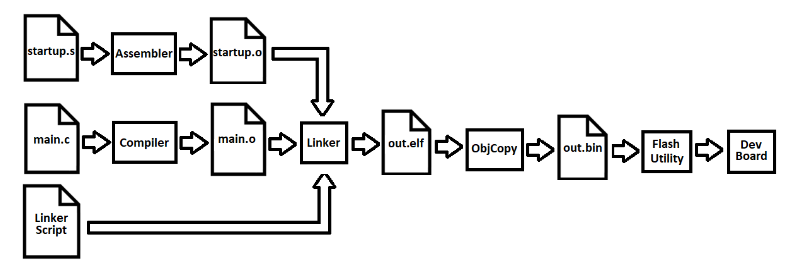
Compilation process
Without understanding the compilation process of the project, there is no way to write a Makefile. The startup file is written by assembly and contains the necessary configuration. LinkerScript here refers to stm32_flash.ld file is used to link main O and startup o
Makefile
#project name
PROJ = syj_temp_test

#compiler and elf-to-bin&hex
CC = arm-none-eabi-gcc
OBJCOPY = arm-none-eabi-objcopy

#cpu
CPUFLAGS = -mthumb -mcpu=cortex-m3
LDFLAGS  = -T stm32_flash.ld -Wl,-cref,-u,Reset_Handler -Wl,-Map=$(PROJ).map -Wl,--gc-sections -Wl,--defsym=malloc_getpagesize_P=0x80 -Wl,--start-group -lc -lm -Wl,--end-group
CFLAGS = $(INCFLAGS) -D STM32F10X_HD -D USE_STDPERIPH_DRIVER -Wall -g -o

#Define PWD variable storage path
PWD = $(shell pwd)
#Find all the c Documents
SRC = $(shell find ./ -name '*.c')
#Find all the o documentation
OBJ = $(SRC:%.c=%.o)

#startup.s file with path
STARTUP_SRC = $(shell find ./ -name 'startup_stm32f10x_hd.s')
#startup.o file path
STARTUP_OBJ = $(STARTUP_SRC:%.s=%.o)

INCFLAGS = -I $(PWD)/cmsis -I $(PWD)/lib/inc -I $(PWD)/user

OUTPUTFLAG = $(PWD)/output/

$(PROJ):startup_stm32f10x_hd.o $(OBJ)
	$(CC) $^ $(CPUFLAGS) $(LDFLAGS) $(CFLAGS) $(OUTPUTFLAG)$(PROJ).elf
startup_stm32f10x_hd.o:./startup/startup_stm32f10x_hd.s
	$(CC) -c $^ $(CPUFLAGS) $(CFLAGS) $@
$(OBJ):%.o:%.c
	$(CC) -c $^ $(CPUFLAGS) $(CFLAGS) $@

#transformation
bin:
	$(OBJCOPY) $(OUTPUTFLAG)$(PROJ).elf $(OUTPUTFLAG)$(PROJ).bin
hex:
	$(OBJCOPY) $(OUTPUTFLAG)$(PROJ).elf -Oihex $(OUTPUTFLAG)$(PROJ).hex

clean:
	rm -f $(shell find ./ -name '*.o') $(shell find ./ -name '$(PROJ).*')
arm-none-eabi-objcopy is used to transfer the data with debugging information elf file into a downloadable bin and hex file.
Files that are not in the same directory as the Makefile cannot be accessed directly by name, and a path needs to be added.
JLink burning
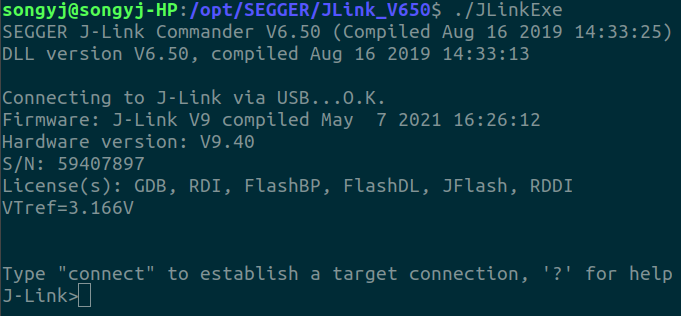
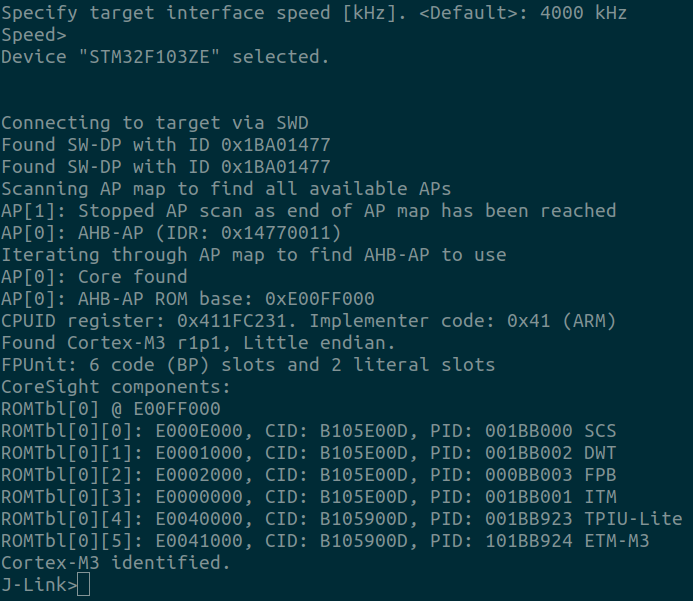
Use make bin or make hex to generate files that can be downloaded, and open JLinkExe:
Select device:
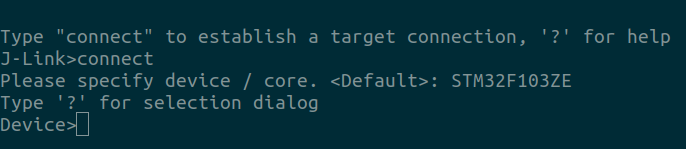
When the question mark cannot pop up the period selection window, use the device command followed by the device name.
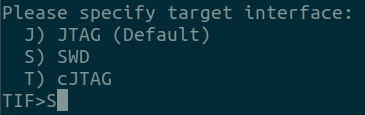
Select download method:
?
The default speed indicates that the device has been linked
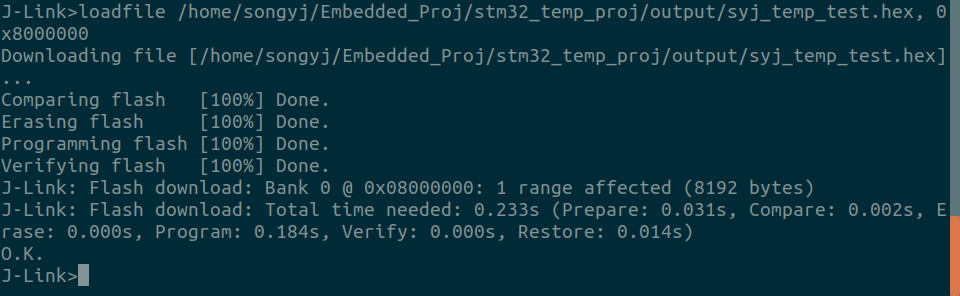
Use the loadfile or loadbin command to download to the MCU:
#Syntax: loadfile <filename>, [<addr>]
loadfile /home/songyj/Embedded_Proj/stm32_temp_proj/output/syj_temp_test.hex, 0x8000000
Download succeeded:
JLink GDB debugging
See this brother's blog xxgui1992
JLinkGDBServer -if SWD -device STM32F103ZET6
Open arm none EABI GDB in a new window
target remote 127.0.0.1:2331
moniter halt
load /home/songyj/Embedded_Proj/stm32_temp_proj/output/syj_temp_test.elf
file /home/songyj/Embedded_Proj/stm32_temp_proj/output/syj_temp_test.elf
reference resources
Project management of STM32 development on Ubuntu / Hexo
In Depth Analysis of an ARM Cortex-M4 Program/Terence Darwen
Rookies are familiar with STM32 firmware library folder / snail dove
About STM32F103 v3 5.0 firmware library stm32f10x_conf.h file / baicai_c