1, Virtual machine installation
1. Install operating system as Ubuntu The virtual machine of 20.04 is used to build and install the fabric environment
2. Configure the domestic source for the virtual machine. Take configuring Tsinghua source as an example
- Enter the source of Tsinghua University( https://mirrors.tuna.tsinghua.edu.cn/help/ubuntu/ )
- Select the source code of version 20.04
- Open the virtual machine terminal and enter the configuration directory
$ cd /etc/apt
4. Edit source
$ sudo cp sources.list sources_backup.list       #Backup source, copy sources List file and name it sources_back.list
$ sudo gedit sources.list      #Replace the original with the newly copied source in the open file (delete the original and paste the newly copied)
5. Update source
sudo apt update
2, Fabric environment construction
1. Install git
To install the git tool, use the following command:
$ sudo apt update
$ sudo apt install git
2. Install cURL
Use the following command to install cURL:
$ sudo apt install curl
3. Install Docker
Check whether Docker is installed in the system:
$ docker --version
Use the following command to install the latest version of Docker:
$ sudo apt update
$ sudo apt install docker.io
View Docker version information:
$ docker --version
4. Install docker compose
Determine whether docker compose tool is installed in the system:
$ docker-compose --version
If the system prompts that it is not installed, use the following command to install the docker compose tool:
$ sudo apt install docker-compose
After successful installation, view Docker - Compose version information:
$ docker-compose --version
Output: docker compose version 1.25.0, build unknown
5. Install Golang
To install the WGET command:
yum install wget
Use the wget tool to download the latest version of Golang's compressed package file go1 14.4. linux-amd64. tar. gz
$ wget https://dl.google.com/go/go1.14.4.linux-amd64.tar.gz
After downloading, the file will be saved in the current directory. You can use the ll command to view
Use the tar command to unzip the downloaded compressed package file to the specified / usr/local / path
$ sudo tar -zxvf go1.14.4.linux-amd64.tar.gz -C /usr/local/
Configure environment variables: after decompression, Golang can be used normally by all users of the system, so we use vim file editing tool to open the system profile file for editing:
$ sudo vim /etc/profile
Add the following content at the end of the profile file:
export GOPATH=$HOME/go
export GOROOT=/usr/local/go
export PATH=$GOROOT/bin:$PATH
Use the source command to make the configuration information just added effective:
$ source /etc/profile
Verify success with the go version command:
$ go version
6. Install make
$ sudo apt install make
7. Installation g++
$ sudo apt install g++
8. Install libltdl dev Library
$ sudo apt-get install libltdl-dev
III. compile and install fabric1.0 in the form of source code four
1. Download fabric component version 1.4.0
$ mkdir -p $GOPATH/src/github.com/hyperledger/
$ cd $GOPATH/src/github.com/hyperledger/
#Clone from the code cloud based on 1.4.0 (Note: The Clone address given below may become invalid. If it fails, it can be replaced with another address on the code cloud or the address on GitHub: https://github.com/hyperledger/fabric-samples.git )
$ git clone -b v1.4.0 https://gitee.com/Hospital-Ledger/fabric-samples.git
2. Download fabric 1.4.0 source code
$ cd $GOPATH/src/github.com/hyperledger/

#Use - B v1 4.0 specify the clone version and use the domestic mirror website to speed up the download speed (Note: the address on the code cloud may become invalid. If it cannot be cloned, it can be changed to another address on the code cloud or cloned directly from GitHub: https://github.com/hyperledger/fabric.git )
$ git clone -b v1.4.0 https://gitee.com/mirrors/hyperledger-fabric.git

#Change hyperledger fabric to fabric
$ sudo mv hyperledger-fabric fabric
3. Compiling fabric 1.4.0
compile
$ cd fabric
$ make release
Check whether the compilation is successful
$ ll release/linux-amd64/bin/
You should be able to view the following 8 files
configtxgen
configtxlator
cryptogen
discover
get-docker-images.sh
idemixgen
orderer
peer
4. Download fabric Ca 1.4.0 source code
$ cd $GOPATH/src/github.com/hyperledger
#Use - B v1 4.0 specify the clone version and use the domestic mirror website to speed up the download speed (Note: the address on the code cloud may become invalid. If it cannot be cloned, it can be changed to another address on the code cloud or cloned directly from GitHub: https://github.com/hyperledger/fabric-ca.git )
$ git clone -b v1.4.0 https://gitee.com/zhangsen999/fabric-ca.git
5. Compiling fabric CA source code
$ cd fabric-ca
$ make fabric-ca-server
$ make fabric-ca-client
6. Check whether the compilation is successful
$ ll bin/
You should see the following 2 files:
fabric-ca-client
fabric-ca-server
7. Copy the compiled files (otherwise, the network cannot be started)
#Create the bin directory in the fabric samples directory
$ cd $GOPATH/src/github.com/hyperledger/fabric-samples/
$ mkdir bin
#Copy the file from the compiled fabric
$ cp $GOPATH/src/github.com/hyperledger/fabric/release/linux-amd64/bin/* $GOPATH/src/github.com/hyperledger/fabric-samples/bin/
#Copy the compiled fabric CA file
$ cp $GOPATH/src/github.com/hyperledger/fabric-ca/bin/* $GOPATH/src/github.com/hyperledger/fabric-samples/bin/
#View replication results
$ ll bin/
8. Pull docker image
- Log in to alicloud container service: https://account.aliyun.com/login/login.htm?oauth_callback=https%3A%2F%2Fcr.console.aliyun.com%2Fcn-hangzhou%2Finstances%2Fmirrors
- Locate the mirror accelerator entry
- Copy the code to the terminal for execution
4. Execute the following command to pull the image:
$ export FABRIC_TAG=1.4.0
$ export CA_TAG=1.4.0
$ export THIRDPARTY_IMAGE_VERSION=0.4.14

$ docker pull hyperledger/fabric-peer:$FABRIC_TAG \
&& docker pull hyperledger/fabric-orderer:$FABRIC_TAG \
&& docker pull hyperledger/fabric-ca:$CA_TAG \
&& docker pull hyperledger/fabric-tools:$FABRIC_TAG \
&& docker pull hyperledger/fabric-ccenv:$FABRIC_TAG \
&& docker pull hyperledger/fabric-baseimage:$THIRDPARTY_IMAGE_VERSION \
&& docker pull hyperledger/fabric-baseos:$THIRDPARTY_IMAGE_VERSION \
&& docker pull hyperledger/fabric-couchdb:$THIRDPARTY_IMAGE_VERSION \
&& docker pull hyperledger/fabric-kafka:$THIRDPARTY_IMAGE_VERSION \
&& docker pull hyperledger/fabric-zookeeper:$THIRDPARTY_IMAGE_VERSION
5. Mark downloaded images as up-to-date
$ docker tag hyperledger/fabric-peer:$FABRIC_TAG hyperledger/fabric-peer \
&& docker tag hyperledger/fabric-orderer:$FABRIC_TAG hyperledger/fabric-orderer \
&& docker tag hyperledger/fabric-ca:$CA_TAG hyperledger/fabric-ca \
&& docker tag hyperledger/fabric-tools:$FABRIC_TAG hyperledger/fabric-tools \
&& docker tag hyperledger/fabric-ccenv:$FABRIC_TAG hyperledger/fabric-ccenv \
&& docker tag hyperledger/fabric-baseimage:$THIRDPARTY_IMAGE_VERSION hyperledger/fabric-baseimage \
&& docker tag hyperledger/fabric-baseos:$THIRDPARTY_IMAGE_VERSION hyperledger/fabric-baseos \
&& docker tag hyperledger/fabric-couchdb:$THIRDPARTY_IMAGE_VERSION hyperledger/fabric-couchdb \
&& docker tag hyperledger/fabric-kafka:$THIRDPARTY_IMAGE_VERSION hyperledger/fabric-kafka \
&& docker tag hyperledger/fabric-zookeeper:$THIRDPARTY_IMAGE_VERSION hyperledger/fabric-zookeeper
6. Then use the docker images command to view the relevant image information:
$ docker images
IV. test network
1. Enter the corresponding directory
$ cd ~/go/src/github.com/hyperledger/fabric-samples/first-network
2. Generate certificate and key:
$ sudo ./byfn.sh -m generate
After the command is successfully executed, a network structure of 1 order + 4 peers + 1 CLI will be generated, and the 4 peers are included in 2 org
3. Start the network:
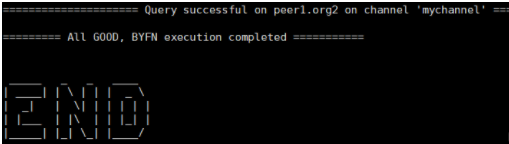
$ sudo ./byfn.sh -m up
The following content appears, indicating that the network test is successful:
4. Turn off the network after the network is used to prevent errors when starting the network later:
$ sudo ./byfn.sh -m down