brief introduction
In large applications, some components may not be displayed at the beginning and will only be rendered under specific conditions. In this case, the resources of the component do not need to be loaded at the beginning, and can be requested when necessary. This can also reduce the resource volume loaded on the page for the first time. It is also very simple to use asynchronous components in Vue:
// AsyncComponent.vue
<template>
  <div>I am the content of asynchronous components</div>
</template>

<script>
export default {
    name: 'AsyncComponent'
}
</script>
// App.vue
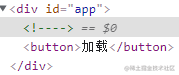
<template>
<div id="app">
<AsyncComponent v-if="show"></AsyncComponent>
<button @click="load">load</button>
</div>
</template>
<script>
export default {
name: 'App',
components: {
AsyncComponent: () => import('./AsyncComponent'),
},
data() {
return {
show: false,
}
},
methods: {
load() {
this.show = true
},
},
}
</script>
Instead of directly introducing the AsyncComponent component for registration, we use the import() method to dynamically load. import() is ES2015 Loader specification A defined method, webpack built-in support, will separate the contents of AsyncComponent components into a js file. The page will not be loaded initially. The request will be made only after clicking the load button. This method will return a promise. Next, let's take a detailed look at this process from the perspective of source code.
Through this article, you can understand the processing process of Vue for asynchronous components and the resource loading process of webpack.
Compiled product
First, we make a package and generate three js files:

The first file is the entry file of our application, which contains main js,App.vue also includes some webpack injection methods. The second file is the content of our asynchronous component AsyncComponent, and the third file is the content of other public libraries, such as Vue.
Then let's look at app Vue compiled content:
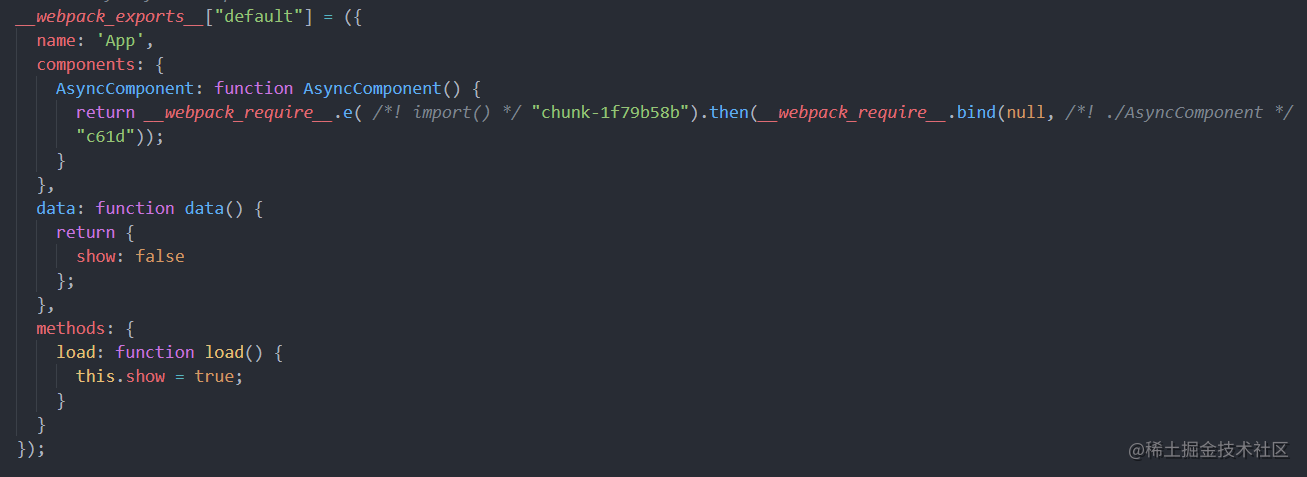
The above figure shows the option object of App component. You can see the registration method of asynchronous component, which is a function.
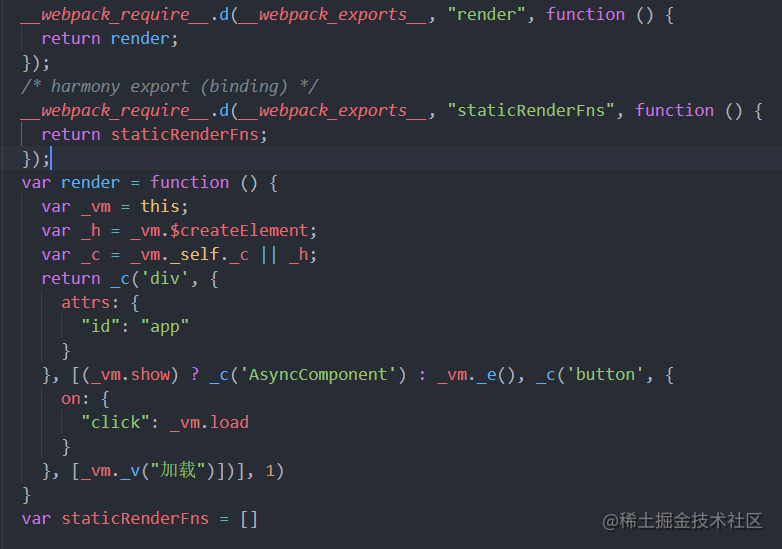
The figure above shows app Vue template part of the compiled rendering function, when_ vm. When show is true, it will be executed_ c('AsyncComponent '), otherwise execute_ vm._e(), create an empty VNode_ c is the createElement method:
vm._c = function (a, b, c, d) { return createElement(vm, a, b, c, d, false); };
Next, let's look at the execution process of this method when we click the button.
createElement method
function createElement (
  context,
  tag,
  data,
  children,
  normalizationType,
  alwaysNormalize
) {
  if (Array.isArray(data) || isPrimitive(data)) {
    normalizationType = children;
    children = data;
    data = undefined;
  }
  if (isTrue(alwaysNormalize)) {
    normalizationType = ALWAYS_NORMALIZE;
  }
  return _createElement(context, tag, data, children, normalizationType)
}
context is App component instance, and tag is_ The parameter AsyncComponent of c and the other parameters are undefined or false, so the two if branches of this method did not go, so they entered directly_ createElement method:
function _createElement (
 context,
 tag,
 data,
 children,
 normalizationType
) {
    // If data is observed data
    if (isDef(data) && isDef((data).__ob__)) {
        return createEmptyVNode()
    }
    // Object syntax in v-bind
    if (isDef(data) && isDef(data.is)) {
        tag = data.is;
    }
    // tag does not exist. It may be that the is attribute of component component is not set
    if (!tag) {
        return createEmptyVNode()
    }
    // Supports a single function item as the default scope slot
    if (Array.isArray(children) &&
        typeof children[0] === 'function'
       ) {
        data = data || {};
        data.scopedSlots = { default: children[0] };
        children.length = 0;
    }
    // Processing child nodes
    if (normalizationType === ALWAYS_NORMALIZE) {
        children = normalizeChildren(children);
    } else if (normalizationType === SIMPLE_NORMALIZE) {
        children = simpleNormalizeChildren(children);
    }
    // ...
}
The above logic will not enter in our example, and then look down:
function _createElement (
 context,
 tag,
 data,
 children,
 normalizationType
) {
    // ...
    var vnode, ns;
    // tag is a string
    if (typeof tag === 'string') {
        var Ctor;
        ns = (context.$vnode && context.$vnode.ns) || config.getTagNamespace(tag);
        if (config.isReservedTag(tag)) {
            // Is it a reserved element, such as html element or svg element
            if (false) {}
            vnode = new VNode(
                config.parsePlatformTagName(tag), data, children,
                undefined, undefined, context
            );
        } else if ((!data || !data.pre) && isDef(Ctor = resolveAsset(context.$options, 'components', tag))) {
            // assembly
            vnode = createComponent(Ctor, data, context, children, tag);
        } else {
            // Other unknown Tags
            vnode = new VNode(
                tag, data, children,
                undefined, undefined, context
            );
        }
    } else {
        // tag is a component option or constructor
        vnode = createComponent(tag, data, context, children);
    }
    // ...
}
For our asynchronous component, the tag is AsyncComponent, which is a string. In addition, the registered AsyncComponent can be found through the resolveAsset method:
function resolveAsset (
  options,// $options for App component instance
  type,// components
  id,
  warnMissing
) {
  if (typeof id !== 'string') {
    return
  }
  var assets = options[type];
  // First check the local registration
  if (hasOwn(assets, id)) { return assets[id] }
  var camelizedId = camelize(id);
  if (hasOwn(assets, camelizedId)) { return assets[camelizedId] }
  var PascalCaseId = capitalize(camelizedId);
  if (hasOwn(assets, PascalCaseId)) { return assets[PascalCaseId] }
  // If there is no local, search on the prototype chain
  var res = assets[id] || assets[camelizedId] || assets[PascalCaseId];
  if (false) {}
  return res
}
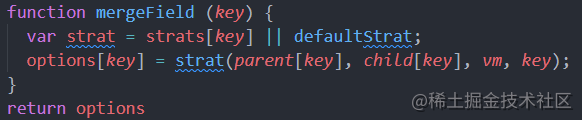
Vue will first create each of our components into a constructor and then instantiate it. During the creation process, options will be merged, that is, the options of the component and the options of the parent constructor will be merged:
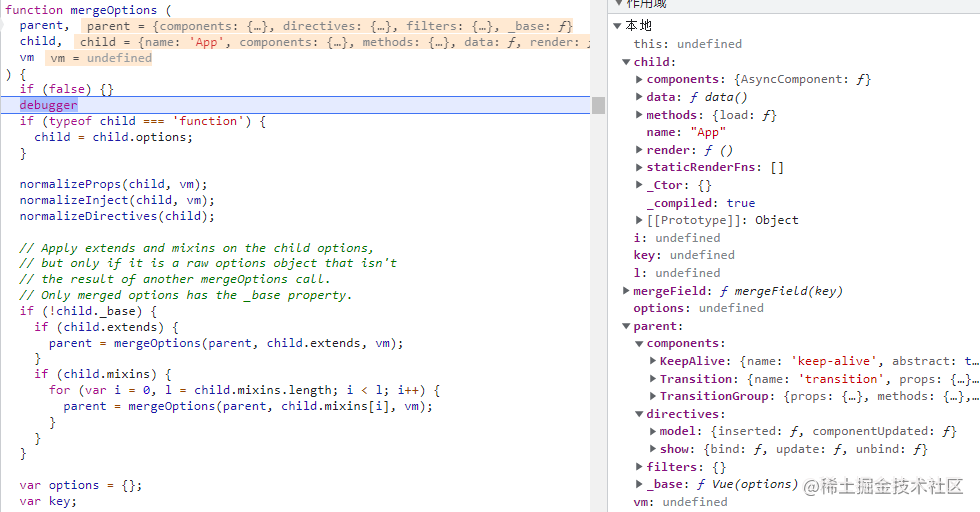
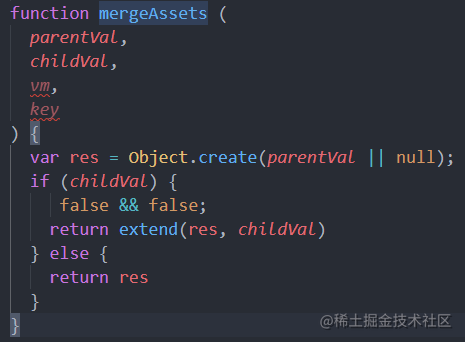
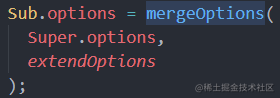
In the above figure, the sub option is the component option of App, and the parent option is the option object of Vue constructor. For the components option, an object will be created based on the option value of the parent class, and then the option value of the sub class itself will be added to the object as an attribute. Finally, this object will be used as the options of the sub class constructor Attribute value of components:
Then, when the component is instantiated, an object will be created with the options object of the constructor as the prototype, as the $options of the instance:

So the App instance can get options from its constructor through $options AsyncComponent component found on components object:
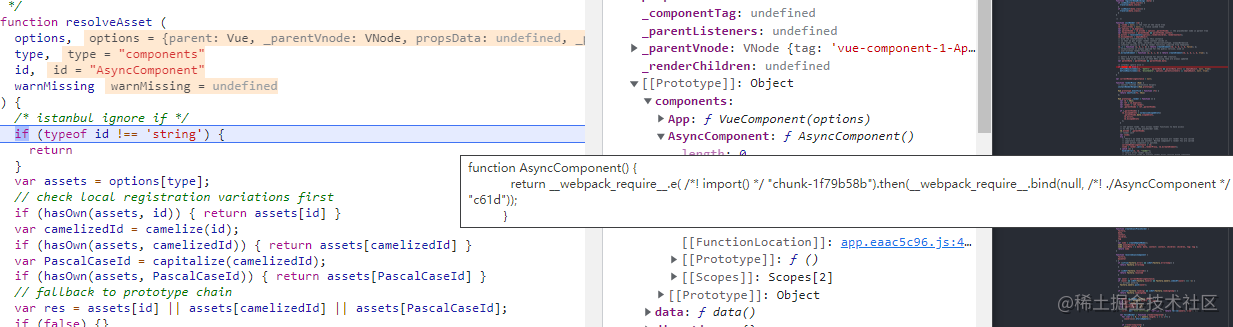
You can find that it is the compiled function we saw earlier.
Next, the createComponent method is executed:
function createComponent (
 Ctor,
 data,
 context,
 children,
 tag
) {
    // ...
    // Asynchronous component
    var asyncFactory;
    if (isUndef(Ctor.cid)) {
        asyncFactory = Ctor;
        Ctor = resolveAsyncComponent(asyncFactory, baseCtor);
        if (Ctor === undefined) {
            return createAsyncPlaceholder(
                asyncFactory,
                data,
                context,
                children,
                tag
            )
        }
    }
    // ...
}
Then the resolveAsyncComponent method is executed:
function resolveAsyncComponent (
 factory,
 baseCtor
) {
     // ...
    var owner = currentRenderingInstance;
    if (owner && !isDef(factory.owners)) {
        var owners = factory.owners = [owner];
        var sync = true;
        var timerLoading = null;
        var timerTimeout = null

        ;(owner).$on('hook:destroyed', function () { return remove(owners, owner); });
        var forceRender = function(){}
        var resolve = once(function(){})
        var reject = once(function(){})
        // Functions that execute asynchronous components
        var res = factory(resolve, reject);
    }
     // ...
}
At this point, the asynchronous component function is finally executed, that is, the following:
function AsyncComponent() {
    return __webpack_require__.e( /*! import() */ "chunk-1f79b58b").then(__webpack_require__.bind(null, /*! ./AsyncComponent */ "c61d"));
}
To know what res is, we have to look at what these webpack functions do.
Load component resources
webpack_require.e method
Look first__ webpack_require__.e) method:
__webpack_require__.e = function requireEnsure(chunkId) {
    var promises = [];
    // Loaded chunk s
    var installedChunkData = installedChunks[chunkId];
    if (installedChunkData !== 0) { // 0 means it has been loaded
      // If the value is not 0, it means that the component is loading, and installedChunkData[2] is the promise object
      if (installedChunkData) {
        promises.push(installedChunkData[2]);
      } else {
        // Create a promise and cache the two callback parameters on the installedChunks object
        var promise = new Promise(function (resolve, reject) {
          installedChunkData = installedChunks[chunkId] = [resolve, reject];
        });
        // Add the promise object itself to the cache array
        promises.push(installedChunkData[2] = promise);
        // Start a chunk request
        var script = document.createElement('script');
        var onScriptComplete;
        script.charset = 'utf-8';
        script.timeout = 120;
        // Request url of the splice chunk
        script.src = jsonpScriptSrc(chunkId);
        var error = new Error();
        // chunk load completed / failed return
        onScriptComplete = function (event) {
          script.onerror = script.onload = null;
          clearTimeout(timeout);
          var chunk = installedChunks[chunkId];
          if (chunk !== 0) {
            // If the value of the chunkId on the installedChunks object still exists, it means that there is a loading error
            if (chunk) {
              var errorType = event && (event.type === 'load' ? 'missing' : event.type);
              var realSrc = event && event.target && event.target.src;
              error.message = 'Loading chunk ' + chunkId + ' failed.\n(' + errorType + ': ' + realSrc + ')';
              error.name = 'ChunkLoadError';
              error.type = errorType;
              error.request = realSrc;
              chunk[1](error);
            }
            installedChunks[chunkId] = undefined;
          }
        };
        // Set timeout
        var timeout = setTimeout(function () {
          onScriptComplete({
            type: 'timeout',
            target: script
          });
        }, 120000);
        script.onerror = script.onload = onScriptComplete;
        document.head.appendChild(script);
      }
    }
    return Promise.all(promises);
  };
Although this method is a little long, its logic is very simple. First, the function returns a promise. If the chunk to be loaded has not been loaded, create a promise, and then cache it on the installedChunks object. Next, create a script tag to load the chunk. The only thing that is difficult to understand is the onScriptComplete function, If it is judged that the cache information of the chunk on installedChunks is not 0, it will be treated as a failure. The problem is that the promise information was cached before, and there is no change. To understand this, we need to look at the contents of the chunk we want to load:
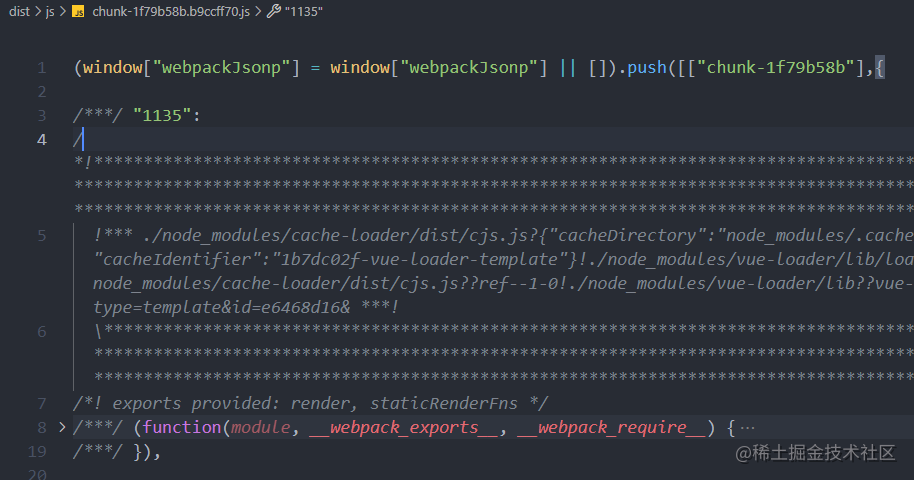
You can see that the code is directly executed, and an item is added to the webpackJsonp array:
window["webpackJsonp"] = window["webpackJsonp"] || []).push([["chunk-1f79b58b"],{..}])
There seems to be no problem. In fact, the push method of window["webpackJsonp"] has been modified:
var jsonpArray = window["webpackJsonp"] = window["webpackJsonp"] || [];
var oldJsonpFunction = jsonpArray.push.bind(jsonpArray);
jsonpArray.push = webpackJsonpCallback;
var parentJsonpFunction = oldJsonpFunction;
Modified to webpackJsonpCallback method:
function webpackJsonpCallback(data) {
    var chunkIds = data[0];
    var moreModules = data[1];
    var moduleId, chunkId, i = 0,
        resolves = [];
    for (; i < chunkIds.length; i++) {
        chunkId = chunkIds[i];
        if (Object.prototype.hasOwnProperty.call(installedChunks, chunkId) && installedChunks[chunkId]) {
            // Add the resolve callback method of the promise of the chunk to the resolve array
            resolves.push(installedChunks[chunkId][0]);
        }
        // Mark that the chunk has been loaded
        installedChunks[chunkId] = 0;
    }
    // Add the module data of the chunk to the modules object
    for (moduleId in moreModules) {
        if (Object.prototype.hasOwnProperty.call(moreModules, moduleId)) {
            modules[moduleId] = moreModules[moduleId];
        }
    }
    // Execute the original push method
    if (parentJsonpFunction) parentJsonpFunction(data);
    // Execute the resolve function
    while (resolves.length) {
        resolves.shift()();
    }
}
This function will take out the resolve function of promise loaded by the chunk, and then mark its information on installedChunks as 0, indicating that the loading is successful. Therefore, the onScriptComplete function executed later can judge whether the loading fails by whether it is 0. Finally, the resolve function will be executed, as shown in the previous figure__ webpack_ require__. The promise state returned by the e function will become success.
Let's review the functions of the AsyncComponent component again:
function AsyncComponent() {
    return __webpack_require__.e( /*! import() */ "chunk-1f79b58b").then(__webpack_require__.bind(null, /*! ./AsyncComponent */ "c61d"));
}
The chunk is executed after loading__ webpack_require__ method.
__ webpack_require__ method
This method is the most important method of webpack to load modules:
function __webpack_require__(moduleId) {
    // Check whether the module has been loaded
    if (installedModules[moduleId]) {
        return installedModules[moduleId].exports;
    }
    // Create a new module and cache it
    var module = installedModules[moduleId] = {
        i: moduleId,
        l: false,
        exports: {}
    };
    // Execute module functions
    modules[moduleId].call(module.exports, module, module.exports, __webpack_require__);
    // Mark module load status
    module.l = true;
    // Returns the export of the module
    return module.exports;
}
So the above__ webpack_ require__. Bind (null, / *!. / asynccomponent * / "c61d") actually loads the c61d module, which is in the chunk we just requested:
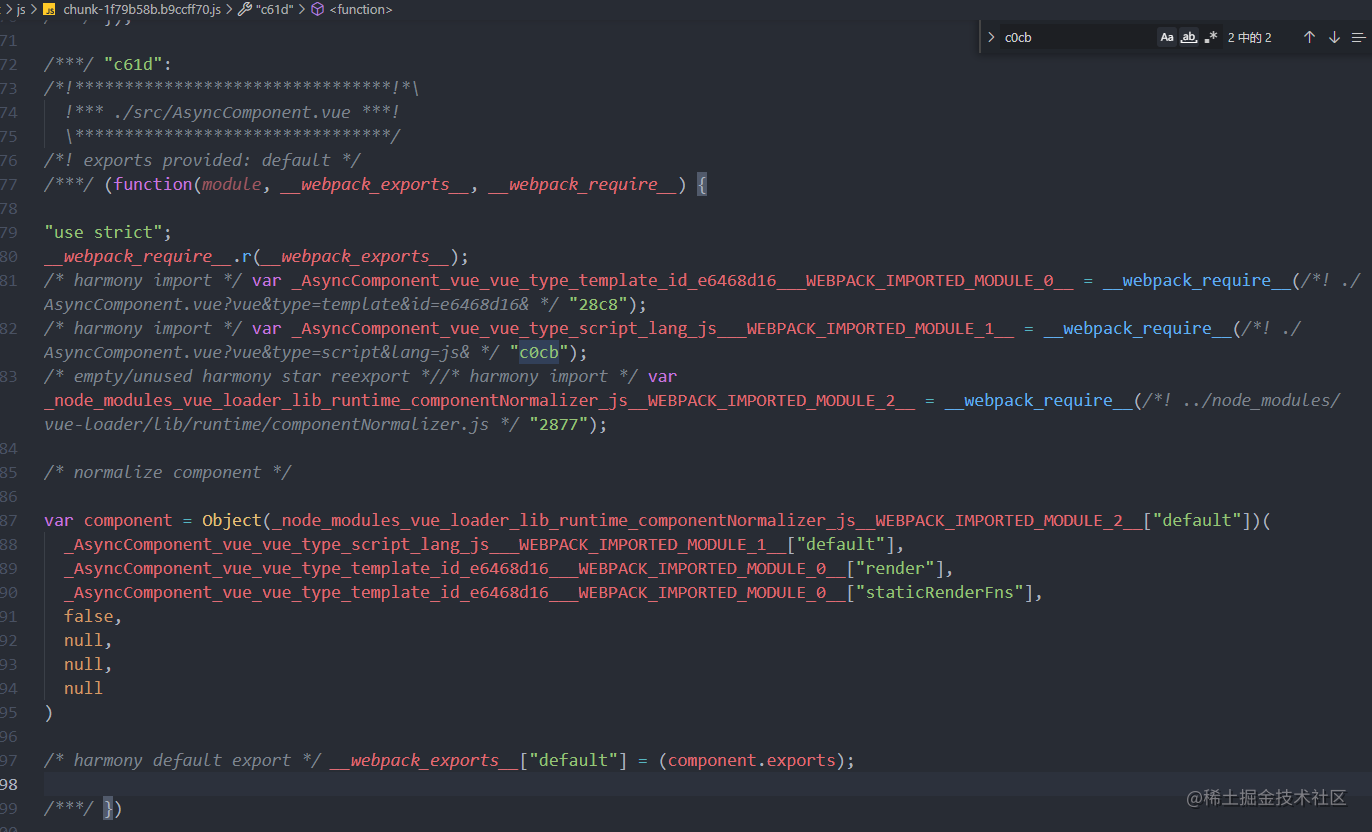
The module will load the module it depends on. The final returned result is:
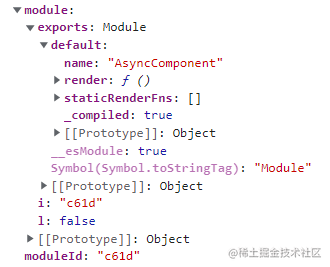
In fact, it is the component option of AsyncComponent.
Go back to the createElement method
Go back to the previous resolveAsyncComponent method:
var res = factory(resolve, reject);
Now we know that this res is actually an unfinished promise. Vue does not wait for the asynchronous component to load, but continues to execute backward:
if (isObject(res)) {
    if (isPromise(res)) {
        // () => Promise
        if (isUndef(factory.resolved)) {
            res.then(resolve, reject);
        }
    }
}

return factory.resolved
Pass the defined resolve and reject functions as parameters to promise res, and finally return factory Resolved, this property has no value set, so it is undefined.
Next, go back to the createComponent method:
Ctor = resolveAsyncComponent(asyncFactory, baseCtor);
if (Ctor === undefined) {
    // Returns the placeholder node of the asynchronous component, which is rendered as a comment node, but retains all the original information of the node.
    // This information will be used for asynchronous server-side rendering.
    return createAsyncPlaceholder(
        asyncFactory,
        data,
        context,
        children,
        tag
    )
}
Because Ctor is undefined, the createAsyncPlaceholder method will be executed to return a placeholder node:
function createAsyncPlaceholder (
  factory,
  data,
  context,
  children,
  tag
) {
  // Creating an empty VNode is actually an annotation node
  var node = createEmptyVNode();
  // Keep information about components
  node.asyncFactory = factory;
  node.asyncMeta = { data: data, context: context, children: children, tag: tag };
  return node
}
Finally, let's go back to_ createElement method:
// ...
vnode = createComponent(Ctor, data, context, children, tag);
// ...
return vnode
Very simply, for asynchronous nodes, directly return the created annotation node, and finally convert the virtual node into a real node to actually create an annotation node:
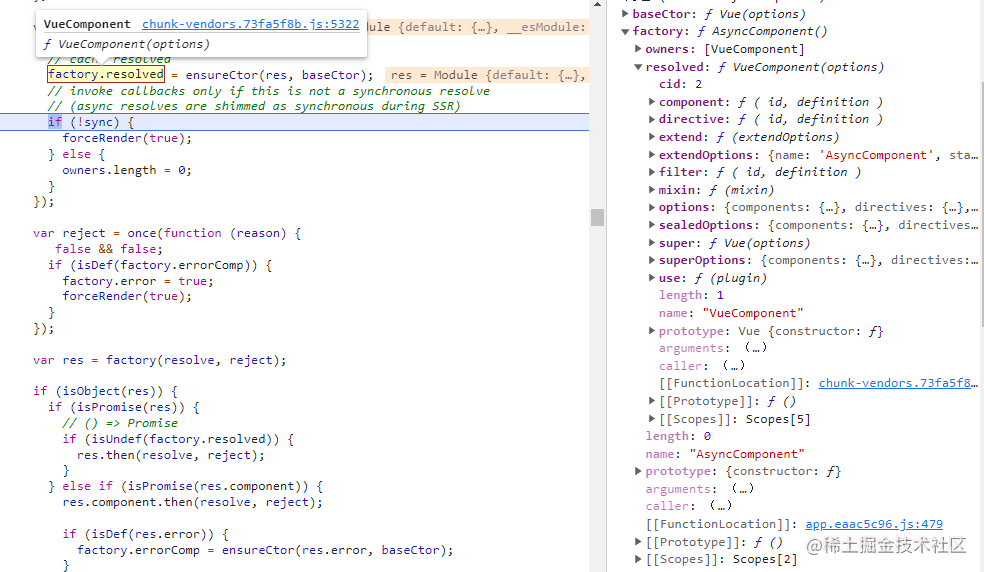
Now let's take a look at the resolve defined in the resolveAsyncComponent function, which will be executed after the chunk is loaded:
var resolve = once(function (res) {d
    // Cache results
    factory.resolved = ensureCtor(res, baseCtor);
    // Called when parsing asynchronously
    // (SSR will resolve asynchrony to synchronization)
    if (!sync) {
        forceRender(true);
    } else {
        owners.length = 0;
    }
});
res is the component option of AsyncComponent. baseCtor is the Vue constructor. It will call the ensuector method as a parameter:
function ensureCtor (comp, base) {
  if (
    comp.__esModule ||
    (hasSymbol && comp[Symbol.toStringTag] === 'Module')
  ) {
    comp = comp.default;
  }
  return isObject(comp)
    ? base.extend(comp)
    : comp
}
You can see that the extend method is actually called:
As mentioned earlier, Vue will create a corresponding constructor for all our components. This method will create a subclass with baseCtor as the parent class, and AsyncComponent subclass will be created here:
After the subclass is created successfully, the forceRender method will be executed:
var forceRender = function (renderCompleted) {
    for (var i = 0, l = owners.length; i < l; i++) {
        (owners[i]).$forceUpdate();
    }

    if (renderCompleted) {
        owners.length = 0;
        if (timerLoading !== null) {
            clearTimeout(timerLoading);
            timerLoading = null;
        }
        if (timerTimeout !== null) {
            clearTimeout(timerTimeout);
            timerTimeout = null;
        }
    }
};
owners contains App component instances, so it will call its $forceUpdate method. This method will force Vue instances to re render, that is, re execute rendering functions and update diff and path of virtual DOM.
Therefore, the rendering function of the App component will be re executed, then the previous createElement method will be executed, and the processes mentioned above will be repeated. Only at this time, the AsyncComponent component has been successfully loaded and the corresponding constructor has been created. Therefore, for the createComponent method, the result of this execution of the resolveAsyncComponent method is no longer undefined, Instead, the constructor of the AsyncComponent component:
Ctor = resolveAsyncComponent(asyncFactory, baseCtor);

function resolveAsyncComponent (
 factory,
 baseCtor
) {
    if (isDef(factory.resolved)) {
        return factory.resolved
    }
}
Next, the normal component rendering logic will follow:
var name = Ctor.options.name || tag;
var vnode = new VNode(
    ("vue-component-" + (Ctor.cid) + (name ? ("-" + name) : '')),
    data, undefined, undefined, undefined, context,
    { Ctor: Ctor, propsData: propsData, listeners: listeners, tag: tag, children: children },
    asyncFactory
);

return vnode
It can be seen that a VNode is actually created for a component. How to render the VNode of the component into a real DOM is not the focus of this article. It is roughly that if the VNode encountered in the diff and patch process of the virtual DOM is a component type, a new instance of the component will be associated with the VNode. The component instantiation is no different from our new Vue(), All operations such as option merging, initialization life cycle, initialization event and data observation will be carried out first, then the rendering function of the component will be executed to generate the VNode of the component, and finally the patch operation will be carried out to generate the actual DOM node. After all these operations of the sub component are completed, it will return to the diff and patch process of the parent component, because the dom of the sub component has been created, So you can insert it. If you are interested in a more detailed process, you can understand it yourself.
The above is the whole content of this article.