What is service governance?
Service governance is the core and basic module in the micro service architecture, which is used to realize the automatic registration and discovery of each micro service.
Service registration: in the service governance framework, a registry will be built. Each service unit registers the details of its own services like the registry. And form a list of services in the registration center. The service registration center should check whether the services in the service list are available. If they are not available, they need to be eliminated.
Service discovery: the service caller consults the service from the service registry, obtains the instance list of all services, and realizes the access to specific instance services.
What is Nacos?
Nacos can quickly realize dynamic service discovery, service configuration, service metadata and traffic management. This paper is based on Nacos 2 0 record relevant contents.
Nacos installation
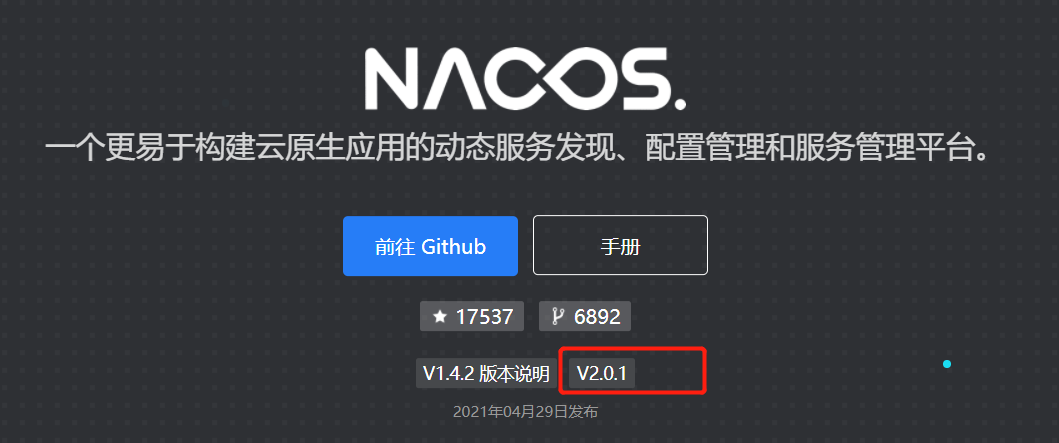
Nacos official website Click version # to download the compressed package

Then start in stand-alone mode, which is the starting mode of windows. If you start in docker mode in linux, it is [docker run - D - P 8848:8848 - e mode = standalone -- name, Nacos server container id]
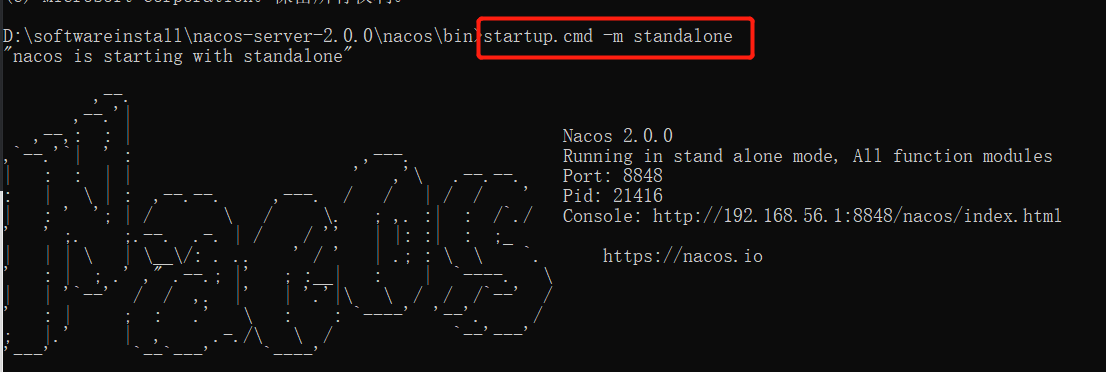
Access after successful startup http://localhost:8848/nacos The default user name and password are Nacos. You can log in directly.
Service registration
We try to write a service and register it with nacos
Parent project pom
<?xml version="1.0" encoding="UTF-8"?>
<project xmlns="http://maven.apache.org/POM/4.0.0"
         xmlns:xsi="http://www.w3.org/2001/XMLSchema-instance"
         xsi:schemaLocation="http://maven.apache.org/POM/4.0.0 http://maven.apache.org/xsd/maven-4.0.0.xsd">
    <modelVersion>4.0.0</modelVersion>

    <groupId>org.example</groupId>
    <artifactId>cloud-alibaba-nacos</artifactId>
    <packaging>pom</packaging>
    <version>1.0-SNAPSHOT</version>
    <modules>
        <module>provider8082</module>
        <module>provider8083</module>
        <module>comsumer9090</module>
    </modules>

    <properties>
        <spring.boot.version>2.2.5.RELEASE</spring.boot.version>
    </properties>
    <dependencyManagement>
        <dependencies>
            <!-- SpringBoot-->
            <dependency>
                <groupId>org.springframework.boot</groupId>
                <artifactId>spring-boot-starter-parent</artifactId>
                <version>${spring.boot.version}</version>
                <type>pom</type>
                <scope>import</scope>
            </dependency>
        </dependencies>
    </dependencyManagement>
</project>
Then create the sub project payment service provider provider8082, and add the following dependencies to the pom:
<dependencies>
        <dependency>
            <groupId>org.springframework.boot</groupId>
            <artifactId>spring-boot-starter-web</artifactId>
        </dependency>
        <dependency>
            <groupId>com.alibaba.cloud</groupId>
            <artifactId>spring-cloud-starter-alibaba-nacos-discovery</artifactId>
            <version>2.2.1.RELEASE</version>
        </dependency>
    </dependencies>
The key point is to introduce the dependency of nacos, and write the configuration file after introducing the dependency:
server.port=8082
#nacos Service Center Address
spring.cloud.nacos.discovery.server-addr=Ip
#service name
spring.cloud.nacos.discovery.service=provider
The @ EnableDiscoveryClient annotation is not required
Start the service and check the background system of nacos:
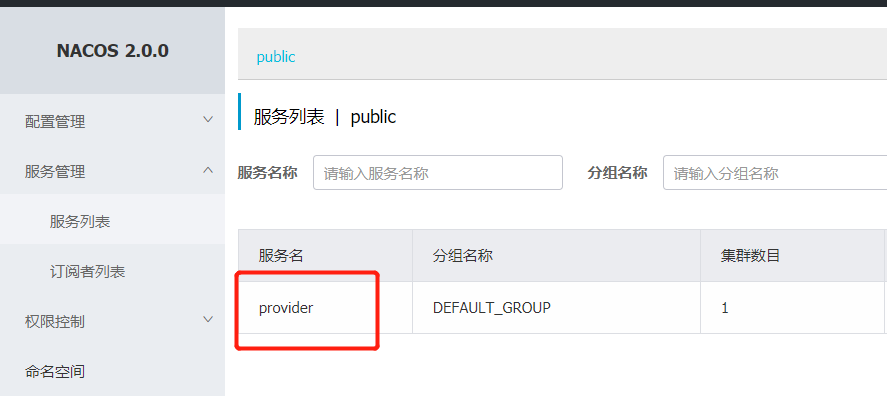
Then write a controller to simulate the service:
@RestController
public class PaymentController {
    @Value("${server.port}")
    private String port;

    @GetMapping("/payment/nacos/{id}")
    public String getPayment(@PathVariable("id") Integer id) {
        return "nacos Service registration, port number:" + port + "\t" + "id:" + id;
    }

}
Test it

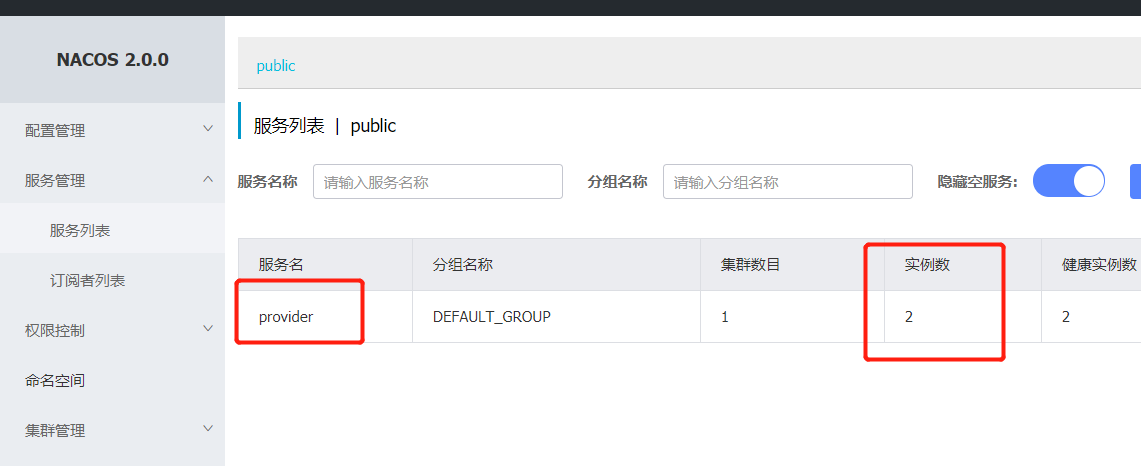
Business is normal. Next, create the second payment service provider payment8083. The code can directly copy the service just now. Just modify the port number to 8083. Everything else is the same.
Start payment8083 and check the background of nacos:
Service consumption
After having service providers, we should create service consumers to consume these services. Of course, consumers should also register with nacos. Create service consumer9090. The pom file is still to introduce nacos dependencies, and then write the configuration file:
server.port=9090
#nacos Service Center Address
spring.cloud.nacos.discovery.server-addr=ip
#service name
spring.cloud.nacos.discovery.service=consumer
Since it is service consumption, service invocation is indispensable. However, nacos has integrated ribbon for us. When we introduce nacos dependency, ribbon dependency is also introduced. Therefore, we can directly use ribbon to realize load balancing. First, we need to register ribbon in the container:
@Configuration
public class ConsumerConfig {

    @Bean
    @LoadBalanced
    public RestTemplate getRestTemplate(){
        return new RestTemplate();
    }
}
Finally, write the controller
@RestController
public class OrderController {

    /**
     * Services to be called
     */
    public static final String SERVER_URL = "http://provider";

    @Autowired
    private RestTemplate restTemplate;

    @GetMapping("/consumer/nacos/{id}")
    public String paymentInfo(@PathVariable("id") Integer id) {
        // Splice request address
        String reqUrl = SERVER_URL + "/payment/nacos/" + id;
        return restTemplate.getForObject(reqUrl, String.class);
    }
}
Start the service consumer. First check the background of nacos:
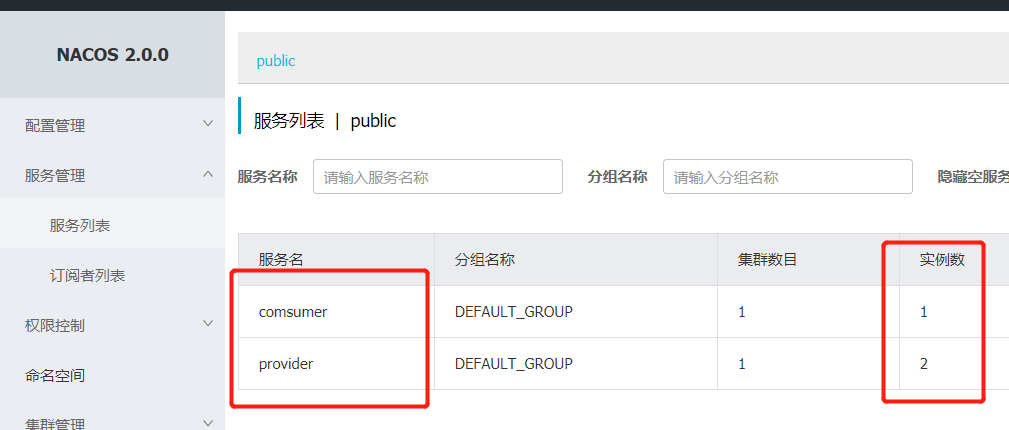
The service is registered successfully. Test the business code and visit localhost:9090/consumer/nacos/1


Moreover, it supports load balancing and adopts polling strategy by default.
Using OpenFeign
Although ribbon can realize the load balancing and service calling of the client, it is a little troublesome and has obvious disadvantages. It needs to call the method in the Controller layer to request the Controller method of another service. To this end, we can use OpenFeign to improve this process. OpenFeign integrates ribbon, which focuses more on calls between services. Of course, it also supports load balancing by default.
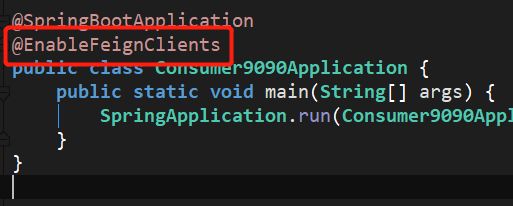
OpenFeign provides two important annotations @ FeignClient and @ EnableFeignClients.
- @FeignClient annotation is used to declare the Web services that Feign clients can access.
- @The EnableFeignClients annotation is used to modify the entry class of the Spring Boot application to inform Spring Boot to scan the Web services accessible by the Feign client declared in the application when starting the application.
First, modify the pom file in the sub project consumer9090 and add dependencies:
<!-- org.springframework.cloud/spring-cloud-starter-openfeign -->
        <dependency>
            <groupId>org.springframework.cloud</groupId>
            <artifactId>spring-cloud-starter-openfeign</artifactId>
            <version>2.2.2.RELEASE</version>
        </dependency>
Add annotation on startup class
Then write an interface, mark the @ FeignClient("provider") annotation on the interface, where the value is the name of the service to be called remotely, and define the method in the interface. Generally speaking, the declaration of the method is consistent with that of the method to be called.
@FeignClient("provider")
public interface PaymentService {

    @GetMapping("/payment/nacos/{id}")
    public String getPayment(@PathVariable("id") Integer id);
}
Then rewrite the order control layer, inject the interface, and directly call the methods in the interface.
@RestController
public class OrderController {

    /**
     * Services to be called
     */
//    public static final String SERVER_URL = "http://provider";
//
//    @Autowired
//    private RestTemplate restTemplate;
//
//    @GetMapping("/consumer/nacos/{id}")
//    public String paymentInfo(@PathVariable("id") Integer id) {
//        //Splice request address
//        String reqUrl = SERVER_URL + "/payment/nacos/" + id;
//        return restTemplate.getForObject(reqUrl, String.class);
//    }

    @Autowired
    private PaymentService paymentService;

    @GetMapping("/consumer/nacos/{id}")
    public String paymentInfo(@PathVariable("id") Integer id){
        return paymentService.getPayment(id);
    }
}
Start the project and test the business

Using Nacos as the service configuration center
Projects generally have multiple Profile configurations, which are used to distinguish development environment, test environment, quasi production environment, generation environment, etc. each environment corresponds to a properties file (or yml/yaml file), and then set spring profiles. The value of active determines which configuration file to use
The function of Nacos Config is to move the contents of these files to a unified configuration center, which is convenient for maintenance and supports dynamic refresh of applications after real-time modification
Splicing format of Data ID: ${prefix} - ${spring. Profiles. Active}$ {file-extension}
-
prefix defaults to spring application. The value of name can also be set through the configuration item spring cloud. nacos. config. prefix to configure
-
spring.profiles.active spring profiles. The value of active is the profile corresponding to the current environment
-
File extension is the data format of the configuration content, which can be configured through the configuration item spring cloud. nacos. config. File extension
Here we create a new sub project, Nacos config 2001
Dependencies in pom are
<dependency>
<groupId>org.springframework.boot</groupId>
<artifactId>spring-boot-starter-web</artifactId>
</dependency>
<dependency>
<groupId>com.alibaba.cloud</groupId>
<artifactId>spring-cloud-starter-alibaba-nacos-discovery</artifactId>
<version>2.2.1.RELEASE</version>
</dependency>
<dependency>
<groupId>com.alibaba.cloud</groupId>
<artifactId>spring-cloud-starter-alibaba-nacos-config</artifactId>
<version>2.2.1.RELEASE</version>
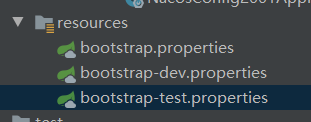
</dependency>The configuration file here is particular. We need to create a file called bootstrap Properties [or bootstrap.yml], because we need to go to the configuration center first to obtain the required configuration. When there is no configuration in the configuration center, we can use the local configuration instead of bootstrap The priority of X configuration file is higher than other named configuration files, so the configuration needs to be written in bootstrap In X.
server.port=2001
#nacos Service Center Address
spring.cloud.nacos.discovery.server-addr=192.168.56.1
#nacos configuration center address
spring.cloud.nacos.config.server-addr=192.168.56.1
#Specify the format of the configuration file
#spring.cloud.nacos.config.file-extension=yaml
#DataId prefix
spring.cloud.nacos.config.prefix=nacosconfig

#service name
spring.cloud.nacos.discovery.service=nacos-config2001
Here is a line specifying the format of the configuration file. Because the default is properties, you need to configure it if you use yml.

Write an interface to test
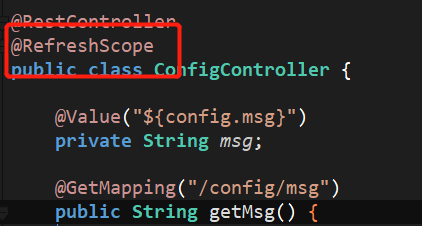
@RestController
public class ConfigController {
@Value("${config.msg}")
private String msg;
@GetMapping("/config/msg")
public String getMsg() {
return msg;
}
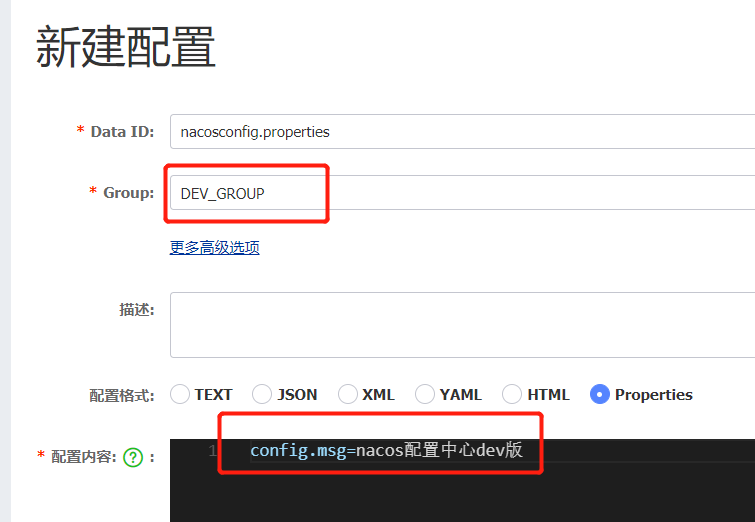
}Add a new configuration in the configuration list of the nacos console

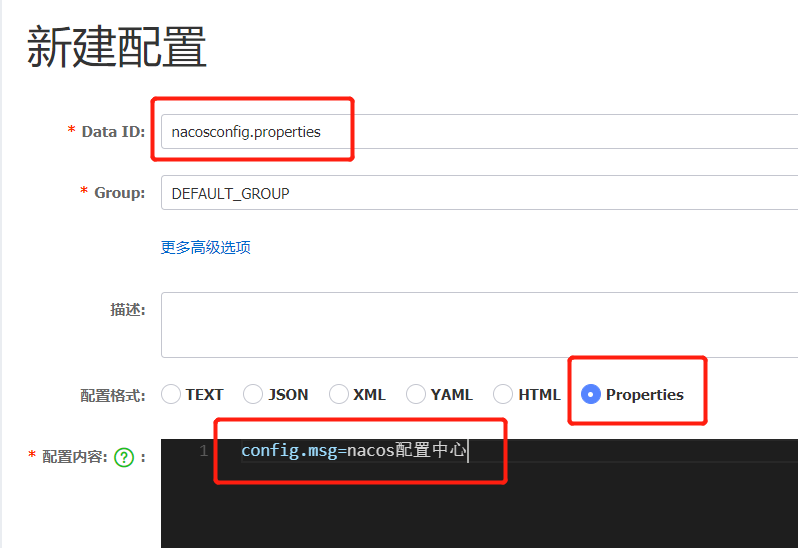
Then click publish
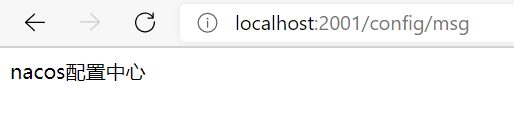
Start the project and start the test
Then we modify the configuration to see if it can take effect
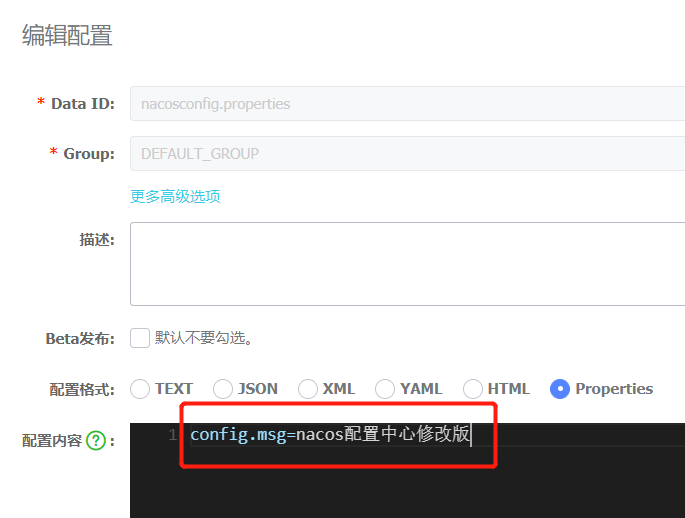

If it is found that it does not take effect, go back to the control layer and add @ RefreshScope annotation on the class. After modifying the configuration in the nacos configuration center, it can take effect in the project immediately without restarting the project.
configuration management
As a configuration center, nacos not only provides configuration, but also has very powerful functions, such as namespace, configuration grouping, etc. first, let's talk about namespace. Namespaces are used to distinguish deployment environments. A project often needs to go through three stages: development, testing and maintenance. The configuration contents of each stage may be different. Therefore, three namespaces can be created to take over the configuration of these three stages respectively; By default, there will be a public namespace. Then comes the Data ID. we have learned about the composition structure of Data ID, so we can directly distinguish the configuration of different environments through different data IDs
At this point, we can modify:
spring.profiles.active=dev
To get the configuration of the three configuration files respectively.
Next, let's take a look at grouping. By default, we will have a default_ The newly created configuration files can also be stored in the group configuration files:
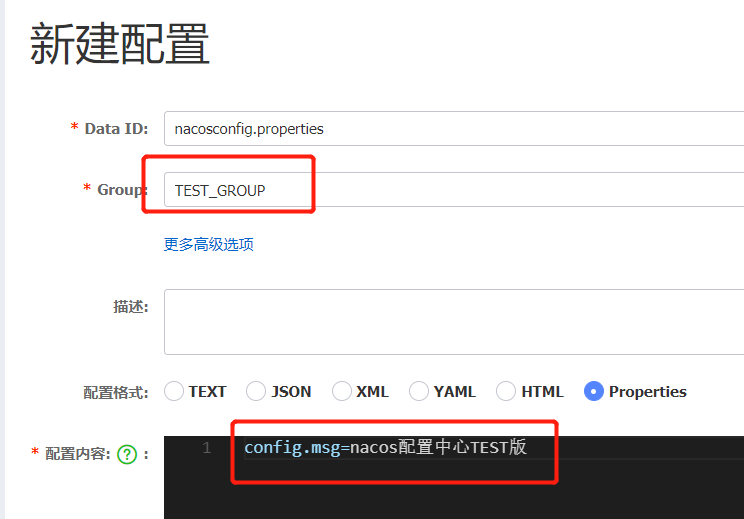
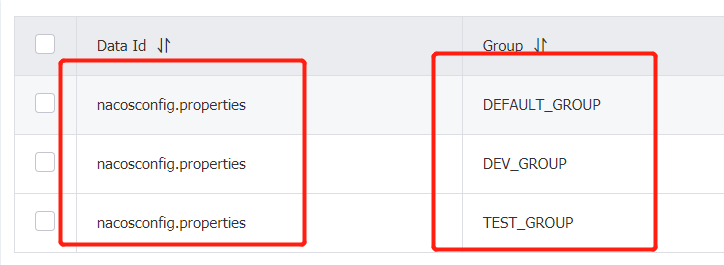
The names of these three profiles are the same, but the groups belong to the development, test and production environments respectively, and then you can specify them through the {group} attribute:
spring.cloud.nacos.config.group=DEV_GROUP
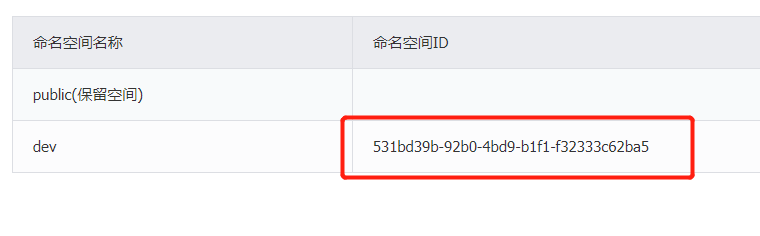
Finally, the namespace, through which we can still achieve the same effect:
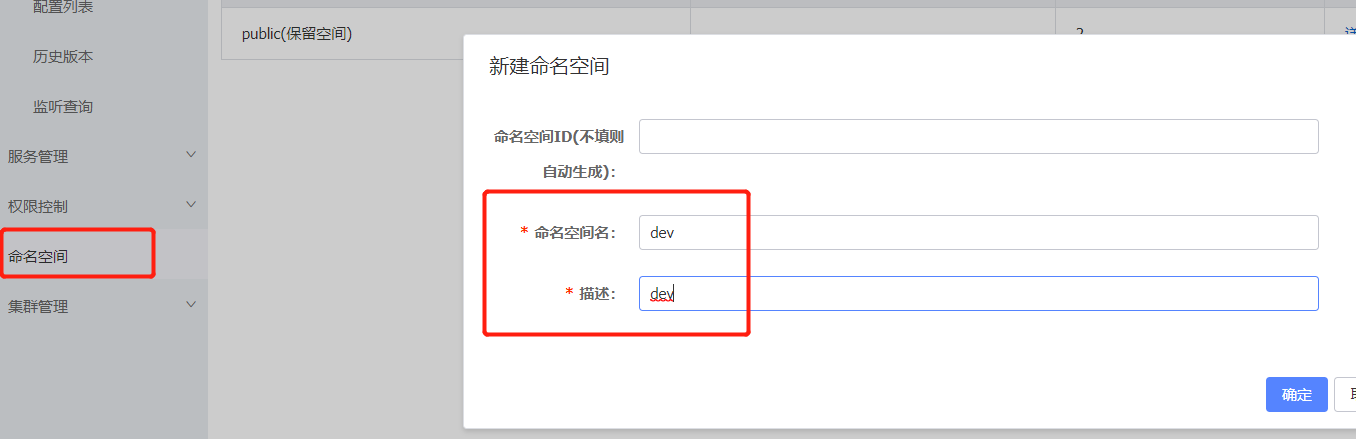
After creating namespaces, nacos assigns IDs to each namespace
At this time, the service will look for the configuration file of the specified group under the namespace. If there is an environment specified, it also needs to be added, and then create a new configuration file in nacos:
spring.cloud.nacos.config.group=DEV_GROUP
spring.cloud.nacos.config.namespace=531bd39b-92b0-4bd9-b1f1-f32333c62ba5
Create a configuration file under the specified namespace.
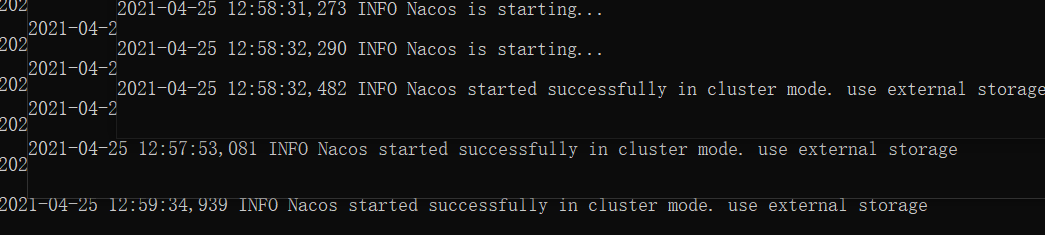
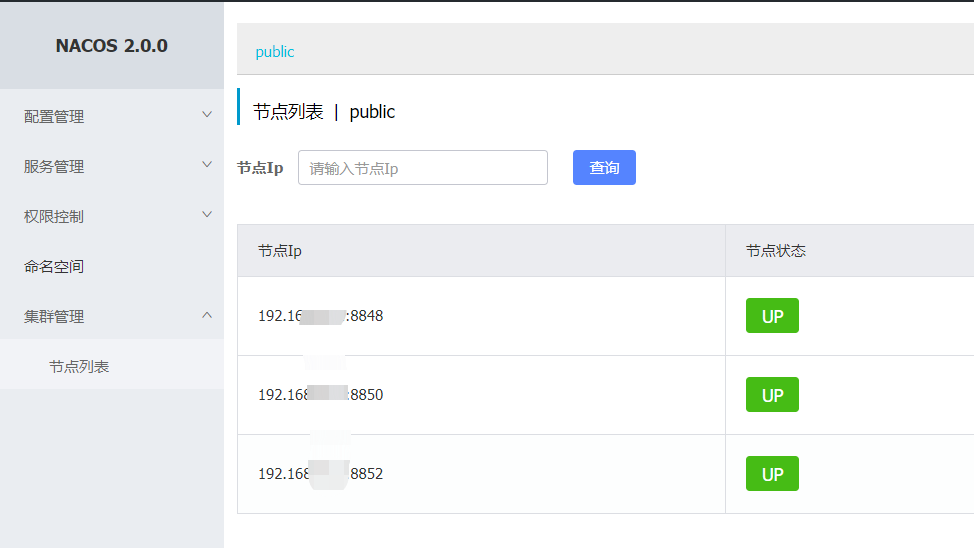
Cluster mode
Only three or more Nacos nodes can form a cluster. Pseudo cluster built locally
Configure cluster profile
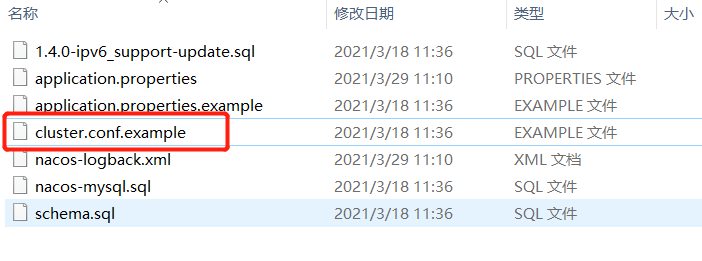
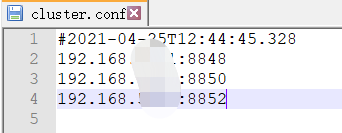
In the conf directory of the decompression directory of nacos, there is a configuration file cluster Conf, please configure each line as ip:port. (please configure 3 or more nodes)
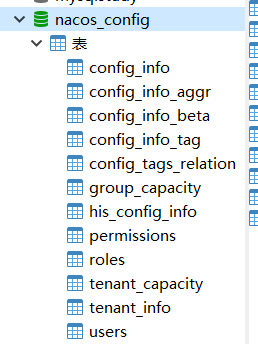
Import the sql file in the [conf] directory into the database
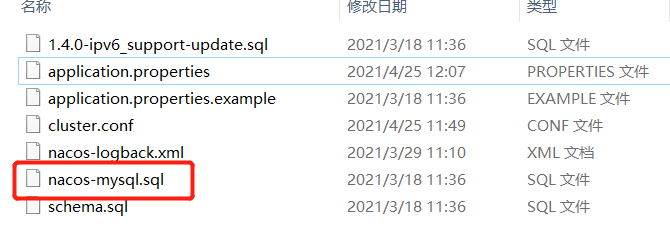
Cluster configuration file in the [conf] directory. After removing the suffix [. example] of the file, modify the contents of the file
Please configure each line as ip:port. (please configure 3 or more nodes)
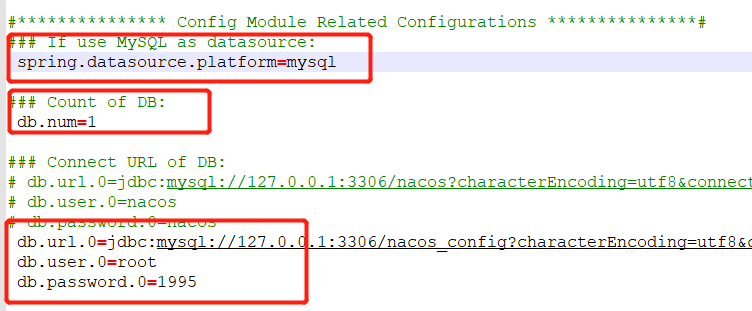
Then modify the db information in the [application.properties] file
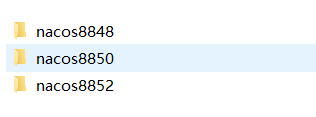
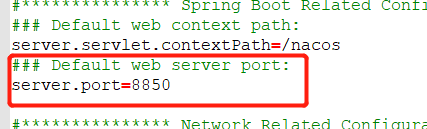
Copy the nacos directory in duplicate, add the corresponding port number to the directory name, and modify the port number in the [application.properties] file under the [conf] directory in each service
Start these three services in turn