preface
Jasper Flick Unity programmable rendering pipeline series tutorial: Custom shaders. This tutorial shares how users can build simple shaders from scratch on the basis of existing rendering pipelines. The original link can be found at the end of the blog.
Custom unlit shader

In the previous chapter, we used Unity's default unlit shader to test our custom rendering pipeline. However, if we want to fully explore the advantages of custom rendering pipeline, the default shader can not meet this point, so we need to create custom rendering pipeline.
1.1 creating shaders
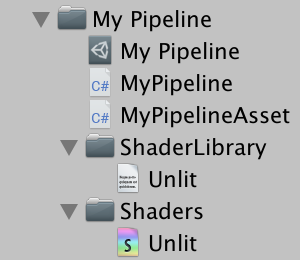
We can open the "Assets / Create / Shader" menu in the Unity editor and select a shader to edit. In this tutorial, we will select the lightless shader, delete Untiy's pre generated code, and start building the shader again. We name the created shader "Unlit".
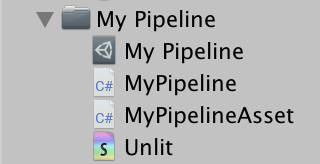
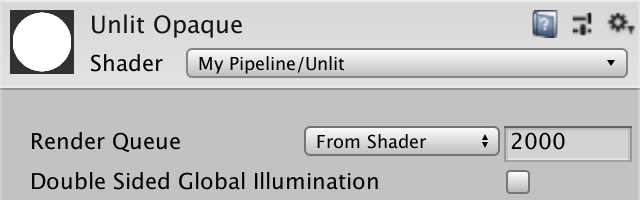
The simplest Shader that can run is composed of the Shader main module and the Properties, SubShader and Pass sub modules of the main module. After being processed by the Unity engine, these modules become a lightless Shader that can shade white. By adding a string after the Shader module, we can add a Shader option with the corresponding name in the menu in the Unity editor. In this tutorial, we named it "My Pipeline / Unlit".
Shader "My Pipeline/Unlit" {

    Properties {}

    SubShader {
		Pass {}
    }
}
If the object in the scene using the Unlit Opaque material does not turn white, we need to manually select the custom shader we just created for it.
1.2 High Level Shader Language
Shaders do not use conventional programming languages such as Java and C/C + +, but a specific language called Shading Language. The Unity engine supports GLSL and HLSL. The default shader built in Unity generally uses GLSL, while the newly added rendering pipeline in the version of Unity 2018 uses HLSL. Therefore, our shaders also need to use HLSL. To use HLSL, we need to add HLSLPROGRAM and ENDHLSL macros in the Pass module of the shader.
    Pass {
        HLSLPROGRAM

        ENDHLSL
    }
Basically, a Unity shader needs to include a function responsible for processing vertices and a function responsible for processing fragments, both of which need pragma compilation instructions. In this tutorial, the vertex handler uses unlitpasvertex and the fragment handler uses unlitpasfragment. We do not write the code of these two functions in the shader script, which makes the code of the shader itself too bloated. We will encapsulate the extra code into the library and call the library in the shader. In this tutorial, we also named the library "Unlit" and the file type is ".hlsl".
// In .shader file

    Pass {
        HLSLPROGRAM

        #pragma vertex UnlitPassVertex
        #pragma fragment UnlitPassFragment

        #include "Unlit.hlsl"

        ENDHLSL
    }
Because the Unity engine cannot directly create files in ". hlsl" format. Therefore, we need to create an irrelevant file, such as "xxx.txt", and then manually change the file format to "xxx.hlsl".
In order to prevent redundant code segments when the library file is referenced by other programs, we need to add a reference detection mechanism at the beginning of the library file:
// In .hlsl file

#ifndef MYRP_UNLIT_INCLUDED
#define MYRP_UNLIT_INCLUDED

#endif // MYRP_UNLIT_INCLUDED
As mentioned earlier, we need to implement a function responsible for processing vertices and a function responsible for processing fragments in the library. For the vertex processing function, its return value is a homogeneous clip space position. Therefore, it is necessary to provide the vertex position as a transfer parameter. Based on this, we first declare an input structure and an output structure for the vertex processing function:
// In .hlsl file

#ifndef MYRP_UNLIT_INCLUDED
#define MYRP_UNLIT_INCLUDED

struct VertexInput {
    float4 pos : POSITION;
};

struct VertexOutput {
    float4 clipPos : SV_POSITION;
};

#endif // MYRP_UNLIT_INCLUDED
Next, we can declare the fixed-point handler unlitpasvertex. So far, we have directly used the object space vertex position as the clipping space position, which is wrong. We will modify it later. In addition, we also simply declare the fragment processing function UnlitPassFragment, whose input parameter is the output of the vertex processing function. At present, we don't need to add additional functions to the shader, so we can let the fragment output function return 1 as the output first.
// In .hlsl file

struct VertexOutput {
    float4 clipPos : SV_POSITION;
};

VertexOutput UnlitPassVertex (VertexInput input) {
    VertexOutput output;
    output.clipPos = input.pos;
    return output;
}

float4 UnlitPassFragment (VertexOutput input) : SV_TARGET {
    return 1;
}

#endif // MYRP_UNLIT_INCLUDED
1.3 transformation matrices
So far, our shader has been able to compile and run, although the effect shown is not correct. Next, we will convert the vertex space into the correct space. If we can get a model view projection matrix, we can directly convert the object space into the clipping space. However, Unity will not provide us with this matrix. All we can use is the model matrix. We can use this matrix to convert object space into world space. The Unity engine wants to get a float4x4 unity_ObjectToWorld variable to store the matrix. Therefore, we need to declare this variable manually in the code and use it to convert object space into world space in the vertex processing function.
// In .hlsl file

float4x4 unity_ObjectToWorld;

struct VertexInput {
    float4 pos : POSITION;
};

struct VertexOutput {
    float4 clipPos : SV_POSITION;
};

VertexOutput UnlitPassVertex (VertexInput input) {
    VertexOutput output;
    float4 worldPos = mul(unity_ObjectToWorld, input.pos);
    output.clipPos = worldPos;
    return output;
}
Next, we need to convert world space into clipping space. To complete this step, we need to use the view projection matrix. The Unity engine uses a float4x4 unity_MatrixVP variable to save the matrix.
// In .hlsl file

float4x4 unity_MatrixVP;
float4x4 unity_ObjectToWorld;

...

VertexOutput UnlitPassVertex (VertexInput input) {
    VertexOutput output;
    float4 worldPos = mul(unity_ObjectToWorld, input.pos);
    output.clipPos = mul(unity_MatrixVP, worldPos);
    return output;
}
After this step, our shader can perform the correct space conversion. We can see the objects we placed before again in the Unity editor, and they are painted white. However, the space conversion method we adopt is not efficient, because the program needs to multiply a matrix by a four-dimensional vector, and in fact, the fourth dimension of the vector is always 1. Therefore, we can explicitly declare the fourth bit of the vector as 1, so that the compiler can optimize the operation.
float4 worldPos = mul(unity_ObjectToWorld, float4(input.pos.xyz, 1.0));
1.4 constant buffers
As mentioned in the previous section, Unity engine will not directly provide us with model view projection matrix, because the function of this matrix can also be completed through model matrix and view projection matrix. In addition, the perspective projection matrix can be reused when the camera depicts multiple objects in a single frame, so we hope to save these data and avoid repeated calculation. In our code in the previous section, we declared the model matrix and perspective projection matrix as variables, but their data is stored as constants when the engine depicts a single space. We need to store these data in the cache additionally. In this tutorial, the perspective projection matrix needs to be put into the pre frame buffer and the model matrix needs to be put into the per draw buffer.
Of course, shader variables do not necessarily need to be stored in the constant cache, but this allows all data in the cache to be changed more effectively.
// In .hlsl file

cbuffer UnityPerFrame {
    float4x4 unity_MatrixVP;
};

cbuffer UnityPerDraw {
    float4x4 unity_ObjectToWorld;
}
1.5 core library
Because constant cache can not play its advantages on any platform, shaders are more suitable to use constant cache by calling macros when needed. In this tutorial, we use CBUFFER_START and CBUFFER_END macro to replace the previous cbuffer
// In .hlsl file

CBUFFER_START(UnityPerFrame)
    float4x4 unity_MatrixVP;
CBUFFER_END

CBUFFER_START(UnityPerDraw)
    float4x4 unity_ObjectToWorld;
CBUFFER_END
However, if you use this directly, the Unity engine will report compilation errors because the two macros have not been defined. Instead of manually determining when it is appropriate to use constant cache and define macros to call, we can use the core library built in the Unity engine to decide when to define macros. We can add Unity core library in the package manager window of Unity editor. We first switch to the root directory of All Packages, activate Show Preview Packages under the Advanced option, and then select render pipelines After selecting core, an installation prompt will pop up. We can install it according to the prompt. In this tutorial, we installed 4.6 0-preview version, which is the highest version compatible with Unity 2018.3.
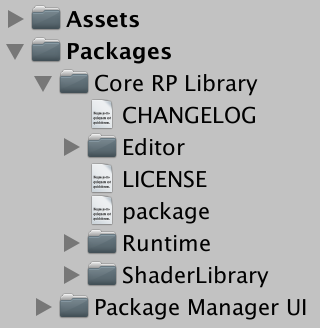
Now we can reference the Unity core library in our code. The path of the core library is "Packages/com.unity.render-pipelines.core/ShaderLibrary/Common.hlsl".
// In .hlsl file

#include "Packages/com.unity.render-pipelines.core/ShaderLibrary/Common.hlsl"

CBUFFER_START(UnityPerFrame)
	float4x4 unity_MatrixVP;
CBUFFER_END
1.6 compilation target level
By referring to the core library, our shaders can operate again, but errors will still be reported when compiling for OpenGL ES 2 platform, because the compiler of Unity engine for OpenGL ES 2 platform does not support its own core library. One way to solve this problem is to add #pragma preference_ Hlslcc gles compilation instruction, which is usually used for shader compilation of lightweight rendering pipeline in Unity engine. However, OpenGL ES 2 is a platform developed for old mobile devices. The current mainstream platforms have basically abandoned OpenGL ES 2. In fact, we do not need to compile OpenGL ES 2. For this purpose, we can manually specify our compilation level from the default 2.5 to 3.5 using #pragma target compilation instruction.
// In .shader file

    #pragma target 3.5

    #pragma vertex UnlitPassVertex
    #pragma fragment UnlitPassFragment
1.7 folder structure
In order to better manage our files, we create a new ShaderLibrary folder in the My Pipeline directory, and Unlit The HLSL file is placed in the ShaderLibrary folder. Then create a new Shader folder and put the Unlit file under the Shader folder.
Because the file path is changed, we also need to adjust the path of the referenced Library in the shader code
// In .shader file

#include "../ShaderLibrary/Unlit.hlsl"
The current overall code is as follows:
Shader code:
// In .shader file

Shader "My Pipeline/Unlit" {

    Properties {}

    SubShader {
        Pass {
            HLSLPROGRAM

            #pragma target 3.5

            #pragma vertex UnlitPassVertex
            #pragma fragment UnlitPassFragment

            #include "../ShaderLibrary/Unlit.hlsl"

            ENDHLSL
        }
    }
}
Library code:
// In .hlsl file

#ifndef MYRP_UNLIT_INCLUDED
#define MYRP_UNLIT_INCLUDED

#include "Packages/com.unity.render-pipelines.core/ShaderLibrary/Common.hlsl"

CBUFFER_START(UnityPerFrame)
    float4x4 unity_MatrixVP;
CBUFFER_END

CBUFFER_START(UnityPerDraw)
    float4x4 unity_ObjectToWorld;
CBUFFER_END

struct VertexInput {
    float4 pos : POSITION;
};

struct VertexOutput {
    float4 clipPos : SV_POSITION;
};

VertexOutput UnlitPassVertex (VertexInput input) {
    VertexOutput output;
    float4 worldPos = mul(unity_ObjectToWorld, float4(input.pos.xyz, 1.0));
    output.clipPos = mul(unity_MatrixVP, worldPos);
    return output;
}

float4 UnlitPassFragment (VertexOutput input) : SV_TARGET {
    return 1;
}

#endif // MYRP_UNLIT_INCLUDED
Dynamic Batching
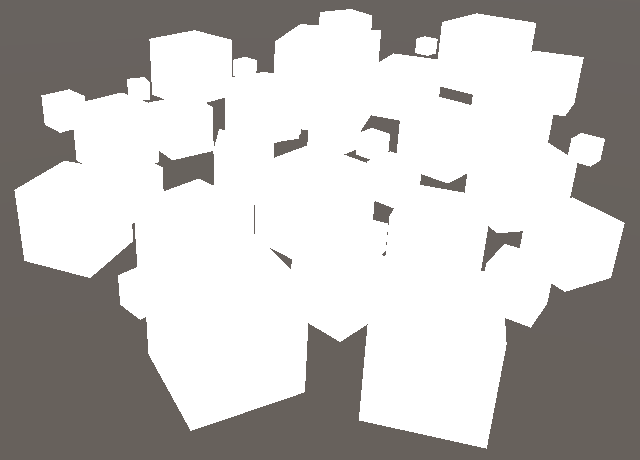
Now that we have a custom shader that implements the most basic functions, we can use it to further study how the rendering pipeline performs rendering. One problem we have been concerned about is where the performance limit of rendering pipeline is. We test the performance of the rendering pipeline by adding a large number of objects to the scene. The position of the object can be set at will, but the size proportion of each object needs to be consistent.

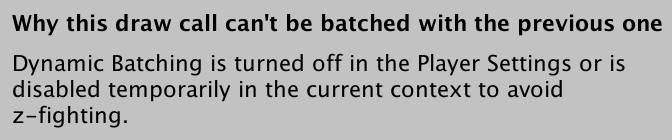
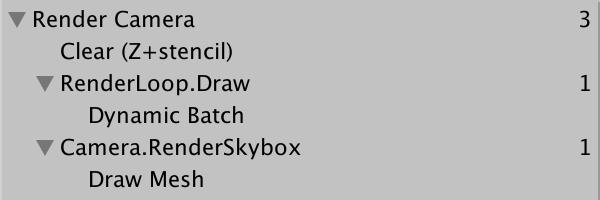
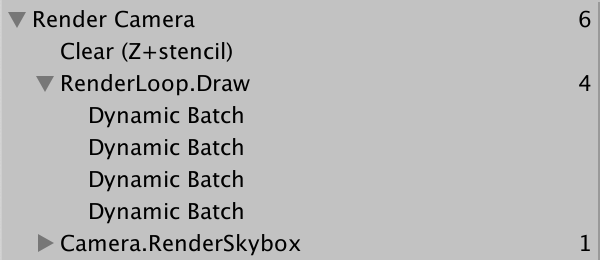
When we monitor the rendering state of the scene through the frame debugger, we will notice that each object needs to call a rendering command to depict itself. Obviously, the performance in this case is not efficient, because each rendering command requires communication between CPU and GPU. Ideally, it is best to draw multiple objects with one drawing command. By selecting a drawing command in the frame debugger, we can view relevant suggestions on multiple drawing.
2.1 enabling batching
By looking at the prompt of the frame debugger, we can know that we cannot use the batch function temporarily because the batch function is not enabled or disturbed by depth sorting. If we look at the player settings, we will find that the Dynamic Batching option is indeed not enabled. However, if we directly enable it, the desired effect will not appear, because we enable the batch processing function of the default rendering pipeline built-in in the Unity engine and will not be applied to our custom rendering pipeline.
To enable dynamic batching for our rendering pipeline, we need to manually enable it in our code. More precisely, we need to enable the rendering pipeline before rendering it. We need to render mypipeline In the render section, set the rendering setting to drawrenderflags EnableDynamicBatching.
// In render pipeline file

    var drawSettings = new DrawRendererSettings(
        camera, new ShaderPassName("SRPDefaultUnlit")
    );

    drawSettings.flags = DrawRendererFlags.EnableDynamicBatching;
    drawSettings.sorting.flags = SortFlags.CommonOpaque;
After this step, we go to the frame debugger to see that the dynamic batch function is still not enabled, but the reason is different from before. The principle of dynamic batch processing is that the Unity engine merges multiple objects into the same mesh, so that multiple objects can be depicted at the same time. Merging multiple objects into the same grid consumes CPU time, so only smaller grids support this operation. In three-dimensional objects, the mesh of the sphere is large, while the mesh of the cube is much smaller. If there is a sphere object in the scene, you need to change it into a cube and try again.

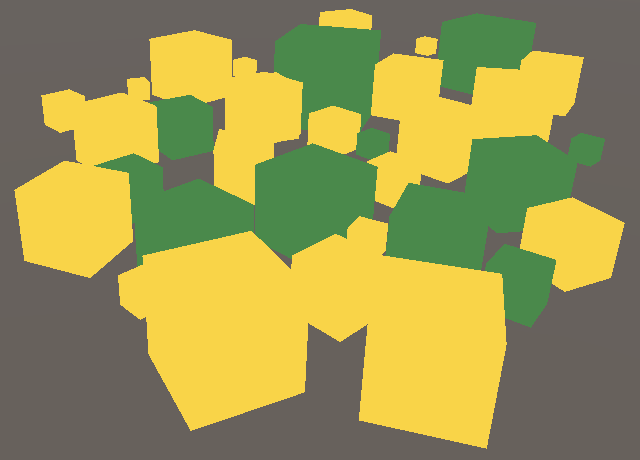
2.2 colors
Dynamic batch processing supports small meshes with the same material applied. However, if the mesh uses multiple materials, the situation becomes complicated. To explore this in depth, we will add a color change feature to our shader. We need to add a color attribute in the Properties module of the shader and use white as the default color.
// In .shader file

    Properties {
        _Color ("Color", Color) = (1, 1, 1, 1)
    }
In addition, we need to add a float4 in the library file_ Color variable and make the fragment handler return it. Since each material will declare a color separately, we can also store the color in the constant cache, so the Unity engine only needs to change the color when switching materials. In this tutorial, we name the constant cache of colors UnityPerMaterial.
// In .hlsl file

CBUFFER_START(UnityPerDraw)
    float4x4 unity_ObjectToWorld;
CBUFFER_END

CBUFFER_START(UnityPerMaterial)
    float4 _Color;
CBUFFER_END

struct VertexInput {
    float4 pos : POSITION;
};

...

float4 UnlitPassFragment (VertexOutput input) : SV_TARGET {
    return _Color;
}
Next, we create multiple materials and set the materials to different colors to distinguish them. Finally, apply different materials to the objects in the scene. We can see from the frame debugger that the dynamic batch function is enabled and multiple batches appear. Theoretically, the Unity engine assigns a batch to each material, and since the Unity engine also optimizes the grouping of batches to avoid the stacking effect, we usually see that the number of batches will be greater than the total number of materials used by objects in the scene.
2.3 optional batching
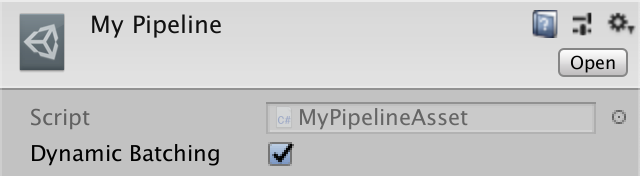
Although dynamic batch can optimize rendering performance in some scenes, it may reduce rendering performance in others. If there are not many small meshes with the same material applied in the scene, it would be wise to disable Dynamic Batching, because in this way, the Unity engine does not need to judge whether dynamic batching is required in the rendering of each frame. To do this, we need to add a function to our rendering pipeline so that we can set whether dynamic batch processing should be enabled. This function cannot be implemented on player settings. We need to directly add a startup setter for MyPipelineAsset.
// In render pipeline file

    [SerializeField]
    bool dynamicBatching;
When our rendering pipeline example is created, we need to tell the instance whether dynamic batch processing needs to be enabled. We pass the variables created above as parameters into the constructor of the rendering pipeline:
// In render pipeline file

    protected override IRenderPipeline InternalCreatePipeline () {
        return new MyPipeline(dynamicBatching);
    }
Since the rendering pipeline constructor provided by the Unity library does not accept any parameters, we need to abandon the default constructor and rewrite the constructor. The new constructor needs to accept dynamicBatching as a parameter. Inside the constructor, judge whether dynamic batch processing needs to be enabled during rendering according to the passed parameter value, and finally set the rendering settings in Render.
// In render pipeline file

    DrawRendererFlags drawFlags;

    public MyPipeline (bool dynamicBatching) {
        if (dynamicBatching) {
            drawFlags = DrawRendererFlags.EnableDynamicBatching;
        }
    }

    drawSettings.flags = drawFlags;
It should be noted that whenever we change the status of Dynamic Batching in the Unity editor, the batch status of Untiy will be changed immediately. Therefore, whenever we adjust Dynamic Batching once, a new rendering pipeline example will be created.
The current overall code is as follows:
Render pipeline code (due to the long original code, the author has appropriately reduced it, and the original code can be viewed in the previous chapter):
// In render pipeline file

using UnityEngine;
using UnityEngine.Rendering;
using UnityEngine.Experimental.Rendering;
using Conditional = System.Diagnostics.ConditionalAttribute;

[SerializeField]
bool dynamicBatching;                                                       // Receive user instruction regarding to enabling dynamic batching

...

/* Pipeline object field */
public class MyPipeline : RenderPipeline {
    DrawRendererFlags drawFlags;

    public MyPipeline (bool dynamicBatching) {
        if (dynamicBatching) {
            drawFlags = DrawRendererFlags.EnableDynamicBatching;
        }
    }

    ...

    void Render (ScriptableRenderContext context, Camera camera) {

        ...

        /* Drawing */
        var drawSettings = new DrawRendererSettings(                        // Set pipeline to use default unlit shader pass
            camera, new ShaderPassName("SRPDefaultUnlit"));

        drawSettings.flags = drawFlags;
        drawSettings.sorting.flags = SortFlags.CommonOpaque;                // Sort opaque object render order
        var filterSettings = new FilterRenderersSettings(true) {            // Limit pipeline to render opaque object frist
            renderQueueRange = RenderQueueRange.opaque};                    // Render queue range: 0 ~ 2500
        context.DrawRenderers(cull.visibleRenderers, ref drawSettings, filterSettings);

        ...
}

/* Pipeline asset field */
[CreateAssetMenu(menuName = "Rendering/My Pipeline")]                           // Add pipeline asset to editor menu
public class MyPipelineAsset : RenderPipelineAsset {
    protected override IRenderPipeline InternalCreatePipeline () {
        return new MyPipeline(dynamicBatching);                                 // Instantiate pipeline object
    }
}
Shader code:
// In .shader file
Shader "My Pipeline/Unlit" {

    Properties {
        _Color ("Color", Color) = (1, 1, 1, 1)
    }

    SubShader {
        Pass {
            HLSLPROGRAM

            #pragma target 3.5

            #pragma vertex UnlitPassVertex
            #pragma fragment UnlitPassFragment

            #include "../ShaderLibrary/Unlit.hlsl"

            ENDHLSL
        }
    }
}
Library code:
// In .hlsl file
#ifndef MYRP_UNLIT_INCLUDED
#define MYRP_UNLIT_INCLUDED

#include "Packages/com.unity.render-pipelines.core/ShaderLibrary/Common.hlsl"

CBUFFER_START(UnityPerFrame)
    float4x4 unity_MatrixVP;
CBUFFER_END

CBUFFER_START(UnityPerDraw)
    float4x4 unity_ObjectToWorld;
CBUFFER_END

CBUFFER_START(UnityPerMaterial)
    float4 _Color;
CBUFFER_END

struct VertexInput {
    float4 pos : POSITION;
};

struct VertexOutput {
    float4 clipPos : SV_POSITION;
};

VertexOutput UnlitPassVertex (VertexInput input) {
    VertexOutput output;
    float4 worldPos = mul(unity_ObjectToWorld, float4(input.pos.xyz, 1.0));
    output.clipPos = mul(unity_MatrixVP, worldPos);
    return output;
}

float4 UnlitPassFragment (VertexOutput input) : SV_TARGET {
    return _Color;
}

#endif // MYRP_UNLIT_INCLUDED
GPU instantiating
Dynamic batch processing mechanism is not the only strategy that can reduce the number of rendering instructions called per frame. Another strategy is GPU instantiation. During instantiation, the CPU will instruct the GPU to paint a specific mesh material combination multiple times in a single drawing instruction. In this way, it is possible to combine objects with the same mesh and material, rather than creating a new mesh. This also removes the grid size limit.
3.1 optional instantiating
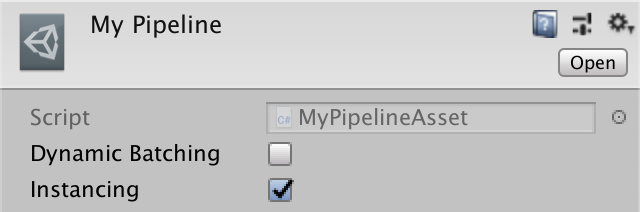
GPU instantiation is enabled by default. Similar to dynamic batch processing, we also add an enable switch to the GPU instantiation function. In this way, we can more easily compare the impact of GPU instantiation on rendering performance.
// In render pipeline file

[SerializeField]
bool instancing;

protected override IRenderPipeline InternalCreatePipeline () {
    return new MyPipeline(dynamicBatching, instancing);
}
In MyPipeline constructor, add corresponding judgment for GPU instantiation. We use Boolean - or detection mechanism, so that dynamic batch processing and GPU instantiation can be set at the same time.
// In render pipeline file

    public MyPipeline (bool dynamicBatching, bool instancing) {
        if (dynamicBatching) {
            drawFlags = DrawRendererFlags.EnableDynamicBatching;
        }
        if (instancing) {
            drawFlags |= DrawRendererFlags.EnableInstancing;
        }
    }
3.2 Material Support
Enabling GPU instantiation does not mean that the object forces in the scene can automatically participate in the instantiation. This requires the support of the material applied to the object. Since instantiation is not required for any material, we need two shader variants: one supports GPU instantiation and the other does not support GPU instantiation. We can declare #pragma multi in the shader code_ compile_ Instancing to create all the variants we need. In this tutorial, the instruction generates two variants, one of which defines installing_ On keyword, the other is not.
// In .shader file

    #pragma target 3.5

    #pragma multi_compile_instancing

    #pragma vertex UnlitPassVertex
    #pragma fragment UnlitPassFragment
After completing this step, we can see the Enable GPU Instancing option in the material window of the Unity editor.

3.3 Shader Support
When instantiation is enabled, the GPU will be told to use the same constant data to depict the same grid multiple times. However, the model matrix is also a part of constant data, which means that we use the same rendering method for multiple rendering of the same mesh. To improve this, we need to use a list to store the model matrix of all objects, and then store the list in the constant cache. In this way, each instance can be depicted using its own model matrix.
Then, for shader variants that do not perform instantiation, we only use the unit declared at the beginning_ Objecttoworld variable. For shader variants that need to be instantiated, another matrix list needs to be declared. To avoid duplicate code, we define a new macro unit_ MATRIX_ M. This name is used as the macro name because the same macro is also defined in the Unity core library to handle both shader variants. The path of the core library is "Packages/com.unity.render-pipelines.core/ShaderLibrary/UnityInstancing.hlsl". However, in order to avoid redefinition errors, we need to define our own macros first, and then reference the core library.
// In .hlsl file

CBUFFER_START(UnityPerDraw)
    float4x4 unity_ObjectToWorld;
CBUFFER_END

#define UNITY_MATRIX_M unity_ObjectToWorld
#include "Packages/com.unity.render-pipelines.core/ShaderLibrary/UnityInstancing.hlsl"

...

VertexOutput UnlitPassVertex (VertexInput input) {
    VertexOutput output;
    float4 worldPos = mul(UNITY_MATRIX_M, float4(input.pos.xyz, 1.0));
    output.clipPos = mul(unity_MatrixVP, worldPos);
    return output;
}
During GPU instantiation, the index of the object currently being depicted will be added to the vertex data of the object by GPU. The previously defined UNITY_MATRIX_M depends on this index, so we need to add the macro unit of the object's index value to the verteinput structure_ VERTEX_ INPUT_ INSTANCE_ ID.
// In .hlsl file

struct VertexInput {
    float4 pos : POSITION;
    UNITY_VERTEX_INPUT_INSTANCE_ID
};
Finally, we need to use the obtained index in unlitpasvertex in the vertex processing function to call the corresponding model matrix.
// In .hlsl file

VertexOutput UnlitPassVertex (VertexInput input) {
    VertexOutput output;
    UNITY_SETUP_INSTANCE_ID(input);
    float4 worldPos = mul(UNITY_MATRIX_M, float4(input.pos.xyz, 1.0));
    output.clipPos = mul(unity_MatrixVP, worldPos);
    return output;
}
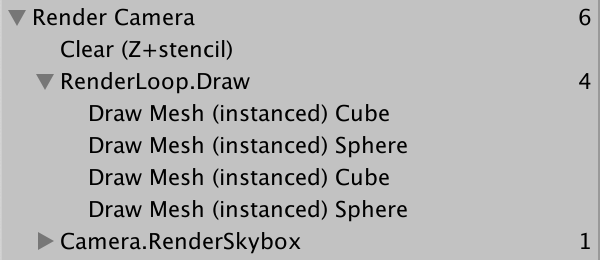
In this way, the objects in the scene are instantiated. Like dynamic batch processing, the Unity engine generates multiple instantiation batches due to the use of multiple materials.
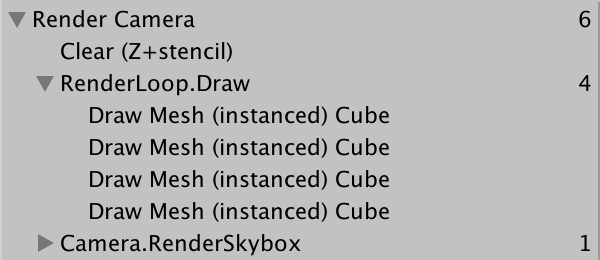
In addition to the model matrix, the perspective projection matrix is also stored in the constant cache. The viewing angle projection matrix is the inverse of the model matrix, which is used to calculate the normal vector under non-uniform scale. Since we use uniform proportions in this tutorial, we do not need these additional matrices. So we can use #pragma instancing_ The options assumeuniformscaling directive tells the Unity engine this. However, if we need to support non-uniform scale, we need to create a shader variant or a new shader for this case.
// In .shader file

    #pragma multi_compile_instancing
    #pragma instancing_options assumeuniformscaling
3.4 Many Colors
If we want the objects in the scene to have multiple colors, we need to create multiple materials, which means that more batch processing will be generated in rendering. But just as the transformation matrix can be stored in a list for unified processing, we can do the same for colors. In this way, we can process objects with different colors in the same batch.
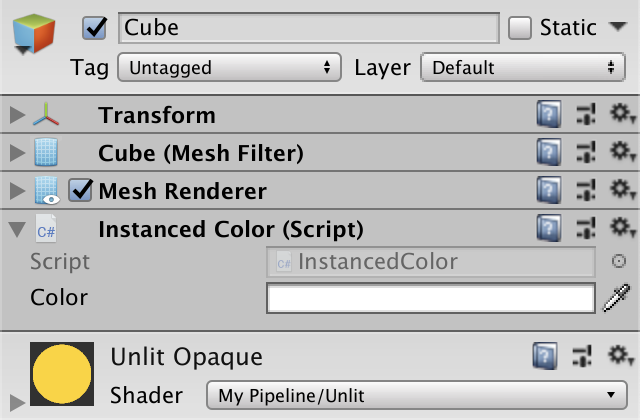
We first need to set a function, so that we can set its own color for each object through this function. We can't use the method of adding different materials to objects, because we want to study how to make all objects use the same material, but their colors are different from each other. Create a component named InstancedColor, add the function code for the user to set the color in the component script, and finally add the component for the objects in the scene:
// In component script file

using UnityEngine;

public class InstancedColor : MonoBehaviour {

    [SerializeField]
    Color color = Color.white;
}
After completing this step, we need to overwrite the color set by the material with the color set by the component. Therefore, we need to provide the material attribute module for the rendering component of the object. We first create an instance of MaterialPropertyBlock object and set its color property through the SetColor method of the instance. Finally, the instance is passed into the MeshRenderer component of the object through the SetPropertyBlock method. We assume that the color of the object remains unchanged during rendering.
// In component script file

    [SerializeField]
    Color color = Color.white;

    void Awake () {
        var propertyBlock = new MaterialPropertyBlock();
        propertyBlock.SetColor("_Color", color);
        GetComponent<MeshRenderer>().SetPropertyBlock(propertyBlock);
    }
After adding our components to the object and then rendering, we can see that the color of the object has changed. If we want to see the color change directly in the editor window without rendering, we need to make the following adjustments to the code:
// In component script file

    [SerializeField]
    Color color = Color.white;

    void Awake () {
        OnValidate();
    }

    void OnValidate () {
        var propertyBlock = new MaterialPropertyBlock();
        propertyBlock.SetColor("_Color", color);
        GetComponent<MeshRenderer>().SetPropertyBlock(propertyBlock);
    }
Then we add the InstancedColor component to all objects in the scene, but we need to ensure that all objects only need to add the component once, and all objects should use the same material.
According to the code we wrote above, the engine will create a new instance of MaterialPropertyBlock every time it overwrites the material color with the component color. However, this is not necessary, because the mesh render of each object will continuously record the overwritten attributes and copy them from the attribute module, which means that we can reuse the MaterialPropertyBlock and recreate it only when necessary. To do this, we need to make the following adjustments to the code:
// In component script file

    [SerializeField]
    Color color = Color.white;

    static MaterialPropertyBlock propertyBlock;

    ...

    void OnValidate () {
        if (propertyBlock == null) {
            propertyBlock = new MaterialPropertyBlock();
        }
        propertyBlock.SetColor("_Color", color);
        GetComponent<MeshRenderer>().SetPropertyBlock(propertyBlock);
    }
In addition, we can further optimize performance by pre assigning each color attribute its own ID:
// In component script file

    [SerializeField]
    Color color = Color.white;

    static MaterialPropertyBlock propertyBlock;
    static int colorID = Shader.PropertyToID("_Color");

    ...

    void OnValidate () {
        if (propertyBlock == null) {
            propertyBlock = new MaterialPropertyBlock();
        }
        propertyBlock.SetColor(colorID, color);
        GetComponent<MeshRenderer>().SetPropertyBlock(propertyBlock);
    }
3.5 per instance colors
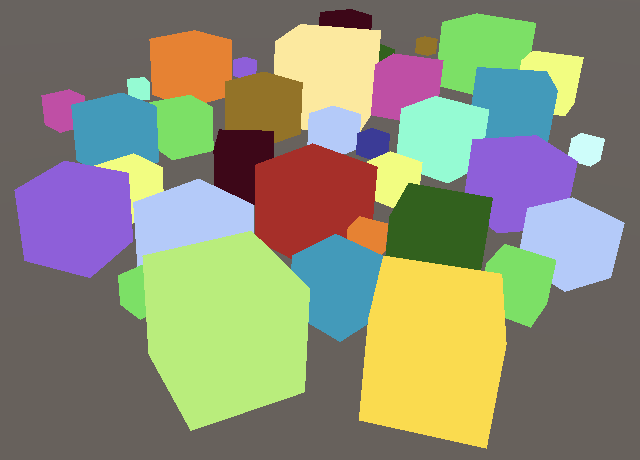
Covering each object with color will cause GPU instantiation interruption. Although the objects in the scene use the same material, what actually affects is the data used for rendering. When we perform the operation of covering color for each object, we actually force them to paint separately.
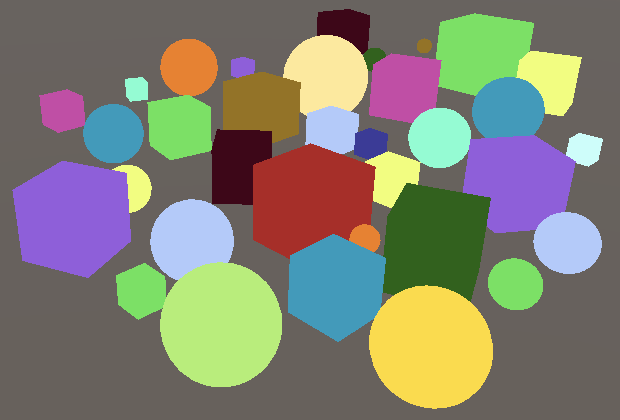
Therefore, the optimization method we adopt is to store all the color data in the list like the model matrix, so that the GPU instantiation can run normally again. However, different from the processing of model matrix, the core library of Unity does not provide ready-made macros that we can use, so we need to manually use UNITY_INSTANCING_BUFFER_START macro to create a constant cache. In the middle of the macro field, we define the color as a unit_ DEFINE_ INSTANCED_ Prop (float4, _color) macro. If the shader enables GPU instantiation, the macro will create a list to store color attributes. If GPU instantiation is not enabled, the color will still be in float4_ Exists as a color variable.
// In .hlsl file

//CBUFFER_START(UnityPerMaterial)
    //float4 _Color;
//CBUFFER_END

UNITY_INSTANCING_BUFFER_START(PerInstance)
    UNITY_DEFINE_INSTANCED_PROP(float4, _Color)
UNITY_INSTANCING_BUFFER_END(PerInstance)
Then we need to make corresponding modifications in the fragment processing function to deal with the cases where the color is a single variable or a color is a list. By adding UNITY_ACCESS_INSTANCED_PROP macro to achieve this function.
// In .hlsl file

float4 UnlitPassFragment (VertexOutput input) : SV_TARGET {
    return UNITY_ACCESS_INSTANCED_PROP(PerInstance, _Color);
}
After adjustment, the fragment processing function can process color data in list form, and can also process GPU instances with indexes. To add this function, let's first add unity to VertexOutput_ VERTEX_ INPUT_ INSTANCE_ ID macro, and then add unity to the fragment processing function_ SETUP_ INSTANCE_ ID macro. Finally, we passed UNITY_TRANSFER_INSTANCE_ID macro to transfer the instance index from vertex input to vertex output.
// In .hlsl file

...

struct VertexInput {
    float4 pos : POSITION;
    UNITY_VERTEX_INPUT_INSTANCE_ID
};

struct VertexOutput {
    float4 clipPos : SV_POSITION;
    UNITY_VERTEX_INPUT_INSTANCE_ID
};

VertexOutput UnlitPassVertex (VertexInput input) {
    VertexOutput output;
    UNITY_SETUP_INSTANCE_ID(input);
    UNITY_TRANSFER_INSTANCE_ID(input, output);
    float4 worldPos = mul(UNITY_MATRIX_M, float4(input.pos.xyz, 1.0));
    output.clipPos = mul(unity_MatrixVP, worldPos);
    return output;
}

float4 UnlitPassFragment (VertexOutput input) : SV_TARGET {
    UNITY_SETUP_INSTANCE_ID(input);
    return UNITY_ACCESS_INSTANCED_PROP(PerInstance, _Color);
}
After this step, all objects can be painted in a single drawing instruction, even if they use different colors. However, the constant cache has space constraints, and the maximum batch size of an instance depends on the space we allocate for each instance. In addition, the cache size is also affected by the platform, so we should use smaller meshes and materials as much as possible. For example, if we mix spherical and cubic objects, batch processing will have to be executed separately, resulting in a certain degree of performance degradation.
So far, we have created a shader that is the most basic and whose performance is optimized as much as possible. In the following chapters, we will continue to add advanced functions based on this shader.
The final code is as follows:
Render pipeline code (due to the long original code, the author has appropriately reduced it, and the original code can be viewed in the previous chapter):
using UnityEngine;
using UnityEngine.Rendering;
using UnityEngine.Experimental.Rendering;
using Conditional = System.Diagnostics.ConditionalAttribute;

[SerializeField]
bool dynamicBatching;                                                       // Receive user instruction about whether enabling dynamic batching
[SerializeField]
bool instancing;                                                            // Receive user instruction about whether enabling GPU instancing

...

/* Pipeline object field */
public class MyPipeline : RenderPipeline {
    DrawRendererFlags drawFlags;

    public MyPipeline (bool dynamicBatching, bool instancing) {
        if (dynamicBatching) {
            drawFlags = DrawRendererFlags.EnableDynamicBatching;
        }
        if (instancing) {
            drawFlags |= DrawRendererFlags.EnableInstancing;
        }
    }

    ...

    void Render (ScriptableRenderContext context, Camera camera) {

        ...

        /* Drawing */
        var drawSettings = new DrawRendererSettings(                        // Set pipeline to use default unlit shader pass
            camera, new ShaderPassName("SRPDefaultUnlit"));

        drawSettings.flags = drawFlags;
        drawSettings.sorting.flags = SortFlags.CommonOpaque;                // Sort opaque object render order
        var filterSettings = new FilterRenderersSettings(true) {            // Limit pipeline to render opaque object frist
            renderQueueRange = RenderQueueRange.opaque};                    // Render queue range: 0 ~ 2500
        context.DrawRenderers(cull.visibleRenderers, ref drawSettings, filterSettings);

        ...
}

/* Pipeline asset field */
[CreateAssetMenu(menuName = "Rendering/My Pipeline")]                       // Add pipeline asset to editor menu
public class MyPipelineAsset : RenderPipelineAsset {
    protected override IRenderPipeline InternalCreatePipeline () {
        return new MyPipeline(dynamicBatching, instancing);                 // Instantiate pipeline object
    }
}
Shader code:
// In .shader file
Shader "My Pipeline/Unlit" {

    Properties {
        _Color ("Color", Color) = (1, 1, 1, 1)
    }

    SubShader {
        Pass {
            HLSLPROGRAM

            #pragma target 3.5

            #pragma multi_compile_instancing
            #pragma instancing_options assumeuniformscaling

            #pragma vertex UnlitPassVertex
            #pragma fragment UnlitPassFragment

            #include "../ShaderLibrary/Unlit.hlsl"

            ENDHLSL
        }
    }
}
Library code:
// In .hlsl file
#ifndef MYRP_UNLIT_INCLUDED
#define MYRP_UNLIT_INCLUDED

#include "Packages/com.unity.render-pipelines.core/ShaderLibrary/Common.hlsl"

CBUFFER_START(UnityPerFrame)
    float4x4 unity_MatrixVP;
CBUFFER_END

CBUFFER_START(UnityPerDraw)
    float4x4 unity_ObjectToWorld;
CBUFFER_END

#define UNITY_MATRIX_M unity_ObjectToWorld
#include "Packages/com.unity.render-pipelines.core/ShaderLibrary/UnityInstancing.hlsl"

UNITY_INSTANCING_BUFFER_START(PerInstance)
    UNITY_DEFINE_INSTANCED_PROP(float4, _Color)
UNITY_INSTANCING_BUFFER_END(PerInstance)

struct VertexInput {
    float4 pos : POSITION;
    UNITY_VERTEX_INPUT_INSTANCE_ID
};

struct VertexOutput {
    float4 clipPos : SV_POSITION;
    UNITY_VERTEX_INPUT_INSTANCE_ID
};

VertexOutput UnlitPassVertex (VertexInput input) {
    VertexOutput output;
    UNITY_SETUP_INSTANCE_ID(input);
    UNITY_TRANSFER_INSTANCE_ID(input, output);
    float4 worldPos = mul(UNITY_MATRIX_M, float4(input.pos.xyz, 1.0));
    output.clipPos = mul(unity_MatrixVP, worldPos);
    return output;
}

float4 UnlitPassFragment (VertexOutput input) : SV_TARGET {
    UNITY_SETUP_INSTANCE_ID(input);
    return UNITY_ACCESS_INSTANCED_PROP(PerInstance, _Color);
}

#endif // MYRP_UNLIT_INCLUDED
Color component code:
using UnityEngine;

public class InstancedColor : MonoBehaviour {

    [SerializeField]
    Color color = Color.white;

    static MaterialPropertyBlock propertyBlock;
    static int colorID = Shader.PropertyToID("_Color");

    void Awake () {
        OnValidate();
    }

    void OnValidate () {
        if (propertyBlock == null) {
            propertyBlock = new MaterialPropertyBlock();
        }
        propertyBlock.SetColor(colorID, color);
        GetComponent<MeshRenderer>().SetPropertyBlock(propertyBlock);
    }
}
Original link
Jasper Flick. (2019). Custom Shaders. Retrieved from https://catlikecoding.com/unity/tutorials/scriptable-render-pipeline/custom-shaders/