This article shares another Mask solution used in Unity to solve the aliasing of Mask components
motivation
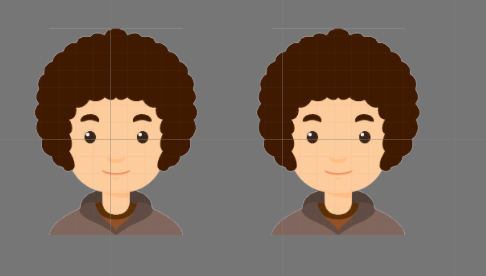
In the previous article, careful students may have seen that when the avatar is enlarged, obvious sawtooth can be seen, as shown in the figure:

This is because the template test is based on pixels, either pass or fail. If it fails, it will not be rendered. In those transition places, because of the high opacity, the effect of mixing is almost the same as that of no mixing
We use another idea to make a mask: when drawing a picture, we sample the transparency from the mask texture to modify the transparency of the slice element. The transparency of the part outside the circle of the mask is 0, and there are different transparency in the excessive part, so that we can mix correctly and play the mask effect correctly
Process and effect
As in the previous article, we need to prepare two pictures, a circular semi transparent picture as a mask and a head picture. As shown in the figure, two pictures:

Create a material and a shader (directly copy the UI default of Unity for modification), as follows:

- CustomMask2.shader
- Object2.mat
The corresponding shader code is:
Shader "Custom/CustomMask2"
{
	Properties
	{
		[PerRendererData] _MainTex ("Sprite Texture", 2D) = "white" {}
		_MaskTex ("Mask Texture", 2D) = "white" {}
		_Color ("Tint", Color) = (1,1,1,1)

		_ColorMask ("Color Mask", Range(0, 15)) = 15

		[Toggle(UNITY_UI_ALPHACLIP)] _UseUIAlphaClip ("Use Alpha Clip", Float) = 0
	}

	SubShader
	{
		Tags
		{
			"Queue"="Transparent"
			"IgnoreProjector"="True"
			"RenderType"="Transparent"
			"PreviewType"="Plane"
			"CanUseSpriteAtlas"="True"
		}

		Cull Off
		Lighting Off
		ZWrite Off
		ZTest [unity_GUIZTestMode]
		Blend SrcAlpha OneMinusSrcAlpha
		ColorMask [_ColorMask]

		Pass
		{
			Name "CustomMask2"
		CGPROGRAM
			#pragma vertex vert
			#pragma fragment frag
			#pragma target 2.0

			#include "UnityCG.cginc"
			#include "UnityUI.cginc"

			#pragma multi_compile __ UNITY_UI_ALPHACLIP

			struct appdata_t
			{
				float4 vertex   : POSITION;
				float4 color    : COLOR;
				float2 texcoord : TEXCOORD0;
				UNITY_VERTEX_INPUT_INSTANCE_ID
			};

			struct v2f
			{
				float4 vertex   : SV_POSITION;
				fixed4 color    : COLOR;
				float2 texcoord  : TEXCOORD0;
				float4 worldPosition : TEXCOORD1;
				UNITY_VERTEX_OUTPUT_STEREO
			};

			fixed4 _Color;
			fixed4 _TextureSampleAdd;
			float4 _ClipRect;

			v2f vert(appdata_t IN)
			{
				v2f OUT;
				UNITY_SETUP_INSTANCE_ID(IN);
				UNITY_INITIALIZE_VERTEX_OUTPUT_STEREO(OUT);
				OUT.worldPosition = IN.vertex;
				OUT.vertex = UnityObjectToClipPos(OUT.worldPosition);

				OUT.texcoord = IN.texcoord;

				OUT.color = IN.color * _Color;
				return OUT;
			}

			sampler2D _MainTex;
			sampler2D _MaskTex;

			float _OneMinusSaturability;

			fixed4 frag(v2f IN) : SV_Target
			{
				half4 color = (tex2D(_MainTex, IN.texcoord) + _TextureSampleAdd);
				if (IN.color.r < 0.0001 && IN.color.g < 0.0001 && IN.color.b > 0.0001 && IN.color.b < 0.004)
				{
					float gray = dot(color.rgb, float3(0.2125, 0.7154, 0.0721));
					color.rgb = float3(gray, gray, gray);
				}
				else
				{
					color *= IN.color;

					if (_OneMinusSaturability > 0.05)
					{
						float gray = dot(color.rgb, float3(0.2125, 0.7154, 0.0721));
						color.rgb = lerp(float3(gray, gray, gray), color.rgb, 1 - _OneMinusSaturability);
					}
				}

				color.a *= UnityGet2DClipping(IN.worldPosition.xy, _ClipRect);
				color.a *= tex2D(_MaskTex, IN.texcoord).a;

				#ifdef UNITY_UI_ALPHACLIP
				clip (color.a - 0.001);
				#endif

				return color;
			}
		ENDCG
		}
	}
}
Compared with the previous shader, we deleted the configuration related to the template test and added a texture_ MaskTex ("Mask Texture", 2D) = "white" {}, and added a line of code color.a *= tex2D(_MaskTex, IN.texcoord).a
Then build two rawimages with the size of 120x120. One is used to display the original image and the other is used to mask the avatar, as shown in the figure:
After setting the material and shader for the mask avatar, drag the texture of the circular mask onto the Mask Texture to complete all the work, as shown in the figure:

Of course, you can also further optimize the effect of the edge by adjusting the transparency of the edge of the circular mask. As long as you understand that transparency mixing is used to solve the problem of edge aliasing. I hope it will be helpful to you