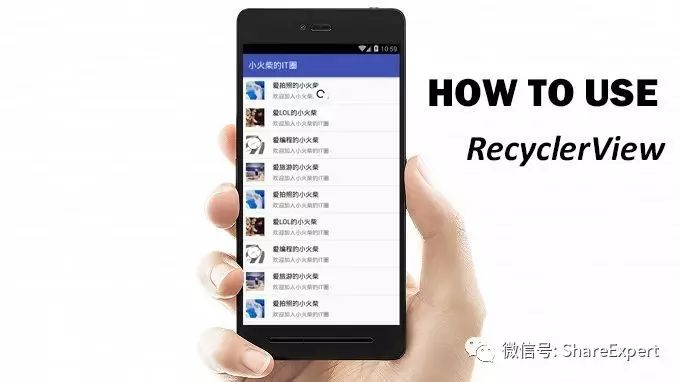
Do you remember that you used to learn ListView from Issue 38 to Issue 50, among which you used 8 to talk about the use of ListView, I believe you have mastered it. So let's learn about a new list component in Android 5.X, which is the use of RecyclerView.
I. Overview of Recycler View
From the previous study, we know that ListView is very powerful, and almost most applications will use it. Although we have learned some methods and techniques to improve the efficiency of ListView, its performance is still not perfect.
In addition, the scalability of ListView is relatively weak. In the past, to achieve a highly different interface for each list item, or to achieve the waterfall effect, a very complex customization process was required.
Google added Recycler View to Android L, a new view group, with the goal of providing similar rendering for any adapter-based view. It is used as a successor to ListView and GridView controls and is supported in the latest support-V7 version.
RecyclerView can be seen as an evolutionary version of ListView. Of course, RecyclerView does not inherit ListView. RecyclerView is directly inherited from the ViewGroup parent class. RecyclerView is similar to ListView in principle: it maintains only a small number of Views and can display a large number of data sets.
In developing RecyclerView, extensibility is fully considered, so you can use it to create any kind of layout you think of. But it is also a little inconvenient to use, such as the use of more complex steps, especially some click control, long-pressure events need to be completed by themselves. The project structure developed using RecyclerView is roughly as follows:

As you can see from the figure above, to use RecyclerView, you need to understand the LayoutManager and Adadapter elements, respectively, as follows:
-
Layout Manager: Used to determine how each item is arranged and when it is displayed and hidden. When a View is reclaimed or reused, LayoutManager requests the adapter for new data to replace old data, which avoids creating too many Views and calling findViewById methods frequently. Currently, the RecyclerView library provides the following three sub-managers:
-
Linear Layout Manager: Displays horizontal or vertical scrolling lists, equivalent to the ListView you learned earlier, but without headers and footers.
-
GridLayout Manager: Displaying entries in a grid is equivalent to the GridView you learned earlier.
-
Staggered Grid Layout Manager: Display entries in scattered grids, such as common waterfalls.
-
-
Adapter: This is a new type of adapter, different from the BaseAdapter used before. Before using RecyclerView, you need to customize an adapter that inherits from RecyclerView.Adapter to bind data to the interface of each item. It should be noted that editing the Adapter is for ViewHolder instead of View, and the reuse logic is encapsulated to make the implementation easier. The following two main methods need to be rewritten when using:
-
onCreateViewHolder: Used to present the view and its holders.
-
onBindViewHolder: Mainly used to bind data to views.
-
In addition to the above two main elements, the following three categories are usually used:
-
ViewHolder: Maintains references to views of all data-filled entities.
-
ItemDecoration: Decoration around an entity.
-
ItemAnimator: Animation generated by reordering entries when they are added or deleted.
2. RecyclerView example
With all that said above, it's still a bit confusing, so let's take a simple example to learn more.
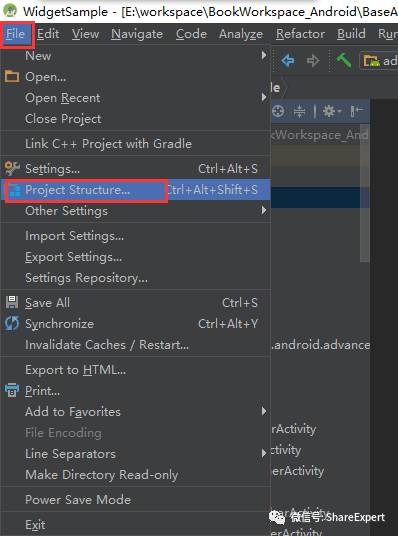
Continuing to use the advanced dviewsample module of the WidgetSample project, we first need to add support libraries, which are implemented by graphical operations, and then learn to add direct code later.
Select the menu bar File-> Project Structure in turn, as shown in the following figure:
Then the Projectrt Structure settings page opens, confirms that the left Modules select the advanced dviewsample module, then the upper menu selects Dependencies, and then clicks the + number in the upper right corner to select the first library denpendency, as shown in the following figure:
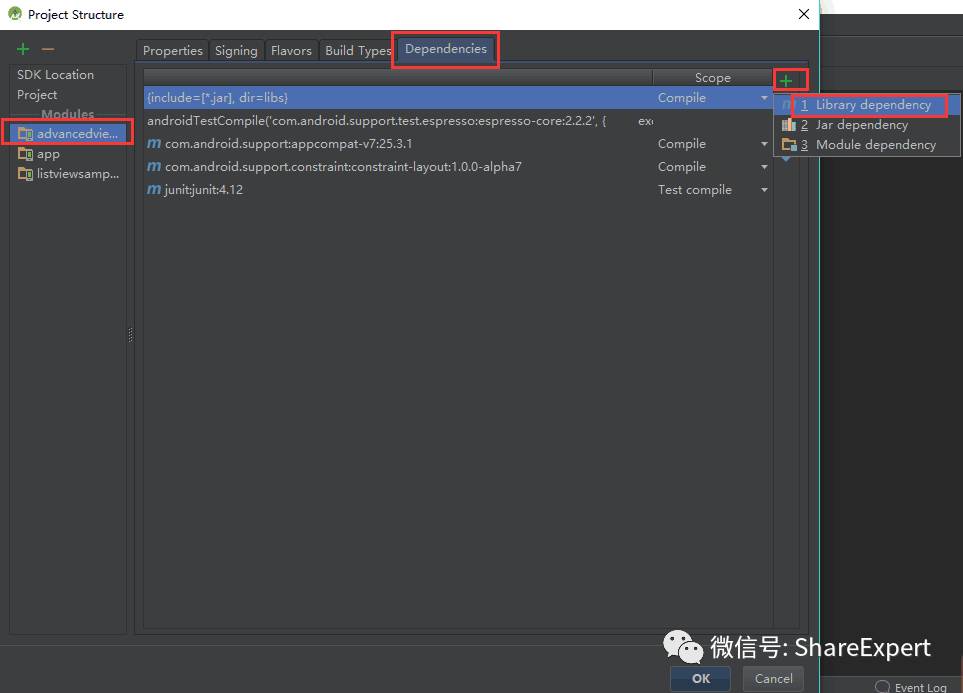
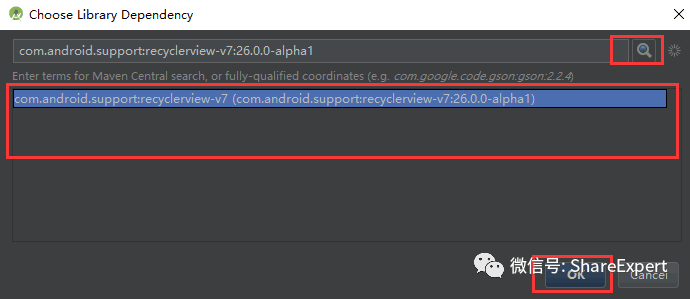
Enter recyclerview in the pop-up window, then click the search button on the right side to retrieve the latest recyclerview dependency library, and then click OK button to add it.
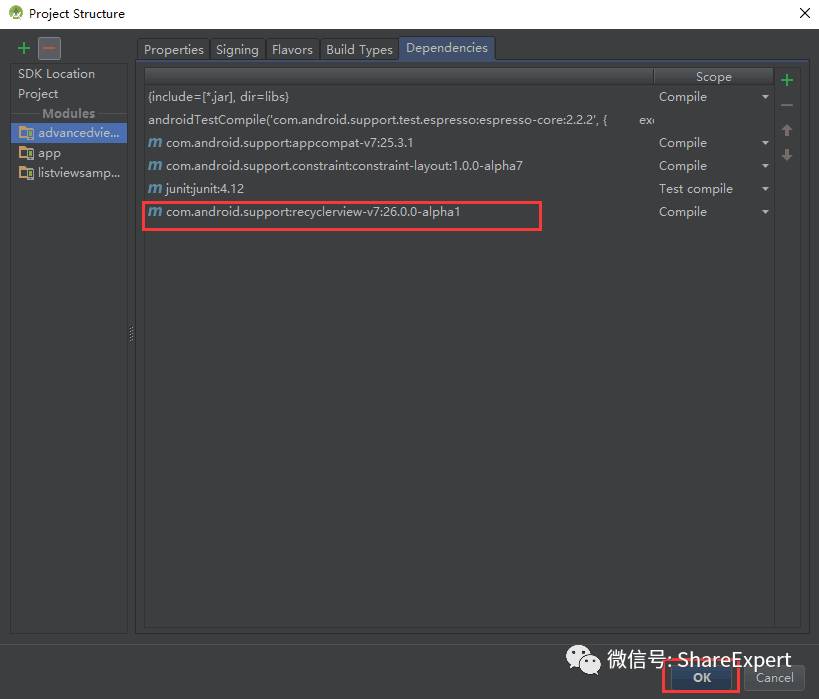
You can see that the recyclerview dependency library has been successfully added to the list of Dependencies pages, and you can finally confirm by clicking the OK button.
Create a recyclerview_layout.xml file in the app/main/res/layout/directory and fill it with the following code fragments:
<?xml version="1.0" encoding="utf-8"?>
<LinearLayout xmlns:android="http://schemas.android.com/apk/res/android"
              android:orientation="vertical"
              android:layout_width="match_parent"
              android:layout_height="match_parent">

    <android.support.v7.widget.RecyclerView
        android:id="@+id/recyclerview"
        android:layout_width="wrap_content"
        android:layout_height="wrap_content"/>
</LinearLayout>
Create a new recyclerview_item.xml list item layout file under res/layout/directory, the code is as follows:
<RelativeLayout xmlns:android="http://schemas.android.com/apk/res/android"
                android:layout_width="wrap_content"
                android:layout_height="wrap_content"
                android:padding="6dp" >

    <ImageView
        android:id="@+id/icon_img"
        android:layout_width="wrap_content"
        android:layout_height="wrap_content"
        android:layout_centerVertical="true"
        android:layout_marginRight="6dp"
        android:contentDescription="null"
        android:src="@mipmap/ic_launcher" />

    <TextView
        android:id="@+id/title_tv"
        android:layout_width="match_parent"
        android:layout_height="wrap_content"
        android:layout_toRightOf="@id/icon_img"
        android:layout_alignParentTop="true"
        android:layout_marginTop="5dp"
        android:gravity="center_vertical"
        android:text="Title"
        android:textSize="16sp" />

    <TextView
        android:id="@+id/content_tv"
        android:layout_width="match_parent"
        android:layout_height="wrap_content"
        android:layout_toRightOf="@id/icon_img"
        android:layout_alignParentRight="true"
        android:layout_below="@id/title_tv"
        android:layout_marginTop="5dp"
        android:text="content"
        android:textSize="12sp" />

</RelativeLayout>
Next is to create adapter adapter, create new RecyclerViewAdapter class, inherit RecyclerView. Adapter < RecyclerViewAdapter. ViewHolder > class, complete the internal class ViewHolder, and rewrite the following three main methods, the specific code is as follows:
package com.jinyu.cqkxzsxy.android.advancedviewsample.adapter;

import android.content.Context;
import android.support.v7.widget.RecyclerView;
import android.view.LayoutInflater;
import android.view.View;
import android.view.ViewGroup;
import android.widget.TextView;

import com.jinyu.cqkxzsxy.android.advancedviewsample.R;

import java.util.ArrayList;

/**
 * @Founder Xinji
 * @Describe Android Zero Foundation Introduction to Proficiency Series
 * Share Expert
 */
public class RecyclerViewAdapter extends RecyclerView.Adapter<RecyclerViewAdapter1.ViewHolder> {
    private ArrayList<String> mDatas = null;
    private LayoutInflater mInflater = null;

    public RecyclerViewAdapter(Context context, ArrayList<String> datas) {
        this.mDatas = datas;
        this.mInflater = LayoutInflater.from(context);
    }

    // Create a new View, called by LayoutManager
    @Override
    public ViewHolder onCreateViewHolder(ViewGroup parent, int viewType) {
        View view = mInflater.inflate(R.layout.recyclerview_item, parent, false);
        ViewHolder vewHolder = new ViewHolder(view);
        return vewHolder;
    }

    // Operation of binding data to interface
    @Override
    public void onBindViewHolder(ViewHolder holder, int position) {
        String name = mDatas.get(position);
        holder.titleTv.setText("Title " + name);
        holder.contenTv.setText("content " + name);
    }

    // Number of data obtained
    @Override
    public int getItemCount() {
        return mDatas == null ? 0 : mDatas.size();
    }

    // Custom ViewHolder, which holds all the interface components for each Item
    public class ViewHolder extends RecyclerView.ViewHolder {
        public TextView titleTv = null;
        public TextView contenTv = null;

        public ViewHolder(View itemView) {
            super(itemView);

            titleTv = (TextView) itemView.findViewById(R.id.title_tv);
            contenTv = (TextView) itemView.findViewById(R.id.content_tv);
        }
    }
}
Then use RecyclerView to achieve ListView effect, use custom RecyclerView Adapter to determine what RecyclerView will display, and set the display interface style. New RecyclerViewActivity.java file, load the new layout file above, the specific code is as follows:
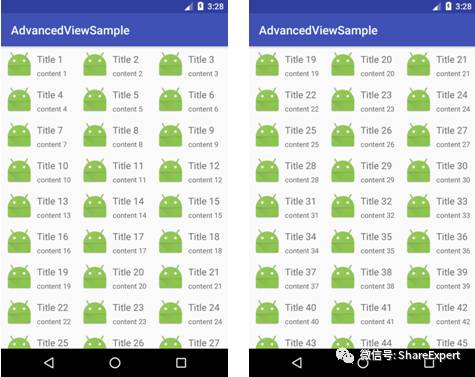
package com.jinyu.cqkxzsxy.android.advancedviewsample;

import android.os.Bundle;
import android.support.v7.app.AppCompatActivity;
import android.support.v7.widget.LinearLayoutManager;
import android.support.v7.widget.RecyclerView;

import com.jinyu.cqkxzsxy.android.advancedviewsample.adapter.RecyclerViewAdapter;
import com.jinyu.cqkxzsxy.android.advancedviewsample.view.RecyclerViewItemDivider;

import java.util.ArrayList;

/**
 * @Founder Xinji
 * @Describe Android Zero Foundation Introduction to Proficiency Series. Welcome to ShareExpert
 */
public class RecyclerViewActivity extends AppCompatActivity {
    private RecyclerView mRecyclerView = null;
    private RecyclerViewAdapter1 mAdapter = null;
    private ArrayList<String> mDatas = null;


    @Override
    protected void onCreate(Bundle savedInstanceState) {
        super.onCreate(savedInstanceState);
        setContentView(R.layout.recyclerview_layout);

        // Get components
        mRecyclerView = (RecyclerView) findViewById(R.id.recyclerview);

        // Setup Manager
        LinearLayoutManager layoutManager = new LinearLayoutManager(this);
        mRecyclerView.setLayoutManager(layoutManager);
        // If you can determine that the height of each item is fixed, setting this option can improve performance.
        mRecyclerView.setHasFixedSize(true);

        // Initialize list data
        initDatas();

        // Setting up the adapter
        mAdapter = new RecyclerViewAdapter1(this, mDatas);
        mRecyclerView.setAdapter(mAdapter);
    }

    private void initDatas() {
        mDatas = new ArrayList<>();

        for (int i = 0; i < 50; i++) {
            mDatas.add(i, i + 1 + "");
        }
    }
}
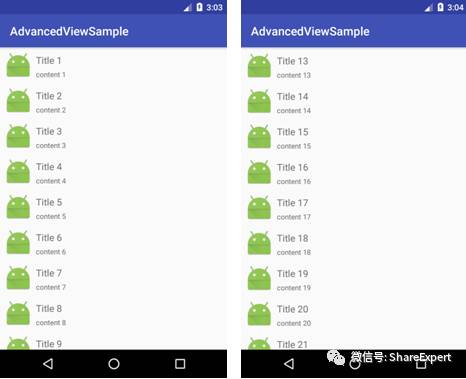
Modify the Activeness of the startup, and the running program can see the effect of the list interface shown in the figure below, which is basically the same as the ListView you learned before.
As can be seen from the examples above, RecyclerView is not more complex than ListView, but more flexible and easy to use. It separates data, arrangement and presentation of data, so it can be customized, and there are many forms of customization, which are very flexible.
III. RecyclerView Extension
Continue to use the examples above to implement horizontal lists, grids, and waterfalls, and you'll see how flexible they are.
If you want a horizontal List, simply set up Linear Layout Manager. Just add a line of directional code in Recycler View Activity. The local code is as follows:
        // Setup Manager
        LinearLayoutManager layoutManager = new LinearLayoutManager(this);
        layoutManager.setOrientation(LinearLayoutManager.HORIZONTAL);
        mRecyclerView.setLayoutManager(layoutManager);
        // If you can determine that the height of each item is fixed, setting this option can improve performance.
        mRecyclerView.setHasFixedSize(true);
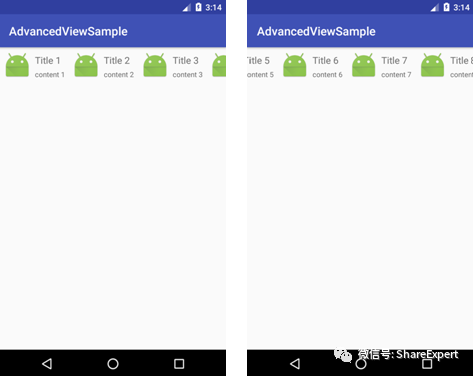
The rest of the code remains unchanged. Rerun the program and you can see the effect of the horizontal list interface, as shown in the following figure.
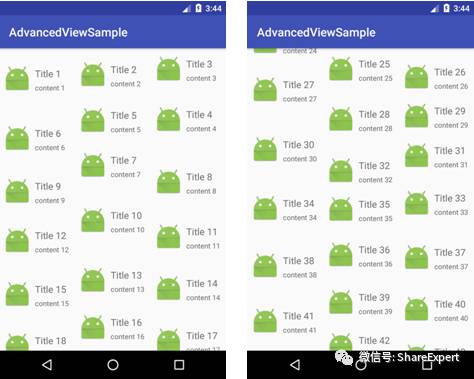
If you want a list of GridView layouts, simply replace the previous Layout Manager with the GridLayout Manager. The local code is as follows:
        // Setup Manager
        GridLayoutManager layoutManager = new GridLayoutManager(this, 3);
        mRecyclerView.setLayoutManager(layoutManager);
        // If you can determine that the height of each item is fixed, setting this option can improve performance.
        mRecyclerView.setHasFixedSize(true);
The rest of the code remains unchanged. Rerun the program and you can see the effect of the grid interface, as shown in the following figure.
It should be noted that the Orientation attribute of the list can also be set in the grid layout to achieve horizontal and vertical grid layout.
If you want to implement a waterfall flow, you just need to replace the previous Layout Manager with the Staggered Grid Layout Manager. The local code is as follows:
        // Setup Manager
        StaggeredGridLayoutManager layoutManager = new StaggeredGridLayoutManager(3,
                StaggeredGridLayoutManager.VERTICAL);
        mRecyclerView.setLayoutManager(layoutManager);
        // If you can determine that the height of each item is fixed, setting this option can improve performance.
        mRecyclerView.setHasFixedSize(true);
Because of the previous contour, there is no difference between direct operation and grid layout. Simply modify the onBindViewHolder method in the custom RecyclerViewAdapter class to generate a random height. The code is as follows:
    // Operation of binding data to interface
    @Override
    public void onBindViewHolder(ViewHolder holder, int position) {
        String name = mDatas.get(position);
        holder.titleTv.setText("Title " + name);
        holder.contenTv.setText("content " + name);

        int padding = Math.abs(new Random().nextInt() % 50);
        holder.titleTv.setPadding(0, padding, 0, 0);
        holder.contenTv.setPadding(0, 0, 0, padding);
    }
The rest of the code remains unchanged. Rerun the program and you can see the effect of the waterfall flow interface, as shown in the figure below.
Does it feel like a treasure has been mined and can be switched between different interface effects by modifying very little code, which is a good illustration of its flexibility?
For space reasons, I'll start here today and continue to learn more advanced usage of RecyclerView in the next issue.
Let's stop here today. If you have any questions, please leave a message and discuss it together. Welcome to join Android Zero Basic Technology to discuss Wechat Group and grow up together! _________.
Copyright of this article is owned by Share Expert. If you need to reproduce this article, please contact the authorized author.
Summary and share:
Android Zero Foundation Introduction Section 1: Android's Past and Present Life
Android Zero Foundation Introduction Section 2: Android System Architecture and Application Components
Android Zero Foundation Introduction Section 3: Let's talk about Android development environment.
Android Zero Foundation Introduction Section 4: Correctly install and configure JDK, Gao Fu Shuai develops the first move
Android Zero Foundation Introduction Section 5: Use ADT Bundle to Meet Goddess Easily
Android Zero Foundation Introduction Section 6: Configuration optimization SDK Manager, official dating goddess
Android Zero Foundation Introduction Section 7: Find Android Simulator and Start a Sweet Journey
Android Zero Foundation Introduction Section 8: Hello World, the starting point of my first trip
Android Zero Foundation Introduction Section 9: Android applications can be developed without knowing the code
Android Zero Foundation Introduction Section 10: Developing IDE upgrades finally ushered in Android Studio
Android Zero Foundation Introduction Section 11: Simple steps to take you flying and run the Android Studio project
Android Zero Foundation Introduction Section 12: Familiar with Android Studio interface, start to pretend to sell.
Android Zero Foundation Introduction Section 13: Android Studio Personalized Configuration, Creating Development Tools
Android Zero Foundation Introduction Section 14: Using High Speed Genymotion to Enter the Rocket Age
Android Zero Foundation Introduction Section 15: Master the structure of Android Studio project and set sail
Android Zero Foundation Introduction Section 16: Overview of Android User Interface Development
Android Zero Foundation Introduction Section 17: TextView TextBox
Android Zero Foundation Introduction Section 18: Input box EditText
Android Zero Foundation Introduction Section 19: Button Button
Android Zero Foundation Introduction Section 20: Checkbox CheckBox and radio button Radio Button
Android Zero Foundation Introduction Section 21: Switch components Toggle Button and Swich
Android Zero Foundation Introduction Section 22: Image View
Android Zero Foundation Introduction Section 23: Image Button and Zoom Button
Android Zero Foundation Introduction Section 24: Custom View is easy to use to create your own controls
Android Zero Foundation Introduction Section 25: Simple and most commonly used Linear Layout linear layout
Android Zero Foundation Introduction Section 26: Two alignments, layout_gravity and gravity, are quite different
Android Zero Foundation Introduction Section 27: Correct use of padding and margin
Android Zero Foundation Introduction Section 28: Easily grasp Relative Layout relative layout
Android Zero Foundation Introduction Section 29: Make Good Use of TableLayout Table Layout
Android Zero Foundation Introduction Section 30: Two Minutes to Master FrameLayout Frame Layout Layout Layout
Android Zero Foundation Introduction Section 31: Absolute Layout Absolute Layout Absolute Layout
Android Zero Foundation Introduction Section 32: New GridLayout Grid Layout
Android Zero Foundation Introduction Section 33: Overview of Android Event Processing
Android Zero Foundation Introduction Section 34: Monitoring-based event handling in Android
Android Zero Foundation Introduction Section 35: Callback-based event handling in Android
Android Zero Foundation Introduction Section 36: Processing of Android System Events
Android Zero Foundation Introduction Section 37: First Understanding ListView
Android Zero Foundation Introduction Section 38: First Understanding of Adapter
Android Zero Foundation Introduction Section 39: ListActivity and custom list items
Android Zero Foundation Introduction Section 40: Custom Array Adapter
Android Zero Foundation Introduction Section 41: Using SimpleAdapter
Android Zero Foundation Introduction Section 42: Customize BaseAdapter
Android Zero Foundation Introduction Section 43: ListView optimization and use at the beginning and end of the list
Android Zero Foundation Introduction Section 44: ListView Data Dynamic Update
Android Zero Foundation Introduction Section 45: GridView
Android Zero Foundation Introduction Section 46: List Options Box Spinner
Android Zero Foundation Introduction Section 47: AutoComplete TextView
Android Zero Foundation Introduction Section 48: Foldable List Expandable ListView
Android Zero Foundation Introduction Section 49: AdapterView Flipper Picture Rotation
Android Zero Foundation Introduction Section 50: StackView Card Stack
Android Zero Foundation Introduction Section 51: Progress Bar
Android Zero Foundation Introduction Section 52: Custom ProgressBar Cool Progress Bar
Android Zero Foundation Introduction Section 53: Drag bar SeekBar and star rating bar Rating Bar
Android Zero Foundation Introduction Section 54: Viewswitch component ViewSwitcher
Android Zero Foundation Introduction Section 55: ImageSwitcher and TextSwitcher
Android Zero Foundation Introduction Section 56: Flipper View
Android Zero Foundation Introduction Section 57: DatePicker and TimePicker selectors
Android Zero Foundation Introduction Section 58: Number Picker
Android Zero Foundation Introduction Section 59: Three Clock Clock Clock Clock Components in Common Use
Android Zero Foundation Introduction Section 60: Calendar View and Chronometer
Android Zero Foundation Introduction Section 61: ScrollView ScrollView
Android Zero Foundation Introduction Section 62: SearchView, Search Box Component
Android Zero Foundation Introduction Section 63: The TabHost tab worth learning from