 https://www.pixeltrice.com/upload-and-download-the-files-using-spring-boot-application/
If you are on the Internet, you will certainly upload or download some files, such as movies, songs or any files, such as pdf, images, etc. These are very common features of any application or software.
So, without wasting too much time, let's get to the topic, that is, how to realize the upload and download functions in the Spring Boot application.
Here, we will build a Restful API for uploading and downloading files. We will also use Javascript to develop a very simple front end to upload and download files.
Don't worry, I won't use a lot of javascript. Only five lines of code are needed to implement our Restful API. It is completely optional. If you are not interested or if you want to add front-end code to your application, you can skip it, and then download the source code from the last section of this article.
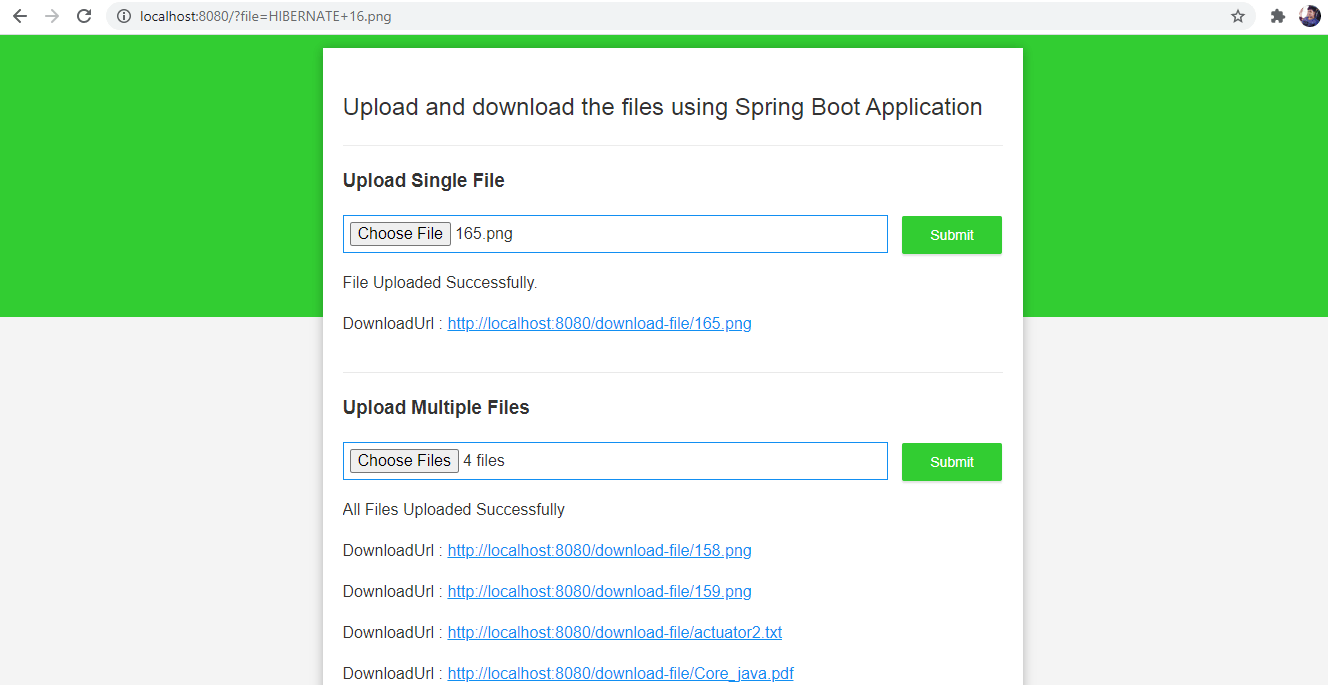
The following is the final application.
Well, let's start
Note: video tutorials can be found at the bottom of this article.
Step 1: create a Spring Boot application.
You can create from any of the options mentioned.
- Create a project using Spring Initialzr.
- Create a project using Spring Boot CLI.
Create a project from Spring Initialzr.
- go to https://start.spring.io/.
- Enter a group name. com.pixeltrice
- Give the workpiece ID. Upload download file with spring boot
- Add a Spring Web dependency.
- Click build project and start the download.
- After downloading, unzip the file and import it into an IDE, such as Eclipse.
- Follow these steps to import files in Eclipse.
Select File - > Import - > existing Maven Projects - > Browse - > upload download files with spring boot - > finish.
Create a project from the Spring Boot CLI.
- Download and install Spring Boot CLI on your system. Please follow the article Running an application from the Spring Boot CLI.
- Open a command prompt and type the following command.
spring init --name=upload-download-files-with-spring-boot --dependencies=web upload-download-files-with-spring-boot

3. Press Enter and check the following path of the project
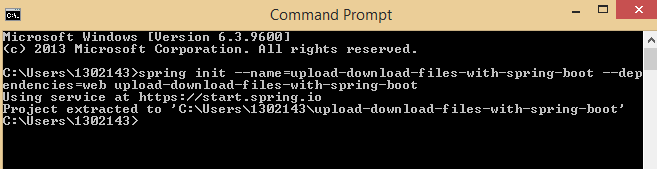
Project extracted to 'C:\Users\1302143\upload-download-files-with-spring-boot'
great! You have successfully completed the first step.
Step 2: in application Configure the server and file store properties in the properties file
Here, we will configure the following.
- Enable segmented file upload in Spring Boot Application.
- Defines the maximum upload size of the file.
- Save directory of configuration upload file.
Go to application Properties file.
# Enable multipart uploads
spring.servlet.multipart.enabled=true
# Threshold after which files are written to disk.
spring.servlet.multipart.file-size-threshold=2KB
# Max file size.
spring.servlet.multipart.max-file-size=300MB
# Max Request Size
spring.servlet.multipart.max-request-size=315MB

## File Storage Properties
# All files uploaded through the REST API will be stored in this directory
file.upload-dir=C:/Users/1302143/uploads
Note: you can change the path file The value of upload dir. If you are a developer and want to implement the upload function in your project, please change the upload storage file location according to your requirements.
Step 3: create Pojo or model class and bind or allocate application Properties of the properties file
Spring Boot provides us with a very unique function, which can automatically bind or assign attribute values to parameters existing in Pojo classes.
To do this, we need to use the @ ConfigurationProperties annotation in the Pojo class, as shown below.
package com.pixeltrice.uploaddownloadfileswithspringboot;

import org.springframework.boot.context.properties.ConfigurationProperties;

@ConfigurationProperties(prefix = "file")
	public class FileStoragePojo {

		private String uploadDir;

	    public String getUploadDir() {
	        return uploadDir;
	    }

	    public void setUploadDir(String uploadDir) {
	        this.uploadDir = uploadDir;
	    }
	}
Therefore, in the above code, prefix = "file" is used to find the attribute starting with "file", which exists in application Properties file and assign this value to the uploadDir variable of FileStoragePojo. java class.
In our example, once you run the Spring Boot application, uploadDir will be assigned C:/Users/1302143/uploads, because in application In the properties file, we only have one property starting with the prefix "file", that is
file.upload-dir=C:/Users/1302143/uploads
Note: if you want to be in application If you add more properties starting with "file" in properties, you just need to add a parameter in the Pojo class, so that it will automatically assign a value to the parameter.
Step 4: enable configuration properties in the main class
To enable this property, we need to add the @ EnableConfigurationProperties annotation to the main class or the class marked with @ SpringBootApplication, or you can add @ EnableConfigurationProperties to any other configuration class.
package com.pixeltrice.uploaddownloadfileswithspringboot;

import org.springframework.boot.SpringApplication;
import org.springframework.boot.autoconfigure.SpringBootApplication;
import org.springframework.boot.context.properties.EnableConfigurationProperties;

@SpringBootApplication
@EnableConfigurationProperties({
    FileStoragePojo.class
})
public class UploadDownloadFilesWithSpringBootApplication {

	public static void main(String[] args) {
		SpringApplication.run(UploadDownloadFilesWithSpringBootApplication.class, args);
	}

}
congratulations! Now that you have completed all the configuration parts, we can continue to write the actual lines of code to upload and download files.
Step 5: create a service class for storing and retrieving files.
We will create a file named filestorageservice Java class to store the file on our system and retrieve it.
package com.pixeltrice.uploaddownloadfileswithspringboot;

import java.io.IOException;
import java.net.MalformedURLException;
import java.nio.file.Files;
import java.nio.file.Path;
import java.nio.file.Paths;
import java.nio.file.StandardCopyOption;

import org.springframework.beans.factory.annotation.Autowired;
import org.springframework.core.io.Resource;
import org.springframework.core.io.UrlResource;
import org.springframework.stereotype.Service;
import org.springframework.util.StringUtils;
import org.springframework.web.multipart.MultipartFile;


@Service
public class FileStorageService {

    private final Path fileStorageLocation;


	@Autowired
    public FileStorageService(FileStoragePojo fileStoragePojo) {
        this.fileStorageLocation = Paths.get(fileStoragePojo.getUploadDir())
                .toAbsolutePath().normalize();

        try {
            Files.createDirectories(this.fileStorageLocation);
        } catch (Exception ex) {
            throw new FileStorageException("Unable to create the directory where the uploaded files will be stored.", ex);
        }
    }


	 public String storeFile(MultipartFile file) {
	        // Normalize file name
	        String fileName = StringUtils.cleanPath(file.getOriginalFilename());

	        try {
	            // Check if the file's name contains invalid characters
	            if(fileName.contains("..")) {
	                throw new FileStorageException("Sorry! Filename contains invalid path sequence " + fileName);
	            }

	            // Copy file to the target location (Replacing existing file with the same name)
	            Path targetLocation = this.fileStorageLocation.resolve(fileName);
	            Files.copy(file.getInputStream(), targetLocation, StandardCopyOption.REPLACE_EXISTING);

	            return fileName;
	        } catch (IOException ex) {
	            throw new FileStorageException("Could not store file " + fileName + ". Please try again!", ex);
	        }
	    }


	   public Resource loadFileAsResource(String fileName) {
	        try {
	            Path filePath = this.fileStorageLocation.resolve(fileName).normalize();
	            Resource resource = new UrlResource(filePath.toUri());
	            if(resource.exists()) {
	                return resource;
	            } else {
	                throw new MentionedFileNotFoundException("File not found " + fileName);
	            }
	        } catch (MalformedURLException ex) {
	            throw new MentionedFileNotFoundException("File not found " + fileName, ex);
	        }
	    }


}
Explanation of each line of code that exists in the service class.
- Explanation of the FileStorageService constructor.
 public FileStorageService(FileStoragePojo fileStoragePojo) {
        this.fileStorageLocation = Paths.get(fileStoragePojo.getUploadDir())
                .toAbsolutePath().normalize();

        try {
            Files.createDirectories(this.fileStorageLocation);
        } catch (Exception ex) {
            throw new FileStorageException("Unable to create the directory where the uploaded files will be stored.", ex);
        }
}- In the above code line, we define a parameterized constructor, in which we pass a FileStoragePojo object we have created in the previous paragraph.
- Specify the path where the file will be stored after uploading.
this.fileStorageLocation = Paths.get(fileStoragePojo.getUploadDir())
                .toAbsolutePath().normalize();
- Create a folder or directory in the path where the uploaded file will be saved.
Files.createDirectories(this.fileStorageLocation);
2. Description of storefile() method
 public String storeFile(MultipartFile file) {
	        // Normalize file name
	        String fileName = StringUtils.cleanPath(file.getOriginalFilename());

	        try {
	            // Check if the file's name contains invalid characters
	            if(fileName.contains("..")) {
	                throw new FileStorageException("Sorry! Filename contains invalid path sequence " + fileName);
	            }

	            // Copy file to the target location (Replacing existing file with the same name)
	            Path targetLocation = this.fileStorageLocation.resolve(fileName);
	            Files.copy(file.getInputStream(), targetLocation, StandardCopyOption.REPLACE_EXISTING);

	            return fileName;
	        } catch (IOException ex) {
	            throw new FileStorageException("Could not store file " + fileName + ". Please try again!", ex);
	        }
}- In the first line of code, we get the actual name of the file from the path where the file is saved. For example, suppose we upload a file named springboot in the following path C:/Users/1302143/uploads / Pdf file springboot pdf.
Now above the path, we use the following line of code to extract the original name of the file, springboot pdf.
String fileName = StringUtils.cleanPath(file.getOriginalFilename());
So filename = springboot pdf
Similarly, you can easily get the explanation of another line of code, which I mentioned in the form of comments.
Note: the entire purpose of the storeFile() method is to return the original file name.
3. Description of loadfileasresource (string filename) method
This method will return the stored or uploaded files in the form of resource objects.
 public Resource loadFileAsResource(String fileName) {
	        try {
	            Path filePath = this.fileStorageLocation.resolve(fileName).normalize();
	            Resource resource = new UrlResource(filePath.toUri());
	            if(resource.exists()) {
	                return resource;
	            } else {
	                throw new MentionedFileNotFoundException("File not found " + fileName);
	            }
	        } catch (MalformedURLException ex) {
	            throw new MentionedFileNotFoundException("File not found " + fileName, ex);
	        }
	    }
brilliant! I have some ideas about the code written in the Service class. If we notice that you are using some kind of exception in the filefoundexception and filefoundexception classes above.
In fact, these exceptions are not predefined classes, and we must create them ourselves.
Note: written in filestorageservice The code in the Java service class will be used when creating the API in later sections.
Step 6: create an exception handling class
- FileStorageException.java
package com.pixeltrice.uploaddownloadfileswithspringboot;

	public class FileStorageException extends RuntimeException {
	    public FileStorageException(String message) {
	        super(message);
	    }

	    public FileStorageException(String message, Throwable cause) {
	        super(message, cause);
	    }
}
2. MentionedFileNotFoundException.java
package com.pixeltrice.uploaddownloadfileswithspringboot;

import org.springframework.web.bind.annotation.ResponseStatus;
import org.springframework.http.HttpStatus;

@ResponseStatus(HttpStatus.NOT_FOUND)
	public class MentionedFileNotFoundException extends RuntimeException {
	    public MentionedFileNotFoundException(String message) {
	        super(message);
	    }

	    public MentionedFileNotFoundException(String message, Throwable cause) {
	        super(message, cause);
	    }
}
In the above code, I used @ ResponseStatus(HttpStatus.NOT_FOUND). If the mentioned file is not found, it will return 404 status.
Step 7: create a controller class for API to upload and download files.
package com.pixeltrice.uploaddownloadfileswithspringboot;

import java.io.IOException;
import java.util.Arrays;
import java.util.List;
import java.util.stream.Collectors;

import javax.servlet.http.HttpServletRequest;

import org.springframework.beans.factory.annotation.Autowired;
import org.springframework.core.io.Resource;
import org.springframework.http.HttpHeaders;
import org.springframework.http.MediaType;
import org.springframework.http.ResponseEntity;
import org.springframework.web.bind.annotation.GetMapping;
import org.springframework.web.bind.annotation.PathVariable;
import org.springframework.web.bind.annotation.PostMapping;
import org.springframework.web.bind.annotation.RequestParam;
import org.springframework.web.bind.annotation.RestController;
import org.springframework.web.multipart.MultipartFile;
import org.springframework.web.servlet.support.ServletUriComponentsBuilder;

@RestController
public class FileStorageController {

	@Autowired
    private FileStorageService fileStorageService;

	 @PostMapping("/upload-single-file")
	    public UploadFileResponse uploadSingleFile(@RequestParam("file") MultipartFile file) {
	        String fileName = fileStorageService.storeFile(file);

	        String fileDownloadUri = ServletUriComponentsBuilder.fromCurrentContextPath()
	                .path("/download-file/")
	                .path(fileName)
	                .toUriString();

	        return new UploadFileResponse(fileName, fileDownloadUri,
	                file.getContentType(), file.getSize());
	    }

	 @PostMapping("/upload-multiple-files")
	    public List<UploadFileResponse> uploadMultipleFiles(@RequestParam("files") MultipartFile[] files) {
	        return Arrays.asList(files)
	                .stream()
	                .map(file -> uploadSingleFile(file))
	                .collect(Collectors.toList());
	    }

	    @GetMapping("/download-file/{fileName:.+}")
	    public ResponseEntity<Resource> downloadFile(@PathVariable String fileName, HttpServletRequest request) {
	        // Load file as Resource
	        Resource resource = fileStorageService.loadFileAsResource(fileName);

	        // Try to determine file's content type
	        String contentType = null;
	        try {
	            contentType = request.getServletContext().getMimeType(resource.getFile().getAbsolutePath());
	        } catch (IOException ex) {
	            System.out.print("Could not determine file type.");
	        }

	        // Fallback to the default content type if type could not be determined
	        if(contentType == null) {
	            contentType = "application/octet-stream";
	        }

	        return ResponseEntity.ok()
	                .contentType(MediaType.parseMediaType(contentType))
	                .header(HttpHeaders.CONTENT_DISPOSITION, "attachment; filename=\"" + resource.getFilename() + "\"")
	                .body(resource);
	    }
}
Description of each api present in the controller class.
- Upload file
 @PostMapping("/upload-single-file")
	    public UploadFileResponse uploadSingleFile(@RequestParam("file") MultipartFile file) {
	        String fileName = fileStorageService.storeFile(file);

	        String fileDownloadUri = ServletUriComponentsBuilder.fromCurrentContextPath()
	                .path("/download-file/")
	                .path(fileName)
	                .toUriString();

	        return new UploadFileResponse(fileName, fileDownloadUri,
	                file.getContentType(), file.getSize());
	    }
The above api is used to upload a single file and store it in the above location on the system.
2. Upload multiple files
@PostMapping("/upload-multiple-files")
	    public List<UploadFileResponse> uploadMultipleFiles(@RequestParam("files") MultipartFile[] files) {
	        return Arrays.asList(files)
	                .stream()
	                .map(file -> uploadSingleFile(file))
	                .collect(Collectors.toList());
	    }
By using the above api, we can upload multiple files together.
3. Download the API of the file.
@GetMapping("/download-file/{fileName:.+}")
	    public ResponseEntity<Resource> downloadFile(@PathVariable String fileName, HttpServletRequest request) {
	        // Load file as Resource
	        Resource resource = fileStorageService.loadFileAsResource(fileName);

	        // Try to determine file's content type
	        String contentType = null;
	        try {
	            contentType = request.getServletContext().getMimeType(resource.getFile().getAbsolutePath());
	        } catch (IOException ex) {
	            System.out.print("Could not determine file type.");
	        }

	        // Fallback to the default content type if type could not be determined
	        if(contentType == null) {
	            contentType = "application/octet-stream";
	        }

	        return ResponseEntity.ok()
	                .contentType(MediaType.parseMediaType(contentType))
	                .header(HttpHeaders.CONTENT_DISPOSITION, "attachment; filename=\"" + resource.getFilename() + "\"")
	                .body(resource);
	    }
If you notice in the above code that we use an object named UploadFileResponse as the return type. Basically, we need to create this class, which is only responsible for returning the response correctly when the API is triggered or called.
UploadFileResponse.java
package com.pixeltrice.uploaddownloadfileswithspringboot;

public class UploadFileResponse {

	    private String fileName;
	    private String fileDownloadUri;
	    private String fileType;
	    private long size;

	    public UploadFileResponse(String fileName, String fileDownloadUri, String fileType, long size) {
	        this.fileName = fileName;
	        this.fileDownloadUri = fileDownloadUri;
	        this.fileType = fileType;
	        this.size = size;
	    }

		public String getFileName() {
			return fileName;
		}

		public void setFileName(String fileName) {
			this.fileName = fileName;
		}

		public String getFileDownloadUri() {
			return fileDownloadUri;
		}

		public void setFileDownloadUri(String fileDownloadUri) {
			this.fileDownloadUri = fileDownloadUri;
		}

		public String getFileType() {
			return fileType;
		}

		public void setFileType(String fileType) {
			this.fileType = fileType;
		}

		public long getSize() {
			return size;
		}

		public void setSize(long size) {
			this.size = size;
		}


}
Step 8: run the application and test from POSTMAN
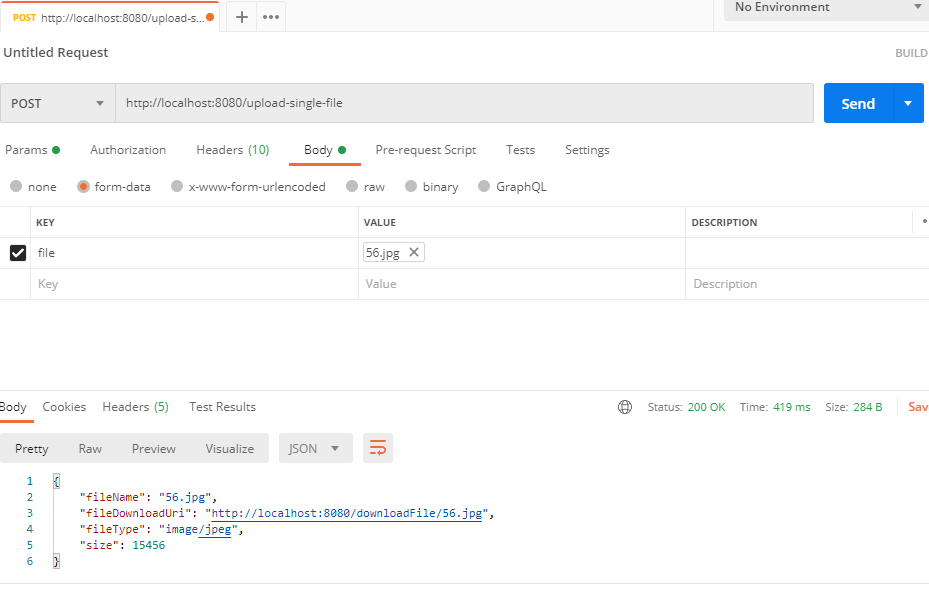
- Upload a single file
In this step, we call API from POSTMAN. http://localhost:8080/upload -Single file and pass parameters in the form of key value pairs, as shown in the figure. Once the API is called, you will get the response shown below.
Verify whether the file is uploaded to application The path mentioned in the properties file C:/Users/1302143/uploads
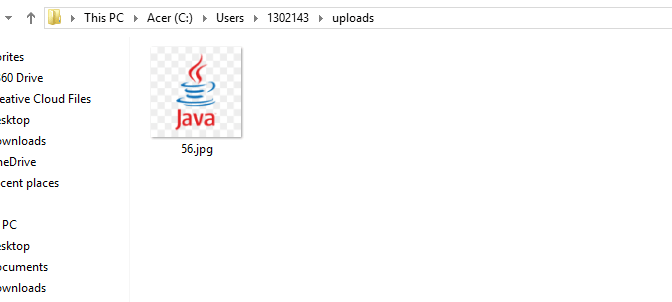
You can see in the above figure that the image has been saved in the above path.
2. Upload multiple files
Call API http://localhost:8080/upload -Multiple files and upload multiple files, which can be any image, pdf or any other format.
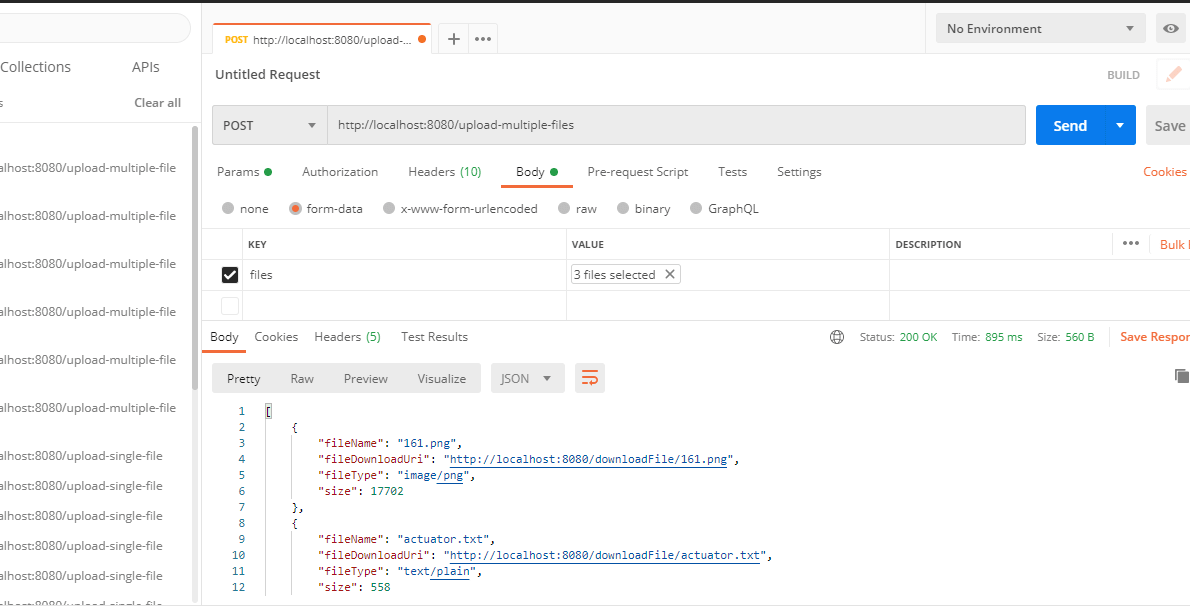
I uploaded three here txt, pdf and png files. Let's verify that they are stored in the mentioned path C:/Users/1302143/uploads.
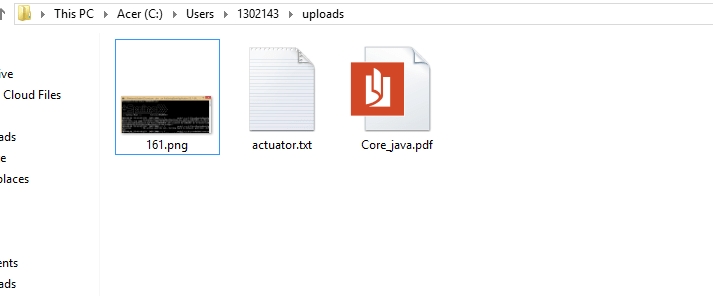
great! As you can see in the figure above, all three files have been saved in the above location.
3. Download files
Go to POSTMAN and enter the following API http://localhost:8080/download-file/Core_java.pdf # make sure the fileName is correct.
Instead of clicking the send button, first select send and download, as shown in the figure below. Your file will be downloaded.

ok Finally, we built a RestFul API for downloading and uploading multiple files.
Note: if you want the front-end code, please download the source code from the following link.
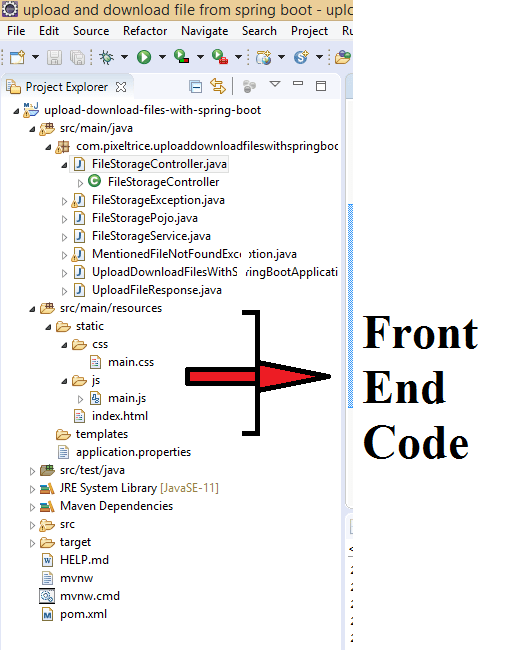
Just add three front-end files under the path src\main\resources\static in the eclipse workspace, which are: main css,index.html and main js.
The final structure of the folder in Eclipse.
generalization
Thank you very much for reading this article. In this article, we learned how to upload and download files using Spring Boot. If you have any questions or questions, please feel free to ask in the comment box.
You can also read my article.
- Build Spring Boot Restful CRUD API using Hibernate and Postgresql from scratch
- Spring Boot security using OAuth2 and JWT
- Deploy Spring Boot application on external Tomcat server
- How to send email using Spring Boot application
- Running an application from the Spring Boot CLI
- How to use Thymeleaf to develop Spring Boot Web application