Uploading Excel using the upload component of Element in vue can be roughly divided into two cases
- Upload to the server using action
- Upload to the server using axios
Note: the uploaded file may fail due to the inconsistent format of the front and back ends
- application/x-www-form-urlencoded generally, this is used more often
- multipart/form-data
- application/json
Use action
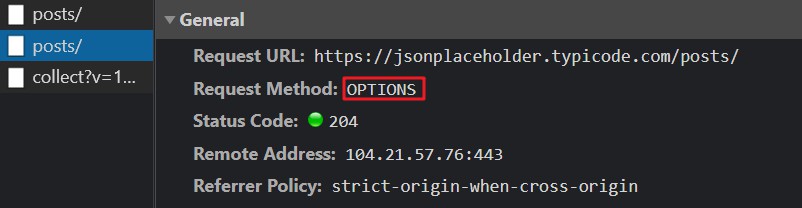
When using action, you will first initiate a pre check request using the OPTIONS method to know whether the server allows the cross domain request. After the server confirms that it is allowed, it initiates the actual HTTP request. The back end returns 204 to prevent access errors when processing POST requests
Note: using action requires cross domain processing at the back end. Like Nginx Reverse proxy , CORS, etc
- The code is as follows:
<template>
  <div>
    <el-upload
      ref="upload"
      accept=".xlsx .xls"
      :limit="1"
      :headers="upload.headers"
      :action="upload.url"
      :disabled="upload.isUploading"
      :on-progress="handleFileProgress"
      :on-success="handleFileSuccess"
      :auto-upload="false"
      drag
    >
      <i class="el-icon-upload" />
      <div class="el-upload__text">
        Drag the file here, or
        <em>Click upload</em>
      </div>
      <div slot="tip" class="el-upload__tip" style="color: red">
        Tip: only import is allowed“ xls"Or“ xlsx"Format file!
      </div>
    </el-upload>
    <el-button type="success" size="mini" @click="submitUpload">Upload to server</el-button>
  </div>
</template>

<script>
import { getToken } from '@/utils/auth'
export default {
  name: 'Upload',
  data() {
    return {
      upload: {
        // Set upload request header
        headers: { Authorization: getToken() },
        // Upload address
        url: 'https://jsonplaceholder.typicode.com/posts/',
        // Update existing user data
        isUploading: false
      }
    }
  },
  methods: {
    // File upload processing
    handleFileProgress() {
      this.upload.isUploading = true
    },
    // File upload successfully processed
    handleFileSuccess() {
      this.upload.isUploading = false
      this.$refs.upload.clearFiles()
    },
    // Submit upload file
    submitUpload() {
      this.$refs.upload.submit()
    }
  }
}
</script>
Do not use action
The above needs to be used in conjunction with the back end. Communication is still troublesome. It is recommended not to use action. You can handle ajax requests more freely
The effect is as follows (the data is randomly generated with mock and stored in Excel):

- If you want to transmit the file to the server in the form of breakpoint continuation, you usually use readAsArrayBuffer() to read the file
- To display the data in the file on the page, you usually use readAsBinaryString() to read the file
-
: on change the hook when the file status changes. It will be called when adding a file, uploading successfully and uploading failed
The first parameter is file, which contains information such as file content and status

-
After converting the file contents into binary files through FileReader
Then through xlsx Read to get the Excel data content

-
Finally, through xlsx utils. sheet_ to_ JSON can be converted to the data format we need
-
Loading.service(options) loading invoked as a service needs to be closed asynchronously
Need to combine this$ Nexttick() uses
<template>
  <div class="uploadBox">
    <!-- Upload file button -->
    <div class="buttonBox">
      <el-upload
        action
        accept=".xlsx,.xls"
        :show-file-list="false"
        :on-change="handleChange"
        :auto-upload="false"
      >
        <el-button slot="trigger" type="primary">selection Excel file</el-button>
        <el-button type="success" :disabled="disabled" @click="submit">Submit to server</el-button>
      </el-upload>
    </div>

    <!-- Parsed data -->
    <div v-show="show" class="tableBox">
      <h3>
        <i class="el-icon-info">Please check and click the "submit to server" button</i>
      </h3>
      <el-table :data="tempData" border style="width: 100%" :height="height">
        <el-table-column prop="name" label="full name" min-width="50%" />
        <el-table-column prop="phone" label="Telephone" min-width="50%" />
      </el-table>
    </div>
  </div>
</template>

<script>
import xlsx from 'xlsx'
import { Loading } from 'element-ui'
import uploadExcel from '@/api'
export default {
  name: 'Upload',
  data() {
    return {
      height: document.documentElement.clientHeight - 130,
      tempData: [],
      show: false,
      disabled: false,
      character: {
        name: {
          text: 'full name',
          type: 'string'
        },
        phone: {
          text: 'Telephone',
          type: 'string'
        }
      }
    }
  },
  methods: {
    // Collecting excel data
    async handleChange(file) {
      const originData = file.raw
      if (!originData) return
      this.show = false
      const loadingInstance = Loading.service({
        text: 'Trying to load!!!',
        background: 'rgba(0, 0, 0, 0.8)'
      })
      const binaryData = await this.readFile(originData)
      const workbook = xlsx.read(binaryData, { type: 'binary' })
      const worksheet = workbook.Sheets[workbook.SheetNames[0]]
      const data = xlsx.utils.sheet_to_json(worksheet)
      this.tempData = this.handleData(data)
      await this.delay(300)
      this.show = true
      loadingInstance.close()
    },
    // Convert the read data into the format required by the server
    handleData(data) {
      const arr = []
      const char = this.character
      data.forEach(item => {
        const obj = {}
        for (const key in char) {
          if (Object.hasOwnProperty.call(char, key)) {
            const el = char[key]
            let val = item[el.text] || ''
            const type = el.type
            type === 'string' ? (val = String(val)) : null
            type === 'number' ? (val = Number(val)) : null
            obj[key] = val
          }
        }
        arr.push(obj)
      })
      return arr
    },
    // Submit data to server
    async submit() {
      if (this.tempData.length <= 0) {
        this.$message({
          message: 'Please select first Excel file',
          type: 'warning',
          showClose: true
        })
        return
      }
      this.disabled = true
      const loadingInstance = Loading.service({
        text: 'Trying to load!!!',
        background: 'rgba(0, 0, 0, 0.8)'
      })
      await this.delay(300)
      // Send API request
      uploadExcel(this.tempData).then(() => {
        this.$message({
          message: 'Excel The file has been uploaded',
          type: 'success',
          showClose: true
        })
        this.show = false
        this.disabled = false
        loadingInstance.close()
      })
    },
    readFile(file) {
      return new Promise(resolve => {
        const reader = new FileReader()
        reader.readAsBinaryString(file)
        reader.onload = e => {
          resolve(e.target.result)
        }
      })
    },
    delay(interval = 0) {
      return new Promise(resolve => {
        const timer = setTimeout(_ => {
          clearTimeout(timer)
          resolve()
        }, interval)
      })
    }
  }
}
</script>

<style scoped>
.buttonBox {
  padding: 15px;
  display: flex;
}
.el-button {
  margin-right: 20px !important;
}
.tableBox {
  padding: 0 15px;
}
h3 {
  font-size: 18px;
  color: #f56c6c;
  padding-bottom: 15px;
}
</style>
Export data
The following methods can be used to export using xlsx or xlsx + file saver
-
@Selection change, this event will be triggered when the selection item changes
The parameter is selection. Handle it after you get it
-
Then through xlsx utils. json_ to_ Sheet turn it into sheet
Create a new table xlsx utils. book_ new
Insert data xlsx into the table utils. book_ append_ sheet
Finally, through xlsx WriteFile to download
const arr = this.selectionList.map(item => {
  return {
    number: item.id,
    full name: item.name,
    Telephone: item.phone
  }
})
const sheet = xlsx.utils.json_to_sheet(arr)
const book = xlsx.utils.book_new()
xlsx.utils.book_append_sheet(book, sheet, 'Table name')
xlsx.writeFile(book, `user${new Date().getTime()}.xls`)