preface:
Hello, guys, I'm running snail rz. Of course, you can call me snail Jun. I'm a rookie who has studied Java for more than half a year. At the same time, I also have a great dream, that is, to become an excellent Java Architect one day.
This spring MVC basic learning series is used to record the whole process of my learning the basic knowledge of spring MVC framework (this series is written with reference to the latest spring MVC tutorial of crazy God in station B. because it was sorted out before, but it was not released at that time, there may be errors in some places. I hope you can correct them in time!)
After that, I will try my best to update this series at the speed of two days and one hour. For those who haven't learned the spring MVC framework, please refer to my blog; Of course, the little friends who have studied can also review the basics with me. Finally, I hope I can make progress with you. Come on, programmer!
Special note: if you are interested in spring MVC basic learning series, you can read the previous blogs of this series:
Part I: A brief review of spring MVC basic learning MVC architecture and the use of servlets
Part II: First knowledge of spring MVC basic learning
Part III: First knowledge of spring MVC basic learning
Today we come to the fourth stop of spring MVC basic learning: using annotation development. No more nonsense. Let's start today's study.
4. Development using annotations
4.1 building basic environment
4.1.1 create subprojects and import resource dependencies
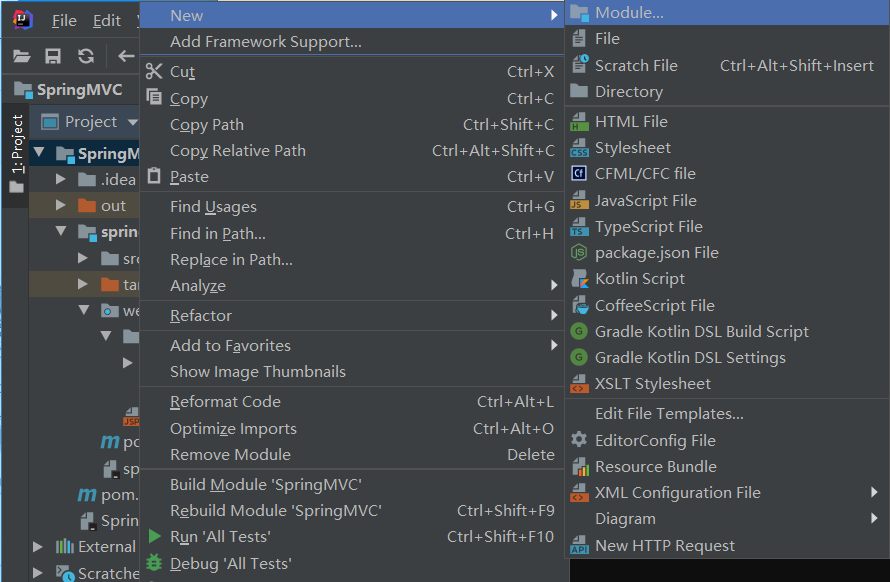
1. Create Module subproject
- Right click the parent project name [SpringMVC], select [New] to create a New Module, and then select [Module] to create a New Module
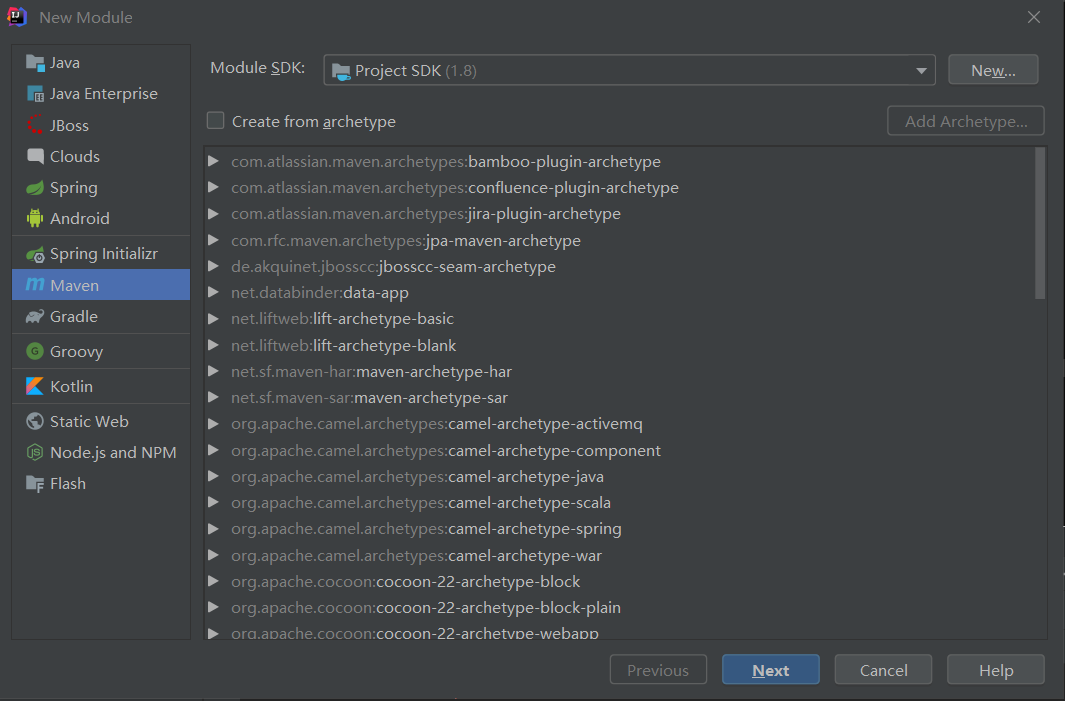
2. Create a normal Maven project
- Like the parent project, the sub module still chooses to create an ordinary Maven project without checking any options, and then names the sub project, such as [springmvc-04-mvcannotion]
3. Import resource dependency
- Introduce the relevant resource jar package into the pom.xml configuration file of the subproject
<dependencies>
    <!-- servlet-api resources dependence -->
    <dependency>
        <groupId>javax.servlet</groupId>
        <artifactId>servlet-api</artifactId>
        <version>2.5</version>
    </dependency>
    <!-- jsp-api resources dependence -->
    <dependency>
        <groupId>javax.servlet.jsp</groupId>
        <artifactId>jsp-api</artifactId>
        <version>2.2</version>
    </dependency>
</dependencies>
4. Configure resources in build
- Configure resources in the build of pom.xml configuration file to prevent the failure of resource export
<!-- stay build Medium configuration resources,To prevent the failure of resource export -->
<build>
    <resources>
        <resource>
            <directory>src/main/resources</directory>
            <includes>
                <include>**/*.properties</include>
                <include>**/*.xml</include>
            </includes>
            <filtering>false</filtering>
        </resource>
        <resource>
            <directory>src/main/java</directory>
            <includes>
                <include>**/*.properties</include>
                <include>**/*.xml</include>
            </includes>
            <filtering>false</filtering>
        </resource>
    </resources>
</build>
4.1.2 add framework support and configure project structure
1. Add framework support to the project
Add framework support to the project to solve the problem of gray java files under src files
1-1 select Add framework support
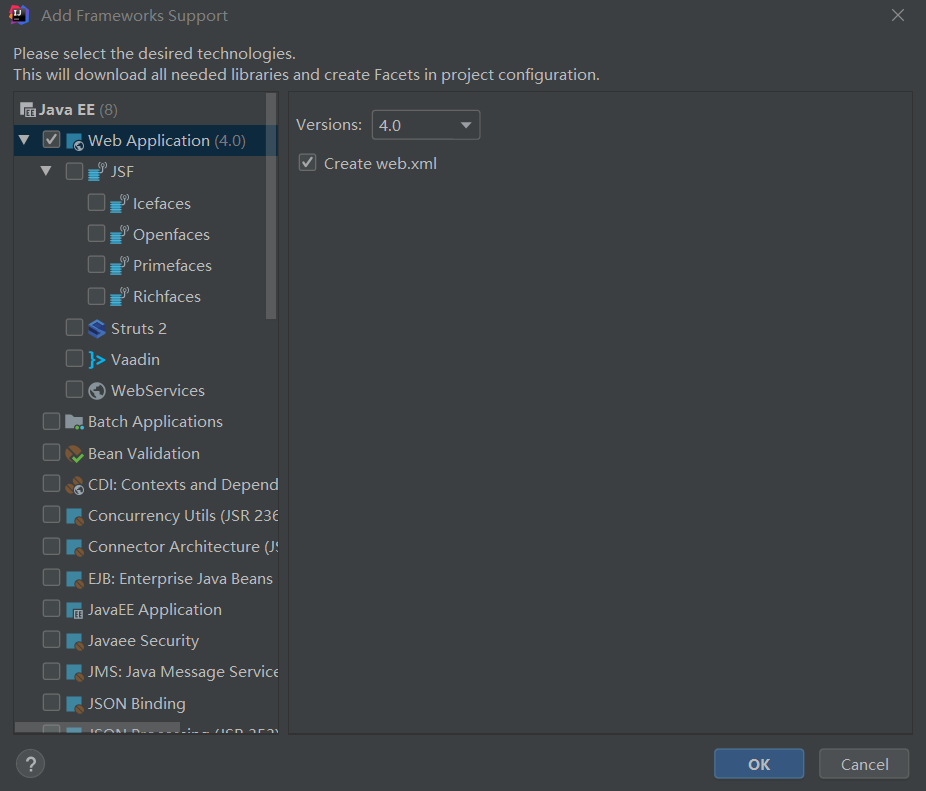
- Right click the project name and select Add Framework Support to Add Framework Support

1-2. Check the Web Application option
- Enter the [Add Framework Support] interface, and then check [Web Application] (i.e. Web Application) under the Java EE directory
2. Configuration project structure
2-1 click project structure
- In the toolbar line at the top left of IDE compiler, find the penultimate icon that looks like a folder, and click to enter the Project Structure page

2-2 create a new lib file directory
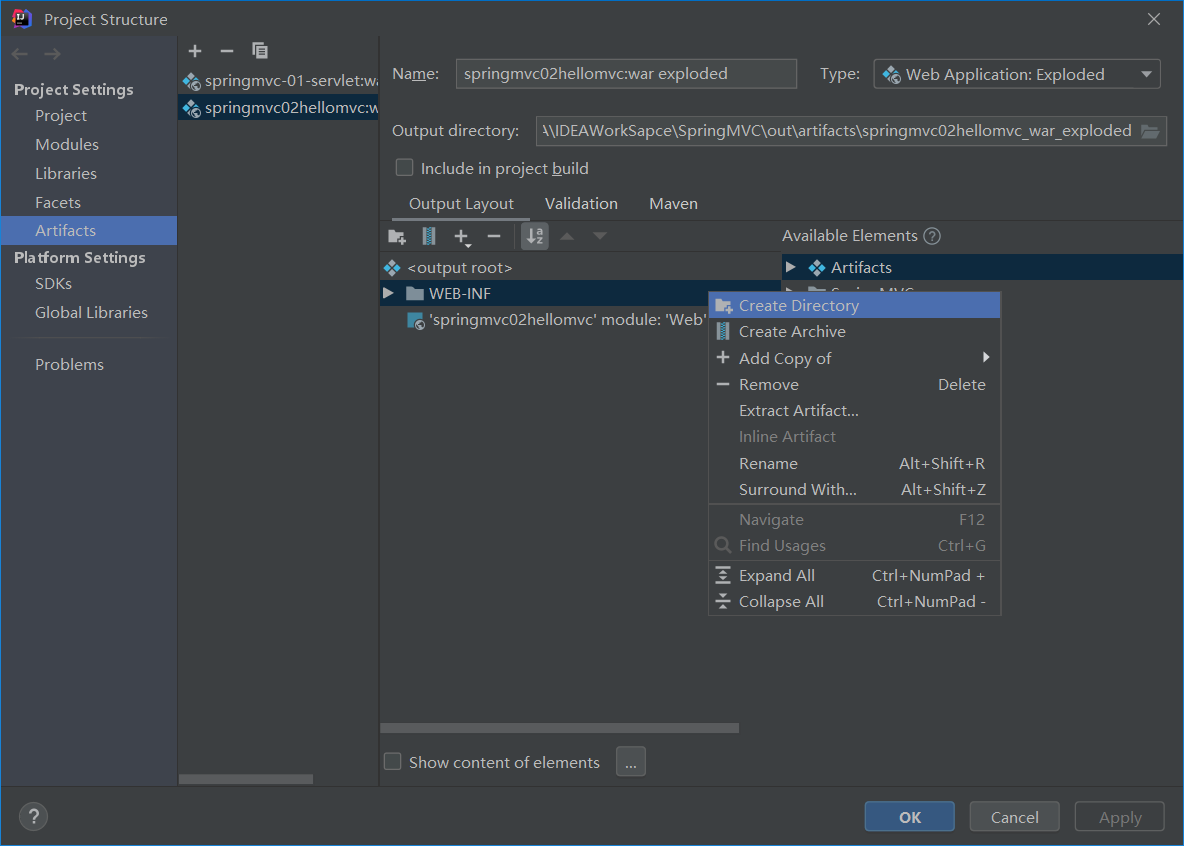
2-3 adding Library Files to lib files
- Click the lib file directory, right-click and select Add Copy of, and then select Library Files
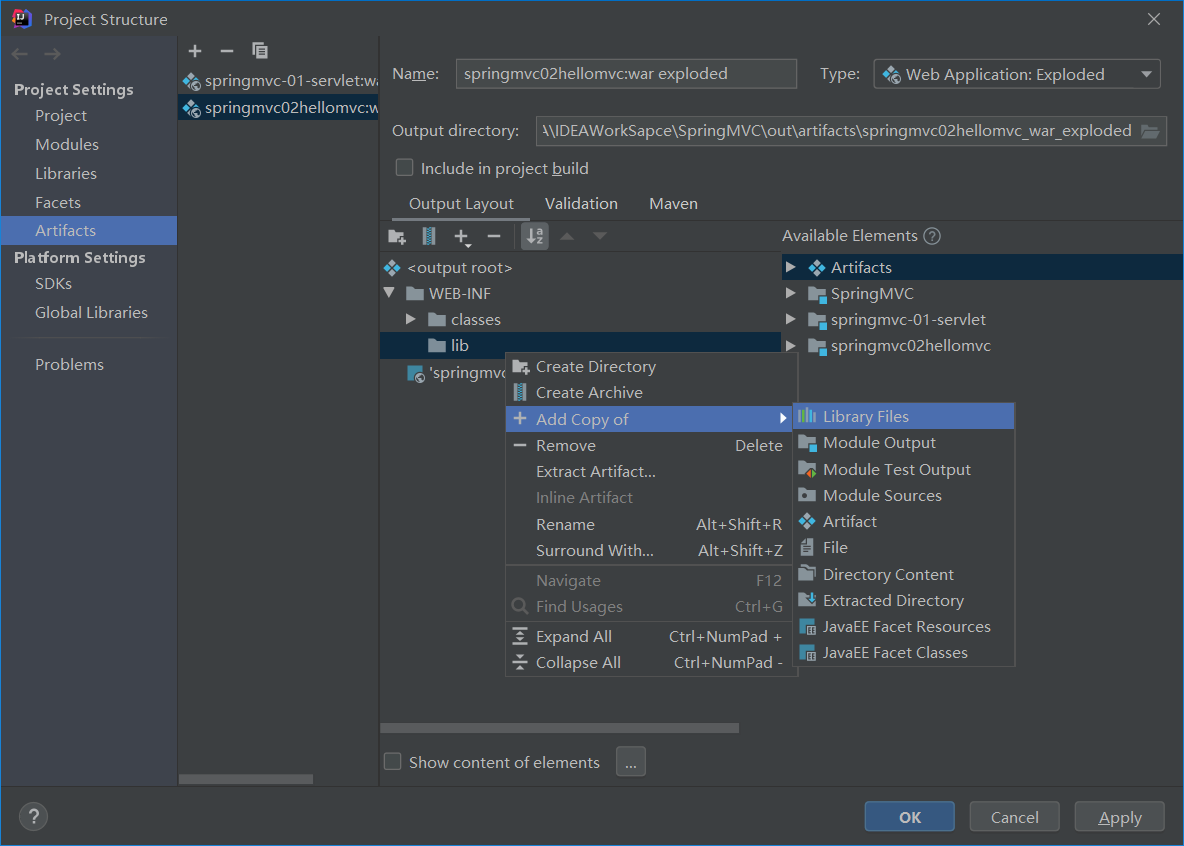
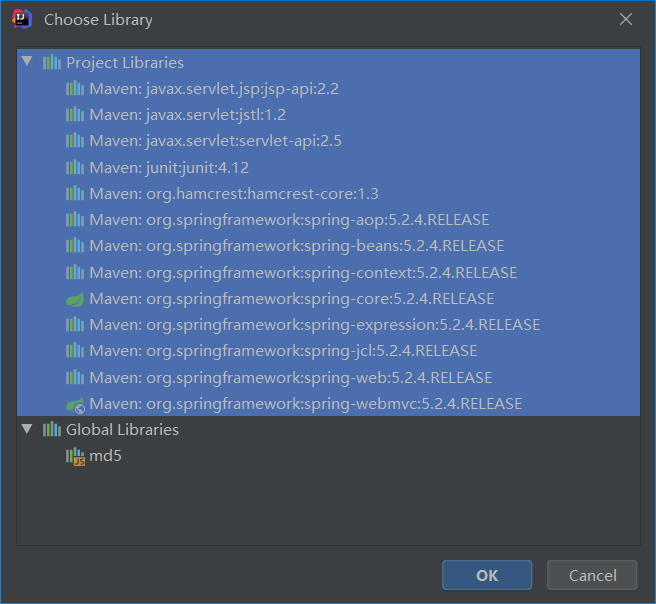
2-4 select project Library resources
- Select all resource dependencies under Project Library and click OK
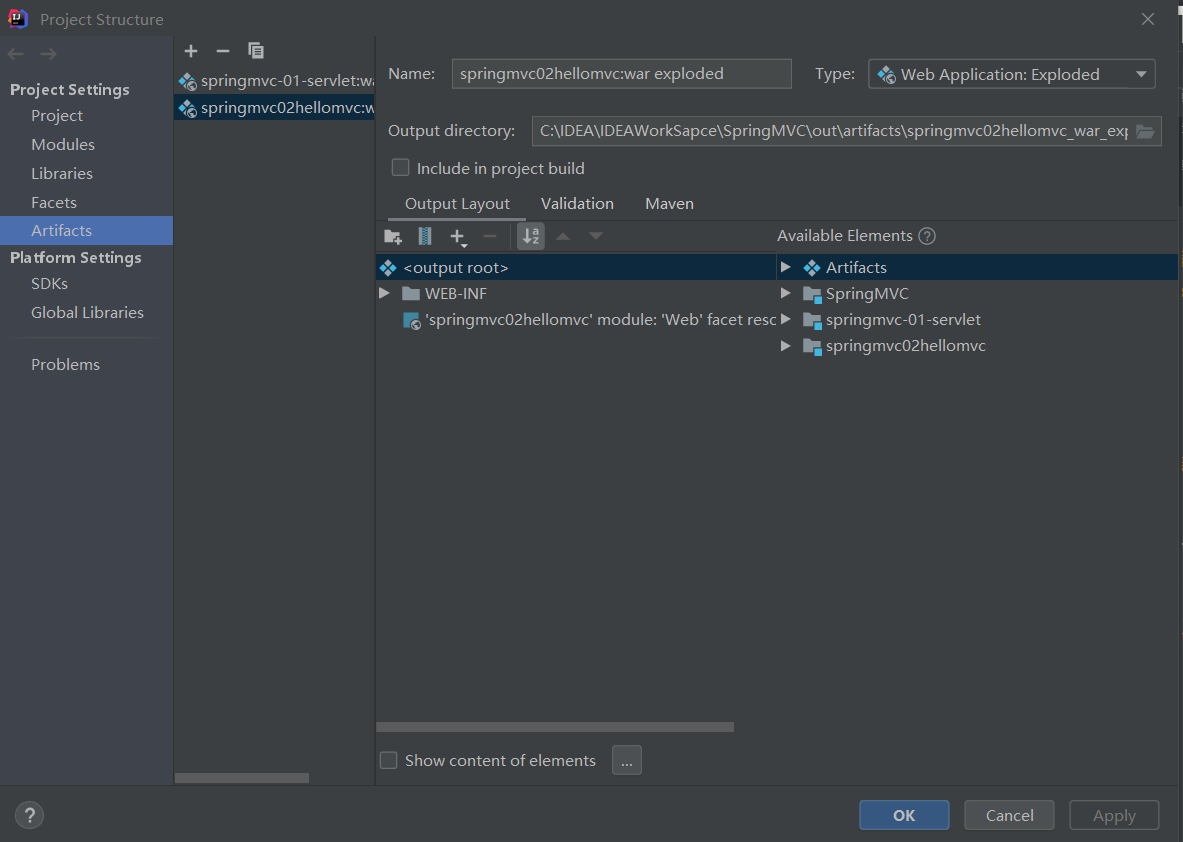
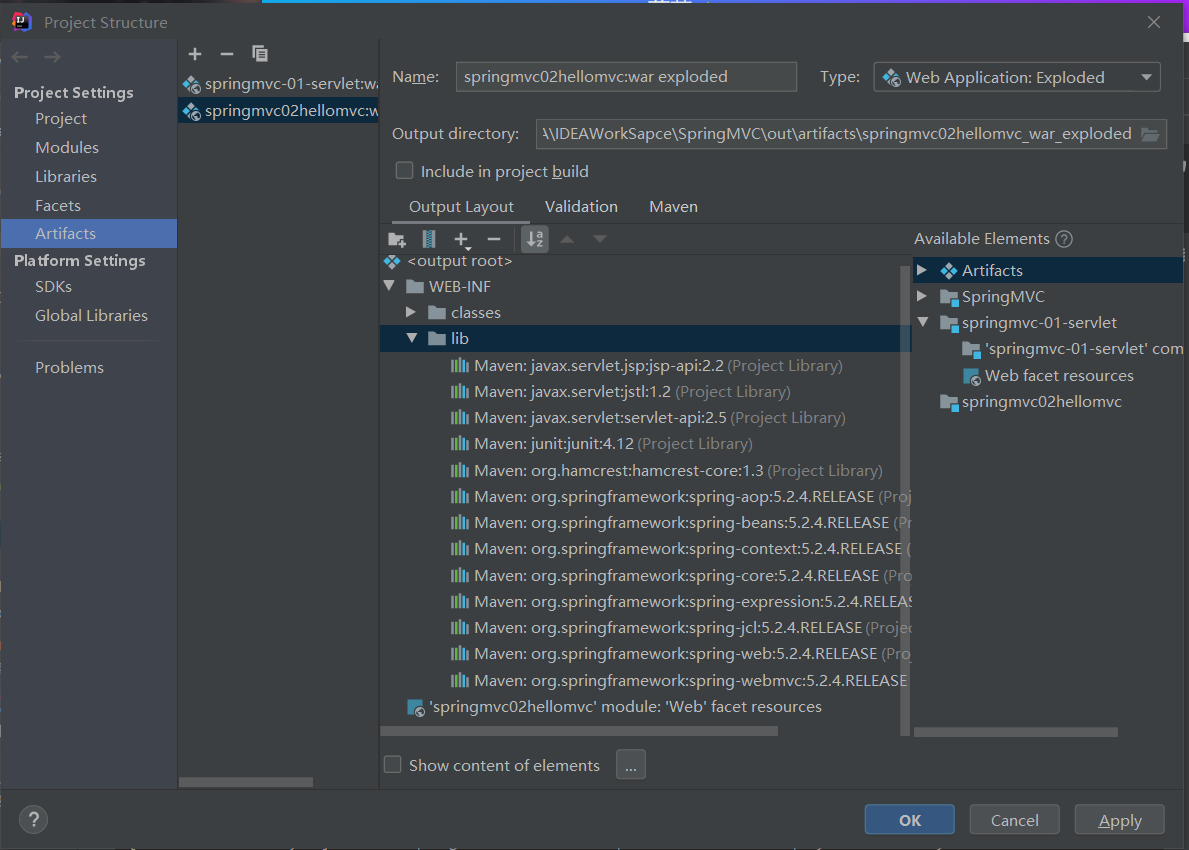
2-5 successfully added Library resources
- As shown in the following figure, the Library resource selected above is successfully added in the lib folder, and then click Apply to Apply this setting, and then you can
4.1.3 configuring the web.xml file
- Find the WEB-INF file under the web file directory of the subproject, and then find the web.xml configuration file to write the configuration file
<?xml version="1.0" encoding="UTF-8"?>
<web-app xmlns="http://xmlns.jcp.org/xml/ns/javaee"
         xmlns:xsi="http://www.w3.org/2001/XMLSchema-instance"
         xsi:schemaLocation="http://xmlns.jcp.org/xml/ns/javaee http://xmlns.jcp.org/xml/ns/javaee/web-app_4_0.xsd"
         version="4.0">

    <!-- to configure DispatcherServlet: Indicates the front controller
         Main role: This is SpringMVC Core, request distributor -->
    <servlet>
        <servlet-name>springmvc</servlet-name>
        <servlet-class>org.springframework.web.servlet.DispatcherServlet</servlet-class>
        <!-- DispatcherServlet To bind Spring Configuration file for -->
        <init-param>
            <param-name>contextConfigLocation</param-name>
            <!-- classpath*:I will find it in all the packages. It is recommended to use it classpath: -->
            <param-value>classpath:springmvc-servlet.xml</param-value>
        </init-param>
        <!-- Startup level -->
        <load-on-startup>1</load-on-startup>
    </servlet>

    <!-- stay SpringMVC In,/ and /* Different functions
         /:  Match all requests without matching jsp (Recommended use /)
         /*: Match all requests, including jsp page -->
    <servlet-mapping>
        <servlet-name>springmvc</servlet-name>
        <url-pattern>/</url-pattern>
    </servlet-mapping>

</web-app>
4.2 improve environmental construction
4.2.1 create HelloController control class
- Create a com.kuang.controller package under the java file under the main file in the src directory to store the HelloController class of the control layer
package com.kuang.controller;

import org.springframework.stereotype.Controller;
import org.springframework.ui.Model;
import org.springframework.web.bind.annotation.RequestMapping;

// Use the @ Controller annotation to register this class as a Controller and submit it to the IOC container of Spring for unified management
@Controller
// Use the @ RequestMapping annotation to set the request mapping: the scope is a class or method
@RequestMapping("/hello")
public class HelloController {

    // Real access address: localhost:8080/hello/h1
    @RequestMapping("/h1")
    public String hello1(Model model) {
        // Encapsulate data: add attributes msg and values to the model, which can be taken out and rendered in JSP pages
        model.addAttribute("msg","Hello,SpringMVCAnnotation!");
        // The view parser processes the view name (Note: "hello" here refers to the name of the jsp page)
        return "hello";
    }

    /**
     * Set multiple request mappings to jump to different pages
     */
    // Real access address: localhost:8080/hello/h2
    @RequestMapping("/h2")
    public String hello2(Model model) {
        // Encapsulate data
        model.addAttribute("msg","Hello,SpringMVC!");
        // The view parser processes the view name
        return "hello";
    }

    // Real access address: localhost:8080/hello/h3
    @RequestMapping("/h3")
    public String hello3(Model model) {
        // Encapsulate data
        model.addAttribute("msg","Hello,Spring!");
        // The view parser processes the view name
        return "hello";
    }

}
4.2.2 write the springmvc-servlet.xml configuration file
<?xml version="1.0" encoding="UTF-8"?>
<beans xmlns="http://www.springframework.org/schema/beans"
       xmlns:xsi="http://www.w3.org/2001/XMLSchema-instance"
       xmlns:context="http://www.springframework.org/schema/context"
       xmlns:mvc="http://www.springframework.org/schema/mvc"
       xsi:schemaLocation="
        http://www.springframework.org/schema/beans
        http://www.springframework.org/schema/beans/spring-beans.xsd
        http://www.springframework.org/schema/context
        http://www.springframework.org/schema/context/spring-context.xsd
        http://www.springframework.org/schema/mvc
        http://www.springframework.org/schema/mvc/spring-mvc.xsd">

    <!-- Automatically scan the package to make the comments under the specified package effective, and IOC Unified container management -->
    <context:component-scan base-package="com.kuang.controller"/>

    <!-- Give Way SpringMVC Do not process static resources: .css .js .html .mp3 .mp4 -->
    <mvc:default-servlet-handler/>
    <!-- support mvc Annotation driven
         (stay Spring Generally used in@RequstMapping Annotation to complete the mapping relationship, To make@RequstMapping Note effective, Must register with context DefaultAnnotationHandlerMapping And one AnnotationMethodHandlerAdapter example, These two instances are handled at the class level and method level, respectively, and annotation-driven Configuration helps us automatically complete the injection of the above two instances) -->
    <mvc:annotation-driven/>

    <!-- view resolver  -->
    <bean class="org.springframework.web.servlet.view.InternalResourceViewResolver"
          id="internalResourceViewResolver">
        <!-- In the view parser, we put all the views in the/WEB-INF/Directory (This can ensure the view security, because the files in this directory cannot be accessed directly by the client) -->
        <!-- prefix -->
        <property name="prefix" value="/WEB-INF/jsp/"/>
        <!-- suffix -->
        <property name="suffix" value=".jsp"/>
    </bean>

</beans>
4.2.3 compiling view layer JSP pages
- In the WEB-INF file under the web folder, create a jsp folder to store the relevant page files of the view layer
<%@ page contentType="text/html;charset=UTF-8" language="java" %>
<html>
<head>
    <title>Title</title>
</head>
<body>
    <!-- Exhibition HellloController Object information encapsulated in the controller -->
    ${msg}
</body>
</html>
4.3 release project and project test
4.3.1 setting project publishing information and starting Tomcat server
1. Set and publish project information
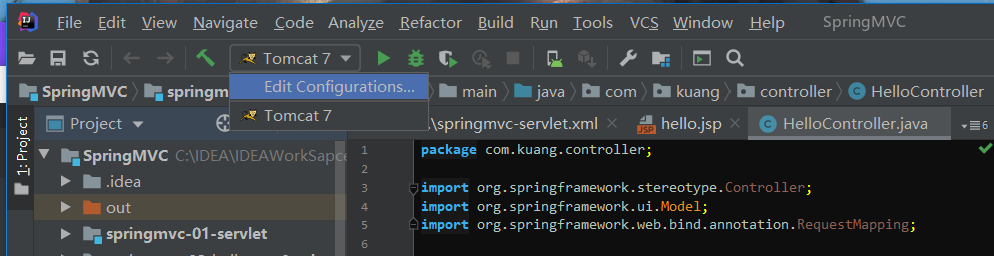
- View the line of toolbar graphics at the top left of the IDEA compiler, find [Tomcat 7], click and select [Edit Configurations]
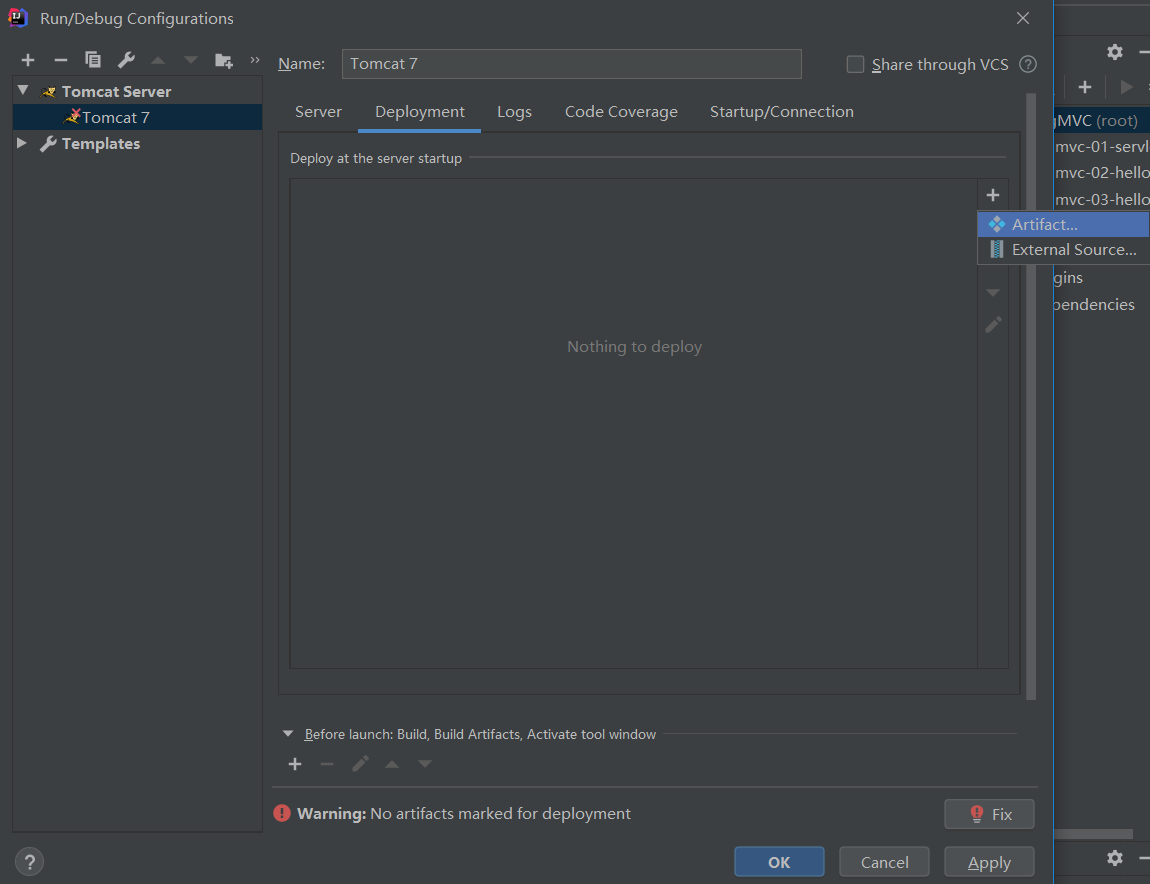
- Under [Deployment], click the "+" sign on the right and select [Artifact...]
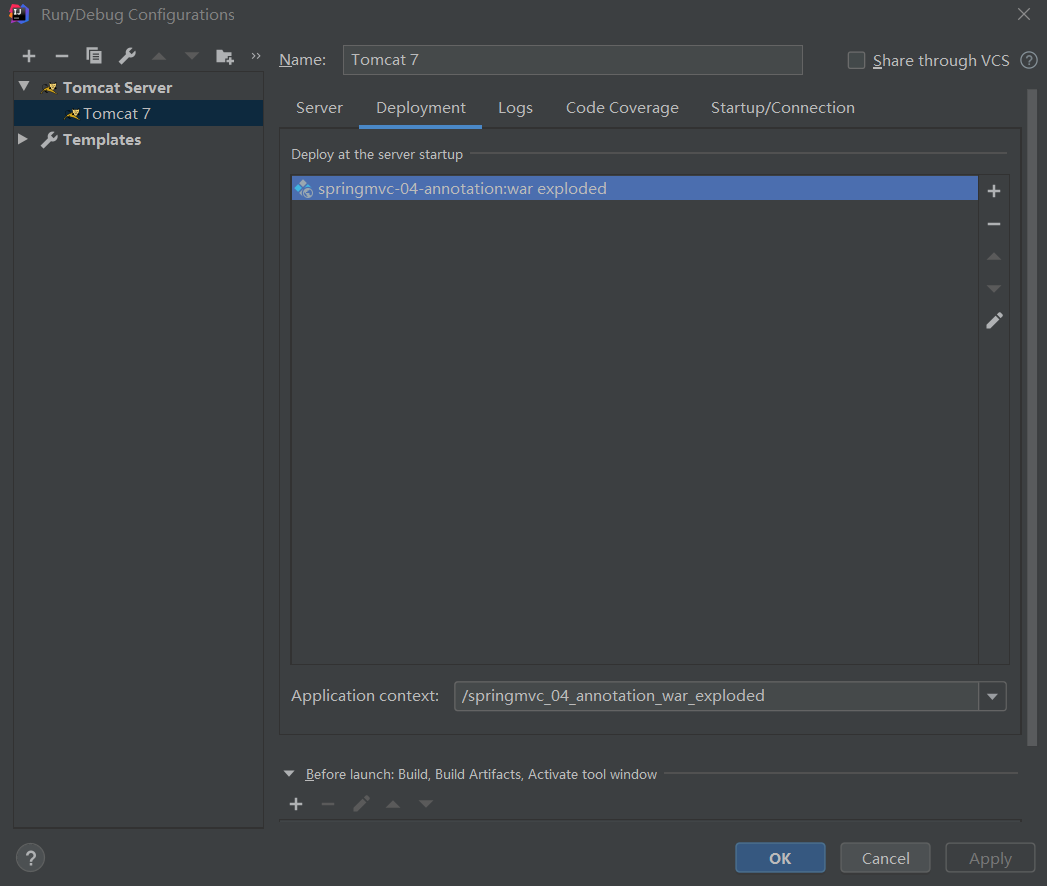
- Then add the published project information, and finally click Apply in the lower right corner to apply this configuration
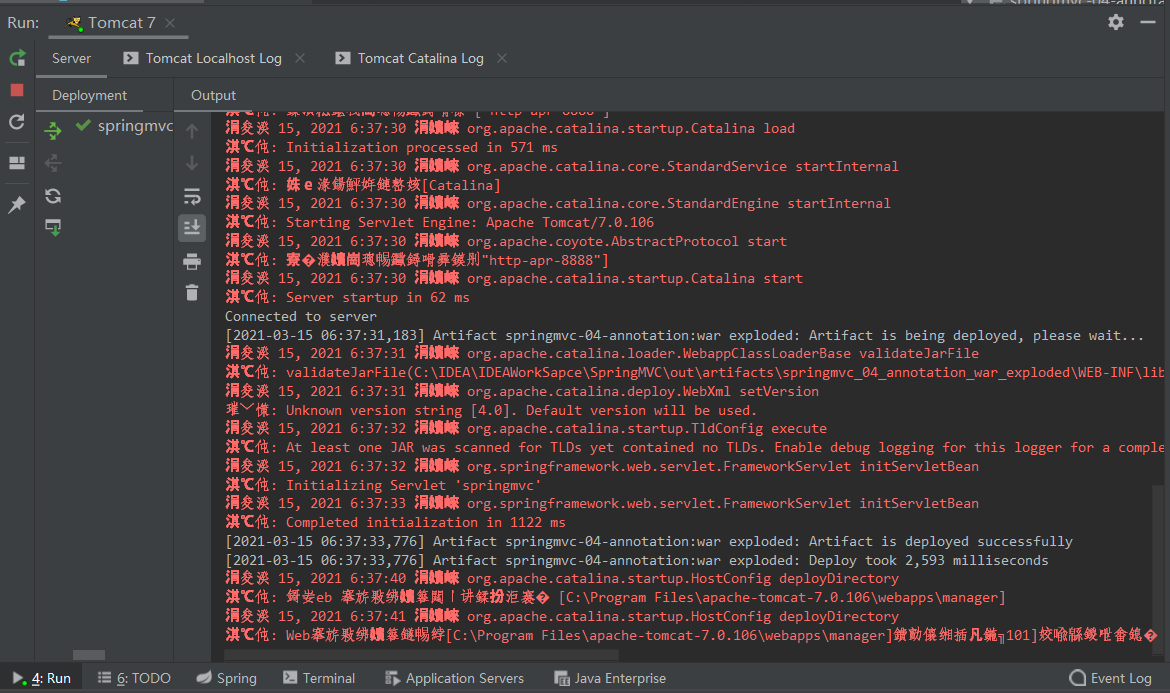
2. Run TomCat server
- Click [Run] behind [Tomcat7] in the toolbar at the upper left corner (i.e. Run the server)

- Wait for the server to start and check whether the project is published successfully on the console
4.3.2 test results
1. Visit the index.jsp page
- The URL link of the welcome page index.jsp is http://localhost:8888/springmvc_04_annotation_war_exploded/
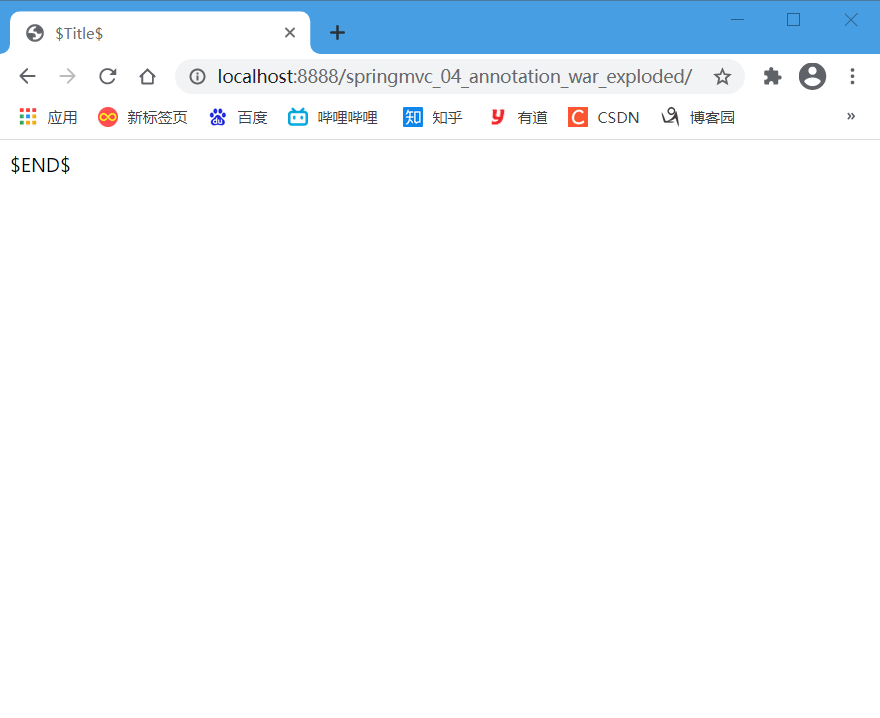
Result: the default page was accessed successfully!
2. Visit the hello/h1 page
Add hello / H1 after the default URL link, that is, the access address is http://localhost:8888/springmvc_04_annotation_war_exploded/hello/h1

Result: the hello/h1 page was successfully accessed and the message "Hello, spring MVC annotation!" was displayed!
3. Visit the hello/h2 page
- Add hello / H2 after the default URL link, that is, the access address is http://localhost:8888/springmvc_04_annotation_war_exploded/hello/h2
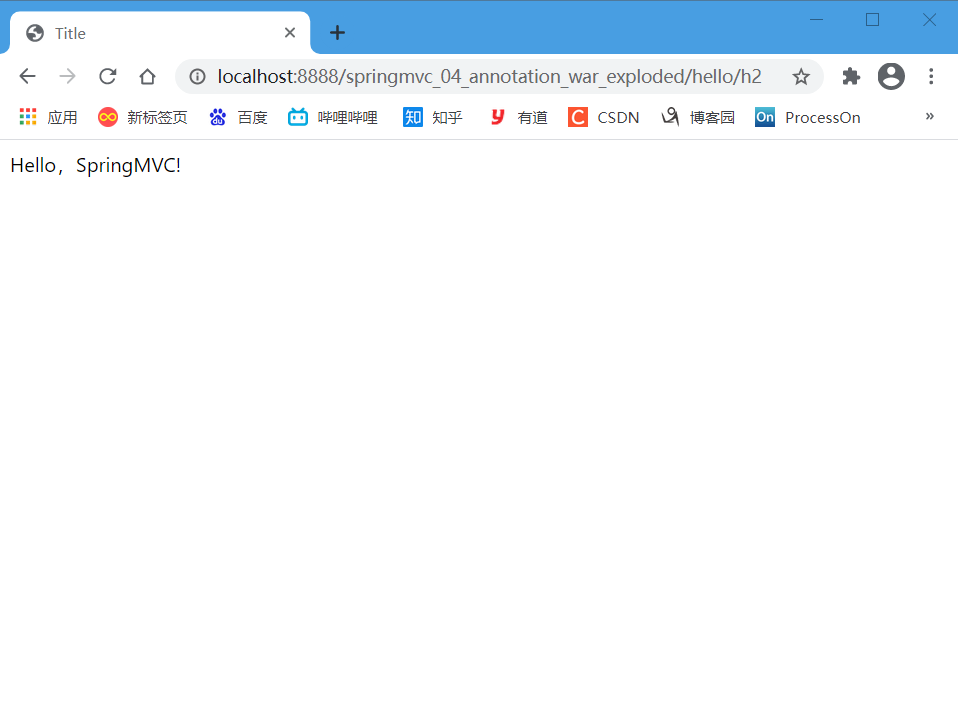
Result: the hello/h2 page is successfully accessed, and the message "Hello, spring MVC!" is displayed!
4. Visit the hello/h3 page
- Add hello / H3 after the default URL link, that is, the access address is http://localhost:8888/springmvc_04_annotation_war_exploded/hello/h3

Result: visit the hello/h3 page successfully, and the message "Hello, Spring" is displayed!
Well, that's the end of today's study on using annotation development. You are welcome to study and discuss actively. If you like, you can pay attention to Mr. snail. By the way, you can click three times. I'll see you next time. Bye!
Reference video link: [crazy God says Java] the latest tutorial of spring MVC, the IDEA version, is easy to understand