Original text: Use BLOC mode to build your Flutter project
Hey, man! I came back with another new article about Flutter. This time, we will discuss and demonstrate "how to build the Flutter project". In this way, you can easily maintain, expand and test your fluent project. Before delving into practical topics, I would like to share a short story about why we should focus on building a reliable architecture for the project.
Update: Articles 2 and 3 of this article have been released, making some changes to the current design to solve some problems and show some amazing implementations. Link in here.
Part 3
Compile time Dependency Injection in Flutter
Part 4
Integration and Unit testing in Flutter
Why do you need to structure your project?
"In 2015, once upon a time, I was a competitive programmer( Hackerearth Personal profile), while also learning Android application development. As a competitive programmer, I only care about the output and efficiency of the program, and have never considered structuring my programs and projects. This trend and coding style are also reflected in my android project. I'm writing Android apps in the mindset of a competitive programmer. At first, everything was fine. Because only I work on the project myself, there is no boss to put forward requirements for me, and there is no need to add new functions or change existing functions. However, when I started working for a startup and building Android applications for them, I always spent a lot of time modifying the existing functions in the program. Not only that, I even introduced Bugs in the process of building applications. The root cause of all these problems is: 'I never follow any architectural model, or never structure my project'. With the passage of time, I began to understand the software world and successfully transformed myself from a competitive programmer to a software engineer. Now, when starting a new project, my main focus is to build a solid structure, or architecture, for the project. This helped me become an excellent and capable software engineer. 😄”
End my boring story 😅, Let's go back to the topic of this article: "build your fluent project using BLOC mode".
Our goal
Build a very simple app with a page containing a grid list. The list item is obtained from the server. The contents of the list are The Movies DB Popular movies on the site.
Note: you should already know before continuing Widgets,how to make a network call in Flutter , and have the intermediate level of Dart related knowledge. This article is a little long and comes with links to a large number of other resources, which is convenient for you to further read related topics.
Let's start the show 😍
Before directly entering the code, first show the visual experience of BLOC architecture. We will follow this architecture to build app s.
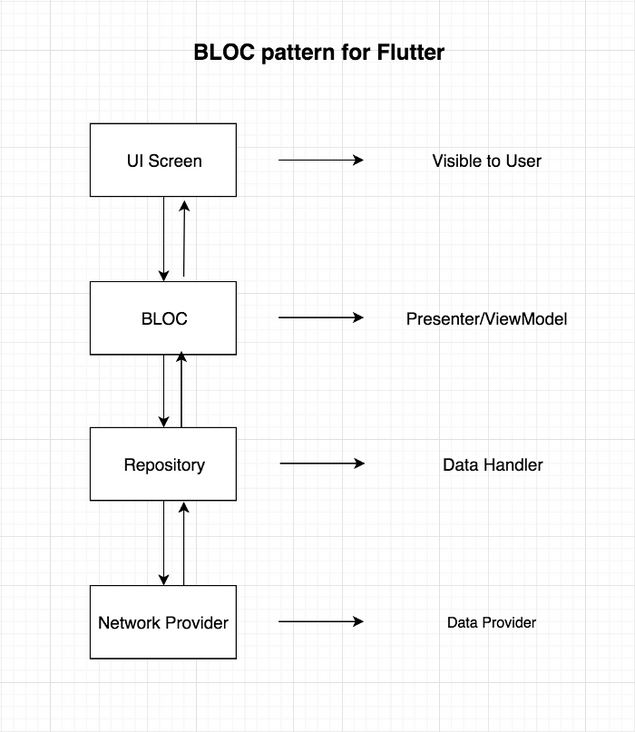
The figure above shows how data flows from the UI to the Data Layer and from the Data Layer to the UI. BLOC does not hold references to Widgets in the UI. The UI will only listen for changes from BLOC. Let's make a small Q & A to understand this figure:
1. What is BLOC mode?
It is the Fletter state management system recommended by Google developers. It accesses data from the central location of the project to help manage state.
2. Can I associate this architecture with any other architecture?
Certainly. MVP and MVVM are some good examples. The only thing that will change is that BLOC will be replaced by ViewModel in MVVM.
3. What is the bottom layer of bloc? Or what is the core of managing state in a place?
The bottom layer is STREAMS or REACTIVE. Generally speaking, data will flow from BLOC to UI or from UI to BLOC. If you've never heard of streaming, read Stack Overflow Your answer.
I hope the small Q & a part can dispel your doubts. If you need further explanation or have other questions, you can comment below or directly through LinkedIn Contact me.
Start building projects using BLOC mode
1. First create a new item and clear main All the code in the dart file. Enter the following command in the terminal:
flutter create myProjectName
2. In main Write the following code in the dart file:
import 'package:flutter/material.dart';
import 'src/app.dart'
void main() {
  void main() {
    runApp(App);
  }
}
3. Create a src package under the lib package, create a file in the src package and name it app Dart, copy and paste the following code into app Dart file.
import 'package:flutter/material.dart';
import 'ui/movie_list.dart';

class App extends StatelessWidget {
  @override
  Widget build(BuildContext context) {
    // TODO: implement build
    return MaterialApp(
        theme: ThemeData.dark(),
        home: Scaffold(
          body: MovieList(),
        ),
      );
  }
}
4. Create a new package under src package and name it resources.
Now create several new packages, namely blogs, models, resources and ui, as shown in the figure below, and then set the skeleton of the project:
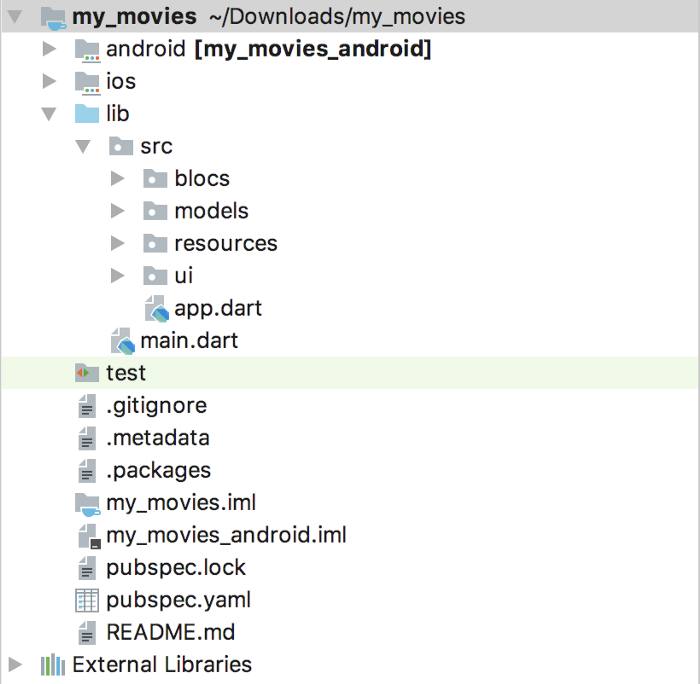
The blocs package will store the files related to the BLOC implementation. The models package will store POJO classes or JSON model classes obtained from the server. The resource package will contain repository classes and network call implementation classes. The resources package will store the data repository class and the implementation class responsible for network calls. The UI package will hold UI pages visible to the user.
5. Last thing, we need to add a third-party library RxDart . Open pubspec Yaml, add rxdart: ^0.18.0 as follows:
dependencies:
  flutter:
    sdk: flutter

  # The following adds the Cupertino Icons font to your application.
  # Use with the CupertinoIcons class for iOS style icons.
  cupertino_icons: ^0.1.2
  rxdart: ^0.18.0
  http: ^0.12.0+1
sync your project, or type the following command in the terminal. You need to execute this command in the project root directory.
flutter packages get
6. The framework of the project has been built, and now we begin to deal with the underlying logic of the project, that is, the network layer. First, let's learn about the server-side API to be used. click link , enter the API page of the movie website database. Complete the registration and get your API key from the settings page. We will get the data from the following url:
http://api.themoviedb.org/3/movie/popular?api_key="your\_api\_key"
Put your API key in the above url and click the url (remove the double quotation marks). You can see the JSON return data similar to the following:
{
  "page": 1,
  "total_results": 19772,
  "total_pages": 989,
  "results": [
    {
      "vote_count": 6503,
      "id": 299536,
      "video": false,
      "vote_average": 8.3,
      "title": "Avengers: Infinity War",
      "popularity": 350.154,
      "poster_path": "\/7WsyChQLEftFiDOVTGkv3hFpyyt.jpg",
      "original_language": "en",
      "original_title": "Avengers: Infinity War",
      "genre_ids": [
        12,
        878,
        14,
        28
      ],
      "backdrop_path": "\/bOGkgRGdhrBYJSLpXaxhXVstddV.jpg",
      "adult": false,
      "overview": "As the Avengers and their allies have continued to protect the world from threats too large for any one hero to handle, a new danger has emerged from the cosmic shadows: Thanos. A despot of intergalactic infamy, his goal is to collect all six Infinity Stones, artifacts of unimaginable power, and use them to inflict his twisted will on all of reality. Everything the Avengers have fought for has led up to this moment - the fate of Earth and existence itself has never been more uncertain.",
      "release_date": "2018-04-25"
    },
7. Create a data model or POJO class for this data type returned by the network. Create a new file under the models package and name it item\_model.dart and copy the following code into the file:
class ItemModel {
  int _page;
  int _total_results;
  int _total_pages;
  List<_Result> _results = [];

  ItemModel.fromJson(Map<String, dynamic> parsedJson) {
    print(parsedJson['results'].length);
    _page = parsedJson['page'];
    _total_results = parsedJson['total_results'];
    _total_pages = parsedJson['total_pages'];
    List<_Result> temp = [];
    for (int i = 0; i < parsedJson['results'].length; i++) {
      _Result result = _Result(parsedJson['results'][i]);
      temp.add(result);
    }
    _results = temp;
  }

  List<_Result> get results => _results;

  int get total_pages => _total_pages;

  int get total_results => _total_results;

  int get page => _page;
}

class _Result {
  int _vote_count;
  int _id;
  bool _video;
  var _vote_average;
  String _title;
  double _popularity;
  String _poster_path;
  String _original_language;
  String _original_title;
  List<int> _genre_ids = [];
  String _backdrop_path;
  bool _adult;
  String _overview;
  String _release_date;

  _Result(result) {
    _vote_count = result['vote_count'];
    _id = result['id'];
    _video = result['video'];
    _vote_average = result['vote_average'];
    _title = result['title'];
    _popularity = result['popularity'];
    _poster_path = result['poster_path'];
    _original_language = result['original_language'];
    _original_title = result['original_title'];
    for (int i = 0; i < result['genre_ids'].length; i++) {
      _genre_ids.add(result['genre_ids'][i]);
    }
    _backdrop_path = result['backdrop_path'];
    _adult = result['adult'];
    _overview = result['overview'];
    _release_date = result['release_date'];
  }

  String get release_date => _release_date;

  String get overview => _overview;

  bool get adult => _adult;

  String get backdrop_path => _backdrop_path;

  List<int> get genre_ids => _genre_ids;

  String get original_title => _original_title;

  String get original_language => _original_language;

  String get poster_path => _poster_path;

  double get popularity => _popularity;

  String get title => _title;

  double get vote_average => _vote_average;

  bool get video => _video;

  int get id => _id;

  int get vote_count => _vote_count;
}
I hope you can map this file with the JSON returned by the server. If not, you need to know that what we care about most is the postman in the Results class_ Path attribute, we will display the posters of all popular movies in the main page. The fromjason () method is used to obtain the decoded JSON and map the JSON data to the correct variables.
8. Now process the network request. Create a new file under the resources package and name it movie\_api\_provider.dart, copy the following code into the file, which will be explained later:
import 'dart:async';
import 'package:http/http.dart' show Client;
import 'dart:convert';
import '../models/item_model.dart';

class MovieApiProvider {
  Client client = Client();
  final _apiKey = 'your_api_key';

  Future<ItemModel> fetchMovieList() async {
    print("entered");
    final response = await client
        .get("http://api.themoviedb.org/3/movie/popular?api_key=$_apiKey");
    print(response.body.toString());
    if (response.statusCode == 200) {
      // If the call to the server was successful, parse the JSON
      return ItemModel.fromJson(json.decode(response.body));
    } else {
      // If that call was not successful, throw an error.
      throw Exception('Failed to load post');
    }
  }
}
Note: move\_ api\_ provider. In dart file_ Replace the value of apiKey with your API key, otherwise you will not be able to request data.
The fetchMovieList() method is used to initiate a network request to the server API. If the network request is successful, a Feature ItemModel object; Otherwise, an exception will be thrown.
9. Create a new file under the resource package and name it repository dart. Copy the following code into the file:
import 'dart:async';
import 'movie_api_provider.dart';
import '../models/item_model.dart';

class Repository {
  final moviesApiProvider = MovieApiProvider();

  Future<ItemModel> fetchAllMovies() => moviesApiProvider.fetchMovieList();
}
Movie is imported into the file\_ api\_ provider. Dart and called the fetchMovieList() method. The Repository class is the central point of data flow to the BLOC.
10. The following part is a little complicated to implement bloc logic. Create a new file under the blocs package and name it movies_bloc.dart . Copy the following code into the file, which will be explained in detail later:
import '../resources/repository.dart';
import 'package:rxdart/rxdart.dart';
import '../models/item_model.dart';

class MoviesBloc {
  final _repository = Repository();
  final _moviesFetcher = PublishSubject<ItemModel>();

  Observable<ItemModel> get allMovies => _moviesFetcher.stream;

  fetchAllMovies() async {
    ItemModel itemModel = await _repository.fetchAllMovies();
    _moviesFetcher.sink.add(itemModel);
  }

  dispose() {
    _moviesFetcher.close();
  }
}

final bloc = MoviesBloc();
Import rxdart package import 'package: rxdart / rxdart dart';, This will RxDart Import all relevant methods and classes into the file. Create a Repository object in the MoviesBloc class to access the fetchAllMovies() method. Create a PublishSubject Object, whose responsibility is to pass the ItemModel object (the data model class obtained from the server) added to it to the UI in the form of flow. In order to pass the ItemModel object as a stream, you need to create another method, allMovies(), whose return type is Observable (if you don't know about Observables, watch this video.). At the end of the file, a bloc object is created to facilitate the UI to access the MoviesBloc class in a singleton way.
If you don't know what responsive programming is, check out this simple explain . In short, as long as the server returns new data, we must update the UI. In order to simplify the update task, let the UI monitor the data changes from MoviesBloc and update the displayed content accordingly. This kind of data monitoring can be completed by using RxDart.
11. This is the last part. Create a file under the UI package and name it movie\_list.dart . Copy the following code into the file:
import 'package:flutter/material.dart';
import '../models/item_model.dart';
import '../blocs/movies_bloc.dart';

class MovieList extends StatelessWidget {
  @override
  Widget build(BuildContext context) {
    bloc.fetchAllMovies();
    return Scaffold(
      appBar: AppBar(
        title: Text('Popular Movies'),
      ),
      body: StreamBuilder(
        stream: bloc.allMovies,
        builder: (context, AsyncSnapshot<ItemModel> snapshot) {
          if (snapshot.hasData) {
            return buildList(snapshot);
          } else if (snapshot.hasError) {
            return Text(snapshot.error.toString());
          }
          return Center(child: CircularProgressIndicator());
        },
      ),
    );
  }

  Widget buildList(AsyncSnapshot<ItemModel> snapshot) {
    return GridView.builder(
        itemCount: snapshot.data.results.length,
        gridDelegate:
            new SliverGridDelegateWithFixedCrossAxisCount(crossAxisCount: 2),
        itemBuilder: (BuildContext context, int index) {
          return Image.network(
            'https://image.tmdb.org/t/p/w185${snapshot.data
                .results[index].poster_path}',
            fit: BoxFit.cover,
          );
        });
  }
}
Interestingly, this class does not use StatefulWidget, but uses a StreamBuilder, which can update the UI like StatefulWidget.
One thing to point out here is that I called the network request in the build method. This should not be because the build(context) method will be called multiple times. However, as articles are getting longer and more complex, in order to keep it simple, the network request is still invoked in the build(context) method. Later, I will update this article to make network calls in a better way.
As I said, the MoviesBloc class passes new data as a stream. To handle streams, there is a good built-in class, StreamBuilder, which listens to incoming streams and updates the UI accordingly. StreamBuilder needs a stream parameter. What is passed here is the allMovies() method of MovieBloc, because allMovies() returns a stream. When a data stream comes, StreamBuilder will re render the Widget with the latest data, which contains the ItemModel object. Of course, you can use any Widget to display any data in the data object (this is your creativity). Here, a GridView is used to display all posters in the ItemModel object list. The output of the final product is as follows:
At the end of the article, guys, it's great that you can stick to the end. I hope you like this article. If you have any questions or questions, please contact LinkedIn or Twitter Contact me. Please enjoy this article and don't save your applause and comments.
If you need complete source code, please visit the website of this project githut repository