----Introduction to JDBC and simple operation of adding, deleting and modifying database
Introduction:
[text]
1, Introduction of JDBC
1. JDBC concept
JDBC: Java Database Connection refers to database connection (any database supports JDBC connection). It is a common interface independent of specific database management system and general sql database access and operation. It is a set of standards specially provided in java for operating databases. If all database manufacturers want to support java, they must support this standard. Since it is a standard, JDBC is actually a set of interfaces to access the database.
2. Common operation classes / interfaces
Connection interface, Statement interface, Preparedstatement interface, ResultSet interface, CallableStatement interface, DriverManager class.
3. JDBC application steps
1. Register and load a driver
2. Create a database Connection
3. Construct SQL statements
4. Create statement and send sql statement
5. Execute sql statement
6. Processing sql results
7. Close the statement and connection
2, Driver download:
According to the definition in the previous paragraph, we understand that java defines the JDBC interface and the database implements this interface. Different manufacturers have different implementations of JDBC, so manufacturers should provide their own database drivers for applications to access. The application program is only accessed through its own set of JDBC interface, and then the driver implements this interface, so that the driver can call the database. So we finally understand this sentence: the driver is provided and downloaded by the database provider.
In Java, the driver is provided in the form of jar package. The download address of MySQL driver is: http://dev.mysql.com/downloads/
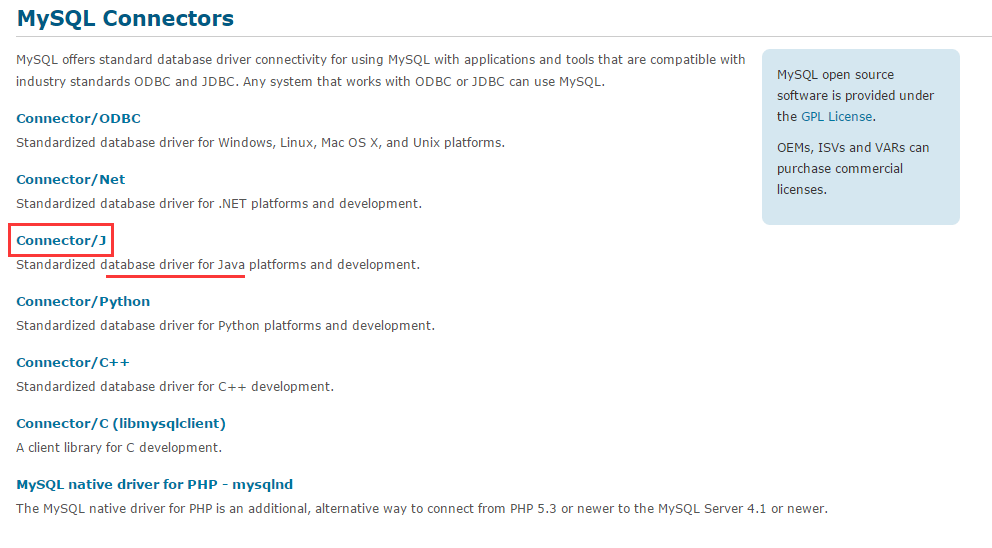
In the above figure, select the version of "Connector/J" to download, and the next interface pops up. Let's select the platform to download: if you select the windows platform, the interface is as follows:
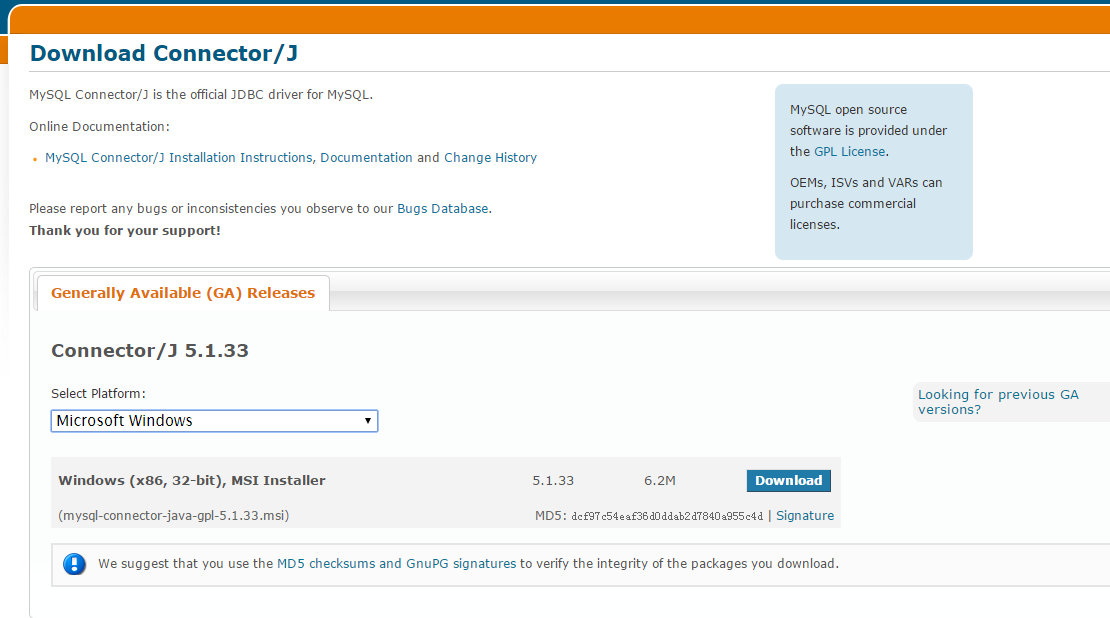
If cross platform is selected, the interface will look like this:
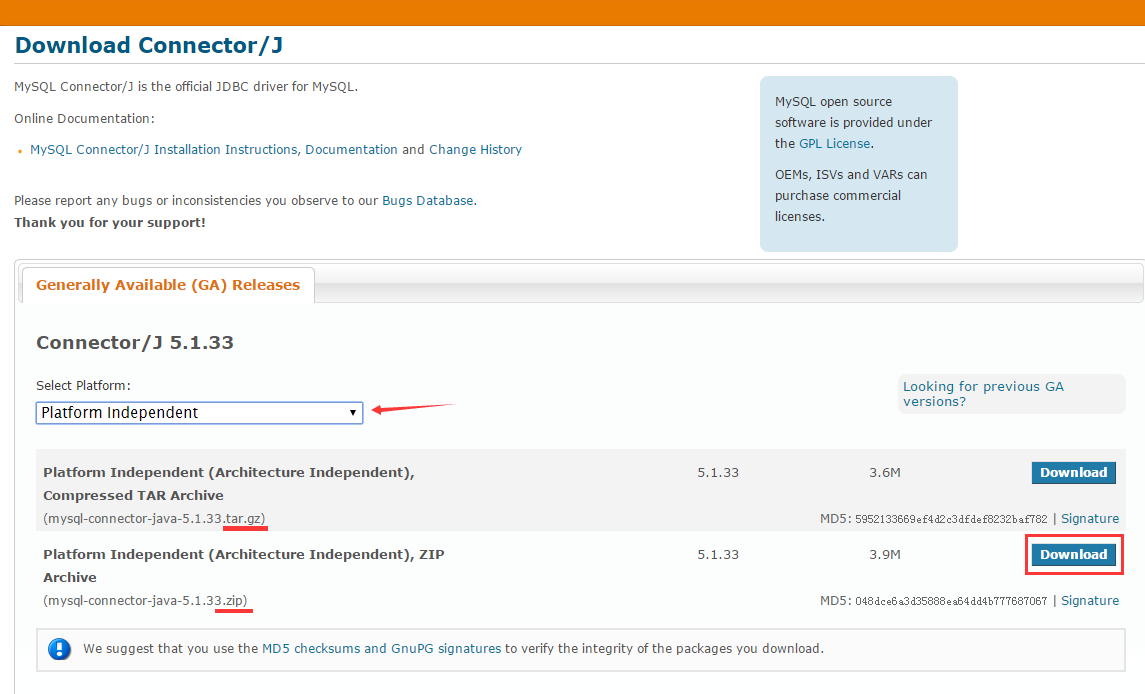
In the figure above, the first version is the compressed package of Linux platform and the second is the compressed package of Windows platform. Then we choose the red box in the figure above to download:
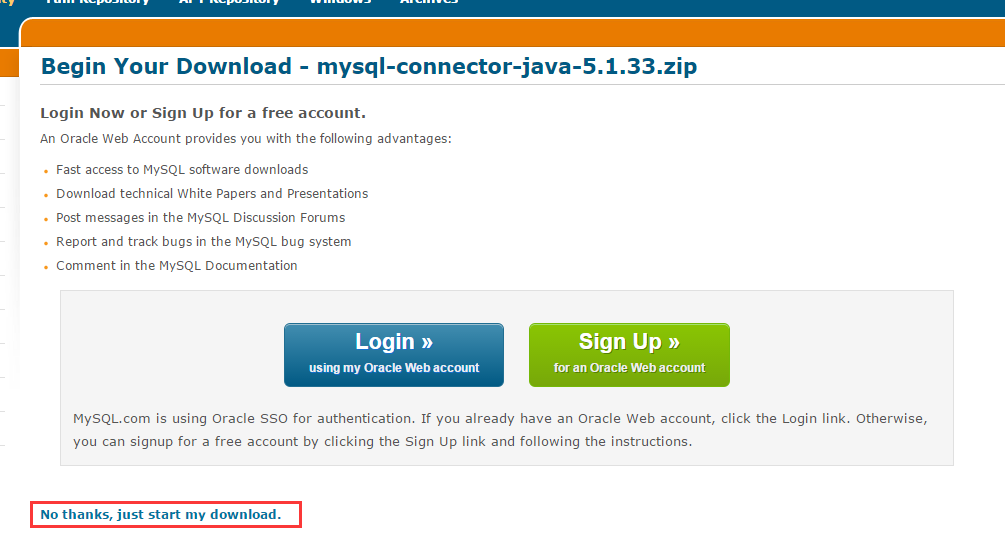
In the figure above, you can download directly without registering. After downloading, unzip:
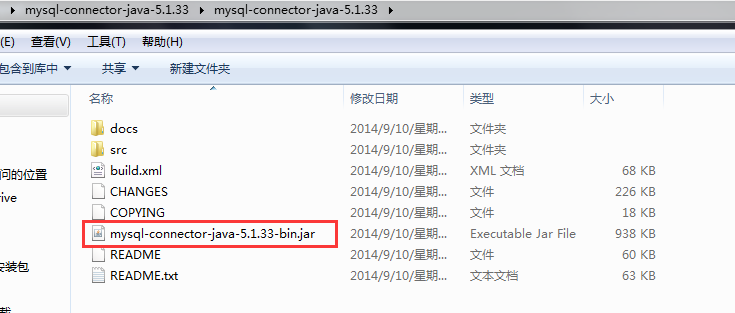
In the above figure, mysql-connector-java-5.1.33-bin. In the red box Jar is the package we need.
3, JDBC implements simple addition, deletion and modification operations
1. Preparations before JDBC operation
2. Implement insert operation
3. Implement update operation
4. Implement delete operation
5. Code optimization (written as a tool class): replace fields with variables
1. Preparations before JDBC operation:
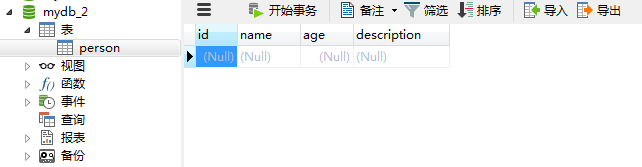
First create the database table: person. Fields: id, name, age, description. The commands for creating tables are as follows:
CREATE TABLE person(
id int primary key auto_increment,
name varchar(20),
age int(2),
description varchar(100)
);
The empty table created is as follows:
Then import the database driver package:
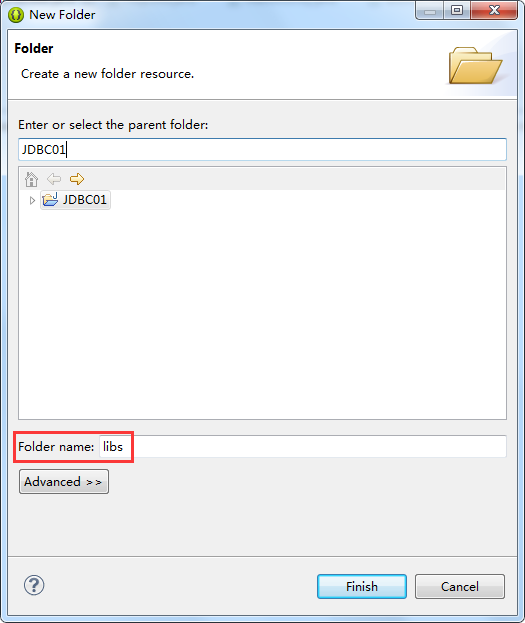
Open eclipse, create a new Java project JDBC01, and then create a new folder libs under the root directory:
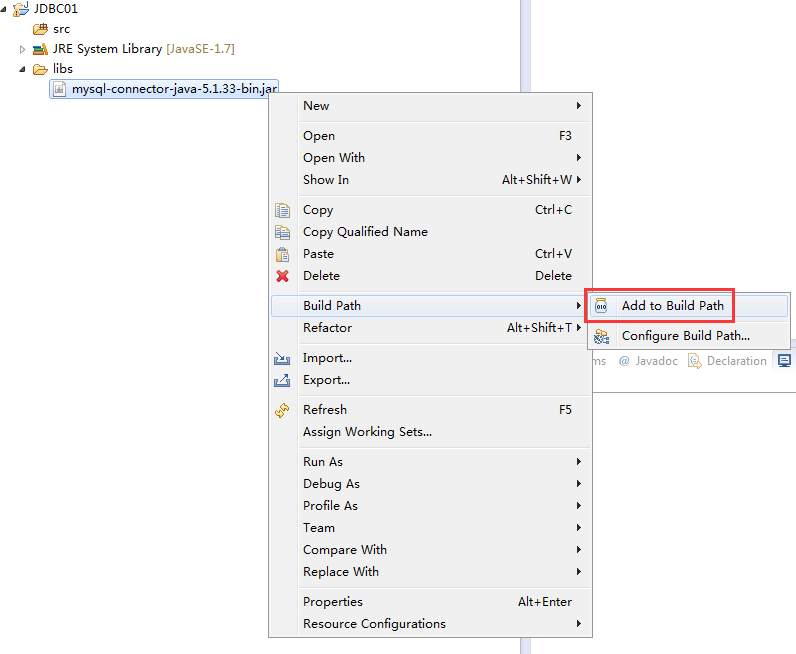
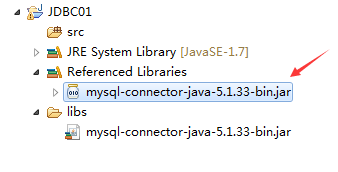
Then copy the previously downloaded driver package mysql-connector-Java-5.1.33-bin Jar, paste it into the libs directory, and then go to the most critical step: add the Java package to the Build path of the project, as shown in the following figure:
If it takes effect, one more file will appear: (at the arrow in the figure below)
2. Implement insert operation:
The steps are as follows:
1. Load database driver: class Forname (driver class);
2. Obtain the database connection object through the user name, password and connection address url: connection connction = drivermanager Getconnection (connection address, url, user name, password). Each database has a specified url. The same format is as follows: jdbc:mysql://ip Address: port number / database name.
3. Construct the inserted SQL statement. Note: in Java programs, SQL statements are used in the form of strings. The program does not recognize this SQL statement. After it is transmitted to the database, the database will recognize it.
4. Create statement instance: statement stmt = conjunction createStatement(). Statement is the carrier used to send SQL statements. Because Java code cannot be parsed, it should be handed over to the database for parsing.
5. Execute insert SQL statement: stmt executeUpdate(sql). The execution here is to send SQL statements. The return value is of type int, indicating how many records have been updated.
6. Close connection: stmt close(), connnction.close(). Closing is to free up resources.
Note: this step is a popular usage and can be used as a template. Let's take an example.
Create a new java class in the project file as the main program:
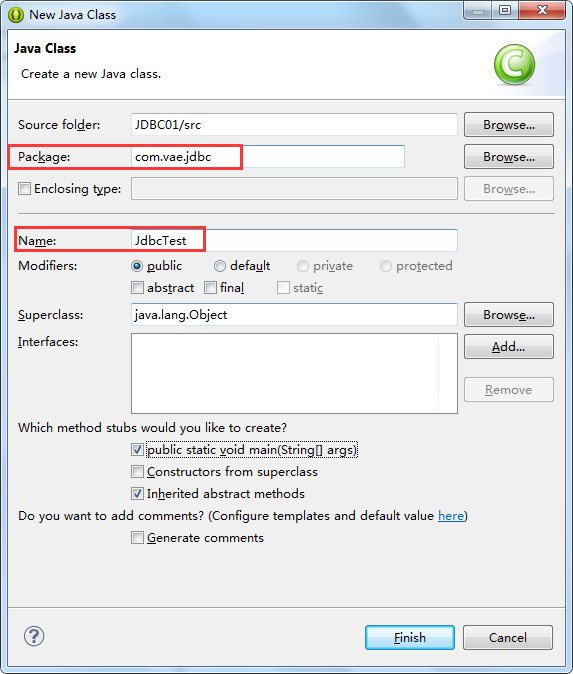
JdbcTest. The complete Java code is as follows: (the comments are very detailed)
Copy code
1
 package com.vae.jdbc;
 2
 3 import java.sql.Connection;
 4 import java.sql.DriverManager;
 5 import java.sql.SQLException;
 6 import java.sql.Statement;
 7
 8 public class JdbcTest {
 9
10     /**
11      * @param args
12      */
13
14     //Database connection address
15     private final static String URL = "jdbc:mysql://localhost:3306/mydb_2";
16     //user name
17     public final static String USERNAME = "root";
18     //password
19     public final static String PASSWORD = "smyh";
20     //Loaded driver class (this class is in the jar package we imported)
21     public final static String DRIVER = "com.mysql.jdbc.Driver";
22
23     public static void main(String[] args) {
24         // TODO Auto-generated method stub
25         insert();
26     }
27
28
29     //Method: insert data
30     public static void insert(){
31         try {
32             //1. Load database driver
33             Class.forName(DRIVER);
34
35             //2. Get database connection
36             Connection connection  = DriverManager.getConnection(URL, USERNAME, PASSWORD);
37
38             //3. Construct SQL statements (insert specific data)
39             String sql = "insert into person(name,age,description)values('Life one',22,'Where I learn, my blog will write')";
40
41             //4. Construct a Statement instance (the carrier used to send SQL statements)
42             Statement state = connection.createStatement();
43
44             //5. Execute SQL statements (actually sending SQL statements to the database)
45             state.executeUpdate(sql);
46
47             //6. Close connection (free resources)
48             state.close();
49             connection.close();
50
51             System.out.println("insert success");
52
53
54         } catch (ClassNotFoundException e) {
55             e.printStackTrace();
56         } catch (SQLException e) {
57             e.printStackTrace();
58         }
59
60     }
61
62 }
Copy code
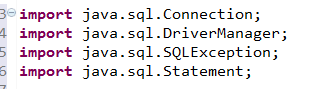
Note that when the program imports packages, the following packages are imported:
Code interpretation:
The URL in line 15 represents the address to connect to the database. The naming format is as follows: url = "jdbc:mysql://ip Address: port number / database name ". If it is local, the IP address can be written as localhost.
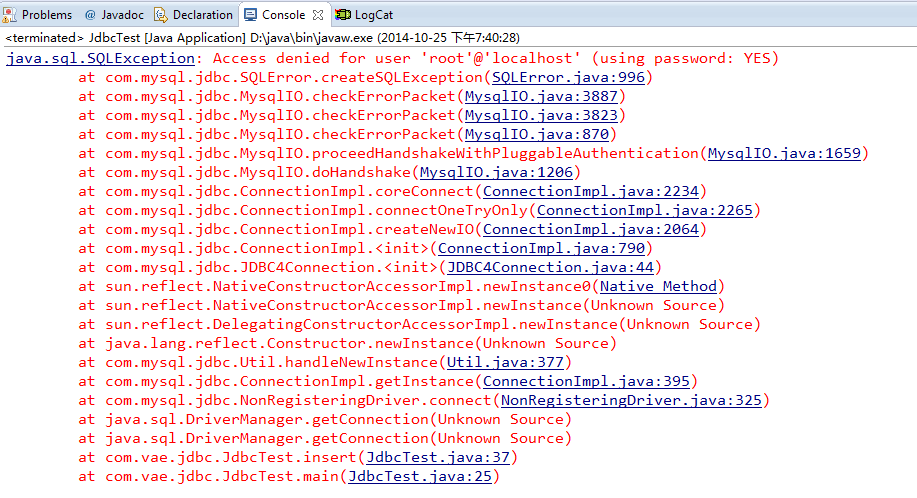
Lines 17 and 19: refer to the user name and password of the database. If the input is wrong, an error will be reported as follows:
Line 21: the name of the driver class we loaded is: com mysql. jdbc. Driver, in fact, it refers to com.com in the jar package mysql/jdbc/Driver. Class file.
After the program runs successfully, the background will output:

We went to the database and found that the data was really filled in:
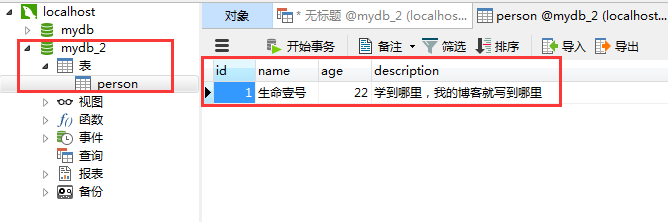
Finally, the connection between Java code and database is realized, and the task is completed.
3. Implement update operation:
The operation of inserting data is different from that of updating data
The steps are as follows:
The update operation method is as follows: (please refer to the above code for code explanation)
Copy code
 1   //Method: update data
 2     public static void update(){
 3         try {
 4             Class.forName(DRIVER);
 5             Connection connection = DriverManager.getConnection(URL, USERNAME, PASSWORD);
 6             String sql = "update person set age=24 where id=1";
 7             Statement state = connection.createStatement();
 8             state.executeUpdate(sql);
 9             state.close();
10             connection.close();
11             System.out.println("update success");
12         } catch (ClassNotFoundException e) {
13             e.printStackTrace();
14         } catch (SQLException e) {
15             e.printStackTrace();
16         }
17     }
Copy code
The core code is line 6. We changed the previous age of 22 to 24. After the program runs, the database will be updated accordingly.
4. Implement delete operation
Similarly, compared with the above insert operation, the sql statement is only different (because inserting data, updating data and deleting data are actually updates)
The method of deleting is as follows:
Copy code
```java
 1     //Method: delete operation
 2     public static void delete(){
 3         try {
 4             Class.forName(DRIVER);
 5             Connection connection = DriverManager.getConnection(URL, USERNAME, PASSWORD);
 6             String sql = "delete from person where id=1";
 7             Statement state = connection.createStatement();
 8             state.executeUpdate(sql);
 9             state.close();
10             connection.close();
11             System.out.println("delete success");
12         } catch (ClassNotFoundException e) {
13             e.printStackTrace();
14         } catch (SQLException e) {
15             e.printStackTrace();
16         }
17     }
Copy code
 The core code is lines 06 and 08.

5,Code optimization (written as a tool class): replace fields with variables

The operations of adding and deleting the above are directly in sql Specific parameters are put into it, but it is possible that such parameters are passed in from the outside, so a more convenient way to write them is to change the parameters into variables. Let's take the insertion operation as an example:

Copy code
 1

```java
```java
     //Method: insert data (code optimization)
 2     public static void insert2(){
 3         String name = "Life II";`Insert code slice here`
 4         int age  = 22;
 5         String description = "Ha ha, I am the optimized code";
 6         try {
 7             Class.forName(DRIVER);
 8             Connection connection  = DriverManager.getConnection(URL, USERNAME, PASSWORD);
 9             //Splicing SQL statements
10             String sql = "insert into person(name,age,description)values('"+name+"',"+age+",'"+description+"')";  //Pay attention to the format of splicing
11             Statement state = connection.createStatement();
12             state.executeUpdate(sql);
13             state.close();
14             connection.close();
15             System.out.println("success.");
16
17
18         } catch (ClassNotFoundException e) {
19             e.printStackTrace();
20         } catch (SQLException e) {
21             e.printStackTrace();
22         }
23
24     }
Copy code
 The core code is line 10, here sql The statement appears in the form of variable, which is in line with the characteristics of tool class. Pay attention to its splicing format~~~Take it apart and have a closer look:

String sql = "insert into person(name,age,description)values(' "+name+" ',      "+age+",    '  "+description+"  ')";

After running, the effect is as follows:

97f4bb25-e4b6-460a-94bb-26350c8a73ea

In fact, this splicing method is very bad: it is troublesome and unsafe. The query operation and detailed explanation of the database will be learned in the next article. Come on!!!

Oh, by the way, finally post the full version of all the codes above:

Copy code


```java
1 package com.vae.jdbc;
  2
  3 import java.sql.Connection;
  4 import java.sql.DriverManager;
  5 import java.sql.SQLException;
  6 import java.sql.Statement;
  7
  8 public class JdbcTest {
  9
 10     /**
 11      * @param args
 12      */
 13
 14     //Database connection address
 15     private final static String URL = "jdbc:mysql://localhost:3306/mydb_2";
 16     //user name
 17     public final static String USERNAME = "root";
 18     //password
 19     public final static String PASSWORD = "smyh";
 20     //Loaded driver class (this class is in the jar package we imported)
 21     public final static String DRIVER = "com.mysql.jdbc.Driver";
 22
 23     public static void main(String[] args) {
 24         // TODO Auto-generated method stub
 25         insert();
 26         //update();
 27         //delete();
 28         //insert2();
 29     }
 30
 31
 32     //Method: insert data
 33     public static void insert(){
 34         try {
 35             //1. Load database driver
 36             Class.forName(DRIVER);
 37
 38             //2. Get database connection
 39             Connection connection  = DriverManager.getConnection(URL, USERNAME, PASSWORD);
 40
 41             //3. Construct SQL statements (insert specific data)
 42             String sql = "insert into person(name,age,description)values('Life one',22,'Where I learn, my blog will write')";
 43
 44             //4. Construct a Statement instance (the carrier used to send SQL statements)
 45             Statement state = connection.createStatement();
 46
 47             //5. Execute SQL statements (actually sending SQL statements to the database)
 48             state.executeUpdate(sql);
 49
 50             //6. Close connection (free resources)
 51             state.close();
 52             connection.close();
 53
 54             System.out.println("insert success");
 55
 56
 57         } catch (ClassNotFoundException e) {
 58             e.printStackTrace();
 59         } catch (SQLException e) {
 60             e.printStackTrace();
 61         }
 62
 63     }
 64
 65
 66     //Method: insert data (code optimization)
 67     public static void insert2(){
 68         String name = "Life number two";
 69         int age  = 22;
 70         String description = "Ha ha, I am the optimized code";
 71         try {
 72             Class.forName(DRIVER);
 73             Connection connection  = DriverManager.getConnection(URL, USERNAME, PASSWORD);
 74             //Splicing SQL statements
 75             String sql = "insert into person(name,age,description)values('"+name+"',"+age+",'"+description+"')";  //Pay attention to the format of splicing
 76             Statement state = connection.createStatement();
 77             state.executeUpdate(sql);
 78             state.close();
 79             connection.close();
 80             System.out.println("success.");
 81
 82
 83         } catch (ClassNotFoundException e) {
 84             e.printStackTrace();
 85         } catch (SQLException e) {
 86             e.printStackTrace();
 87         }
 88
 89     }
 90
 91
 92   //Method: update data
 93     public static void update(){
 94         try {
 95             Class.forName(DRIVER);
 96             Connection connection = DriverManager.getConnection(URL, USERNAME, PASSWORD);
 97             String sql = "update person set age=24 where id=1";
 98             Statement state = connection.createStatement();
 99             state.executeUpdate(sql);
100             state.close();
101             connection.close();
102             System.out.println("update success");
103         } catch (ClassNotFoundException e) {
104             e.printStackTrace();
105         } catch (SQLException e) {
106             e.printStackTrace();
107         }
108     }
109
110
111     //Method: delete operation
112     public static void delete(){
113         try {
114             Class.forName(DRIVER);
115             Connection connection = DriverManager.getConnection(URL, USERNAME, PASSWORD);
116             String sql = "delete from person where id=1";
117             Statement state = connection.createStatement();
118             state.executeUpdate(sql);
119             state.close();
120             connection.close();
121             System.out.println("delete success");
122         } catch (ClassNotFoundException e) {
123             e.printStackTrace();
124         } catch (SQLException e) {
125             e.printStackTrace();
126         }
127     }
128
129 }
Copy code