Author: Grey
Original address: Use KeepAlived to implement a highly available DR model
operating system
- CentOS 8
Related tools
- keepalived
- ipvsadm
- httpd
preparation
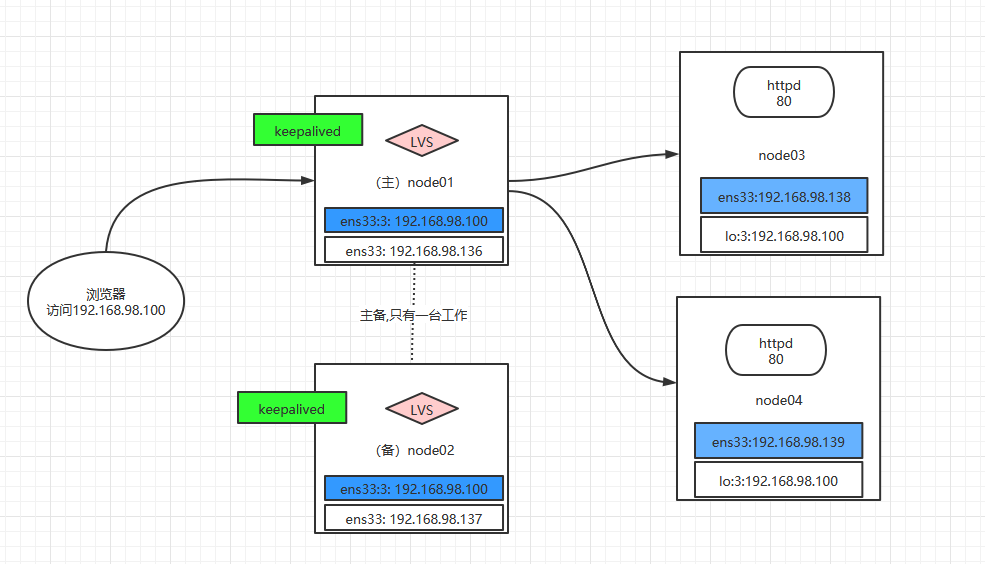
Prepare four nodes, as shown in the figure above, Node01 ~ Node04. By default, you will install Linux on VMWare and configure relevant information. If this content is not clear, you can refer to it Linux Installation, snapshot, clone (based on CentOS 8)
Experimental effect
We will configure LVS on node01 and Node02, and node01 and Node02 are active and standby. Node01 is active and Node02 is standby. When node01 hangs, Node02 can automatically top. Node01 and Node02 are the entry points for receiving requests. Next, the requests will be requested to the back-end Node04 and Node05 services in a load balancing manner.
Example diagram

Operation steps
Prepare services for Node03 and Node04
Execute the following commands on Node03 and Node04 respectively:
yum install -y httpd
After httpd is installed, the following positions are displayed on Node03
/var/www/html
Create a new page named index.html, and enter the following in index.html:
<h>from node03</h>
In the same location as Node04, create an index.html file with the following contents:
<h>from node04</h>
You can quickly copy the index.html of Node03 to Node04 in the following way, and in the var/www/html of Node03
Directory, execute
scp index.html root@192.168.98.139:`pwd`
among
root@192.168.98.139
Is the information corresponding to your node03, and then you can copy the index.html of node03 to the corresponding position of node04.
Then change the index.html information of Node04.
After preparing the index.html page, because the default port of httpd service is 80, we need to open the access permission of port 80 on Node03 and Node04, and execute the following two commands on Node03 and Node04 respectively:
firewall-cmd --permanent --add-port=80/tcp
firewall-cmd --reload
We can start the httpd service on Node04 and Node03, and execute on Node03 and Node04 respectively:
systemctl start httpd
Verify successful startup

Configure Node03 and Node04 kernel parameters
arp_ignore and ARP_ The configuration of the two kernel parameters of announcement is described as follows:
arp_ignore
Defines the response level when an ARP request is received
- 0: respond as long as the locally configured has a corresponding address;
- 1: Respond only when the requested target (MAC) address configuration request reaches the interface;
arp_announce
Define the notification level when announcing your address to the outside
- 0: announce any address on any local interface;
- 1: Attempting to announce only the address matching its network to the target network;
- 2: Announce only to the network matching the address on the local interface;
Since Node03 and Node04 need to Hide IP from the outside and be visible to the inside, we need to configure the following parameters on Node03 and Node04:
echo 1  >  /proc/sys/net/ipv4/conf/ens33/arp_ignore
echo 1  >  /proc/sys/net/ipv4/conf/all/arp_ignore
echo 2 > /proc/sys/net/ipv4/conf/ens33/arp_announce
echo 2 > /proc/sys/net/ipv4/conf/all/arp_announce
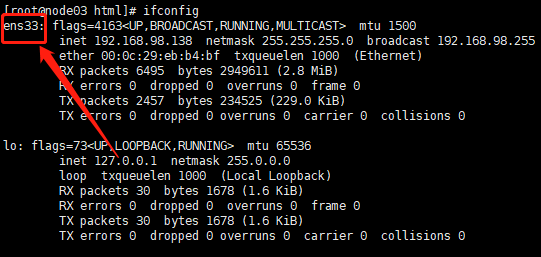
PS: the default network card name of CentOS8 is ens33
You can view it through the ifconfig command

Configure the loop interfaces of Node03 and Node04
To realize the internal visibility and external hiding of IP, you also need to configure the loop interface on Node03 and Node04, and execute it on Node04 and Node03 respectively
ifconfig lo:3 192.168.98.100 netmask 255.255.255.255
Then execute in Node03 and Node04 respectively
ifconfig
Check whether it is added successfully

Since then, everything on Node03 and Node04 has been configured.
Next, start configuring Node01 and Node02.
Install ipvsadm
Execute the following commands on Node01 and Node02
yum install -y ipvsadm
Install keepalived
Under CentOS8, I tried to install keepalived using yum. After configuration, I started keepalived, but the client could not request it.
Helpless, try Compile and install keepalived , problem solving.
The steps are as follows: execute on Node01 and Node02 respectively, and install some front-end tools
yum install curl gcc openssl-devel libnl3-devel net-snmp-devel make tar ipvsadm -y
Then download The latest keepalived source code
curl --progress https://www.keepalived.org/software/keepalived-2.2.2.tar.gz | tar xz
cd keepalived-2.2.2
./configure --prefix=/usr/local/keepalived-2.2.2
make
make install
Modifying the keepalived configuration
On Node01, back up the default keepalived configuration and execute the following command
cd /usr/local/keepalived-2.2.2/etc/keepalived
cp keepalived.conf keepalived.conf.bak
Then start editing the keepalived.conf file and configure it to the following information
On Node01:
! Configuration File for keepalived

global_defs {
   notification_email {
     acassen@firewall.loc
     failover@firewall.loc
     sysadmin@firewall.loc
   }
   notification_email_from Alexandre.Cassen@firewall.loc
   smtp_server 192.168.200.1
   smtp_connect_timeout 30
   router_id LVS_DEVEL
   vrrp_skip_check_adv_addr
   vrrp_strict
   vrrp_garp_interval 0
   vrrp_gna_interval 0
}

vrrp_instance VI_1 {
    state MASTER
    interface ens33
    virtual_router_id 51
    priority 100
    advert_int 1
    authentication {
        auth_type PASS
        auth_pass 1111
    }
    virtual_ipaddress {
       192.168.98.100/24 dev ens33 label ens33:3
    }
}

virtual_server 192.168.98.100 80 {
    delay_loop 6
    lb_algo rr
    lb_kind DR
    persistence_timeout 0
    protocol TCP

    real_server 192.168.98.138 80 {
        weight 1
        HTTP_GET {
            url {
              path /
              status_code 200
            }
            connect_timeout 3
            retry 3
            delay_before_retry 3
        }
    }
    real_server 192.168.98.139 80 {
        weight 1
        HTTP_GET {
            url {
              path /
              status_code 200
            }
            connect_timeout 3
            retry 3
            delay_before_retry 3
        }
    }
}
On Node02
! Configuration File for keepalived

global_defs {
   notification_email {
     acassen@firewall.loc
     failover@firewall.loc
     sysadmin@firewall.loc
   }
   notification_email_from Alexandre.Cassen@firewall.loc
   smtp_server 192.168.200.1
   smtp_connect_timeout 30
   router_id LVS_DEVEL
   vrrp_skip_check_adv_addr
   vrrp_strict
   vrrp_garp_interval 0
   vrrp_gna_interval 0
}

vrrp_instance VI_1 {
    state BACKUP
    interface ens33
    virtual_router_id 51
    priority 50
    advert_int 1
    authentication {
        auth_type PASS
        auth_pass 1111
    }
    virtual_ipaddress {
       192.168.98.100/24 dev ens33 label ens33:3
    }
}

virtual_server 192.168.98.100 80 {
    delay_loop 6
    lb_algo rr
    lb_kind DR
    persistence_timeout 0
    protocol TCP

    real_server 192.168.98.138 80 {
        weight 1
        HTTP_GET {
            url {
              path /
              status_code 200
            }
            connect_timeout 3
            retry 3
            delay_before_retry 3
        }
    }
    real_server 192.168.98.139 80 {
        weight 1
        HTTP_GET {
            url {
              path /
              status_code 200
            }
            connect_timeout 3
            retry 3
            delay_before_retry 3
        }
    }
}
Specify the keepalived configuration file and execute on Node01 and Node02 respectively:
cd /usr/local/keepalived-2.2.2/etc/sysconfig
Modify keepalived file
# Options for keepalived. See `keepalived --help' output and keepalived(8) and
# keepalived.conf(5) man pages for a list of all options. Here are the most
# common ones :
#
# --vrrp               -P    Only run with VRRP subsystem.
# --check              -C    Only run with Health-checker subsystem.
# --dont-release-vrrp  -V    Dont remove VRRP VIPs & VROUTEs on daemon stop.
# --dont-release-ipvs  -I    Dont remove IPVS topology on daemon stop.
# --dump-conf          -d    Dump the configuration data.
# --log-detail         -D    Detailed log messages.
# --log-facility       -S    0-7 Set local syslog facility (default=LOG_DAEMON)
#

KEEPALIVED_OPTIONS="-D -f /usr/local/keepalived-2.2.2/etc/keepalived/keepalived.conf"
In keepalived_ The - f option is added in options to specify the location of kept.conf
Then open the 80 port access permission of Node01 and Node02, and execute the following commands on Node01 and Node02 respectively
firewall-cmd --permanent --add-port=80/tcp
firewall-cmd --reload
Start keepalived
Execute on Node01
systemctl start keepalived
Verify: access via browser: http://192.168.98.100
And refresh the following pages from time to time to display the following results:

Execute on Node01
ipvsadm -lnc
Can see

Execute on Node02
systemctl start keepalived
Then execute on Node02
ipvsadm -lnc
If the content is empty, Node02 is a standby node
At this point, we stop Node01 and execute on Node01
systemctl stop keepalived
Continue to visit the browser, and the service can still be accessed

It is verified that the primary node (Node01) is hung and the standby node (Node02) is on the top
At this point, execute on Node02
ipvsadm -lnc
You can see the connection

This indicates that the standby machine provides services normally.
At this time, start the master node (Node01) and execute the following on Node01:
systemctl restart keepalived
Normal service

Execute on the master node (Node01)
ipvsadm -lnc
Shows the connection

This indicates that the primary node has returned to normal.