Chapter II
This chapter mainly creates 3D models, which are divided into three JS built-in basic model and external import model
Basic model
The basic solid model is probably the solid shape of the foundation such as cube, cuboid and ball. First, the floor and wall of our conference room are actually the basic cuboid. For this basic solid model, we mainly use three Boxbuffergeometry object:
metope
As for the wall, this time it is a solid wall, so it is relatively simple. I have roughly divided it into two steps
Create a box
export const addCubewall = function (
  width,
  height,
  depth,
  angle,
  material,
  x,
  y,
  z,
  name
) {
  let cubeGeometry = new THREE.BoxGeometry(width, height, depth);
  let cube = new THREE.Mesh(cubeGeometry, material);
  cube.position.x = x;
  cube.position.y = y;
  cube.position.z = z;
  cube.rotation.y += angle * Math.PI; //-Counterclockwise rotation, + clockwise
  cube.name = name;
  return cube;
};
I took out this code as a public method. From this code, we can see that the basic conditions for creating a box are width, height, thickness, material, orientation and angle. The specific attributes can go to three JS official website.
Mesh is composed of geometry and material.
Creating wall faces
When you create a box, it's actually very simple to create a wall. You just need to change the attribute value and go directly to the code
	data() {
	  // Foundation size
	  baseX: 600, // Foundation length
      baseY: 1, // High foundation
      baseZ: 240, // Foundation width
 	}
	createWell(long, width, height, x, y, z, name) {
      let well = createMetry.addCubewall(
        long,
        height,
        width,
        0,
        new THREE.MeshPhongMaterial({
          color: 0xaaaaaa,
          opacity: 0.5,
          transparent: true,
        }),
        x,
        y,
        z,
        name
      );
      this.scene.add(well);
    },
    // initialization
    init() {
      this.createWell(
       	this.baseY,
        this.baseZ,
        100,
        this.baseX / 2,
        -10,
        0,
        "East wall"
      );
      this.createWell(
        this.baseX,
        this.baseY,
        100,
        0,
        -10,
        -this.baseZ / 2,
        "South wall"
      );
      this.createWell(
        this.baseY,
        this.baseZ,
        100,
        -this.baseX / 2,
        -10,
        0,
        "West wall"
      );
      this.createWell(
        this.baseX,
        this.baseY,
        100,
        0,
        -10,
        this.baseZ / 2,
        "North wall"
      );
The above function is to create the wall, then call it in the initialization function, adjust the different attributes according to the different positions of the four walls, this is relatively simple, so we can directly look at the code.
Then I'll talk about the process of creating a geometry:
1. First, you need to create a geometry type, three JS provides many objects for this. Creating geometric types generally requires elements such as length, width, thickness, angle and orientation. Of course, columns or irregular geometry are made of other attributes. Here is just an example of a box.
2. Next, create materials, and there are many types of materials. The MeshPhongMaterial used in this article is a material that can be highlighted. You can see other types on the official website.
3. With the geometric type and material, you can create the network model mesh. After creation, you need to add the network model to our 3D Scene scene. add(Mesh)
floor
The creation of the floor is the same as that of the wall. It is still the basic solid model - cuboid. Without much talking, you can directly write the code
   createFloor() {
     let that = this;
     let geometry = new THREE.BoxBufferGeometry(
       this.baseX,
       this.baseY,
       this.baseZ
     );
     // Request picture resources
     this.textureLoader = new THREE.TextureLoader();
     this.textureLoader.load("/floor.png", function (texture) {
       texture.wrapS = THREE.RepeatWrapping;
       texture.wrapT = THREE.RepeatWrapping;
       texture.repeat.x = 10;
       texture.repeat.y = 5;
       let material = new THREE.MeshPhongMaterial({
         map: texture,
       });
       that.ground = new THREE.Mesh(geometry, material);
       that.ground.position.y = -60;
       that.scene.add(that.ground);
     });
   },
The process is the same as creating the wall, but we pasted a picture for the floor on this basis, and here we need to use thread One thing to note about the textureloader object is that if it is a vue project, the load method can be used normally. If it is a native project, remember a service to support requesting image resources.
With picture resources, the key is to assign this value to the map attribute in the floor material, that is, color map.
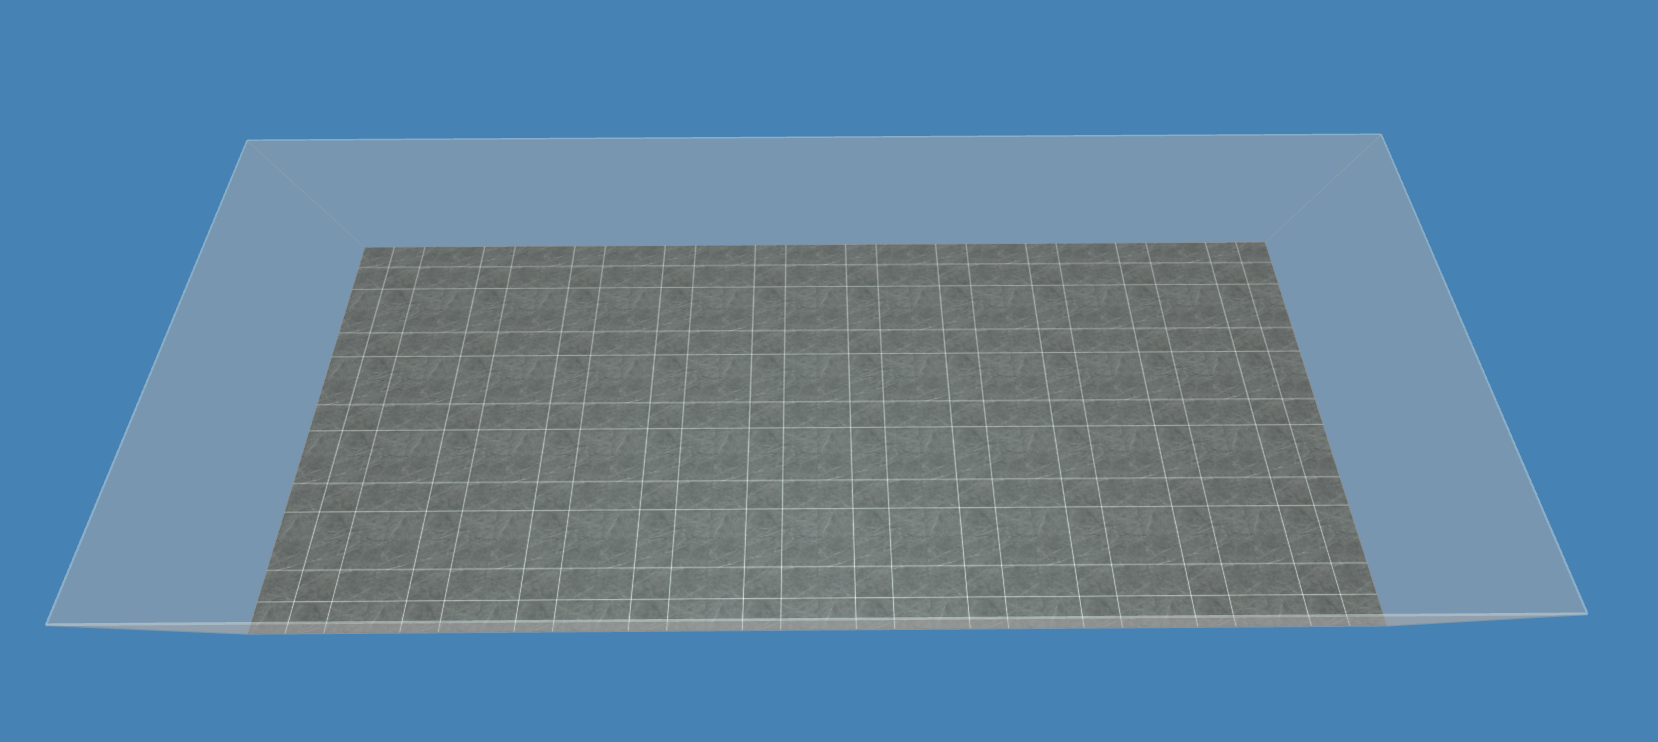
So we created the floor and wall
External model loading
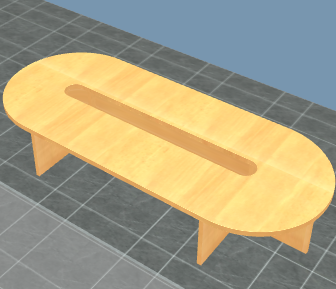
When we do 3D development, sometimes some complex models, if we use the basic model to splice, it will consume a lot of time. At this time, we can load some formed 3D models externally to meet our needs. Three.js loading external file formats include stl,obj,gltf,fbx, etc. next, I mainly give examples of obj and gltf I use
Load OBJ file
First, you need to import the plug-in OBJLoader. Import {OBJLoader} from "three / examples / JSM / loaders / OBJLoader"
There is also a plug-in mtlloader, import {mtlloader} from "three / examples / JSM / loaders / mtlloader"
When using obj files, we mainly need mtl and obj file, where obj file is the core, basically as long as it is loaded obj file can display the model, and mtl contains the material information of the model, such as the color of the model, mapping path, reflection mode and so on.
addObjItem() {
	 this.loader = new OBJLoader();
	 this.mat = new MTLLoader();
     let that = this;
     that.mat.load("/table/file.mtl", function (materials) {
       materials.preload();
       that.loader.setMaterials(materials);
       that.loader.load(
         "/table/file.obj",
         function (object) {
           object.position.set(0, 60, 0);
           object.scale.set(0.05, 0.05, 0.05);
           that.scene.add(object);
         }
         // function (xhr) {
         //   console.log((xhr.loaded / xhr.total) * 100 + "% loaded");
         // },
         // function (error) {
         //   console.log(error);
         // }
       );
     });
   },
Roughly explain the loading process, first request mtl file resource, replace the obtained material information with the material information of the currently created object, and then request obj file resource, add the acquired model to the 3D scene. Here is one thing to note: the size of the external model we load may be too large or too small compared with our scene, so we must use it according to this scale. The set () method is used to scale or enlarge the model
The first one is the callback function of loading progress, and the second one is the callback function of loading failure. It is suggested that when you use OBJ file for the first time, print the loading result and see its object structure.
Load GLTF file
First, you need to import the plug-in gltfloader. Import {gltfloader} from "three / examples / JSM / loaders / gltfloader"
Loading a gltf file is relatively simpler than an obj file because we only need to load one gltf file, and the process and loading obj file only load obj files are consistent, so you can directly enter the code
addGltfItem() {
      let that = this;
      let loader = new GLTFLoader();
      loader.load("/flat/model.gltf", function (gltf) {
        gltf.scene.position.set(0, 0, 95);
        gltf.scene.scale.set(16, 12, 12);
        that.scene.add(gltf.scene);
      });
    },
It should be noted here that although the process of loading GLTF file and loading OBJ file is very similar, the structure of the loaded object is different. For details, you can print and compare the loading results when using
summary
This chapter mainly explains the creation of the model, the basic geometric model and the import of external model files.
There are some specific attribute adjustments in the code in this article, which can be ignored when you look at it. Adjust these attributes according to your own needs