Container is another core concept of Docker. Simply put, a container is a running instance of an image.
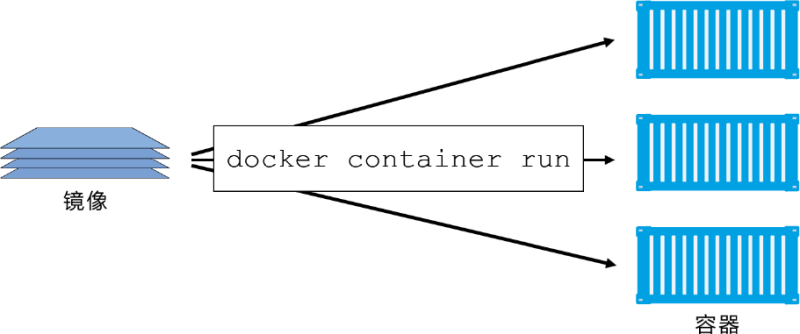
The difference is that the image is a static read-only file, while the container has a writable file layer required by the runtime. If the virtual machine is considered to be a complete set of operating system (including kernel, application running environment and other system environment) and applications running on it, the Docker container is a (or a group) of applications running independently and their necessary running environment.
Container is a component that directly provides application services. It is also the basis for Docker to realize rapid start and stop and efficient service performance.
Containers and virtual machines
Both containers and virtual machines depend on the host to run. The host can be a laptop, a physical server in the data center, or an instance of the public cloud.
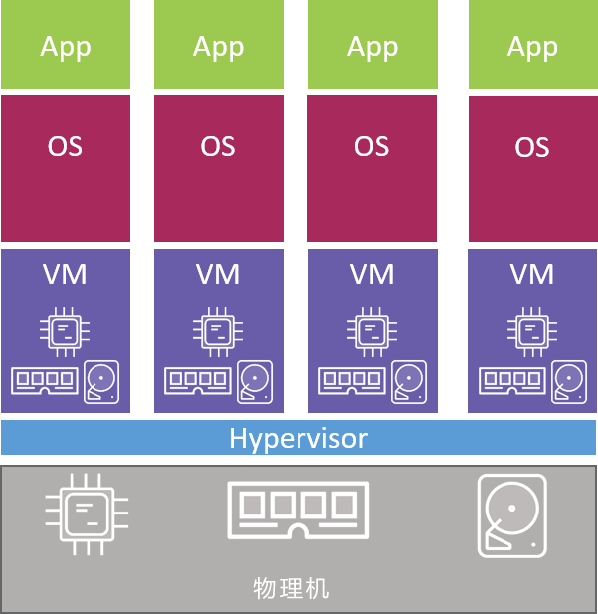
In the following example, assume that the host is a physical server that needs to run four business applications.
In the virtual machine model, first start the physical machine and start the Hypervisor boot program. Once the Hypervisor is started, it will occupy all the physical resources on the machine, such as CPU, RAM, storage and NIC.
The Hypervisor then divides these physical resources into virtual resources and looks exactly the same as the real physical resources.
The Hypervisor then packages these resources into a software structure called a virtual machine (VM). In this way, users can use these virtual machines and install operating systems and applications in them.
As mentioned earlier, you need to run four applications on the physical machine, so you need to create four virtual machines and install four operating systems on the Hypervisor, and then install four applications. When the operation is completed, the structure is shown in the figure below.
The container model is slightly different.
After the server starts, the selected operating system starts. In the Docker world, you can choose Linux or a new version of Windows whose kernel supports container primitives in the kernel.
Like the virtual machine model, OS also occupies all hardware resources. On the OS layer, you need to install a container engine (such as Docker).
The container engine can obtain system resources, such as process tree, file system and network stack, and then divide the resources into secure and isolated resource structures, which are called containers.
Each container looks like a real operating system in which applications can run. According to the previous assumptions, four applications need to be run on the physical machine.
Therefore, it is necessary to divide four containers and run an application in each container, as shown in the figure below.
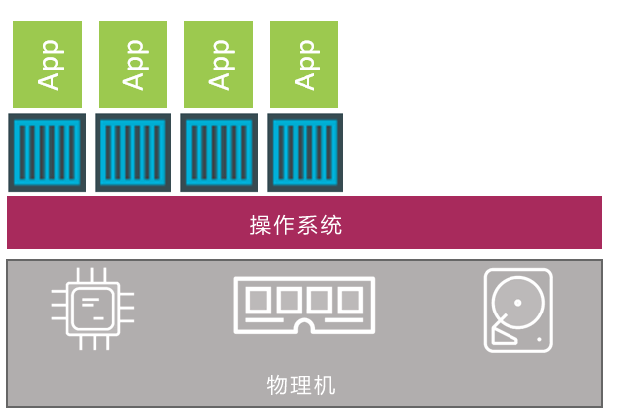
From a higher level, Hypervisor is Hardware Virtualization - Hypervisor divides hardware physical resources into virtual resources.
The container is OS Virtualization -- the container divides system resources into virtual resources.
1, View container docker ps
The docker ps command can be used to list information about Docker containers.
Usage:
docker ps [OPTIONS]

OPTIONS:
	No reference	The running container is displayed by default.
	-a		Displays all containers, including those that are not running.
	-f, --filter filter		Filter the displayed content according to conditions.
	--format	 Specifies the template file for the return value.
	-l		Displays recently created containers.
	-n		Lists the specified number of containers.
	--no-trunc	Do not truncate output containers ID Information (i.e. display complete container) ID Information).
	-q		In silent mode, only the container number is displayed.
	-s		Displays the total file size.
Container status
| created | Created |
|---|---|
| restarting | Restarting |
| running | In operation |
| removing | Migrating |
| paused | suspend |
| exited | sign out |
| dead | dead |
Show running containers
[root@docker ~]# docker ps
CONTAINER ID   IMAGE     COMMAND             CREATED         STATUS         PORTS      NAMES
61a6293bc3d4   tomcat    "catalina.sh run"   3 seconds ago   Up 2 seconds   8080/tcp   upbeat_lovelace

# CONTAINER ID 	 Container ID means the unique corresponding container can be found through this ID.
# IMAGE 	 The image used by the container.
# COMMAND 	 Command to run when starting the container.
# CREATED 	 The creation time of the container. The display format is "* * created before time".
# STATUS 	 The current state of the container.
# PORTS 	 The port information of the container and the connection type used (tcp\udp).
# NAMES 	 The name that the image automatically creates for the container, which also uniquely represents a container.
Container showing all statuses
[root@docker ~]# docker ps -a
CONTAINER ID   IMAGE            COMMAND                  CREATED          STATUS                          PORTS      NAMES
61a6293bc3d4   tomcat           "catalina.sh run"        42 seconds ago   Up 40 seconds                   8080/tcp   upbeat_lovelace
bc8083164d40   nginx:1.17.1     "nginx -g 'daemon of..."   4 minutes ago    Exited (0) About a minute ago              optimistic_allen
bced87c3f8b4   busybox:1.31.1   "sh"                     8 minutes ago    Exited (0) 7 minutes ago                   compassionate_bhaskara
2e1a60b14662   centos:7         "/bin/bash"              35 minutes ago   Created                                    upbeat_hugle
Displays the specified number of (all status) containers
[root@docker ~]# docker ps -n 3
CONTAINER ID   IMAGE            COMMAND                  CREATED              STATUS                          PORTS      NAMES
61a6293bc3d4   tomcat           "catalina.sh run"        About a minute ago   Up About a minute               8080/tcp   upbeat_lovelace
bc8083164d40   nginx:1.17.1     "nginx -g 'daemon of..."   4 minutes ago        Exited (0) About a minute ago              optimistic_allen
bced87c3f8b4   busybox:1.31.1   "sh"                     8 minutes ago        Exited (0) 8 minutes ago                   compassionate_bhaskara
Show container ID only
# Displays the running container ID
docker ps -q
# Displays the ID of the container in all States
docker ps -aq
Display container size at the same time
docker ps -s
docker ps -as
Displays complete information about the container ID
docker ps --no-trunc
If there are too many containers or you want to eliminate interfering containers, you can filter the containers to be displayed through docker ps --filter or docker ps -f.
docker ps filtering rules
Options are followed by key value pairs key=value (without quotation marks). If there are multiple filter conditions, use the filter option multiple times
docker ps --filter id=a1b2c3 --filter name=test
# The above filter conditions will find the container whose name contains test and whose ID contains a1b2c3

# The relationship between the same conditions is or, and the relationship between different conditions is and
docker ps --filter name=test --filter name=daemon --filter status=running
# The above filter conditions will find the container whose name contains test or daemon and whose status is running.

# id and name, which support regular expressions, are very flexible to use
docker ps --filter name=^/test$
2, Create container
The operation of the container is as simple and fast as the direct operation application. Docker containers are so lightweight that users can create or delete containers at any time.
(1) New container docker create
The docker create command is used to create a new Docker container, similar to the docker run -d command.
However, unlike docker run -d, the container created by docker create is not actually started. You need to execute the docker start command or docker run command to start the container.
In fact, the docker create command creates a writable container layer on the specified image and prepares it to run the specified command. Then print the container ID to STDOUT, and the status of the container is: created. The docker create command is often used to make necessary settings and container configuration before starting the container.
Usage:
docker create [OPTIONS] IMAGE [COMMAND] [ARG...]

Common options:
-i,-interactive 	interactive
-t,-tty 			Assign a pseudo terminal
-d,-detach 		Run container to background
--name string 		Specify container name
Create container
[root@docker ~]# docker images
REPOSITORY    TAG       IMAGE ID       CREATED         SIZE
centos        7         8652b9f0cb4c   6 months ago    204MB

# That is, create a container for the centos:7 image. The configuration before startup is: - i and - t. the function of these two parameters is to create a pseudo terminal for the docker, so that you can enter the interaction module of the container
# The function of / bin/bash after the expression (i.e. directly entering the container) is to run bash after loading the container. A process must be kept running in docker, otherwise the whole container will be started
# Will immediately kill itself, so that when you use docker ps to view the started container, you will find that the container you just created is not in the started container queue. This / bin/bash
# It means to start bash after starting the container.
[root@docker ~]# docker create --name mycentos -it centos:7
7c44d80cf66494a7d491f31b00f9448c9b63177a86b6d426a010c986fa927c4e

# Use the docker ps command to view the currently running containers
[root@docker ~]# docker ps
CONTAINER ID   IMAGE     COMMAND   CREATED   STATUS    PORTS     NAMES

# That is, there are no running containers. We use the docker ps -a command to view the current list of all containers
[root@docker ~]# docker ps -a
CONTAINER ID   IMAGE            COMMAND                  CREATED         STATUS                   PORTS      NAMES
7c44d80cf664   centos:7         "/bin/bash"              7 seconds ago   Created                             mycentos
# The Created container already exists at this time, but it is not running. The status is Created, but the corresponding settings are made before the container is started
(2) Start container
1. docker start
Use the docker start command to start one or more containers that have been created or one or more containers that have been stopped
Usage:
docker start [OPTIONS] CONTAINER [CONTAINER...]
Start the container created using docker create above
[root@docker ~]# docker ps -a
CONTAINER ID   IMAGE            COMMAND                  CREATED       STATUS
7c44d80cf664   centos:7         "/bin/bash"              About a minute ago   Created                             mycentos

[root@docker ~]# docker start mycentos	# You can also use docker start 7c44d80cf664
mycentos
[root@docker ~]# docker ps
CONTAINER ID   IMAGE      COMMAND             CREATED              STATUS         PORTS      NAMES
7c44d80cf664   centos:7   "/bin/bash"         About a minute ago   Up 4 seconds              mycentos
#At this time, you can see that the container is running
Containers in the terminated state can be restarted with the docker start command
[root@docker ~]# docker ps -a
CONTAINER ID   IMAGE            COMMAND                  CREATED         STATUS                       PORTS     NAMES
61a6293bc3d4   tomcat           "catalina.sh run"        2 hours ago     Exited (143) 3 seconds ago             upbeat_lovelace
# The container status is exit

[root@docker ~]# docker start 61a6293bc3d4
61a6293bc3d4
[root@docker ~]# docker ps
CONTAINER ID   IMAGE      COMMAND             CREATED         STATUS         PORTS      NAMES
61a6293bc3d4   tomcat     "catalina.sh run"   2 hours ago     Up 2 seconds   8080/tcp   upbeat_lovelace
# This is the start state
However, you cannot use this command to directly run the image as a container. You can use this command to start the image only if it is a container created by docker create or a container in a stopped state
2. docker restart
The docker restart command can be used to restart one or more Docker containers. The CONTAINER after this command can be CONTAINER Id or CONTAINER name.
The docker restart command will terminate a running container first and then restart it
Usage:
docker restart [OPTIONS] CONTAINER [CONTAINER...]

OPTIONS:
	-t, --time int	The number of seconds to wait to stop before terminating the container
(3) Create a new container and start docker run
In addition to starting with the start command after creating a container, you can also directly create and start a container. The required command is mainly docker run, which is equivalent to executing the docker create command first and then the docker start command.
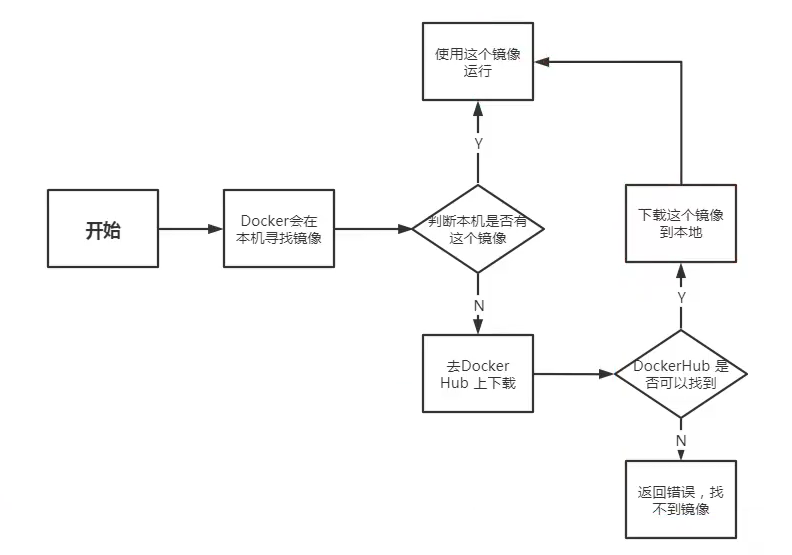
docker run flowchart:
Usage:
docker run [OPTIONS] IMAGE [COMMAND] [ARG...]
# Common syntax: docker run --name "CONTAINER_NAME" [OPTIONS] IMAGE [COMMAND] [ARG...]
# --name="" 	 Specify the container name. You can manage containers by name later
# If the -- name attribute is not used to specify the name of the Docker container, the name of each run is a random name, which brings great inconvenience to our management.

OPTIONS:

	-d, --detach=false	Specifies whether the container runs in the foreground or background. The default is false.
	-i, --interactive=false	open STDIN,For console interaction.
	-t, --tty=false	distribution tty The device can support terminal login. The default is false.
	-u, --user=""	Specifies the user of the container.
	-a, --attach=[]	Login container (must be in docker run -d Start container).
	-w, --workdir=""	Specifies the working directory of the container.
	-c, --cpu-shares=0	Set container CPU Weight, in CPU Shared scene usage.
	-e, --env=[]	Specifies an environment variable that can be used in the container.
	-m, --memory=""	Specifies the maximum memory limit for the container.
	-P, --publish-all=false	Randomly specify the ports exposed by the container.
	-p, --publish=[]	Specifies the port on which the container is exposed.
		-p IP:Host port has:Container port
		-p Host port has:Container port
		-p Container port
	-h, --hostname=""	Specifies the host name of the container.
	-v, --volume=[]	Mount the storage volume to the container and mount it to a directory of the container.
	--volumes-from=[]	Mount the volume on another container to the container and mount it to a directory of the container.
	--cap-add=[]	Add permissions.
	--cap-drop=[]	Delete permissions.
	--cidfile=""	After running the container, write the container in the specified file PID Value, a typical usage of monitoring system.
	--cpuset=""	Set what containers can use CPU,This parameter can be used for container exclusivity CPU.
	--device=[]	Adding a host device to a container is equivalent to a device pass through.
	--dns=[]	Specifies the name of the container dns The server.
	--dns-search=[]	Specifies the name of the container dns Search the domain name and write it to the container /etc/resolv.conf Documents.
	--entrypoint=""	cover image The entry point of.
	--env-file=[]	Specify an environment variable file in the format of one environment variable per line.
	--expose=[]	Specify the exposed port of the container, that is, the exposed port of the modified mirror.
	--link=[]	Specify the association between containers and use the association of other containers IP,env And other information.
	--lxc-conf=[]	Specifies the configuration file of the container, only when specified --exec-driver=lxc Used when.
	--name=""	Specify the container name, which can be used for container management in the future, links The feature requires a name.
	--net="bridge"	Manager network settings:
		1. bridge use docker daemon The specified bridge.
		2. host //The container uses the host's network.
		3. container:NAME_or_ID >//Use the network of other containers to share network resources such as IP and PORT.
		4. none The container uses its own network (similar to–net=bridge),But not configured.
	--privileged=false	Specifies whether the container is a privileged container, and the privileged container owns all capabilities.
	--restart="no"	Specifies the restart policy after the container is stopped:
		1. no: Do not restart when the container exits.
		2. on-failure: Restart when the container fails to exit (return value is non-zero).
		3. always: Always restart when the container exits.
	--rm=false	Specifies that containers are automatically deleted when they are stopped(Not supported with docker run -d Started container).
	--sig-proxy=true	Set the agent to accept and process the signal, but SIGCHLD,SIGSTOP and SIGKILL Cannot be represented.
When using docker run to create and start a container, the standard operations of Docker running in the background include:
- Check whether the specified image exists locally. If it does not exist, download it from the public warehouse;
- Create a container using the image and start the container;
- Allocate a file system to the container, and mount a read-write layer outside the read-only image layer;
- Bridging a virtual interface from the bridge interface configured by the host to the container;
- Configure an IP address to the container from the address pool of the bridge;
- Execute the application specified by the user;
- After execution, the container is automatically terminated.
1. Operation in guard state
The first method: specify the container to exit directly after running in the background
[root@docker ~]# docker images
REPOSITORY    TAG       IMAGE ID       CREATED         SIZE
centos        7         8652b9f0cb4c   6 months ago    204MB

[root@docker ~]# docker run -d centos:7
cf56a1165723997e90fc50193e1d84dc9dac77d0329e50ed628d45f3ee6dcc84
# Use the docker run -d command to run Docker in a background mode. At this time, the terminal outputs a long string of container ID s.

# Use the docker ps command to view the running container
[root@docker ~]# docker ps
CONTAINER ID   IMAGE     COMMAND   CREATED   STATUS    PORTS     NAMES
# At this point, we find that there are no running containers. Although we have specified the background operation of Docker container, there is no program running in the container, so the container exits directly,
# Therefore, there are no Docker containers running.

[root@docker ~]# docker ps -a
CONTAINER ID   IMAGE      COMMAND       CREATED         STATUS                     PORTS     NAMES
cf56a1165723   centos:7   "/bin/bash"   6 seconds ago   Exited (0) 6 seconds ago             crazy_chandrasekhar
# You can see that it is in exit status
The second method: specify the container to continue running in the background after running in the background
[root@docker ~]# docker run -d centos:7 tail -f /dev/null
2fb7afde7bab2b857930d66e72835e612ff1bf07bed2312581ea668903a600d5

# Use the docker ps command to view the running container
[root@docker ~]# docker ps
CONTAINER ID   IMAGE      COMMAND               CREATED          STATUS          PORTS     NAMES
2fb7afde7bab   centos:7   "tail -f /dev/null"   12 seconds ago   Up 11 seconds             dazzling_golick
# At this time, it is found that the terminal outputs the running container and the basic information of the container (container Id, image name, running command, creation time, etc.).
# Run the Docker container this time because we used the tail -f command, which will always be executed in the background. Therefore, the Docker container has a running process at this time, so the container does not exit, but always runs in the background.
Third: interactive background operation
[root@docker ~]# docker run -it -d centos:7 /bin/bash
3396f9d0f3a9f86b047fae1795498abd3772b5b73f69980abc5573a0c6f04590

# Use the docker ps command to view the running container
[root@docker ~]# docker ps
CONTAINER ID   IMAGE      COMMAND               CREATED         STATUS         PORTS     NAMES
3396f9d0f3a9   centos:7   "/bin/bash"           2 seconds ago   Up 2 seconds             optimistic_nightingale
# The Docker container is run this time because the docker run -it -d command is used, and the - it parameter is to run the container interactively. Therefore, the container does not exit, but always runs in the background.
2. Foreground interactive operation
[root@docker ~]# docker run --name test -it centos:7 /bin/bash
# The - t option allows Docker to assign a pseudo TTY and bind it to the standard input of the container, while - i keeps the standard input of the container open.

# In interactive mode, the user can input commands through the created terminal
[root@42d730983a37 /]# cd /etc
[root@42d730983a37 etc]# pwd
/etc
[root@42d730983a37 etc]# ps -aux
USER        PID %CPU %MEM    VSZ   RSS TTY      STAT START   TIME COMMAND
root          1  0.2  0.0  11828  1892 pts/0    Ss   06:36   0:00 /bin/bash
root         17  0.0  0.0  51732  1704 pts/0    R+   06:36   0:00 ps -aux
# Check the process with ps command in the container. You can see that only bash application is running, and no other irrelevant processes are running.
[root@42d730983a37 etc]# exit
exit
# You can exit the container by using [Ctrl + d] or entering the exit command:
[root@docker ~]# docker ps
CONTAINER ID   IMAGE      COMMAND               CREATED         STATUS         PORTS     NAMES
3396f9d0f3a9   centos:7   "/bin/bash"           5 minutes ago   Up 5 minutes             optimistic_nightingale
2fb7afde7bab   centos:7   "tail -f /dev/null"   8 minutes ago   Up 8 minutes             dazzling_golick
# For the bash container created, after exiting with the exit command, the container is automatically in the Exited state. This is because for the Docker container, when the running application exits, the container has no need to continue running.
Sometimes, there will be an error when executing docker run, because the command cannot be executed normally, and the container will exit directly. At this time, you can view the exit error code.
By default, common error codes include:
	125:  Docker daemon An error occurred during execution, for example, an unsupported was specified Docker Command parameters;
	126: The specified command cannot be executed, such as permission error;
	127: The command in the container cannot be found.
If there is an error after the command is executed, the error code will be returned by default.
3. Specify Docker port
Specifies the port exposed by the Docker container when it runs
Usage:
docker run -p PORT1:PORT2 IMAGE [COMMAND] [ARG]
# Use the - p operation parameter to expose port 2 inside the container as port 1 of the host.
Specify the exposed port of nginx container
[root@docker ~]# docker images
REPOSITORY    TAG       IMAGE ID       CREATED         SIZE
nginx         1.17.1    98ebf73aba75   23 months ago   109MB

# Create and start the nginx container and expose port 80 inside the container as port 9999 of the host
[root@docker ~]# docker run --name mynginx -it -d -p 9999:80 nginx:1.17.1
229b70ba2a76bb053b1a5debaee4317ccc7ac6890bca285eb300869e13223e0b
# Also specify the Docker mapping, specify the host and port - p HOST_ZIP:PORT

[root@docker ~]# docker ps
CONTAINER ID   IMAGE          COMMAND                  CREATED          STATUS          PORTS                                   NAMES
229b70ba2a76   nginx:1.17.1   "nginx -g 'daemon of..."   4 seconds ago    Up 3 seconds    0.0.0.0:9999->80/tcp, :::9999->80/tcp   mynginx
# The internal port 80 is displayed under the PORTS field and is exported as the 9999 port of the host.

# Use the docker port command to view the port mapping of the Docker container
[root@docker ~]# docker port mynginx
80/tcp -> 0.0.0.0:9999
80/tcp -> :::9999
# It also shows that the internal port 80 is exported as the 9999 port of the host.

# At the same time, check whether the 9999 port of the host is monitored
[root@docker ~]# ss -anp | grep 9999
tcp    LISTEN     0      128       *:9999                  *:*                   users:(("docker-proxy",pid=4055,fd=4))
tcp    LISTEN     0      128    [::]:9999               [::]:*                   users:(("docker-proxy",pid=4060,fd=4))

# The 9999 port of the host is being monitored by the docker container

3, Enter container
When using the - d parameter, the container will enter the background after it is started, and the user cannot see the information in the container or operate. At this time, if you need to enter the container for operation, there are many methods, including using the official attach or exec command.
(1) docker attach
The docker attach command can be used to enter a running Docker CONTAINER. CONTAINER after docker attach command can be CONTAINER Id or CONTAINER name.
Usage:
docker attach [OPTIONS] CONTAINER

OPTIONS:
	--detach-keys[=[]]: Specify exit attach Shortcut key sequence of mode. The default is CTRL-p;
	--no-stdin=true|false: Whether to close the standard input. The default is to keep it open;
	--sig-proxy=true|false: Whether to send the system signal received by the agent to the application process. The default is true.
After entering the container, the container exits
After using the exit command or ctrl + d to exit the container in the container, the original running container will exit
# Create a container that runs in the background
[root@docker ~]# docker run --name mycentos -itd centos:7
7c22ca255369669baead5755b205fa598c5104e320d5b511120d60f9168d2eb9

# see
[root@docker ~]# docker ps
CONTAINER ID   IMAGE      COMMAND       CREATED         STATUS         PORTS     NAMES
7c22ca255369   centos:7   "/bin/bash"   3 seconds ago   Up 2 seconds             mycentos

# get into
[root@docker ~]# docker attach mycentos
[root@7c22ca255369 /]#
# At this time, the command line prompt of the terminal becomes docker containerId, that is, we have entered the interior of the docker container.
# We can execute any linux command inside the dokcer container, use the exit command or Ctrl+d to exit the docker attach container.
[root@7c22ca255369 /]# exit
exit
[root@docker ~]# docker ps
CONTAINER ID   IMAGE     COMMAND   CREATED   STATUS    PORTS     NAMES
# There is no running container at this time, which means that we use the docker attach command. After entering the container,
# After using the exit command or Ctrl+d to exit the container, the original running container will also stop.
Enter the container without exiting
Use Ctrl+p+q to exit the container of docker attach. The container will not exit
Create background run container
[root@docker ~]# docker run --name mycentos -itd centos:7
deabcdbe07d87a2bcca8d854fe748d2d05fdbf19af6e0d813c6e11e4f55f87da

[root@docker ~]# docker ps
CONTAINER ID   IMAGE      COMMAND       CREATED         STATUS         PORTS     NAMES
deabcdbe07d8   centos:7   "/bin/bash"   4 minutes ago   Up 4 minutes             mycentos

# Enter container
[root@docker ~]# docker attach mycentos
[root@deabcdbe07d8 /]# pwd
/
[root@deabcdbe07d8 /]# read escape sequence # At this time, use Ctrl+p+q to exit the container of docker attach.


[root@docker ~]# docker ps
CONTAINER ID   IMAGE      COMMAND       CREATED         STATUS         PORTS     NAMES
deabcdbe07d8   centos:7   "/bin/bash"   6 minutes ago   Up 6 minutes             mycentos
# At this time, the container is still running.
(2) docker exec
Use the docker exec command to enter the running docker container, and then use the exit command or Ctrl+d to exit the container again. The original running container will not stop. This is the difference between docker exec command entering the container and docker attach entering the container.
Usage:
docker exec [OPTIONS] CONTAINER COMMAND [ARG...]

OPTIONS:
	-d	Running commands in the background
	-i	--interactive=true|false: Open standard input and accept user input commands. The default is false;
	--privileged=true|false: Whether to give high permission to execute commands. The default is false;
	-t,--tty=true|false: Assign pseudo terminal, default to false;
	-e	Setting environment variables
	-w	The directory where the command needs to be executed
	-u,--user="": The user name or password to execute the command ID.
[root@docker ~]# docker run --name mycentos -itd centos:7
d537aab49227ec7d9e083dd9e7240c4a3580a0aa734e5d3a50d73db972fcb1e3
[root@docker ~]# docker ps
CONTAINER ID   IMAGE      COMMAND       CREATED          STATUS         PORTS     NAMES
d537aab49227   centos:7   "/bin/bash"   10 seconds ago   Up 9 seconds             mycentos

# Enter the newly created container and start a bash
[root@docker ~]# docker exec -it mycentos /bin/bash
[root@d537aab49227 /]#
# It can be seen that a bash terminal is opened, and users can easily interact with the container without affecting other applications in the container.

# Use the exit command or Ctrl+d or Ctrl+p+q to exit the container. Use the docker ps command again to view the currently running container
[root@d537aab49227 /]# exit
exit
[root@docker ~]# docker ps
CONTAINER ID   IMAGE      COMMAND       CREATED         STATUS         PORTS     NAMES
d537aab49227   centos:7   "/bin/bash"   3 minutes ago   Up 3 minutes             mycentos
# The container that was already running continues to run. Here, if you use the docker attach to enter the container and use the exit command or Ctrl+d to exit the container, the running container will exit.
be careful:
Keep the standard input on by specifying the - it parameter and assign a pseudo terminal. Using the exec command to perform operations on containers is the most recommended way.
4, Docker log command
(1) docker events
The docker events command is used to print out real-time system events.
Usage:
docker events [OPTIONS]

OPTIONS:
	-f	Filter events by criteria.
	--since	Displays all events from the specified timestamp.
	--until	The running time is displayed until the specified time.
Show events for a time period
display docker From 2021-5-1 Subsequent events
[root@docker ~]# date -d "2021-5-1" +%s
1619798400
[root@docker ~]# docker events  --since="1619798400"
Displays events for the specified mirror
# Displays the events of centos image after 2021-5-1.
[root@docker ~]# docker events -f "image"="centos"  --since="1619798400"
(2) docker history
The docker history command is used to print out the historical version information of the specified Docker image.
Usage:
docker history [OPTIONS] IMAGE

OPTIONS:
	-H, --human	Print the image size and date in a readable format. The default is true.
	--no-trunc	Displays the complete submission record.
	-q, --quiet	List submission records only ID.
View the commit history of the image
[root@docker ~]# docker images
REPOSITORY         TAG       IMAGE ID       CREATED         SIZE
centos             7         8652b9f0cb4c   7 months ago    204MB
[root@docker ~]# docker history centos:7
IMAGE          CREATED        CREATED BY                                      SIZE      COMMENT
8652b9f0cb4c   7 months ago   /bin/sh -c #(nop)  CMD ["/bin/bash"]            0B
<missing>      7 months ago   /bin/sh -c #(nop)  LABEL org.label-schema.sc...   0B
<missing>      7 months ago   /bin/sh -c #(nop) ADD file:b3ebbe8bd304723d4...   204MB
Only the submission history ID of the mirror is displayed
[root@docker ~]# docker history -q centos:7
8652b9f0cb4c
<missing>
<missing>
(3) docker logs
The docker logs command is used to obtain the Docker container logs (standard output information on the console)
Usage:
docker logs [OPTIONS] CONTAINER

OPTIONS:
	--details		 display log Additional details of the information.
	-f, --follow	 Trace log output.
	--since	string	 Displays all logs for a start time.
	--tail	string	 List only the latest N Container logs.
	-t, --timestamps	Displays the timestamp.
View container log
# Use the docker run command to run the docker container and keep outputting logs in the background.
[root@docker ~]# docker run --name mycentos -d centos:7 /bin/sh -c "while true; do echo hello world; sleep 2; done"
c0438b7f20d7bce721084a910bddef845f6cbb893879c0f5d6ef179511767548
[root@docker ~]# docker logs mycentos
hello world
hello world
hello world
Trace container log
[root@docker ~]# docker logs -f mycentos
Displays the time of the container log at the same time
[root@docker ~]# docker logs -t mycentos
2021-06-18T08:02:37.153502097Z hello world
2021-06-18T08:02:38.156463485Z hello world
Displays the last specified number of log information
[root@docker ~]# docker logs --tail 4 mycentos
5, File copy docker cp
The docker cp command is used to copy files or folders between the local file system and the Dokcer container.
Usage:
docker cp [OPTIONS] CONTAINER:SRC_PATH DEST_PATH|-
docker cp [OPTIONS] SRC_PATH|- CONTAINER:DEST_PATH

explain:
1. docker cp The command is similar to Linux Medium cp -a Command to recursively copy all subdirectories and files under the directory.
2. docker cp In command - Indicates standard input/The output device reads or writes in a stream tar Documents.
3. The path in the local file system can be absolute or relative, relative to the path of the current command execution.
4. The paths in the container are relative to the container / Root path.
5. docker cp The container of command operation can be in running state or stopped state.
6. docker cp The command cannot be copied /proc, /sys, /dev, tmpfs And container mount File under the path of.

OPTIONS:
	-a, --archive	Archive Mode (copy all) UID / GID Information)
	-L, --follow-link	Always follow the symbolic link at the source address
Copy files from host to container
# Create file on host
[root@docker ~]# echo "hello" > test.txt

# Create and start a container
[root@docker ~]# docker run --name mycentos -itd centos:7
9edfb6dc4374a478441c0f059cbc2476db722ef44b8c24089c2668e6a00d1541
[root@docker ~]# docker ps
CONTAINER ID   IMAGE      COMMAND       CREATED         STATUS         PORTS     NAMES
9edfb6dc4374   centos:7   "/bin/bash"   6 seconds ago   Up 3 seconds             mycentos

# Copy the file just created on the host to the docker container
[root@docker ~]# docker cp ./test.txt mycentos:/tmp

# Use the docker attach command to enter the docker container
[root@docker ~]# docker attach mycentos

# Check the / tmp directory of the container, check whether there are files just copied, and check the contents of the files
[root@9edfb6dc4374 /]# cd tmp
[root@9edfb6dc4374 tmp]# ll test.txt
-rw-r--r--. 1 root root 6 Jun 19 02:47 test.txt
[root@9edfb6dc4374 tmp]# cat test.txt
hello
# There are copied files in the / tmp directory inside the container, and the contents of the files are what we wrote on the host.
Copy the files in the container to the host
# Create and run containers
[root@docker ~]# docker run --name mycentos1 -it centos:7
# Create file in container
[root@ec1fd58664c7 /]# echo "this file is from container" > test1.txt
[root@ec1fd58664c7 /]# exit
exit

# Use the docker cp command to copy the file just created inside the container to the host
[root@docker ~]# docker cp mycentos1:/test1.txt ./

# Check whether the host computer has the newly copied file and check the contents of the file
[root@docker ~]# ll test1.txt
-rw-r--r--. 1 root root 28 Jun 19 10:53 test1.txt
[root@docker ~]# cat test1.txt
this file is from container
6, Terminate container
(1) docker stop
The docker stop command can be used to stop a running Docker CONTAINER. The CONTAINER after this command can be CONTAINER Id or CONTAINER name.
The stopping process is: first send SIGTERM signal to the container, wait for a timeout period (default: 10 seconds), and then send SIGKILL signal to terminate the container
Usage:
docker stop [OPTIONS] CONTAINER [CONTAINER...]
[root@docker ~]# docker ps
CONTAINER ID   IMAGE          COMMAND                  CREATED             STATUS             PORTS                                   NAMES
229b70ba2a76   nginx:1.17.1   "nginx -g 'daemon of..."   38 minutes ago      Up 2 seconds       0.0.0.0:9999->80/tcp, :::9999->80/tcp   mynginx
3396f9d0f3a9   centos:7       "/bin/bash"              About an hour ago   Up About an hour                                           optimistic_nightingale

# Stop container with container name
[root@docker ~]# docker stop mynginx
mynginx
[root@docker ~]# docker ps
CONTAINER ID   IMAGE      COMMAND               CREATED             STATUS             PORTS     NAMES
3396f9d0f3a9   centos:7   "/bin/bash"           About an hour ago   Up About an hour             optimistic_nightingale

# Stop container with container ID
[root@docker ~]# docker stop 3396f9d0f3a9
3396f9d0f3a9
[root@docker ~]# docker ps
CONTAINER ID   IMAGE      COMMAND               CREATED             STATUS             PORTS     NAMES
In addition, when the application specified in the Docker container terminates, the container will also terminate automatically.
(2) docker kill
The docker kill Command can be used to forcibly terminate one or more running Docker containers. The CONTAINER after this command can be CONTAINER Id or CONTAINER name.
The docker kill Command will directly send a SIGKILL signal to forcibly terminate the container.
Usage:
docker kill [OPTIONS] CONTAINER [CONTAINER...]

OPTIONS:
	-s	Send a signal to the container.
[root@docker ~]# docker ps
CONTAINER ID   IMAGE          COMMAND                  CREATED       STATUS        PORTS                                   NAMES
229b70ba2a76   nginx:1.17.1   "nginx -g 'daemon of..."   2 hours ago   Up 1 second   0.0.0.0:9999->80/tcp, :::9999->80/tcp   mynginx
2fb7afde7bab   centos:7       "tail -f /dev/null"      2 hours ago   Up 2 hours                                            dazzling_golick

# Force container termination with container name
[root@docker ~]# docker kill mynginx
mynginx
[root@docker ~]# docker ps
CONTAINER ID   IMAGE      COMMAND               CREATED       STATUS       PORTS     NAMES
2fb7afde7bab   centos:7   "tail -f /dev/null"   2 hours ago   Up 2 hours             dazzling_golick

# Force container termination with container ID
[root@docker ~]# docker kill 2fb7afde7bab
2fb7afde7bab
[root@docker ~]# docker ps
CONTAINER ID   IMAGE     COMMAND   CREATED   STATUS    PORTS     NAMES

# Kill all containers
docker kill `docker ps -q`
The difference between kill and stop:
docker
stop, which supports "graceful exit". First send SIGTERM signal, and then send SIGKILL signal after a period of time (10s). The internal application of Docker can receive SIGTERM signal and then do some "pre exit work", such as saving state, processing current request, etc.
docker kill, send SIGKILL signal, and the application will exit directly.
Elegant exit of online applications is very necessary. docker stop is not unique to docker. lxc and google borg systems have similar designs, that is, send SIGTERM signal to notify the task before sending SIGKILL.
7, Delete container docker rm
You can use the docker rm command to delete containers in the terminated or exited state,
Usage:
docker rm [OPTIONS] CONTAINER [CONTAINER...]
# By default, the docker rm command can only delete containers that are in the terminated or exited state, but cannot delete containers that are still in the running state.
# If you want to delete a running container directly, you can add the - f parameter. Docker will first send SIGKILL signal to the container, terminate the application in it, and then forcibly delete it

OPTIONS:
-f,--force	adopt SIGKILL The signal forces the deletion of a running container.
-l,--link	Remove network connections between containers, not the container itself.
-v:-v	Delete the volume associated with the container.

# Delete all containers
docker rm -f `docker ps -aq` or docker rm -f $(docker ps -aq) or docker rm -f `docker ps -a | awk 'NR!=1 {print $1}'` or docker ps -aq | xargs docker rm -f
Delete stopped containers
[root@docker ~]# docker run --name mycentos -itd centos:7
b05de44eb02fc80752446d5e9f43a212fde4436859ca24412ebaf4dd66ce8475
[root@docker ~]# docker ps -a
CONTAINER ID   IMAGE      COMMAND       CREATED         STATUS         PORTS     NAMES
b05de44eb02f   centos:7   "/bin/bash"   5 seconds ago   Up 4 seconds             mycentos

# Kill the newly created container
[root@docker ~]# docker kill mycentos
mycentos
# View running containers
[root@docker ~]# docker ps
CONTAINER ID   IMAGE     COMMAND   CREATED   STATUS    PORTS     NAMES
# Use the docker ps -a command to view all containers
[root@docker ~]# docker ps -a
CONTAINER ID   IMAGE      COMMAND       CREATED          STATUS                       PORTS     NAMES
b05de44eb02f   centos:7   "/bin/bash"   21 seconds ago   Exited (137) 2 seconds ago             mycentos

# Use the docker rm command to delete the docker container
[root@docker ~]# docker rm mycentos
mycentos

# Use the docker ps -a command again to view all containers
[root@docker ~]# docker ps -a
CONTAINER ID   IMAGE     COMMAND   CREATED   STATUS    PORTS     NAMES
# At this time, there is no container, that is, the container just created has been deleted.
Delete a running container
[root@docker ~]# docker run --name mycentos1 -itd centos:7
2be43a0eae72d5054aa58e6eebde306e762dfa954fa33c601e2c999cf37bdae1
[root@docker ~]# docker ps -a
CONTAINER ID   IMAGE      COMMAND       CREATED         STATUS         PORTS     NAMES
2be43a0eae72   centos:7   "/bin/bash"   4 seconds ago   Up 3 seconds             mycentos1

# Use the docker rm command to kill the running docker container
[root@docker ~]# docker rm mycentos1
Error response from daemon: You cannot remove a running container 2be43a0eae72d5054aa58e6eebde306e762dfa954fa33c601e2c999cf37bdae1. Stop the container before attempting removal or force remove
# At this time, the command line directly reports an error and prompts us to use the docker rm -f command. We use the docker rm -f command to delete a running docker container.

[root@docker ~]# docker rm -f mycentos1
mycentos1

# Use the docker ps -a command again to view all containers
[root@docker ~]# docker ps -a
CONTAINER ID   IMAGE     COMMAND   CREATED   STATUS    PORTS     NAMES
# At this time, there is no container, that is, the docker container just created and running has been forcibly deleted by the docker rm -f command
8, Import and export containers
Sometimes, you need to migrate containers from one system to another. At this time, you can use the import and export functions of Docker. This is also an important feature provided by Docker itself.
(1) The docker export command exports containers
The docker export command can be used to export the file system in the Docker container as a tar archive file to standard output. Note that the docker save command is used to save the Docker image as a tar package
Export container refers to exporting a container that has been created to a file, regardless of whether the container is running at this time
Usage:
docker export [OPTIONS] CONTAINER

OPTIONS:
-o,--output string	Write the output to a file.
# docker export [-o|--output[=""]] CONTAINER, where you can specify the exported tar file name through the - o option or directly through redirection.
# Or docker export container > filename
Container for exporting running state
[root@docker ~]# docker run --name mycentos2 -itd centos:7
e9d23cd091cccb6264f6277f324e56ee1025601a3af4431838c9aaa511aef899
[root@docker ~]# docker ps
CONTAINER ID   IMAGE      COMMAND       CREATED         STATUS         PORTS     NAMES
e9d23cd091cc   centos:7   "/bin/bash"   3 seconds ago   Up 2 seconds             mycentos2
[root@docker ~]# docker export -o centos_v1.tar mycentos2
# Or docker export mycentos2 > CentOS_ v1. tar
[root@docker ~]# file centos_v1.tar
centos_v1.tar: POSIX tar archive
Export containers that are not running
[root@docker ~]# docker create -it --name mycentos3 centos:7
1ade9b48f4c68b833f3d41b6280f080586d694c3f175091b902876d63fb87b7b
[root@docker ~]# docker ps
CONTAINER ID   IMAGE     COMMAND   CREATED   STATUS    PORTS     NAMES
[root@docker ~]# docker ps -a
CONTAINER ID   IMAGE      COMMAND       CREATED         STATUS    PORTS     NAMES
1ade9b48f4c6   centos:7   "/bin/bash"   8 seconds ago   Created             mycentos3
[root@docker ~]# docker export -o centos_v2.tar mycentos3
# Or docker export mycentos3 > CentOS_ v2. tar
[root@docker ~]# file centos_v2.tar
centos_v2.tar: POSIX tar archive
After that, the exported tar file can be transferred to other machines, and then imported into the system through the Import command, so as to realize the migration of containers.
(2) The docker import command imports containers
The file of the export container can be imported into an image by using the docker import command
Usage:
docker import [OPTIONS] file|URL|- [REPOSITORY[:TAG]]

OPTIONS:
	-c, --change	application docker Command to create a mirror image.
	-m, --message	Description at the time of submission.
Import files exported using containers as images
[root@docker ~]# docker import centos_v2.tar import/centos_v2
sha256:bb4615fa52115aaec35d9ae7b8da556bd6f79b8c9325a970602ddfef646abaa1
[root@docker ~]# docker images
REPOSITORY         TAG       IMAGE ID       CREATED         SIZE
import/centos_v2   latest    bb4615fa5211   4 seconds ago   204MB
# Import / CentOS of the image list at this time_ V2 image is the image imported by using the docker import command
Use the docker load command to import an image file, which is very similar to the docker import command. In fact, you can use the docker load command to import the image storage file to the local image library, or you can use the docker import command to import a container snapshot to the local image library.
The difference between the two is that the container snapshot file will discard all history and metadata information (that is, only the snapshot state of the container at that time), while the mirror storage file will save the complete record and have a larger volume. In addition, metadata information such as labels can be reassigned when importing from the container snapshot file.