References for this article:
http://blog.csdn.net/highboys/article/details/52139268
http://blog.csdn.net/yypsober/article/details/51720355?locationNum=3&fps=1
Now the realization of third-party authorized login is achieved through Oauth 2.0, but about the understanding and use of Oauth 2.0, I am still learning, can see in detail. Here . Although there are various ways to achieve this, I will implement the most routine authorized login through Oauth 2.0. The specific implementation is as follows
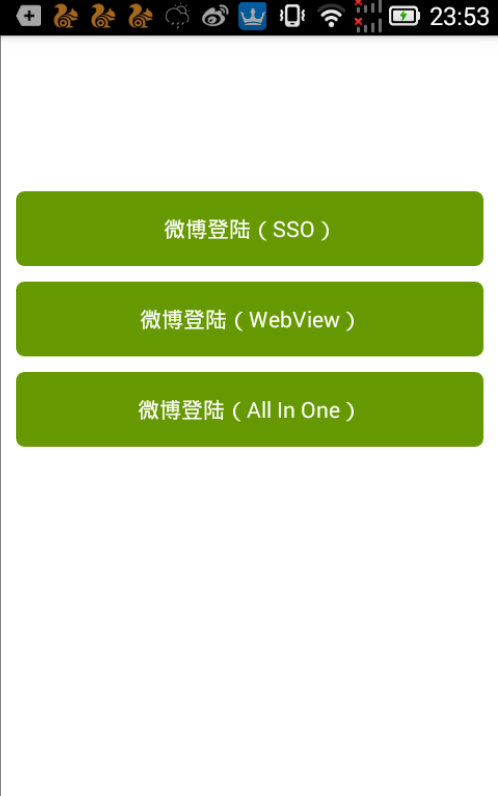
As shown in the figure above, three implementations are used.
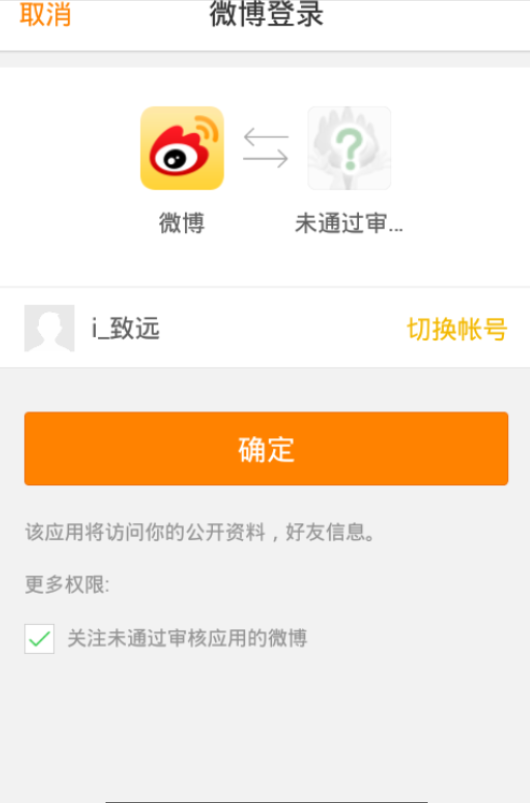
SSO Single Sign-on: If you have an app on your mobile phone, otherwise you will report an error.
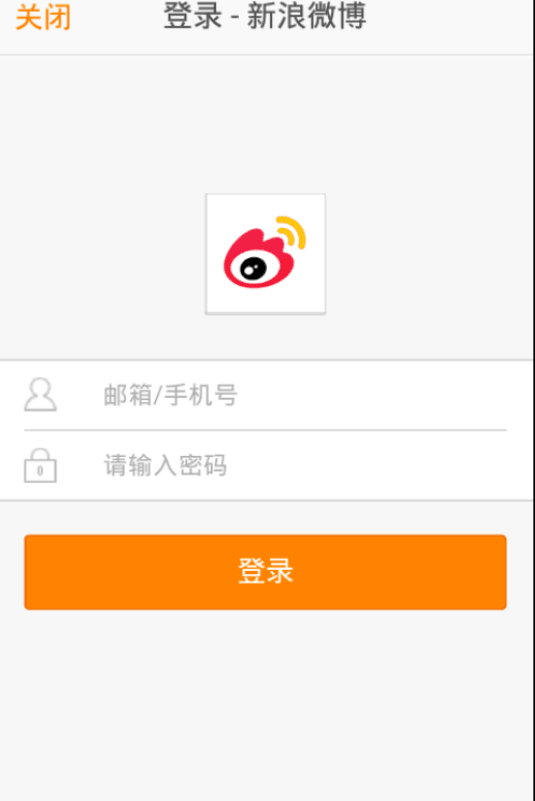
2.web page login: pop up a web interface, and then implement account password login
3.All in one way authorized login: automatic identification if the mobile phone has a micro-blog app, it will login through SSO single sign-on, if not through web pages. This function is more humane, which is also a common way of third-party login.
Then the formal course begins.
I. To http://open.weibo.com/ Register a Weibo Developer Account
First, registration - > successful registration - > micro-connection - > mobile application - > immediate access - > fill in the name, application creation - > open application information - > basic information as required to fill in: 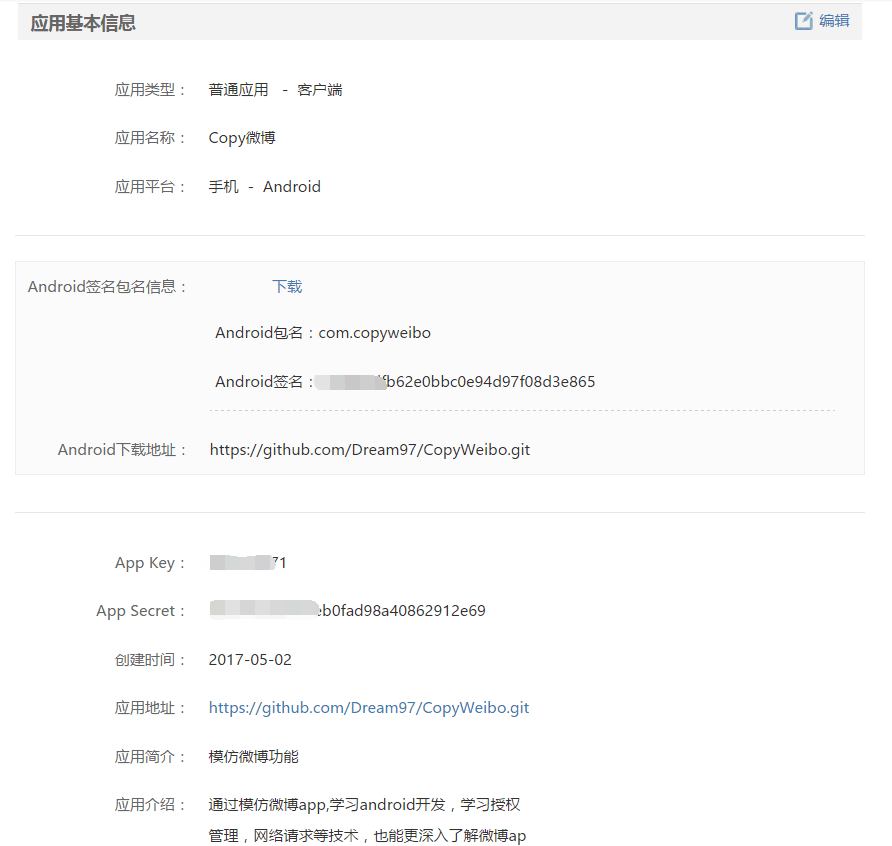
The registration here is the package name when you create the Android project. The Android signature page prompts you to use the Android signature generation tool prompted by Android. You just need to run the app you created on your mobile phone, then install the Android signature generation and copy it. (So the first step is actually to create a proj first.) Ect) other basic requirements
In addition, you need to apply information - > advanced information to fill in the callback page.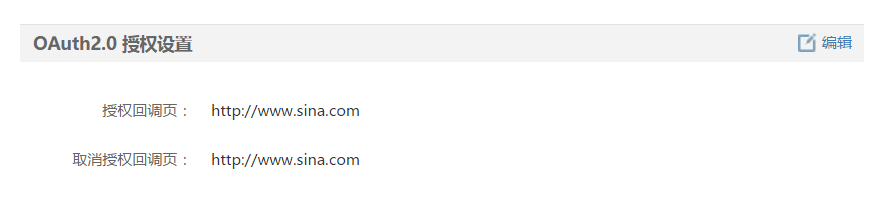
What I'm filling in here is http://www.sina.com Generally, they fill in the default callback page of Weibo http://api.weibo.com/oauth2/default.html In principle, you can also use your own company's website or something.
II. Pre-preparation
- Download the SDK of Weibo: http://open.weibo.com/wiki/SDK
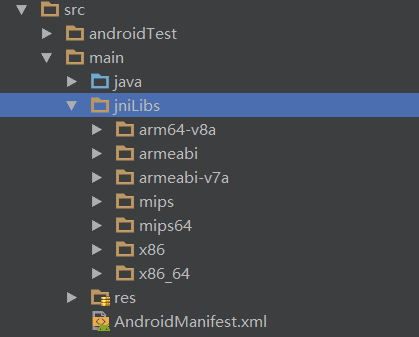
- Create a jniLibs folder under the main folder of the project you created, and copy the content of the microblog SDK into this folder
- In addition, we need to import weiboSDK Core_3.1.4.jar and weibosdk.jar.

III. Logical Arrangement
- I want to implement two activities here. The first activity logs in through these three buttons. The second activity displays the user's information, so there is the following figure.
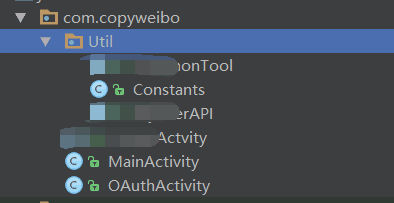
- See if there is a Constants, which stores some common information, such as: token, user information, App Key generated when the microblog microapplication was created, and so on. The code is as follows
Constants.java
public class Constants {
    //User Information
    public static String name = null;//Name
    public static String gender = null;//Gender
    public static String location = null;//Location of Attribution
    public static String token = null;
    /** App_KEY of current DEMO applications, third-party applications should replace the APP_KEY with their own APP_KEY */
    public static final String APP_KEY      = "490704571";

    //Fill in the url of the callback page you filled in when you created it
    public static final String REDIRECT_URL = "http://www.sina.com";
     /*
     * Scope It is a parameter of authorize interface in OAuth 2.0 authorization mechanism.
     * Scope currently supports passing in multiple Scope permissions, separated by commas.
     * For information on which OpenAPI s require permission applications, see http://open.weibo.com/wiki/%E5%BE%AE%E5%8D%9AAPI
     * For Scope concepts and considerations, see http://open.weibo.com/wiki/Scope
     */
    public static final String SCOPE =
            "email,direct_messages_read,direct_messages_write,"
                    + "friendships_groups_read,friendships_groups_write,statuses_to_me_read,"
                    + "follow_app_official_microblog," + "invitation_write";
}
The second Activity is as follows 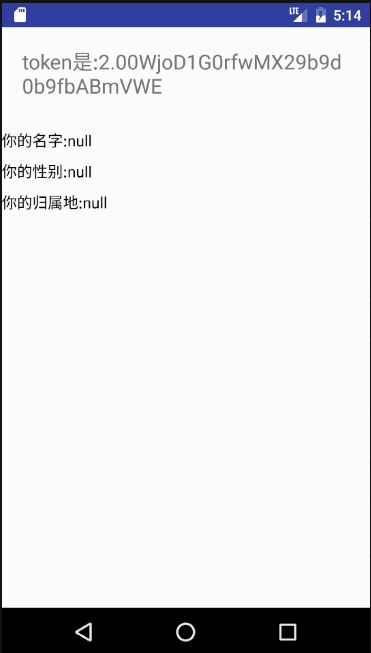
Yes, the basic logic should be clear, and then it should be the third one.
IV. Coding
The main implementation is on OauthActivity.
- First, code the basic code, initialize the button and use Weibo AuthListener interface of Weibo SDK.
public class OAuthActivity extends AppCompatActivity implements View.OnClickListener,WeiboAuthListener{

    //Logon button
    private Button btnSsoLogIn;
    private Button btnWebLogIn;
    private Button btnAllInOneLogIn;
    @Override
    protected void onCreate(Bundle savedInstanceState) {
        super.onCreate(savedInstanceState);
        setContentView(R.layout.activity_login);
        initView();
    }
    private void initView() {
        btnSsoLogIn = (Button) findViewById(R.id.logIn_btn_SsoLogin);
        btnSsoLogIn.setOnClickListener(this);
        btnWebLogIn = (Button) findViewById(R.id.logIn_btn_WebLogin);
        btnWebLogIn.setOnClickListener(this);
        btnAllInOneLogIn = (Button) findViewById(R.id.logIn_btn_AllInOneLogin);
        btnAllInOneLogIn.setOnClickListener(this);
    }
     /**
     * Microblog Authentication Authorization Callback Class.
     * 1. SSO When authorizing, you need to call {@link SsoHandler#authorizeCallBack} in {link#onActivityResult}.
     * The callback will only be executed.
     * 2. When non-SSO authorization is completed, the callback is executed.
     * When the authorization is successful, save the access_token, expires_in, uid and other information to Shared Preferences.
     */
    @Override
    public void onComplete(Bundle bundle) {
    }
    @Override
    public void onWeiboException(WeiboException e) {
        Toast.makeText(OAuthActivity.this, "Authorization exception", Toast.LENGTH_SHORT).show();
    }
    @Override
    public void onCancel() {
        Toast.makeText(OAuthActivity.this, "Delegation revocation", Toast.LENGTH_SHORT).show();
    }

    @Override
    public void onClick(View v) {
}- The next step is to implement the specific details of the function. Define the following variables first
    /**
     * Note: SsoHandler works only when SDK supports SSO
     */
    private SsoHandler mSsoHandler;
    private AuthInfo mAuthInfo;
    /**
     * Encapsulated "access_token", "expires_in", "refresh_token" and provided their management functions.
     */
    private Oauth2AccessToken mAccessToken;
    //Interface for obtaining user information (need to introduce the official weibosdk library into the project first)
    UsersAPI mUsersAPI;
Then it is implemented in onCreate
        // When authorizing quickly, please do not pass in SCOPE, otherwise authorization may not succeed.
        mAuthInfo = new AuthInfo(this, Constants.APP_KEY, Constants.REDIRECT_URL, Constants.SCOPE);
        mSsoHandler = new SsoHandler(this, mAuthInfo);
Monitor for several buttons
@Override
    public void onClick(View v) {
        switch (v.getId()) {
            //sso authorization, client only
            case R.id.logIn_btn_SsoLogin:
                startSsoWeiBoLogIn();
                break;
            //web authorization
            case R.id.logIn_btn_WebLogin:
                startWebWeiBoLogIn();
                break;
            //Automatic detection, if there is a client, sso authorization, if there is no client, web authorization
            case R.id.logIn_btn_AllInOneLogin:
                startAllInOneWeiBoLogIn();
                break;
        }
    }
The action of each button
    /**
     * all in one Mode Authorization, Automatic Detection
     */
    private void startAllInOneWeiBoLogIn() {
        mSsoHandler.authorize(this);
    }
    /**
     * Web To grant authorization
     */
    private void startWebWeiBoLogIn() {
        mSsoHandler.authorizeWeb(this);
    }
    /**
     * SSO Authorization, client only
     */
    private void startSsoWeiBoLogIn() {
        mSsoHandler.authorizeClientSso(this);
        //Getting User Information through accessToken
}- Modify overridden onComplete and redraw function onActivityResult
 @Override
    public void onComplete(Bundle bundle) {
        //Analysis of Token from Bundle
        mAccessToken = Oauth2AccessToken.parseAccessToken(bundle);
        if (mAccessToken.isSessionValid()) {//Successful authorization
            Constants.token = mAccessToken.getToken();
            Toast.makeText(OAuthActivity.this, "Successful landing", Toast.LENGTH_SHORT).show();
            //Getting User Specific Information
            getUserInfo();
            //Jump pages
            Intent intent = new Intent(OAuthActivity.this,MainActivity.class);
            startActivity(intent);
            finish();
        } else {
            /**
             *  In the following cases, you will receive Code:
             * 1. When you have not registered the package name and signature of the application on the platform;
             * 2. When your registered application package name and signature are incorrect;
             * 3. When the package name and signature registered on the platform does not match the package name and signature of the application you are currently testing.
             */
            String code = bundle.getString("code");//Get it directly from bundle s
            if (!TextUtils.isEmpty(code)) {
                Toast.makeText(OAuthActivity.this, "Incorrect signature", Toast.LENGTH_SHORT).show();
            }
        }
//            String phoneNum = mAccessToken.getPhoneNum(); // / can be obtained by authorizing login via SMS, which demo does not implement.
    }

    /**
     * 1.Only SSO authorization, when SSO authorizes Activity to exit, the function is called.
     * 2.only
     */
    @Override
    protected void onActivityResult(int requestCode, int resultCode, Intent data) {
        super.onActivityResult(requestCode, resultCode, data);
        //SSO Authorization Callback
        //Important: The activity that initiates sso login must rewrite onActivty Results
        if (mSsoHandler != null) {
            mSsoHandler.authorizeCallBack(requestCode, resultCode, data);
        }
}- There is also access to user information
 /**
     * Getting User Personal Information
     */
    private void getUserInfo() {
        //Getting User Information Interface
        mUsersAPI = new UsersAPI(OAuthActivity.this,Constants.APP_KEY,mAccessToken);
        System.out.println("mUsersAPI  ----->   " + mUsersAPI.toString());

        //Call interface
        long uid = Long.parseLong(mAccessToken.getUid());
        System.out.println("--------------uid-------------->    " + uid);
        mUsersAPI.show(uid, mListener);//Pass the uid to listener and receive the user's personal information in json format through uid in the listener callback
    }

    /**
     * Implement asynchronous request interface callback and parse User information directly in callback
     */
    private RequestListener mListener = new RequestListener() {
        @Override
        public void onComplete(String response) {
            if (!TextUtils.isEmpty(response)) {
                //Call User parse to parse JSON strings into User objects
                User user = User.parse(response);
                String nickName = user.screen_name;
                Constants.name = user.screen_name;
                Constants.gender = user.gender;
                Constants.location = user.location;
//                Toast.makeText(LogInActivity.this, "User's nickname:" + nickName, Toast.LENGTH_SHORT).show();
            }
        }

        /**
         *If the logged-in account is not the registered application account when running the test, then you need to go:
         *Open Platform -"Management Center -" Application Information -"Test Information -" Add a test account (fill in the user nickname)!
         * Otherwise, the following exception will be thrown
         */
        @Override
        public void onWeiboException(WeiboException e) {
            e.printStackTrace();
            Toast.makeText(OAuthActivity.this, "Abnormal access to user's personal information", Toast.LENGTH_SHORT).show();
        }
    };
Last
- In truth, it was a great success.
- Upload the source code for my test, and click Here download