This article describes how to deploy a sharded database with adg function.
1. Environment introduction
The roles and database versions of each node are shown in the following table: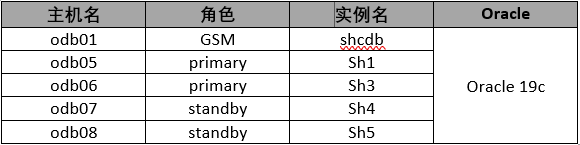
The instance name is named by the system itself.
2. Create Shard Catalog Database
Here we use the silent method to create the directory database on odb01.
[oracle@odb01 ~]$ vi /tmp/dbca.rsp
responseFileVersion=/oracle/assistants/rspfmt_dbca_response_schema_v12.2.0
gdbName=shcdb
sid=shcdb
databaseConfigType=SI
RACOneNodeServiceName=
policyManaged=false
createServerPool=false
force=false
createAsContainerDatabase=false
useLocalUndoForPDBs=true
templateName=/u01/app/oracle/product/19.3.0/db_1/assistants/dbca/templates/General_Purpose.dbc
sysPassword=abcABC12
systemPassword=abcABC12
serviceUserPassword=abcABC12
emConfiguration=DBEXPRESS
emExpressPort=5500
runCVUChecks=FALSE
dbsnmpPassword=abcABC12
dvConfiguration=false
olsConfiguration=false
datafileJarLocation={ORACLE_HOME}/assistants/dbca/templates/
datafileDestination={ORACLE_BASE}/oradata/{DB_UNIQUE_NAME}/
recoveryAreaDestination={ORACLE_BASE}/fast_recovery_area/{DB_UNIQUE_NAME}
storageType=FS
characterSet=ZHS16GBK
nationalCharacterSet=AL16UTF16
registerWithDirService=false
variables=ORACLE_BASE_HOME=/u01/app/oracle/product/19.3.0/db_1,DB_UNIQUE_NAME=shcdb,ORACLE_BASE=/u01/app/oracle,PDB_NAME=,DB_NAME=shcdb,ORACLE_HOME=/u01/app/oracle/product/19.3.0/db_1,SID=shcdb
initParams=sga_target=3GB,nls_language=AMERICAN,remote_login_passwordfile=EXCLUSIVE,db_create_file_dest={ORACLE_BASE}/oradata/{DB_UNIQUE_NAME}/,audit_file_dest={ORACLE_BASE}/admin/{DB_UNIQUE_NAME}/adump,processes=1000,pga_aggregate_target=1GB,nls_territory=AMERICA,db_recovery_file_dest_size=30GB,open_cursors=300,db_name=shcdb,db_recovery_file_dest={ORACLE_BASE}/fast_recovery_area/{DB_UNIQUE_NAME},audit_trail=NONE
sampleSchema=false
memoryPercentage=65
databaseType=MULTIPURPOSE
automaticMemoryManagement=false
totalMemory=0
[oracle@odb01 ~]$ dbca -silent -ignorePreReqs -createDatabase -responseFile /tmp/dbca.rsp -enableArchive true -redoLogFileSize 1024
After the database is created, execute the following SQL, and restart the database instance.
alter system set open_links=16 scope=spfile;
alter system set open_links_per_instance=16 scope=spfile;
alter user gsmcatuser account unlock;
alter user gsmcatuser identified by oracle;
create user gdsadmin identified by oracle;
GRANT connect, create session, gsmadmin_role to gdsadmin;
grant inherit privileges on user SYS to GSMADMIN_INTERNAL;
execute dbms_xdb.sethttpport(8080);
commit;
@?/rdbms/admin/prvtrsch.plb
exec DBMS_SCHEDULER.SET_AGENT_REGISTRATION_PASS('oracle');
SQL> shutdown immediate
SQL> startup
3. Install and configure GSM
The installation of GSM is very simple. Here we use the silent mode to install. The contents of the silent file are as follows:
[oracle@odb01 ~]$ vi /tmp/gsm.rsp
oracle.install.responseFileVersion=/oracle/install/rspfmt_gsminstall_response_schema_v19.0.0
UNIX_GROUP_NAME=oinstall
INVENTORY_LOCATION=/u01/app/oraInventory
ORACLE_HOME=/u01/app/oracle/product/19.3.0/gsm
ORACLE_BASE=/u01/app/oracle
[oracle@odb01 ~]$ /u02/tmp/gsm/runInstaller -silent -ignorePrereq -responseFile /tmp/gsm.rsp
- Create shard catalog
[oracle@odb01 ~]$ gdsctl
GDSCTL: Version 19.0.0.0.0 - Production on Mon Jul 15 11:09:20 CST 2019

Copyright (c) 2011, 2019, Oracle.  All rights reserved.

Welcome to GDSCTL, type "help" for information.

Warning:  GSM  is not set automatically because gsm.ora does not contain GSM entries. Use "set  gsm" command to set GSM for the session.
Current GSM is set to GSMORA
GDSCTL> create shardcatalog -database odb01:1521:shcdb -chunks 12 -user gdsadmin/oracle -sdb shcdb -region region1,region2
GDSCTL> add gsm -gsm sharddirector1 -listener 1531 -pwd oracle -catalog odb01:1521:shcdb -region region1
GDSCTL> add gsm -gsm sharddirector2 -listener 1531 -pwd oracle -catalog odb01:1521:shcdb -region region2
GDSCTL> start gsm -gsm sharddirector1
-
Add operating system credentials
GDSCTL> add credential -credential cre_reg1 -osaccount oracle -ospassword oracle
- Start agent on shard node and register with shard catalog
[oracle@odb05 ~]$ schagent -start;echo oracle|schagent -registerdatabase odb01 8080
[oracle@odb06 ~]$ schagent -start;echo oracle|schagent -registerdatabase odb01 8080
[oracle@odb07 ~]$ schagent -start;echo oracle|schagent -registerdatabase odb01 8080
[oracle@odb08 ~]$ schagent -start;echo oracle|schagent -registerdatabase odb01 8080
- Create database file directory on shard node
This path should be consistent with the path of shard catalog database.[oracle@odb05 ~]$ mkdir /u01/app/oracle/{oradata,fast_recovery_area} [oracle@odb06 ~]$ mkdir /u01/app/oracle/{oradata,fast_recovery_area} [oracle@odb07 ~]$ mkdir /u01/app/oracle/{oradata,fast_recovery_area} [oracle@odb08 ~]$ mkdir /u01/app/oracle/{oradata,fast_recovery_area}
4. Deploy system managed sharded database
The primary group and standby group are created here.
- Create shardgroup
GDSCTL> add shardgroup -shardgroup primary_sgp -region region1 -deploy_as primary
GDSCTL> add shardgroup -shardgroup standby_sgp -region region2 -deploy_as active_standby
- Add members to group
odb05 and odb06 are added to the primary group; odb07 and odb08 are added to the standby group.
GDSCTL> add invitednode odb05
GDSCTL> create shard -shardgroup primary_sgp -destination odb05 -credential cre_reg1
The operation completed successfully
DB Unique Name: sh1
GDSCTL> add invitednode odb06
GDSCTL> create shard -shardgroup primary_sgp -destination odb06 -credential cre_reg1
The operation completed successfully
DB Unique Name: sh3
GDSCTL> add invitednode odb07
GDSCTL> create shard -shardgroup standby_sgp -destination odb07 -credential cre_reg1
The operation completed successfully
DB Unique Name: sh4
GDSCTL> add invitednode odb08
GDSCTL> create shard -shardgroup standby_sgp -destination odb08 -credential cre_reg1
The operation completed successfully
DB Unique Name: sh5
Use the config command to read the configuration information for verification, as shown below: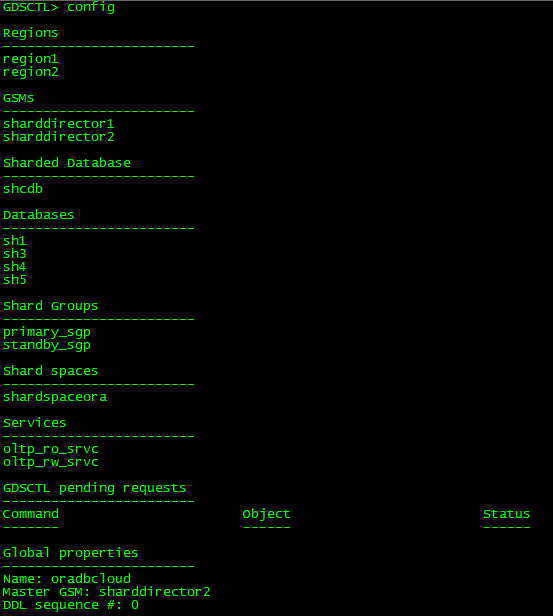

- Deploying shards
Execute the deploy command to deploy at each node.GDSCTL> deploy deploy: examining configuration... deploy: deploying primary shard 'sh1' ... deploy: network listener configuration successful at destination 'odb05' deploy: starting DBCA at destination 'odb05' to create primary shard 'sh1' ... deploy: deploying primary shard 'sh3' ... deploy: network listener configuration successful at destination 'odb06' deploy: starting DBCA at destination 'odb06' to create primary shard 'sh3' ... deploy: waiting for 2 DBCA primary creation job(s) to complete... deploy: waiting for 2 DBCA primary creation job(s) to complete... deploy: waiting for 2 DBCA primary creation job(s) to complete... deploy: waiting for 2 DBCA primary creation job(s) to complete... deploy: waiting for 2 DBCA primary creation job(s) to complete... deploy: waiting for 2 DBCA primary creation job(s) to complete... deploy: waiting for 2 DBCA primary creation job(s) to complete... deploy: waiting for 2 DBCA primary creation job(s) to complete... deploy: waiting for 2 DBCA primary creation job(s) to complete... deploy: waiting for 2 DBCA primary creation job(s) to complete... deploy: waiting for 2 DBCA primary creation job(s) to complete... deploy: waiting for 2 DBCA primary creation job(s) to complete... deploy: DBCA primary creation job succeeded at destination 'odb05' for shard 'sh1' deploy: deploying standby shard 'sh4' ... deploy: network listener configuration successful at destination 'odb07' deploy: starting DBCA at destination 'odb07' to create standby shard 'sh4' ... deploy: DBCA primary creation job succeeded at destination 'odb06' for shard 'sh3' deploy: deploying standby shard 'sh5' ... deploy: network listener configuration successful at destination 'odb08' deploy: starting DBCA at destination 'odb08' to create standby shard 'sh5' ... deploy: waiting for 2 DBCA standby creation job(s) to complete... deploy: waiting for 2 DBCA standby creation job(s) to complete... deploy: waiting for 2 DBCA standby creation job(s) to complete... deploy: waiting for 2 DBCA standby creation job(s) to complete... deploy: waiting for 2 DBCA standby creation job(s) to complete... deploy: DBCA standby creation job succeeded at destination 'odb07' for shard 'sh4' deploy: waiting for 1 DBCA standby creation job(s) to complete... deploy: DBCA standby creation job succeeded at destination 'odb08' for shard 'sh5' deploy: requesting Data Guard configuration on shards via GSM deploy: shards configured successfully The operation completed successfully
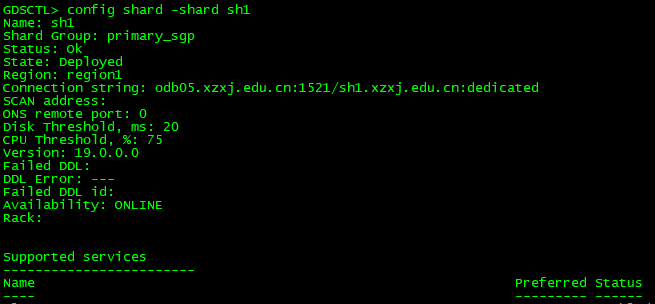
After the deployment is completed, verify it, as shown in the following figure:

- Add global service
GDSCTL> add service -service oltp_rw_srvc -role primary
The operation completed successfully
GDSCTL> start service -service oltp_rw_srvc
The operation completed successfully
GDSCTL> add service -service oltp_ro_srvc -role physical_standby
The operation completed successfully
GDSCTL> start service -service oltp_ro_srvc
The operation completed successfully
GDSCTL> services
Service "oltp_ro_srvc.shcdb.oradbcloud" has 2 instance(s). Affinity: ANYWHERE
   Instance "shcdb%21", name: "sh4", db: "sh4", region: "region2", status: ready.
   Instance "shcdb%31", name: "sh5", db: "sh5", region: "region2", status: ready.
Service "oltp_rw_srvc.shcdb.oradbcloud" has 2 instance(s). Affinity: ANYWHERE
   Instance "shcdb%1", name: "sh1", db: "sh1", region: "region1", status: ready.
   Instance "shcdb%11", name: "sh3", db: "sh3", region: "region1", status: ready.
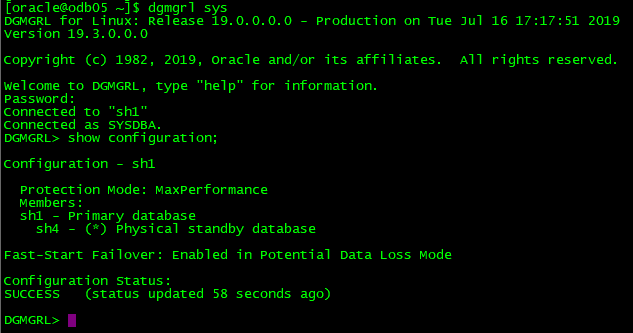
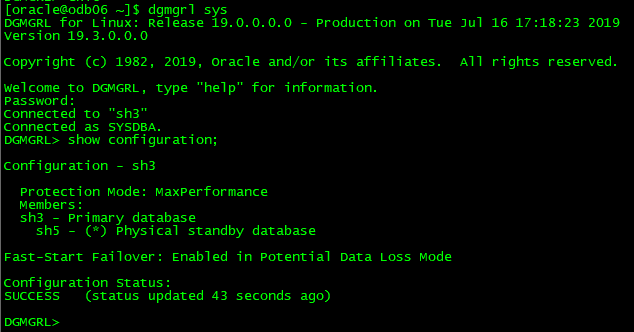
- Verify DataGuard status
Reference: Using Oracle Sharding