Variable naming
1. It can only contain numbers, underscores and letters
2. Can only start with underscore or letter!
Variable level
Global: set from the command line or configuration file
Play: set in play and related structures
Host: tasks collected or registered by lists, facts
Variable priority setting:
Narrow and wide area
Variable setting and usage
1. Directly define variables in playbook
For example:
vim user.yml

---
- name: test var
  hosts: all
  vars:
    USER: westosuser
  tasks:
    - name: create user
      user:
        name: "{{USER}}"
        state: present
After successful execution, check whether the user exists:
Result: Yes

2. Define variables in the file
For example:
vim user_list.yml
---
USER: westosuser
vim test.yml
---
- name: del User
  hosts: all
  vars_files:
    ./user_list.yml
  tasks:
    - name: del user
      user:
        name: "{{USER}}"
        state: absent
Execute playbook as follows:
 westosuser deleted
3. Use variables
tasks:
- name: create user
user:
name: "{{ USER }}"
4. Set host variables and list variables
Used when defining host variables and manifest variables
For example: (IP is used casually)
vim inventory

[list1]
172.25.1.10
[list2]
172.25.1.20
[list3]
172.25.1.10
172.25.1.20
[list1:vars] #Write list1 list directly in hosts
USER=westosuser
vim test.yml
---
- name: test var
- hosts: list1
- tasks:
   - name: create user
     user:
       name: "{{USER}}"
       state: present
5. Directory setting variables
group_vars ## list variable. The file name in the directory is consistent with the host list name
host_vars ## host variable. The file name in the directory is consistent with the host name
The tests are as follows:
vim inventory
Add list1 172.25.254.229
[westos]
172.25.76.6
172.25.76.7
[list1]
172.25.76.6
vim test.yml
---
- name: Create User
  hosts: list1
  tasks:
    - name: create user
      user:
        name: "{{USER}}"
        state: present
Then write: group_vars, manifest variable, host_vars host variable

The tests are as follows:
ansible-playbook -i inventory test.yml
View user westos123 on the controlled machine server6 as follows:

6. Override variables with commands
ansible-playbook user.yml -i inventory -e "USER=lcf"
In this way, you do not need to modify the user of test.yml, you can quickly specify the user and execute it!
The tests after execution are as follows:

7. Use an array to set variables
vim user_var.yml
vim user.yml
The contents are as follows:
vim user_var.yml
---
USER:
  lcf:
    age: 18
    obj: linux

  westos:
    age: 20
    obj: java
vim user.yml
- name: Create User
  hosts: all
  vars_files:
    ./user_var.yml

  tasks:
    - name: create user
      debug:
        msg:  "{{USER['lee']['age']}}{{USER.westos.obj}}"
The tests are as follows:
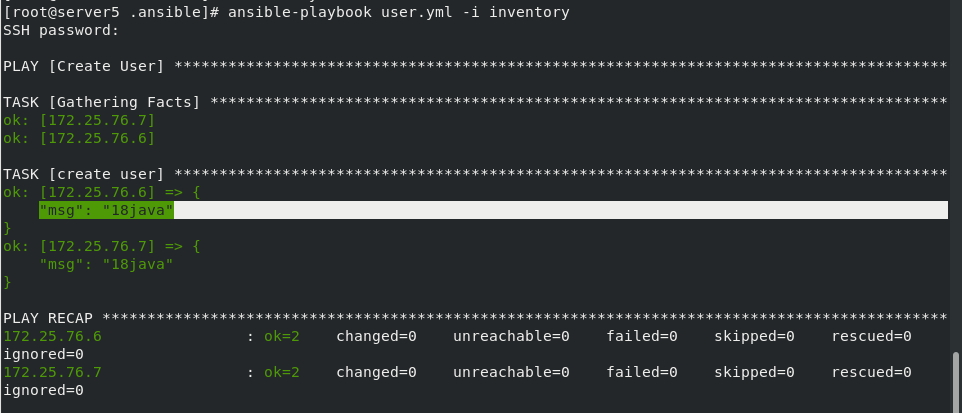
During execution, msg will be output: age 18, and occupation java
practice
Create two virtual hosts and set the default release test page
create web vhost
www.westos.com:80 ------ > /var/www/html
linux.westos.com:80 ------> /var/www/virtual/westos.com/linux
vim vhost.yml

---
- name: vhost
  hosts: all
  vars:
    - web1:
        name: www.westos.com
        port: 80
        documentroot: /var/www/html
        index: www.westos.com page
    - web2:
        name: linux.westos.com
        port: 80
        documentroot: /var/www/virtual/westos.com/linux/html
        index: linux.westos.com page
  tasks:
    - name: install web server
      dnf:
        name: httpd
        state: latest
    - name: configure web server
      copy:
        dest: /etc/httpd/conf.d/vhost.conf
        content:
          "<VirtualHost _default_:80>\n  DocumentRoot /var/www/html\n  CustomLog logs/default.log combined\n</VirtualHost>\n<VirtualHost *:{{web1.port}}>\n  ServerName {{web1.name}}\n  DocumentRoot {{web1.documentroot}}\n  CustomLog logs/{{web1.name}}.log combined\n</VirtualHost>\n\n<VirtualHost *:{{web2.port}}>\n  ServerName {{web2.name}}\n   DocumentRoot {{web2.documentroot}}\n  CustomLog logs/{{web2.name}}.log combined\n</VirtualHost>"
    - name: create documentroot dir
      file:
        path: "{{item}}"
        state: directory
      loop:
        - "{{web1.documentroot}}"
        - "{{web2.documentroot}}"
    - name: create index
      copy:
        content: "{{item.index_content}}"
        dest: "{{item.index_file}}"
      loop:
        - index_file: "{{web1.documentroot}}/index.html"
          index_content: "{{web1.index}}"
        - index_file: "{{web2.documentroot}}/index.html"
          index_content: "{{web2.index}}"
    - name: restart apache
      service:
        name: httpd
        state: restarted
        enabled: yes
    - name: firewalld configure
      firewalld:
         service: http
         state: enabled
         permanent: yes
         immediate: yes
The tests are as follows:
Do a good job of local parsing, and then access

8. Register variables
register registers the module output to the specified string
---
- name: test register
  hosts: list1
  tasks:
    - name: hostname
      shell:
        hostname
      register: info
    - name: show messages
      debug:
        msg: "{{info['stdout']}}"
The tests are as follows:
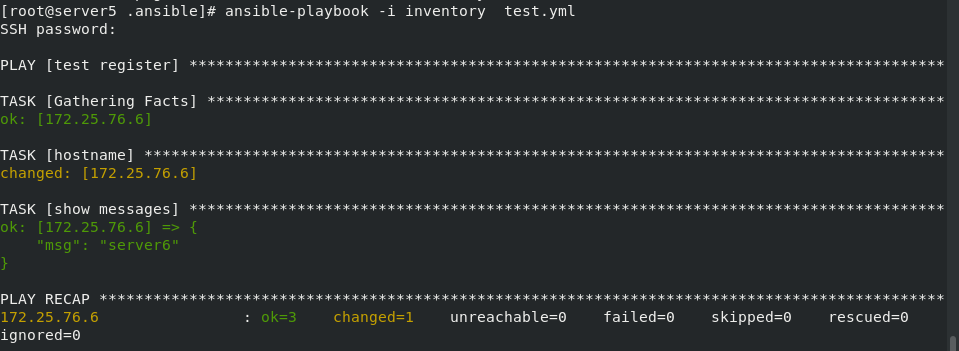
When executing playbook, the host name is output!
9. Factual variables
Fact variables are variables automatically detected by ansible in the controlled host
There is also host related information in the fact variable
When the host related information needs to be used, there is no need to collect and assign values, and it can be called directly
Because the variable information is system information, it cannot be arbitrarily set to collect information only, so it is become a fact variable.
When we don't know the parameters of the system information, we can check them in the system:
The method is:
ansible all -m setup | less
All system parameters exist here, so you can find your own parameters
/fqdn: find fqdn, and the results are as follows
You can know the specific name of the parameter to view the host name, which can be used directly

For example:
vim test.yml
---
- name: test
hosts: list1
tasks:
- name: show
debug:
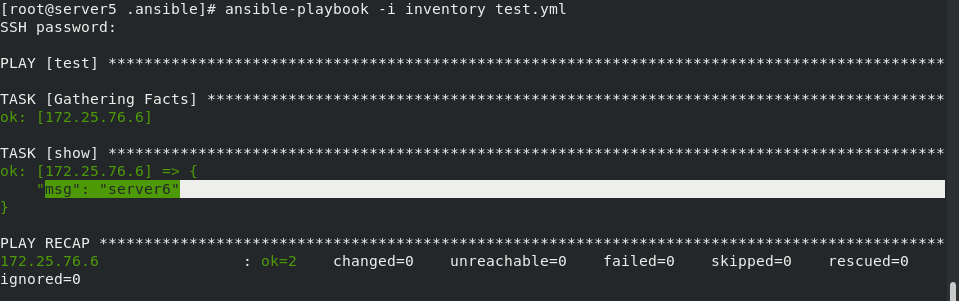
msg: "{{ansible_facts['fqdn']}}"
ansible-playbook -i inventory test.yml
When testing, it is equivalent to outputting the host name:
msg: followed by the hostname of the controlled machine!
Exercise script
Collect the ip and hostname of the host and
hostname:
ip:
Output as / etc/motd!
- name: test
  hosts: list1
  tasks:
    - name: info
      copy:
        content: "hostname: {{ansible_facts['fqdn']}}\nip: {{ansible_facts['eth0']['ipv4']['address']}}\n"
        dest: /etc/motd
The tests are as follows:
ansible-playbook -i inventory test.yml
Execution:

10. Magic variables
hostvars: ##ansible software internal information
group_names: ## current managed host group
Groups: ## lists all groups and hosts in the list
inventory_hostname: ## contains the name of the currently managed host configured in the list
JINJA2 template
Jinja2 is the next widely used template engine in Python
His design idea comes from Django's template engine,
And extends its syntax and a series of powerful functions.
One of the most significant is the addition of sandbox execution function and optional automatic escape function
j2 template writing rules
for loop
vim users.yml
users:

    westos
    linux
    ansible
vim test.j2
{% for NAME in users %}
{{ NAME }}
{%endfor%}
if decision
{% for NAME in users if not NAME == "ansible" %}
User number {{loop.index}} - {{ NAME }}
{%endfor%}
loop.index ##Loop iteration counting starts with 1
loop.index0 ##Loop iteration count starts at 0
{% for user in students %}
name: {{user['name']}}
{%if user['age'] is defined%}
age: {{user['age']}}
{%endif%}
{% if user['age'] is not defined %}
age: null
{% endif%}
obj: {{user['obj']}}
{%endfor%}
Application of j2 template in playbook
#playbook1
---
- name: test register
  hosts: xxxx
  tasks:
    - name: create hosts
      template:
        src: ./xxxx.j2
        dest: /mnt/hosts

#playbook2
---
- name: test.j2
  hosts: 172.25.0.254
  vars:
    students:
      - name: student1
        obj: linux

      - name: student2
        age: 18
        obj: linux

  tasks:
    - template:
        src: ./test.j2
        dest: /mnt/list
Exercise script
Using j2 is different from the previous one
create web vhost
www.westos.com 80 ------ > /var/www/html
linux.westos.com 80 ------> /var/www/westos.org/linux
 vim vhost.j2

 {% for WEB in WEBS%}
 {% if WEB['NAME'] is not defined %}
 <VirtualHost _default_:80>
 {% endif%}
 {% if WEB['NAME'] is  defined %}
 <VirtualHost *:80>
 ServerName {{ WEB['NAME'] }}
 {% endif%}
 DocumentRoot {{ WEB['DOC'] }}
 </VirtualHost>
 {% endfor%}
vim apache.yml

---
- name: install web server
  hosts: all
  vars:
    WEBS:
      - DOC: /var/www/html
        INDEX: /var/www/html/index.html
        INDEX_TEXT: www.westos.org
      - NAME: linux.westos.org
        DOC: /var/www/westos.org/linux
        INDEX: /var/www/westos.org/linux/index.html
        INDEX_TEXT: linux.westos.org
  tasks:
    - name: install apache
      yum:
        name: httpd
        state: present

    - name: create vhosts configure file
      template:
		src: ./vhost.j2
        dest: /etc/httpd/conf.d/vhosts.conf
      notify: restart httpd

    - name: create html dir
      file:
        path: "{{ item['DOC'] }}"
        state: directory
      loop: "{{ WEBS }}"

    - name: create index.html
      copy:
        dest: "{{ item['INDEX']}}"
        content: "{{ item['INDEX_TEXT'] }}"
      loop: "{{ WEBS }}"

    - name: start web server
      service:
		name: httpd
        state: started
        enabled: yes

    - name: set firewalld
      firewalld:
        service:  http
        permanent: yes
        state: enabled
        immediate: yes
  handlers:
    - name: restart httpd
      service:
        name: httpd
        state: restarted
Then test the web content:

Ansible encryption control
#Create build file
1.
ansible-vault create westos

2.
vim westos-vault
123456

ansible-vault create --vault-password-file=westos-vault westos

#Encrypt existing files
ansible-vault encrypt test


#View encrypted files
ansible-vault view westos
ansible-vault view --vault-password-file=westos-valut westos

#Edit encrypted file

ansible-vault edit westos1
ansible-vault edit --vault-password-file=westos-valut westos

##Decrypt file
ansible-vault decrypt westos 			##File permanent decryption
ansible-vault decrypt westos --output=linux	##Decrypt the file and save it as linux

##Change password
ansible-vault rekey westos1
ansible-vault rekey westos1 --new-vault-password-file=key1


#playbook#
ansible-playbook apache_install.yml  --ask-vault-pass
Create encrypted file
Check the file westos again and find that it has been encrypted and cannot be viewed!

Specify a password file to create an encrypted file:
vim westos-vault
123456
ansible-vault create --vault-password-file=westos-vault westos
For existing files, encrypt:
And view the encrypted files
ansible-vault encrypt test.yml
ansible-vault view test.yml
Edit the existing encrypted file directly, and edit the encrypted file using the password file
ansible-vault edit westos
ansible-vault edit --vault-password-file=westos-vault westos
Decrypt the existing encrypted file
ansible-vault decrypt westos
Decrypt the encrypted file to a file with a new name
Just add:
–output=xxxx
ansible-vault decrypt westos --output=1.yml
To change the password for an encrypted file:
ansible-vault rekey westos1
For the encrypted playbook script, you need to ask the password to allow it when running, otherwise it will fail