1. Version compatibility between PyTorch and TensorboardX
In the use of tensorflow, people often use tensorboard to visualize data, such as the change of model structure and loss function. In fact, PyTorch can also use TensorboardX to visualize data. PyTorch has its own visdom module to realize visualization, but TensorboardX is easier to use in terms of convenient interface and brief introduction.
This article briefly introduces my own attempts and problems. Let's put the conclusion first: (friends who don't want to look at the conclusion directly)
For PyTorch 1.1.0 and earlier, it is better to use tensorboardX 1.7 and earlier, because the add graph method is updated in 1.8, which may not be available. The add graph method is used to visualize the model structure.
PyTorch 1.2.0 and above can use the updated tensorboardX. In fact, the above method has better support for the newer version of PyTorch.
Here's a personal experience to share:
I wanted to try TensorboardX myself, so I installed it through pip, as follows:
pip3 install tensorboardX
Due to the lack of understanding of its update, there is no specified version, which is the 2.0 version of tensorboardX at this time.
My PyTorch version is 1.1.0 and my system is Ubuntu 19.04
Take the example of AlexNet recognition of handwritten numbers written in the previous blog, first of all, I tried to visualize loss, and made a little update in the method of train:
from tensorboardX import SummaryWriter
def train(epochs, trainLoader, model, device, Lr, momen):
  writer = SummaryWriter(logdir='./log')
  criterion = nn.CrossEntropyLoss()
  optimizer = torch.optim.SGD(model.parameters(), lr=Lr, momentum=momen)
  model.to(device)
  model.train()
  numInLoader = len(trainLoader)
  for e in range(epochs):
    for i, (imgs, labels) in enumerate(trainLoader):
      imgs = imgs.to(device)
      labels = labels.to(device)
      out = model(imgs)
      loss = criterion(out, labels)
      optimizer.zero_grad() # if don't call zero_grad, the grad of each batch will be accumulated
      loss.backward()
      optimizer.step()
      if i%20==0:
        print('epoch: {}, batch: {}, loss: {}'.format(e + 1, i + 1, loss.data))
        niter = e * numInLoader + i
        with writer:
          writer.add_scalars('Train_loss', {"train_loss": loss.data.item()}, niter)
  torch.save(model, 'myAlexMnistDemo.pth') # save net model and parameters
First, import the summarywriter from tensorboardX,
writer = SummaryWriter(logdir='./log',comment='myAlexNet')
Define a writer. logdir is the log directory address. Other parameters of SummaryWriter's constructor include:
def __init__(self, logdir=None, comment='', purge_step=None, max_queue=10,
                 flush_secs=120, filename_suffix='', write_to_disk=True, log_dir=None, **kwargs):
        """Creates a `SummaryWriter` that will write out events and summaries
        to the event file.

        Args:
            logdir (string): Save directory location. Default is
              runs/**CURRENT_DATETIME_HOSTNAME**, which changes after each run.
              Use hierarchical folder structure to compare
              between runs easily. e.g. pass in 'runs/exp1', 'runs/exp2', etc.
              for each new experiment to compare across them.
            comment (string): Comment logdir suffix appended to the default
              ``logdir``. If ``logdir`` is assigned, this argument has no effect.
            purge_step (int):
              When logging crashes at step :math:`T+X` and restarts at step :math:`T`,
              any events whose global_step larger or equal to :math:`T` will be
              purged and hidden from TensorBoard.
              Note that crashed and resumed experiments should have the same ``logdir``.
            max_queue (int): Size of the queue for pending events and
              summaries before one of the 'add' calls forces a flush to disk.
              Default is ten items.
            flush_secs (int): How often, in seconds, to flush the
              pending events and summaries to disk. Default is every two minutes.
            filename_suffix (string): Suffix added to all event filenames in
              the logdir directory. More details on filename construction in
              tensorboard.summary.writer.event_file_writer.EventFileWriter.
            write_to_disk (boolean):
              If pass `False`, SummaryWriter will not write to disk.
Next, add data to be visualized by adding scalars:
writer.add_scalars('Train_loss', {"train_loss": loss.data.item()}, niter)
The parameter list includes:
def add_scalars(self, main_tag, tag_scalar_dict, global_step=None, walltime=None):
        """Adds many scalar data to summary.

        Note that this function also keeps logged scalars in memory. In extreme case it explodes your RAM.

        Args:
            main_tag (string): The parent name for the tags
            tag_scalar_dict (dict): Key-value pair storing the tag and corresponding values
            global_step (int): Global step value to record
            walltime (float): Optional override default walltime (time.time()) of event
Global step can be regarded as the abscissa after drawing, and each iteration or each epoch records data;
Tag ﹣ scalar ﹣ dict is the data to be observed. The parameter is a dict, the key is the data label, and the value is the data value.
In fact, the function of add Β scalars is to record the change of data with abscissa (number of iterations, etc.).
I record the data in the training stage. After the training, I execute:
tensorboard --logdir ./log --port 9999
Then open host:port in the browser to see the visualization results.
Here, my results are normal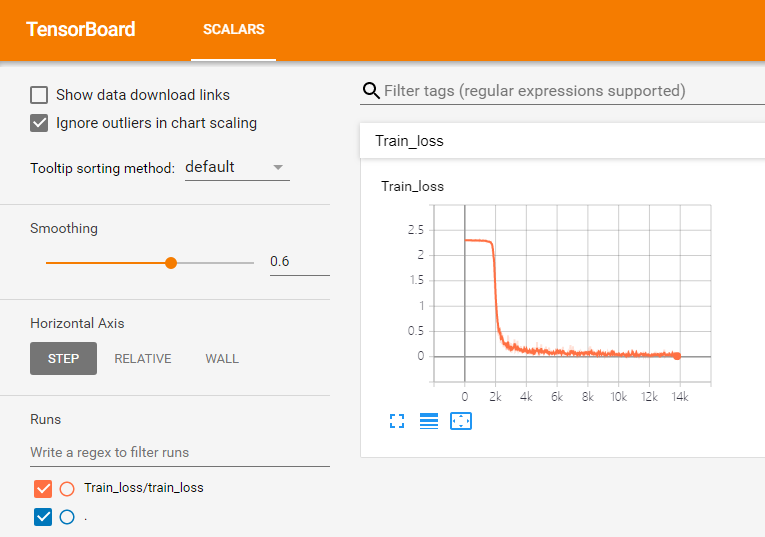
Well, I'm very satisfied. Next, I want to take a look at my network structure, so I joined:
dummyInput = torch.rand(1, 1, 28, 28).to(device)
  with writer:
    writer.add_graph(model,(dummyInput,))
The first parameter here is the network model to be visualized, followed by an analog input in the form of a tuple. In addition to the batch size, other dimensions should be consistent with the real input of the network.
However, there is such a mistake:
At this time, I find that the location of the call is after to(device), so I don't need cuda, so it becomes: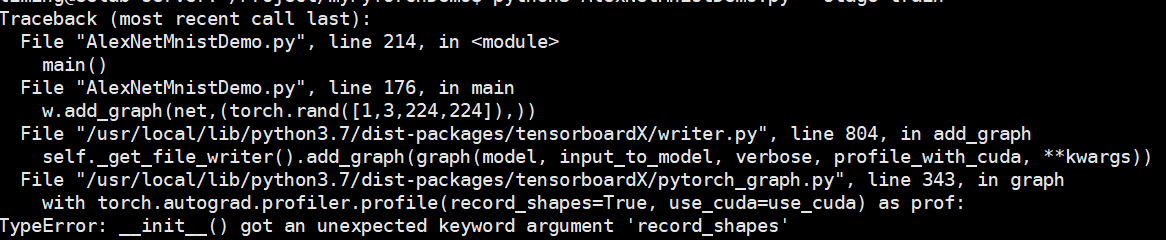
Find the init method of this profile class
There is no record? Shapes parameter.
According to my years of bug writing and debugging experience, well, it should be a version problem. Then came tensorboardX page of pypi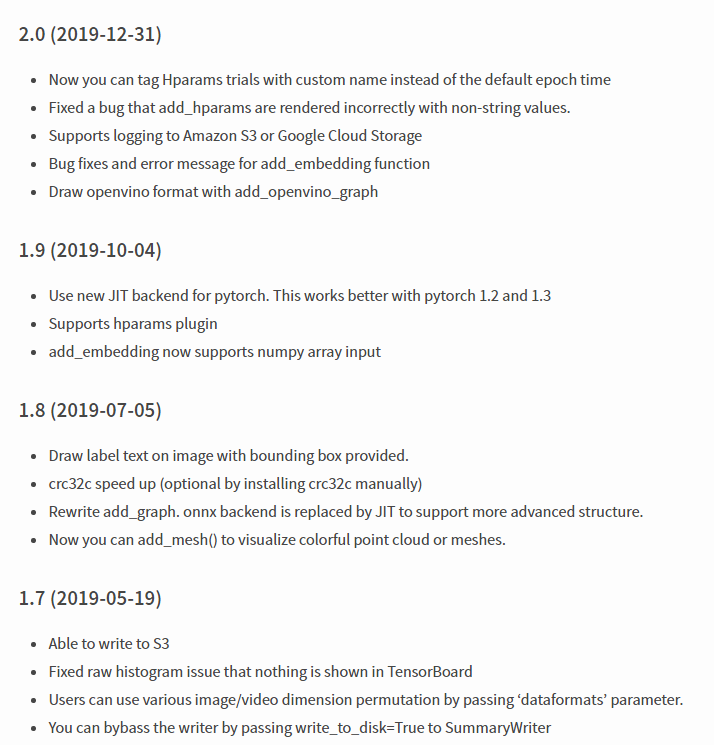
Indeed, in version 1.8, the implementation of the add graph method has been optimized and improved step by step. Although the PyTorch support for 1.2 / 1.3 is better according to his statement, the friends of 1.1.0 are very sad, so they have to uninstall it first and install it back to the version of tensorboardX 1.7
pip3 install tensorboardX==1.7
Then you can. After the program is finished, the shell uses the tensorbboard instruction to specify the log address, port number, and so on. Open it as follows: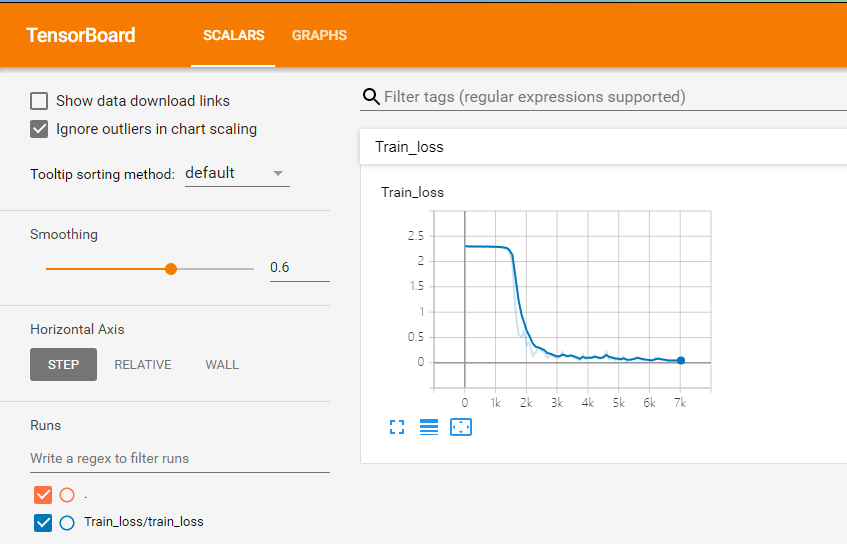
Click the graph above to see: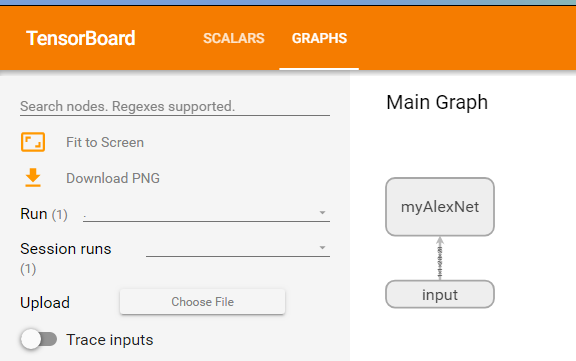
Double click the network to display details, including each layer and the tensor shape transferred between layers
In addition, according to the big guys, the add graph must be carried out under with [SummaryWriter], and I don't know why at present.
Later, I will update my PyTorch to 1.2.0 (CUDA 10.0 can't install 1.3.0, sad). Then I will try the visualization of PyTorch-1.2.0 + tensorboardX-2.0, and I will try some visualization tools such as visdom, which will be shared with you later.
2. About the use of tensorboardX
A lot of blogs have talked about this in detail. Let me just say it briefly.
First, define the SummaryWriter, and then call the add * series functions of the writer according to different needs:
Add or add scalars are data in the form of graphs, which are generally used to see the changes of accuracy, error, loss, etc;
Add graph shows network structure and propagation details
Add image. You can see the result of the middle feature map
Add audio
Add? Histogram histogram
Add? Text
Add PR curve precision recall
Add? Embedding tensor
There are many other ways to do this Here See.

