Correct posture of bioinformatics learning
2.4 Conda installs and configures bioinformatics software 2.4.1 Conda installation and configuration 2.4.2 basic use of CONDA 2.4.3 Conda channel 2.4.4 create different software running environments 2.4.5 removing a conda environment 2.4.6 Conda configuration R 2.4.7 simplified operation of CONDA environment 2.4.8 Conda environment backup 2.4.9 Conda environment export and import 2.4.10 what about core dump error/Segment fault / segment error in CONDA software installation 2.4.11 why is CONDA getting slower and slower? 2.4.12 how CONDA works 2.4.13 which step is CONDA slow? 2.4.14 how to speed up Conda solving environment 2.4.15 how can I download and speed up from outside the channel 2.4.16 use CONDA pack to directly copy a copy from the installed place (the same operating system)
Conda installs and configures bioinformatics software
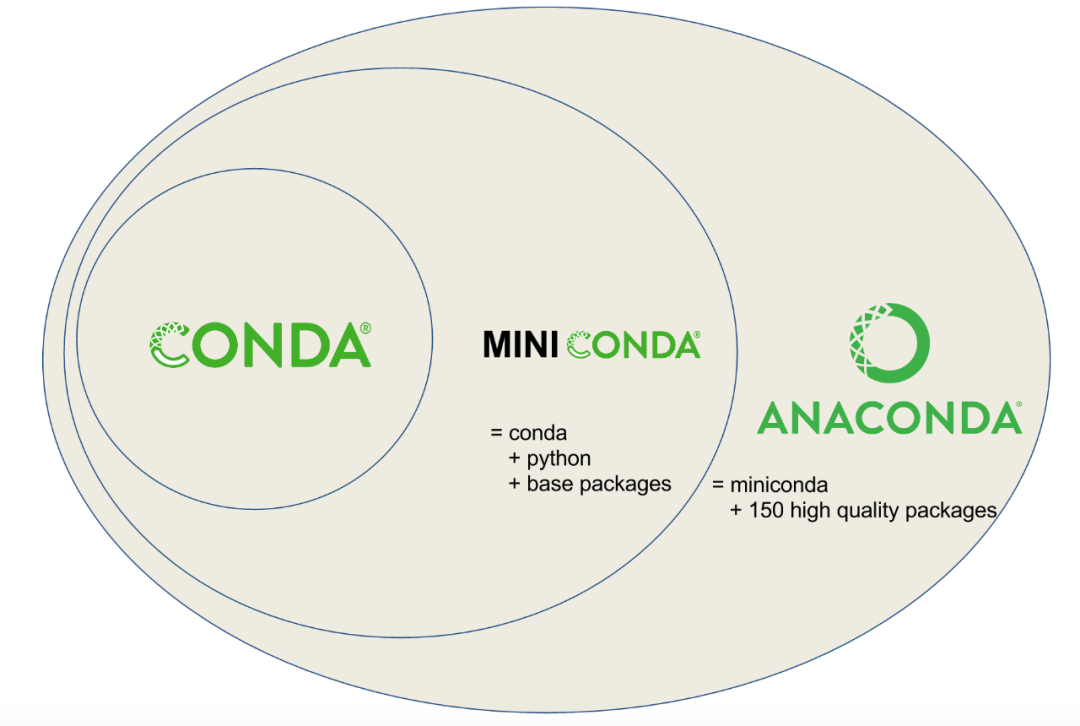
Conda is a general package management system designed to build and manage any type of software in any language. More software packages are usually integrated with Anaconda, https://www.Anaconda.com/products/individual )And Miniconda (only basic function package, https://Conda.io/Miniconda.html )Distributed together.
The first contact with Anaconda was for the installation of Python packages. Anaconda includes more than 100 commonly used Python packages. One click installation solves the pain of Python package installation. However, it was later found that it has more functions, especially the addition of bionconda( https://bioconda.github.io/index.html )After the channel, more than 7925 software for bioinformatics analysis can be installed with one click (the specific list is in: https://anaconda.org/bioconda/repo ), it eliminates the waste of compilation time and solves the problem of library file installation. In addition, its most attractive concept is its virtual software environment, which can simply configure different Python version environments, different Python package environments, different R environments and R package environments, which provides great convenience for complex applications and frequent updates of biological information software.
Conda installation and configuration
In link https://www.anaconda.com/products/individual After downloading the distribution package of the corresponding version of Anaconda or Miniconda, the installation is to run the following commands and operate step by step according to the prompts, mainly to modify the installation path (if you are a root user, you can install it in / Anaconda or any other directory, but it is good to have a short path; ordinary users can install it in a directory with their own permissions, such as ~ / miniconda2).
# The soft directory is the directory of conda installation, which can be modified by yourself
soft=~/miniconda2
echo 'export PATH="'${soft}'/bin:$PATH"' >>~/.bash_profile
export PATH="${soft}/bin:$PATH"
wget -c https://repo.anaconda.com/miniconda/Miniconda3-latest-Linux-x86_64.sh
bash Miniconda2-latest-Linux-x86_64.sh -b -f -p ${soft}
After installation, remember to add the bin folder under the installation path to the environment variable (we have added it for you in the above command).
Conda basic usage
After Conda is installed and configured, it can be used.
conda list # List installed packages
# conda all software names are lowercase
conda search <package ambigious name> # Search for the software package to be installed and get its completion name
Take search numpy as an example:
conda search numpy # *Indicates that the package for version is installed
Fetching package metadata ...............
numpy                        1.7.2           py27_blas_openblas_201  conda-forge     [blas_openblas]
                             1.7.2           py27_blas_openblas_202  conda-forge     [blas_openblas]
                             1.12.0                   py36_0  defaults
                             1.12.0             py36_nomkl_0  defaults        [nomkl]
                          *  1.12.1                   py27_0  defaults
                             1.12.1             py27_nomkl_0  defaults        [nomkl]
                             1.13.1                   py36_0  defaults
                             1.13.1             py36_nomkl_0  defaults        [nomkl]
numpy-indexed                0.3.2                    py27_0  conda-forge
                             1.0.47                   py35_0  conda-forge
                             1.0.47                   py36_0  conda-forge
numpy_groupies               0.9.6                    py27_0  conda-forge
                             0.9.6                    py35_0  conda-forge
                             0.9.6                    py36_0  conda-forge
numpy_sugar                  1.0.6                    py27_0  conda-forge
                             1.0.6                    py34_0  conda-forge
numpydoc                     0.6.0                    py27_0  conda-forge
                             0.6.0                    py34_0  conda-forge
xnumpy                       0.0.1                    py27_0  conda-forge
Installation package
conda install <package name> # Install package
# -y means agree to install. If you don't write, a prompt will pop up and you need to confirm again
conda install numpy=1.7.2 -y # Install a specific version of the package
conda remove <package name> # Remove package
Install R
# See below for details
# Install R and more than 80 common data analysis packages, including idplyr, shiny, ggplot2, tidyr, caret and nnet
conda install -c r r-base=4.0.2 r-essentials
# Install a single package
# conda install -c https://conda.binstar.org/bokeh ggplot
Update package
# Update the basic conda, and the new version of conda is faster to use
conda update -n base -c defaults conda

conda update r-base
Get help
conda -h # View the commands available to conda
conda install -h #View the help for the install subcommand
Just these commands can save a lot of installation trouble, but what if the software is not searched?
Conda's channel
Conda's default source access speed is somewhat slow, and domestic sources can be added. In addition, several sources can be added to facilitate the installation of more software, especially bioconda's installation of health information tools. Conda forge channel is maintained by Conda community and contains many general-purpose software that is not in the default channel. R channel is a backward compatibility channel, especially when using R3.3.1, Now you don't need to add them separately. The added channels have higher priority, so they are generally added in the order listed below. For details, see https://mirrors.tuna.tsinghua.edu.cn/help/anaconda/ (sometimes the Tsinghua image is unstable. When it is unstable, the official image is directly used, and the download speed is good in the morning).
conda config --add channels r # Optional # Lowest priority
conda config --add channels defaults
conda config --add channels conda-forge
conda config --add channels bioconda
conda config --add channels https://mirrors.tuna.tsinghua.edu.cn/anaconda/cloud/msys2/
# Anocanda Tsinghua mirror
conda config --add channels https://mirrors.tuna.tsinghua.edu.cn/anaconda/pkgs/free/
conda config --add channels https://mirrors.tuna.tsinghua.edu.cn/anaconda/pkgs/main/
conda config --add channels  https://mirrors.tuna.tsinghua.edu.cn/anaconda/cloud/cond-forge
# Tsinghua channel, highest priority
conda config --add channels https://mirrors.tuna.tsinghua.edu.cn/anaconda/cloud/bioconda/
conda config --set show_channel_urls yes
Note that the order of channels will affect the speed of solving environment and package download.
# Show existing channels
conda config --get channels
The configuration file of CONDA channel is generally in ~ /. condarc, and the contents are as follows. The global control CONDA is installed in conda_path/.condarc. See https://conda.io/docs/user-guide/configuration/admin-multi-user-install.html .
channels:
  - https://mirrors.tuna.tsinghua.edu.cn/anaconda/cloud/bioconda/
  - https://mirrors.tuna.tsinghua.edu.cn/anaconda/cloud/cond-forge
  - https://mirrors.tuna.tsinghua.edu.cn/anaconda/pkgs/main/
  - https://mirrors.tuna.tsinghua.edu.cn/anaconda/pkgs/free/ # Anocanda Tsinghua mirror
  - https://mirrors.tuna.tsinghua.edu.cn/anaconda/cloud/msys2/
  - bioconda
  - conda-forge
  - r
Create different software running environments
This is the most distinctive feature of Conda. You can create different environments and run multiple versions of different software at the same time.
The directory of the newly created software environment is anaconda_path/envs/enrironment_name. See the following three examples for details.
- Create an environment transcriptome and install common transcriptome analysis software
# Create a new environment named transcriptome
# The environment name is transcriptome
# Installing samtools multiqc rseqc in an environment
conda create -n transcriptome samtools multiqc rseqc

# If you want to continue the installation
conda install -n transcriptome fastqc salmon star stringtie sra-tools trimmomatic rmats rmats2sashimiplot

# Start a new environment
source activate transcriptome
salmon -h

# By default, it is installed in the envs / scriptome directory under anaconda_path (it will also be displayed in the screen output)
# There is a bin folder in this directory, which can be called by using the full path, as shown below
# anaconda_path/envs/transcriptome/bin/salmon -h # But sometimes it fails because of dependencies

source deactivate transcriptome
Many software can also use full PATH call without activating the environment. For example, anaconda_PATH / envs / scriptome / bin / salmon can directly use the salmon program, so we can put the directory anaconda_PATH / envs / scriptome / bin / into the environment variable according to the previous PATH introduction, and then we can directly call most programs in this environment.
The new version of conda will use conda activate scriptome to activate the environment by default.
A prompt will pop up when you use it for the first time. You need to run conda init:
conda activate qiime2-2020.6

CommandNotFoundError: Your shell has not been properly configured to use 'conda activate'.
To initialize your shell, run

    $ conda init <SHELL_NAME>

Currently supported shells are:
  - bash
  - fish
  - tcsh
  - xonsh
  - zsh
  - powershell

See 'conda init --help' for more information and options.

IMPORTANT: You may need to close and restart your shell after running 'conda init'.
However, I prefer to use source anaconda_path/bin/activate transcriptome to activate the environment, which is more flexible. In addition, if it is installed by the root user, it is not recommended to add the conda environment to the environment variables by default, which will cause unnecessary system conflicts. You can use it for a user, and configure the corresponding environment variables yourself.
After activating the environment, you will see an environment name before the command line prompt, such as the following display after activating qiime2-2020.6 environment.
ct@ehbio:~# source /anaconda3/bin/activate qiime2-2020.6
(qiime2-2020.6) ct@ehbio:~# which python
/anaconda3/envs/qiime2-2020.6/bin/python
(qiime2-2020.6) ct@ehbio:~# source /anaconda3/bin/deactivate
DeprecationWarning: 'source deactivate' is deprecated. Use 'conda deactivate'.
ct@ehbio:~# which python
/usr/bin/python
- Installing ete3 in the phylo environment
The reason is that there is a problem during the installation using the official recommended command. The packaging of py3.5 is in the py2.7 environment. The solution is to create a new py2.7 environment and install it.
# Create a new environment named phylo, and specify the python version installed in it as 2.7
conda create -n phylo python=2.7

# Installing ete3 in a phylo environment
# ete3 exists in two channels. Officials recommend using their own channel, but it is not successful
# -n specify installation environment - c specify download channel
# conda install -n phylo -c etetoolkit ete3 ete3_external_apps

# There is also ete3 in the bioconda channel. The following installation does not specify a specific channel,
# The installation will be found in sequence in the channels set earlier
conda install -n phylo ete3 ete3_external_apps

# Anaconda is installed by default_ Path in the envs/phylo directory (it will also be displayed in the screen output)
# There is a bin folder in this directory, which can be called by using the full path, as shown below
# anaconda_path/envs/phylo/bin/ete3 -h # But sometimes it fails because of dependencies

# Therefore, activating this installation environment is a less problematic way to use
source activate phylo

# Execute command operations in the new environment
ete3 -h
# Other operations

# Exit new environment
source deactivate phylo
- Create R environment Reference1
# Create a new conda environment called r, and install anaconda in it
conda create -n r anaconda

# Switch to r environment
source activate r

# Install r in the new environment
conda install -c r r

# Install R kernel for IPython notebook
conda install -c r r-irkernel

# Install ggplot
conda install -c https://conda.binstar.org/bokeh ggplot

# Finally, exit the new environment
source deactivate r
List all environments
conda env list

# conda environments:
#
                         /anaconda2
                         /anaconda2/envs/lefse
                         /anaconda2/envs/metagenome_env
                         /anaconda2/envs/metawrap
                         /anaconda2/envs/prokka_env
                         /anaconda2/envs/py3
                         /anaconda2/envs/r-environment
                         /anaconda2/envs/reseq
                         /anaconda2/envs/sourmash_env
                         /anaconda3/envs/qiime2-2020.6
Remove a conda environment
If the environment is no longer needed or something goes wrong, it can be removed. For example, if you need to remove the phylo environment, execute conda remove -n phylo --all.
Conda configuration R
After adding different sources, some sources are updated quickly and some are updated slowly. We often encounter the problem of different versions. Moreover, the priority of the software version is lower than that of the source. During the insurance period, first search for the appropriate version number, and then select installation.
conda search r-essentials

r-essentials                 1.0                    r3.2.1_0  r
                             1.0                   r3.2.1_0a  r
                             1.1                    r3.2.1_0  r
                             1.1                    r3.2.2_0  r
                             1.1                   r3.2.1_0a  r
                             1.1                   r3.2.2_0a  r
                             1.1                    r3.2.2_1  r
                             1.1                   r3.2.2_1a  r
                             1.4                           0  r
                             1.4.1                  r3.3.1_0  r
                             1.4.2                         0  r
                             1.4.2                  r3.3.1_0  r
                             1.4.3                  r3.3.1_0  r
                             1.5.0                         0  r
                             1.5.1                         0  r
                             1.5.2                  r3.3.2_0  r
                             1.5.2                  r3.4.1_0  r
                             1.6.0                  r3.4.1_0  r
                             1.0                    r3.2.1_0  defaults
                             1.0                   r3.2.1_0a  defaults
                             1.1                    r3.2.1_0  defaults
                             1.1                    r3.2.2_0  defaults
                             1.1                   r3.2.1_0a  defaults
                             1.1                   r3.2.2_0a  defaults
                             1.1                    r3.2.2_1  defaults
                             1.1                   r3.2.2_1a  defaults
                             1.4                           0  defaults
                             1.4.1                  r3.3.1_0  defaults
                             1.4.2                         0  defaults
                             1.4.2                  r3.3.1_0  defaults
                             1.4.3                  r3.3.1_0  defaults
                             1.5.0                         0  defaults
                             1.5.1                         0  defaults
                             1.5.2                  r3.3.2_0  defaults
                             1.5.2                  r3.4.1_0  defaults
                             1.6.0                  r3.4.1_0  defaults
                             1.5.2                  r3.3.2_0  conda-forge
                             1.5.2                  r3.3.2_0  https://mirrors.tuna.tsinghua.edu.cn/anaconda/cloud/conda-forge
It can be seen from the above that the source versions of Tsinghua are synchronized with CONDA forge. They are all old, and they are still installed in the specified r channel.
conda install -c r -n r r-essentials=1.6.0
R will be installed in CONDA_ In path / envs / R / bin, the soft chain can be used normally by linking it to the directory located in the environment variable. This is the flexible learning and application of environmental variables.
Conda environment simplifies operation
In order to facilitate the running of programs in different environments, I wrote a shell script (conda_env_run.sh), which runs as follows:
# -c: Indicates the actual command to run
# -e: Indicates the software environment that needs to be started, that is, the environment established by conda create above
# -b: Generally, you do not need to specify. If conda is not in the environment variable, you need to give the installation path of conda
conda_env_run.sh -c  'ete3 -h mod' -e phylo

conda_env_run.sh -c  'bwa mem -h' -e aligner -b "/usr/local/anaconda2/bin"
conda_env_run.sh is as follows
#!/bin/bash

#set -x

usage()
{
cat <<EOF
${txtcyn}

***CREATED BY Chen Tong (chentong_biology@163.com)***

Usage:

$0 options${txtrst}

${bldblu}Function${txtrst}:

This is designed to run conda program in given environment.
It will automatically activate the environment, run the program and
deactivate the environment.

Thress commands from conda, 'activate', 'conda', 'deactivate' must
be in PATH or you should spcify <-b> parameter.

${txtbld}OPTIONS${txtrst}:
    -c    Full command to be run ${bldred}[NECESSARY]${txtrst}
    -e    Environment name${bldred}[NECESSARY]${txtrst}
    -b    Conda path${bldred}[NECESSARY]${txtrst}
EOF
}

command_cmd=''
environment=''
conda_path=''

while getopts "hc:e:b:" OPTION
do
    case $OPTION in
        h)
            echo "Help mesage"
            usage
            exit 1
            ;;
        c)
            command_cmd=$OPTARG
            ;;
        e)
            environment=$OPTARG
            ;;
        b)
            conda_path=$OPTARG
            ;;
        ?)
            usage
            echo "Unknown parameters"
            exit 1
            ;;
    esac
done

if [ -z ${environment} ]; then
    echo 1>&2 "Please give command and environment."
    usage
    exit 1
fi

if ! [ -z ${conda_path} ]; then
    export PATH=${conda_path}:${PATH}
fi

source activate ${environment}
${command_cmd}
source deactivate ${environment}
Conda environment backup
Sometimes, the current environment will collapse when a new package is installed. Therefore, it is necessary to back up an environment. conda create -n python35copy --clone python35, and back up python35 as python35copy.
Conda environment export and import
During the training, you need to provide the teachers participating in the training with a script for configuring the environment. Before, you need to provide a Bash file. After all, you can complete the configuration of the whole environment. A simpler way is to export the environment and import it when configuring yourself.
# Suppose we have an environment called ehbio, which can be exported as a yml file
conda env export --file ehbio_env.yml --name ehbio

# Then change a computer and you can completely reproduce this environment
# Another advantage of this is that the version of the software is clearly listed in yml,
# It is much faster when using the conda solving environment
conda env create -f ehbio_env.yml
What about core dump error/Segment fault / segment error in Conda software installation
# wipe cache
# https://github.com/conda/conda/issues/7815
conda clean -a
Why is Conda getting slower and slower?
More and more software is included in Conda, and different versions of the software are retained. The index file of the software is getting larger and larger. When installing a new software, the search space for software that meets all software dependencies in the environment will also be larger and larger, resulting in slower and slower solving environment.
How does Conda work
Download the index information (repodata. JSON) of all software in the channel from the set channel (collecting package metadata (repodata. JSON))
Parse the information in repodata to obtain the information of all dependent packages
The SAT solver algorithm is used to determine which version of the package to download and their installation order
Download and install package
Conda, which step is slow?
The third step is mainly to determine the compatibility between the dependent packages of the package to be installed and the compatibility between the installed software, and obtain the package to be downloaded and the corresponding version.
How to speed up Conda
The latest version of CONDA is adopted (CONDA 4.7 is 3.5 times faster than CONDA 4.6, and Conda 4.8 should not be slower than 4.7)
Specify the version during installation to reduce the search space conda install python=3.7.4
Specifying the version of R when installing R package will also greatly reduce the search space (because of its large number, R package is also one of the reasons for the slow dependency resolution of biological software). conda install r-base=4.0.2 r-ggplot2=3.3.2
Use mamba to speed up software dependency resolution [mamba rewrites part of the resolution process in c + +, and the speed-up effect is obvious] (after installing mamba, you can replace conda with mamba for installation)
By default, when conda resolves software dependencies, it gives priority to the maximum version allowed. After setting the channel priority permission higher than the software version, conda can solve the dependency relationship faster and avoid the problem that the software dependency resolution cannot end due to the strange combination of defaults and conda forge channels: conda config --set channel_priority strict (this command only needs to be run once).
Create a new environment (conda env create -n env_name) and install the software. In this way, the compatibility with the existing software will not be considered. It can also greatly reduce the search space and improve the speed of resolving software dependencies.
If the installed software provides environment.yaml, the corresponding software versions in the file are clear and faster to resolve dependencies. You can also export the yaml file of a configured environment in the way provided above and read it directly when configuring other computers. (see for specific export method.) Bioconda software installation artifact: multi version coexistence, environment replication and environment export.
When adding Bioconda channel, pay attention to order, give conda-forge the highest priority, followed by bioconda. If you have added the channel before, adjust your order in ~/.condarc.
Based on the above combination, try the tools that have not been installed for many times before, and do it directly.
Download speed up
- Domestic image, see The software cannot be installed. The network speed may be slow! You are welcome to take away all domestic images such as Conda/R/pip/brew~~
- Change the network or copy the downloaded compressed package from a friend. Generally, it is under anaconda_root_dir/pkgs, and the copy is placed under its own anaconda3/pkgs. When downloading again, the system will recognize the downloaded package and skip it (not always valid).
- Get the names of all relevant packages and copy the downloaded installation package from your friends. If the copy fails to be recognized automatically, you can manually install conda install --offline local_path.
mamba install r-base=4.0.2 r-ggplot2=3.3.2 --dry-run >package_solving_result


# _anaconda_depends  pkgs/main/linux-64::_anaconda_depends-2020.07-py37_0
# _r-mutex           conda-forge/noarch::_r-mutex-1.0.1-anacondar_1
# binutils_impl_lin~ pkgs/main/linux-64::binutils_impl_linux-64-2.33.1-he6710b0_7
# binutils_linux-64  conda-forge/linux-64::binutils_linux-64-2.33.1-h9595d00_17
# brotlipy           conda-forge/linux-64::brotlipy-0.7.0-py37h516909a_1000
# bwidget            conda-forge/linux-64::bwidget-1.9.14-0
# gcc_impl_linux-64  pkgs/main/linux-64::gcc_impl_linux-64-7.3.0-habb00fd_1
# gcc_linux-64       conda-forge/linux-64::gcc_linux-64-7.3.0-h553295d_17

# Get all package names
grep '::' a | sed 's/.*:://' | sed 's/$/.tar.bz2/'

# Manual installation
for i in `grep '::' a | sed 's/.*:://' | sed 's/$/.tar.bz2/'`; do conda install --offline /anaconda3/pkgs/$i; done
Use CONDA pack to copy a copy directly from the installed place (the same operating system)
Install CONDA pack
conda install -c conda-forge conda-pack
# pip install git+https://github.com/conda/conda-pack.git
Package the installed environment
conda pack -n my_env_name -o my_env_name.tar.gz
Copy packaged environment_ env_ Name.tar.gz to the target machine and unzip it to any directory. It is generally recommended to put it in the envs directory (anaconda_root/envs). (Note: anaconda_root changes to its own installation path.)
# Unpack the packaged environment
# The default is to extract them all to the current directory, which is a spectacular scene
# -C be sure to specify
mkdir -p anaconda_root/envs/my_env
tar -xzf my_env.tar.gz -C anaconda_root/envs/my_env

# Activate environment
source my_env/bin/activate

# Unpack
conda-unpack

# At this point, the environment is completely copied
source deactivate