Download VritualBox:
https://download.virtualbox.org/virtualbox/
The version I downloaded is:
https://download.virtualbox.org/virtualbox/6.1.8/VirtualBox-6.1.8-137981-Win.exe
Download CentOS from Tsinghua image source:
https://mirror.tuna.tsinghua.edu.cn/centos/7/isos/x86_64/
Alicloud downloads CentOS:
https://mirrors.aliyun.com/centos/7/isos/x86_64/
The version I downloaded is:
https://mirror.tuna.tsinghua.edu.cn/centos/7/isos/x86_64/CentOS-7-x86_64-Minimal-1908.iso
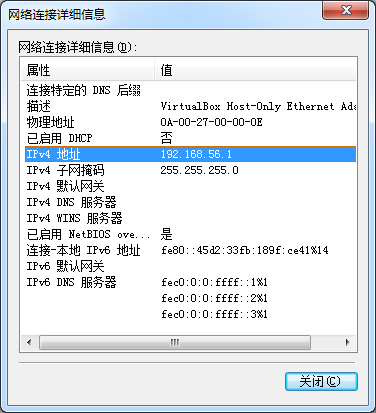
After VirtualBox installation, to view the network configuration
Control panel, network sharing center, change adapter configuration, select VirtualBox host only network, view the connection status and details
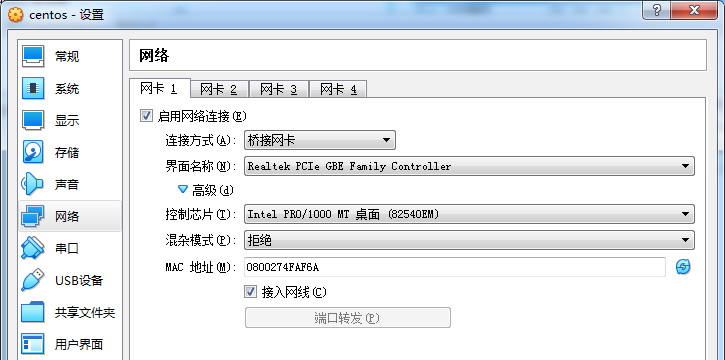
Create a new virtual machine in VirtualBox and set the network connection mode to bridge network card
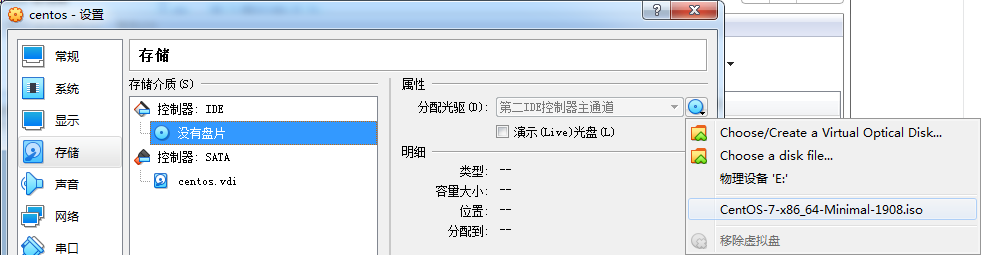
When installing CentOS, you should first select the image and then start the virtual machine to enter the installation phase
The installation process uses the default configuration, sets the partition, sets the root password, and restarts the virtual machine after installation
The previously set image will exit automatically upon restart
After restarting, use vi to open CentOS network configuration
vi /etc/sysconfig/network-scripts/ifcfg-enp0s3
Modify an existing item
BOOTPROTO=static #Use static ip
ONBOOT=yes #Start overload
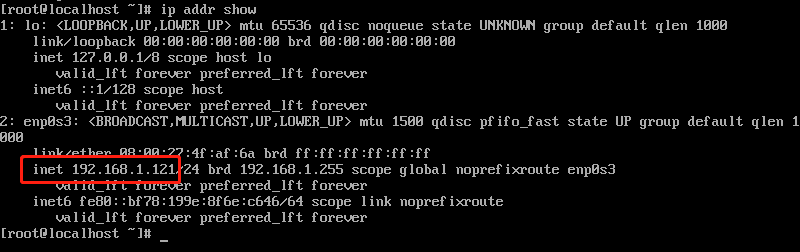
Add a new item, assuming that the LAN ip needs to be fixed: 192.168.1.121
IPADDR=192.168.1.121
NETMASK=255.255.255.0
GATEWAY=192.168.1.1 #Host gateway
DNS1=192.168.1.1 #Host universal dns
After modification, restart the network service
service network restart
View ip address
ip addr show
SSH (centos-7-x86#u 64 minimum has been installed) is also required to use the remote terminal in the future
View installed ssh
rpm -qa|grep ssh

Start ssh service
service sshd start
(there may be problems. You are required to use / bin/systemctl start sshd.service to start)
Shutdown command
shutdown -h now
Restart command
shutdown -r now #Or reboot
Install development environment
View installation source
yum repolist
Install development environment
yum groupinstall "Development Tools" -y
Install vim
yum install vim -y
Install screen, net tools, scp (may be installed)
yum install screen -y
yum install net-tools -y
yum install scp -y
Install killall
yum install psmisc -y
Installing sshpass
yum install epel-release -y
yum install sshpass -y
Install Chinese language pack (may not be required)
yum groupinstall chinese-support
To install uuid, you need to compile the uuid tool
yum install uuid -y
yum install uuid-devel -y
yum install libuuid -y
yum install libuuid-devel -y
yum install e2fsprogs-devel -y
Find repos on the official website of mariadb
https://downloads.mariadb.org/mariadb/repositories/#mirror=limestone
CentOS -> CentOS 7 (x86_64) -> 10.3 [Stable]
Configure the mariadb installation source (replace it with the source of Tsinghua University). You can also install the default version 5.0 without configuration
New file VIM / etc / yum.com repos. d/MariaDB. repo
[mariadb]
name = MariaDB
baseurl = https://mirrors.ustc.edu.cn/mariadb/yum/10.3/centos7-amd64
gpgkey=https://mirrors.ustc.edu.cn/mariadb/yum/RPM-GPG-KEY-MariaDB
gpgcheck=1
Installing mariadb
yum install MariaDB-server MariaDB-client -y
Start the mariadb service and set the startup
systemctl start mariadb
systemctl enable mariadb
Configure mariadb security settings (may not be required)
mysql_secure_installation
- Current root password
- n. No unix_socket authentication
- n. Do not change the root password
- Y. Remove anonymous account
- n. Allow remote root access
- Y. Remove test database
- Y. reload makes the above settings take effect immediately
Allow remote hosts to access the database via password
Run mysql
>grant all privileges on *.* to 'root'@'%' identified by '123456';
>flush privileges;
centos6 firewall opens port 3306
#/sbin/iptables -I INPUT -p tcp --dport 3306 -j ACCEPT
#/etc/rc.d/init.d/iptables save
# service iptables restart or stop
CentOS 7 opens port 3306 of the firewall
Method 1:
firewall-cmd --zone=public --add-port=3306/tcp --permanent
Method 2:
vim /etc/firewalld/zones/public.xml
add to
<port protocol="tcp" port="3306"/>
service iptables restart
systemctl restart firewalld.service
Some systems require mysql to be case insensitive and linux to be case sensitive by default
vim /etc/my.cnf
[mysqld]
# Add a
lower_case_table_names=1