Hello, I'm glad you can click this blog. This blog is a series of articles on the interpretation of Vite source code. After reading it carefully, I believe you can have a simple understanding of Vite's workflow and principle.
Vite is a new front-end construction tool, which can significantly improve the front-end development experience.
I will use the combination of graphics and text to make this article as less boring as possible (obviously, this is not a simple thing for source code interpretation articles).
If you haven't used Vite yet, you can look at my first two articles. I haven't experienced it for two days. (below)
This article is the third in the Vite source code interpretation series. Previous articles can be seen here:
- Vite source code interpretation series (picture and text combination) -- local development server
- Vite source code interpretation series (combination of graphics and text) - Construction
This article mainly interprets the vite source code ontology. In previous articles, we learned:
- vite provides a development server through the connect library during local development, and realizes a number of development server configurations through the middleware mechanism. Without the help of webpack packaging tool, plus the use of rollup (partial function) to schedule the internal plugin to realize file translation, so as to achieve small and fast results.
- When building production products, vite collects all plug-ins, and then hands them to rollup for processing, outputting highly optimized static resources for the production environment.
In this article, I will analyze the source code of @ vitejs / plugin Vue, the plug-in of vite that runs through the first two articles.
Well, don't say much. Let's start!
vite:vue
vite:vue plug-in is automatically injected into vite when the vue project is initialized config. JS. (below)
import { defineConfig } from 'vite'
import vue from '@vitejs/plugin-vue'

// https://vitejs.dev/config/
export default defineConfig({
  plugins: [
    vue()
  ]
});
The plug-in exports several hook functions, some of which are used for rollup and some are exclusive to vite. (as shown below)
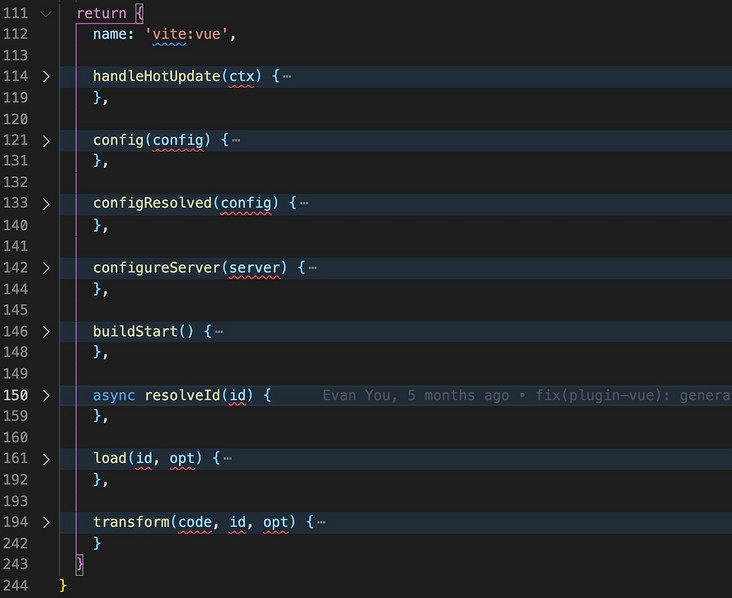
Before starting to read the source code, we need to understand the call timing and function of each hook function in vite and rollup.
| field | explain | Belonging |
|---|---|---|
| name | Plug in name | vite and rollup share |
| handleHotUpdate | Perform custom HMR (module hot replacement) update processing | vite exclusive |
| config | Call before parsing the Vite configuration. You can customize the configuration and merge it with the vite basic configuration | vite exclusive |
| configResolved | After resolving the Vite configuration, call. You can read the vite configuration and perform some operations | vite exclusive |
| configureServer | Is a hook used to configure the development server. The most common use case is to add custom middleware to an internal connect application. | vite exclusive |
| transformIndexHtml | Convert index HTML special hook. | vite exclusive |
| options | Before collecting the rollup configuration, the vite (local) service is called at startup, which can be merged with the rollup configuration | vite and rollup share |
| buildStart | In rollup construction, vite (local) service is called when it is started, and the configuration of rollup can be accessed in this function | vite and rollup share |
| resolveId | Called when parsing a module, you can return a special resolveId to specify an import statement to load a specific module | vite and rollup share |
| load | Called when parsing a module, you can return a code block to specify an import statement to load a specific module | vite and rollup share |
| transform | When parsing the module, it is called to convert the source code and output the converted result, which is similar to the loader of webpack | vite and rollup share |
| buildEnd | Before vite's local service closes, rollup output file is called before directory. | vite and rollup share |
| closeBundle | Before vite's local service closes, rollup output file is called before directory. | vite and rollup share |
After knowing all the hook functions of vite and rollup, we just need to see what the vite:vue plug-in does during the call of each hook function according to the call order.
config
config(config) {
  return {
    define: {
      __VUE_OPTIONS_API__: config.define?.__VUE_OPTIONS_API__ ?? true,
      __VUE_PROD_DEVTOOLS__: config.define?.__VUE_PROD_DEVTOOLS__ ?? false
    },
    ssr: {
      external: ['vue', '@vue/server-renderer']
    }
  }
}
Vite: the config in Vue plug-in does simple things. First, it does two global variables__ VUE_OPTIONS_API__ And__ VUE_PROD_DEVTOOLS__ Replacement work. Then set the dependency to force externalization for SSR.
configResolved
After the config hook is executed, the next call is the configResolved hook. (below)
configResolved(config) {
  options = {
    ...options,
    root: config.root,
    sourceMap: config.command === 'build' ? !!config.build.sourcemap : true,
    isProduction: config.isProduction
  }
},
Vite: the configResolved hook in Vue reads the root and isProduction configurations and stores them in the options attribute inside the plug-in for use by subsequent hook functions.
Then, judge whether the current command is build. If it is to build a production product, read the sourceMap configuration to judge whether to generate a sourceMap, and the local development service will always generate a sourceMap for debugging.
configureServer
In the configureServer hook, the vite:vue plug-in only stores the server in the internal options option and has no other operations. (below)
configureServer(server) {
  options.devServer = server;
}
buildStart
In the buildStart hook function, a compiler is created for subsequent compilation of vue files. (below)
buildStart() {
  options.compiler = options.compiler || resolveCompiler(options.root)
}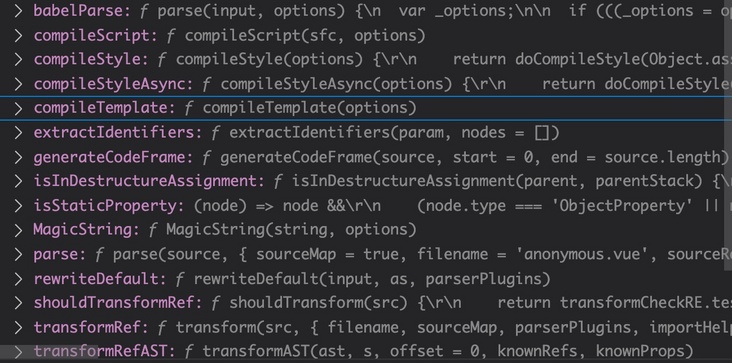
There are many practical methods built into the complier, which are responsible for processing vue files according to rules.
load
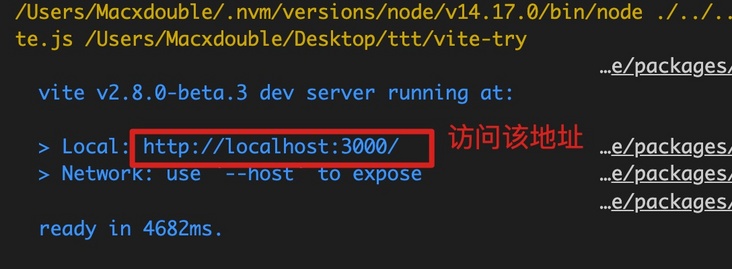
After running the above hooks, vite local development service has been started.
After we open the address of the local service and make a request for resources, we will enter the next hook function. (as shown below)
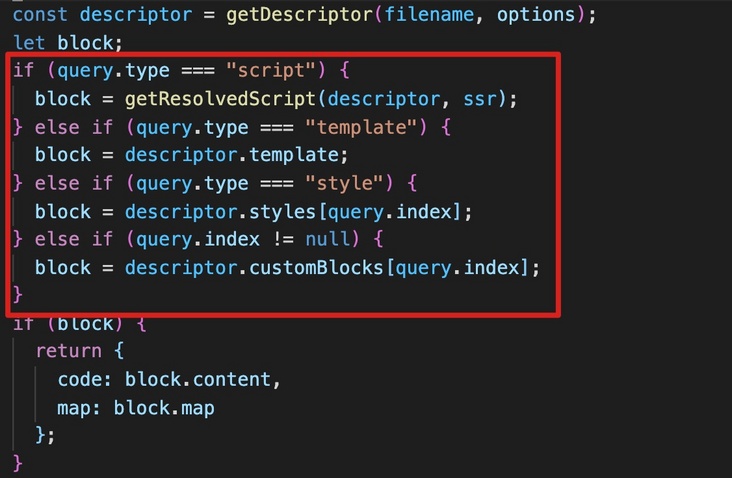
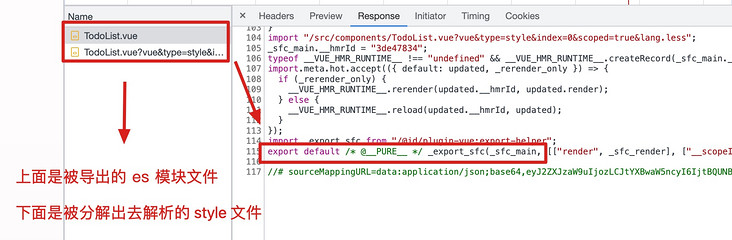
After opening the service, the first thing to enter is the load hook. The main work of the load hook is to return the files with the same name that have been parsed separately in the vue file.
vite will parse part of the file contents to another file, and then add "add" after the file loading path? vue's query parameter to parse the file. For example, parsing template (template), script (js script), css (style module) (as shown below)
These modules (template, script, style) are all created by the complier Parse (as follows)
const { descriptor, errors } = compiler.parse(source, {
  filename,
  sourceMap
});
transform
After the load returns the corresponding code fragment, enter the transform hook.
transform mainly does three things:
- Translate vue files
- Translate the template parsed by vue file
- Translate the style parsed by vue file
Simply understand, this hook corresponds to the loader of webpack.
Here, we take a todolist Take Vue file as an example to talk about the file translation work done by transform.
Here is TodoList You can also delete a source through tovue list Second issue article - Vite + Vue3 initial experience - Vue3 articles Understand its detailed functions.
<script setup lang="ts">
import { DeleteOutlined, CheckOutlined, CheckCircleFilled, ToTopOutlined } from '@ant-design/icons-vue';
import { Input } from "ant-design-vue";
import { ref } from "vue";
import service from "@/service";
import { getUserKey } from '@/service/auth';
// Create a reference variable to bind Todo List data
const todoList = ref<{
id: string;
title: string;
is_completed: boolean;
is_top: boolean;
}[]>([]);
// Initialize todo list
const getTodoList = async () => {
const reply = await service.get('/todo/get-todo-list', { params: { key: getUserKey() } });
todoList.value = reply.data.data;
}
getTodoList();
// The logic of deleting, completing and topping are all placed in the same place as todoList, which makes the focus on logic more focused
const onDeleteItem = async (index: number) => {
const id = todoList.value[index].id;
await service.post('/todo/delete', { id });
todoList.value.splice(index, 1);
}
const onCompleteItem = async (index: number) => {
const id = todoList.value[index].id;
await service.post('/todo/complete', { id });
todoList.value[index].is_completed = true;
// Reorder to put the completed items back
const todoItem = todoList.value.splice(index, 1);
todoList.value.push(todoItem[0]);
}
const onTopItem = async (index: number) => {
const id = todoList.value[index].id;
await service.post('/todo/top', { id });
todoList.value[index].is_top = true;
// Reorder to move the completed items forward
const todoItem = todoList.value.splice(index, 1);
todoList.value.unshift(todoItem[0]);
}
// The logic of adding todo items is put in one place
// Create a reference variable to bind the input box
const todoText = ref('');
const addTodoItem = () => {
// Add a TodoItem and request to add an interface
const todoItem = {
key: getUserKey(),
title: todoText.value
}
return service.post('/todo/add', todoItem);
}
const onTodoInputEnter = async () => {
if (todoText.value === '') return;
await addTodoItem();
await getTodoList();
// After adding successfully, clear the value of todoText
todoText.value = '';
}
</script>
<template>
<section class="todo-list-container">
<section class="todo-wrapper">
<!-- v-model:value Grammar is vue3 The new feature of represents the bidirectional binding within the component, which is a value key yes value -->
<Input v-model:value="todoText" @keyup.enter="onTodoInputEnter" class="todo-input" placeholder="Please enter a to-do item" />
<section class="todo-list">
<section v-for="(item, index) in todoList"
class="todo-item"
:class="{'todo-completed': item.is_completed, 'todo-top': item.is_top}">
<span>{{item.title}}</span>
<div class="operator-list">
<CheckCircleFilled v-show="item.is_completed" />
<DeleteOutlined v-show="!item.is_completed" @click="onDeleteItem(index)" />
<ToTopOutlined v-show="!item.is_completed" @click="onTopItem(index)" />
<CheckOutlined v-show="!item.is_completed" @click="onCompleteItem(index)" />
</div>
</section>
</section>
</section>
</section>
</template>
<style scoped lang="less">
.todo-list-container {
display: flex;
justify-content: center;
width: 100vw;
min-height: 100vh;
box-sizing: border-box;
padding-top: 100px;
background: linear-gradient(rgba(219, 77, 109, .02) 60%, rgba(93, 190, 129, .05));
.todo-wrapper {
width: 60vw;
.todo-input {
width: 100%;
height: 50px;
font-size: 18px;
color: #F05E1C;
border: 2px solid rgba(255, 177, 27, 0.5);
border-radius: 5px;
}
.todo-input::placeholder {
color: #F05E1C;
opacity: .4;
}
.ant-input:hover, .ant-input:focus {
border-color: #FFB11B;
box-shadow: 0 0 0 2px rgb(255 177 27 / 20%);
}
.todo-list {
margin-top: 20px;
.todo-item {
box-sizing: border-box;
padding: 15px 10px;
cursor: pointer;
border-bottom: 2px solid rgba(255, 177, 27, 0.3);
color: #F05E1C;
margin-bottom: 5px;
font-size: 16px;
transition: all .5s;
display: flex;
justify-content: space-between;
align-items: center;
padding-right: 10px;
.operator-list {
display: flex;
justify-content: flex-start;
align-items: center;
:first-child {
margin-right: 10px;
}
}
}
.todo-top {
background: #F05E1C;
color: #fff;
border-radius: 5px;
}
.todo-completed {
color: rgba(199, 199, 199, 1);
border-bottom-color: rgba(199, 199, 199, .4);
transition: all .5s;
background: #fff;
}
.todo-item:hover {
box-shadow: 0 0 5px 8px rgb(255 177 27 / 20%);
border-bottom: 2px solid transparent;
}
.todo-completed:hover {
box-shadow: none;
border-bottom-color: rgba(199, 199, 199, .4);
}
}
}
}
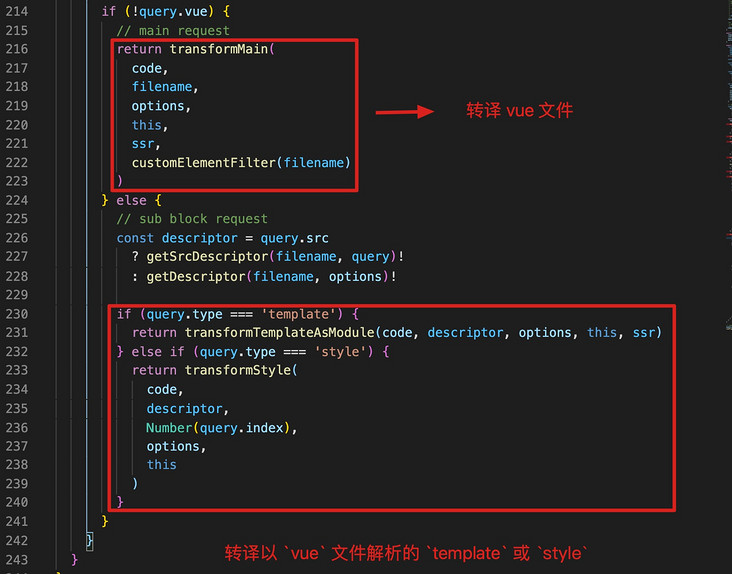
</style>After entering the transformMain function, you can find that transformMain mainly does several things:
- Deconstruct the script, template and style of vue file
- Parsing script code in vue file;
- Parse the template code in the vue file;
- Parse the style code in the vue file;
- Parse the user-defined module code in vue file;
- Logic for handling HMR (module thermal overload);
- Logic for handling ssr;
- Logic for processing sourcemap;
- Process the conversion from ts to es;
Next, we will go deep into the source code and analyze each task.
Deconstruct script, template, style
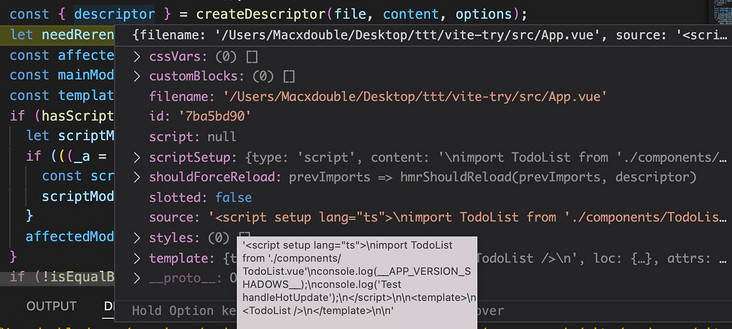
vue file contains script, template and style. In transformMain, the compiler in createDescriptor separates and parses these three blocks as a large object, and then facilitates subsequent parsing. (as shown below)
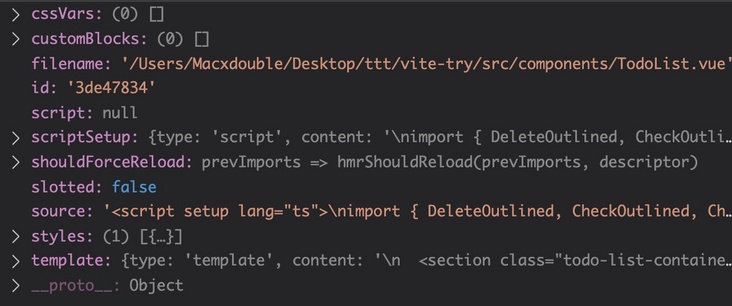
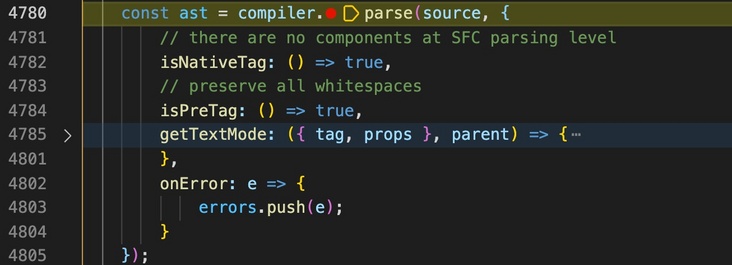
In the compiler, the parse method will be used first to parse the source code into an AST tree. (as shown below)
As can be seen from the figure below, the parsed AST tree has three modules, mainly script, template and style.
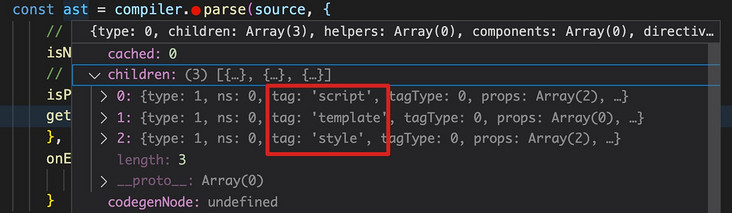
Next, record the attributes and code lines of each module. For example, the style tag records the information of lang: less for later analysis.
Resolve Template
The template in the vue file writes a lot of syntax sugar for vue, such as the following line
<Input v-model:value="todoText" @keyup.enter="onTodoInputEnter" class="todo-input" placeholder="Please enter a to-do item" />
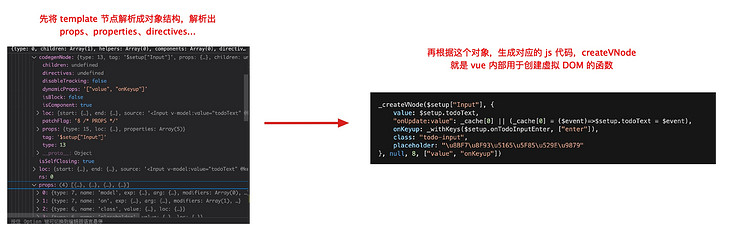
Like this syntax, the browser cannot recognize and bind events to vue's internal functions, so vite first makes an internal conversion on such tags, converts them into executable functions, and then executes the functions through the browser to generate a set of virtual dom. Finally, the rendering engine inside vue renders the virtual DOM into a real dom.
Now we can take a look at the translation process of template syntax inside vite, which is implemented through the genTemplateCode function.
In genTemplateCode, the template syntax is first parsed into an AST syntax tree. (as shown below)
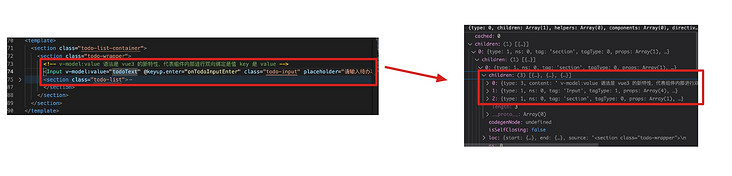
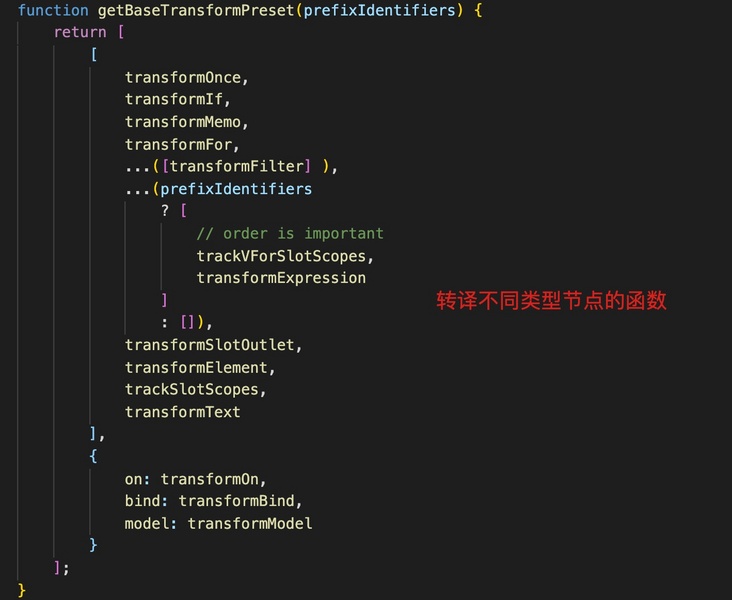
Then, the corresponding AST nodes are transformed through different translation functions.
Let's take the Input node as an example to briefly explain the translation process.
Repeat this step until the entire template tree is parsed.
Parsing script tags
Next, let's take a look at the parsing part of the script tag. The corresponding internal function is genScriptCode
This function mainly does the following things:
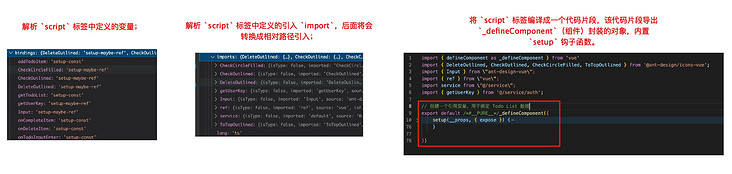
- Parse the variables defined in the script tag;
- Parse the import defined in the script tag, which will be converted into relative path import later;
- Compile the script tag into a code fragment, which is exported_ The object encapsulated by the defineComponent (component) has a built-in setup hook function.
Let's illustrate the above three steps with a diagram. (as shown below)
Parsing style tags
The parsing of the style tag is relatively simple. It just parses the code into an import statement (as follows)
import "/Users/Macxdouble/Desktop/ttt/vite-try/src/components/TodoList.vue?vue&type=style&index=0&scoped=true&lang.less"
Then, according to the type and lang in the query parameter in the request, the transformStyle function in the load hook (the last resolved hook) of the vite:vue plug-in continues to process the compilation of the style file. I won't start this part. Interested students can read the code by themselves.
Compile ts to es
After the code of script, template and style is parsed, the following processing is also done:
- Parse the user-defined module code in vue file;
- Logic for handling HMR (module thermal overload);
- Logic for handling ssr;
- Logic for processing sourcemap;
- Process the conversion from ts to es;
Due to space reasons, here is only a brief introduction to the transformation from ts to es. This step is mainly to complete the transformation from ts to es through esbuild internally. We can see how fast this tool is. (as shown below)
Output code
After ts is also translated into es, vite:vue combines the script, template and style codes converted into es, then outputs them through transform, and finally outputs them to an ES module, which is loaded by the page as a js file. (as shown below)
handleHotUpdate
Finally, let's take a look at the handling of hot overloading of file modules, that is, the handleHotUpdate hook.
After we started the project, we opened the app Add a line of code to the setup of Vue file.
console.log('Test handleHotUpdate');After the code is added and saved, the change is captured by the watcher inside vite, and then the handleHotUpdate hook is triggered to pass in the modified file.
vite:vue uses compiler internally Parse function on app Parse the Vue file and parse the script, template and style tags. (that is, the compilation steps parsed above) (as shown below).
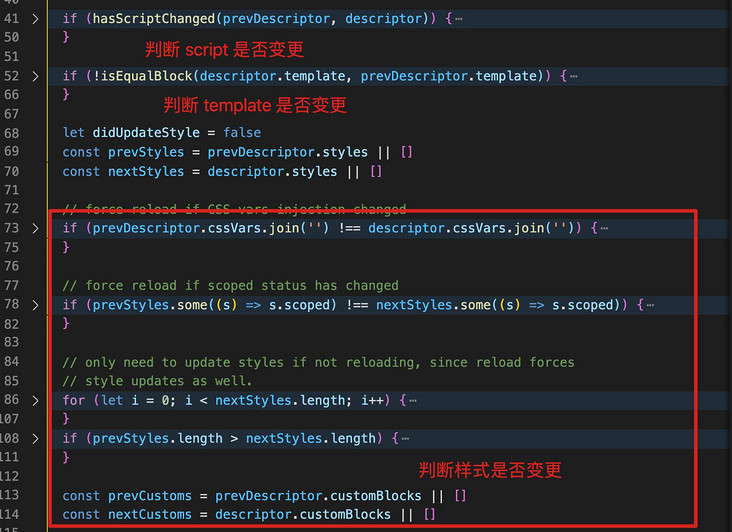
Then, the inside of the handleHotUpdate function detects the changed content and adds the changed part to the affectedModules array. (as shown below)
Then, handleHotUpdate returns the affectedModules to vite for internal processing.
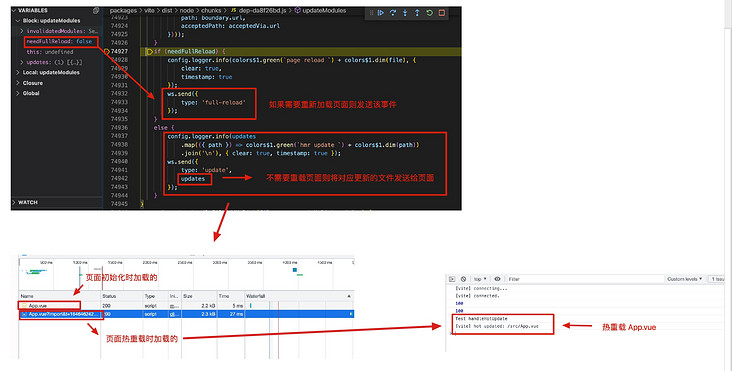
Finally, vite will determine whether the current changed file needs to reload the page. If it does not need to reload, it will send an update message to ws of the client to inform the client to reload the corresponding resources and execute. (as shown below)
Well, in this way, we know the contents of module thermal overload.
Summary
That's the end of the analysis of @ vitejs / plugin Vue in this issue.
It can be seen that vite combines rollup internally, presets multiple life cycle hooks of the plug-in, and calls them at each stage of compilation, so as to achieve the combined effect of loader + plugin of webpack.
The direct use of plugin by vite/rollup replaces the loader + plugin function of webpack, which may also be to simplify the concept, integrate functions, make the work of plug-ins easier, and enable plug-in developers in the community to better participate and contribute.
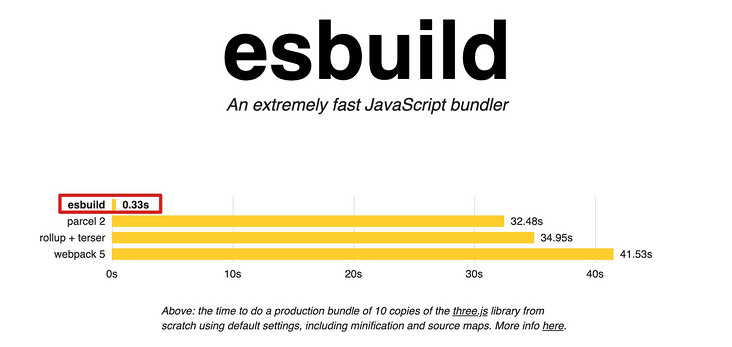
vite is fast not only because it does not compile the native es module at runtime, but also uses the light and fast compilation library such as esbuild to compile ts at runtime, which makes the whole local development very light and fast.
In the next chapter, we will practice the vite plug-in: implement a vite plug-in whose function is to load local md files by specifying tags.
One last thing
If you've seen here, I hope you'd better give me a compliment before you leave~
Your praise is the greatest encouragement to the author, and can also let more people see this article!
If you think this article is helpful to you, please help in github Light up star and encourage it!