1. docker volume mode
In Docker, in order to realize data persistence (the so-called data persistence in Docker means that the data does not end with the end of the Container), you need to mount the data from the host to the Container. Currently, Docker provides three different ways to mount data from the host to the Container:
(1) Volumes: part of the file system of Docker management host, which is located in / var/lib/docker/volumes directory by default; (the most common way)

As can be seen from the above figure, at present, the data of all containers are saved under this directory. Since no volume is specified during creation, Docker helps us create many anonymous (just the names with long ID S above) volumes by default.
Note: if volume is empty and the directory in the container has content, docker will copy the content in the container directory to volume, but if there is content in volume, it will overwrite the directory in the container.
(2) bind mounts: it means that it can be stored in any location of the host system; (more commonly used)
Bind mount is not portable in different host systems. For example, the directory structure of Windows and Linux is different, and the host directory pointed to by bind mount cannot be the same. This is why bind mount cannot appear in Dockerfile, because Dockerfile is not portable.
There are several points to note:
1. The directory path of the host machine must be the full path (to be exact, the path starting with / or ~ /) or docker will treat it as volume instead of volume
2. If the directory on the host machine does not exist, docker will automatically create the directory
3. If the directory in the container does not exist, docker will automatically create the directory
4. If the directory in the container already has content, docker will overwrite it with the directory on the host
(3) tmpfs: mount and store in the memory of the host system, but not write to the file system of the host; (generally not used)
2. Basic usage of Volume
2.1 managing volumes
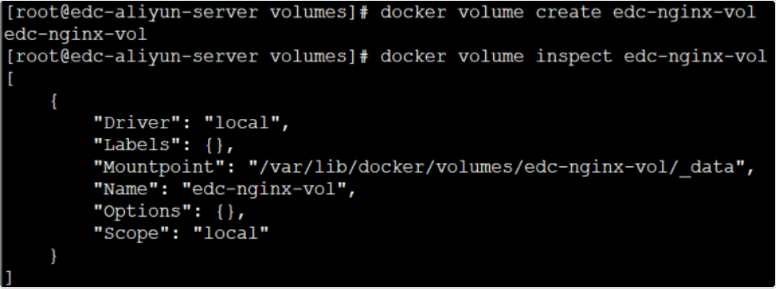
# Docker volume create EDC nginx volume / / create a custom container volume
# docker volume ls / / view all container volumes
# Docker volume inspect EDC nginx volume / / view the details of the specified container volume
For example, here we create a custom container volume named "EDC nginx Vol":
2.2 create a container that uses the specified volume
With a custom container volume, we can create a container that uses this data volume. Here we take nginx as an example:
# docker run -d -it --name=edc-nginx -p 8800:80 -v edc-nginx-vol:/usr/share/nginx/html nginx
Where, - v stands for mounting the data volume. Here, use the customized data volume EDC nginx Vol, and mount the data volume to / usr/share/nginx/html (this directory is the default web directory for yum to install nginx). If it is not specified through - v, Docker will help us create anonymous data volumes for mapping and mounting by default.
After creating the container, we can enter the container and have a look:
 You can see that there are two default pages. At this time, we start a new SSH connection to the host machine and go to the data volume just created to have a look:

You can see that we can access the two default pages in the container. From this, we can see that volume helps us do a function similar to a soft link. Changes in the container can be perceived in the host, while changes in the host can be perceived in the container. At this time, if we manually stop and remove the current nginx container, we will find that the files in the container volume are still there and have not been deleted.
It can be verified that the things in the data volume can be persisted. If you need to create an nginx container next time, reuse the files in the current data volume.
In addition, we can also start multiple nginx container instances and share the same data volume, which has strong reusability and scalability.
2.3 cleaning volume
If you no longer use custom data volumes, you can manually clean them up:
# Docker stop EDC nginx / / pause container instance
# Docker RM EDC nginx / / remove container instance
# Docker volume RM EDC nginx Vol / / delete the user-defined data volume
3. Basic use of Bind Mounts
3.1 create a container using volumes
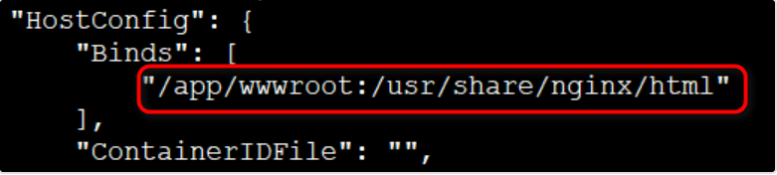
docker run -d -it --name=edc-nginx -v /app/wwwroot:/usr/share/nginx/html nginx
It is specified here to mount the / app/wwwroot directory on the host computer (which will be automatically created if it is not available) to / usr/share/nginx/html (this directory is the default web page directory for yum to install nginx).
Now let's go inside the container again:
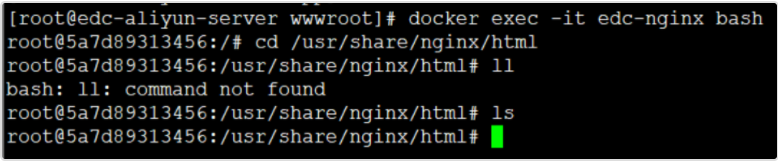
It can be seen that unlike volumes, bind mounts hides the contents of the mounted directory (if not empty). Here, the contents in / usr/share/nginx/html directory are hidden, so we can't see it.
However, we can mount the files on the host to the container at any time:
Step1. Create a new index html

Step2. View in container

3.2 validate binding
docker inspect edc-nginx
Through the above command, we can see a large wave of configuration. We should pay attention to:
3.3 cleaning
docker stop edc-nginx
docker rm edc-nginx
Like volumes, after we clean up the container, the files in the mounted directory are still there and will not disappear with the end of the container, so as to realize data persistence.
3.4 application cases
Among the service governance components, the service discovery component is one of the most commonly used components. Consul is a popular open source service discovery project. Consul recommends that we register service information by using configuration files. Therefore, we often put the completed service registration configuration file in a file directory of the host computer and mount it in the specified directory of the container of consul, as shown below:
docker run -d -p 8500:8500 --restart=always \
-v /XiLife/consul/data/server1:/consul/data -v /XiLife/consul/conf/server1:/consul/config \
-e CONSUL_BIND_INTERFACE='eth0' --privileged=true \
--name=consul_server_1 consul:1.4.4 agent -server -bootstrap-expect=3 -ui -node=consul_server_1 -client='0.0.0.0' \
-data-dir /consul/data -config-dir /consul/config -datacenter=xdp_dc;
As you can see, we attached the / xilife / consumer / data / Server1 directory on the host to the / consumer / data directory of the container through Bind Mounts, and also attached the / xilife / consumer / conf / Server1 directory to the / consumer / config directory of the container, The two directories / consult / data and / consult / config under the container are the places where we specify to store agent data and configuration files. Therefore, the changes of the configuration file on the host will be reflected in the container in time. For example, if we update the configuration file in the directory on the host, we only need to reload the container instance of Consul:
docker exec consul-server consul reload
Here, the consumption server is the name of the container, and the consumption reload is the reload command (not restart).
docker volume prune
4. Remove unused data volumes.
[root@izoq008ryseuupz _data]# docker volume ls
DRIVER              VOLUME NAME
local               3c1ed533ce142b49eadc15ba57b87a3bac780e89e22c06503b3e909ab69ed62f
local               5b086d5fdb68b5a58593fdca6d6f0a9b3ead0ed929fd3961b7db48e3a928c24d
local               6b5a0394e690c4e0e869ddecc0db24a748a0229c70a83db46e0f2f95e3314958
local               8eb0f149b72711acd9618f827fc26a9afcce63ed51f1e60ac48e752344f88f22
local               08b4d10ef219075ee8a283112be06e1df52729bf23d3216342da3f8b21a0c127
local               31a6cbc600b3d30d0c567b3842ce5e7944495fcc12d42008385912d32facfd7a
local               208ddc66938b611237d4e868cb8800a36b5390969ba7a22d2d2e65a8c173b2c8
local               3285a7fb977eb7a87da83b2a5ff838c98037b15ec659eeff68c489e7004114ea
local               a4beb8e0e17a3369c8c9a447d777323df71d2b5e2f77ebfc69cc99af39e1077a
local               c8079a1f169f2f0d93923db7b785f1033a46bdc8cf6baf73d742ebbb3c03d6a4
local               centos-volume
local               db153ec29b07b6268e7204fc2e91a32db91797bcd8f4d92c7e2637577cd1a155
local               dcf0505225e08c4c4d24f0e89ac83ed02a5387620734c4add6ab4f1d8196489c
local               f00edae7bd06b264a25329143fa2207e998491e459c24b0c30b1f78996a49369
[root@izoq008ryseuupz _data]#
[root@izoq008ryseuupz _data]# docker volume prune
WARNING! This will remove all local volumes not used by at least one container.
Are you sure you want to continue? [y/N] y
Deleted Volumes:
31a6cbc600b3d30d0c567b3842ce5e7944495fcc12d42008385912d32facfd7a
208ddc66938b611237d4e868cb8800a36b5390969ba7a22d2d2e65a8c173b2c8
3c1ed533ce142b49eadc15ba57b87a3bac780e89e22c06503b3e909ab69ed62f
db153ec29b07b6268e7204fc2e91a32db91797bcd8f4d92c7e2637577cd1a155
f00edae7bd06b264a25329143fa2207e998491e459c24b0c30b1f78996a49369
a4beb8e0e17a3369c8c9a447d777323df71d2b5e2f77ebfc69cc99af39e1077a
5b086d5fdb68b5a58593fdca6d6f0a9b3ead0ed929fd3961b7db48e3a928c24d
8eb0f149b72711acd9618f827fc26a9afcce63ed51f1e60ac48e752344f88f22
centos-volume
08b4d10ef219075ee8a283112be06e1df52729bf23d3216342da3f8b21a0c127
dcf0505225e08c4c4d24f0e89ac83ed02a5387620734c4add6ab4f1d8196489c
3285a7fb977eb7a87da83b2a5ff838c98037b15ec659eeff68c489e7004114ea


Total reclaimed space: 94.79MB
[root@izoq008ryseuupz _data]# docker volume ls
DRIVER              VOLUME NAME
local               6b5a0394e690c4e0e869ddecc0db24a748a0229c70a83db46e0f2f95e3314958
local               c8079a1f169f2f0d93923db7b785f1033a46bdc8cf6baf73d742ebbb3c03d6a4