vscode voice annotation to enrich information (Part 1)
In this series, I will share the whole process of making my "voice annotation" plug-in, or is that sentence "process" more interesting than "result".
Usage display
Download: voice annotation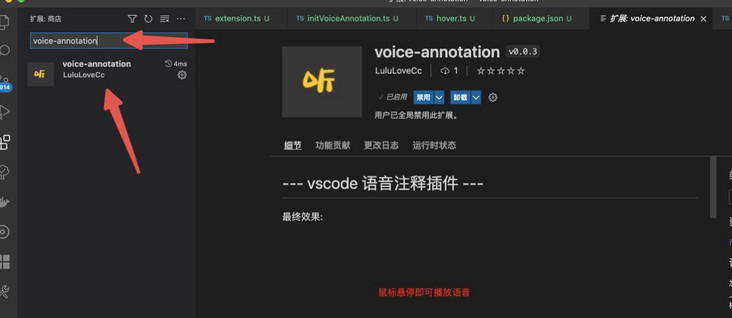
Configure + create voice file storage address

Right click to call out 'record audio notes'

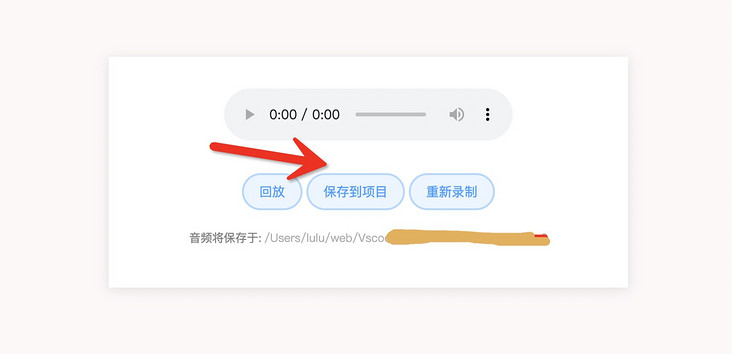
After recording, click 'save to project'
Hover to play voice

background
When you start reading an engineering code, you may occasionally read some code that you don't know. If it has comments but is still confused after reading it, or it doesn't write comments at all, the most convenient way to solve this problem is to ask the original developer directly. Why do students write this here?
Not only js language, but also most languages have provided the syntax of "text annotation". Why do we still encounter the above problems? Suppose we write comments in each piece of code, but we still can't understand them. Let's see what problems we can "alleviate" through the voice plug-in:
- The writing is quite clear. It is indeed the reader's own problem (unsolvable)
- Written but not understood, the developer's own expression ability (can not be solved, between the "dak effect" & "Curse of knowledge" can not be self aware)
- Maybe it's related to some needs. It's very 'complex' to describe it clearly in words. Just don't write it (maybe it can be alleviated)
- The form of words is not clear. It is common in our daily communication. If we can't speak clearly online, we can directly face-to-face solo (maybe it can be alleviated)
- Cross page description, such as explaining the "debugging method" in large sections, hiding which variable, forcibly assigning a variable, and some operations can achieve some effects. It is often used in some scenes of the front-end mock (which may be alleviated)
Students who have not done vscode plug-in are recommended to read the introductory tutorial I wrote first:
- Remember a super detailed sharing meeting on the front-end "vscode plug-in writing practice" (recommended Collection) (Part I)
- Remember a super detailed sharing meeting on the front-end "vscode plug-in writing practice" (recommended Collection) (Part 2)
1, Function point 'technical solution' analysis
① Identify specific comments
We need to agree on a specific writing method. The plug-in recognizes this writing method as "voice annotation" and can broadcast correctly when the mouse hovers over it. At present, I use / / voice_annotation + _ Numbers are in this form.
② Play note audio
Since it is written in vscode, in fact, the first choice is to use node to control the audio output device. If you play sound by opening a new web page, it will increase the user's operation link. We investigated the existing audio plug-ins in the market, mainly music playback plug-ins or by opening a web page, However, there are no other operations for playback here, such as fast forward loop playback and other slightly more complex requirements, so we choose to use node playback.
③ Record notes
If you want eggs, of course 🐔 For egg laying, the recording function must be able to put the user's recording into the corresponding project and return to the writing method of the user's' specific comment ', assuming that voice is returned_ annotation_ In 20201, users can use it normally by pasting it directly into the project. There should be few usage scenarios for this function, so performance related issues should be considered.
④ Store audio information
Most developers have more than one project on their computers. How can we make each project accurately play the voice under the corresponding project, and put the generated audio file into the corresponding project after each recording, and support the team to use it.
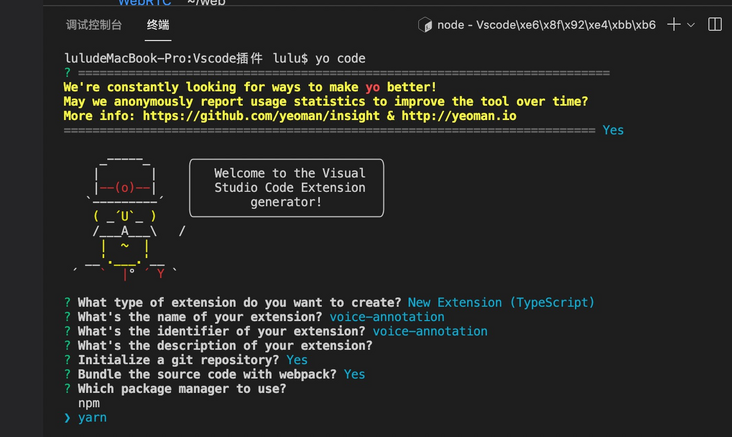
2, In the initial project, this time we use ts
Install the vscode development tool globally and initialize the project:
npm install -g yo generator-code

yo code
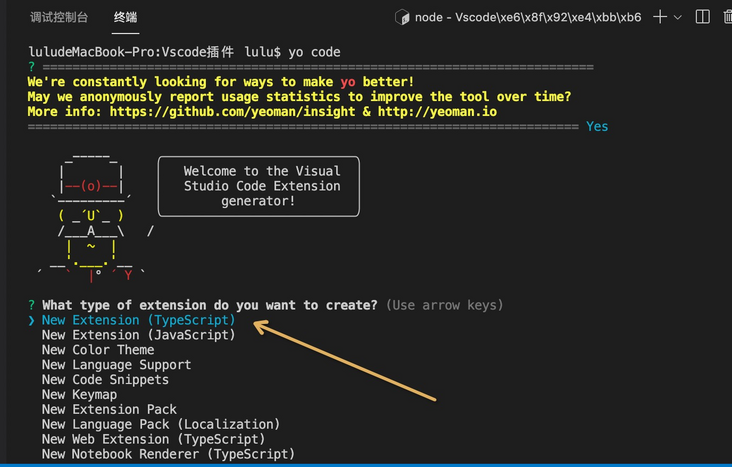
(ts is really delicious) the plug-ins developed in the previous several times are developed using native js. Because the plug-ins developed this time will use some "rare" APIs, frankly, the vscode documents are not very friendly, so it is most convenient for us to directly look at the ts type of the code.
    "activationEvents": [
        "onStartupFinished"
    ],
Come to package JSON file, modify the configuration of plug-in activation here:
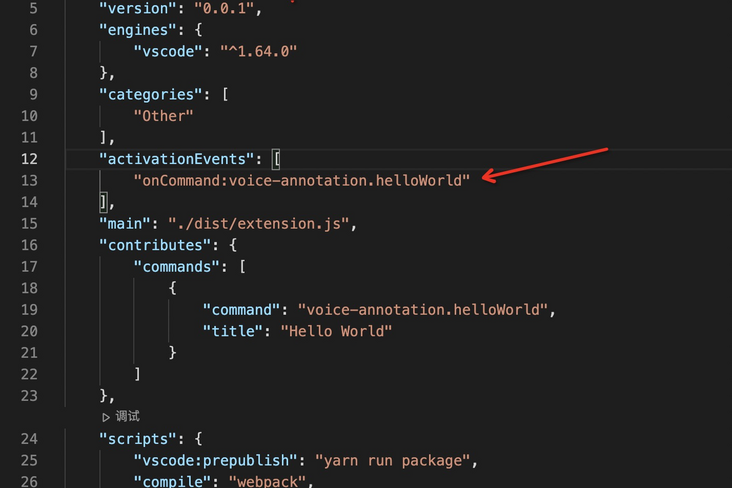

onStartupFinished specifies that the plug-in starts after the vscode initialization is completed. It will not occupy the performance of the user when initializing vscode, and our voice annotation is not a very urgent program.
Come to extension TS file, empty all useless codes
Before emptying

After emptying

Start compiling the code after executing yarn watch, and the fn + F5 debugging code will report an error:
I was also confused when I saw the error report above. I didn't seem to have encountered it before. I upgraded the vscode editor or reported an error, and then went to the code to check:
This is very clear. We just circled a compatibility range. We checked the official website log and finally selected the version with a minimum of around October 2020.
    "engines": {
        "vscode": "^1.50.0"
    },
Sure enough, a prompt box will appear after debugging again:
Note:
The @ types/vscode below should also be changed to the same version number as above, otherwise there will be no error at this stage, and an error will be reported when packaging and publishing.
  "dependencies": {
    "@types/vscode": "^1.50.0",
  }
3, Identify special notes
This function is to identify and highlight the "voice annotation" on the page. The reason for giving priority to the development of this function is that it is relatively independent in its own function and can see the effect intuitively. When browsing the official website of vscode, I found two ways to achieve the effect of "highlighting" of specific sentences.
Here, we can define several regular rules for recognizing "voice annotation" in advance. Suppose there is such a string of characters / / voice_ annotation_ 202070612135678, first we need to identify the / / annotation and get the voice after '/ /'_ annotation_ 202202070612135678 this string of characters can give it 'style', and match the number 202202202070612135678 in the content, so as to accurately play the voice.
In Src / util / index ts
export const targetName = "voice_annotation"; // Take it out separately to facilitate subsequent changes
export const getAllTargetReg = new RegExp(`//\\s(${targetName}_\\d+)`, "g");
export const testTargetReg = new RegExp(`${targetName}_(\\d+)`);
4, Scheme 1: Custom syntax highlighting
For example, function () {} in js is the syntax of the function. In belongs to the keyword. These meaningful expressions will be given various' highlights'. Then we can use / / voice_annotation is set as keyword,
Step 1: in package The JSON file is added to the scope of jojo
It works on js, ts and tsx files.
  "contributes": {
    "grammars": [
      {
        "path": "./syntaxes/injection.json",
        "scopeName": "jojo.injection",
        "injectTo": [
          "source.js",
          "source.ts",
          "source.tsx"
        ]
      }
    ]
  },
Step 2: create an injection JSON file
{
  "scopeName": "jojo.injection",
  "injectionSelector": "L:comment.line.double-slash",
  "patterns": [
    {
      "include": "#jojo"
    }
  ],
  "repository": {
    "jojo": {
      "match": "jojo_Gold experience",
      "name": "support.constant.color.0xFF00.css",
      "settings": {
        "foreground": "FFFFFF"
      }
    }
  }
}
- scopeName defines the scope name as its name implies.
- The injectionSelector defines the effective scope of the scope, which means to be effective for / / the following contents.
- jojo.match to match keywords.
- jojo.name is a bit special. It defines the keyword style, but it is not an ordinary css style. You need to define it in the file that defines the language style, and then it can only be used here.

This scheme has many disadvantages, such as bad 'custom style', bad dynamic change settings and so on. Finally, I didn't choose this implementation method.
5, Scheme 2: Document Retrieval
That is to get all the text content of the current 'document' and give it the ability of css style. This method is more flexible and can achieve some interesting effects through pseudo elements.
First, we need to abstract an initVoiceAnnotationStyle method separately, which is specially used to set the style of voice annotation to facilitate the recognition of "voice annotation" anytime and anywhere:
extension. Modify in TS file
import * as vscode from 'vscode';
import initVoiceAnnotationStyle from './initVoiceAnnotationStyle'; // newly added

export function activate(context: vscode.ExtensionContext) {
    initVoiceAnnotationStyle() // newly added
    context.subscriptions.push( // newly added
        vscode.window.onDidChangeActiveTextEditor(() => {
            initVoiceAnnotationStyle()
        })
    )
}

export function deactivate() { }
- context.subscriptions.push is the registration command. Here, a life cycle event is registered.
- vscode.window.onDidChangeActiveTextEditor listens to the event when we switch development files in vscode, that is, every time we open a file, we use this because our 'voice notes' will hardly be changed and do not need to occupy the performance of vscode.
define styles
initVoiceAnnotationStyle file
import * as vscode from 'vscode';
import { getAllTargetReg } from './util/index'

export default function () {
    vscode.window.visibleTextEditors.map((res) => {
        const documentText = res.document.getText();
        const decorator = vscode.window.createTextEditorDecorationType({
            color: 'gray',
            cursor: "pointer",
            textDecoration: "underline",
            before: {
                contentText: "📢",
                width: "10px",
                height: '10px',
                margin: "0 8px 0 0"
            }
        })

        let n;
        const ranges = [];
        while (n = getAllTargetReg.exec(documentText)) {
            const startPos = res.document.positionAt(n.index + 3);
            const endPos = res.document.positionAt(n.index + 3 + n[1].length);
            const range = new vscode.Range(startPos, endPos)
            ranges.push(range);
        }
        res.setDecorations(decorator, ranges)
    })}
The knowledge here is very interesting. Let's talk about it with the screenshot
- vscode.window.visibleTextEditors you can understand is to get the properties of the current 'activated' code editing page, including the number of lines currently flipped and whether some styles are activated.
- res.document.getText() gets the content of the currently active page.
vscode.window.createTextEditorDecorationType creates a style. Only several fixed styles are defined here, but the powerful point is that 'pseudo elements' can be created here, so the playing methods are diverse. We can print its return results.
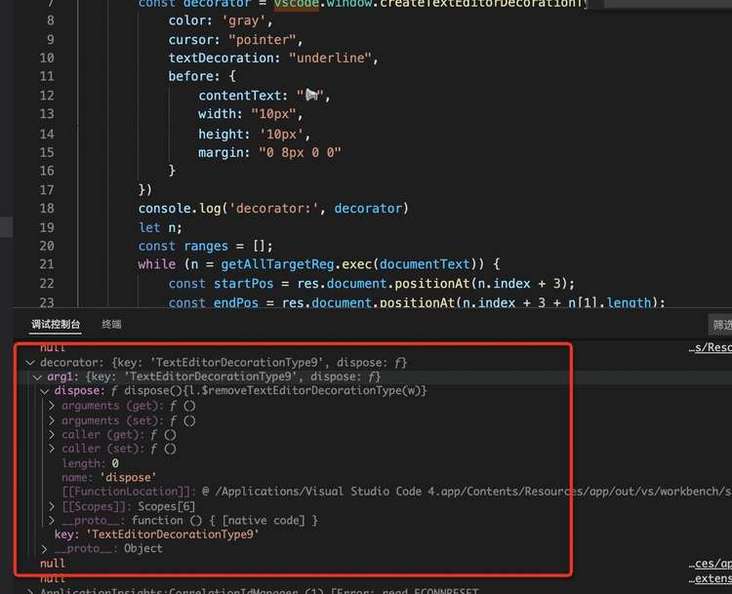
The key returned here is actually a className.
- ranges is used to record the start and end positions of voice annotation.
- The reason why the while loop is selected for processing is that there may be multiple voice annotations.
- n.index + 3 is because / / the front of voice annotation is / / I choose to keep it as it is.

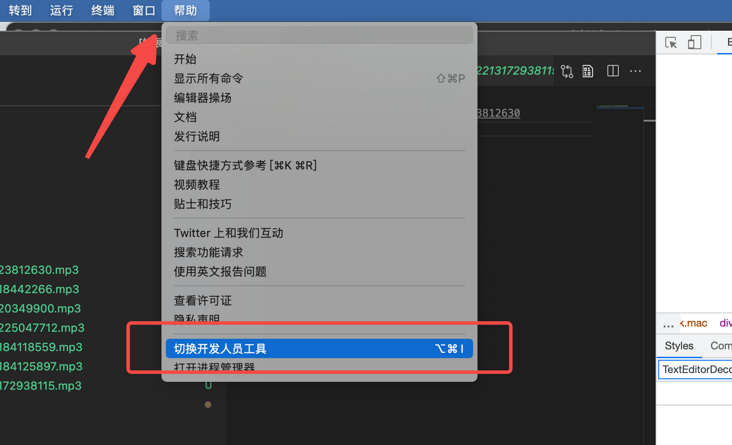
We can adjust the style through the vscode developer tool

6, Hover / / voice_annotation playback style
First of all, we need to define a hover module, which is responsible for the style after hover + playing audio.
extension.ts increase:
import * as vscode from 'vscode';
import hover from './hover'; // newly added
import initVoiceAnnotationStyle from './initVoiceAnnotationStyle';

export function activate(context: vscode.ExtensionContext) {
    initVoiceAnnotationStyle()
    context.subscriptions.push(hover); // newly added
    context.subscriptions.push(
        vscode.window.onDidChangeActiveTextEditor(() => {
            initVoiceAnnotationStyle()
        })
    )
}

export function deactivate() { }
Define file content
hover.ts
import * as vscode from 'vscode';
import { getVoiceAnnotationDirPath, targetName, testTargetReg } from './util'
let stopFn: () => void;

function playVoice(id: string) {
   // Here is the logic of playing audio
}

export default vscode.languages.registerHoverProvider("*", {
    provideHover(documennt: vscode.TextDocument, position: vscode.Position) {
        stopFn?.()
        const word = documennt.getText(documennt.getWordRangeAtPosition(position));
        const testTargetRes = testTargetReg.exec(word);
        if (testTargetRes) {
            playVoice(testTargetRes[1])
            return new vscode.Hover('Playing ...')
        }
    }
})
- documennt. Gettext (document. Getwordrangeatposition (position)) can get the text content of the current hover.
- testTargetReg.exec(word) checks whether the text of the current hover is the target text.
- return new vscode.Hover('playing... ') the text returned here can only be in markdown format.
- stopFn is the logic to stop playing in the later stage, because some audio may be very long and we don't want to listen to it half way, or I hover on another voice note while listening to an audio, so we should stop the previous audio and play the current audio.
end
The next article should talk about how vscode plays sound, how audio files are transmitted and stored, and so on. Wait for me to jump. This is it this time. I hope to make progress with you.