1, Basic syntax: v-bind, v-if, v-else, v-else-if, v-for
1.1 v-bind binding element
<!DOCTYPE html>
<html lang="en" xmlns:v-bind="http://www.w3.org/1999/xhtml">
<head>
    <meta charset="UTF-8">
    <title>Title</title>

</head>
<body>

<!--view Layer, template-->
<div id="app">
    <span v-bind:title="message">
    Hover for a few seconds to view the prompt information of dynamic binding here!
  </span>
</div>

<!--1.Import Vue.js-->
<script src="https://cdn.jsdelivr.net/npm/vue@2.5.21/dist/vue.min.js"></script>
<script type="text/javascript">
    var vm = new Vue({
        el:"#app",
        /*Model: data*/
        data:{
            message: : "hello"
        }
    });
</script>
</body>
</html>
demonstration:

The v-bind you see is called an instruction. Instructions are prefixed with V to indicate that they are a special feature provided by Vue. As you may have guessed, they will apply special responsive behavior on the rendered DOM. Here, the instruction means: "keep the title attribute of this element node consistent with the message attribute of Vue instance".
if you open the JavaScript console of the browser again and enter app, message = 'new message', you will see that the HTML bound with the title feature has been updated again.
If-1, V-2
<!DOCTYPE html>
<html lang="en" xmlns:v-bind="http://www.w3.org/1999/xhtml">
<head>
    <meta charset="UTF-8">
    <title>Title</title>
</head>
<body>
<!--view Layer, template-->
<div id="app">
    <h1 v-if="ok">Yes</h1>
    <h1 v-else>No</h1>

</div>

<!--1.Import Vue.js-->
<script src="https://cdn.jsdelivr.net/npm/vue@2.5.21/dist/vue.min.js"></script>
<script type="text/javascript">
    var vm = new Vue({
        el:"#app",
        /*Model: data*/
        data:{
            ok: true
        }
    });
</script>
</body>
</html>
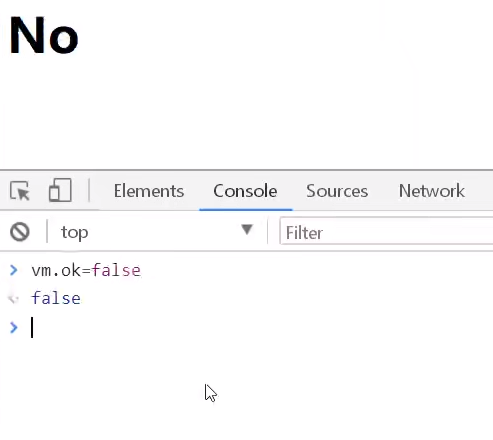
Test:
1. Run on the browser and open the console!
2. Enter VM. In the console OK = false, then press enter, and you will find that the content displayed in the browser will directly change to NO
note: data binding using v - * attribute does not need to be wrapped in double curly braces
1.3 conditional judgment statement v-else-if
<!DOCTYPE html>
<html lang="en" xmlns:v-bind="http://www.w3.org/1999/xhtml">
<head>
    <meta charset="UTF-8">
    <title>Title</title>
</head>
<body>
<!--view Layer, template-->
<div id="app">
    <h1 v-if="type==='A'">A</h1>
    <h1 v-else-if="type==='B'">B</h1>
    <h1 v-else-if="type==='D'">D</h1>
    <h1 v-else>C</h1>

</div>

<!--1.Import Vue.js-->
<script src="https://cdn.jsdelivr.net/npm/vue@2.5.21/dist/vue.min.js"></script>
<script type="text/javascript">
    var vm = new Vue({
        el:"#app",
        /*Model: data*/
        data:{
            type: 'A'
        }
    });
</script>
</body>
</html>
Note: = = the same value and different types, and = = = the same value and type
Demonstrate:

1.4 cycle v-for
Parameter Description: items is the traversal array, item is the alias of array element iteration, and index is the subscript of element index
<!DOCTYPE html>
<html lang="en">
<head>
    <meta charset="UTF-8">
    <title>Title</title>
</head>
<body>
<!--view Layer, template-->
<div id="app">
    <li v-for="(item,index) in items">
        {{item.message}}---{{index}}
    </li>

</div>

<!--1.Import Vue.js-->
<script src="https://cdn.jsdelivr.net/npm/vue@2.5.21/dist/vue.min.js"></script>
<script type="text/javascript">
    var vm = new Vue({
        el:"#app",
        /*Model: data*/
        data:{
            items:[
                {message:'Madness theory Java'},
                {message:'Crazy God said'},
                {message:'Crazy God said'}
            ]
        }
    });
</script>
</body>
</html>
Demonstrate:

2, Binding event v-on
v-on listening events
Look directly at the code above:
Note that there is also a v-on constraint imported above
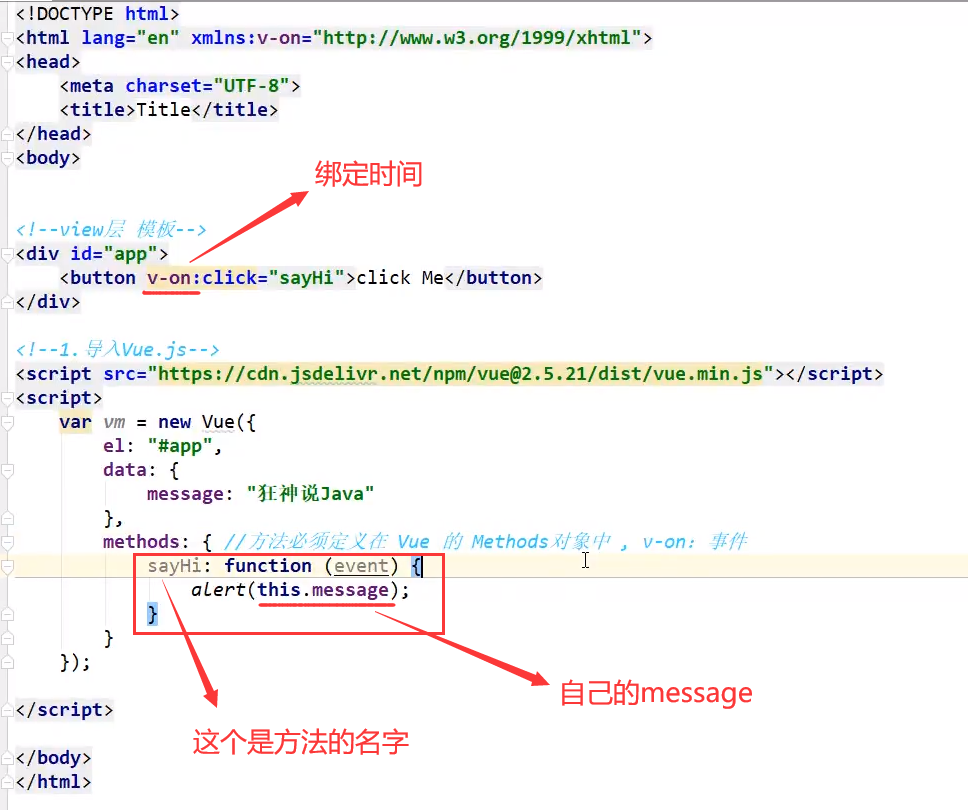
Show me

Vue also has some basic usage methods. If you need it, you can follow the official documents, because we have seen almost all these basic instructions, which are all accessible! Master the way of learning!
3, Bidirectional binding v-model
(1) What is bidirectional data binding
Vue.js is an MV VM framework, that is, two-way data binding, that is, when the data changes, the view will change, and when the view changes, the data will change synchronously. This is also Vue The essence of JS.
it is worth noting that what we call two-way data binding must be that non UI controls will not involve two-way data binding for UI controls. One way data binding is the premise of using state management tools. If we use vuex, the data flow is also single, which will conflict with two-way data binding.
(2) Why do we need to realize two-way binding of data
In Vue In. JS, if vuex is used, the data is actually one-way. The reason for data two-way binding is that the UI control is used. For us to process forms, Vue JS bidirectional data binding is particularly comfortable to use. That is, the two are not mutually exclusive, and a single item is used in the global data flow to facilitate tracking; Local data flow is bidirectional and easy to operate.
(3) Use two-way data binding in forms
You can use the v-model command to create two-way data bindings on forms, and elements. It will automatically select the correct method to update the element according to the control type. Despite some magic, v-model is essentially just a grammar sugar. It is responsible for monitoring user input events to update data, and some special processing for some extreme scenarios.
note: v-model will ignore the initial values of the value, checked and selected properties of all form elements, and always take the data of Vue instances as the data source. You should declare the initial value in the data option of the component through JavaScript!
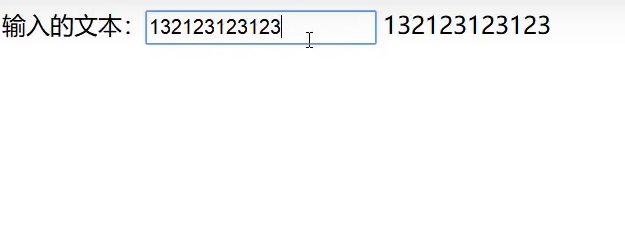
3.1 single line text
<!DOCTYPE html>
<html lang="en">
<head>
    <meta charset="UTF-8">
    <title>Title</title>
</head>
<body>
<div id="app">
    Text entered:<input type="text" v-model="message" value="hello">{{message}}
</div>

<script src="../js/vue.js"></script>
<script type="text/javascript">
    var vm = new Vue({
        el:"#app",
        data:{
            message:""
        }
    });
</script>
</body>
</html>
Demonstrate:
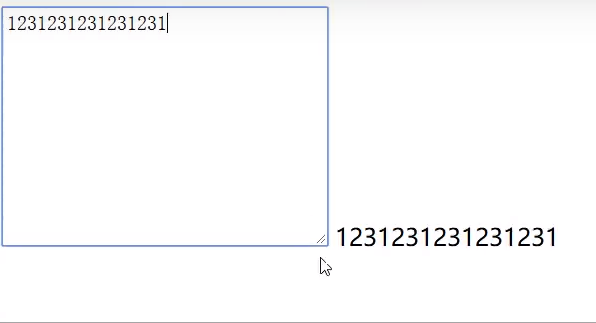
3.2 multiline text
<!DOCTYPE html>
<html lang="en">
<head>
    <meta charset="UTF-8">
    <title>Title</title>
</head>
<body>
<div id="app">
  <textarea name="" id="" cols="3e"rows="1e" v-model="message"'></textarea>
  {{fimessage}}
</div>

<script src="../js/vue.js"></script>
<script type="text/javascript">
    var vm = new Vue({
        el:"#app",
        data:{
            message:"Hello hello!"
        }
    });
</script>
</body>
</html>
Demonstrate:
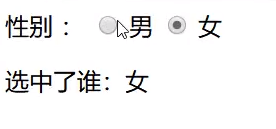
3.3 radio box
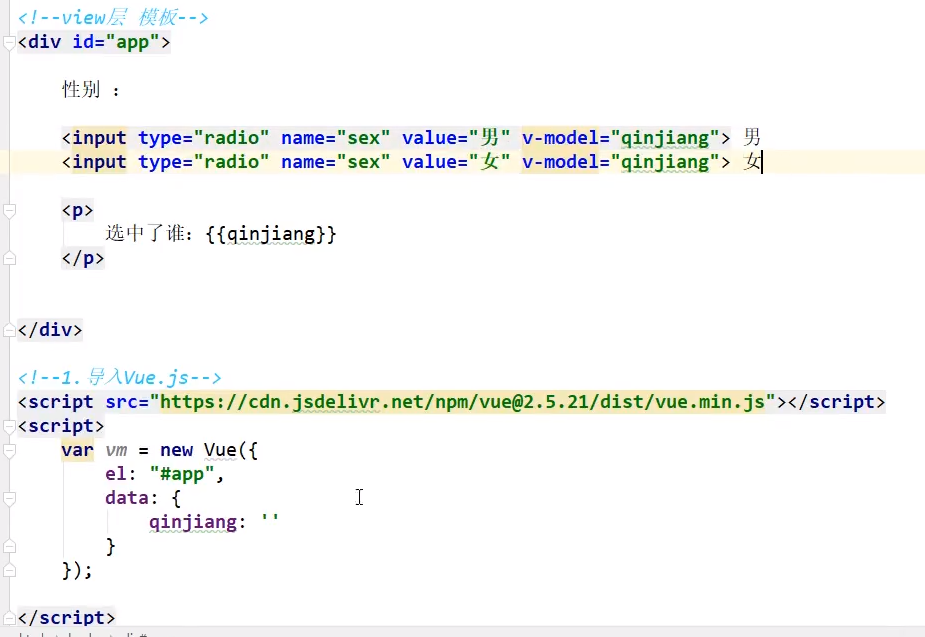
Demonstrate:
3.4 drop down box
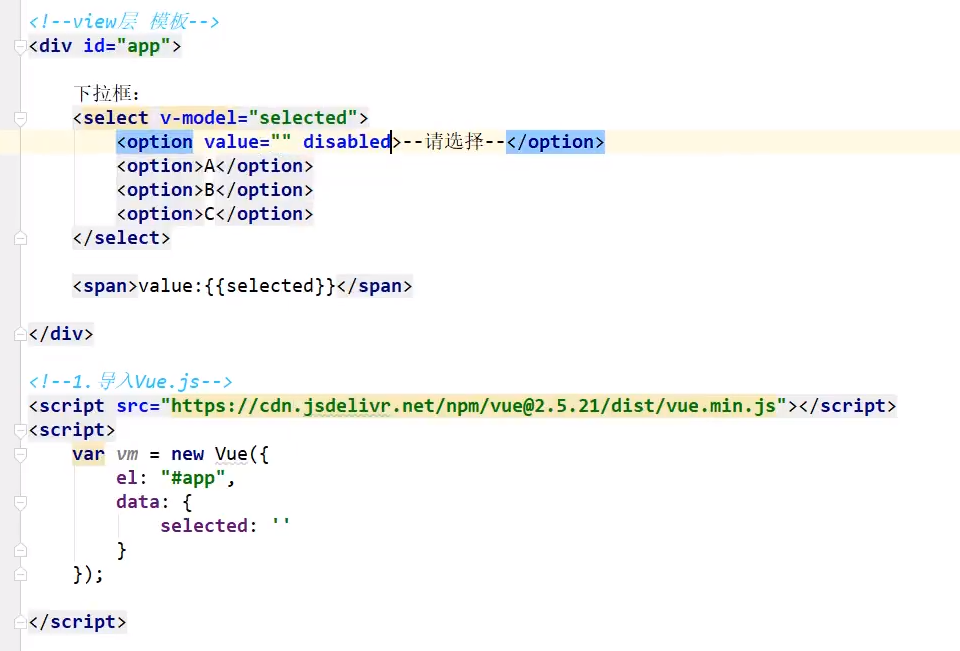
Demonstrate:
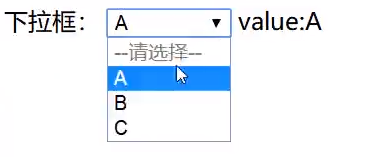
Note: if the initial value of the v-model expression fails to match any options, the meta system will be rendered as "unchecked". In iOS, this will prevent the user from selecting the first option, because in this case, iOS will not trigger the change event. Therefore, it is more recommended to provide a disabled option with a blank value as above.
4, Component template, component, props
What are components:
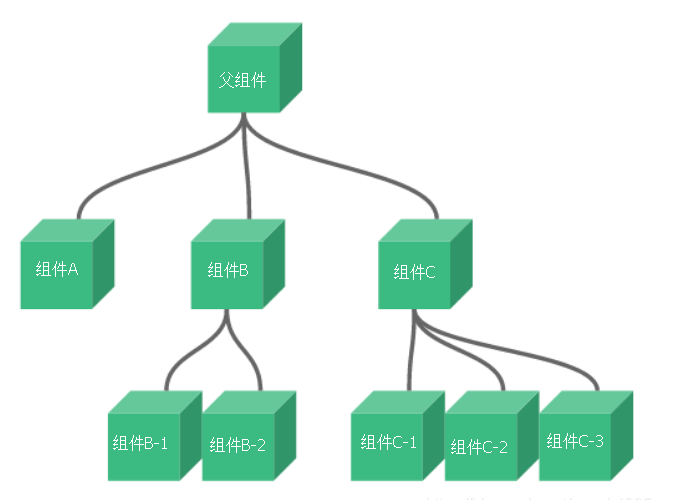
Components are reusable Vue instances. To put it bluntly, they are a set of reusable templates, which are similar to JSTL's custom tags, Thymeleal's th:fragment and other frameworks. Usually, an application will be organized in the form of a nested component tree:

The above figure corresponds to the following figure:
For example, you may have components such as page header, sidebar and content area, and each component contains other components such as navigation links and blog posts.
4.1 create a component
Note: in the actual development, we will not develop components in the following way, but in the way of vue cli creation and vue template file. The following methods are only for everyone to understand what components are.
Using Vue The component () method registers the component
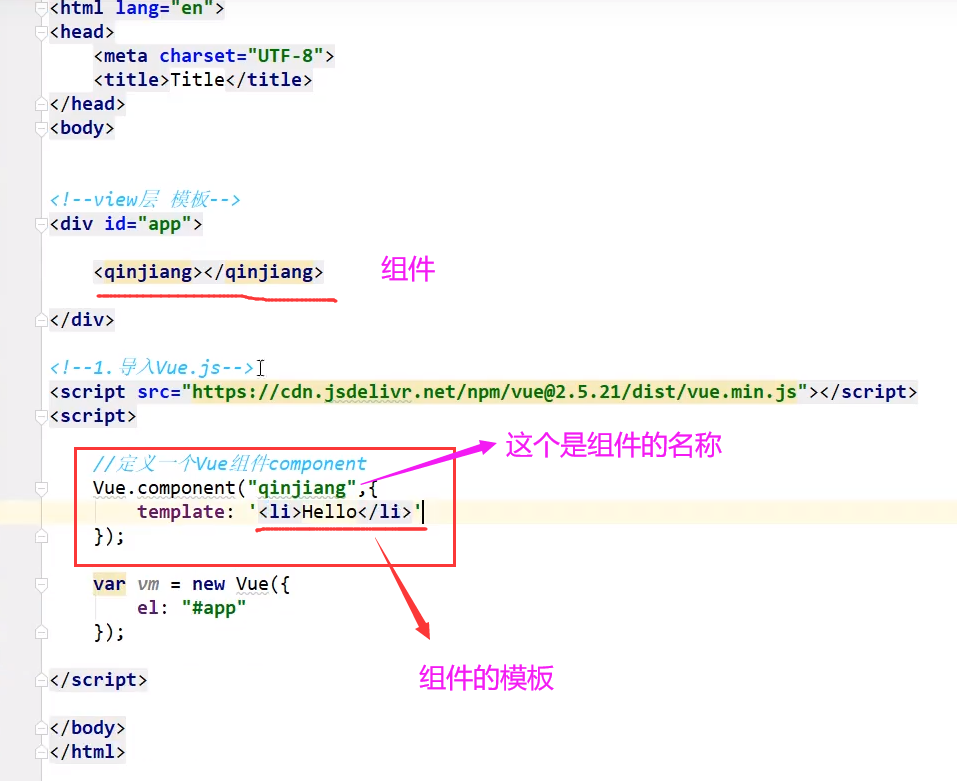
explain:
- Vue.component(): register components
- qinjiang: the name of the custom component
- Template: the template of the component
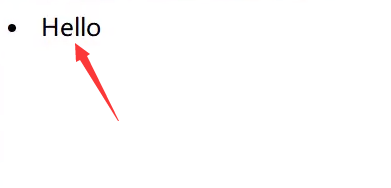
Demonstrate:
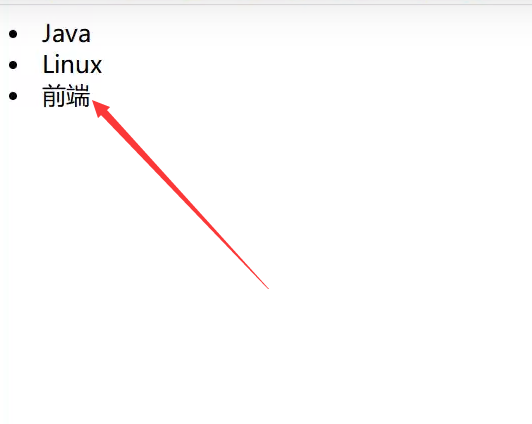
4.2 passing parameters using props attribute
Using components like the above does not make any sense, so we need to pass parameters to components. At this time, we need to use props attribute!
Note: under the default rule, the value in props attribute cannot be capitalized;

explain:
- v-for = "item in items": traverse the array named items defined in the Vue instance and create the same number of components
- v-bind:item = "item": bind the traversed item item to the item attribute named item defined by props in the component= The item on the left of the number is the property name defined by props, and the item on the right is the value of the item item traversed in item in items
Demonstrate:
Crazy God said Vue video notes + his own opinions