Vue 2.x notes
Notes of common knowledge points. If there are mistakes, you are welcome to give advice. If the number of words exceeds 10000, you have to taste them carefully
catalogue
- Vue 2.x notes
-
- 1. Create a new Vue instance
- 2. Prevent production prompt generation
- 3. Template syntax
- 4.MVVM model
- 5. Data broker
- 6. Event handling
- 7. Calculation attribute
- 8. Monitoring properties
- 9. Binding style
- 10. Conditional rendering
- 11. List rendering
- 12. Collect form data
- 13. Filter (Vue3 removed)
- 14. Built in instructions
- 15. Provisional
- 16. Custom instruction
- 17.Vue life cycle
- 18. Components
- 19. Create Vue scaffolding
- 20.ref attribute
- 21.props configuration item
- 22. Mixin configuration item
- 23.plugins.js plug-in
- 24.scoped style
- 25. Custom events of components
- 26. Global event bus
- 27. Message subscription
- 28.nextTick
- 29. Use CSS3 animation library
- 30.Vue.cli solves cross domain problems
- 31. Slot
- 32.Vuex
- 33. Routing
- 34. Multi level routing (nested routing)
- 35. query parameters of route
- 36. Named route
- 37. params parameters of route
- 38. props configuration of routing
- 39. replace attribute of router link
- 40. Programmed route navigation
- 41. Cache routing component
- 42. Two new life cycle hooks
- 43. Route guard
- 44. Two working modes of router
- 45.Vue UI component library
- Error prone point
1. Create a new Vue instance
// Example 1
new Vue({
    el:'#Test ', / / template of element Vue
    // The first way to write data is object-oriented
    data:{
        name: 'lhd',
        test:{
            id:1,
            age:19,
        }
    }
})


// Example 2
const vm = new Vue({
    // The first way to write data is object-oriented
    data:{
        name: 'lhd',
        test:{
            id:1,
            age:19,
        }
    }
})
vm.$mount('#test')


// Function must be used
const vm = new Vue({
// The second way to write data is functional
    data:function(){
        return{
            name:'lhd'
        }
    }
})
vm.$mount('#test')
2. Prevent production prompt generation
If you are using a development version of Vue, Vue generates a production prompt at startup
// Close the prompt and create a new Vue instance under this statement
Vue.config.productionTip = false
3. Template syntax
3.1 interpolation syntax
Used for label body content
Syntax: {{data you want to dynamically change}}
// Example: create Vue instance and define data name
new Vue({
    el:'#root',      // element
    data:{
        name:lhd
    }
})
// Interpolation in div Tags
<div id='root'> {{name}} <div>
3.2 instruction syntax
Used to resolve label properties
3.2.1 one way data binding
Unidirectional meaning: it can only flow from data to the page (the label data can only be changed by modifying the data in the instance)
Syntax: v-bind: tag attributes
v-bind: attribute can be abbreviated as = >:
// Example: create Vue instance, define data url, and interpolate in a tag
// Use v-bind: after binding, the statements inside will be parsed as expressions
<a v-bind:href="url">Jump link</a>
<a :href="url">Jump link</a>
3.2.2 bidirectional data binding
Bidirectional meaning: it can flow from data to page, and it can also flow from page to data
Syntax: v-model: tag properties
v-model:value can be abbreviated as = > V-model. Because the value value is collected by default
Note: v-model can only be applied to form class elements (input class elements)
<input type='text' v-model:value="test">
<input type='text' v-model="test">
4.MVVM model
1.M: model: data in data
2.V: View: template code
3.VM: ViewModel: Vue instance
All attributes in data appear on the vm
All attributes on vm and Vue prototype can be used directly in Vue template
5. Data broker
5.1 review object Defineproperty method
// Example 1
let a = {
    name:lhd
}
// Add age data
Object.defineProperty(a,'age',{
    value:18
    enumerable:true       // Make data enumerable
    writable:true         // Make data modifiable
    configurable:true	  // Make data erasable
})
console.log(Object.keys(a))     //Output data with array


// Example 2
let number = 18
let a = {
    name:lhd
}
Object.defineProperty(a,'age',{
    // As long as the age attribute of a is read, the get function (getter) will be called
    get(){
        return number
    },
    // Whenever someone modifies the age attribute, the set function is called
    set(value){
        // Assign the modified value to number
        number = value
    }
})
5.2 what is data broker
The operation of attributes in another object through one object proxy
// Examples
let obj = {x:100}
let obj2 = {y:200}
Object.defineProperty(obj2,'x',{
    // Visit obj 2 X can output obj Value of X
    get(){
        return obj.x
    },
     // Modify obj 2 X can modify obj Value of X
    set(value){
        obj.x = value
    }
})
5.3 data broker in Vue
Proxy the operation (read / write) of the attributes in the data object through the vm object
Benefits: more convenient operation of data in data
Basic principle:
Through object Defineproperty() adds all the properties of the data object to the vm.
Specify a getter/setter for each property added to the vm.
Operate (read / write) the corresponding properties in data inside getter/setter.
6. Event handling
6.1 basic use of events
Syntax: v-on: Events
Can be abbreviated as = >@
The callback of events needs to be configured on methods and will eventually appear on vm
Note: the functions configured in methods should not use arrow functions, otherwise this is not a vm
// Example 1
<div id='root'>
	<button v-on:click="What you want to do">1</button>
	<button @click="What you want to do">2</button>

// Example 2 parameter transfer. Suppose the show() function is executed when clicking
	<button @click="show()">3</button>   // Space time default event object
	<button @click="show(10,$event)">4</button>   // Space time default event object
</div>
const vm = new Vue({
    el:'#root',
    methods:{
        show(number,event){
            console.log(number)   // 10
            console.log(event)	  // Event object
        }
    }
})
6.2 event modifiers
Event modifier in Vue, which can be written continuously
1.prevent: block default events (common)
2.stop: stop event bubbling (common)
3.once: the event is triggered only once (common)
Event capture mode: 4
5.self: only event The event is triggered only when target is the element of the current operation
6.passive: the default behavior of the event is executed immediately without waiting for the event callback to complete
6.3 keyboard events
@Press the keyup button to lift it up and execute @ keydown button to press it down and execute
1. Key aliases commonly used in Vue:
(1) Enter = > Enter
(2) Exit = > ESC
(3) Space = > space
(4) Line feed = > tab (with @ keydown)
(5) Up, down, left, right = > up, down, left, right
(6) Delete = > delete (capture "delete" and "backspace" keys)
2. If Vue does not provide alias keys, you can use the original key value of the keyboard to bind them, but pay attention to change them to kebab case (named by a short horizontal line)
For example, case: capslock = > caps lock
3. System modifier keys (special usage): ctrl, alt, shift, meta (win key)
(1) Use with keyup: press the modifier key, then press other keys, and then release other keys
(2) Use with keydown: normal trigger
3. You can also use keyCode to specify specific keys (not recommended)
4.Vue.config.keyCodes. Custom key name = key code custom alias
// Example 1 enter output
<div id="root">
	<input type="text" placeholder="Enter and output" @keyup.enter="show">
</div>
// js
new Vue({
	el:"#root",
    methods:{
        show(e){
            console.log(e.target.value)
        }
    }
})
7. Calculation attribute
1. Definition: the attribute to be used does not exist, but must be calculated from the existing attribute
2. Principle: the bottom layer uses object getter and setter provided by defineproperty method
3. When does the get function execute?
(1) It is executed once on the first reading
(2) When the dependent data changes, it will be called again
Compared with the internal caching mechanism (4. Reuse mechanism), it has high efficiency
5. Remarks:
(1) The calculated properties will eventually appear on the vm.
(2) If the calculated property is to be modified, the set function must be written to respond to the modification.
// Example: change the last name and first name, and the full name will change
<div id='root'>
	Last name:<input tpye='text' v-modle="firstName"><br/><br/>
	Name:<input tpye='text' v-modle="lastName"><br/><br/>
    Full name:<span>{{fullName}}</span>
</div>
// js
const vm = new Vue({
    el:"#root",
    data:{
        firstName:'Zhang',
        lastName:'three'
    },
    computed:{
        fullName:{
            get(){
                return this.firstName + '-' this.lastName
            },
            // When the vm value is modified, modify the data value
            set(value){
                const arr = value.split('-')
                this.firstName = arr[0]
                this.lastName = arr[1]
            }
        }
    }
})
// Example: abbreviation = > when only the get method is needed, it can be abbreviated
computed:{
    fullName(){
        return this.firstName + '-' + this.lastName
    }
}
8. Monitoring properties
watch:
1. When the monitored attribute changes, the callback function will execute automatically
2. The monitored attribute must exist before it can be monitored
3. Two ways of monitoring:
(1) Incoming watch configuration when new Vue
const vm = new Vue({
    el:'#root',
    data:{
        isHot:true
    },
    watch:{
        isHot:{
            immediate:true,     //Let the handler call once during initialization. The default is false
        	handler(newValue,oldValue){
            	console.log(newValue,oldValue)
        	}
        }
    }
})
(2) Via VM$ Watch monitoring
vm.$watch('isHot',{
    immediate:true,     //Let the handler call once during initialization. The default is false
    handler(newValue,oldValue){
    	console.log(newValue,oldValue)
    }
})
4. In depth monitoring
(1) By default, the watch in Vue does not monitor the change of the internal value of the object (layer 1)
(2) Configure deep:true to monitor the changes of internal values of objects (multiple layers)
remarks:
Vue itself can monitor the changes of internal values of objects, but the watch provided by Vue cannot by default
vm.$watch('isHot',{
    deep:true,     //Deep monitoring
    handler(){
    	console.log('Data change')
    }
})
5. Monitoring abbreviation
It can be abbreviated when only one handler configuration item is required
// Example 1
const vm = new Vue({
    el:'#root',
    data:{
        isHot:true
    },
    watch:{
        isHot(){
            console.log('The data has changed')
        }
    }
})
//Example 2
vm.$watch('isHot',function(){
     console.log('The data has changed')
})
9. Binding style
9.1 string writing. Applicable to: the class name of the style is uncertain and needs to be specified dynamically
// Example 1: a div has a base style and other styles a,b,c
<div id="#root">
	<div class="basic" :class="mood"></div>
</div>
// js
new Vue({
    el:"#root",
    data:{
        mood:'a'
    }
})
9.2 array writing. Applicable to: the number of styles to be bound is uncertain, and the name is uncertain
// Example 2
<div id="#root">
	<div class="basic" :class="classArr"></div>
</div>
// js
new Vue({
    el:"#root",
    data:{
        classArr:['a','b','c']          // To modify, change the quantity of classArr
    }
})
9.3 object writing method. Applicable to: the style and name to be bound shall be determined, but whether to use it or not shall be determined dynamically
// Example 2
<div id="#root">
	<div class="basic" :class="classObj"></div>
</div>
// js
new Vue({
    el:"#root",
    data:{
        classObj:{				// To modify, change the Boolean value
        	a:true,
            b:true,
            c:false
        }
    }
})
9.4 extension, operation style
// Example 2
<div id="#root">
	<div class="basic" :style="styleObj"></div>
</div>
// js
new Vue({
    el:"#root",
    data:{
        styleObj:{
        	fontSize:'40px',
            color:'blue',
            backgroundColor:'gray'
        }
    }
})
10. Conditional rendering
10.1 v-if
Writing method:
(1) v-if = "expression"
(2) v-else-if = "expression"
(3) v-else = "expression"
Applicable to: scenes with low switching frequency
Features: DOM elements that are not displayed are removed directly
Note: v-if can be used with v-else-if and v-else, but the structure cannot be interrupted
10.2 v-show
Writing method: v-show = "expression" true display, false hide
Applicable to: scenes with high switching frequency
Features: DOM elements that are not displayed are not removed, but are hidden with styles
11. List rendering
11.1 basic list
v-for instruction
(1) List used to display data
(2) Syntax: V-for = "(item, index) in XXX": key = "yyy"
(3) Traversable: array, object, string, specified times
11.2 principle of key
Interview question: what is the role of the key in react and vue?
1. Role of key in virtual DOM:
key is the identification of the virtual DOM object. When the data changes, Vue will generate a new virtual DOM according to the [new data]
Then Vue compares the differences between [new virtual DOM] and [old virtual DOM], and the comparison rules are as follows:
2. Comparison rules:
(1). The same key as the new virtual DOM was found in the old virtual DOM:
①. If the content in the virtual DOM does not change, directly use the previous real DOM!
②. If the content in the virtual DOM changes, a new real DOM is generated, and then the real DOM in the page is replaced.
(2). The same key as the new virtual DOM was not found in the old virtual dom
Create a new real DOM and then render it to the page.
3. Possible problems caused by using index as key:
(1) If the data is added or deleted in reverse order, the following sequence is broken:
It will produce unnecessary real DOM updates = = > the interface effect is no problem, but the efficiency is low.
(2) If the structure also contains the DOM of the input class:
There will be an error DOM update = = > there is a problem with the interface.
4. How to select a key during development
(1) it is better to use the unique identifier of each data as key, such as id, mobile phone number, id card number, student id number and so on.
(2) If there are no destructive operations such as reverse order addition and reverse order deletion of data, it is only used for rendering the list for display,
There is no problem using index as the key.
11.3 list filtering
// Example search name filtering, using calculated properties
<div id="root">
	<h2>Personnel list</h2>
       	<input type="text" v-model="keyWord">
    <ul>
		<li v-for = "person in filtPersons" :key="person.id">
			{{person.id}}-{{person.name}}-{{person.age}}
		</li>
    </ul>
</div>
<script>
	new Vue({
		el:"#root",
		data:{
            keyWord:'',
            persons:[
            	{id:'001',name:'Ma Dongmei',age:19},
            	{id:'002',name:'Zhou Dongyu',age:20},
            	{id:'003',name:'Jay Chou',age:21},
            	{id:'004',name:'Wen zhaolun',age:22}
            ]
		},
        computed:{
            filtPersons(){
                return this.persons.filter((p)=>{
                    return p.name.indexOf(this.keyWord) != -1
                })
            }
        }
	})
</script>
11.4 list sorting
<div id="root">
	<h2>Personnel list</h2>
	<input type="text" v-model="keyWord">
	<button @click="sortType=0">Original sequence</button>
	<button @click="sortType=1">Ascending order of age</button>
	<button @click="sortType=2">Age descending order</button>
	<ul>
    	<li v-for = "person in filtPersons" :key="person.id">
    	    {{person.id}}-{{person.name}}-{{person.age}}
    	</li>
    </ul>
</div>
<script>
	new Vue({
	    el:"#root",
	    data:{
	        keyWord:'',
	        sortType:0,
	        persons:[
	            {id:'001',name:'Ma Dongmei',age:28},
	            {id:'002',name:'Zhou Dongyu',age:24},
	            {id:'003',name:'Jay Chou',age:40},
	            {id:'004',name:'Wen zhaolun',age:18}
	        ]
	    },
        computed:{
            filtPersons(){
                const arr = this.persons.filter((p)=>{
                    return p.name.indexOf(this.keyWord) != -1
                })
                if(this.sortType){
                    arr.sort((a,b)=>{
                        return this.sortType === 1 ? a.age-b.age : b.age - a.age
 					})
                }
                return arr
            }
        }
	})
</script>
11.5 data monitoring principle
Principle of Vue monitoring data:
1. vue will monitor all levels of data in data.
2. How to monitor the data in the object?
Monitoring is realized through setter, and the data to be monitored is passed in when new Vue is created.
(1). Object. By default, Vue does not perform responsive processing
(2). To make a response to the attribute added later, please use the following API:
Vue.set(target,propertyName/index,value)or
vm.$set(target, propertyName/index, value)
3. How to monitor the data in the array?
By wrapping the update elements of the array, the essence is to do two things:
(1). Call the native corresponding method to update the array.
(2). Re parse the template to update the page.
4. When modifying an element in the Vue array, you must use the following methods:
1. Use these APIs: push(), pop(), shift(), unshift(), splice(), sort(), reverse()
2.Vue.set() or VM$ set()
Special note: Vue Set() and vm$ Set() cannot add attributes to vm or vm's root data object
12. Collect form data
If you use text, v-model collects value values, and the user enters value values.
<input type="text"/>
If you use radio, v-model collects the value value, and you need to configure the value value for the tag.
<input type="radio"/>
If you use checkbox, there are two situations
1. If the value attribute of input is not configured, what is collected is checked (checked or unchecked, Boolean value)
2. Configure the value attribute of input:
(1) If the initial value of V-model is not an array, then what is collected is checked (checked or unchecked, Boolean value)
(2) The initial value of V-model is an array, so what is collected is an array composed of values
<input type="checkbox"/>
Note: three modifiers of v-model:
lazy: lose focus and collect data
Number: convert the input string to a valid number
trim: enter the leading and trailing spaces to filter
13. Filter (Vue3 removed)
filter:
Definition: display the data to be displayed after specific formatting (applicable to some simple logic processing)
Syntax:
1. Registration filter: Vue Filter (name, callback) or new Vue{filters: {}}
2. Use filter: {xxx | filter name}} or v-bind: attribute = "xxx | filter name"
remarks:
1. The filter can also receive additional parameters, and multiple filters can also be connected in series
2. The original data is not changed, but new corresponding data is generated
3. The global filter should be written in front of the Vue instance
14. Built in instructions
14.1 v-text command
1. Function: render text content to its node
2. Difference from interpolation syntax: v-text will replace the content in the node and will not be parsed
<div v-text="xx"></div>
14.2 v-html instruction
Labels can be parsed. There is a security problem!
<div v-html="xx"></div>
14.3 v-cloak
1. It is essentially a special attribute. After the Vue instance is created and takes over the container, the v-cloak attribute will be deleted.
2. Using css and v-cloak can solve the problem of {xxx}} displayed on the page when the network speed is slow.
// css
[v-cloak]:{display:none}
// html
<div v-cloak>123</div>
14.4 v-once
1. The node where v-once is located will be regarded as static content after the initial dynamic rendering.
2. Future data changes will not cause the update of the structure of v-once, which can be used to optimize performance
<div v-once="xx"></div>
14.5 v-pre
1. Skip the compilation process of its node.
2. It can be used to skip: nodes that do not use instruction syntax or interpolation syntax will speed up compilation.
<div v-pre>123</div>
15. Provisional
16. Custom instruction
1. Definition syntax:
(1). Local instruction:
// 1
new Vue({ directives:{Instruction name:Configuration object} }}
// 2
new Vue({ directives:{Instruction name:Callback function} })
(2). Global instruction:
// 1
Vue.directive(Instruction name,Configuration object)
// 2
Vue.directive(Instruction name,Callback function)
2. Three callbacks commonly used in configuration objects:
(1).bind: called when the instruction successfully binds to the element.
(2).inserted: called when the element of the instruction is inserted into the page.
(3).update: called when the template structure of the instruction is re parsed.
3. Remarks:
1. v - is not added when the instruction is defined, but v - is added when it is used;
2. If the instruction name is more than one word, use the kebab case naming method
// Functional formula
new Vue({
    directives:{
        big(element,binding){     // Big is a custom name. Use: v-big="xx"
            console.log(element,binding)  // binding => xx
        }
    }
})
// Object type
new Vue({
    directives:{
        big(element,binding){     // Big is a custom name. Use: v-big="xx"
            console.log(element,binding)  // Binding binding information xx
        }
    }
})
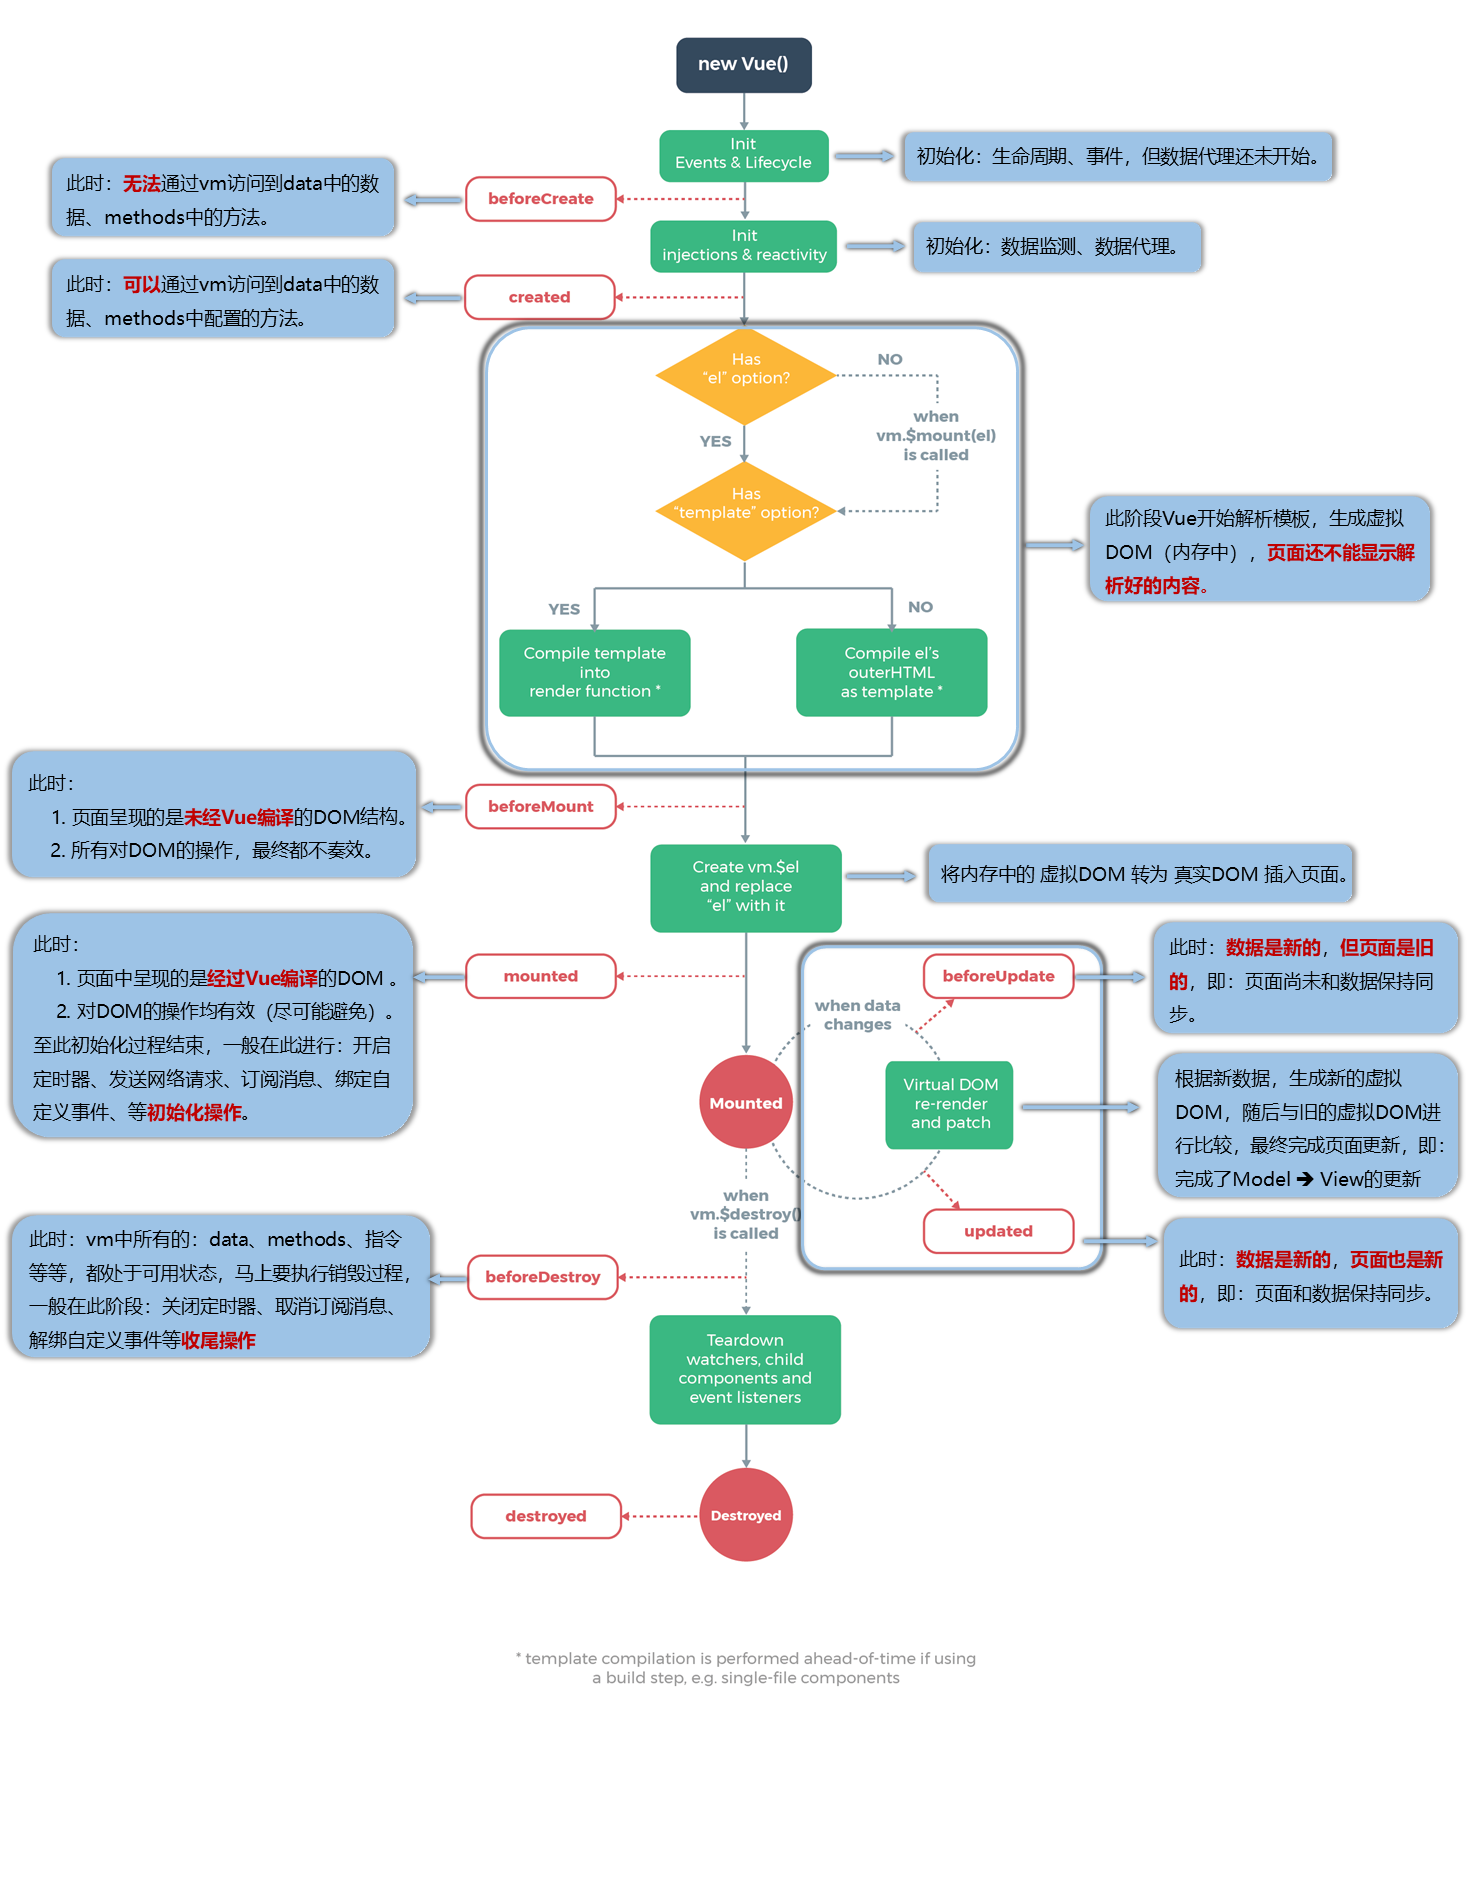
17.Vue life cycle
Life cycle:
1. Also known as: life cycle callback function, life cycle function, life cycle hook.
2. What is it: some functions with special names that Vue calls for us at critical moments.
3. The name of the life cycle function cannot be changed, but the specific content of the function is written by the programmer according to the requirements.
4. this in the lifecycle function refers to the vm or component instance object.
Common life cycle hooks:
1.mounted: send ajax request, start timer, bind custom event, subscribe message, etc. [initialization]
2.beforeDestroy: clear timers, unbind custom events, unsubscribe messages, etc.
About destroying Vue instances:
1. After destruction, you can't see any information with the help of Vue developer tools.
2. After destruction, the custom event will become invalid, but the native DOM event is still valid.
3. Generally, the data will not be operated in beforeDestroy, because even if the data is operated, the update process will not be triggered.
18. Components
18.1 non single document components
1. Three steps of using components in Vue:
(1) Define components (create components)
(2) Register components
(3) Use component (write component label)
2. How to define a component?
Use Vue Extend (options) creation, where options are almost the same as the options passed in during new Vue(options), but there are some differences
The differences are as follows:
(1) el don't write
Because ultimately all components are managed by a vm, the el in the vm decides which container to serve.
(2) data must be written as a function
Avoid data reference relationship when components are reused.
Note: use template to configure the component structure.
3. How to register components?
(1) Local registration: pass in the components option when relying on new Vue
(2) Global registration: Vue Component ('component name ')
4. Write component label:
<myinfo><myinfo>


// Examples
<div id="root">
    <h2>Components: partial registration</h2>
	// 3. Use component labels
    <myinfo></myinfo>
</div>
<script>
	// Remove Vue production tips
	Vue.config.productionTip = false

	// 1. Create components
	const myinfo = Vue.extend({
	    template:`
	        <div>
	            <h4>My name is:{{myName}}</h4>
	            <h4>I this year{{age}}year</h4>
	        </div>
	    `,
	    data(){
	        return {
	            myName:'lhd',
	            age:19
	        }
	    }
	})
	new Vue({
	    el:"#root",
	    components:{
	        // 2. Register components
	        myinfo:myinfo    // The first myInfo is the defined tag name, and the second is the component name
            				 // With the same name, you can write a name directly = > myinfo
	    }
	})
</script>
Several points for attention:
1. About component name:
One word composition:
The first writing method (initial lowercase): info
The second writing method (initial capital): Info
Multiple words:
The first way to write (kebab case name): My Info
The second writing method (named by CamelCase): MyInfo (Vue scaffold support is required)
remarks:
(1). The component name shall avoid the existing element name in HTML as much as possible, for example, H2 and H2 are not allowed.
(2). You can use the name configuration item to specify the name of the component in the developer tool.
2. About component label:
The first way to write:
The second way to write:
Note: when scaffolding is not used, subsequent components will not be rendered.
3. An abbreviation:
const myinfo = Vue.extend(options)
// Can be abbreviated as
const myinfo = options
18.2 component nesting
Register the child component in the parent component, and the component label of the child component is written in the template of the parent component.
// For example, there are student s in the school component
const student = Vue.extend({
    template:`
                <div>
         			<h2>I'm a student</h2>
                </div>
            `,
})
const school = Vue.extend({
    template:`
                <div>
         			<h1>I'm a school component</h1>
					<student><student>
                </div>
            `,
    components:{
        // Registered student component
        student
    }
})
new Vue({
	el:"#root",
	components:{
	// Registered school components
		school
	}
})
18.3 VueComponent
About VueComponent:
1. The essence of the school component is a constructor named VueComponent, which is not defined by the programmer, but Vue Generated by extend.
Vue. Options will help us create an instance of vuecomponent (that is, vuecomponent or vuecomponent).
3. Special attention: every time Vue is called Extend, returns a new VueComponent!!!!
4. About this point:
(1). In component configuration:
The data function, the functions in methods, the functions in watch, and the functions in computed all have this as the instance object of VueComponent
(2). In the new Vue (options) configuration:
The data function, the functions in methods, the functions in watch, and the functions in computed all have this as Vue instance object
5. The instance object of vuecomponent, hereinafter referred to as vc (also known as component instance object). Vue instance object, hereinafter referred to as vm.
18.4 an important built-in relationship
VueComponent.prototype.__proto__Vue.prototype
Why is there such a relationship: the component instance object (vc) can access the properties and methods on the Vue prototype

19. Create Vue scaffolding
Step 1 (only for the first time): Global according to @ Vue/cli
npm install -g @vue/cli
Step 2: switch the directory where you want to create the project, and then use the command to create the project
// xxxx is the project name
vue create xxxx
Step 3: start the project
npm run serve
remarks:
1. If the download is slow, please use npm Taobao image
npm config set registry https://registry.npm.taobao.org
2.Vue scaffold hides all webpack related configurations. If you want to view the specific configuration
vue inspect > output.js
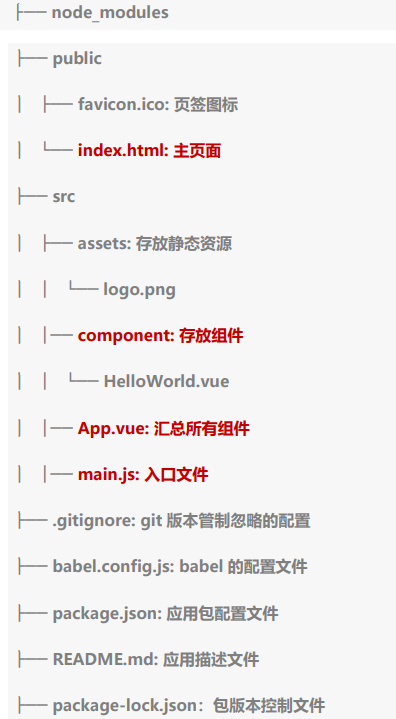
19.1 template project structure
19.2 about different versions of Vue
vue.js and Vue runtime. xxx. JS difference:
(1).vue.js is the full version of Vue, including: core functions + template parser.
(2).vue.runtime.xxx.js is the running version of Vue, which only contains: core functions; There is no template parser.
Because Vue runtime. xxx. JS does not have a template parser, so you can't use the template configuration item. You need to use
The render function receives the createElement function to specify the specific content.
19.3 vue.config.js configuration file
Use Vue inspect > output JS can view the default configuration of Vue scaffold.
Use Vue config. JS can customize the scaffold. For details, see: Vue cli official website
20.ref attribute
1. Used to register reference information (id substitutes) for elements or subcomponents
2. The real DOM element is obtained on the html tag, and the component instance object (vc) is applied on the component tag
3. Usage:
// Marking
<h1 ref="xxx">..</h1>
<School ref="xxx"></School>
// obtain
this.$refs.xxx
21.props configuration item
Function: let the component receive the data from the outside
(1). Transfer data:
<Demo name="xxx"/>
(2). Receive data:
The first method (receive only):
props:['name']
Second method (restriction type):
props:{
		name:String
}
The third method (restriction type, restriction necessity, specifying default value):
props:{
	name:{
		type:String,//type
		required:true,//necessity
		default: 'Lao Wang' //Default value
	}
}
remarks:
Props is read-only. The Vue bottom layer will monitor your changes to props. If you make changes, you will issue a warning,
If the business requirements really need to be modified, please copy the contents of props into the data, and then modify the data
Data.
22. Mixin configuration item
Function: the configuration shared by multiple components can be extracted into a mixed object
Usage:
The first step is to define mixing, for example:
// Create a new js file, define method data, etc., which need to be exposed
{
    data(){....},
    methods:{...}
    ...
}
The second step is to use blending, for example:
(1). import: import
(2). Global blending: Vue mixin(xxx)
(3). Local mixing: mixins: ["xxx"]
23.plugins.js plug-in
Features: for enhancing Vue
The first parameter of install object is the essence of Vue
The second parameter after is the data passed by the plug-in user.
Define plug-ins:
// Need exposure
 object.install = function (Vue, options){
    // 1. Add global filter
	Vue.filter(....)
	// 2. Add global instruction
	Vue.directive(....)
	// 3. Configure global mixing (integration)
	Vue.mixin(....)
}
Add instance method:
Vue-prototype.$myMethod = function ()
Vue.prototype.$myProperty = xxxx
Using plug-ins:
// main.js introduction
import plugins from "./plugins"
Vue.use(plugins)
24.scoped style
Function: make styles take effect locally to prevent conflicts
// The component lang='xxx 'can be configured with css specifications, such as less
<style scoped></style>
25. Custom events of components
1. A way of communication between components, applicable to: child component = > parent component
2. Usage scenario: A is the parent component and B is the child component. If B wants to transfer data to a, it needs to bind a custom event to B in a (the callback of the event is in a).
3. Bind custom events:
(1) First, in the parent component:
< demo @ mydemo = "test" / > or < demo v-on: mydemo = "test" / >
(2) In the second way, in the parent component:
<Demo ref="xxx"/>
mounted(){
	this.$refs.xxx.$on('mydemo',this.test)    // Binding events with identity
}
(3) If you want a custom event to be triggered only once, you can use the once modifier or the $once method.
4. Trigger custom event: this$ Emit ('mydemo ', data)
5. Unbind custom event: this$ off('mydemo')
6. Native DOM events can also be bound on components, and the native modifier needs to be used.
7. Note: through this$ refs. xxx.$ On ('mydemo ', callback) when Binding custom events, the callback is either configured in methods or used as an arrow function, otherwise there will be problems with the pointing of this
26. Global event bus
GlobalEventBus
1. A way of communication between components, which is suitable for communication between any components.
2. Install the global event bus:
new Vue({
    ......
	beforeCreate(){
		Vue .prototype.$bus = this //Install the global event bus, $bus is the vm of the current application
	},
	......
})
3. Use event bus:
Receive data: if component a wants to receive data, bind a custom event to Sbus in component A, and the callback of the event remains in component a itself.
methods(){
	demo(data){......}
}
......
mounted() {
	this.$bus.$on('xxxx',this.demo)  // XXXX = > bound event name
}
4. Provide data:
this.$bus.$emit('xxxx ', data)
remarks:
It is better to use $off in the beforeDestroy hook to unbind the events used by the current component.
It is suggested to use props for parent-child transmission, user-defined events for child-child transmission, and $bus for cross component communication
27. Message subscription
PubSub (third party Library)
-
A way of communication between components, which is suitable for communication between any components.
-
Use steps:
(1) Install pubsubnpm i pubsub-js
(2) Introduceimport pubsub from 'pubsub-js'
-
Receive data: if component a wants to receive data, it subscribes to messages in component A, and the subscribed callback remains in component a itself.
methods(){
	demo(data){......}
}
mounted(){
	this pid = pubsub.subscribe('xxx',this.demo) //Subscribe to messages
}
4. Provide data:
pubsub.publish('xxx ', data)
5. It is better to use PubSub in the beforeDestroy hook Unsubscribe (PID) to unsubscribe.
Installation example:
// install
npm i pubsub-js
// Both subscription and publication should be imported
import pubsub from 'pubsub.js'
// Subscribe to the suggestion callback methods method to prevent this problem
this.pubId = pubsub.subscribe('hello',(msgName,data)=>{
    console.log(msgName)	  // Message name
    console.log(data)    // data
})
// release
pubsub.publish('hello',666)
// Unsubscribe
pubsub.unsubscribe(this.pubId)
28.nextTick
1. Syntax:
this.$ Nexttick (callback function)
2. Function: execute the specified callback after the next DOM update.
3. When to use: when to perform some operations based on the updated new DOM after changing the data, it should be executed in the callback function specified by nextTick.
29. Use CSS3 animation library
Note: < transition > tags can only wrap one tag. Multiple tags need to be animated with < transition group > and each tag must have a key value
// Animation library name
animate.css
// install
npm install animate.css
// introduce
import 'animate.css'
// Use appearance = > to execute the animation once at the beginning of the page. xxx is the animation name
<transition-group
	appear
    name="animate__animated animate__bounce"
	enter-active-class="xxx"
	leave-active-class="xxx"
>
</transition-group>
30.Vue.cli solves cross domain problems
Method 1:
In Vue config. JS to add the following configuration:
devServer:{
	proxy:"http://Localhost: 5000 "/ / 5000 is the server port that needs to be requested
}
explain:
- Advantages: simple configuration. When requesting resources, it can be sent directly to the front end (8080).
- Disadvantages: multiple agents cannot be configured, and it is not possible to flexibly control whether requests go through agents.
- Working mode: if the agent is configured according to the above, when a resource that does not exist in the front end is requested, the request will be forwarded to the server (the front-end resource is matched first)
Method 2:
Write Vue config. JS configure specific proxy rules:
module.exports = {
	devServer:
	proxy: {
		'/api1': {// Match all request paths starting with '/ api1'
		target: 'http://localhost:5000 ', / / the basic path of the proxy target
		changeOrigin: true,
		pathRewrite: {'^/api1': ''}
	},
	'/api2': {// Match all request paths starting with '/ api2'
		target:'http://localhost:5001 ', / / the basic path of the proxy target
		changeOrigin: true,
		pathRewrite: {'^/api2': ''}
	}
}
/*
	changeOrigin Set to true In the request header received by the server host For: localhost: 5000
	changeOrigin Set to false In the request header received by the server host For: localhost: 8080
	changeOrigin The default value is true
/*
explain:
- Advantages: multiple agents can be configured, and it can flexibly control whether requests go through agents.
- Disadvantages: the configuration is slightly cumbersome, and the resource request must be prefixed.
31. Slot
-
Function: enables the parent component to insert the communication mode between components in the html structure to the specified location of the child component
-
Category: default slot, named slot, scope slot
-
Usage:
(1) Default slot:// Example: Category is a sub component label In parent component: <Category> <div>html Structure 1</div> </Category> In subcomponents: <template> <div> <!-- Define slot--> <slot>Slot default content...</slot> </div> </template>
(2) Named slot
In parent component:
<Category>
	<template slot="center">    // Insert center slot
		<div>html Structure 1</div>
	</template>
	<template v-slot:footer>	// Insert the footer slot
		<div>html Structure 2</div>
	</template>
</Category>

In subcomponents:
<template>
	<div>
		<!-- Define slot-->
		<slot name="center">Slot default content...</slot>
		<slot name="footer">Slot default content...</slot>
	</div>
</template>
-
Scope slot:
(1) Understanding: the data is in the component itself, but the user of the component needs to decide according to the structure of data generation. (the games data is in the Category component, but the structure traversed by the data is determined by the App component)
(2) Specific code:
In parent component:
<Category>
	<template scope="scopeData">
		<!-- Generated is ul list -->
		<ul>
			<li v-for="g in scopeData.games" :key="g">{{g}}</li>
		</ul>
	</template>
</Category>

<Category>
	<template slot-scope="scopeData">
		<!-- Generated is h4 title-->
		<h4 v-for="g in scopeData.games" :key="g">{{g}}</h4>
	</template>
</Category>

In subcomponents:
<template>
	<div>
		<slot :games="games"></slot>
	</div>
</template>

<script>
export default {
	name:'Category',
	props:['title'],
	//The data is in the subcomponent itself
	data(){
		return {
			games:[ 'Red Alert",Cross Fire',Audition',Super Marie']
		},
}
</script>
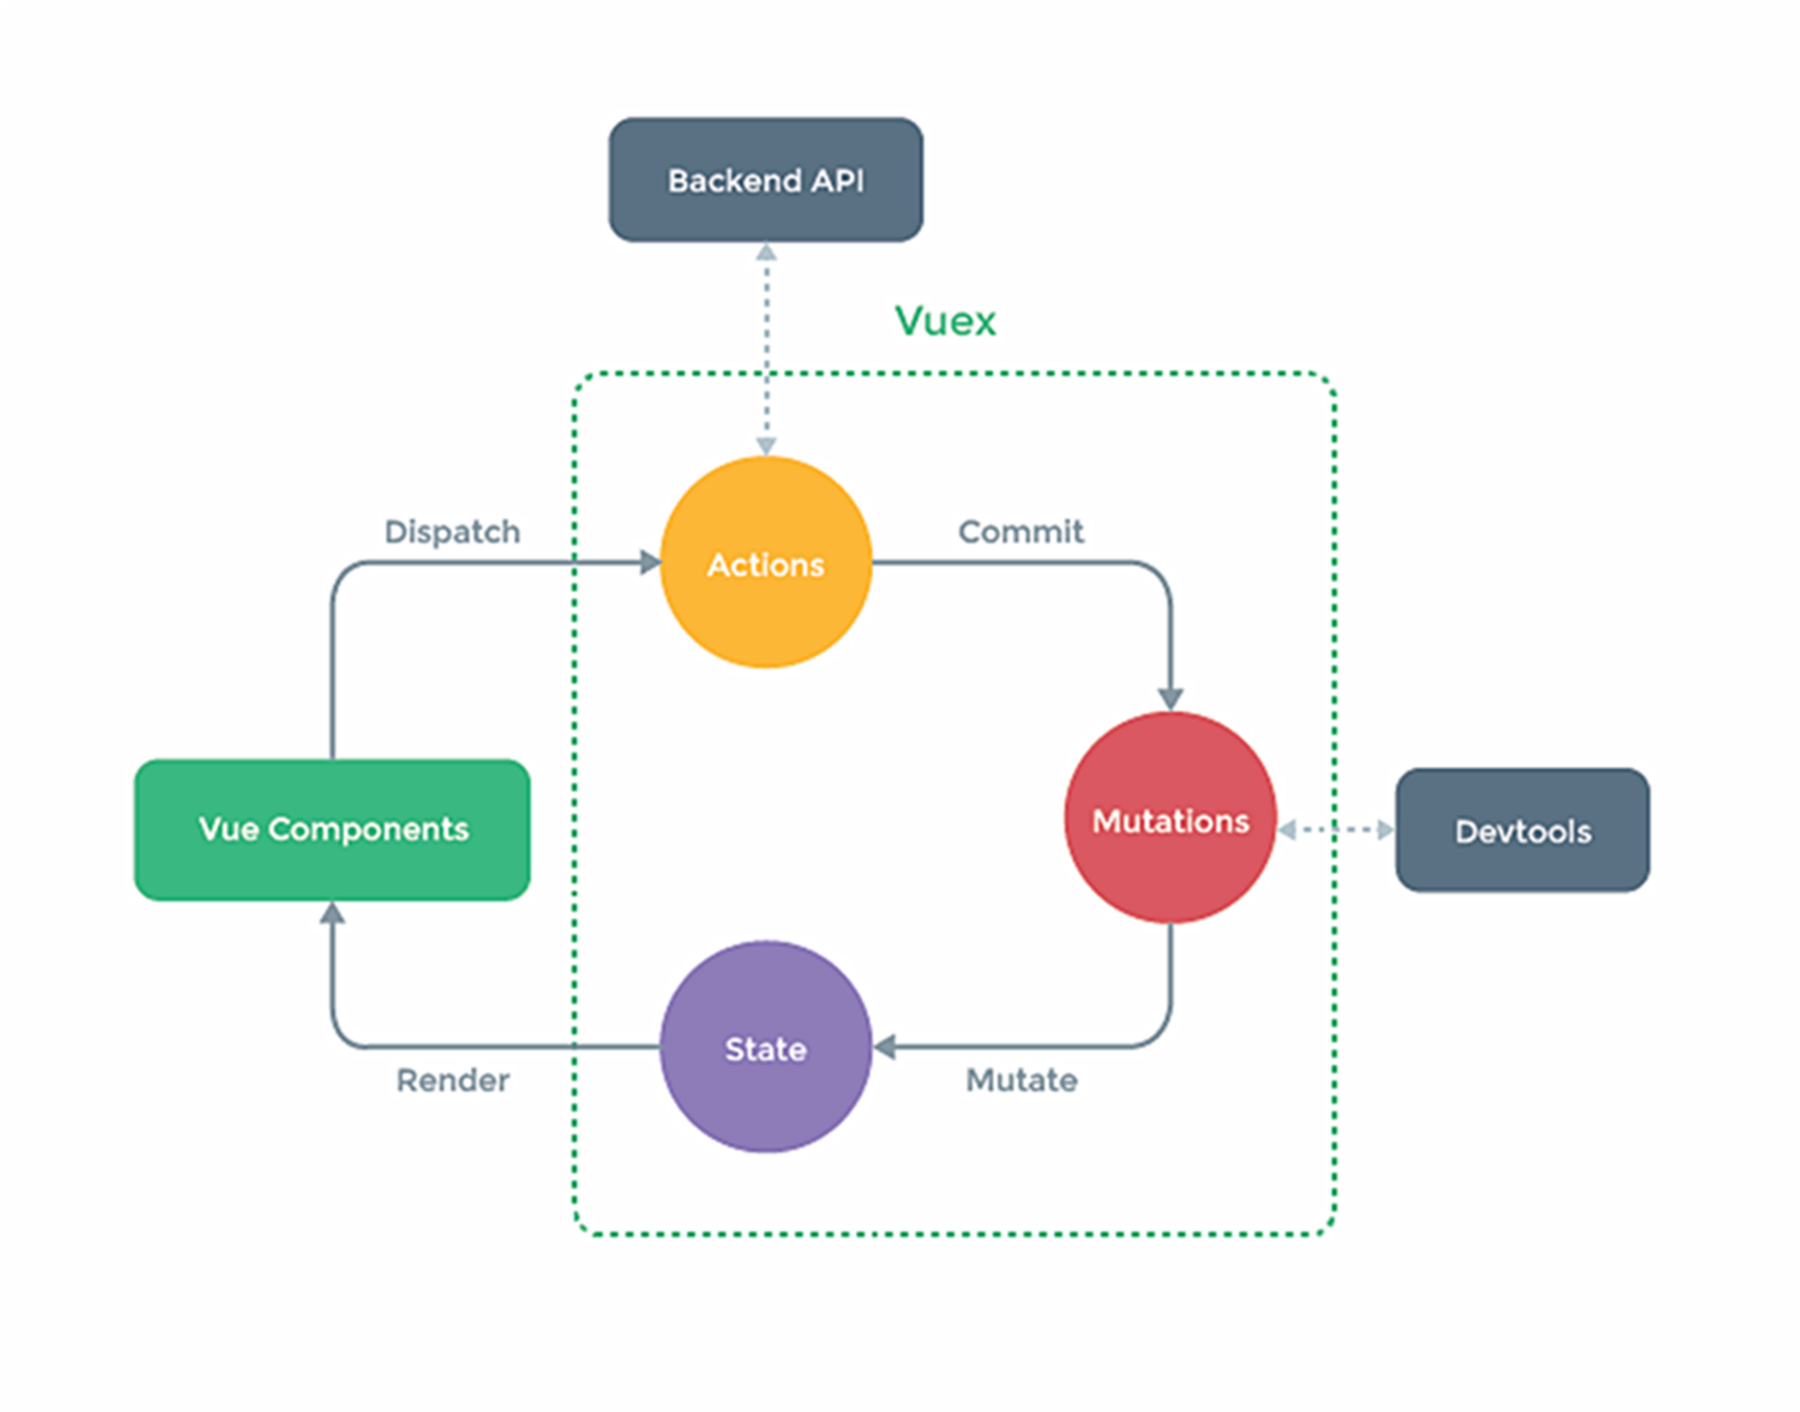
32.Vuex
schematic diagram:
32.1 building vuex environment
(1) Installation
npm install vuex
(2) Create Src / store / index JS can also be Src / vuex / store js
//Introduce Vue core library
import Vue from 'vue'
//Introduce Vuex
import Vuex from 'vuex'
//Apply Vuex plug-ins
Vue.use(Vuex)
//Prepare the actions object to respond to the user's actions in the component
const actions = {}
//Prepare the changes object to modify the data in state
const mutations = {}
//Prepare state object - save specific data
const state = {}
//Create and expose store s
export default new Vuex.Store({
	actions,
	mutations,
	state
})
(3) In main When creating vm in JS, pass in the store configuration item
// Introducing store
import store from './store'
......
// Create vm
new Vue({
	el:'#app',
	render: h => h(App),
	store
})
32.2 basic use (example)
(1) Initialize data, configure actions, changes, state
//Introduce Vue core library
import Vue from 'vue
//Introduce Vuex
import Vuex from 'vuex'
//Reference Vuex
Vue.use(Vuex)

const actions = {
	//Action added in response component
	jia(context,value){
		context.commit('JIA',value)
	},

const mutations = {
    //Executive plus
	JIA(state,value){
		state.sum += value
	}
}

//Initialization data
const state = {
	sum:0
}
// Create and expose store s
export default new Vuex.store({
    state,
    mutations,
    actions
})
(2)main.js configuration store
(3) Read data from vuex in component: $store state. sum
(4) Modify data in vuex in component: $store Dispatch ('method name in action ', data) or $store Commit ('method name in changes', data)
Note: if there is no network request or other business logic, actions can also be crossed in the component, that is, commit can be written directly without writing dispatch
32.3 getters in store
(1) Concept: when the data in state needs to be processed before use, you can use getters processing.
(2) In the store JS
// getters configuration
const getters = {
	bigSum(state){
		return state.sum * 10
	}
}
// Create and expose store s
export default new Vuex.Store({
	getters
})
(3) Read data from component:
$store.getters.bigSum
32.4 use of four map methods
Import
import {mapState,mapGetters,mapActions,mapMutations} from 'vuex'
(1) mapState method: it is used to help us map the data in state into calculated attributes
// Get the sum, school and subject of the state in the store, and directly use {sum}} in the component Data can be obtained
computed:
{
	//Generate calculation attributes with mapState: sum, school, subject (object writing method)
	...mapState({sum:'sum',school:'school',subject:'subject'}),

	//Generate calculation attributes with mapState: sum, school, subject (array writing method)
	...mapState(['sum','school','subject']),
},
(2) mapGetters method: used to help us map the data in getters into calculated attributes
// Get bigSum() of getters in the store, and directly use {bigSum}} in the component to get data
computed:
{
	//Generate calculation attribute with mapGetters: bigSum (object writing method)
	...mapGetters({bigSum:'bigSum'}),

	//Generate calculation attribute with mapGetters: bigSum (array writing method)
	...mapGetters(['bigSum'])
},
(3) mapActions method: it is used to help us generate a dialogue with actions, that is, it contains $store Function of dispatch (xxx)
// Get jiaOdd() and jiaWait() of actions in the store
methods:{
	//Generated by mapActions: incrementadd, incrementWait (object form)
	...mapActions({incrementOdd:'jiaOdd',incrementWait:'jiawait'})

	//Generated by mapActions: incrementadd, incrementWait (array form)
	...mapActions(['jiaOdd','jiaWait'])
}
(4) mapMutations method: a method used to help us generate a conversation with mutations, that is, $store Function of commit (xxx)
// Get the JIA() and JIAN() of the changes in the store
methods:{
	//Generated by mapActions: increment and decrement (object form)
	...mapMutations({increment:'JIA',decrement:'JIAN'}),
	//Generated by mapMutations: JIA, JIAN (object form)
	...mapMutations(['JIA','JIAN']),
}
Note: when mapActions and mapMutations are used, if parameters need to be passed: pass the parameters when binding events in the template, otherwise the parameters are event objects.
32.5 modularity + namespace
(1) Purpose: to better maintain the code and make the classification of multiple data more clear.
(2) Modify store js
const countAbout = {
	namespaced:true,//Open namespace
	state:{x:1},
	mutations:{...},
	actions: { ... },
    getters:{
        bigSum(state){
			return state.sum * 10
        }
    }
}

const personAbout = {
	namespaced:true,//Open namespace
	state:{ ... },
	mutations:{...},
	actions:{...}
}

const store = new Vuex.Store({
	modules: {
		countAbout,
		personAbout
	}
)}
(3) After the namespace is opened, read the state data from the component:
//Method 1: read directly by yourself
this.$store.state.personAbout.list
//Method 2: read with mapState:
...mapState('countAbout',['sum','school','subject']),
(4) After the namespace is opened, the getters data is read from the component:
//Method 1: read directly by yourself
this.$store.getters['personAbout/firstPersonName
//Method 2: read with mapGetters:
...mapGetters('countAbout',['bigSum'])
(5) after namespace is opened, dispatch is invoked in the component.
//Method 1: directly dispatch yourself
this.$store.dispatch('personAbout/addPersonWang',person)
//Method 2: with mapActions:
...mapActions('countAbout',{incrementOdd:'jiaOdd',incrementWait:'jiaWait'})
(6) after namespace is opened, commit is invoked in the component.
//Method 1: commit yourself directly
this.$store.commit('personAbout/ADD_PERSON',person)
//Method 2: with mapMutations:
...mapMutations('countAbout',{increment:'JIA',decrement:'JIAN'}),
(7) Modules separate different files
// Create a new count in the store directory js,person.js
// conut.js into the previously written countAbout configuration item and person JS into the personAbout configuration item
// Both js will be exposed

// Index. Under store JS js,person.js
import countOptions form './count'
import personOptions form './person'

// expose
export default new Vuex.store({
    modules:{
        countAbout:countOptions
       	personAbout:personOptions
    }
})
33. Routing
1. Understanding: a route is a set of key value s. Multiple routes need to be managed by a router.
2. Front end Routing: key is the path and value is the component.
33.1 basic use
(1) Install Vue router, command:
npm i vue-router
(2) Application plug-ins:
// main.js
import VueRouter from 'vue-router'
Vue.use(VueRouter)
(3) Write router configuration items:
New path: Src / router / index js
//Introducing VueRouter
import VueRouter from 'vue-router'
//Introduce the components to be routed (the routing components should be placed under pages. Here is a demonstration of the writing method of undivided components)
import About from '../components/About
import Home from '../components/Home
//Create a router instance object to manage groups of routing rules
const router = new VueRouter({
	routes:[
		{
			path:'/about'		// route
			component:About     // Component name
		},
		{
			path:'/home'
			component : Home
		}
	]
})
//Exposure router
export default router


// main.js
// Importing Vue router and configuration files
import VueRouter from 'vue-router'
import router from './router'
// Application plug-in
Vue.use(VueRouter)
// Incoming configuration item
new Vue({
    el:'#app',
    render:h => h(App),
    router
})
(4) Achieve switching (active class configurable highlight style)
// In the App component, change the a label of the specified click switch to < router link > href to, and pay attention to the path
<router-link active-class="active" to="/about">About</router-link>
<router-link active-class="active" to="/home">home</router-link>
(5) Specify display location
// Specify display location in App component
<router-view></router-view>
33.2 several points for attention
(1) Routing components are usually stored in the pages folder, and general components are usually stored in the components folder.
(2) By switching, "hidden" routing components are destroyed by default and can be mounted when necessary.
(3) Each component has its own $route attribute, which stores its own routing information.
(4) There is only one router in the whole application, which can be obtained through the $router attribute of the component.
34. Multi level routing (nested routing)
(1) To configure routing rules, use the children configuration item:
routes:[
	{
		path:'/about',
		component:About,
	},
	{
		path:'/home',
		component:Home,
		children:[ 		//Configure child routing through children
			{
	    		path:'news', //Do not write here: / news
				component:News
			},
    		{
	    		path:'message',
				component:Message
			},
	    ]
	}
]
(2) Jump (to write full path)
<router-link to="/home/news">News</router-link>
(3) Specify insertion point
<router-view></router-view>
35. query parameters of route
(1) Transfer parameters
<!-- Jump and carry query Parameters, to String writing -->
<router-link :to="/home/message/detail}id=666&title=Hello">Jump</router-link>
<!-- Jump and carry query Parameters, to String writing and reading data Data in -->
<router-link :to="`/home/message/detail}id=${xxx}&title=${xxx}`">Jump</router-link>

<!-- Jump and carry query Parameters, to Object writing method of -->
<router-link :to="{
	path:'/home/message/detail',
	query:{
		id:666,
		title:'Hello'
   	}"
>Jump</router-link>
(2) Receiving parameters:
// Get id and title
$route.query.id
$route.query.title
36. Named route
1. Function: it can simplify the jump of route.
2. How to use
(1) Name the route:
{
    path:'/demo',
	component:Demo,
	children:[
		{
			path:'test'
			component:Test,
			children:[
				{
					name:'hello' //Name the route
					path:'welcome',
					component:Hello,
    			}
			]
		}
	]
}
(2) Simplified jump
<!--Before simplification, you need to write a complete path -->
<router-link to="/demo/test/welcome">Jump</router-link>
<!--After simplification, jump directly through the name -->
<router-link :to="{name:'hello'}">Jump</router-link>
<!--Simplified writing fit transfer parameters-->
<router-link
	:to="{
		name:'hello',    // Before / demo/test/welcome
		query:{
		id:666,
		title: Hello'
	}"
>Jump</router-link>
37. params parameters of route
(1) Configure the route and declare to receive params parameters
{
	path:'/home',
	component:Home,
	children:[
		{
			path:'news',
			component:News
		},
		{
			component:Message,
			children:[
				{
					name:'xiangqing',
					path:'detail/:id/:title',   //Receive params parameters using placeholder declarations
					component:Detail
        		}
        	]
        }
	]
}
(2) Transfer parameters
<!-- Jump and carry params Parameters, to String writing -->
<router-link :to="/home/message/detail/666/Hello">Jump</router-link>
<!-- Jump and carry params Parameters, to Object writing method of-->
<router-link
	:to="{
		name:'xiangqing',
		params:{
		id:666,
		title:'Hello'
	}"
>Jump<router-link>
Special note: when the route carries params parameters, if the object writing method of to is used, the path configuration item cannot be used, but the name configuration must be used!
38. props configuration of routing
Function: make it easier for routing components to receive parameters
{
	name:'xiangqing',
	path:'detail/:id',       // params. Only the second writing method is applicable, and the third writing method is changed to query
	component:Detail,

	//The first way to write it: props value is an object, and all key value combinations in the object will eventually be passed to the Detail component through props
	// props:{a:900}

	//The second method: if the props value is Boolean and the Boolean value is true, all params parameters received by the route will be passed to the Detail component through props
	// props:true

	//The third way to write: props value is a function, and each group of key values in the object returned by this function will be passed to the Detail component through props
	props(route){
		return {
			id:route.query.id,
			title:route.query.title
        }
	}
}
After writing, the component receives it with props
39. replace attribute of router link
1. Function: control the mode of operating browser history during route jump
2. There are two ways to write the history of the browser: push and replace. Push is to add the history and replace is to replace the current record. The default value for route jump is push
3. How to start the replace mode: < router link replace > News < / router link > or
<router-link :replace="true">News</router-link>
40. Programmed route navigation
1. Function: realize route jump without the help of < router link >, making route jump more flexible, such as button jump
2. Specific code:
//Two API s of $router
this.$router.push({
	name:'xiangqing',
	params:{
		id:xxx,
		title:xxx
	}
})

this.$router.replace({
	name:'xiangqing',
	params:{
		id:xxx,
		title:xxx
	}
})

this.$router.forward()//forward
this.$router.back()//back off
this.$router.go()//You can move forward or backward. Negative numbers move backward and positive numbers move forward
41. Cache routing component
1. Function: keep the routing components not displayed mounted and not destroyed.
2. Specific code:
News is the component name. If you don't write include, all the components shown here are cached. Multiple components: include="[xx,xx]"
<keep-alive include="News">
	<router-view></router-view>
</keep-alive>
42. Two new life cycle hooks
1. Function: the two hooks unique to the routing component are used to capture the activation status of the routing component.
2. Specific name:
(1) Triggered when the activated routing component is activated.
(2) Triggered when the deactivated routing component is deactivated.
43. Route guard
Function: execute the method before or after component loading, and judge and intercept it
43.1 global guard
First, configure meta on each route and store the information isAuth to judge the permission. true means to intercept
(1) Global pre routing
Write after configuration and expose at last
// Before and after route initialization
router.beforeEach((to,from,next)=>{
     // Judge whether school=lhd is satisfied
	if(localStorage.getItem('school')==='lhd'){
		next()     // Release
    }else{
		alert('No permission to view')
	}
})
(2) Global post routing
// During and after route initialization
router.afterEach((to,from)=>{
    // The name of the configured component. Easy to modify the page name
	if(to.meta.title){
		document.title = to.meta.title  // Modify the title of the page
	}
})
43.2 exclusive guard
// Add beforeEnter into the router configuration item
beforeEnter(to,from,next){
	if(to.meta.isAuth){ //Judge whether the current route needs permission control
        // Judge whether school=lhd is satisfied
		if(localStorage.getItem('school')==='lhd'){
			next()     // Release
    	}else{
			alert('No permission to view')
		}
	}else{
        // No interception, release
		next()
	}
}
43.3 guard inside the assembly
Note: it is called only through routing rules
//Entry guard: it is called when entering the component through routing rules
beforeRouteEnter(to,from, next){
},
//Leave guard: it is called when leaving the component through routing rules
beforeRouteLeave(to,from,next){
}
44. Two working modes of router
1. What is a hash value for a url?
#And what follows is the hash value.
2. The hash value will not be included in the HTTP request, that is, the hash value will not be brought to the server.
3.hash mode:
(1) The address always carries a # number, which is not beautiful.
(2) If the address is shared through a third-party mobile app in the future, if the app verification is strict, the address will be marked as illegal.
(3) Good compatibility.
4.history mode:
(1) The address is clean and beautiful.
(2) Compatibility is slightly worse than hash mode.
(3) When the application is deployed online, it needs the support of back-end personnel to solve the problem of refreshing the page server 404.
45.Vue UI component library
45.1 common UI component library of mobile terminal
(1) Vant
(2) Cube Ul
(3) Mint Ul
45.2 common UI component library on PC side
(1)Element UI
(2) View UI
Error prone point
1. Define the method or instruction name, use - to separate letters, and use '' in vm
// Example: Custom directive
<div v-big-number></div>
// js
new Vue({
    directives:{
        'big-number'(element,binding){
            console.log('test')
        }
    }
})
2. Judge whether this attribute exists
Object.prototype.hasOwnProperty.call(Object,'xxx') // xxx attribute name
3. Introduce third-party resources
For example: bootstrap, if you put it directly under assets, Vue will check the whole file. If there are missing fonts and other things in the file, you will report an error even if you don't use it. You should put it directly under public and import it in html